Create a Scroll View With Swift
A few months ago, I didn't know the existence of swift and Xcode. Today, I was able to develop a small part of the application I want to create. I was able to create something cool, which I would like to share with you.
In this tutorial I will take you through the process of building a scroll view scene, in which users will be redirected when they want to register a new account. Along the way, I'll make sure to provide you some theoretical explanations of the things we do, so that you can actually understand what it is that we are doing.
Before we do that, let's talk about what is Swift and Xcode:
1. Swift is a powerful and intuitive programming language for macOS, iOS, watchOS and tvOS. Writing Swift code is interactive and fun, the syntax is concise yet expressive, and Swift includes modern features developers love. Swift code is safe by design, yet also produces software that runs lightning-fast. It is designed to work with Apple's Cocoa and Cocoa Touch frameworks and the large body of existing Objective-C code written for Apple products. It is built with the open source LLVM compiler framework and has been included in Xcode since version 6, released in 2014. On Apple platforms, it uses the Objective-C runtime library which allows C, Objective-C, C++ and Swift code to run within one program.
2. Xcode is an integrated development environment (IDE) for macOS containing a suite of software development tools developed by Apple for developing software for macOS, iOS, watchOS, and tvOS.
Download Xcode
Xcode 10 includes everything you need to create amazing apps for all Apple platforms. Now Xcode and Instruments look great in the new Dark Mode on macOS Mojave. The source code editor lets you transform or refactor code more easily, see source control changes alongside the related line, and quickly get details on upstream code differences. You can build your own instrument with custom visualisation and data analysis. Swift compiles software more quickly, helps you deliver faster apps, and generates even smaller binaries. Test suites complete many times faster, working with a team is simpler and more secure, and much more.
Xcode 10 includes Swift 4.2, which compiles your software more quickly, helps you deliver faster apps, and generates even smaller binaries. Compared to Swift 4.0, the latest Swift compiler can build large apps more than twice as fast.* Combined with the new Xcode new build system, your everyday edit, build, and test workflow is much faster. Optimised for the latest multi-core Mac hardware, Xcode and Swift make for a lightning-fast development platform.
Let's Get Started
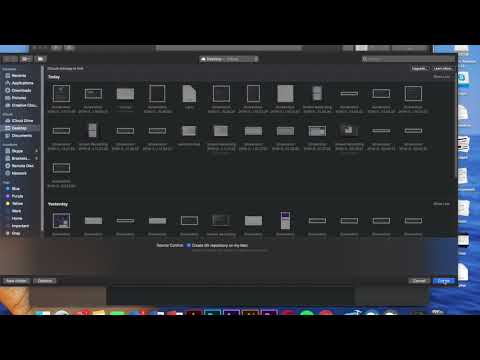
So what we will do is to go to Xcode and create a new project. Once we click a new project our application will be a single view app. For those who don't know, a single view app means that you will need to start everything from scratch and that there will be one single view that we can program.
Name your product TutorialApp. If you are an experienced developer who publishes apps in the App Store you will probably have a team, but if you are new and you don't have any applications published, you can skip this field. In the organization name, you can write the name of the company in case you do have one, in my case I will just keep MacBook Pro. Then, the Organization Identifier is considered as something like a unique identifier of your project, therefore, you can write whatever you want. Language will definitely be swift.
So, press next and let's save the project on desktop so it is easy to access.
The new project consists of three files, AppDelegate.swift, ViewController.swift, and the star of this tutorial: Main.storyboard.
Under Deployment Info > Device Orientation in the General project settings, set Devices to iPhone. Since this is a portrait-only app, uncheck the Landscape Leftand Landscape Right options. Open Main.storyboard in the project navigator to view it in the Interface Buildereditor:
We are not going to make any changes in the configuration and we will go straight to the main storyboard. Since we made a single view app, we created a simple one single, blank, view. This is something we need to work on.
Working in the UI
The official storyboard terminology for a view controller is “scene”, but you can use the terms interchangeably. A scene represents a view controller in the storyboard.
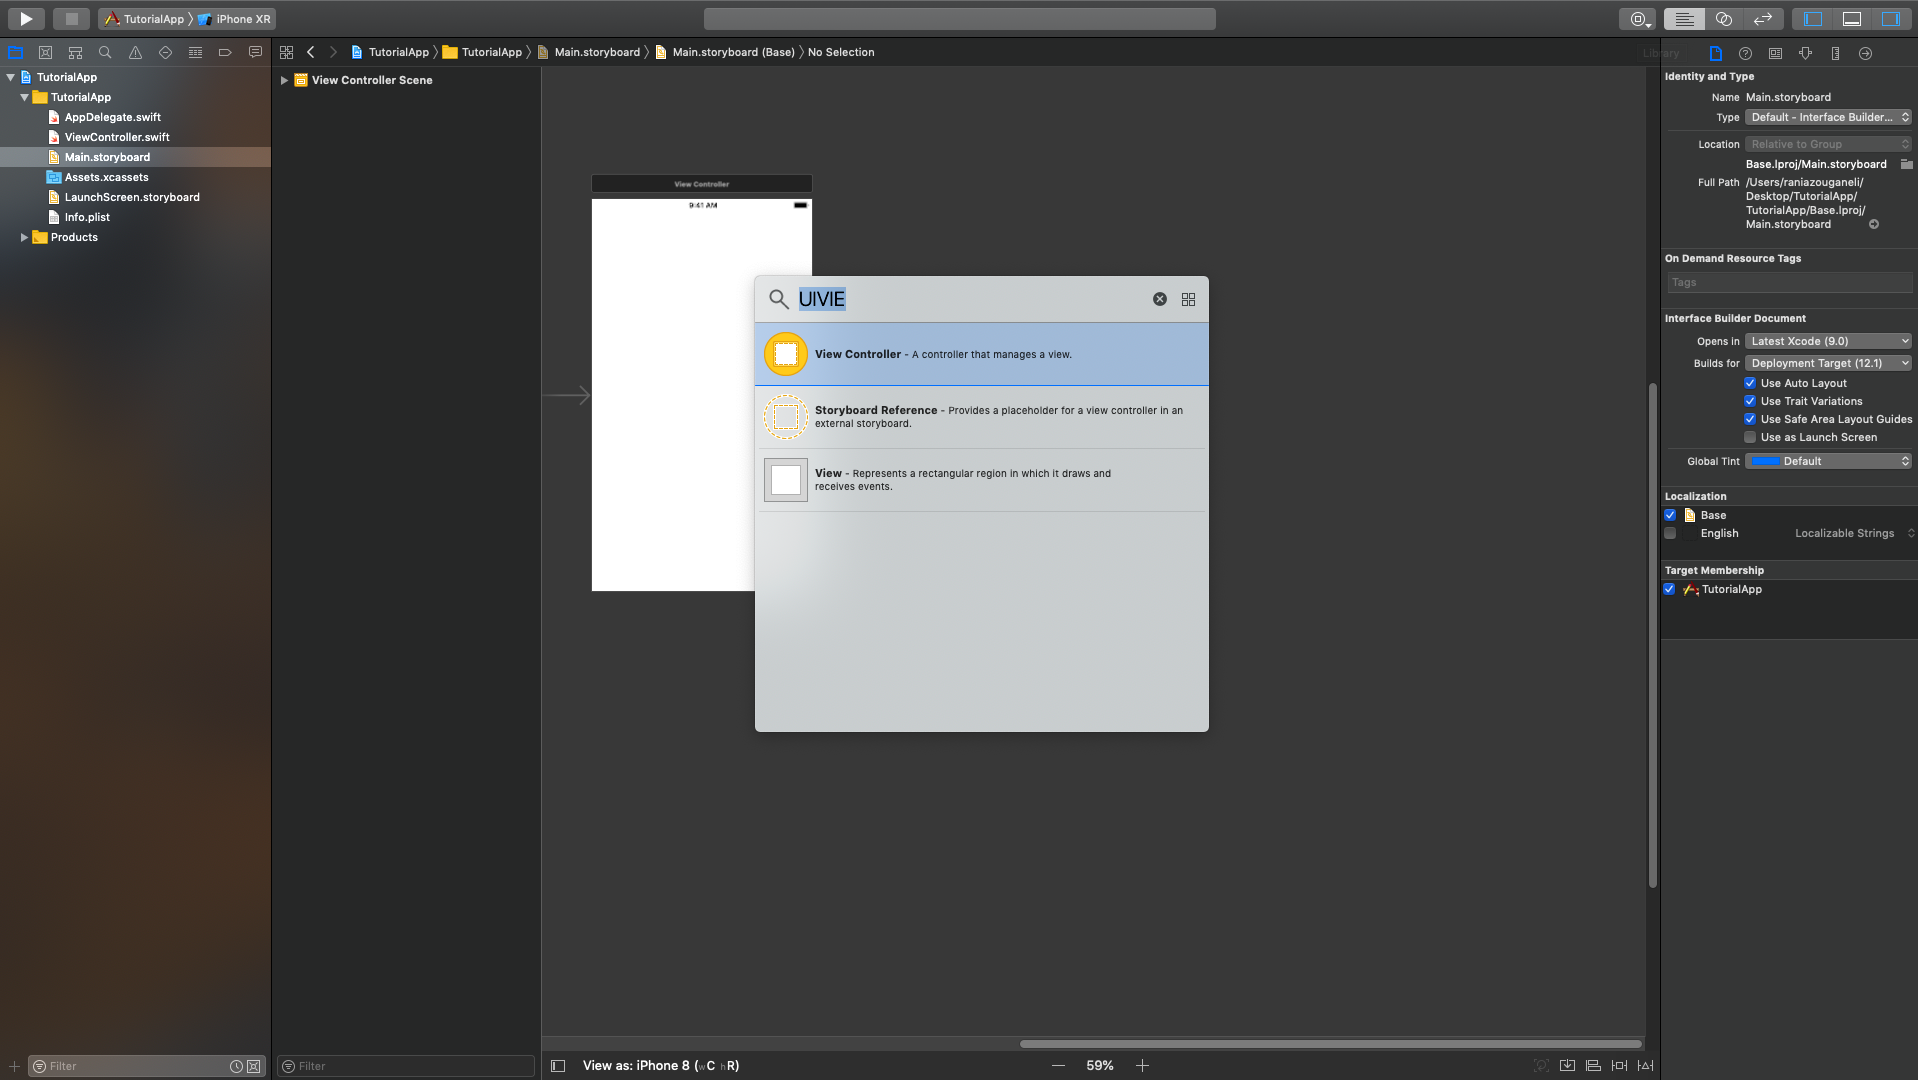
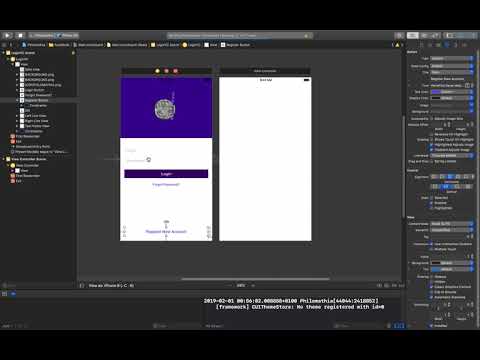
Here you see a single view controller containing an empty view. The arrow pointing to the view controller from the left indicates it’s the initial view controller to be displayed for this storyboard. Designing a layout in the storyboard editor is done by dragging controls from the Object Library (see top-right corner) into your view controller.
To get a feel for how the storyboard editor works, drag some controls from the Object Library into the blank view controller as seen in the video.
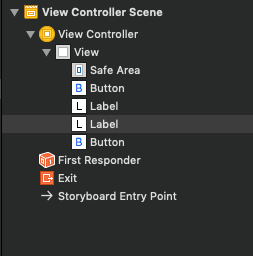
As you drag controls in, they should show up in the Document Outline on the left.
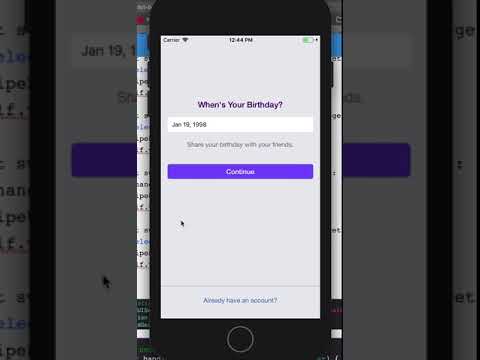
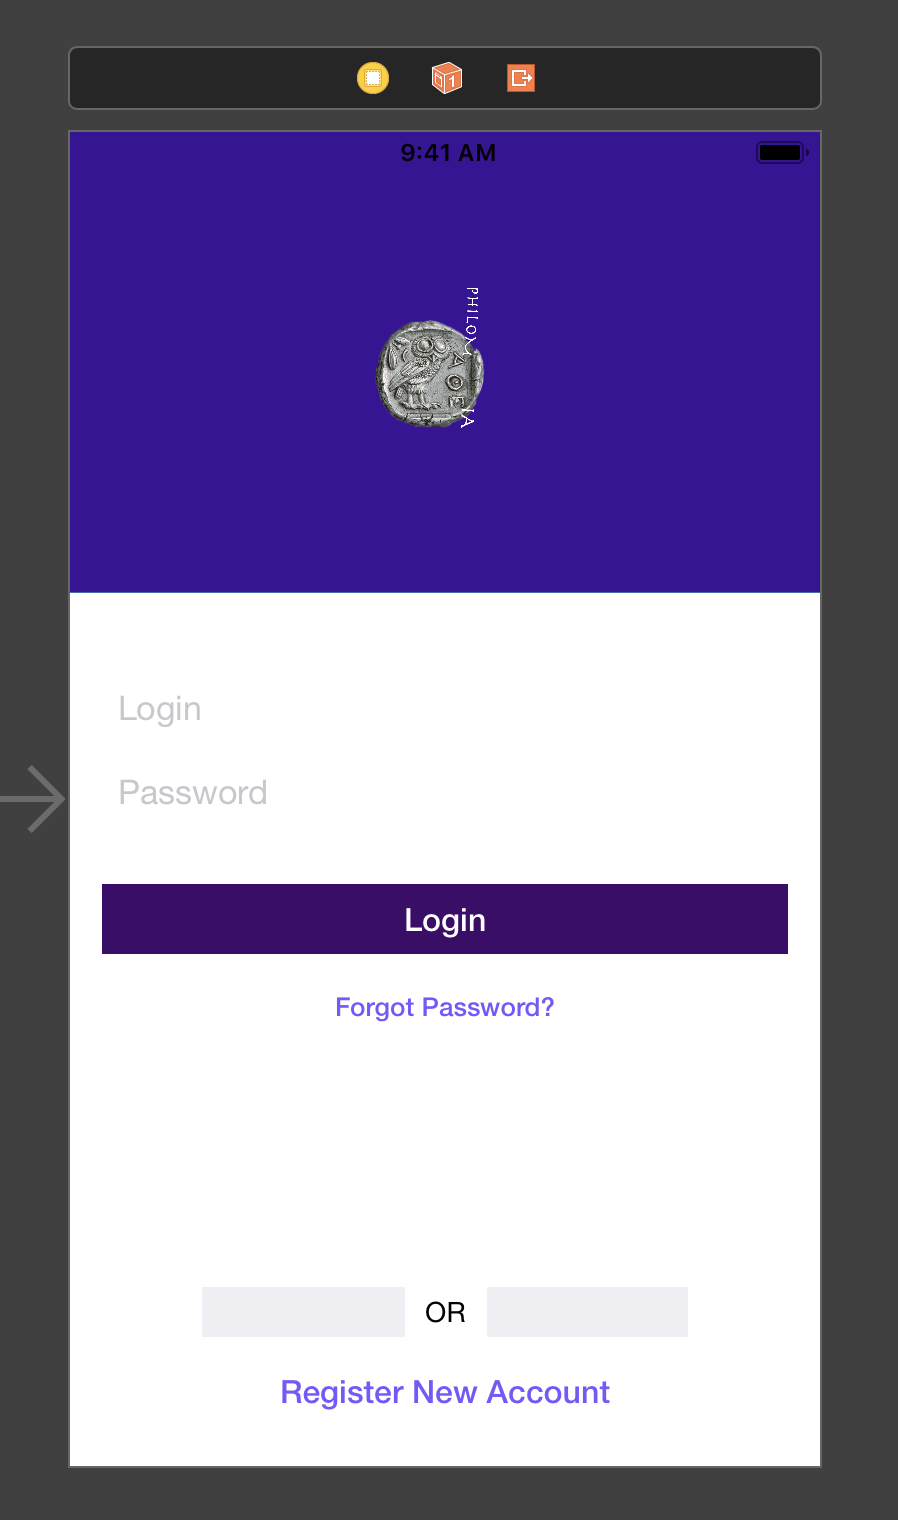
You can create the User Interface that you want. In my case, I used the one you see in the picture.
Develop a Second View Controller and Initiate Segues (transitions)
So, in my app, when the user presses the button "Register New Account", I want him to be redirected to the register account page. So for that purpose, every single page is a new scene, a new display. For that reason, we have to create a second view controller, which you can find in the object library.
Type view controller and place it next to your initial view controller. This scene will be responsible for the register view controller. The redirection to that page can be done in two ways :
- we can do it manually when we make an action connection from the button to the other view control
- we can do it programatically
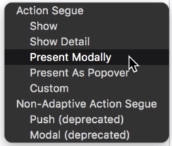
What I chose to do is to make it manually. It is simple as that:
- Make one left click on your button (in my case, Register New Account)
- Hold command and left mouse click to drag it to the register control scene.
- Release it there and choose "Present Modally"
Create Programming Class for Registration Process
So, now we want to create a dedicated encoding class for the new scene.
To do so you need to do the following steps:
- right click on your project folder
- click on the new file called cocoa touch class
- in class write: RegisterVC
- VERY IMPORTANT! Make sure that the subclass must be of type UIViewController
- language must be swift.
- click next and save your cocoa class inside in the main root of your project.
- Click on the main storyboard and go to the new view controller
- click on the the yellow button which is placed above it
- in the right go to the class inspector and make a reference to the Register VC (Costum class, class = RegisterVC
Build the Horizontal Swipe of the Page
In iOS, scroll views are used to view content that won’t fit entirely on the screen. Scroll views have two main purposes:
To let users drag the area of the content they want to display, to let users zoom in to or out of the displayed content using the pinch gestures. A common control used in iOS apps – UITableView – is a subclass of UIScrollView and provides a great way to view content that is larger than the screen.
What use sub-pages in a horizontal swipe?
Well, if I were to create 6 different pages, it would mean that I have to create a dedicated class for each one of them and it is not that convenient to pass information from one class to another one. When for example the I type my email and then click next, if I have a different view controller, I will leave the first page of the View Controller and then the second one will be presented. In this case, the information of the first view controller, must be passed onto the next one and then again to the third view controller etc. When I have all of the view controllers I need, I will have to gather all the data from all the pages and send them to the server. So, this would be really complex.
So, moving on to the creation of this view controller, in my case, I had 5 pages that I wanted to create:
- Full Name
- Password
- Date of birth
- Gender
This means, that the view controller that we will create, must be 5 times bigger than the one we made before.
Select your view controller and go to the top, right corner and click on the ruler icon and edit the Simulated Size. You will choose Freeform in order to adjust the width and height. The default width of the screen which is suitable for iphone 8 is 375, so if I multiply 375*5 = 1875. And here you go, you have an extended view controller.
Similarly, you follow the same process for all the different phones and screen sizes.
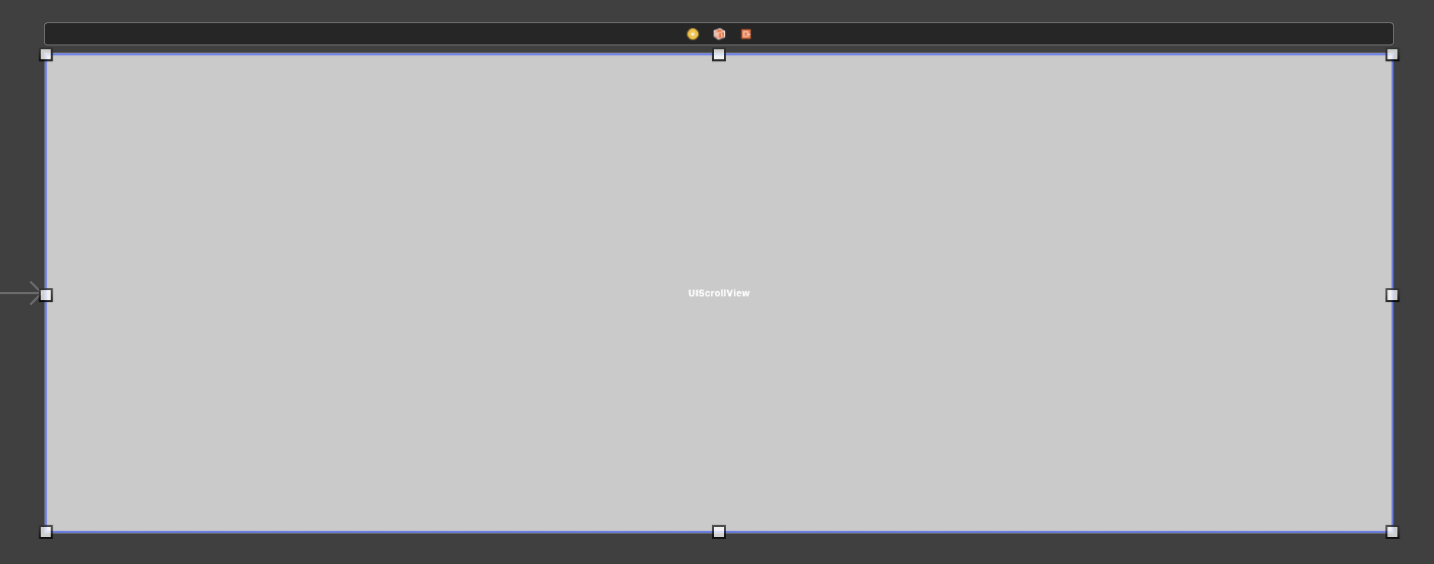
In order to make the scroll view work, we need a scroll view object. Scroll View provides a mechanism to display content that is larger than the size of the application's window. Click on this object, drag it and place it on the top left corner of the view controller and make sure that X and Y is on zero positions and stretch is accordingly to your view controller.
Scroll View only allows us to scroll, nothing else. Then we need to add a content view, which will be storing other views. You can find the UIView - it represents a rectangular region in which it draws and receives events - in the object library. Simply, click and drag it into the scroll view and once again, stretch it accordingly.
Select the scroll view from the left panel and we will call alignment 0, 0, 0, 0 and add constraints. Do the same thing for the content view.
Develop the User Interface for the Sub-pages of the Horizontal Swipe
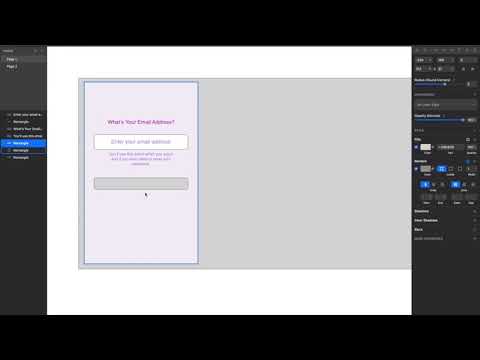
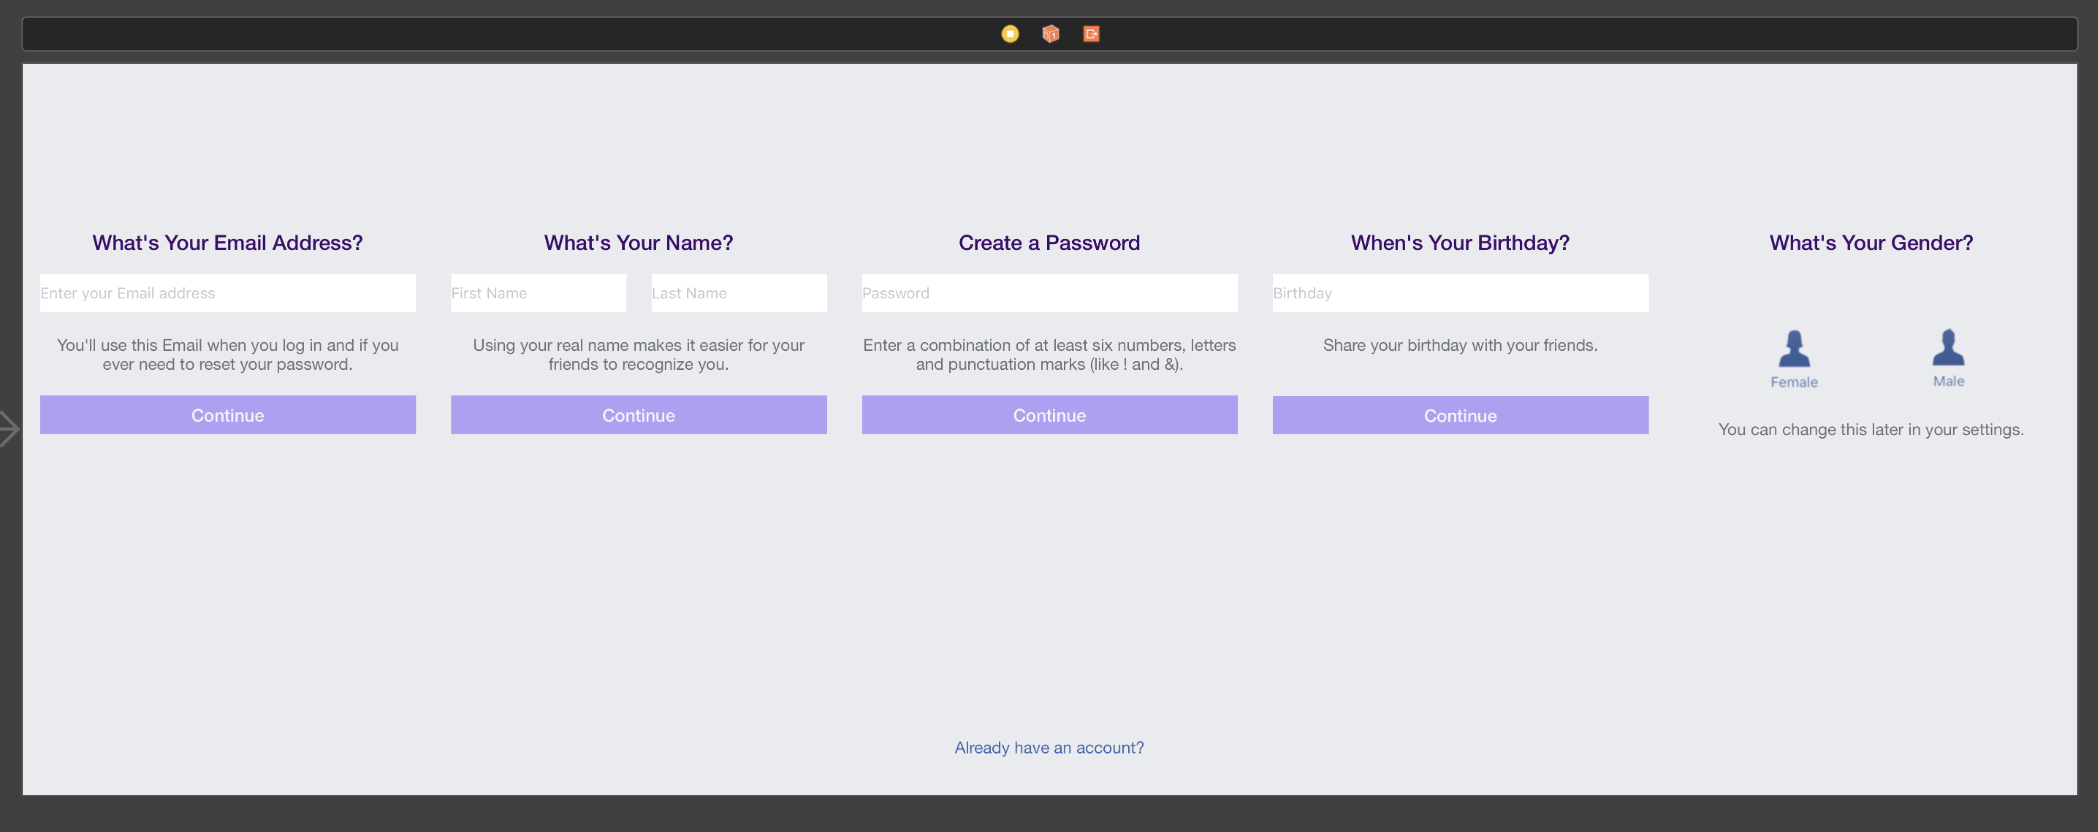
In this step, you have to create the UI of your sub-pages. What I chose to do, is make a prototype in Sketch and then build it in Xcode.
Implement the Design in Xcode
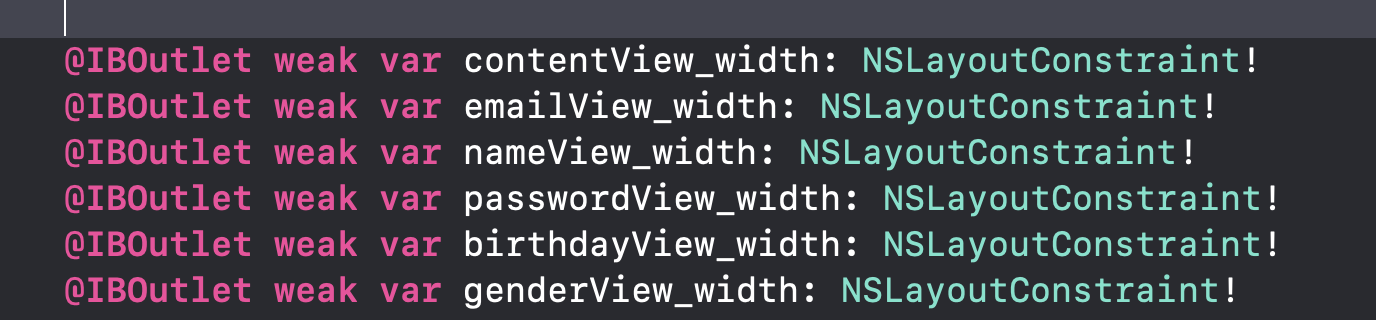
The next step is to implement this design in Xcode. To do so, you have to create outlet connections for all the sub-pages and create another one for the "mother view", meaning, one outlet connection for the whole view controller.
Elements in a storyboard are linked to source code. It’s important to understand the relationship that a storyboard has to the code you write.
In a storyboard, a scene represents one screen of content and typically one view controller. View controllers implement your app’s behaviour and manages a single content view with its hierarchy of subviews. They coordinate the flow of information between the app’s data model, which encapsulates the app’s data, and the views that display that data, manage the life cycle of their content views, handle orientation changes when the device is rotated, define the navigation within your app, and implement the behavior to respond to user input. All view controller objects in iOS are of type UIViewController or one of its subclasses.
You define the behavior of your view controllers in code by creating and implementing custom view controller subclasses. You can then create a connection between those classes and scenes in your storyboard to get the behavior you defined in code and the user interface you defined in your storyboard.
Xcode already created one such class that you looked at earlier, ViewController.swift, and connected it to the scene you’re working on in your storyboard. As you add more scenes, you’ll make this connection yourself in the Identity inspector. The Identity inspector lets you edit properties of an object in your storyboard related to that object’s identity, such as what class the object belongs to.
Create Outlets for UI Elements
Outlets provide a way to reference interface objects—the objects you added to your storyboard—from source code files. To create an outlet, Control-drag from a particular object in your storyboard to a view controller file. This operation creates a property for the object in your view controller file, which lets you access and manipulate that object from code at runtime
- Open your storyboard, Main.storyboard.
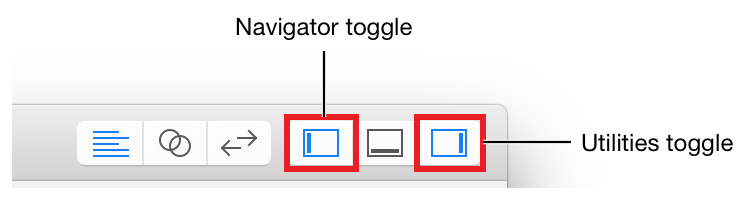
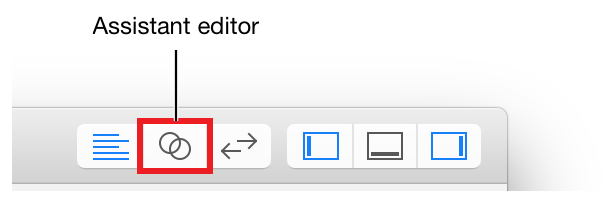
- Click the Assistant button in the Xcode toolbar near the top right corner of Xcode to open the assistant editor. If you want more space to work, collapse the project navigator and utility area by clicking the Navigator and Utilities buttons in the Xcode toolbar.
- You can also collapse the outline view.
In the editor selector bar, which appears at the top of the assistant editor, change the assistant editor from Preview to Automatic > ViewController.swift.
Click the sub-page and drag into the appropriate class in the code.
Integrate Custom Gestures


SWIPE GESTURE
A swipe gesture occurs when the user moves one or more fingers across the screen in a specific horizontal or vertical direction. Use the UISwipeGestureRecognizer class to detect swipe gestures.
Implementation of swipe gesture
Step 1: Add swipe Gesture(s) in viewDidLoad() method.
override func viewDidLoad() { super.viewDidLoad()
let swipeLeft = UISwipeGestureRecognizer(target: self, action: #selector(handleGesture)) swipeLeft.direction = .left self.view.addGestureRecognizer(swipeLeft)
let swipeRight = UISwipeGestureRecognizer(target: self, action: #selector(handleGesture)) swipeRight.direction = .right self.view.addGestureRecognizer(swipeRight)
let swipeUp = UISwipeGestureRecognizer(target: self, action: #selector(handleGesture)) swipeUp.direction = .up self.view.addGestureRecognizer(swipeUp)
let swipeDown = UISwipeGestureRecognizer(target: self, action: #selector(handleGesture)) swipeDown.direction = .down self.view.addGestureRecognizer(swipeDown) }
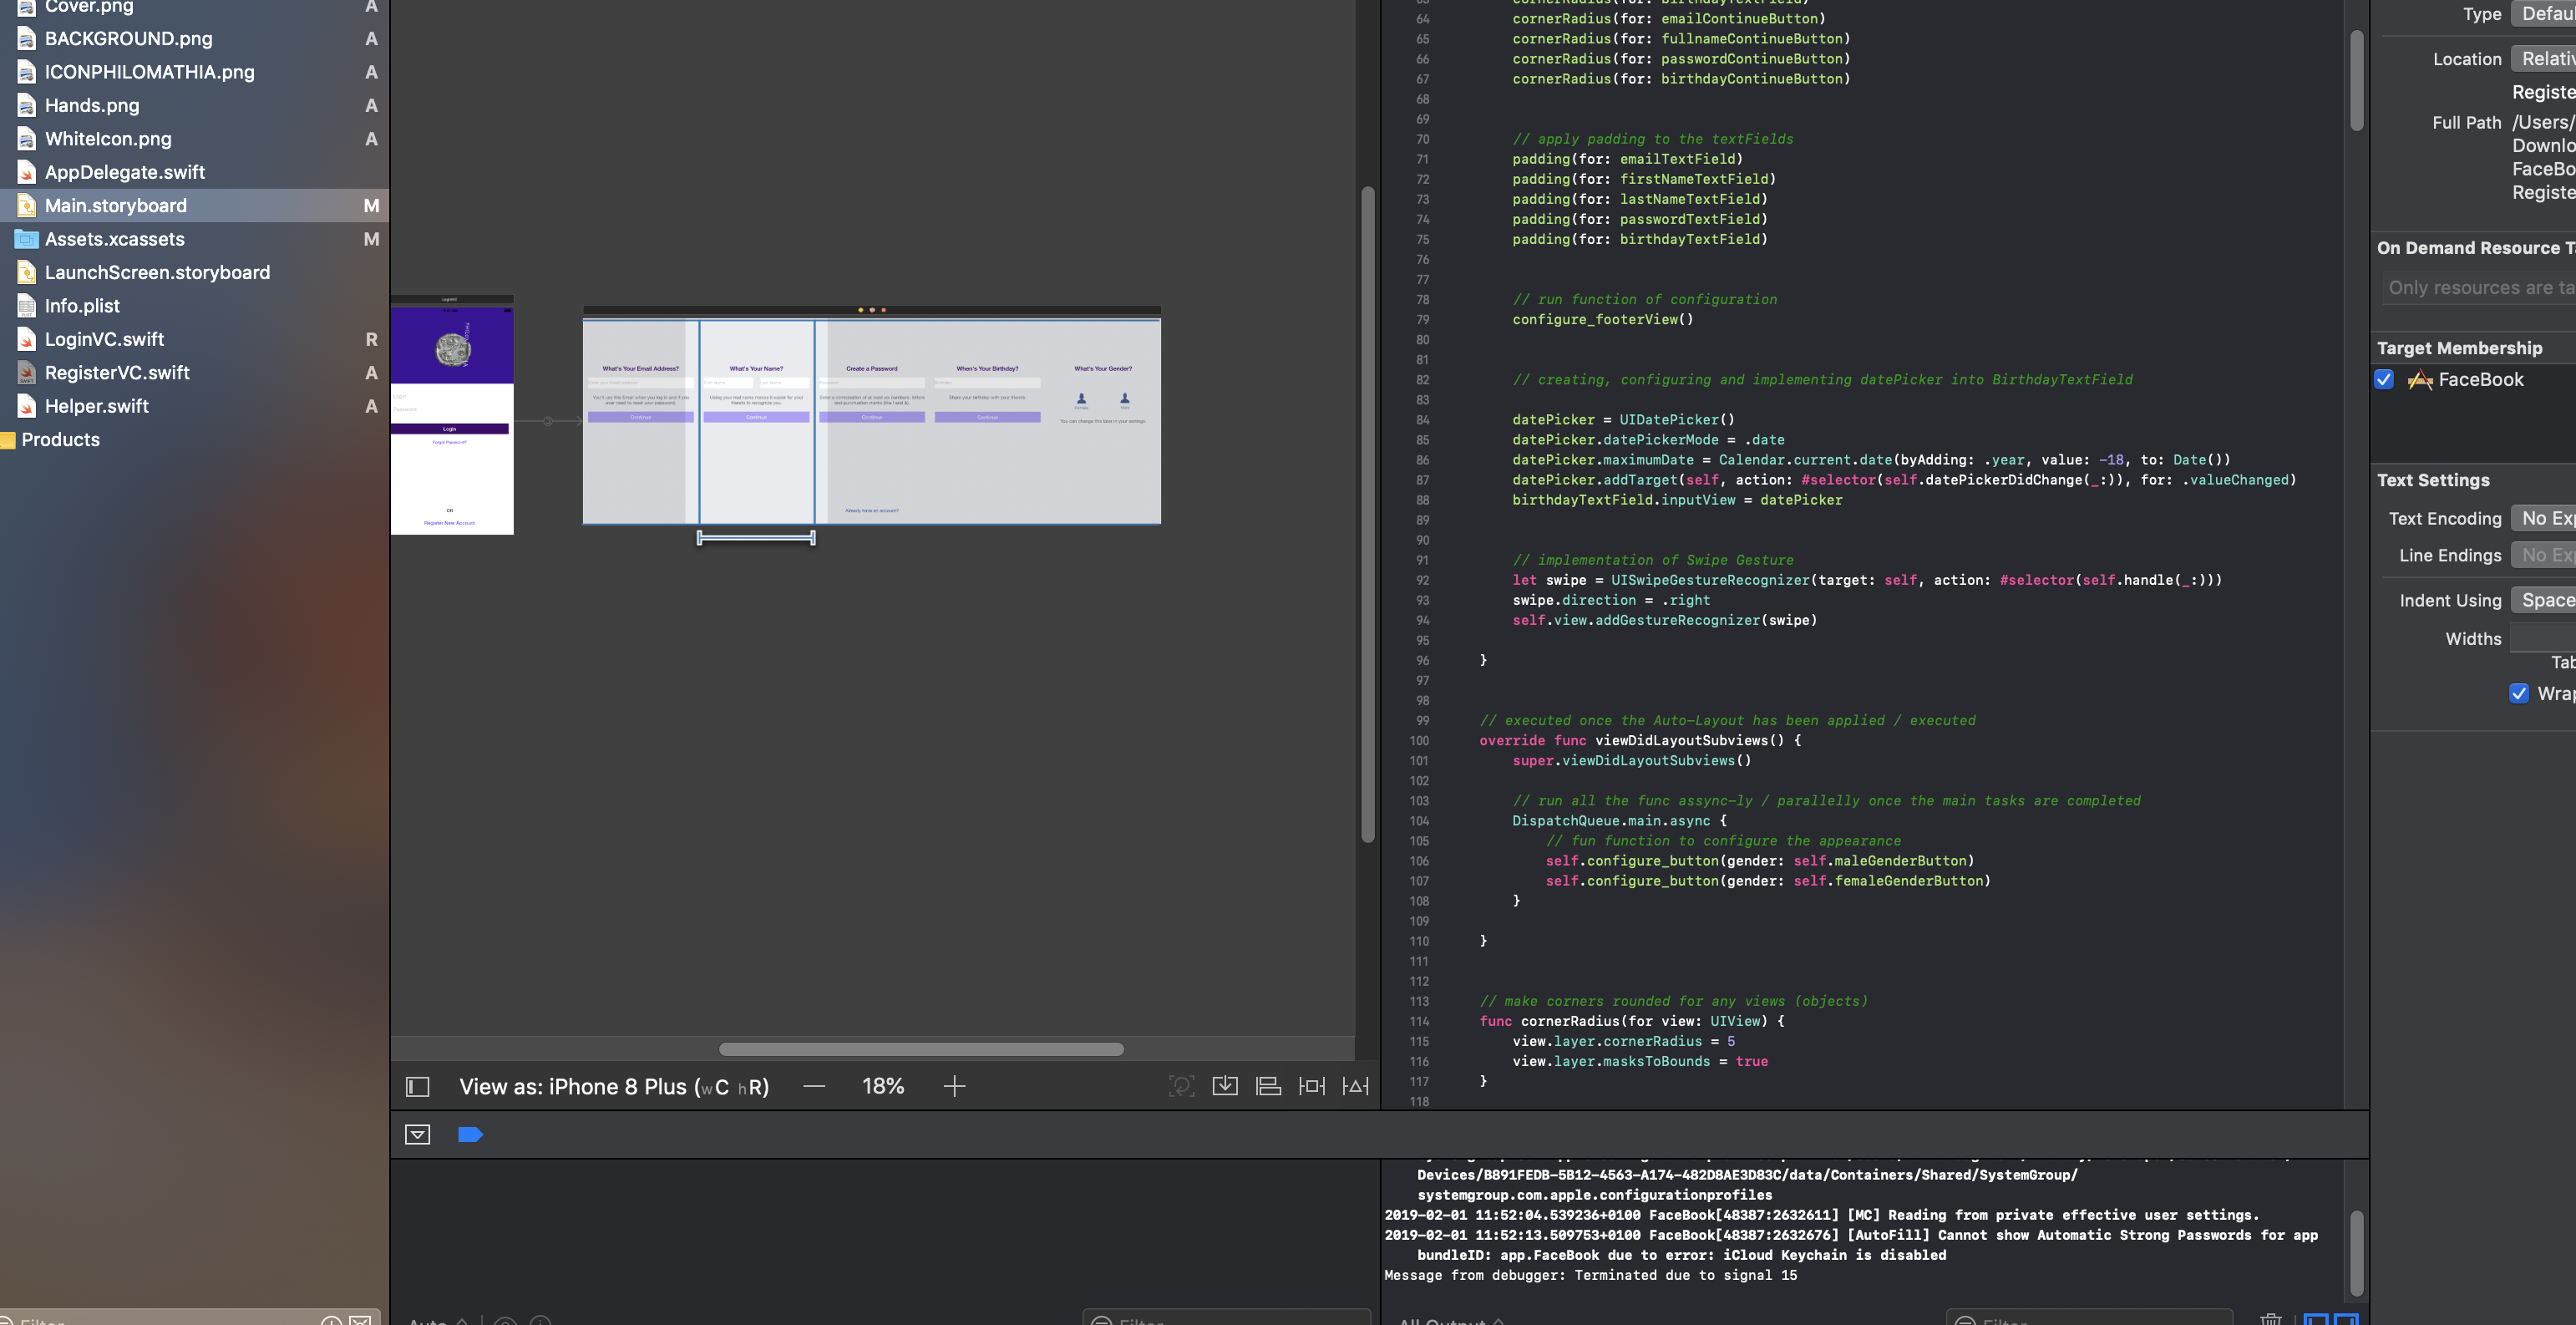
Step 2: Check the gesture detection in handleGesture() method
func handleGesture(gesture: UISwipeGestureRecognizer) -> Void { if gesture.direction == UISwipeGestureRecognizerDirection.right { print("Swipe Right") } else if gesture.direction == UISwipeGestureRecognizerDirection.left { print("Swipe Left") } else if gesture.direction == UISwipeGestureRecognizerDirection.up { print("Swipe Up") } else if gesture.direction == UISwipeGestureRecognizerDirection.down { print("Swipe Down") } }
In my app, I wanted to use swipeRight, but fell free to use the one which is more appropriate for your application.
Now, let's implement this into our code.
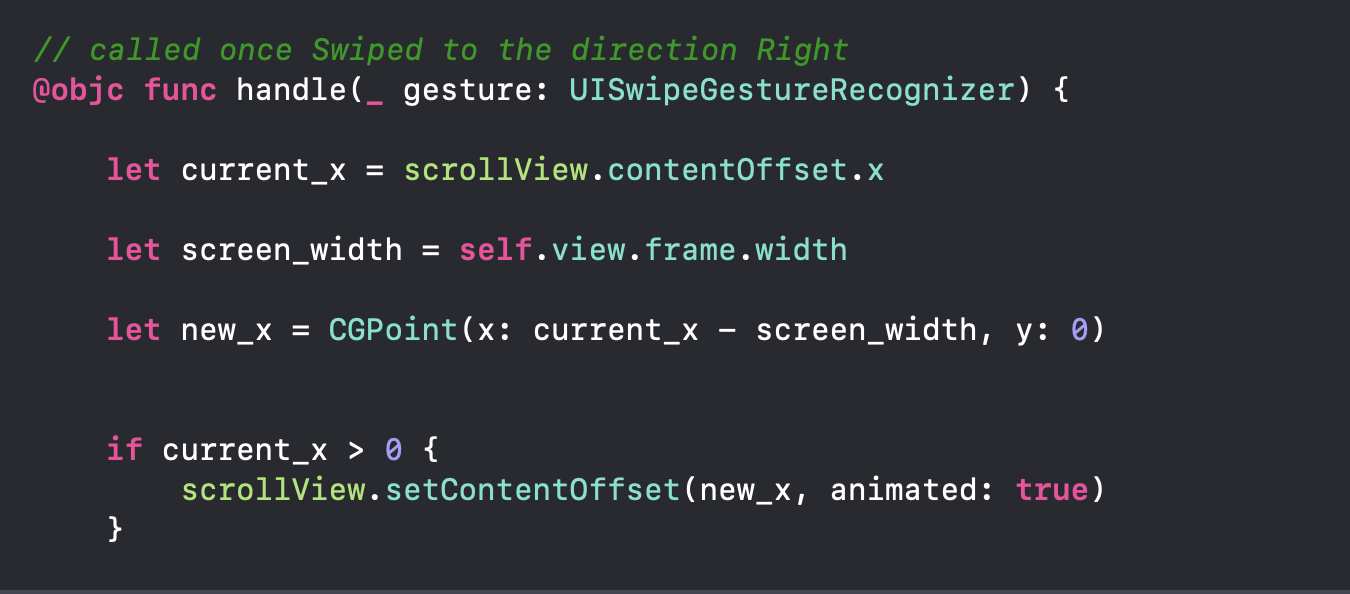
We go to the registerVC.swift that we created before and write the code as you can see in the pictures.
EXPLANATION OF THE CODE
let current_x --> getting current position of the ScrollView (horizontal position)
let screen_width --> getting the width of the screen, deducting this size let new_x --> from current position of scrollview, i comeback by width of the screen if current_x > 0 --> until unless it is more than 0 - 0 is the 1st page.
And we are done!
Good job guys!