A Miniature Chess Locket From Scratch!
8726 Views, 88 Favorites, 0 Comments
A Miniature Chess Locket From Scratch!
.png)


Hello fellow makers,
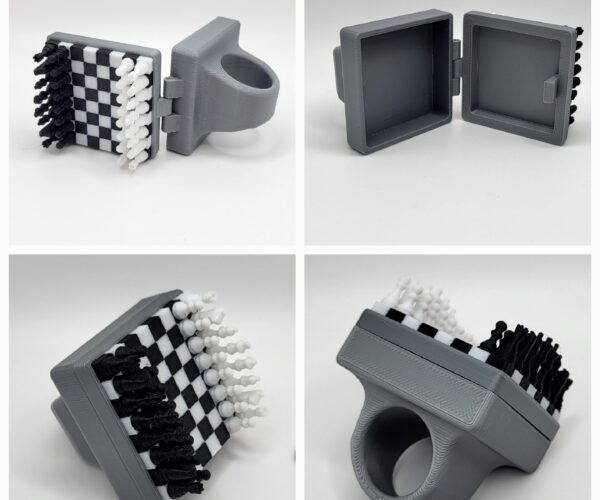
In this Instructable I will show you how to make a full miniature chess set locket that fits all of the chess pieces inside of felt lined locket.
The inspiration for this project came from this absolutely beautiful ring made by Joe Turner. Unfortunately I'll never be able to create something with that much detail and precision but I think I got the essence of it.


I made my locket from scratch by forging round brass and bronze rods for the frames and using leftovers scraps for the rest of it.
If you enjoy my Instructables and would like to support my future projects you can Buy Me A Coffee.
Supplies
To make your own you will need the following:


- Access to a 3D printer Amazon - Creality Resin Printer Halot-Mage 8K
- Airbrush with mini compressor Amazon - Airbrush-Kit Rechargeable
^ HIGHLY RECOMENDED! ^ This is one of those purchases that I use so much more than I ever thought.
- 2mm Bronze/brass rods Amazon - 2mm x 300mm Brass Round Rod
- 0.5mm Bronze/brass plate Amazon - 2 Pcs Brass Sheet, 6" x 6", 24 Gauge(0.5mm) Thickness
- Silver solder (easy) Amazon - 4.5 Grams (About 500 Pcs) Silver Solder Jewelry Precut Chips
- Clear UV curable resin Amazon - UV Resin 300g
- Black and white pigment Amazon - LET'S RESIN Epoxy Resin Dye
- 1.5mm and 2mm Ferrules Amazon - Wire Ferrules Terminals Kit
- Black and white paint Amazon - Tamiya Lacquer Spray Paint


*As an Amazon Associate I receive a small percentage from sales made through provided links at no cost to you, this helps fund future projects.
Designing the Locket:

The locket frame is designed around a 3D printed chess board I made in Fusion 360 along with the accompanying mini chess pieces.
I designed the chess pieces so that they are all connected with pins to a base to make printing easier that can simply be clipped off later, but as all the bases of pieces are level if you don't want to print them like this simply lower the STL model down into the print bed in the slicer to get rid of the pins.
The original files are 30mm in size but you can adjust it to any size you want by simply scaling all three files together in your slicer before printing, I printed mine in two different sizes (the original 30mm and one that's 80% scaled) in the end I used the larger of the two for the final locket.

As my board is only 30mm big I chose to print the parts using my Creality Halot One resin printer in a smokey clear ABS like resin.
A scaled up version of the chess set can also be printed on a normal FDM printer but my old faithful home built 0.8mm printer is definitely not up to the task.
A larger fully FDM printed chess ring from @DrOperator on Printables.
Coloring Your Chess Board:

With the parts printed it's time to make the iconic black and white chequered board.
For this I'm using some of my clear 3D printer resin with some black and white pigment added but if you do not have that available you can purchase small quantities of UV curable resin meant for jewellery from the link provided above under "supplies".
You will only need about a teaspoon of resin for both of the colors so I use old medicine container lids to mix up the resin with about 3 drops of pigment per teaspoon of resin.
The best way for me to get the resin into their cavities without spilling into the next is to use a plain old wooden toothpick that I brake the sharp point off (the broken fibres help wick the resin like a brush) and then transferring the drop of resin into the cavity, it's best to let the resin flow into the cavity by pressing the toothpick against a corner than to drip it in to prevent pesky air bubbles.

After curing the resin with a UV light or just placed in the sun I use some 220 grit sanding paper wetted with soapy water and placed on a glass pane to ensure a level surface and sanded the chequered board down about 0.5mm until I was left with a clear even board.

Next up is our chess pieces.
With the help of my trusty air brush I used white and black 2K spray paint to color both sets of pieces. As all 16 pieces are held in place by the pins onto the base it is much easier than trying to paint 0.3mm wide pieces individually.

Forging the Bronze Frame:

Our chess board and pieces are done now we need to create the locket.
This step is of course optional an you can simply buy rectangular brass bars used to make jewellery blanks.
Safety first!
Always wear leather gloves and face protection when forging metals, the pieces can cause serious burns even after standing for a while. Always handle your metal as if it is hot.

Now we will need to start shaping our bronze rod.
The frame of the locket will need a 132mm long piece of rectangular bar but I suggest you forge this length first before cutting off the excess off the original rod as it will make handling it easier.
Now we need to anneal the bronze rod, with the butane/propane torch you need to heat up your bronze rod until it gets to a cherry red color and then quench it in a bucket of water (or if you are comfortable working with hot metal you can hot forge it without quenching first)
Tip: Pick a hammer that has a defect free head as all the scratches and dents from the head will be transferred to your piece. I like to sand and polish the hammer I use for jewellery to get the best results.
When the rod has reached temperature you can place the rod on the anvil (any heavy flat metal piece you have, I have even previously used a large 4 pound hammer mounted in a vice as a makeshift anvil) and start hammering it down on one side, try to keep your hammer head as flat as possible whilst moving across the rod.
While hammering you will feel the bronze getting harder, once you feel this happening you will need to reheat the rod as above.

After the first round of hammering you will end up with a piece like the one above, don't get discouraged as this is what you want!
Step two is to reheat the rod and then place it on its side and gently hammer down the side to end up with a uniform bar that's approximately 3mm by 1mm. Repeat until you are left with a mostly uniform bar as shown bellow.
Remember you will need two of these bars, one for the lid and one for the box.

Making the Frames:

We will now need to bend our freshly forged bronze bars into a square to make the frame for the locket.
Using the 3D printed jig makes it easy to get a perfect square otherwise my squares turn out a little wonky. The resin printed jig was surprisingly strong enough for me to bend the corners around it by hand and then gently hammer it to get sharp 90 degree corners. Do this to both of your bars.

With the frame bent we need to solder the open corner seam using silver solder, I almost exclusively use "easy" silver solder in all of my projects. There are basically three options: Easy – melting range 705 to 725°C, Medium – melting range 720 to 765°C and Hard – melting range 745 to 780°C.
To solder the items I place them on a ceramic tile that has a piece of ceramic fibre insulator on top of it to prevent the heat sinking too quickly from the item into the tile making soldering much easier.
First you need to cut off any excess bar from the frame and make sure the two edges of your seam is as flush to each other as possible then you will place some flux along with a tiny piece of silver solder (the solder I use come pre cut into 1mm squares for easy use) against the joint and start heating the area with a butane torch.
Once the joint gets red hot you will notice the the solder melt and wick into the joint.

We will use the same method as above to solder on the brass plate to the frame, for the lid frame I decided to use a 0.1mm brass foil as it didn't have to offer any support unfortunately this was a terrible choice as it ended up deforming with the heat so rather stick to the 0.5mm plate for both frames.
When soldering on the plate I start with the corner furthest away from the joint in frame we soldered as with my big butane torch I don't have a lot of control and this ensures that the frame joint doesn't open up again.

After you've finished soldering the plate to the frame you can use a multitool with a cut-off disk and remove any excess plate and smooth off the joints.

Some Refinement:

Now it will be next to impossible to get the two pieces identical if you've forged it by hand and while I love the imperfections that come with hand forging with a locket it doesn't really work.
To solve this and get our two pieces to match up we will need to solder them together using regular lead free electronic solder, this will give us a sturdy but non permanent connection.
I simply solder a small piece on the joint of each of the sides, try to get the two pieces as centred as possible.
With the two pieces soldered together...and cooled...I used a 120 grit drum sanding bit in my Dremel to sand the sides even.

You can heat up the piece and separate them when the sides are even.
The Locket Hinge and Clasp:

Onto the last of the soldering.
There are a few ways to make the hinge of the locket but this solution comes from something I was using on another project as I was busy with this one and it worked really well.
I use bootlace ferrules quite a lot and have a container full of them, all sizes being in the same container they tend to push into each other turns out this is exactly what I needed the 1.5mm ferrules fit perfectly in the 2mm ones and they are copper so easy to solder.
I went ahead and simply melted off the plastic from the back and then two 2mm ferrules with one 1.5mm in the middle will make the perfect hinge.

In one of my previous Instructables I used some thin copper pipe and a needle for the hinge.

The clasp was made from a piece of the off-cut bronze rod we used in the forging part, I simply bent a hook on the one end for the necklace and the flat end has a little hoop in it for keeping the lid closed.
Both the hinge and the clasp is soldered onto the box using lead-free electronic solder.

The Finishing Touches:

Now to finish the locket.
I use the same clear UV resin to set the chess board inside of the frame, I recommend you do this in a few layers curing the resin in-between layers as a thick pour will result in a lot of heat generated during curing that can cause air bubbles.
You will want to overfill the frame to create a slight dome that can be sanded flat and polished to give a level glossy finish.

I usually sand down my pieces to 1500 grit sanding paper and then polish them to a high shine but with this project I wanted to try something new with a brushed finish so I only went to a 400 grit trying to keep all sanding in one direction and then finished the locket by polishing it with fine steel wool.

To stop the chess pieces from rattling around and give a more luxurious feel I lined the inside of the locket with a thin felt using clear contact adhesive.

Now that our locket is finished and lined in felt we need to finish the chess pieces.
Using small flush cutters I snipped off all the pieces as close to their bases as possible and then simply pull each piece across a piece of sanding paper to flatten the base.

And finally my locket will be hung on a piece of leather lace that was simply threaded through the locket and then given an adjustable knot on the end.
And that's it your mini chess locket is ready to use!
Enjoy Your Creation!

I hope you guys find this Instructable useful and if you have any questions please feel free to leave me a message or comment bellow.

Thank you for taking the time to read through my project and as always..
Happy making!