Create Your Own Arduino Header
by GunduBulbu in Circuits > Arduino
14941 Views, 6 Favorites, 0 Comments
Create Your Own Arduino Header


Hey there,
Today i'm gonna share you an awesome tips every Arduino user wish to know sooner. when i was learning Arduino no one ever told me these tricks, so i ended up learning the Arduino in a complex way. Then only after 7-8 months later i figured it out and realized how much time and resources i wasted without knowing these tips. lets dive in to the tutorial.
Tutorial Summery
- Using "analogWrite" Function effectively to avoid complex circuitry
- Create Your Own Header Files to simplify the coding
- Pass data as parameter to increase code re-usability
Supplies
- Arduino with USB
- 3V LED
- Some Jumping Wires
Using "analogWrite" to Minimize Circuit Design

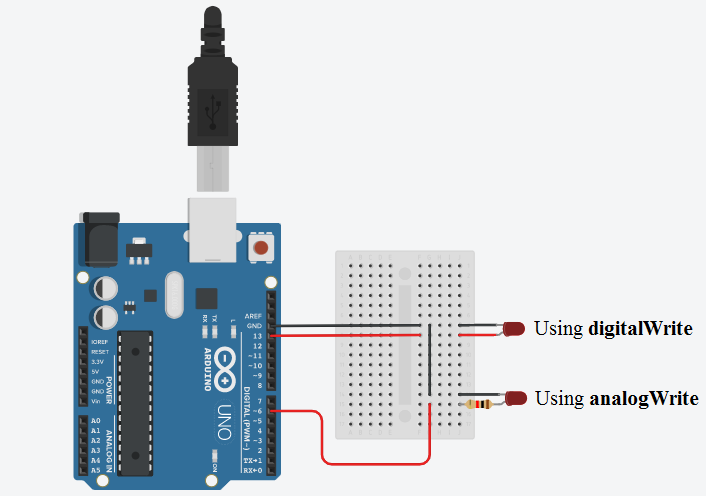
On your Arduino code you can't normally control the amount of power you supply to the LED or any other device using digitalWrite but Using analogWrite will help you control the amount of power to the circuit. The image below shows the circuit designed for both analog and digital output.
int R_LED = 9;
void setup()
{
  pinMode(R_LED, OUTPUT);
}

void loop()
{
  analogWrite(RED_LED, 10);
  delay(delay_value);
  analogWrite(RED_LED, 255);
  delay(delay_value);
}
The Above code will blink the LED with LOW and HIGH brightness instead of toggle between ON and OFF
Create Your Own Header & Pass Arguments
To create your Own Header click on the arrow button on the right corner in Arduino IDE then select "New tab". Then type a file name for header and click OK button on the bottom, this will create a header file in your code directory. all you need to do is import that header in main code and use the function calls.
Main Code:
#include"GunduBulbu.h"
int R_LED = 9;
void setup()
{
  pinMode(R_LED, OUTPUT);
}

void loop() {
  Blink(R_LED,1000);
}
Header Code:
void Blink(int RED_LED,int delay_value)
{
  analogWrite(RED_LED, 10);
  delay(delay_value);
  analogWrite(RED_LED, 255);
  delay(delay_value);
  analogWrite(RED_LED, 0);
  delay(delay_value);
}