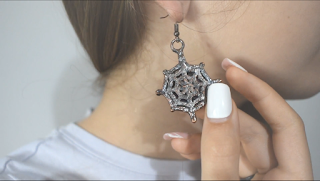
Crafting Halloween 3D Printed Electroformed Jewelry
by CuForming in Craft > Jewelry
243 Views, 2 Favorites, 0 Comments
Crafting Halloween 3D Printed Electroformed Jewelry


Halloween is a season that beckons us to embrace creativity and step into the extraordinary. In this latest project, we embarked on a captivating journey into the world of jewelry crafting, combining cutting-edge 3D printing with the age-old art of copper electroforming. The result? A stunning collection of Halloween-themed jewelry that promises to bewitch and bedazzle. In this blog, I'm thrilled to take you behind the scenes of this project, unveiling the techniques, and the final creations.
Supplies

The Ingredients for this Magical Recipe:
Before we delve into this electroforming project, let's first take a glance at the essential supplies that made it all possible:
- Anycubic Photon M3 3D Printer https://amzn.to/45tSmTa | https://ebay.to/3tAkWF7
- Water-Wash Resin https://amzn.to/46pRuR3 | https://ebay.to/3RWJcLZ
- Conductive Paint https://amzn.to/3LZ8qWl | https://ebay.to/3t7eqlC
- Cabochon Stones https://amzn.to/3Qd5yaN | https://ebay.to/35oIFwe
- Copper Tape https://amzn.to/46OnwFR | https://ebay.to/46GuMng
- Zigzag scissors https://amzn.to/474HHzR | https://ebay.to/3LXetKN
- Sandpaper https://amzn.to/46Lm0o9 | https://ebay.to/46obTWs
- Copper Jump Rings https://amzn.to/48OJpXs | https://ebay.to/4086Ozv
- Copper sheet https://amzn.to/3ZQsH5W | https://ebay.to/3FfsHmQ
- CA Glue https://amzn.to/3PRvc3A | https://ebay.to/3PVVK3o
- Burnisher Agate Knife https://amzn.to/3QdC9Ny | https://ebay.to/3RWg8nH
- Solder Iron https://amzn.to/46GnjEE | https://ebay.to/45mSkfW
- Tin Soldering https://amzn.to/45ICtst | https://ebay.to/48PHRfN
- Flux https://amzn.to/3FxTwmp | https://ebay.to/3tspJJ1
- Nail Polish https://amzn.to/45AWnFK | https://ebay.to/3ZPYVhS
- Copper Ring Shanks https://amzn.to/46xKHVy | https://ebay.to/4087pBf
- Stud Earring Posts https://amzn.to/45np4Wx | https://ebay.to/3Ff26Gn
- Acetone https://amzn.to/45rQA5g | https://ebay.to/3LYMxqd
- Liver of Sulfur https://amzn.to/45sS5zV | https://ebay.to/3BOoR1i
- Rotary tool https://amzn.to/46se3Ev | https://ebay.to/44B9mqs
- Bristle brush Wheels https://amzn.to/3tsoycz | https://ebay.to/3RXNjHO
- Respirator Mask https://amzn.to/46Ihc2Q | https://ebay.to/3AJtJoy
- Various containers https://amzn.to/3RWbohX | https://ebay.to/3PUoCZT
- Complete Electroforming Kit: Comprising a Copper Electroforming Solution in its tank, Anode Cage with an Anode Bag (filled with copper scraps serving as electrodes), a thermometer, and the indispensable Power Supply https://kit.co/cuforming/electroforming-advanced-kit
.JPG)

The Project:
My ambitious project encompassed crafting a diverse range of jewelry pieces, each inspired by the spirit of Halloween:
- Pumpkin Pendant: A playful pumpkin-shaped pendant that captures the essence of Halloween's favorite gourd.
- Funny Ghost Earrings: A whimsical pair of ghost earrings designed to add humor to your Halloween attire.
- Skull with Tiger Eye Cabochon: A beautifully haunting skull pendant adorneing a mesmerizing Tiger Eye cabochon.
- Spiderweb Earrings with Amethyst Cabochon: Delicate spiderweb earrings with an enchanting Amethyst cabochon at their heart.
- Bat Ring: A stylish bat-themed ring featuring a small Amethyst cabochon.
- Spiderweb Ring: An intricate spiderweb ring that exudes a sense of mystery.
- Bat Stud Earrings: Subtle yet stylish, these bat stud earrings provide the perfect finishing touch to your Halloween look.


2. Preparing the Pieces: Once the pieces were printed, we embarked on preparing them. This involved sanding all the imperfections of the prints, attaching bails, jump rings, and stones where needed, accomplished by using CA glue. Bezel the tiger eye cab with copper tape and solder the bail. The whole preparation needs to ensure the structural integrity of each piece. Paint the stones with nail polish to protect them from the acidic environment of the electroforming bath.


4. Electroforming: The heart of the project, electroforming, was where the real transformation took place. Before starting the process, I need to make a calculation of the entire surface area of the pieces to be sure of how much current must be applied to them. The surface, if measured in centimeters, must be multiplied by 0.002 Amperes; If measured in inches, must be multiplied by 0.05 Amperes. The painted pieces were submerged then in the electroforming bath, initiating the process of copper deposition. Electricity played its role, as the copper solution adhered to the conductive paint, gradually covering the jewelry pieces.


6. Polishing: This journey concluded with a meticulous polishing process. Using a rotary tool and bristle brush wheels, I ensured that this jewelry pieces shone brilliantly, revealing their captivating beauty. For last, a dip in acetone to remove the remained nail polish to reveal the stones underneath.
This multi-step was a blend of creativity and techniques all together that seamlessly merged modern innovation with timeless craftsmanship.

Creating these Halloween-themed electroformed jewels wasn't just an art project; it was a thrilling journey filled with laughter and experimentation. From 'eureka' moments when my designs came to life, to inevitable giggles when things didn't go as planned, it was a project that truly encapsulated the joy of creativity.
I'm excited to share my entire adventure with you, and the best way to experience it is through the related YouTube video
This Halloween, why not infuse a little DIY magic into your holiday? Crafting your own jewelry can be both enchanting and entertaining. Plus, the end result is a unique collection of jewelry that captures the essence of Halloween like nothing else.
So, gather your supplies, unleash your creativity, and let's get crafting – because Halloween just got a lot more stylish and fascinating. Happy haunting, and enjoy creating your own magical jewelry pieces!


