Cosmic Compass - Points to the Center of Milky Way Galaxy
by mondal3011 in Circuits > Microcontrollers
815 Views, 7 Favorites, 0 Comments
Cosmic Compass - Points to the Center of Milky Way Galaxy


In this Instructable, I present to you the Cosmic Compass! A compass that always points to the centre of the Milky Way galaxy. Centuries ago, when people read the sky like a map, ancient stargazers prayed to the great Archer. It is said that Sagittarius himself lent this compass to the inhabitants of the Earth. The compass was rumoured to answer only after the moon blinked twice, and you recited the alphabet backwards.
Just kidding. This Cosmic Compass simply uses a microcontroller and some cool math to figure out the direction of the galactic centre (the black hole Sagittarius A*) relative to itself.
It lights up one of eight LEDs arranged in a circle, pointing to the direction where the Galactic Centre lies. But how do we show the altitude on a compass that’s flat and only points in 2D? That’s where the LED colour comes in! Since the compass can’t tilt or move vertically, the colour of the LED indicates how high or low the Galactic Centre is.
When it’s deep below the horizon, the LED glows red; as it starts to rise, the colour shifts to orange, and when it’s high above, it glows bright white.
Supplies
The Basic Concepts (Good to Know)

Galaxy and Galactic Center: The Milky Way is a disk of stars we live inside. The Galactic Center is the direction toward the dense middle of that disk (near the constellation Sagittarius).
Two useful coordinate systems:
- Equatorial coordinates (RA, Dec) - how astronomers name fixed positions on the sky (like longitude & latitude on Earth). RA is in hours (0–24 h) or degrees (0–360°); Declination is in degrees north/south of the celestial equator.
- Horizon coordinates (Altitude, Azimuth) - how we see something from a place on Earth at a moment:
Altitude (Alt) = angle above (+) or below (−) the horizon.
Azimuth (Az) = compass direction along the horizon, measured 0° = North, increasing clockwise (90° = East, 180° = South).
Why convert? RA/Dec are fixed in the sky, but what we see depends on where we are on Earth and what time it is. We convert RA/Dec → Alt/Az for our location and time.
The Math

Here I'm explaining the math behind it all. If you'd rather get to the build directly, skip to step 4
1. Get the Galactic Centre in RA/Dec.
We use the standard J2000 values:
RA = 17h 45m 40.04s -> convert to degrees: RA(deg) = RA_hours × 15.
Dec = −29° 00′ 28.1″ -> Dec (deg) ≈ −29.007805556°.
2. Get the exact current time (UTC) and our latitude & longitude (longitude positive east).
Time is crucial because Earth’s rotation changes what direction corresponds to a given RA.
3. Convert the current UTC time --> Julian Date (JD).
This is a continuous day count used by astronomy formulas:
JD = (unix_time_seconds/86400) +2440587.5
4. Compute Greenwich Mean Sidereal Time (GMST) from JD. GMST tells what RA is crossing the Greenwich meridian.
(We use a standard approximation; code implements it.)
5. Convert GMST --> Local Sidereal Time (LST) by adding our longitude (degrees).
LST tells what RA is on our meridian.
6. Compute the Hour Angle (HA):
HA=LST - RA
HA says how far east or west the target is from our overhead meridian.
7. Convert HA & Dec (with our latitude) to Altitude and Azimuth using spherical trig:
- Altitude:
sin(Alt) = sin(lat)sin(dec)+cos(lat)cos(dec)cos(HA)
Alt = arcsin(sin(Alt))
- Azimuth (stable form):
sin(Az) = −(sin(HA)cos(dec)) / cos(Alt)
cos(Az) = (sin(dec)−sin(Alt)sin(lat))/cos(Alt)cos(lat)
Az=atan2(sin(Az),cos(Az))
Convert Az to degrees and wrap it to 0°- 360° (0° = North, clockwise).
8. Map the Azimuth to a single LED on our compass ring.
With NUM_LEDS = 8, each LED covers 360°/8 = 45°.
Decide what compass bearing corresponds to LED 0 (top of the ring). We call that WALL_BEARING. It can be 0° for North, 90° for East, etc., or a custom angle you measured.
Compute relative angle:
rel=(Az−WALL_BEARING) mod 360°
Index:
index=round (rel/(360/NUM_LEDS)) mod NUM_LEDS
Light LED index.
9. Color the LED by altitude (our banded scheme):
Alt < −10° = deep red (well below horizon)
−10° <= Alt < 0° = red-orange (just below)
0° <= Alt < 30° = amber (low above horizon)
30° <= Alt < 60° = warm white (mid)
Alt >= 60° = bright white (high)
Numeric Example
Target (Galactic Center):
- RA = 17h 45m 40.04s → RA_hours = 17 + 45/60 + 40.04/3600 = 17.761122 h
- RA₍deg₎ = 17.761122222... × 15 = 266.416833°
- Dec = −29° 00′ 28.1″ → −29.00780°
Observer / time used in example:
- Latitude = 28.6139° N
- Longitude = 77.2090° E (longitude positive east)
- UTC time = 2025-10-05 00:00:00 UTC
Step A — Julian Date:
- The Unix timestamp of 2025-10-05 00:00 UTC is 1759622400 seconds.
- JD = 1759622400 / 86400 + 2440587.5 = 2460953.5.
Step B — GMST and LST:
- Compute GMST using the standard formula; for this JD we get:
- GMST ≈ 13.92388985°
- LST = GMST + longitude = 13.92388985° + 77.2090° = 91.13288985°
Step C — Hour Angle (HA):
- HA = LST − RA = 91.13288985° − 266.41683333° = −175.28394348°
- (We generally wrap HA into (−180°, +180°) for trig.)
Step D — Altitude and Azimuth (final target direction):
- Altitude ≈ −85.849° (well below the horizon at this time & place)
- Azimuth ≈ 96.579° (about East)
Step E — Which LED on our 8-LED compass?
- Degrees per LED = 360 / 8 = 45°.
- If we set WALL_BEARING = 0° (LED 0 at top points North), then
- rel = Az − WALL_BEARING = 96.579° − 0° = 96.579°.
- index = round(96.579 / 45) = round(2.1462) = 2.
- So LED 2 lights.
- Altitude is −85.849°, which is below −10°, so the LED colour will be deep red.
Design


We'll first print out the template which I've provided in this step. We need an A4 sized sunboard (Low density PVC board) to stick the template onto and cut out the shapes.
Downloads
Build the Compass


Using the templates, we cut out the base of the compass from sunboard. Follow the images in sequence in this step.
The rectangular dividers are to keep the light in each section from leaking into the others.
Build the Compass - 2


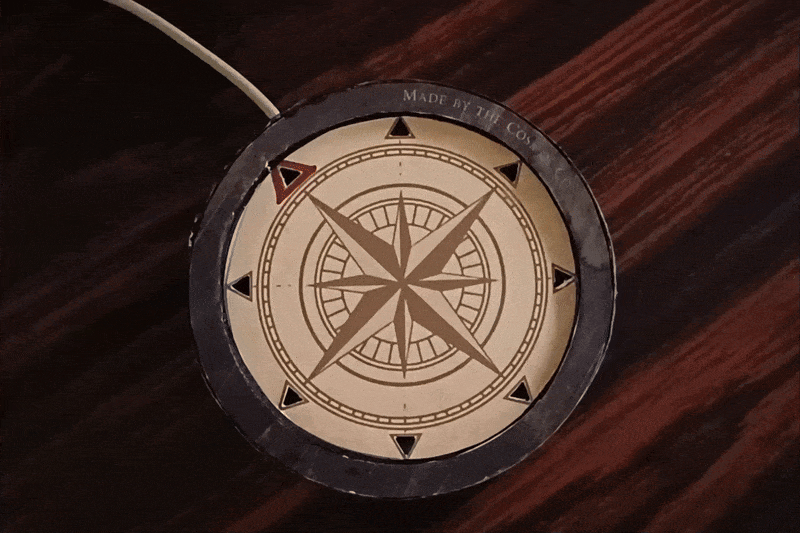
Now we make the top of the compass. We first cut a ring out of sunboard and paint the sides black. Then we glue the templates on the top, including the ring. Notice how I coloured one of the arrows red. This will be the arrow that should be placed pointing to the north direction.
Build the Compass - 3


Now for the base, we simply cut a circular piece of sunboard and glue a circle of aluminium foil. This will reflect the light internally and make it brighter.
Code

I will do a detailed code walk through at the end of the tutorial. For now, all you need to do is add your Wi-Fi SSID and Password, and add your current latitude and longitude. Refer to the highlighted section in the image. Code is attached below.
Once updated, upload the code to your Esp32 module.
Downloads
Test If the Code Works


Refer to the above circuit diagram to make your connections. This code uses 8 LEDs in the LED strip as per the template. So you can cut the strip at 8 LEDs.
I used an external 5v power supply for both the LED strip and the esp32. The signal wire of the LED strip is connected to GPIO pin 5.
Once powered on, it should start blinking orange to indicate it is trying to connect to Wi-Fi. Once connected, it should light up one LED in a specific colour. If that works, then we're all set!
Fit in the Electronics


Time to install the electronics. Refer to the images and follow. Make sure LED 1, that is, the first LED after the connecting wires, is facing the arrow we coloured red. This will be the North-facing LED. This is very important, or everything will mess up.
I made a hole in the side to pass the power wire into the compass.
Final Assembly


Finally, stick the baseplate and we're done! Our Cosmic Compass is alive!
Place it flat on a table with the red arrow pointing North, and give it a moment to connect and start glowing. The single illuminated LED shows the direction of the Milky Way’s centre, home to the black hole Sagittarius A*. Face that direction and use the colour to know where to look: if it’s deep red, the centre lies far below the horizon; orange means just below; yellow means right at the horizon; warm white tells you it’s climbing upward; and bright white means it’s high overhead, shining (invisibly) above you.
It’s a small device with a big reminder: we live inside something vast and beautiful, and now, thanks to a few LEDs, you can point straight to its heart :)
Code Walkthrough
The program finds where the Galactic Centre (Sagittarius A*) is in the sky for our place and time, converts that to an azimuth (compass bearing) and altitude (how high), picks the nearest LED on an 8-LED ring for that azimuth, and colours that LED according to altitude.
1) Top-of-file configuration: change these
These are the only values most people need to edit: Wi-Fi (optional), your lat/lon, and which way LED0 points.
2) setup()
- Initializes serial (for debug) and the LED strip (FastLED).
- Computes wall_bearing from WALL_ORIENT_CHAR or WALL_ORIENT_DEG (this is the compass bearing that corresponds to LED0).
- Starts Wi-Fi and tries to get NTP time. While it’s trying, all LEDs blink orange.
- If NTP works, we use real UTC time. If not, we fall back to compile-time + millis() so the code still runs.
Why: accurate time is required because the sky rotates — we need correct time to know where the Galactic Centre appears.
3) loop()
- Get current time (time(nullptr)). If invalid, use fallback compileTime() + millis()/1000.
- Call radec_to_altaz(...) with:
- RA/Dec of the Galactic Center (constants in file),
- LATITUDE, LONGITUDE,
- the unixTime.
- This returns alt_deg and az_deg (degrees).
- Map azimuth to LED index:
- Choose color by altitude using colorForAltitude(alt_deg).
- Clear LEDs, set leds[index] = chosenColor, FastLED.show().
- Print a debug line: Unix, Alt, Az, rel, index.
4) Key helper functions:
- jrulianDate(unixTime) — converts UNIX seconds → Julian Date (astronomy timebase).
- gmst_from_jd(JD) — computes Greenwich Mean Sidereal Time from JD.
- radec_to_altaz(ra, dec, lat, lon, unixTime, &alt, &az) — full pipeline: JD → GMST → LST → HA → Alt/Az (outputs degrees).
- wrap360(x) — normalize angle into 0..360°.
- colorForAltitude(alt) — maps altitude to a CRGB color (we show the 5-band version below).
- showBlinkOrange() — small animation while connecting Wi-Fi.
- compileTime() — parse __DATE__/__TIME__ to provide an offline time baseline.