Converting Your 3D Printer to a Drawing Machine for Free?
by Dawn_of_justiz in Circuits > Electronics
3390 Views, 61 Favorites, 0 Comments
Converting Your 3D Printer to a Drawing Machine for Free?

"Everything that can be automated will be automated " - Robert Cannon
Want someone to do a repetitive job like writing your notes or drawing images? You have a 3d printer lying around. Then you have come to the right place. Many people have already tried this, and you may ask why I am replicating it.
Well, you are right, although many of the solutions I found on the internet were either for a different model printer or were an attachment to use by replacing the extruder while drawing. So I decided to make one which was permanently placed in the printer for ease of use :D
Let's get started!
Supplies
Download the stl files from here: Thingiverse
How 3D Printing Works?

In my opinion, 3D printing and normal printing are almost the same. 3D printing is printing one layer at a time and on top of them again and again to make a 3-dimensional object.
So to summarize
- You need a design for your drawing, we generally create one from an image in stl format.
- Then the stl is sliced using the slicing software of your choice. I use Cura. Cura converts the stl file to g-code.
- The g-code is fed into the printer and then the magic happens😎
Creating a Custom Addon for Ender 3 Pro


These are the custom addons which I designed, and are freely available in Thingiverse. After printing these two files, I recommend sanding the parts a little for them to move freely.
Note: This design is for Ender 3 Pro model but the concept used here is the same for any model.
Print Instructions:
- Rafts: Yes
- Supports: Yes
- Resolution: 0.2mm
- Infill: 25% for Ender_Plotter_v2 and 100% for PenHolderv2
- Filament: PLA
Attaching the Part to the Printer

While attaching this to your printer, remove the screws shown in the image above and use the same screws to hold them both. After tightening the screws only place the pen holder, because you can't access the screws after placing the pen holder. Place the pen only during a test run, because if it's not fixed properly, it may collide with the build plate and cause damage as shown in the pic.
In simple, Upload a design you want to print, then start the print without the pen and pause the print when the extruder is on top of the build plate. Now level your pen to just touch the paper, then resume the print.
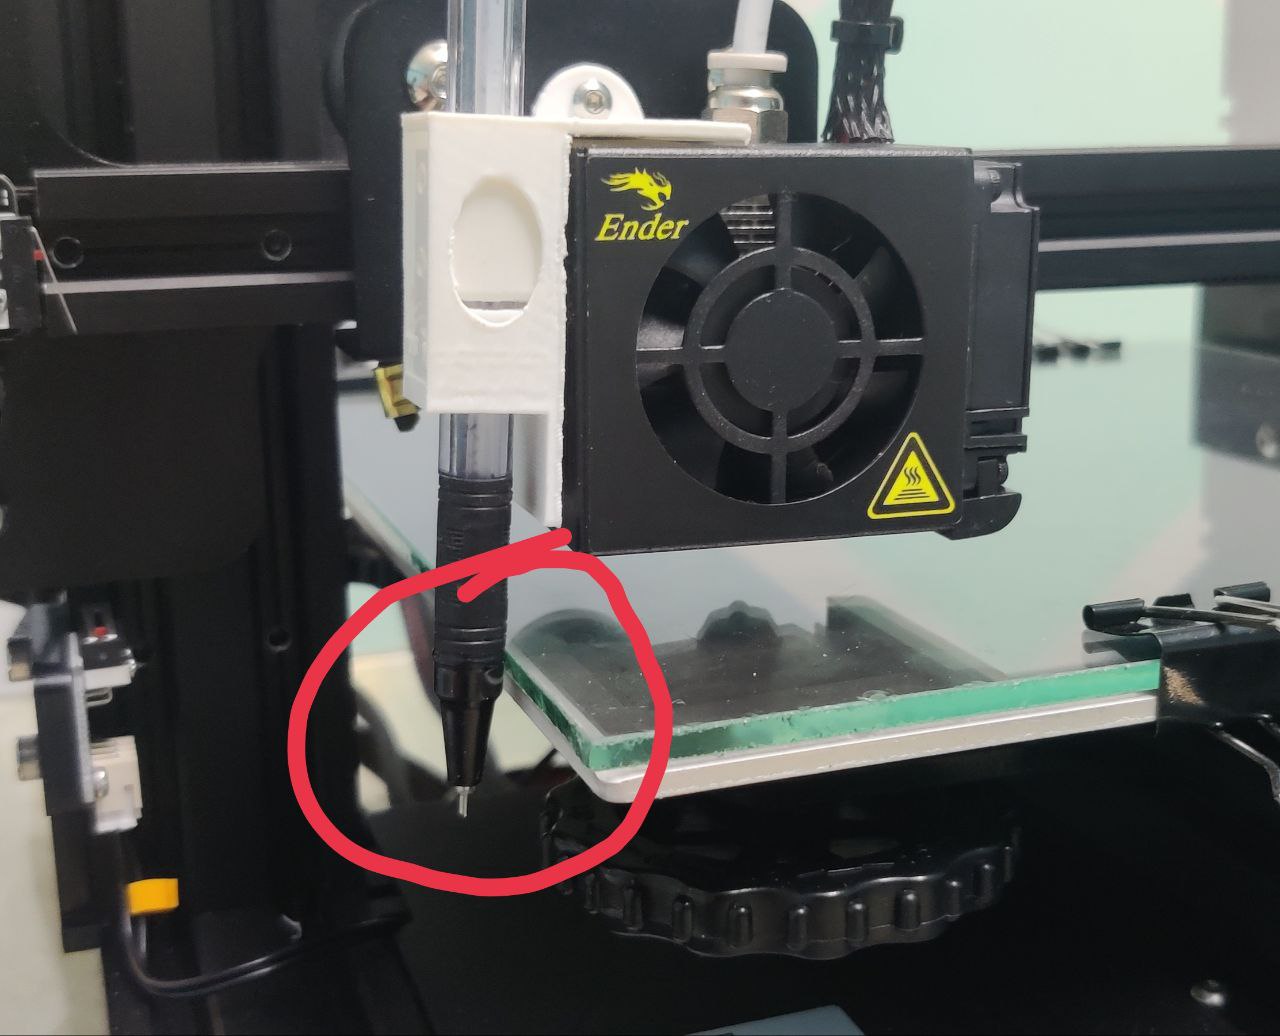
Note: Level the bed first then move the extrude to the build plate and then place the pen, otherwise the pen may collide with the build plate and cause damage.
Editing Cura Settings


For this, I would recommend adding a new printer so that it won't tamper with the 3D printing settings, and name it anything you want. For now, I'll name it plotter.

We need to change the parameter in the printer setting because we don't need bed heating and filament extruding etc. So for that consider replicating the setting shown above.
Start G-code
Ender 3 Custom Start G-code
G92 E0 ; Reset Extruder
G28 ; Home all axes
G1 Z2.0 F3000 ; Move Z Axis up little to prevent scratching of Heat Bed
G1 X5 Y20 Z0.3 F5000.0 ; Move over to prevent blob squish
End G-code
G91 ;Relative positioning
G1 E-2 F2700 ;Retract a bit
G1 E-2 Z0.2 F2400 ;Retract and raise Z
G1 X5 Y5 F3000 ;Wipe out
G1 Z10 ;Raise Z more
G90 ;Absolute positioning
G1 X0 Y{machine_depth} ;Present print
M84 X Y E ;Disable all steppers but Z
Also, we need to adjust the nozzle position ie the pen in this case because we are attaching the pen to the side. So we need to tell the slicer that the nozzle is shifted. For that replicate the below values.
Preparing the Stl File From an Image

For that, I recommend checking this short video.
Importing the stl file, we get an image like this.

Changing Print Settings
We need to change some print settings before we get going.
Things to change are
Layer Height: 0.2mm
Wall Thickness: 0.2mm
Wall Line Count: 1
Infill: 100%
Printing Temperature: 0
Build Plate Temperature: 0
Enable Retraction: True
Z hop When Retracted: True
Z Hop Height: 0.24mm
Enable Print Cooling: False
Build Playe Adhesion Type: None
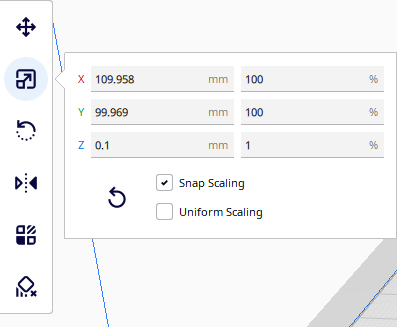
We need to change the scale of the image also, currently, it's in a 3D form, So to fix that, Click the scale tool and uncheck uniform scaling and set Z to 0.1mm. Finally, we are done now, Slice and upload the g-code to your printer and enjoy.
Wall - E stl file can be downloaded by clicking here
Wall - E SVG file can be downloaded by clicking here
Note: Level the bed first then move the extrude to the build plate and then place the pen, otherwise the pen may collide with the build plate and cause damage.
Final Results
)
If you reached here, consider leaving a comment. :D