Convert Rockband Controller to MIDI Drums
by EvanKale in Circuits > Arduino
126230 Views, 621 Favorites, 0 Comments
Convert Rockband Controller to MIDI Drums
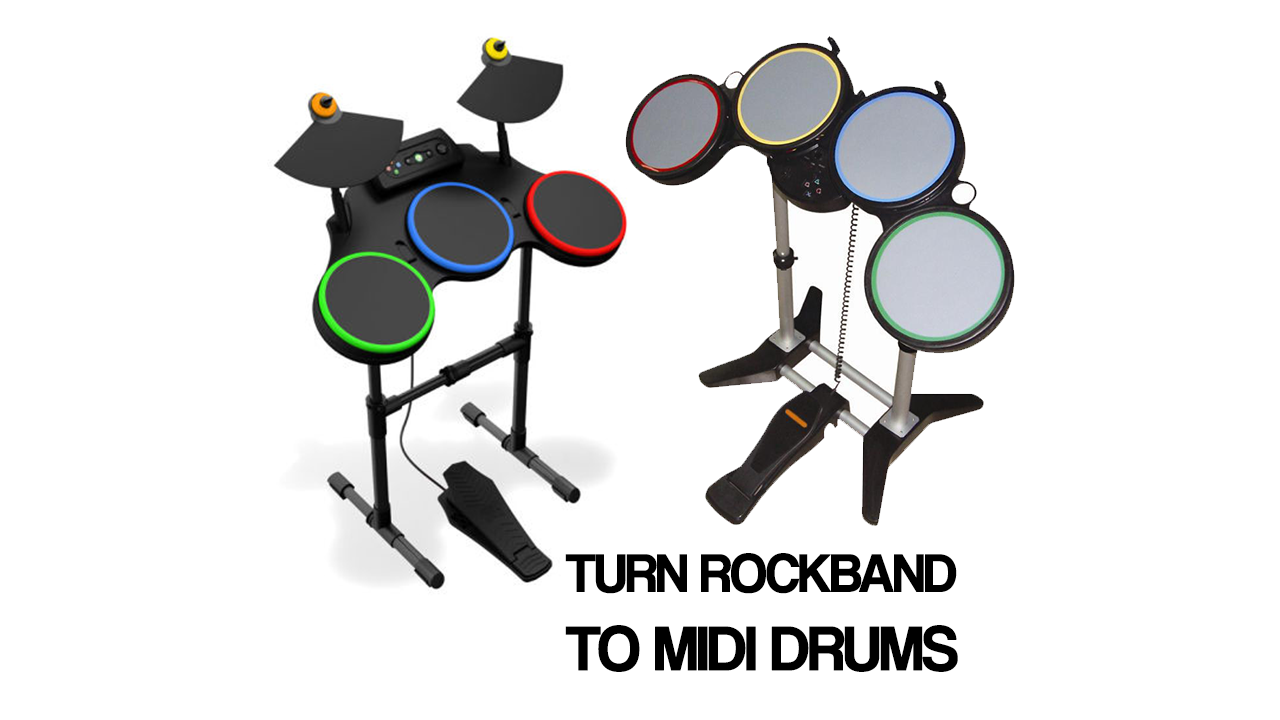
Hey! Today I'm going to show you how to convert a Rock band or Guitar Hero drum controller into a real MIDI drum set that can interface with digital audio workstations like Ableton Live, FL Studio, Pro Tools, etc.
Or you can simply use it to play DTXMania (DrumMania)!
Watch the Video!

Check out this video to see the drum set working as a MIDI controller!
It is also recommended if you'd like to know the inner workings of the Arduino code, and want a more detailed explanation of the circuit.
If you'd like to just get it done, then read on!
What You'll Need
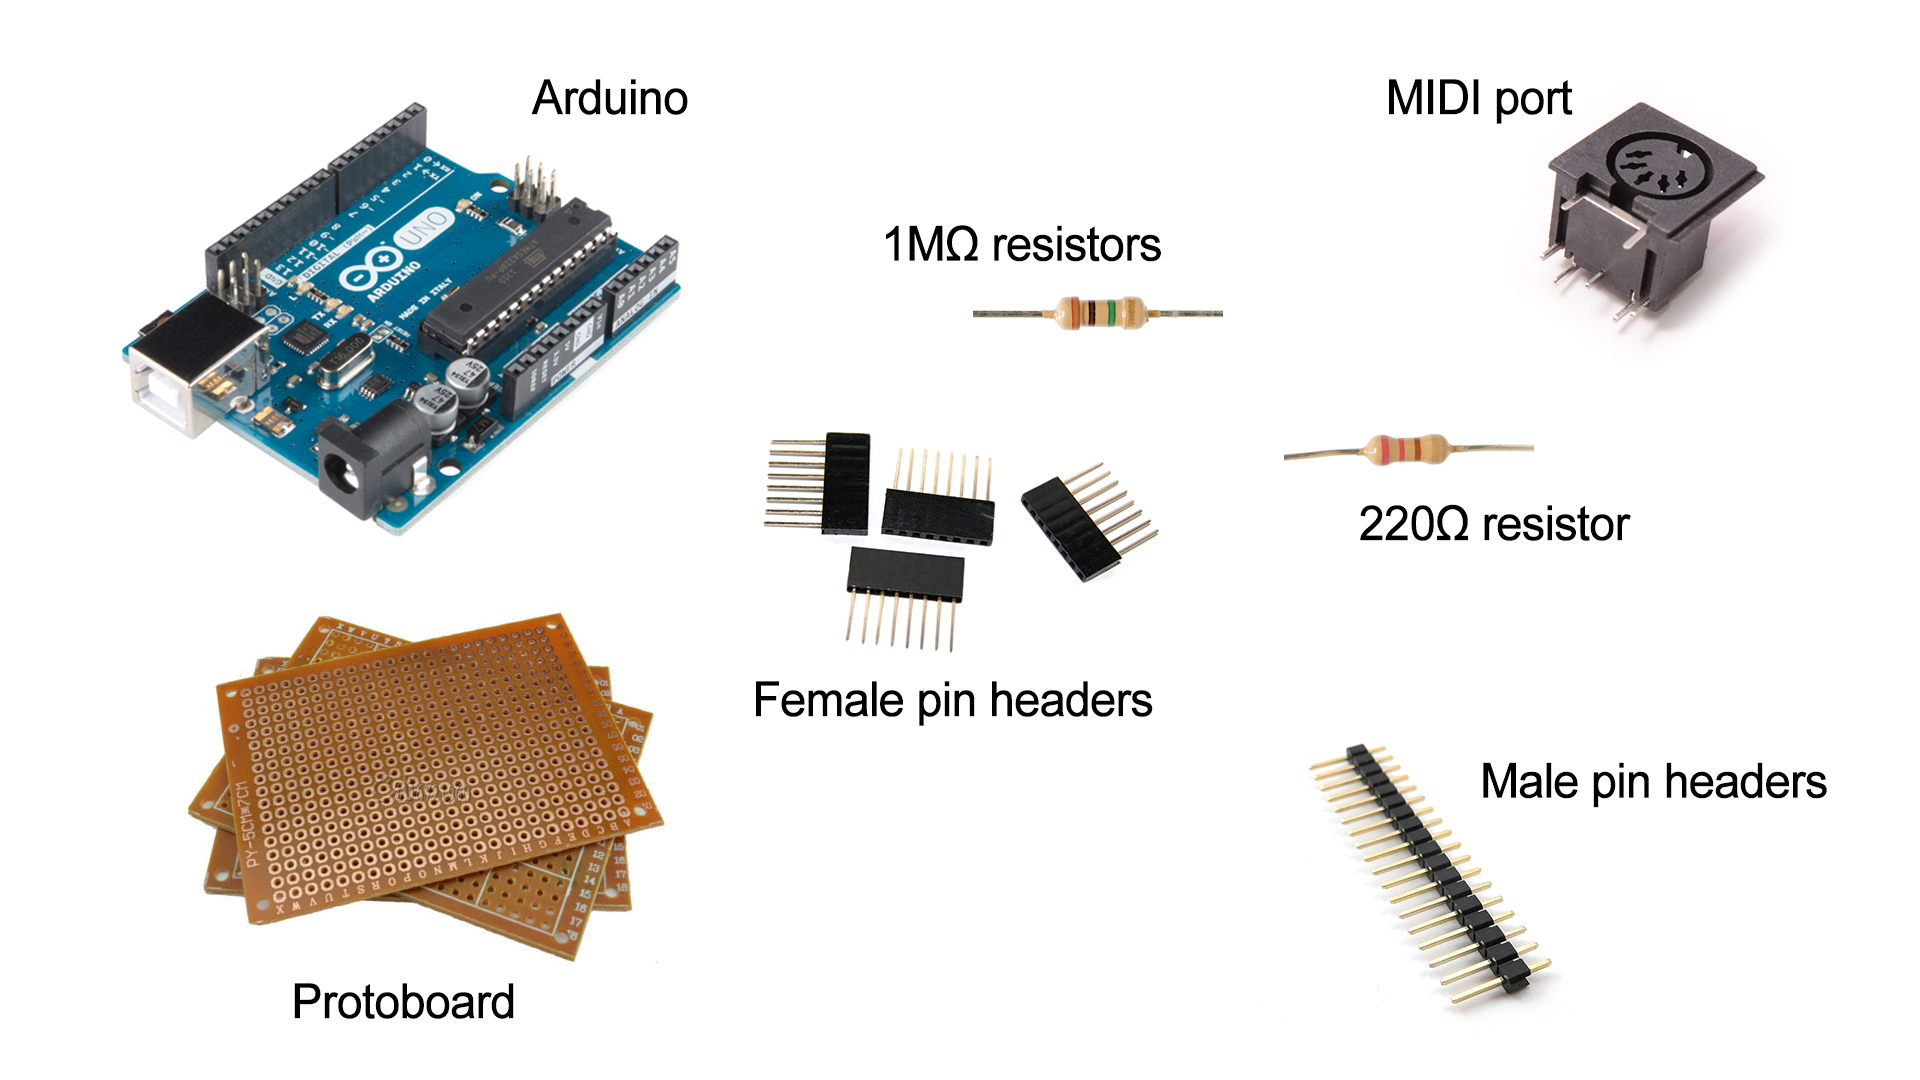
We're going to need an Arduino.
I chose to use the Arduino UNO because I only needed 6 analog inputs but if you have more than 6 piezo sensors, then you can go with the Arduino Mega which has 16 analog inputs.
We'll also need:
- 1 proto board
- 1MΩ resistor for every drumpad
- 1 220Ω for the MIDI port
- 1 MIDI port
- Male pin headers
Where to buy
- Arduino UNO: http://amzn.to/2dq41Mv
- Perfboard: http://amzn.to/2cQcN7q
- Resistor pack: http://amzn.to/2d8uQaw
- MIDI port: http://amzn.to/2dt5Tmp
- Male pin headers: http://amzn.to/2dqw79G
Soldering gear:
- Weller WES51 Analog Soldering Station: http://amzn.to/2dq7Q4m
- MG Chemicals Silver Solder: http://amzn.to/2dHj0nq
- Helping hand: http://amzn.to/2dc553O
Test gear:
- Multimeter: http://amzn.to/2dc54N6
- Breadboard & Jumpers: http://amzn.to/2dHknm2
What I'll Be Using
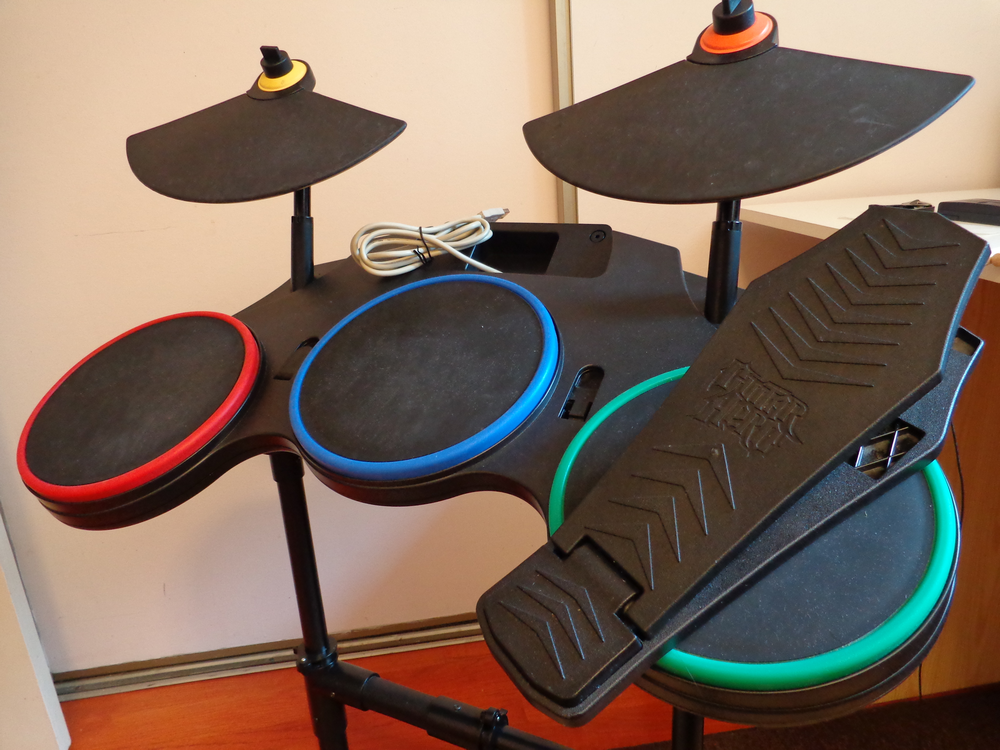
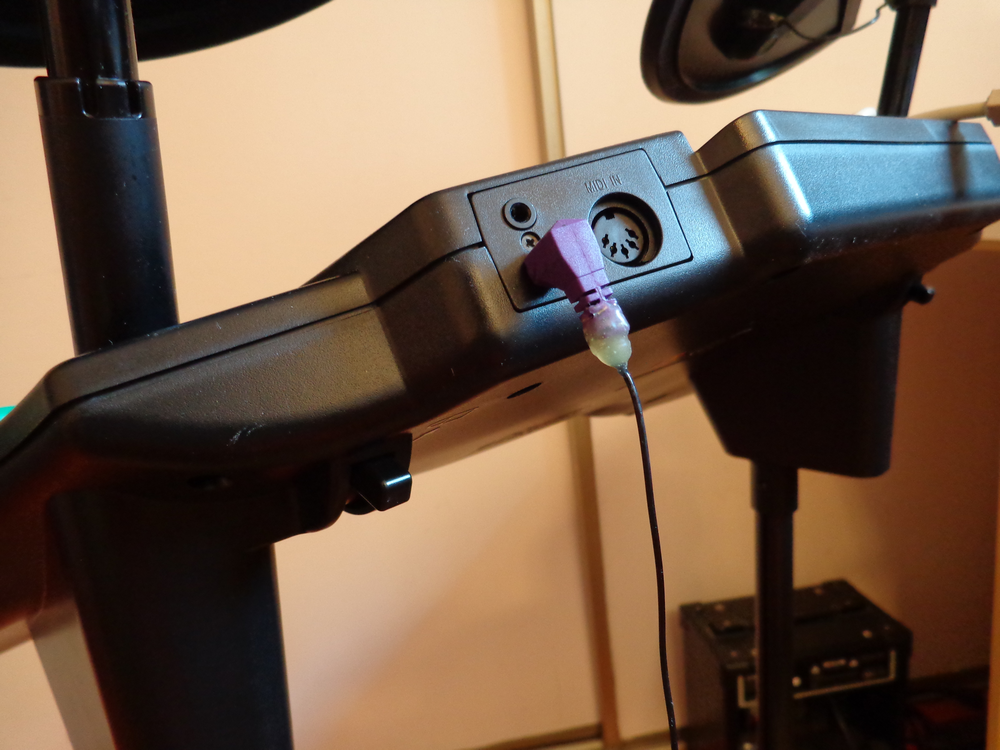
I'll be using the Guitar Hero World Tour controller for this Instructable.
It's got 3 drum pads, 2 cymbal pads, and a pedal. On the back panel, there's even 2 stereo 3.5mm audio jacks - one of which connects the bass pedal and the other we can save for any further modifications to the drumset.
Also, this set comes with a MIDI input port. Which is perfect, because we'll just save a MIDI jack and rewire this port internally and turn it into a MIDI output port.
Open Up the Controller
![MAH00432.MP4_snapshot_02.19_[2015.07.10_14.31.47].png](/proxy/?url=https://content.instructables.com/FZ7/V1U0/IBXML97I/FZ7V1U0IBXML97I.png&filename=MAH00432.MP4_snapshot_02.19_[2015.07.10_14.31.47].png)
![MAH00432.MP4_snapshot_05.14_[2015.07.10_14.32.36].png](/proxy/?url=https://content.instructables.com/F5G/REQ6/IBXML9CX/F5GREQ6IBXML9CX.png&filename=MAH00432.MP4_snapshot_05.14_[2015.07.10_14.32.36].png)
After you take out the screws on the back and unhook the controller dock, we can lift the back plate, and access the piezos.
You can see that the piezos are plugged in directly to the mainboard. The other board on the top just holds the back panel, and all the inputs of the back panel are plugged into the main board directly as well.
We'll just unscrew the main board, and replace it with our Arduino.
Create a Shield for the Arduino
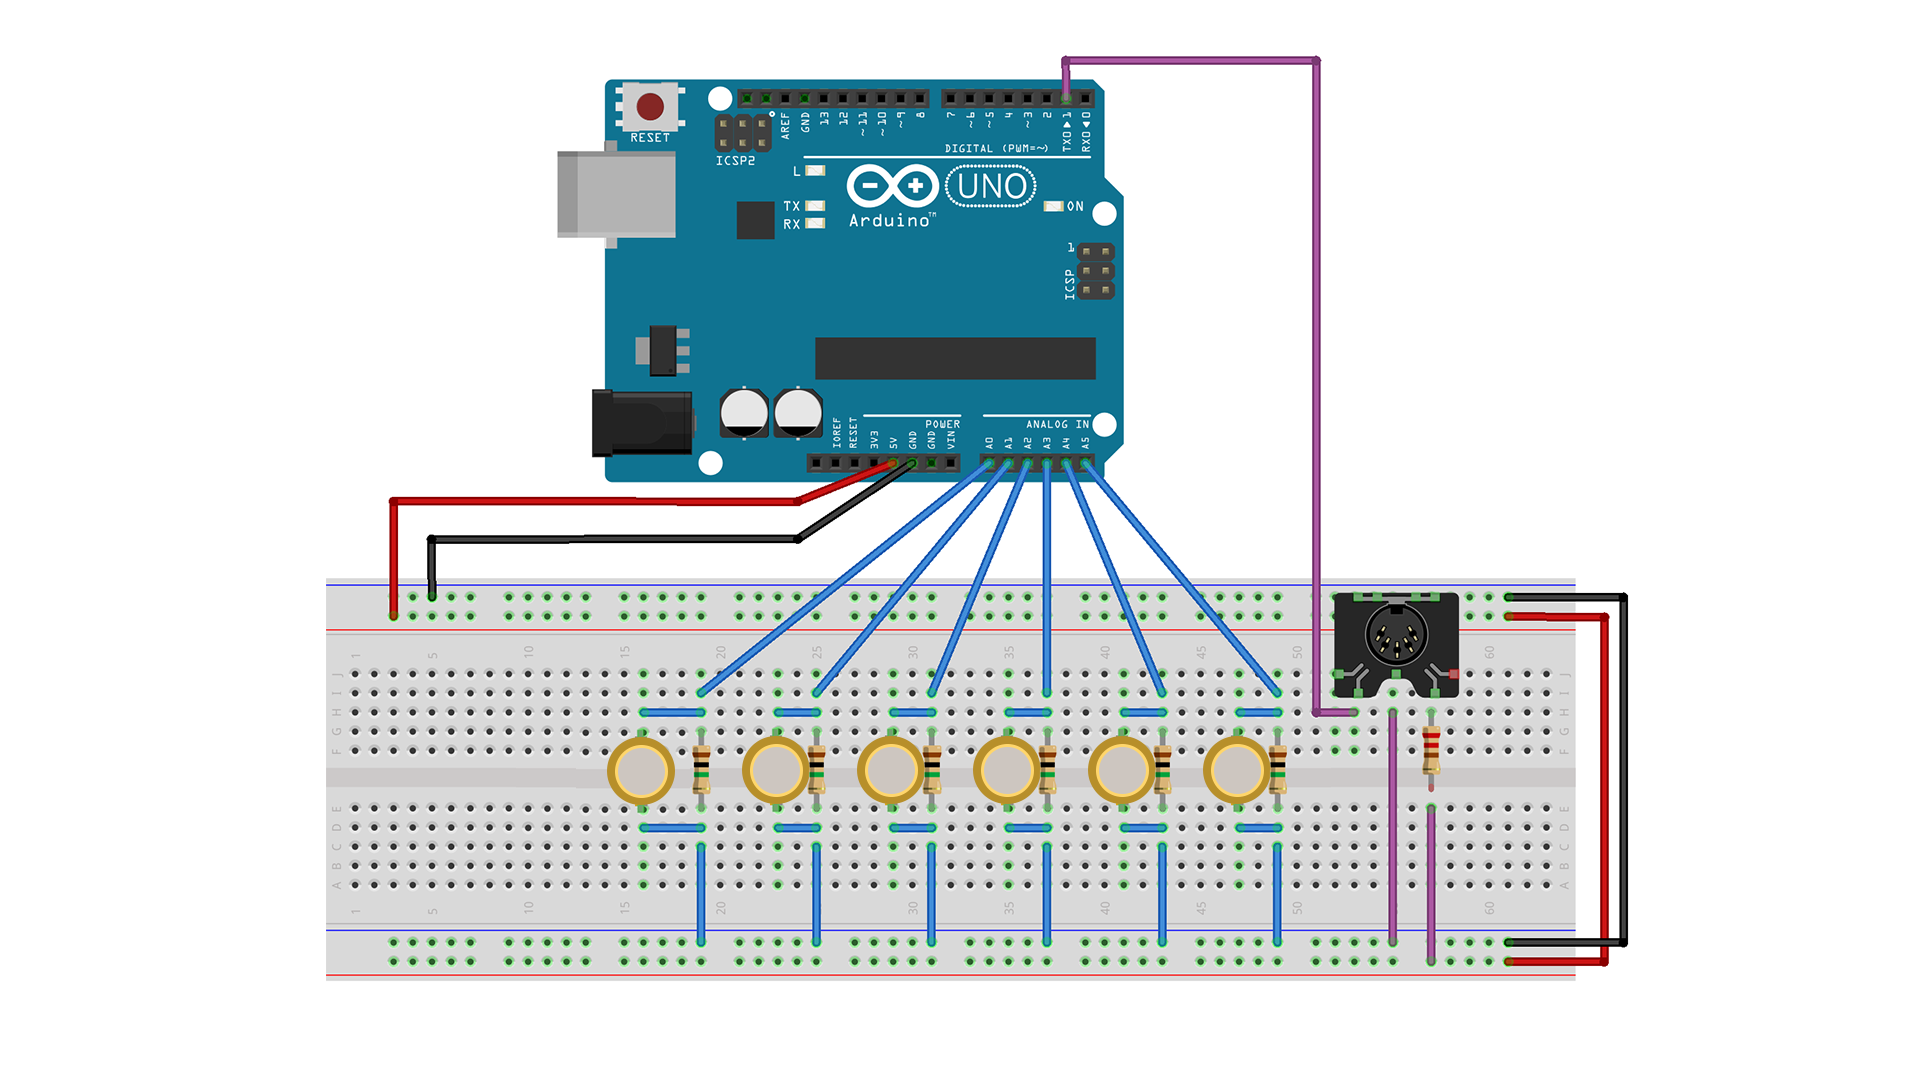
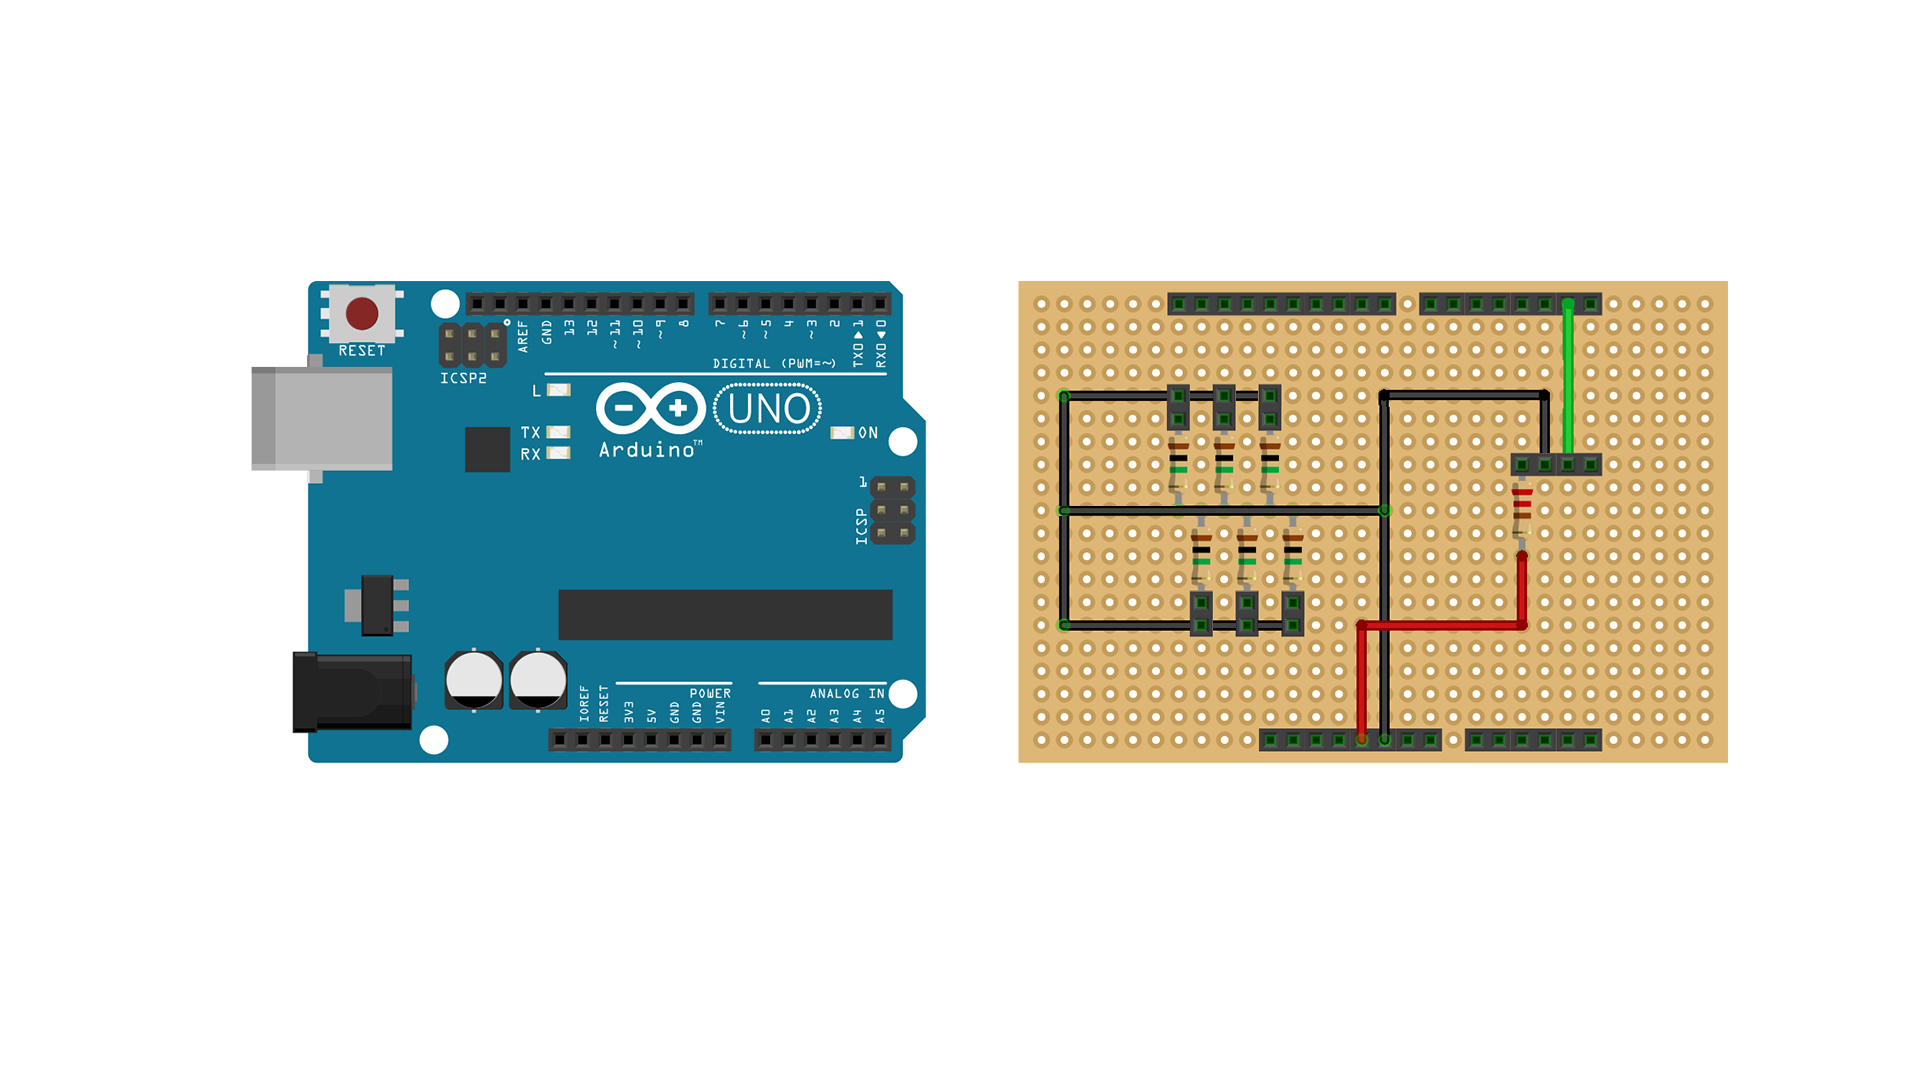
![MAH00438.MP4_snapshot_00.15_[2015.07.10_15.04.56].png](/proxy/?url=https://content.instructables.com/F8M/R8VH/IBXMLCIR/F8MR8VHIBXMLCIR.png&filename=MAH00438.MP4_snapshot_00.15_[2015.07.10_15.04.56].png)
The first image here explains how our piezos need to be hooked up to the Arduino.
Then we'll have make a shield for the Arduino where we can plug in the piezos from the drum set into.
The second image is the schematic of the shield on a protoboard.
First we add some pin headers on the board to match the pins of the arduino, so that we can snap the proto board on top like a shield.
Then we'll take our resistors and connect it to a common ground.
Then we take our pin headers, break them into twos, and solder one end of each of the these to the other end of the resistors. Then we connect the other pins of the headers to ground as well. Now we can just plug our piezos directly to these pin headers.
We'll also add one more pin header for the MIDI port, as drawn in the schematic.
Back Panel Modification (Guitar Hero Controller Only)
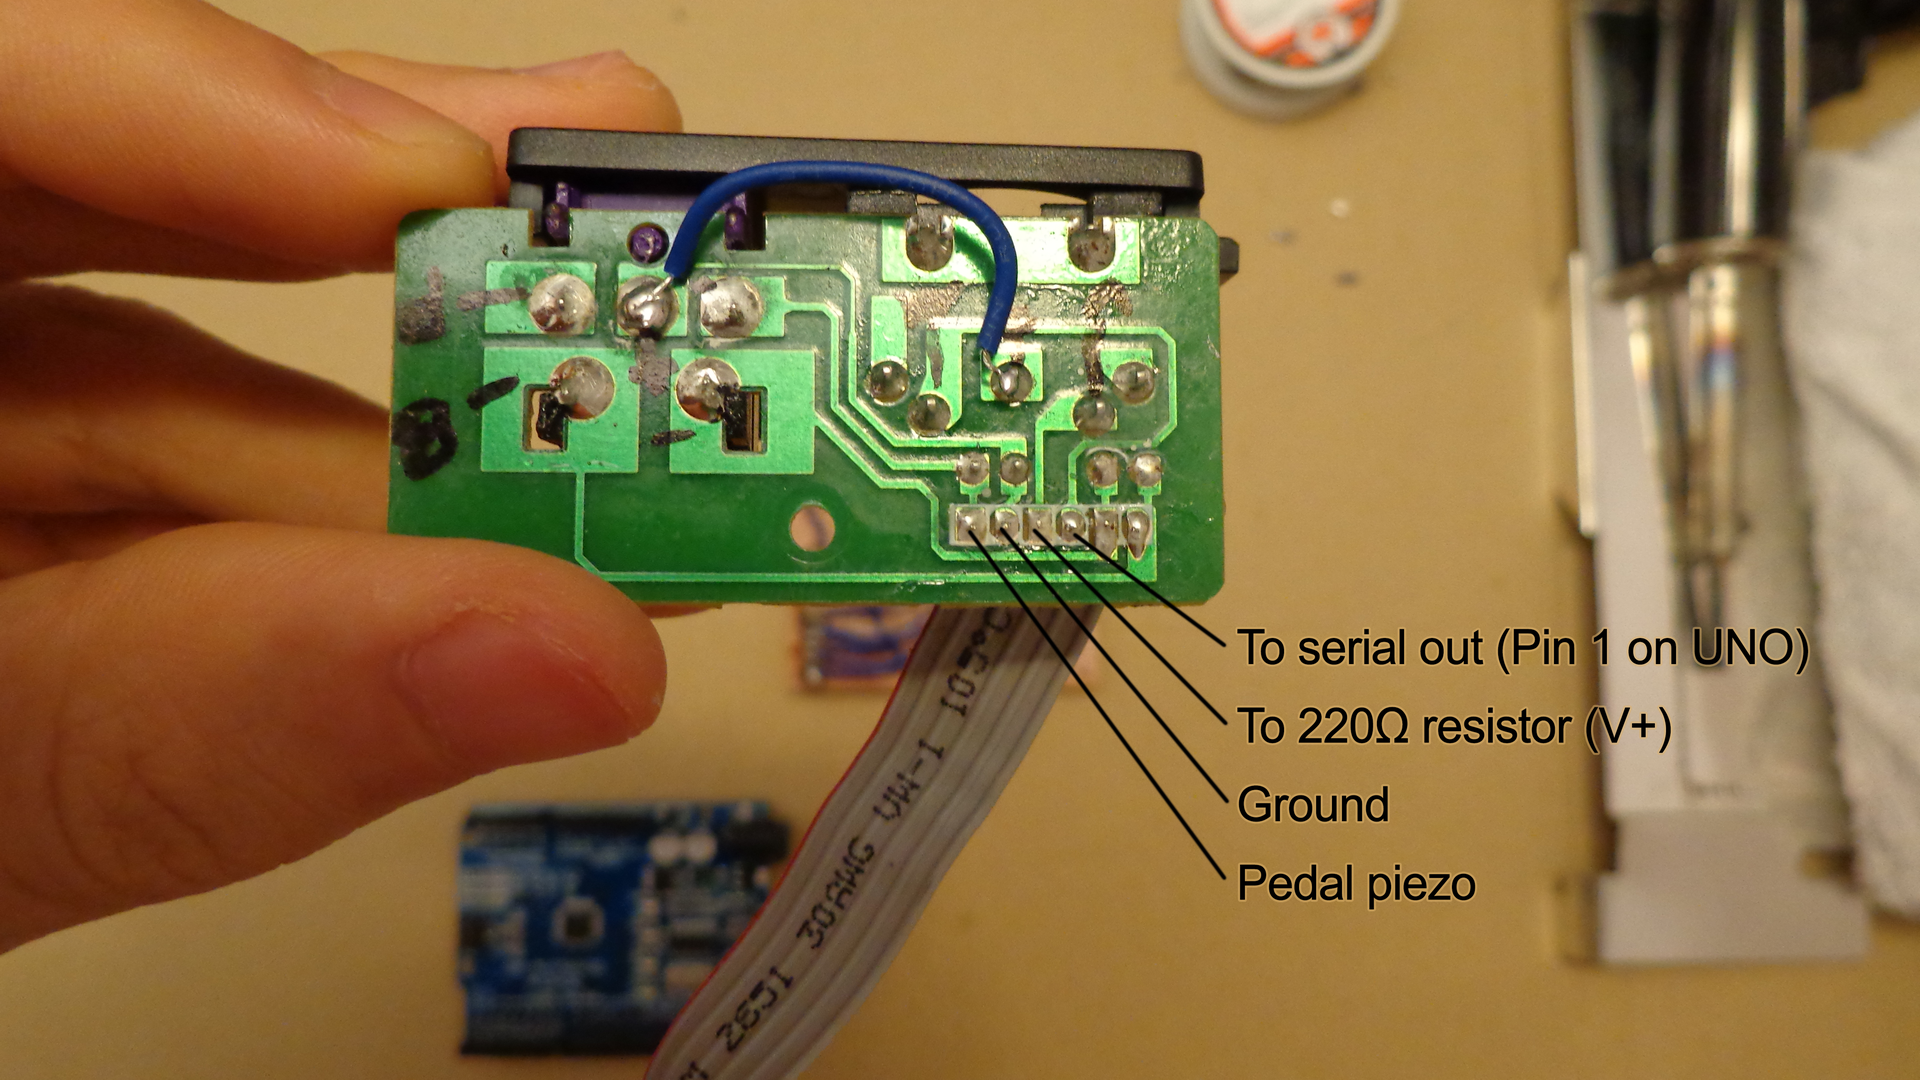
This step is for Guitar Hero World Tour controllers only -
Since we're reusing the MIDI port on the back panel of this controller,
We'll need to make a slight modification to the back panel board. By adding a jumper between the two pins pictured above, we can ground the middle pin of the MIDI port which would otherwise be missing for a MIDI output port. We can then plug the last four pins of the cable ribbon directly into our proto board.
Install the Arduino Code
![clip0002.avi_snapshot_00.00_[2015.07.10_14.45.38].png](/proxy/?url=https://content.instructables.com/F2H/QNCX/IBXMLAU1/F2HQNCXIBXMLAU1.png&filename=clip0002.avi_snapshot_00.00_[2015.07.10_14.45.38].png)
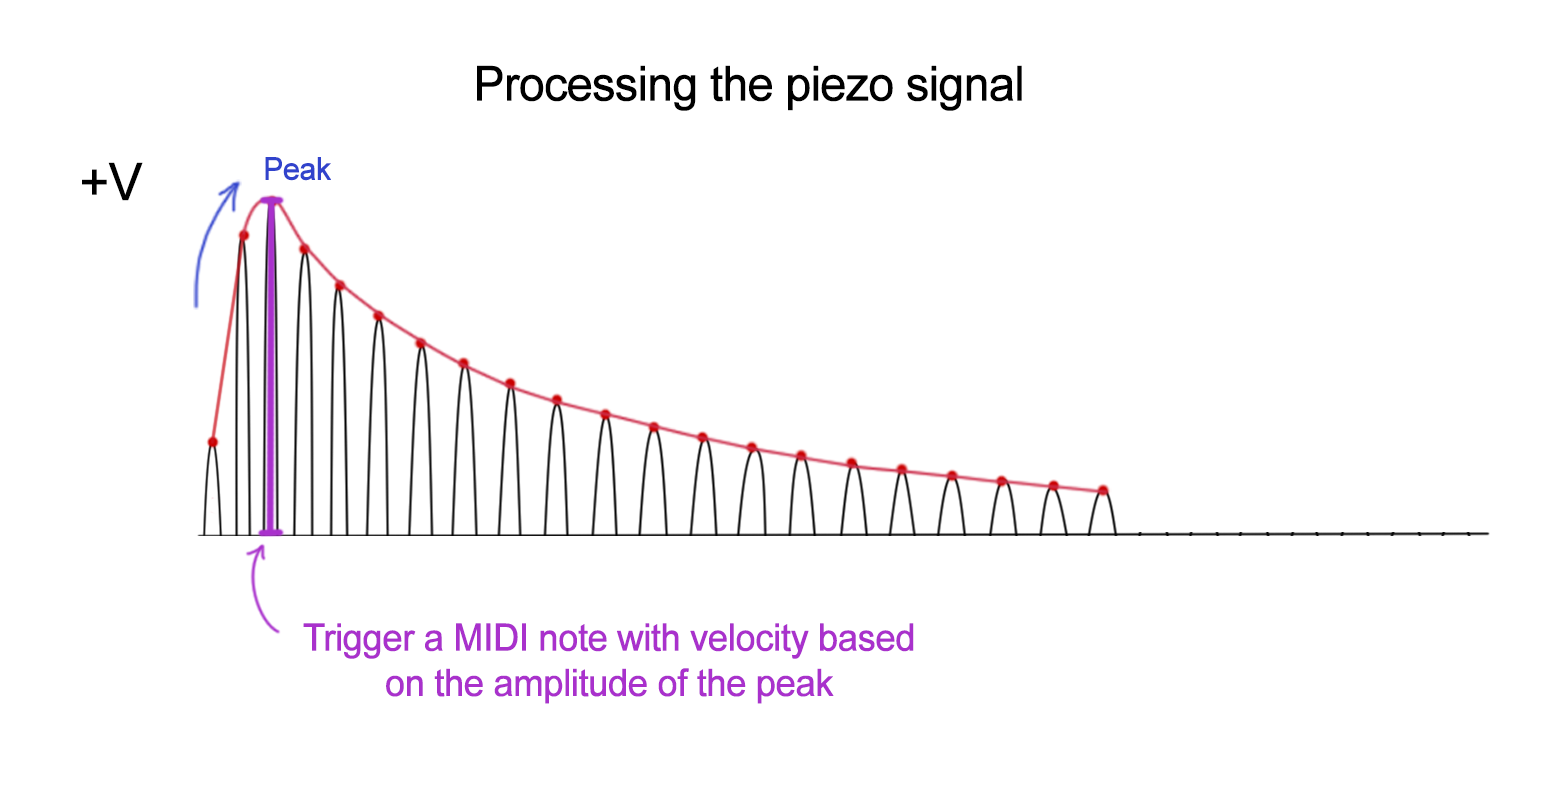
Download the full Arduino source code here:
https://github.com/evankale/ArduinoMidiDrums
If you're using the Guitar Hero World Tour controller, the default code will work out of the box.
Otherwise, you'll need to make adjustments to the definitions at the top of the code as you see fit to your drum set.
If you'd like a detailed explanation of how the program works, then check the the video from step 1!
Snap It in and Close It Up!
![MAH00450.MP4_snapshot_06.43_[2015.07.10_15.13.42].png](/proxy/?url=https://content.instructables.com/FOI/H65F/IBXMLDD7/FOIH65FIBXMLDD7.png&filename=MAH00450.MP4_snapshot_06.43_[2015.07.10_15.13.42].png)
![MAH00451.MP4_snapshot_02.14_[2015.07.10_15.14.52].png](/proxy/?url=https://content.instructables.com/FOZ/JJ6N/IBXMLDDC/FOZJJ6NIBXMLDDC.png&filename=MAH00451.MP4_snapshot_02.14_[2015.07.10_15.14.52].png)
Snap our new shield onto the Arduino, then plug in all the piezos into the pin headers.
I also added some hot glue to the solder joints to prevent it from breaking off in the future from all the drum hits.
Then make sure the wires are secured by taping them down with scotch tape, and close up the unit!
Give It a Test!
![MAH00457.MP4_snapshot_01.38_[2015.07.10_15.20.17].png](/proxy/?url=https://content.instructables.com/FNF/HU89/IBXMLDZK/FNFHU89IBXMLDZK.png&filename=MAH00457.MP4_snapshot_01.38_[2015.07.10_15.20.17].png)
Fire up a digital audio workstation like FL Studio and give it a go.
That's all there is to it!
If you liked this instructable, then perhaps you'll like some of my other projects!
You can check them out at my YouTube Channel.
Later!