Controlling Relay Module From Anywhere in the World With Amazing UI Using Losant
by megashot in Circuits > Microcontrollers
3776 Views, 40 Favorites, 0 Comments
Controlling Relay Module From Anywhere in the World With Amazing UI Using Losant
Learn how to control relay module from anywhere in the world with Amazing UI using Losant, this is part 6 of IoT World Series
Needed Components
Needed components
- ESP8266
- PlatformIO IDE with default project setup
- Relay Module [Shipping free for a dollar]
- Jumper cables [40 pcs Shipping free for a dollar]
- USB 2/3 to Micro USB [Shipping free for a dollar]
- Losant Account
- Breadboard (optional) [Shipping free for few dollars]
Kits with various sensors, wires, leds (optional) [Small Kit][Big Kit][Insanely Huge Kit] Shipping Free!
Creating Device and Setting Up Dashboard

Log in your account, in case of not having one, sing up, it’s really fast and easy
Create a device with no Device attributes set, my recipe is available
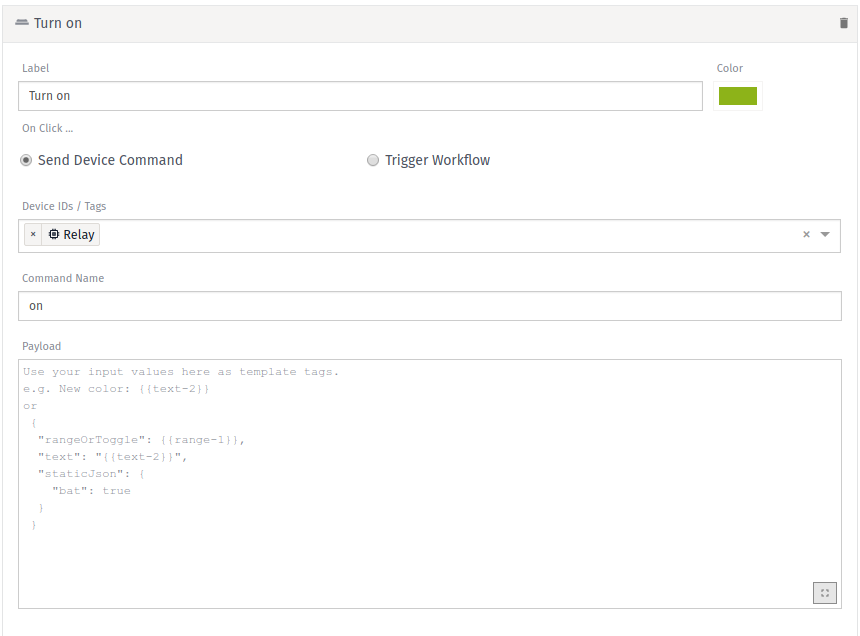
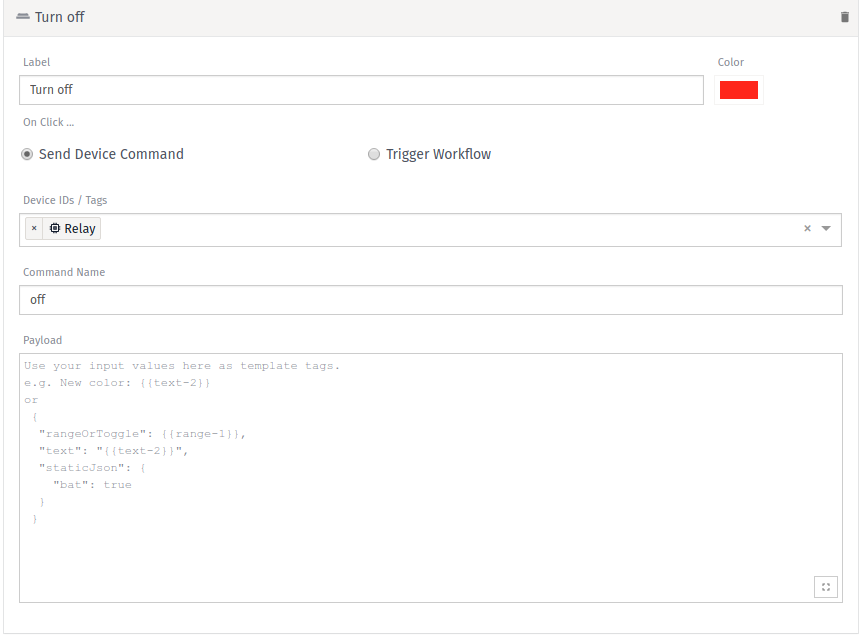
Create a dashboard (mine is named Relay dashboard) with 2 Button Trigger
Turn on button with Command Name – on
Turn off button with Command Name – off
In case you can’t press the buttons, go to the Settings icon in upper right on the block and select Unlock
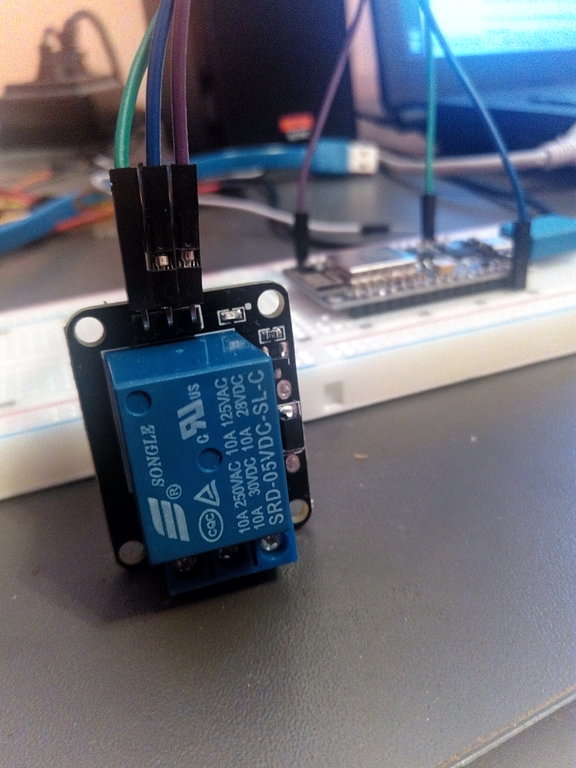
Wiring the ESP8266 and the Relay Module
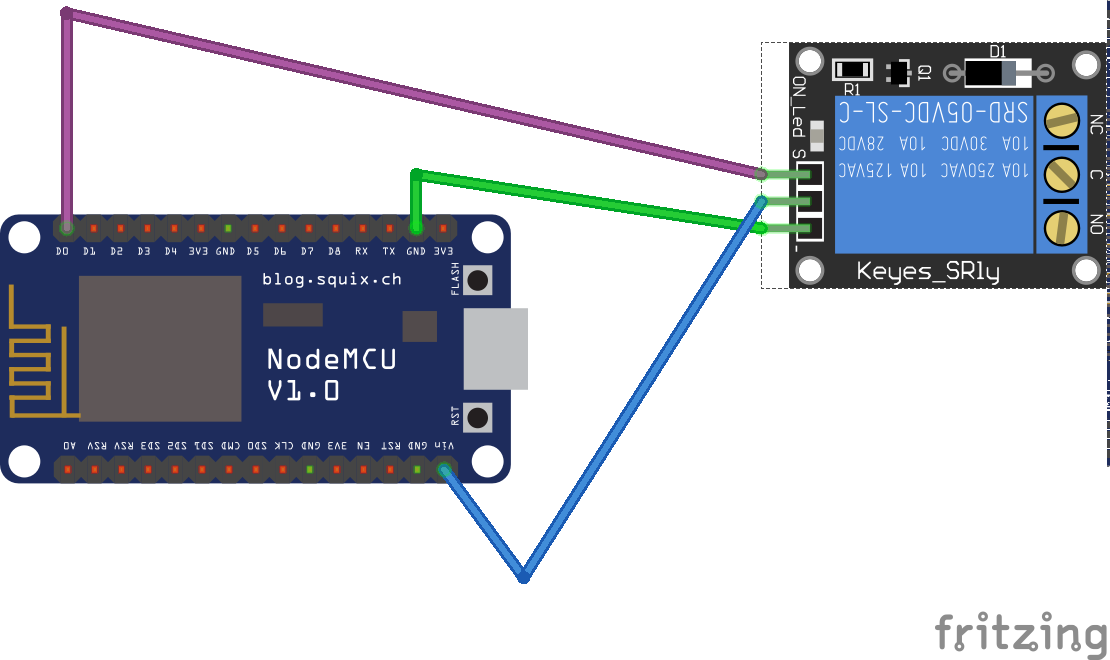
Connect Relay Module to ESP8266
S to D0
+ to VIN
– to GND
Flashing the Code on the ESP8266
Create a file inside ProjectName/src/ called main.cpp and inside put
#include <ESP8266WiFi.h>

#include <Losant.h>


// WiFi credentials.
const char *WIFI_SSID = "wifi-name";
const char *WIFI_PASS = "wifi-password";</p><p>// Losant credentials.
const char *LOSANT_DEVICE_ID = "device-id"; // Device id can be found under
                                            // Applications > Devices > Your
                                            // device > Right corner
const char *LOSANT_ACCESS_KEY = "access-key";
const char *LOSANT_ACCESS_SECRET =
    "access-secret"; // To generate Key & Secret go to Applications > Security >
                     // Right corder + Add access key</p><p>WiFiClientSecure wifiClient;</p><p>// For an unsecure connection to Losant.
// WiFiClient wifiClient;</p><p>#define RELAY_PIN D0</p><p>LosantDevice device(LOSANT_DEVICE_ID);</p><p>// Called whenever the device receives a command from the Losant platform.
void handleCommand(LosantCommand *command) {
  Serial.println();
  Serial.print("Command received: ");
  Serial.println(command->name);</p><p>  if (strcmp(command->name, "on") == 0) {
    digitalWrite(RELAY_PIN, HIGH);
    Serial.println("Relay on");
  } else if (strcmp(command->name, "off") == 0) {
    digitalWrite(RELAY_PIN, LOW);
    Serial.println("Relay off");
  }
}</p><p>void connect() {
  // Connect to Wifi.
  Serial.print("Connecting to ");
  Serial.println(WIFI_SSID);</p><p>  WiFi.begin(WIFI_SSID, WIFI_PASS);</p><p>  while (WiFi.status() != WL_CONNECTED) {
    delay(500);
    Serial.print(".");
  }</p><p>  Serial.println();
  Serial.println("WiFi connected");
  Serial.println("IP address: ");
  Serial.println(WiFi.localIP());</p><p>  // Connect to Losant.
  Serial.println();
  Serial.print("Connecting to Losant...");</p><p>  device.connectSecure(wifiClient, LOSANT_ACCESS_KEY, LOSANT_ACCESS_SECRET);</p><p>  // For an unsecure connection.
  // device.connect(wifiClient, ACCESS_KEY, ACCESS_SECRET);</p><p>  while (!device.connected()) {
    delay(500);
    Serial.print(".");
  }</p><p>  Serial.println("Connected successfully");
}</p><p>void setup() {
  Serial.begin(115200);
  while (!Serial) {
    // wait until Serial is initialized
  }</p><p>  // map the pin as output
  pinMode(RELAY_PIN, OUTPUT);</p><p>  // default turned off
  digitalWrite(RELAY_PIN, LOW);</p><p>  // Register the command handler to be called when a command is received
  // from the Losant platform.
  device.onCommand(&handleCommand);</p><p>  // connects to WiFi
  connect();
}</p><p>void loop() {
  bool toReconnect = false;</p><p>  if (WiFi.status() != WL_CONNECTED) {
    Serial.println("Disconnected from WiFi");
    toReconnect = true;
  }</p><p>  if (!device.connected()) {
    Serial.println("Disconnected from Losant");
    Serial.println(device.mqttClient.state());
    toReconnect = true;
  }</p><p>  if (toReconnect) {
    connect();
  }</p><p>  device.loop();
}</p>
Project is available in GitHub
git clone <a href="https://github.com/beastovest/relay.git">https://github.com/beastovest/relay.git</a>
Connected to your ESP8266, on the right in Platform IO there is an arrow button > with tooltip Upload, press it, the upload should take few seconds
In case you get similar message
/dev/ttyUSB0: Access denied
You need to give rights to your current user to read ttyUSB0 port