Controllable Weather Cloud
by qstroud32 in Circuits > Raspberry Pi
157 Views, 3 Favorites, 0 Comments
Controllable Weather Cloud
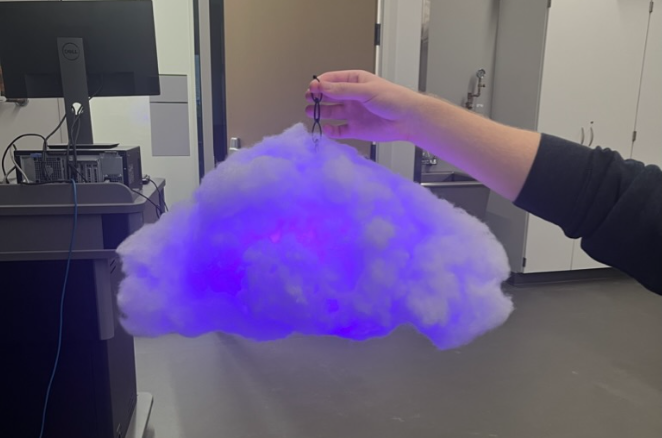
This guide will show you how to make a model cloud that can connect to the internet and show the weather with LEDs. It can also function as a controllable, color changing lamp.
Both of these functions are controlled through an AdafruitIO dashboard. In this dashboard you will be able to display a desired color, or click a button to display the weather.
The forecast is as follows:
- White = Snow
- Deep Blue = Rain
- Light Blue = Drizzle
- Cyan = Fog
When there is no precipitation in the forecast
- Green = Over 60 F
- Yellow = between 36 and 60 F
- Red = Below 35 F
Supplies
- Three Paper Lanterns
- Zip Ties
- Polyfill
- 3 Male to Female Jumper Wires
- Portable Battery Pack
- Usb to Micro-Usb Cable
- Adhesive Spray
- Raspberry-Pi Pico W
- 1 m NeoPixel strip
Creating the Skeleton

The cloud is going to get its shape and structure from three paper lanterns, one big one and two slightly smaller ones. I used one 10 inch and two 5 inch ones, but this can vary. All you need to do is poke holes above and below the lanterns' middle structural ring and zip tie the two smaller ones on opposite sides of the big one.
Adding Polyfill
What gives the cloud its fluffy look is Polyfill. The best way to go about adding this to the outside of the lanterns is to use any adhesive spray. Loctite is a good example. Start by spraying handfull size clumps of polyfill with adhesive and hold it against the lantern for 10 seconds. Do this until the lanterns is completely covered or until you get the shape you want. make sure to leave a hole at the top so the internals can be added later.
AdafruitIO Dashboard
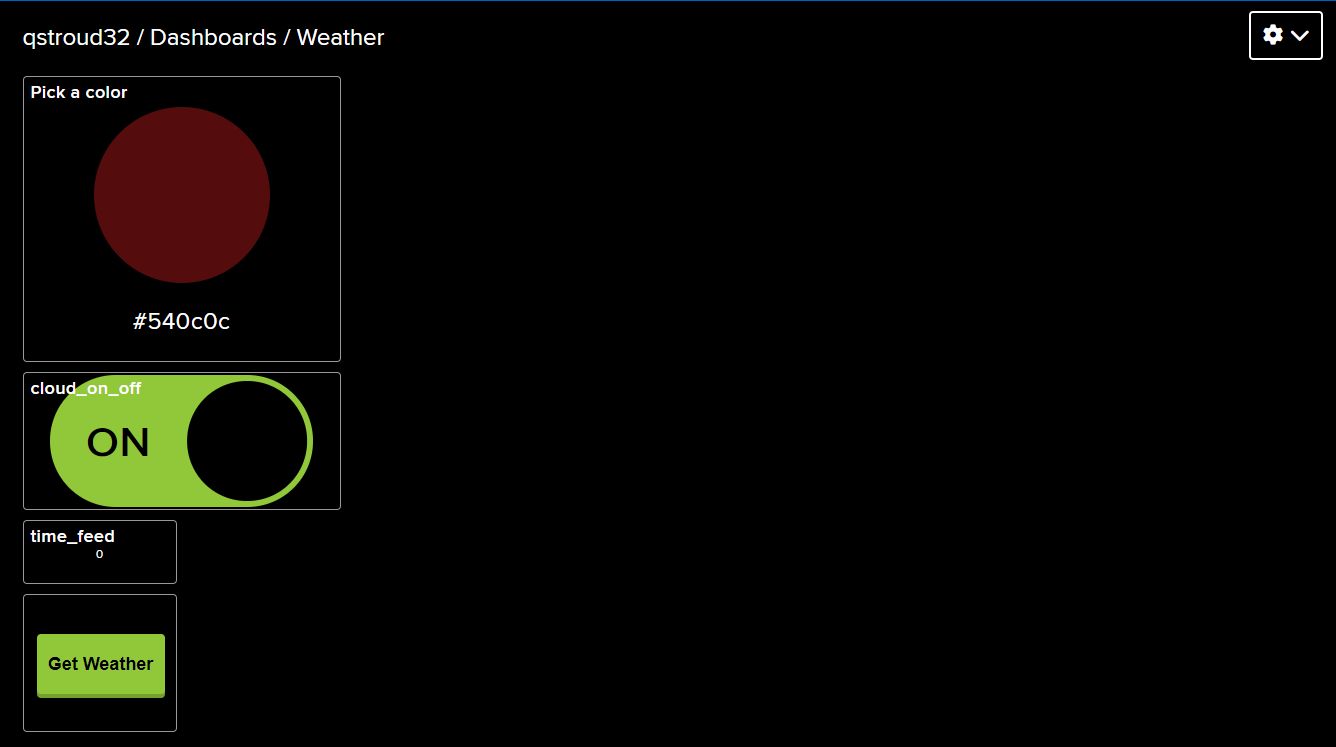
The first thing you will need to do for this step is to make an Adafruit account if you don't already have one. This is where the cloud will be controlled from.
Once on the Adafruit website you need to:
- Click the IO tab at the top of the page
- Click "New Dashboard"
- Create one named "Weather Cloud"
- Click the settings gear and click "Create New Block"
- Select the Color Picker and connect it to a new feed called "cloud_color". TItle this block "color"
- Create another block and pick the toggle button
- Connect it to a feed called "cloud_on_off"
- Title it "On/Off"
- Set the on text to "ON" and off to "OFF"
- Leave everything else
- Now create a new block and pick momentary button and connect it to a new feed named "time_feed"
Code
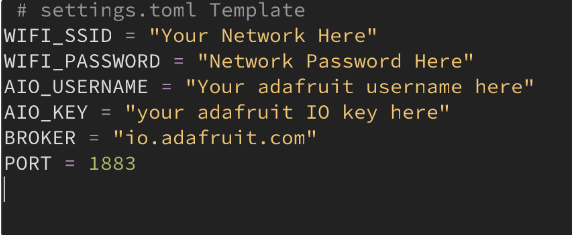
Now it's time to get the Pico W ready. For this step you will need any python IDE to edit some code. I used Thonny to easily upload to the Pico. The necessary code can be found at the end of this step.
settings.toml:
This file will give the Pico W the information it needs in order to access Wifi and the Adafruit dashboard. Make sure this file gets saved with a .toml. extension There are four things you need to edit in the code.
- WIFI_SSID = your Wifi address
- WIFI_PASSWORD = your wifi password
- AIO_USERNAME = your adafruit username
- AIO_KEY = you adafruit dashboard key.
- To get the dashboard key, go to your own dashboard and click on the golden key icon in the top right. The line titled "Active Key" is what should be placed in settings.toml.
- Save this and drag it into the main folder in your Pico.
code.py:
There are a few lines in this code that will need your attention. Make sure the file is named code and has a .py extension.
- Line 83: change this to your own openweathermap key.
- A key can be generated at https://openweathermap.org/api. You will need to make an account first and request one which will then be sent to your email.
- Line 84: Add your zip code
- Line 106-130: This is where the conditions are set for the weather. These can be customized to whatever you'd like.
Libraries:
Before uploading code there are a few things that need to be done. The first is donloading circuitypython onto your Pico. This is very simple and many tutorials can be found online. Next, there are some libraries that need to be added to your Pico in order for the code to work. These libraries can be found in this download: https://circuitpython.org/libraries (Make sure to download version 8.x)
You will need
- adafruit_adps9960
- adafruit_led_animation
- adafruit_minimqtt
- adafruit_datetime.mpy
- adafruit_requests.mpy
- circuitypython_schedule
- neopixel.mpy
These will all go in the /lib folder in your Pico.
Internals
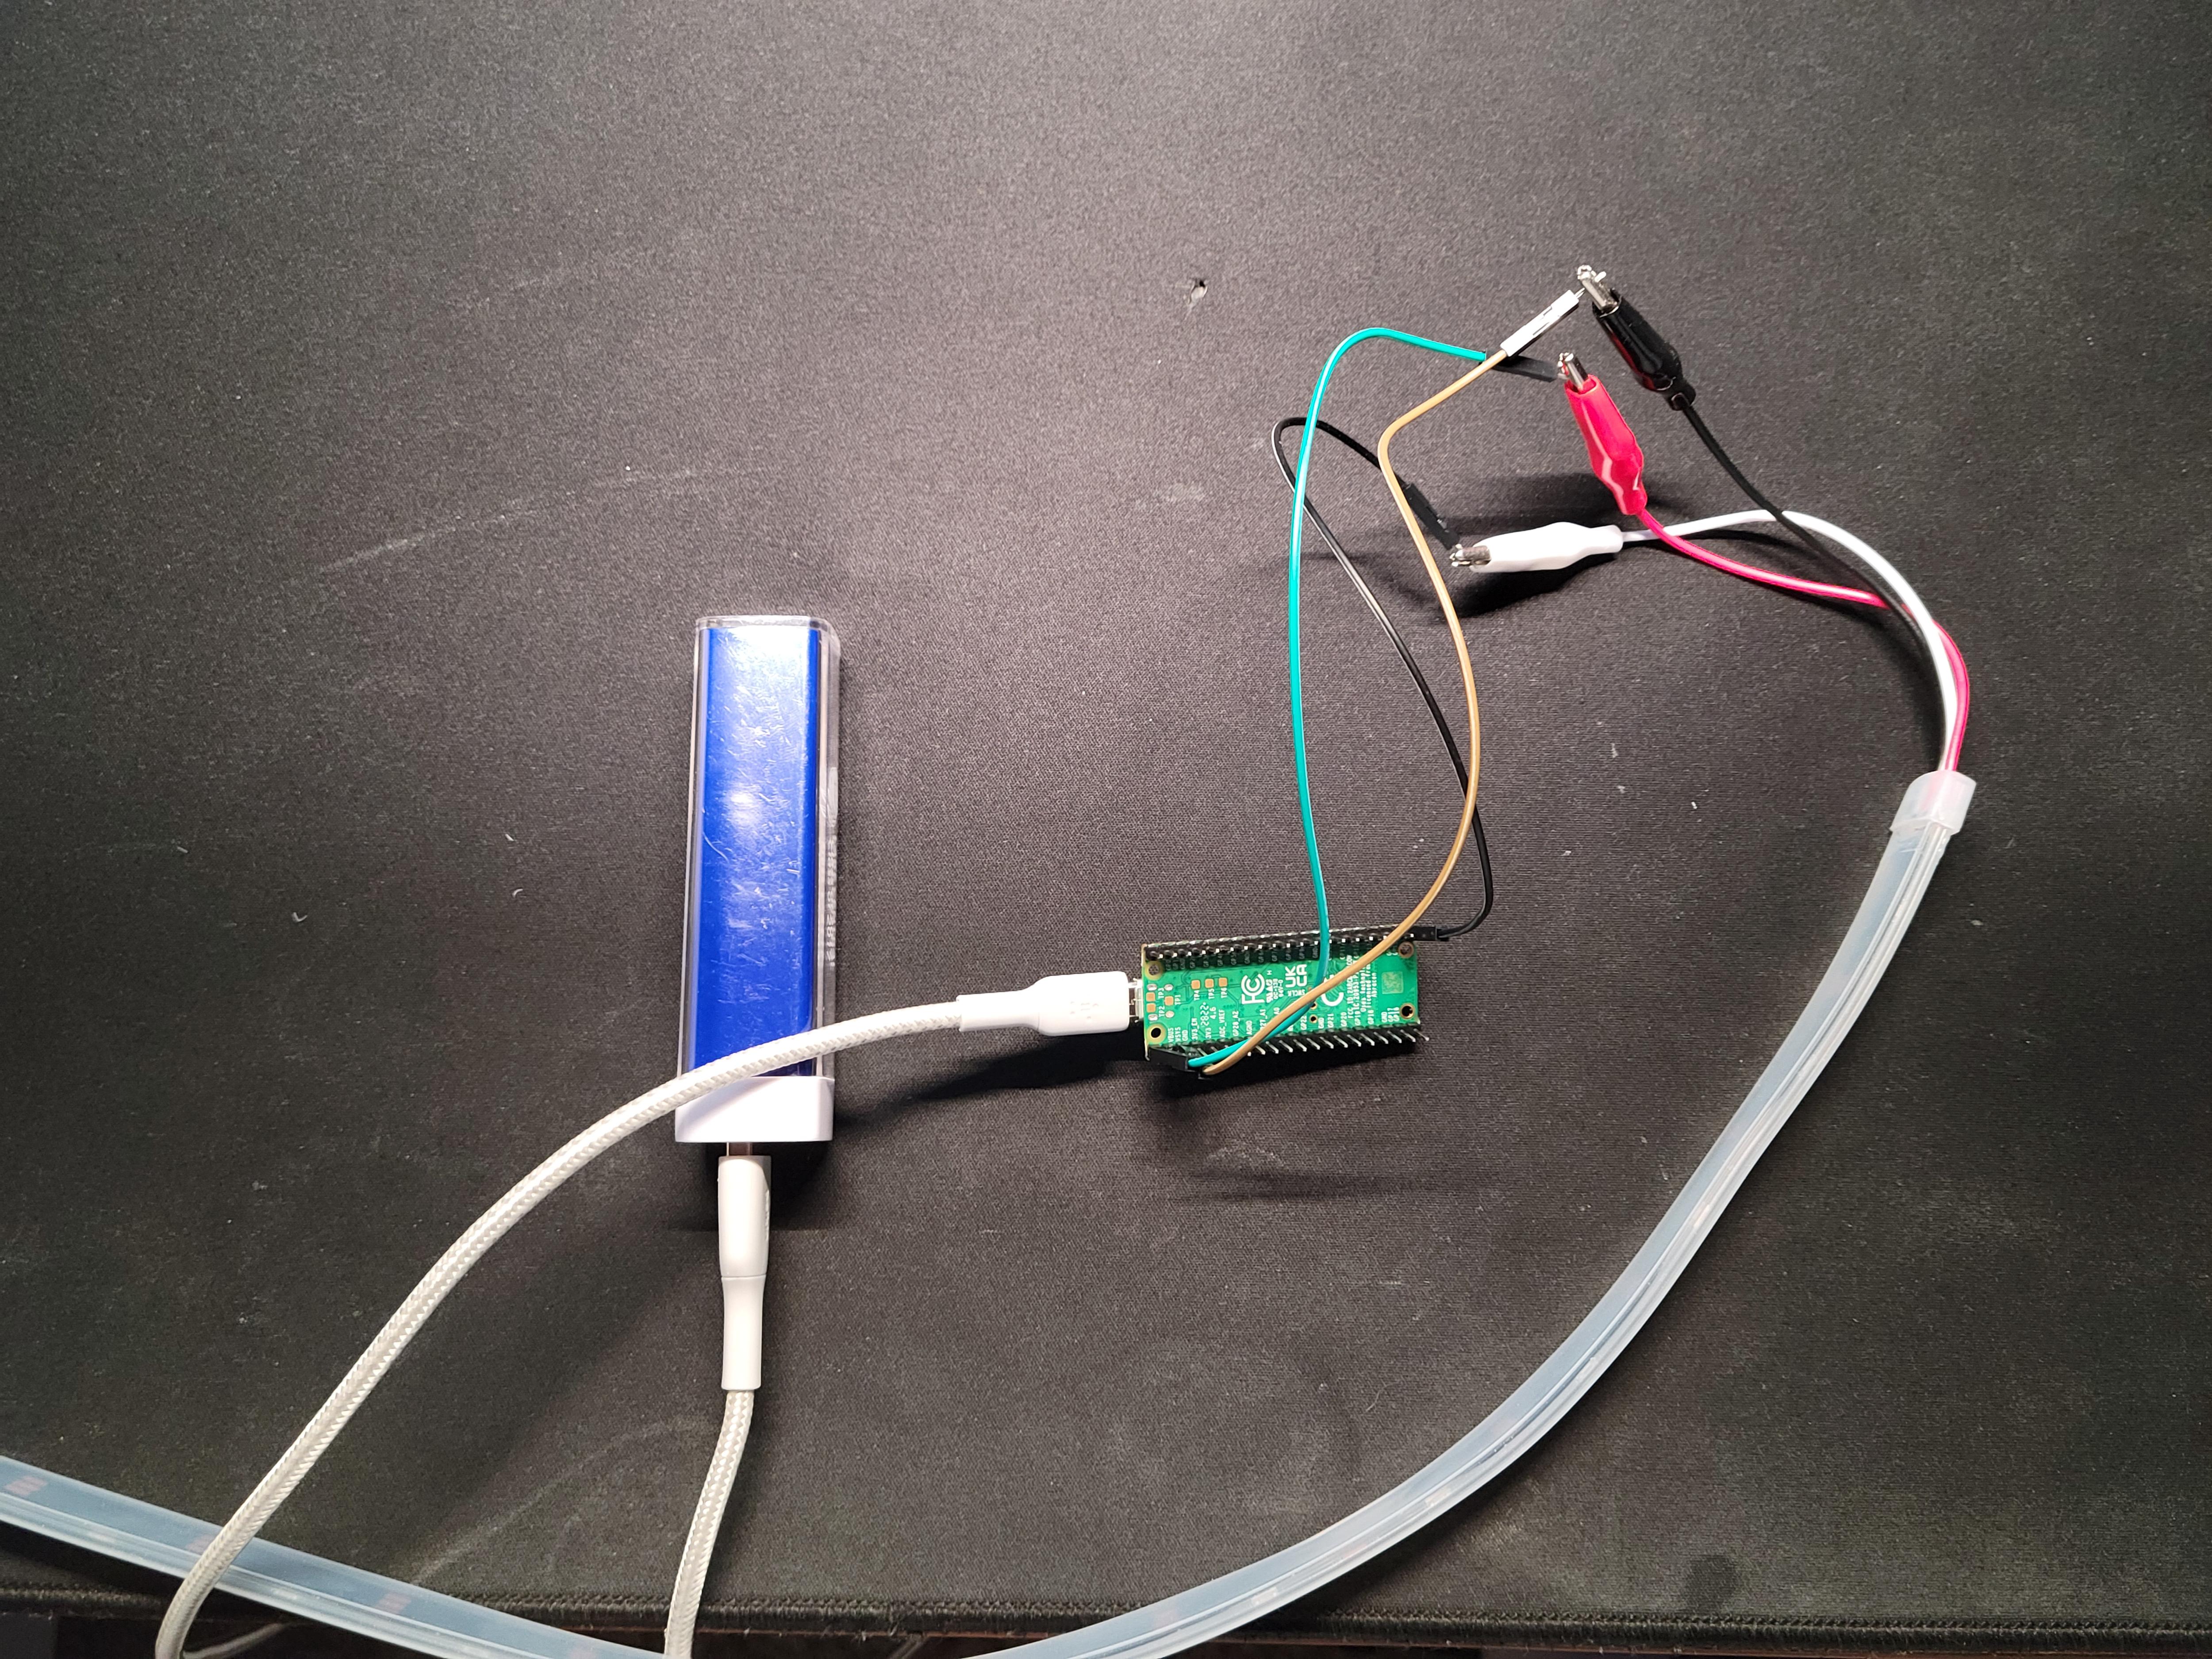
The last thing to do is add the internals to the lantern.
First you need to wire the Neopixel light strip. Conditions on the right are pins on the PICO, left are the Neopixel minigrabbers.
- RED = VBUS
- BLACK = GND
- WHITE = GP15
Use the top opening of the lantern to coil the light strip around the inside. Next add in the Pico along with with a battery pack of your choice. All that is left to do is plug it in and control it from the Adafruit dashboard.