Controling LEDs Using ESP8266 Via Http Shortcut and Google Sheets
by stoneroweast in Circuits > Arduino
1754 Views, 4 Favorites, 0 Comments
Controling LEDs Using ESP8266 Via Http Shortcut and Google Sheets

IoT is a hot trend in the world of electronics and information technology today. The concept is connecting electronic devices with the Internet network. Data communication, setting and controlling the device can be done anywhere without having to deal directly with the device.
In an IoT system, the server plays an important role. The server functions as the central terminal of the data stream sent by the connected devices. On the server the data sent is stored in a database. The data is an important source of information which can then be analyzed for further system improvement and innovation. Types of server services commonly used in IoT include MQTT Brokers, Web Servers, and so on.
For beginners, school students or students who have limited resources, providing a server for IoT needs that can be accessed publicly is quite troublesome. How not needed a server device that must always be active plus the server device must have a public address to be accessed from the internet. Of course costs and technical obstacles are the main challenges.
Departing from these conditions, the authors try to find alternatives that are easy and inexpensive. The author uses the Google Sheet Cloud service as a "server" for data communication bridges.
Require Device
1. Arduino IDE laptop or PC with Library ESP8266 ver. 2.7
2. ESP8266 Module
3. USB data cable
4. Google Account, used to log in to the Google Sheets service.
Source Code :
https://github.com/stoneroweast/GSRW
Open Google Drive and Create New Google Spreadsheets
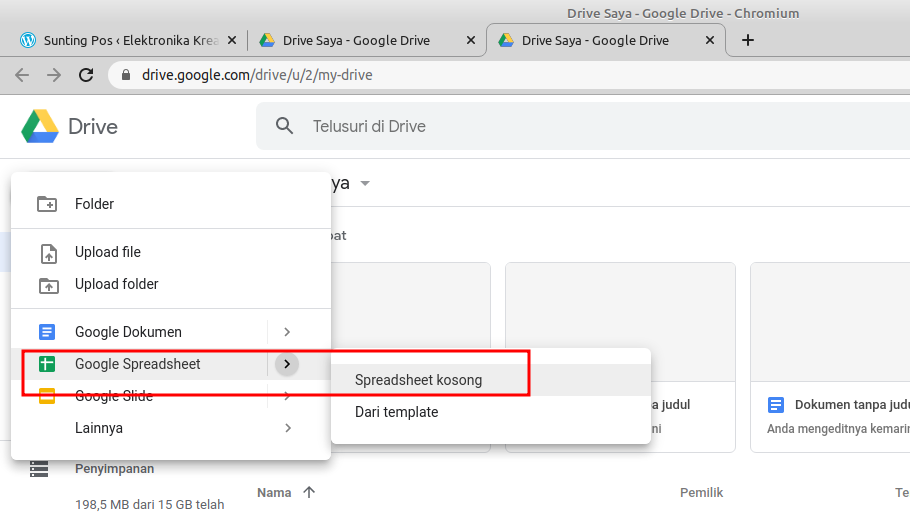
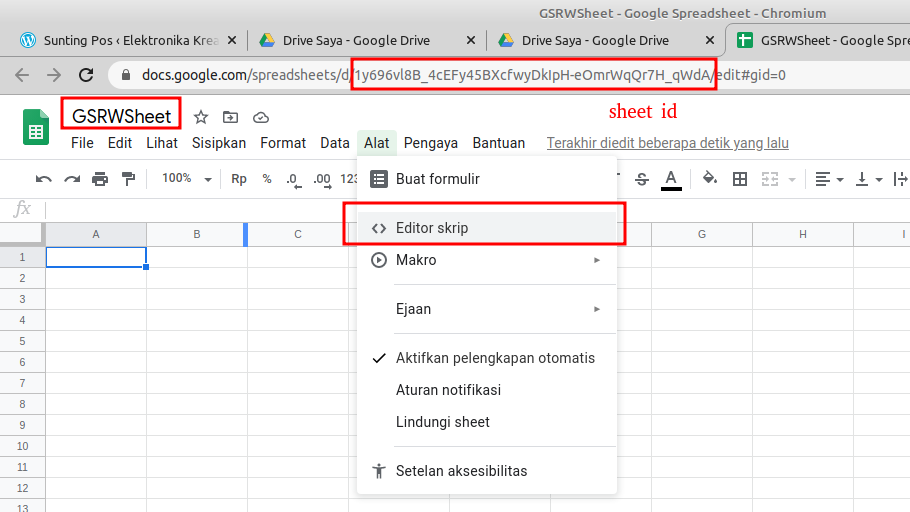
Rename File, Copy Sheets ID at Address Bar and Click Tools->Script Editor
Writing Google Script Code
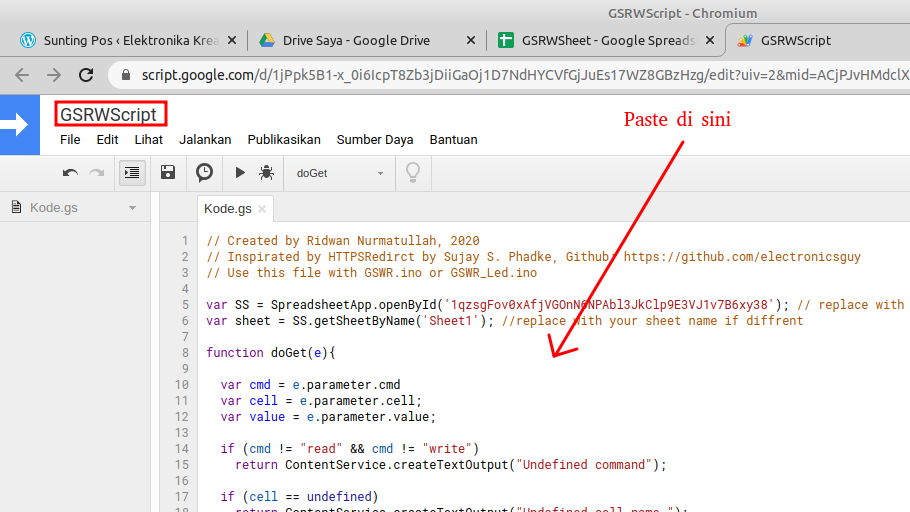
// Inspirated by HTTPSRedirct by Sujay S. Phadke, Github: https://github.com/electronicsguy
// Use this file with GSWR.ino or GSWR_Led.ino

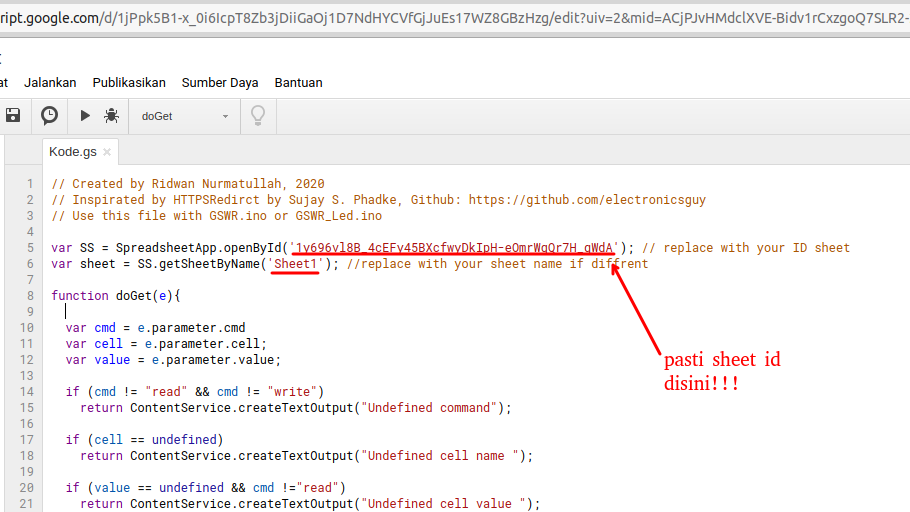
var SS = SpreadsheetApp.openById('1qzsgFov0xAfjVGOnN6NPAbl3JkClp9E3VJ1v7B6xy38'); // replace with your ID sheet
var sheet = SS.getSheetByName('Sheet1'); //replace with your sheet name if diffrent

function doGet(e){

  var cmd = e.parameter.cmd
  var cell = e.parameter.cell;
  var value = e.parameter.value;

  if (cmd != "read" && cmd != "write")
    return ContentService.createTextOutput("Undefined command");

  if (cell == undefined)
    return ContentService.createTextOutput("Undefined cell name ");

  if (value == undefined && cmd !="read")
    return ContentService.createTextOutput("Undefined cell value ");

  if (cmd == "write"){
    var range = sheet.getRange(cell);
    var retval = range.setValue(value).getValue();
    if (retval == e.parameter.value)
      return ContentService.createTextOutput("OK\r\n");
    else
      return ContentService.createTextOutput("Error\r\n");
  }
  else{
    return ContentService.createTextOutput(sheet.getRange(cell).getValue() + "\r\n");
  }
}
Replace Sheet ID With Yours That Copy Before
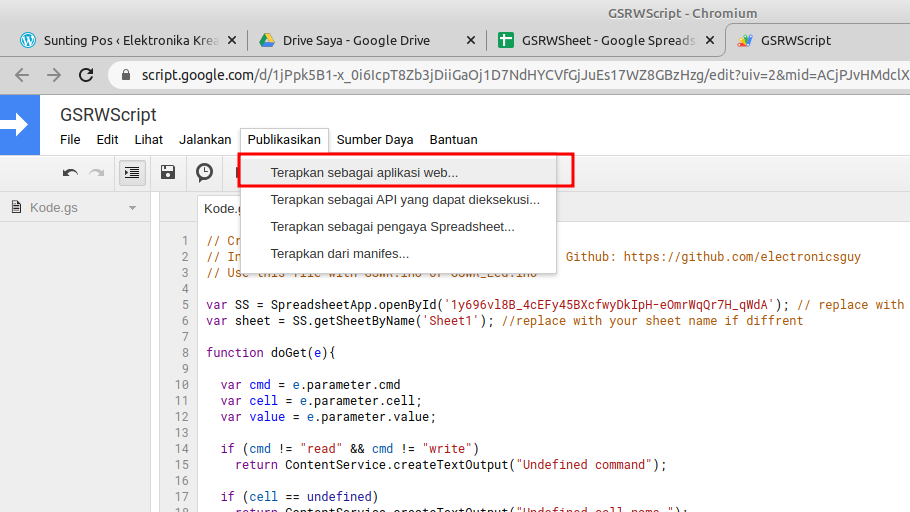
Click on Publis->Deploy As Web App
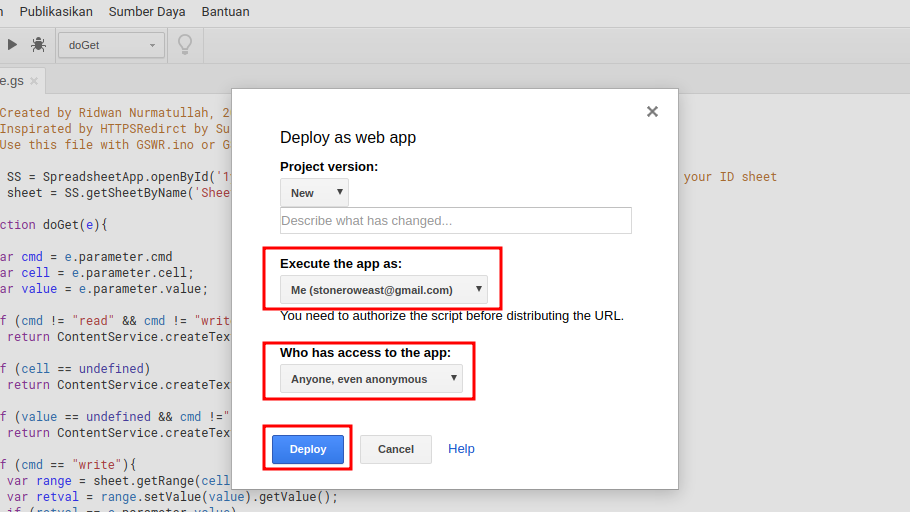
At Column 'Execute the App As' Fill With Your Google Acount, Column 'who Has Access to the App' Select Anyone Even Anonymous
Follow Instruction ....
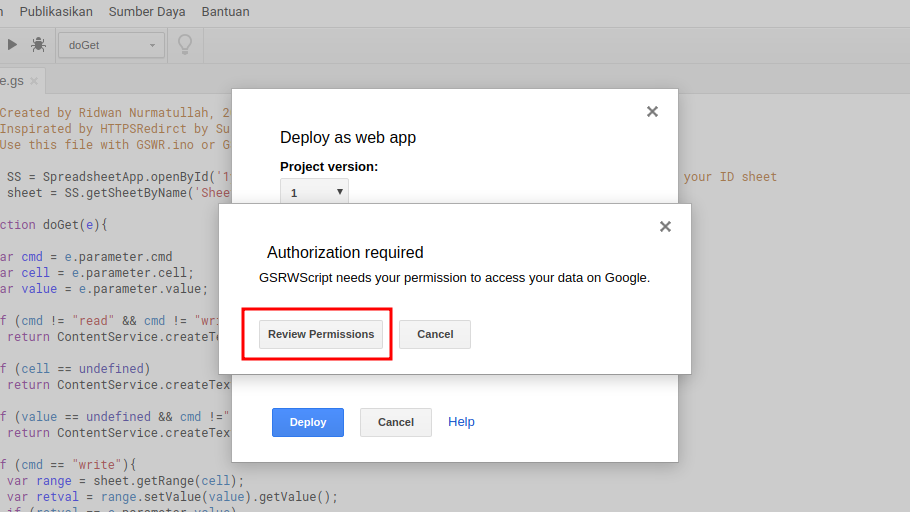
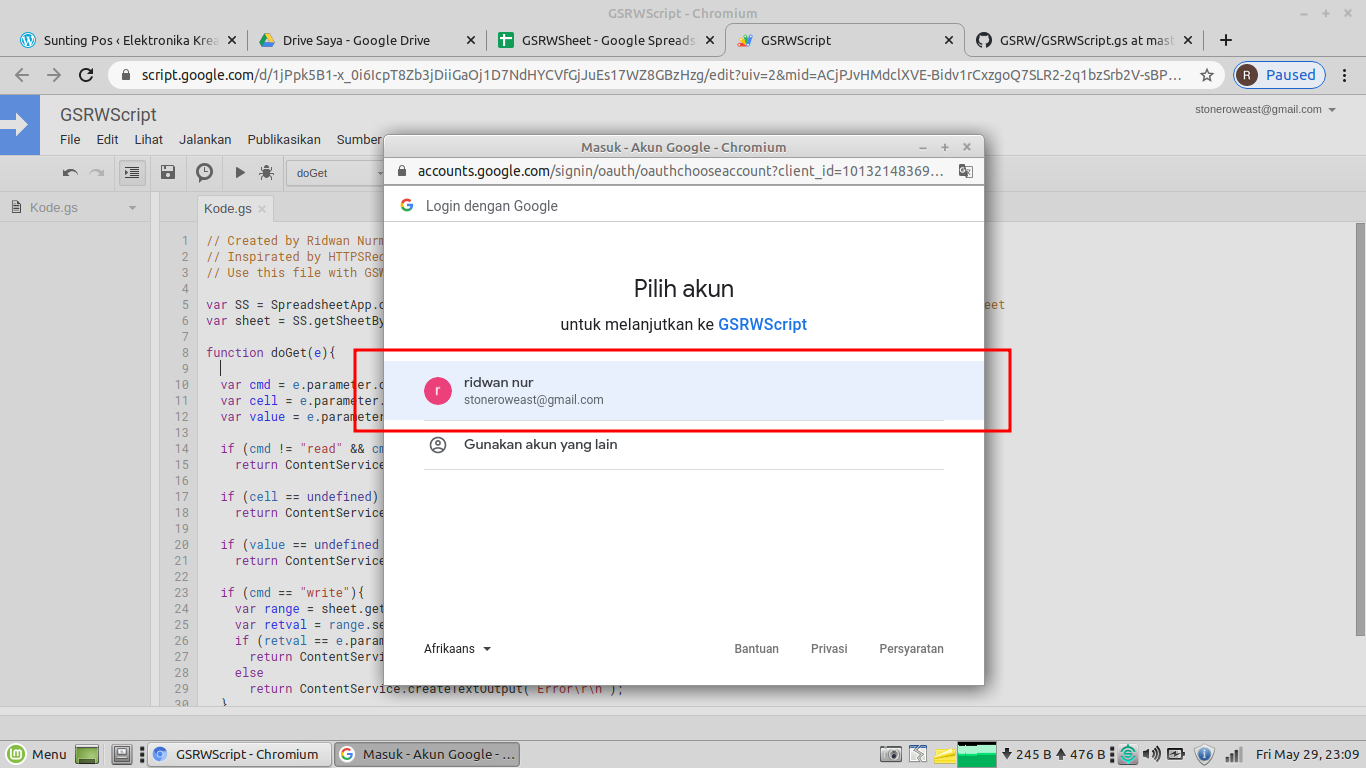
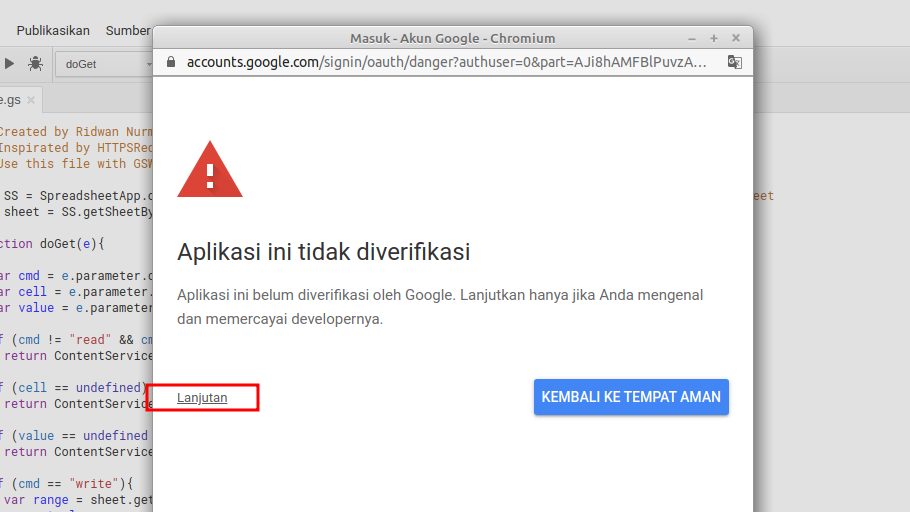
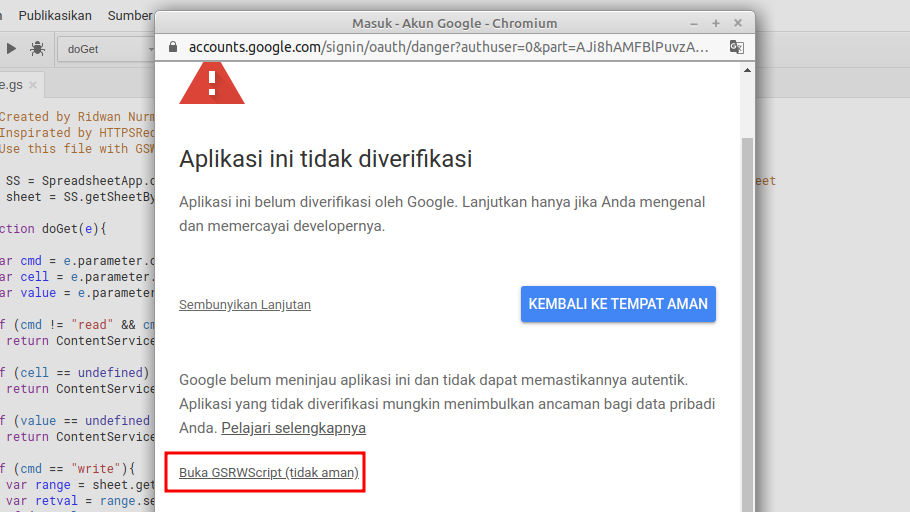
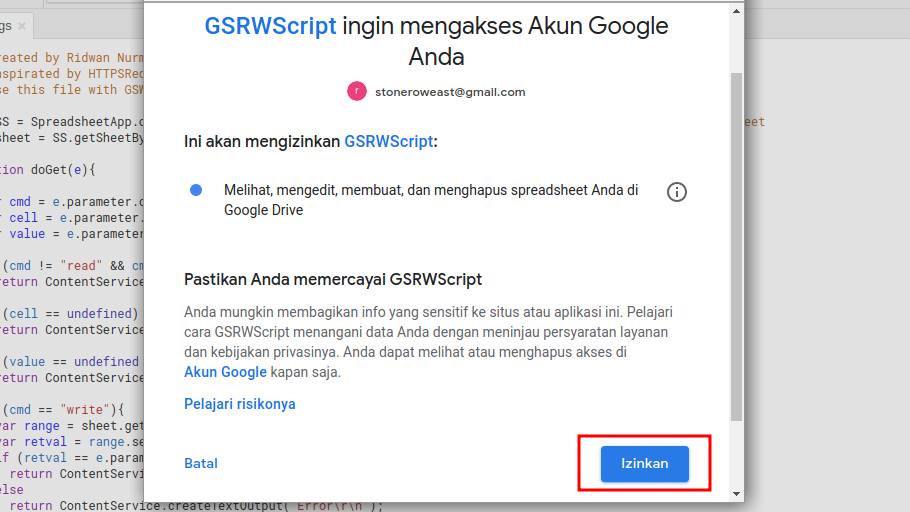
Copy or Save This Web App URL...
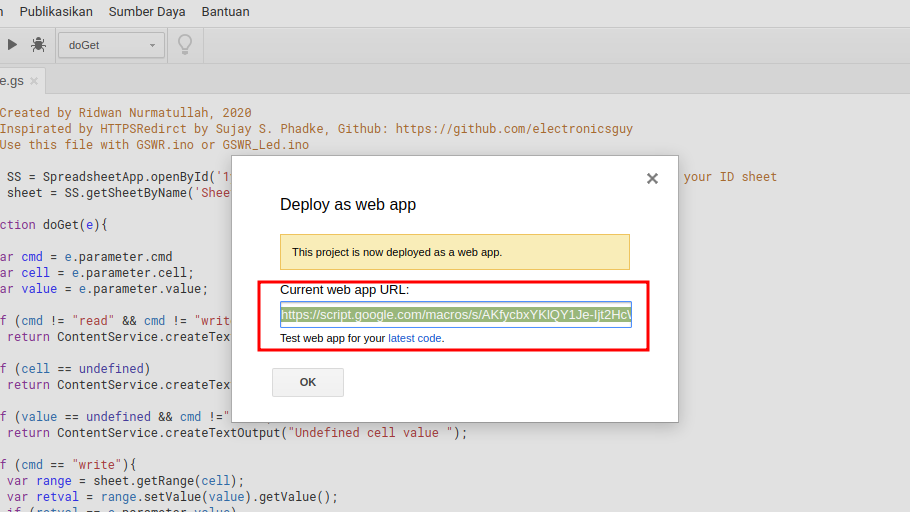
Test Web App URL... Use Browser and Paste the URL to Address Bar

Add Command to Write Value 1 to Cell A1

you can chage with orher cell and other value
Return Value Must Be 'OK'

Add This Command to Read Value of Cel A1

You can replace A1 for other cell read
Return Value Cell of A1

OK next step are write kode to ESP8266
Open Arduino IDE and Copy Paste This Code

Paste code below to Arduino sketch, replace app web URL with yours, select the right Board (here using NodeMCU) with yours have, and the Upload the code...
This sketch using LED_BUILTIN for simplicity. You can edit the code to replace with your need, and may be want to attach with relay or other device to control something...
/*
    ------------------------------
    GSRW - Google Sheet Read Write
    ------------------------------
    Examples of programs for writing and reading cells in Google sheets.
    Using GET http client request.
    Inspired by the work of Sujay S. Phadke, Github: <a href="https://github.com/electronicsguy." rel="nofollow"> https://github.com/electronicsguy.
</a>
    Differ to his work here only uses standart the ESP8266HTTPClient.h library instead of using the HTTPSRedirect.h library.
    Version : 1.0
    Author:Ridwan Nurmatullah
    Github:@stoneroweast
    email:stoneroweast@gmail.com

*/

#include <ESP8266WiFi.h>
#include <ESP8266HTTPClient.h>

const char* ssid     = "YOUR_SSID";
const char* password = "SSID_PASS";

String httpsAddr =  "https://script.google.com/macros/s/AKfycbxYKlQY1Je-Ijt2HcWN9UnsZLPUtmBRCoN6_RtQKw0wtk9U6n4/exec";

char *cellName  = "A1";

void setup() {
  Serial.begin(115200);
  pinMode(LED_BUILTIN, OUTPUT);

  Serial.println();
  Serial.print("Connecting to wifi: ");
  Serial.println(ssid);

  WiFi.begin(ssid, password);
  while (WiFi.status() != WL_CONNECTED) {
    delay(500);
    Serial.print(".");
  }

  Serial.println("");
  Serial.println("WiFi connected");
  Serial.println("IP address: ");
  Serial.println(WiFi.localIP());
}

void loop() {

  WiFiClientSecure client;
  HTTPClient http;

  client.setInsecure();
  http.setFollowRedirects(true);
  http.setRedirectLimit(10);

  /* Read Cell */
  /* ....................*/
  //append cell name dan cell value to httpsAddr
  String payload = httpsAddr + "?cmd=read" + "&&cell=" + cellName;

  //cek connection to HTTPS Server...
  Serial.print("Connecting to https Server...\n");
  if (!http.begin(client, payload)) {
    Serial.println("Unable to connect...");
    return;
  }
ulang:
  //Send GET request to write cell
  Serial.println("Send request to Server to read value to cell");
  int httpCode = http.GET();

  //cek http code
  if (!(httpCode == HTTP_CODE_OK || httpCode == HTTP_CODE_MOVED_PERMANENTLY)) {
    Serial.printf("[HTTP] GET... failed, error: %s\n", http.errorToString(httpCode).c_str());
    http.end();
    return;
  }
  //read the value
  payload = http.getString();
  int value = payload.toInt();

  Serial.print("Value of cell ");
  Serial.print(cellName);
  Serial.print(" is ");
  Serial.println(value);

  if (value) {
    digitalWrite(LED_BUILTIN, LOW);
  }
  else {
    digitalWrite(LED_BUILTIN, HIGH);
  }
goto ulang;
  http.end();
  delay(1000);
}
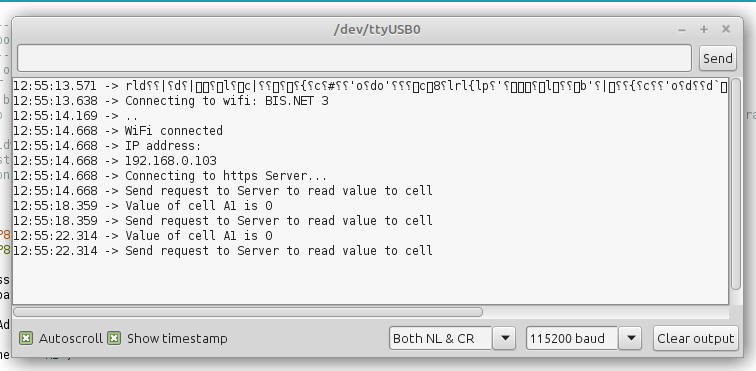
Open the Serial Monitor, Output Should Be Like This ...
Now Lets Check It...
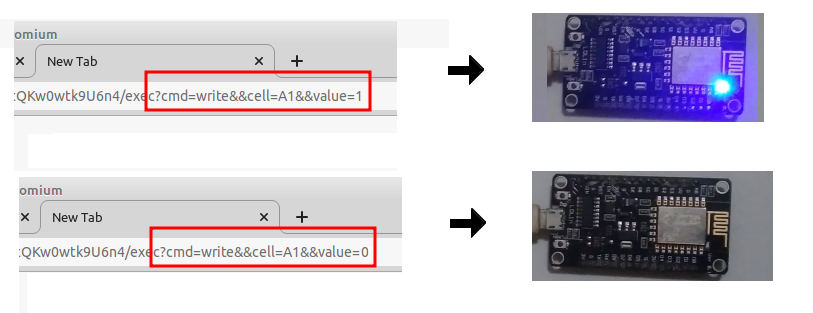
use your browser then write the command to write in the URL value 1 to make the LED light up.
Wait a few seconds (depending on the smooth network connectivity). Internal LEDs must turn on ...
After a successful turn on, try to turn off by writing a URL with a value of 0 to make the LED go out. NodeMCU internal leds should turn off ...
Now you can turn of and turn of LEDs every where using browser....
You can expand circuit connect MCU pin with relay circuit or optocoupler to drive another divice like Bulb, etc...
but less interesting and troublesome if you want to control having to open the browser then write a long URL ...
Therefore, the next step will be shown how to control using the Android application ...
Install Http Shortcut and Configure
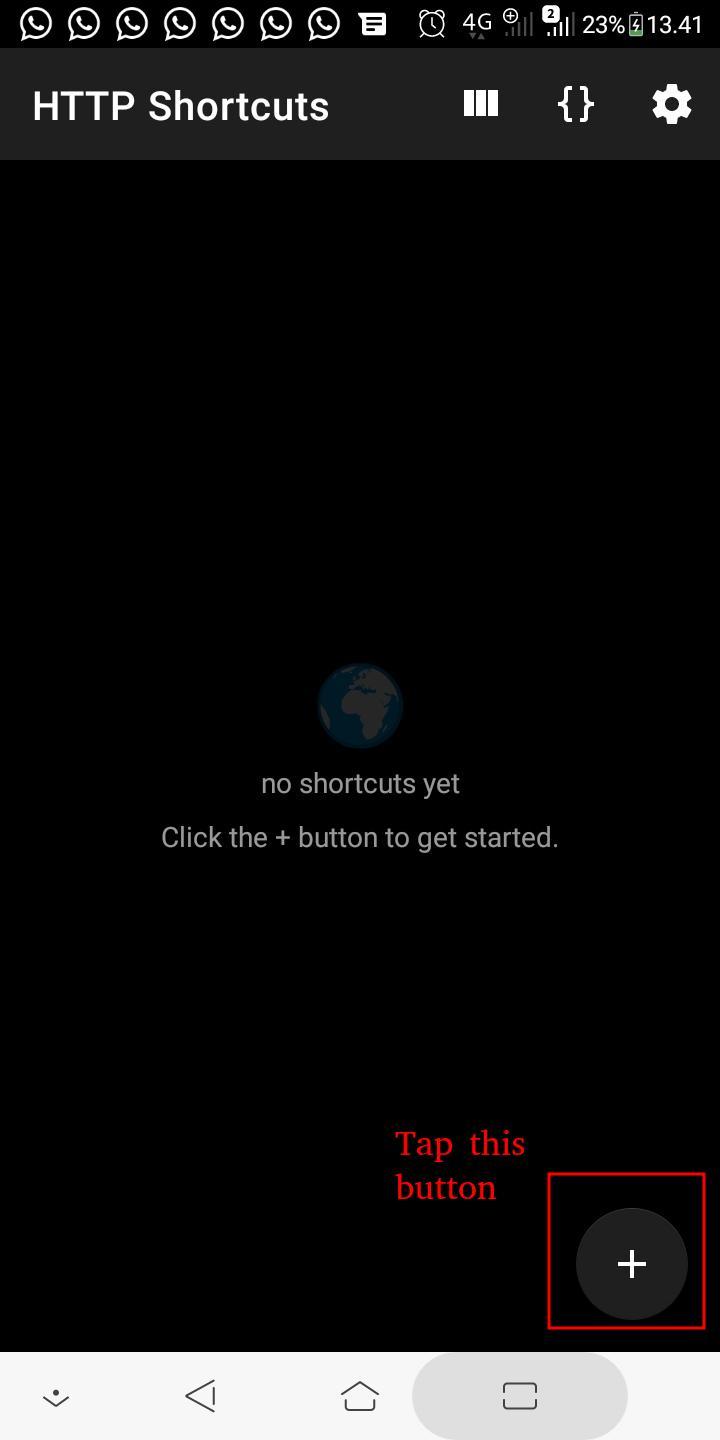
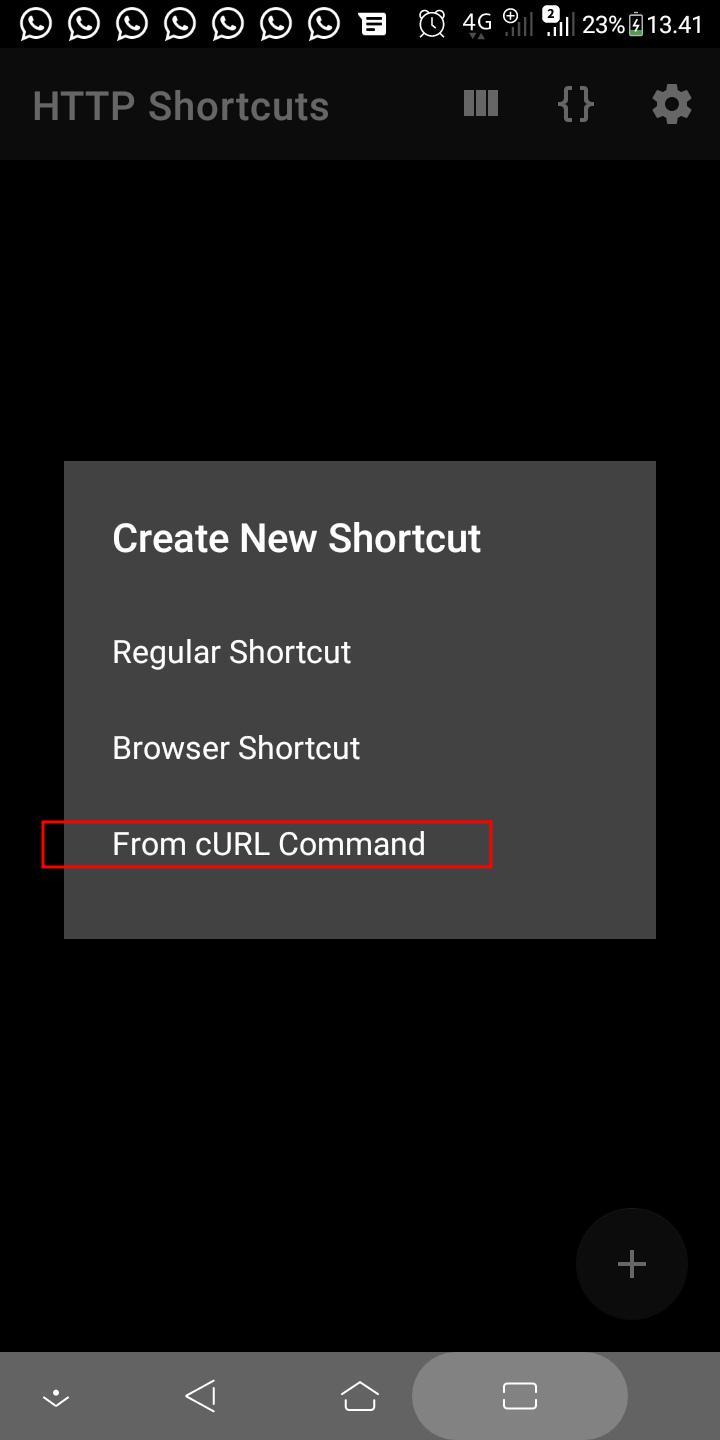
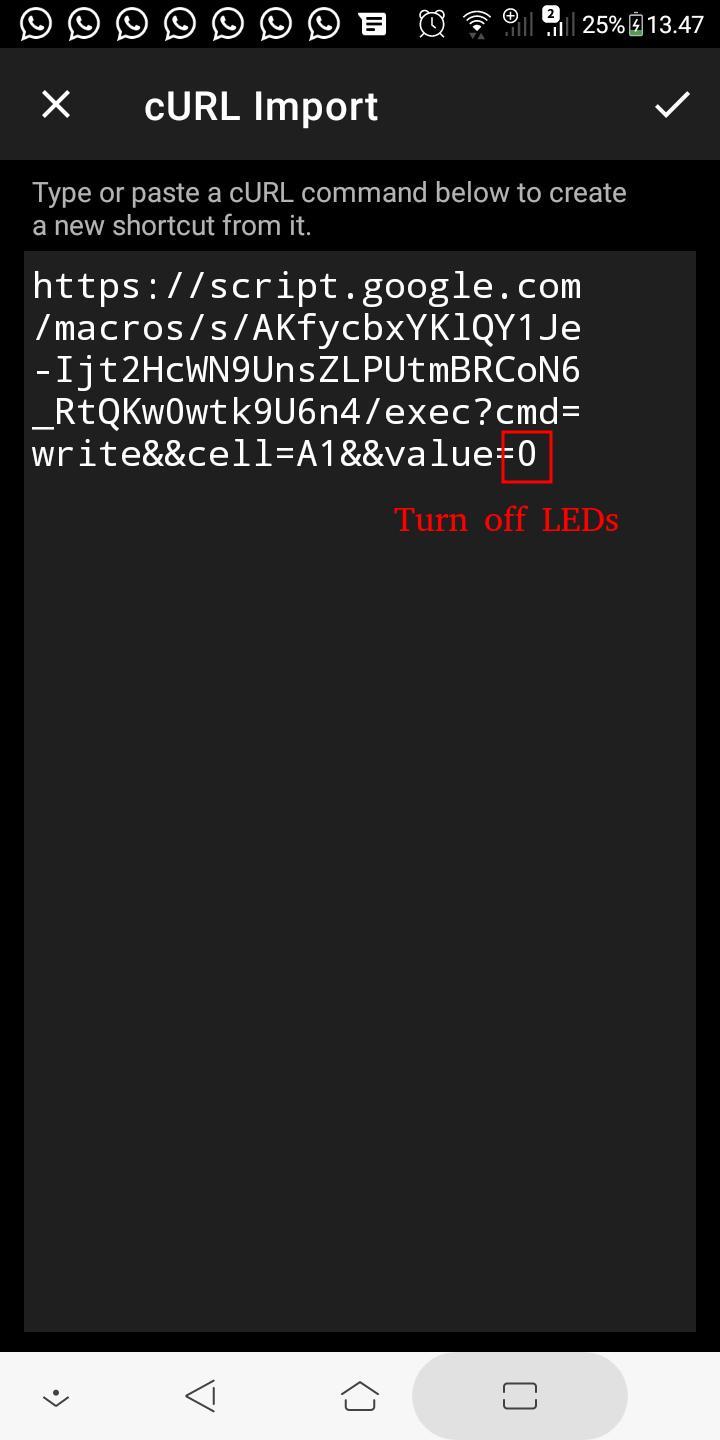
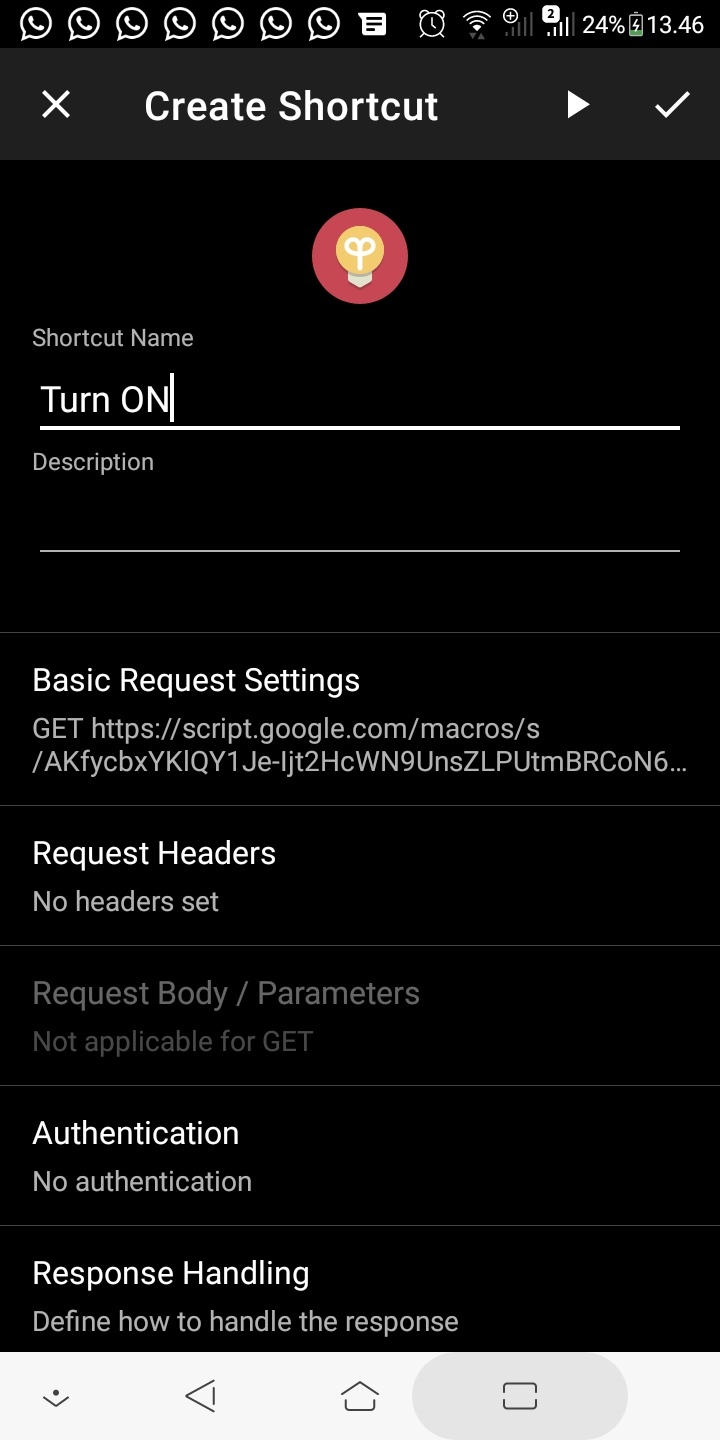
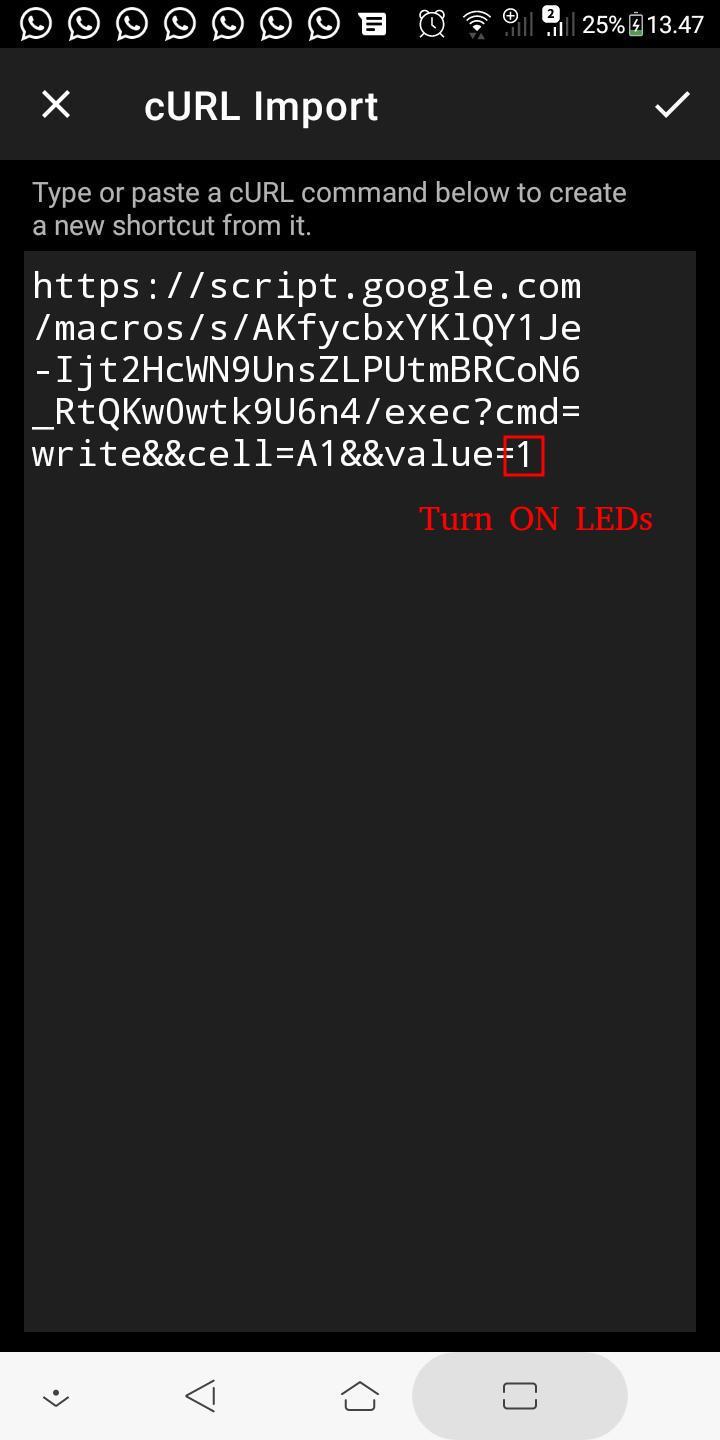
First, download third party application 'Http Shortcut' at Play Store and do like example...
Build two, to Turn ON and Turn OFF ...
Finally
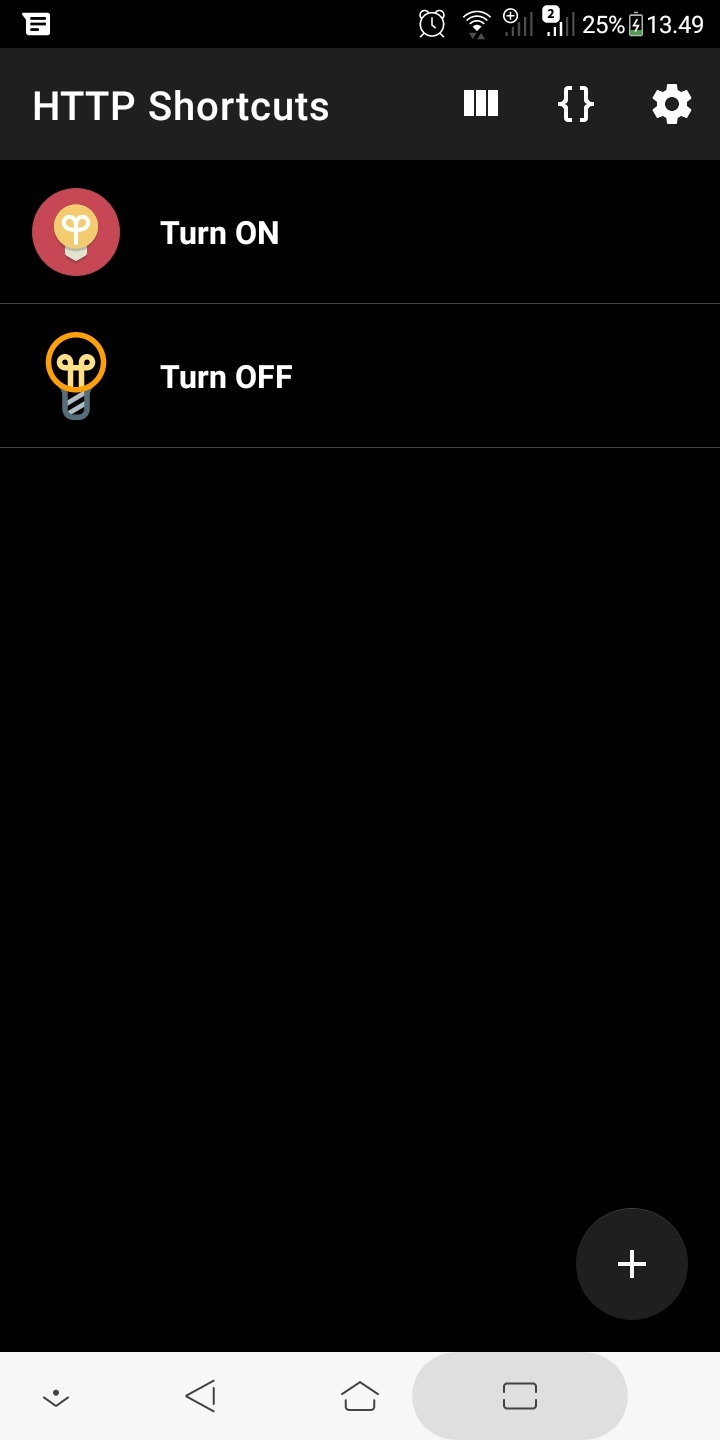
Now just tap the icon...
more practical right?
Now you can control LEDs anywhere using smartphone ...
Dont forget to explore your imagination to improvise the project, maybe connecting it with relay circuit to control any device at your home....
Thats all... :)