Construction and Connecting SolarAssistant on a Raspberry Pi to Control and Monitor Your Solar Panel System
by oliverb in Circuits > Raspberry Pi
3680 Views, 8 Favorites, 0 Comments
Construction and Connecting SolarAssistant on a Raspberry Pi to Control and Monitor Your Solar Panel System
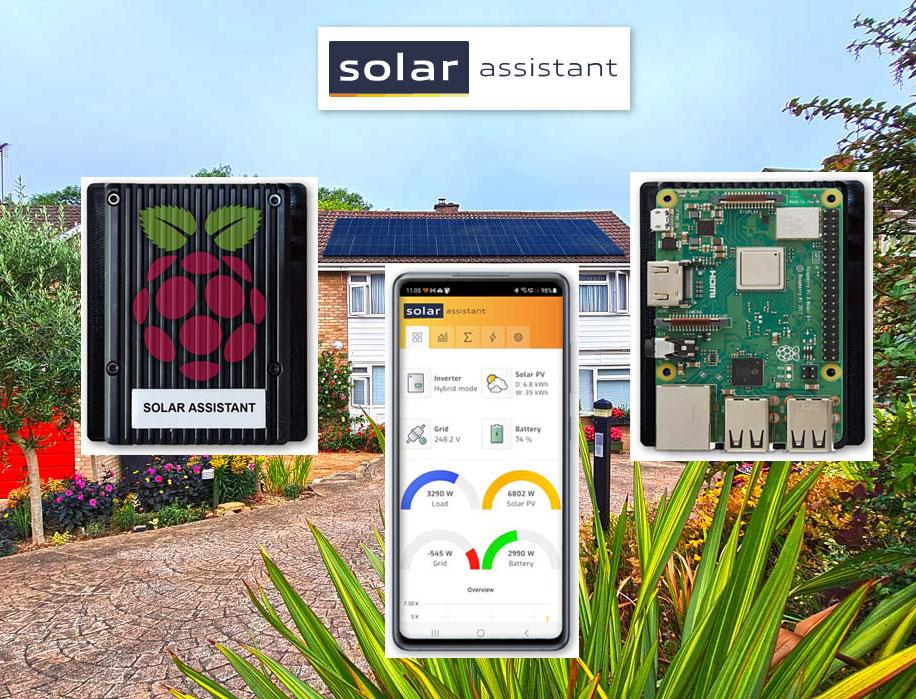
Full detail on my main site here http://www.brettoliver.org.uk/Solar_Power/Solar_Power.htm
SolarAssistant is software used to monitor and control your solar system in real time and can be purchased from the SolarAssistant site.
This instructable is designed as a technical reference for myself & also a guide for someone considering using SolarAssistant with a similar setup.
SolarAssistant is designed to run on a Raspberry Pi that is plugged into your solar inverter and optionally a battery.
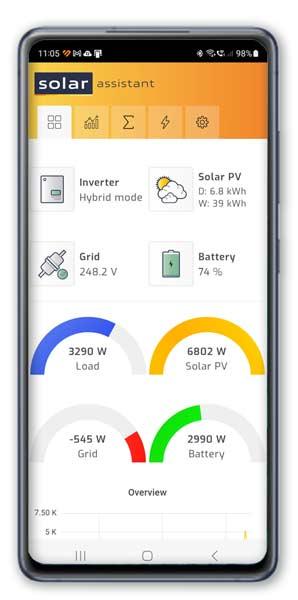
The application can be accessed from a web browser or the Android/iPhone app via local network or the internet.
My solar system uses a Growatt SPH5000 inverter but using this instructable you should be able to work out how to use it on any inverter.
Supplies
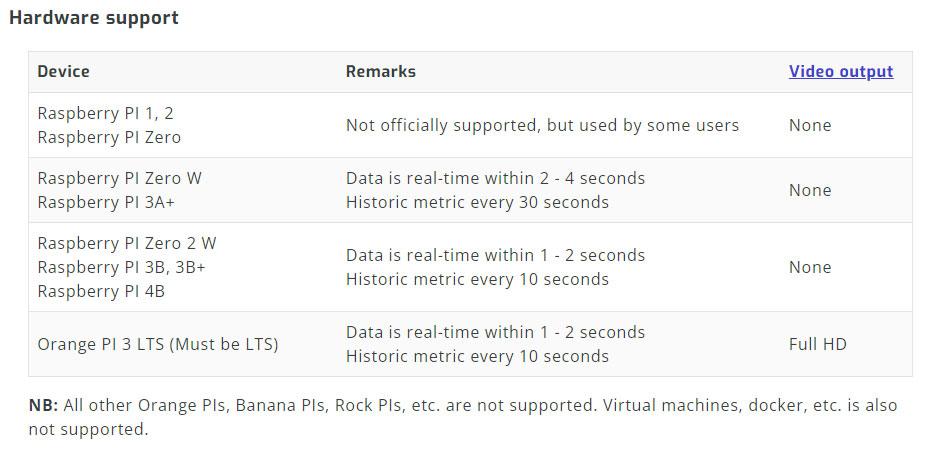
You will need a Raspberry Pi see chart for supported versions
5v Raspberry Pi PSU. Make sure you get a PSU with enough power to drive the Pi you are using.
Optional A Raspberry Pi case. I used a metal case with a heatsink built into the case.
Optional USB to RS485 Converter. I kept my supplied USB dongle so needed an adaptor to connect the Raspberry Pi to the RS485 connector on my Inverter. This means I could run SolarAssistant and the supplied Growatt software at the same time.
A USB cable from the Raspberry Pi to the inverter. Type depending on your inverter make.
SolarAssistant Features
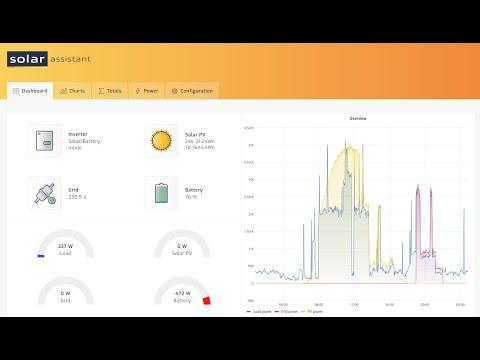
SolarAssistant
SolarAssistant is software used to monitor and control your solar system.
It is designed to run on a Raspberry Pi that is plugged into the solar inverter and optionally a battery BMS.
The idea is that you leave the PI running permanently.
The application can be accessed from a web browser or the Android/iPhone app via local network or the internet.
Features
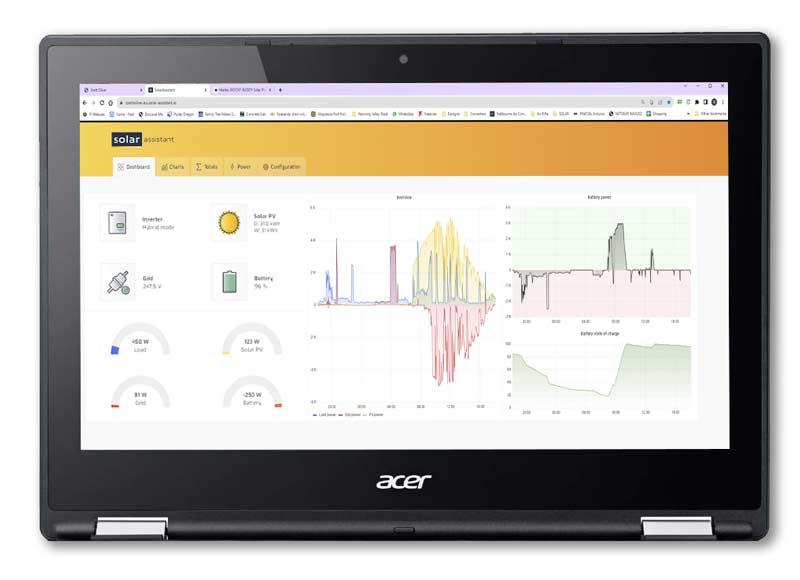
Real-time analytics via Web- PC, MAC or Chromebook, Android and iPhone.
Metrics are live up to 2 seconds. SolarAssistant is a standalone system that can be used without the internet.
However when you are away from home all features are available remotely via the internet.
Real-time metrics makes all the difference and gives true insight into how your system performs.
Instant updates are really convenient if your trying different settings to see how it affects your system.
10+ Years of historical data via interactive charts
SolarAssistant puts you in control of your data by storing it on your device instead of a cloud service in another country.
My Raspberry Pi Setup
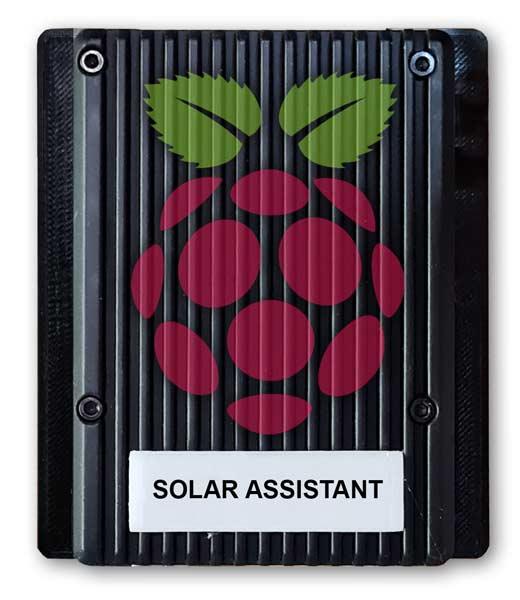
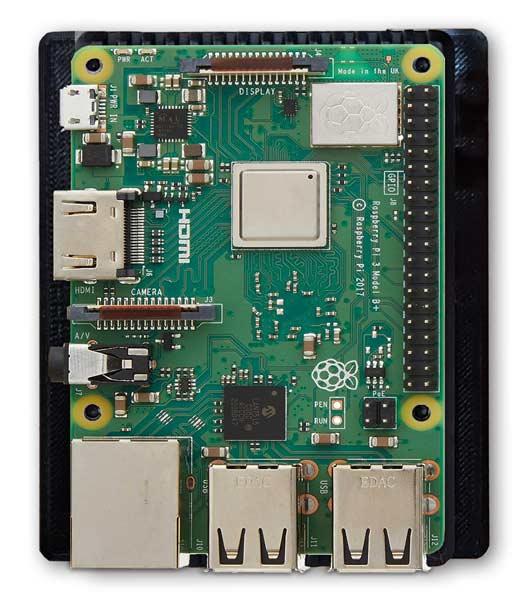
Pic 1& 2 SolarAssistant's Raspberry Pi 3+ mounted in a metal case
My SolarAssistant uses a Raspberry Pi 3+ mounted in a metal case and is positioned near my Growatt SPH5000 inverter.
The metal case also acts as a heatsink so no other cooling is required.
I have run a LAN cable direct to the raspberry Pi as the WIFI signal is poor at that location.
If required you can still connect the manufacturers supplied WIFI dongle and configure your inverter via their servers or use the their supplied app on your mobile device.
I have both connected and they work alongside each other.
My Solar System
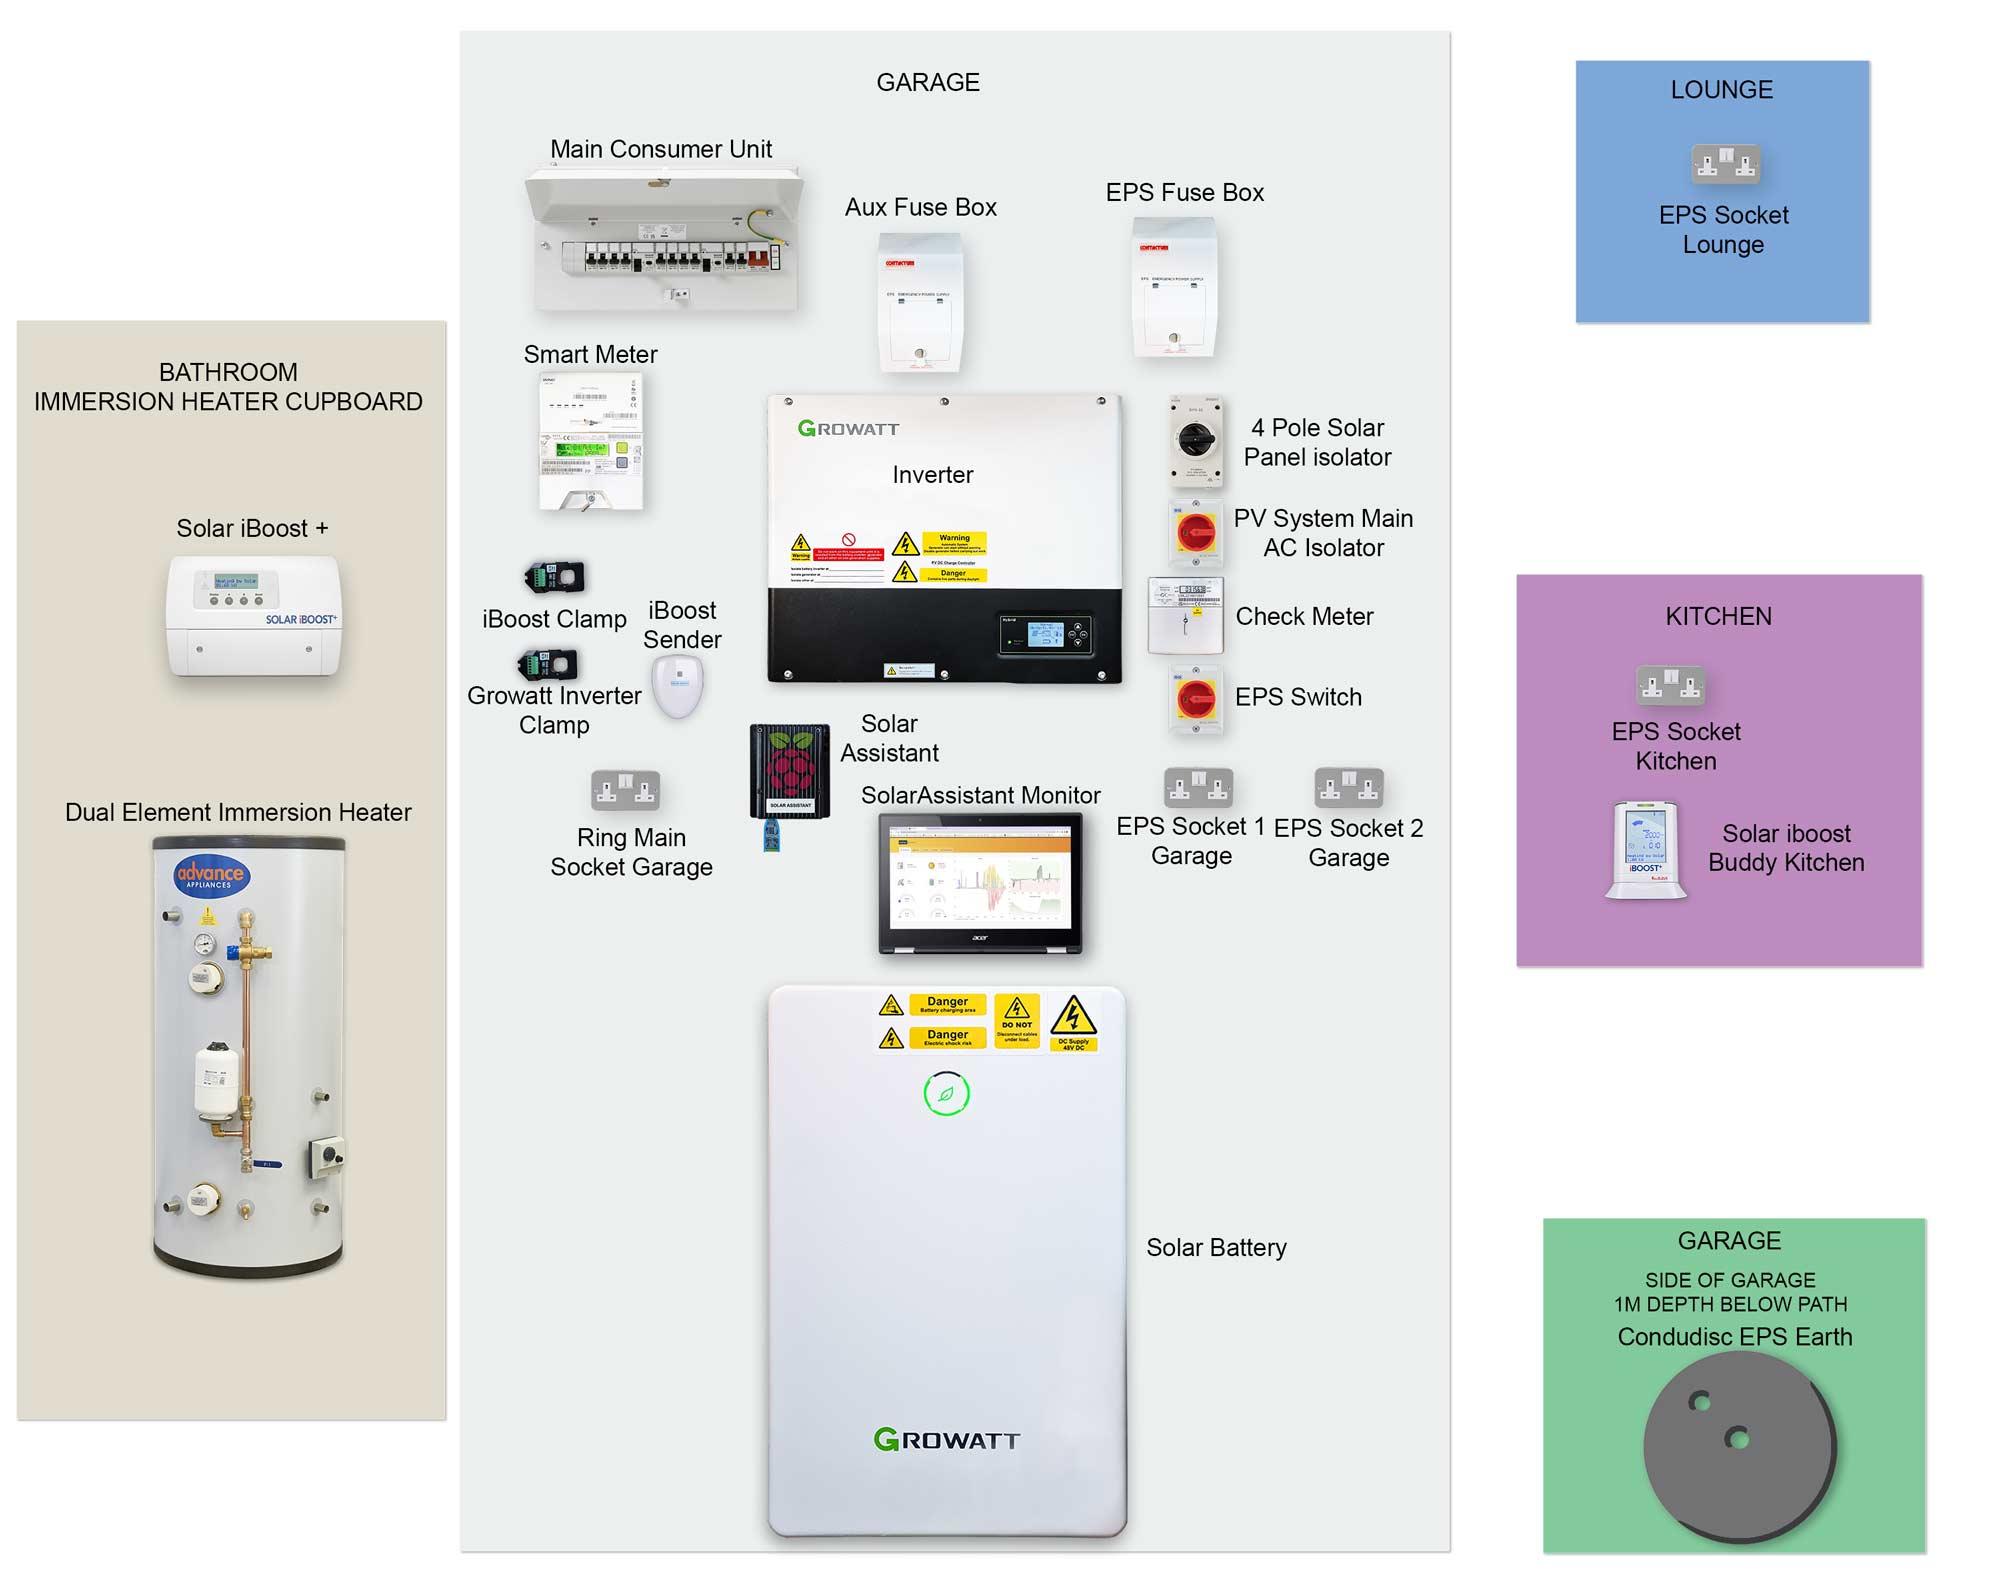
My System Layout and Specifications
The solar system is located in my garage with a rough layout as above.
There are 14 Trina Solar Vertex 405 panels on my ESE facing roof.
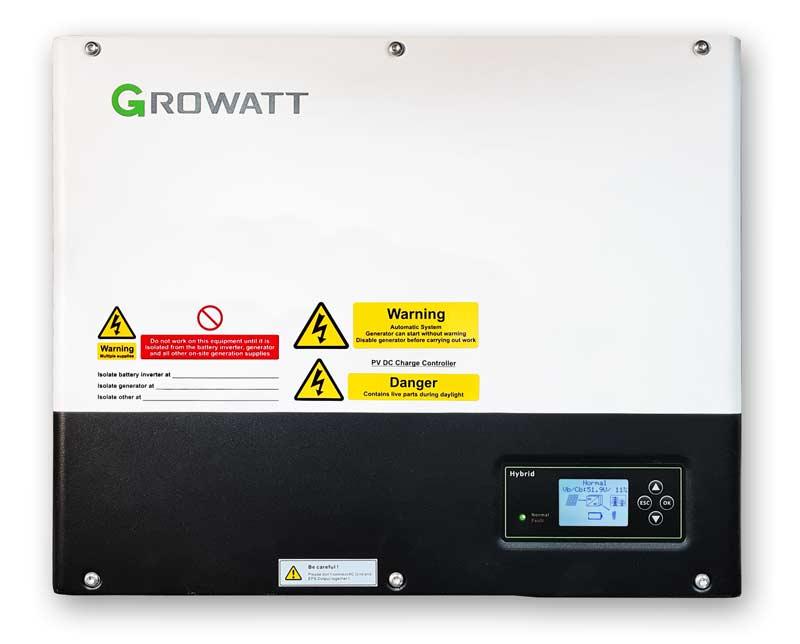
I have a Growatt SPH5000 inverter that has an a/c rated output of 5kW.
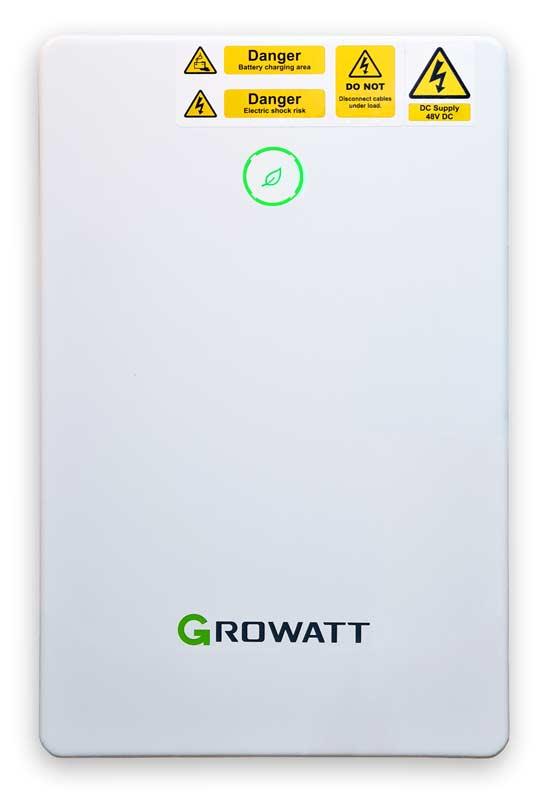
My battery is a Growatt GBLI6532 with 6.5kWH capacity.
I have EPS (emergency power supply) supplying a few sockets in the house.
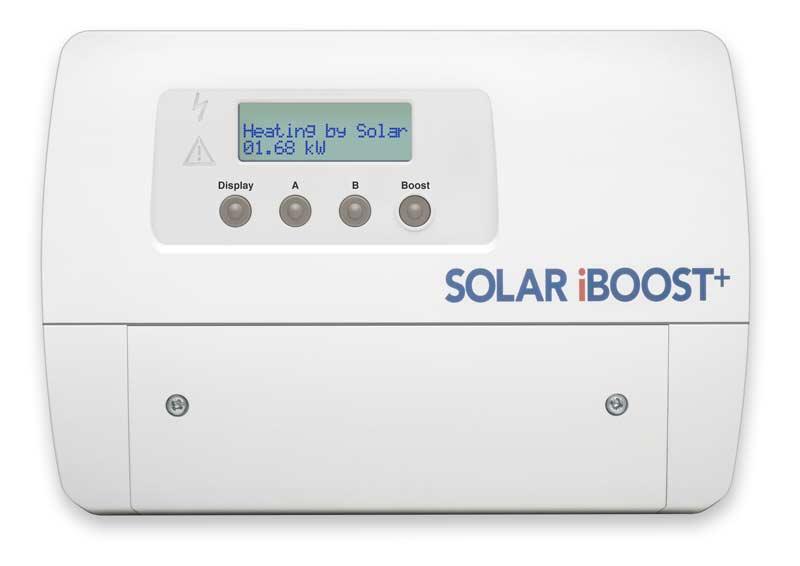
My dual element immersion heater is connected to a Solar iBoost+ for hot water heating by Solar.
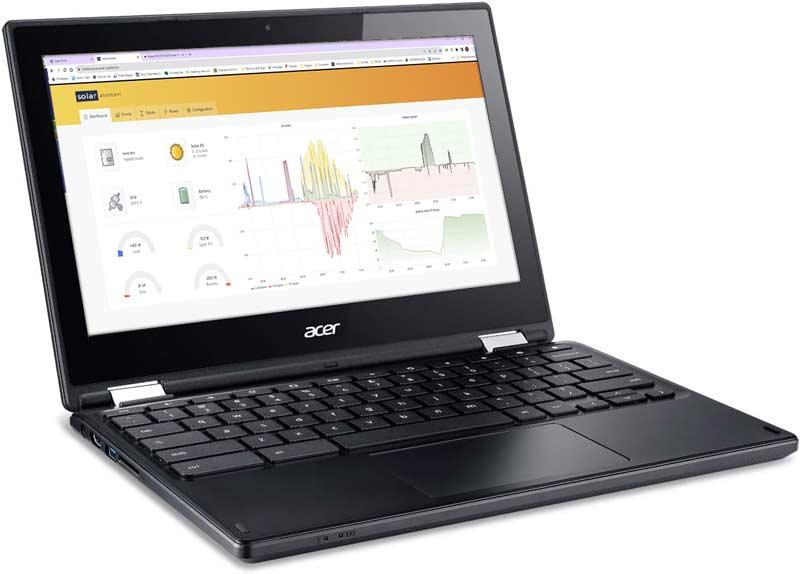
I have a chrome book mounted near the inverter which is used for setting up and monitoring via SolarAssistant and or the Growatt Server.
My Solar System Main Parts
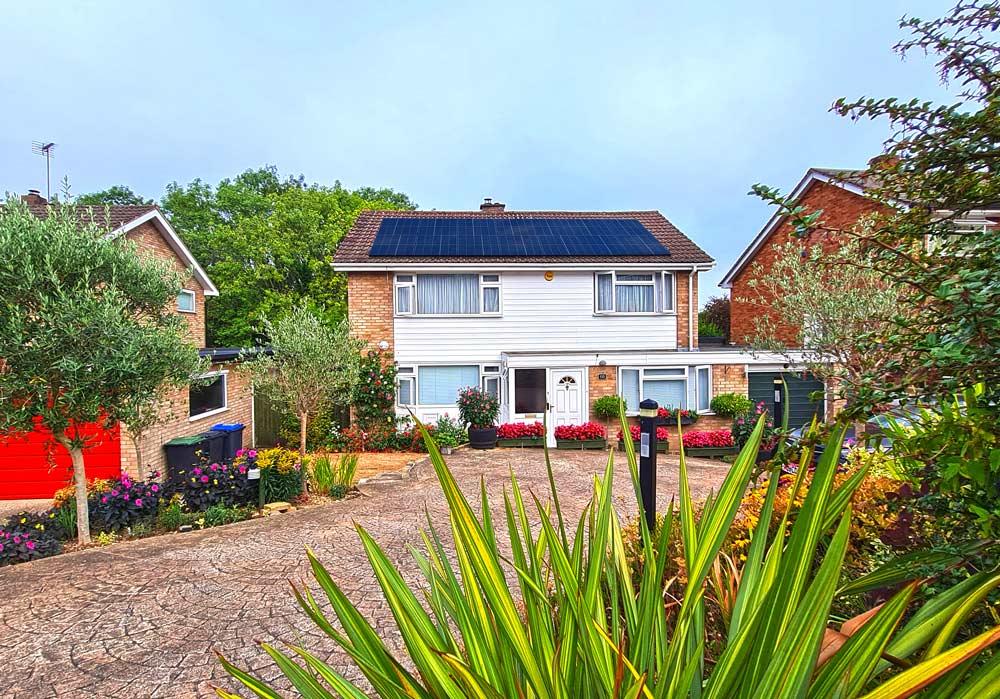
Pic 1 I have 14 405w solar panels mounted on my roof
Pic 2 Growatt SPH5000 Inverter
The Growatt SPH Series inverter is used to store energy generated by the photovoltaic cell panels
or energy from grid if it is allowed in the battery, also energy can be sent to power
grid through the SPH for self consumption or when Grid power is lost, the SPH can be used as
back up power.
Pic 3 Growatt GBL6532 6.5kWh Battery
The Growatt GBLI6532 is a lithium battery with a capacity of 6.5kWh. The battery utilises LiFePO4 technology, which offers a range of benefits, including: improved discharge and charging efficiency, longer lifespan, increased safety and lightweight design.
The battery can be paired with a twin unit to offer a maximum capacity of 13kWh. The unit is easy to install and can be wall mounted or floor standing.
Pic 4 Solar iBoost
Solar iBoost+ is installed next to the hot water tank and receives messages from the Sender unit clamped to the main feed off the incoming main.
When activated, it intelligently controls and adjusts the level of energy flowing to your immersion heater in line with the export levels as they rise and fall.
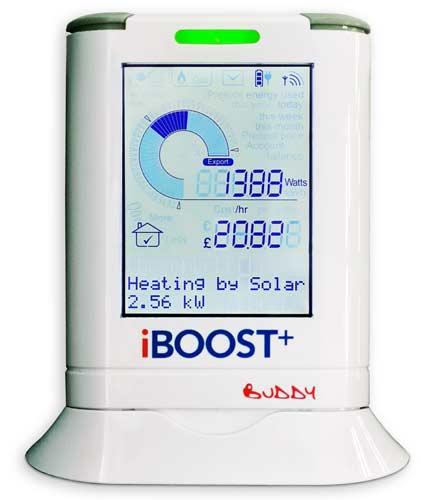
Pic 5 iBoost+ Buddy
iBoost+ Buddy is the wireless home energy monitor and remote control for the Solar iBoost+
The eco-gauge lets you know when unused energy is available so you can switch on appliances.
It has the same buttons and functions as the main unit and can be situated anywhere in your house.
Install SolarAssistant on Your Raspberry Pi
Download and install a copy of SolarAssistant and install it on your Raspberry Pi following the instructions on the site.
I have installed SolarAssistant onto a Raspberry Pi 3+ and mounted it into a metal case from Amazon.
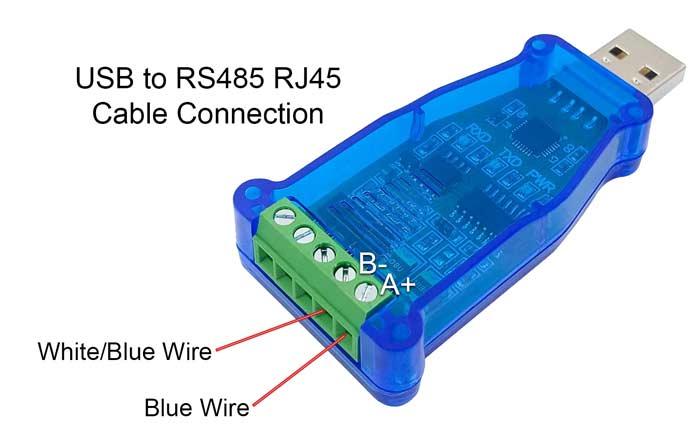
Pic 1 The connection to my Growatt inverter is via a USB to RS485 Converter with CP2102 Chip.
I found the converters with the cheaper CH340 chip did not work with my inverter.
Connecting to Your Inverter
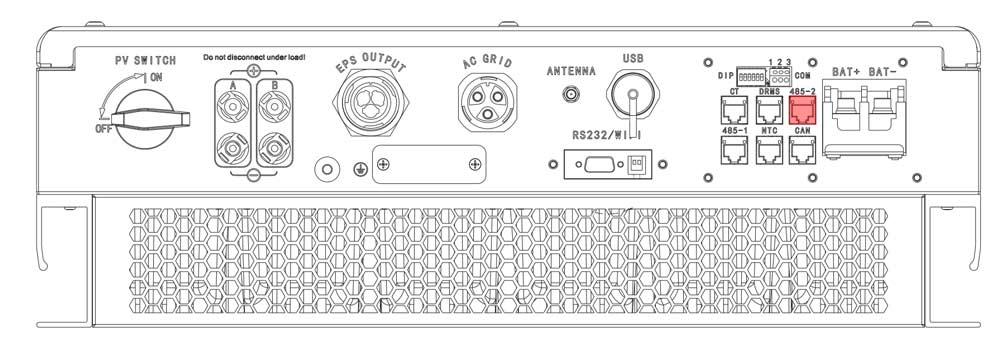
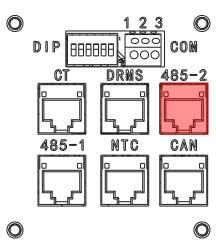
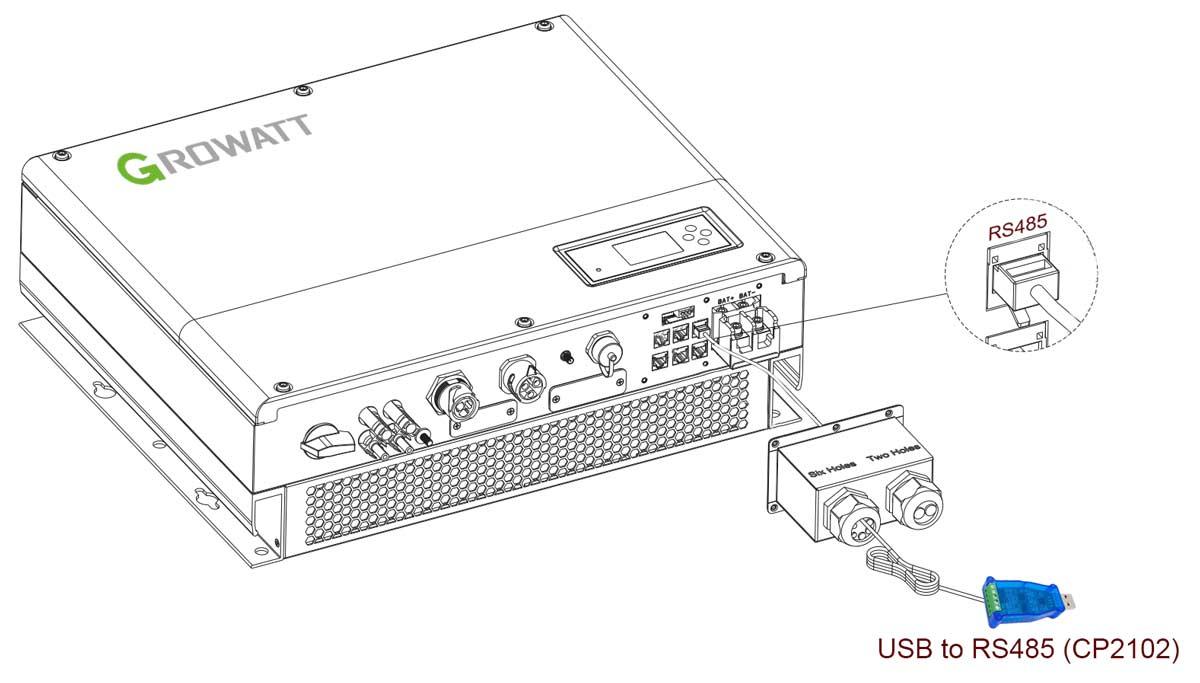
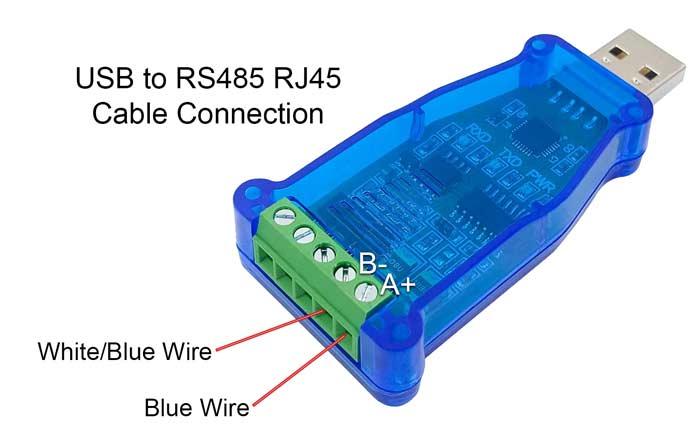

The connections below are for my Growatt Inverter. For different inverter models and brands consult the manuals.
Pic 1&2 View from the underside of my inverter showing the location of the com port I used in red. The port is labeled RS485 on my inverter but the diagrams from Growatt show it as 485-2.
Pic 3 Connecting the USB to RS485 Converter to the Inverter RJ45 socket.
Pic 4 I used a standard RJ45 cable and cut one end off and then connected the Blue and White/Blue wires to A+ and B- of the USB to RS485 converter.
Pic 5 Pin connection chart for the SPH Inverter. Your inverter manual should show your connections. I found Pin 4 Blue & Pin 5 White/Blue worked on my inverter.
Raspberry Pi Connection / Inverter Com Port Seteup
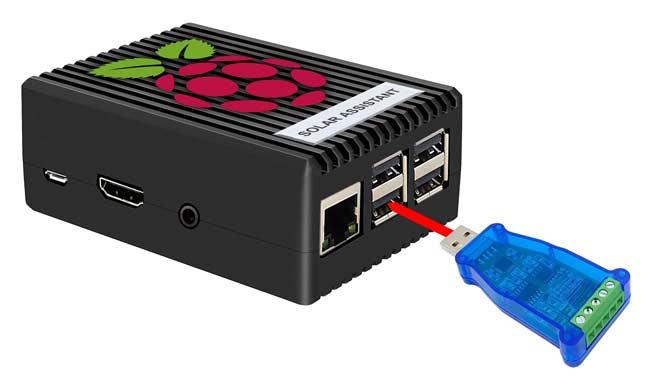
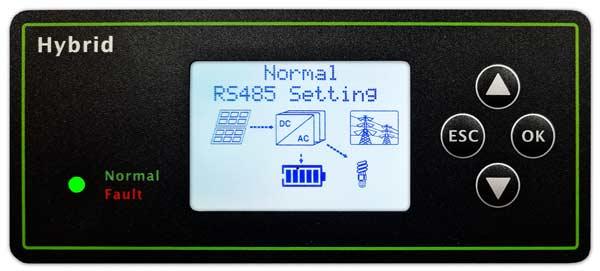
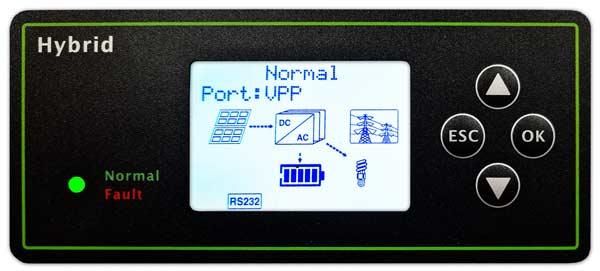

Pic 1 Connect the USB cable from your Inverter into your Raspberry Pi running SolarAssistant. In my case the USB to RS485 converter is plugged into a SolarAssistant USB Port.
Pic 2 & 3 You may need to setup the com port on your inverter. On my Growatt inverter I navigated to the RS485 menu and set it to VPP mode.
Pic 4 On the SolarAssistant configuration page the converter should now be visible.
Click "Connect" to start using the data from your inverter.
Pic 5 Note the SolarAssistant help pages have detailed setup instrutions for all supported Inverters.
SolarAssistant Connections Schematic
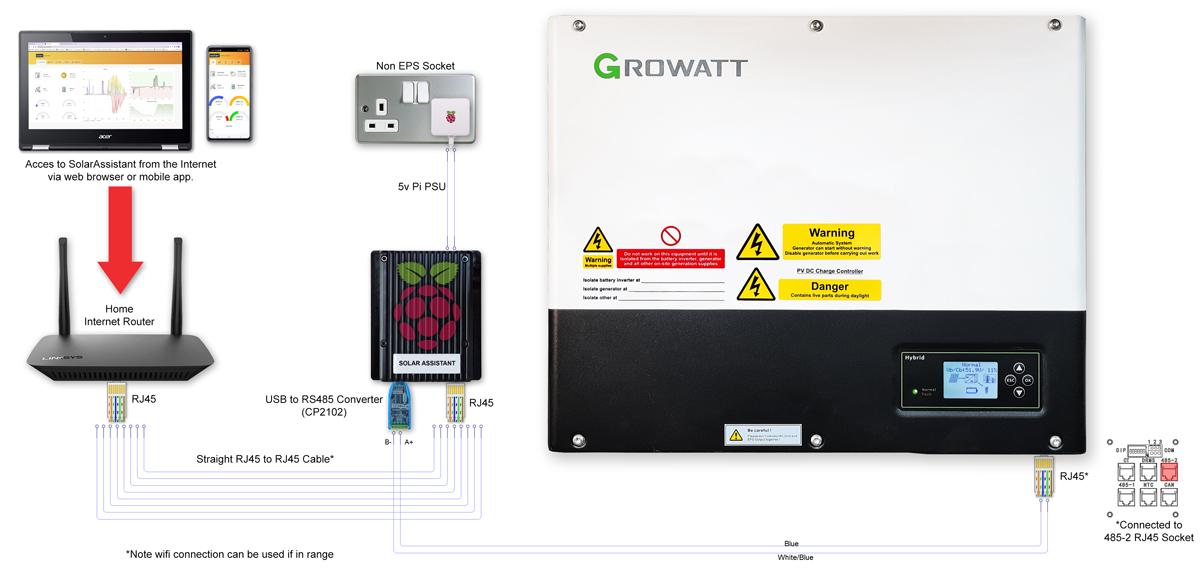
Pic 1 Shows the wiring of the Raspberry Pi (SolarAssistant) to the inverter.
SolarAssistant is powered from a 5v Raspberry Pi PSU plugged into a wall socket off the standard ring main in my garage.
A USB to RS485 CP2102 converter plugs into a USB port and the A+ & B- outputs are connected to pins 4&5 of a RJ45 plug.
The RJ45 plug is connected to the top right socket on the inverter marked RJ45. This is socket 485-2 shown on the diagrams from the inverter manual.
A standard RJ45 to RJ45 network cable then connects to my internet router (you can also use WIFI if your router is in range).
Once connection is established your SolarAssistant will be accessible on your home network as well as anywhere in the world via the internet.
Local Control & Monitoring
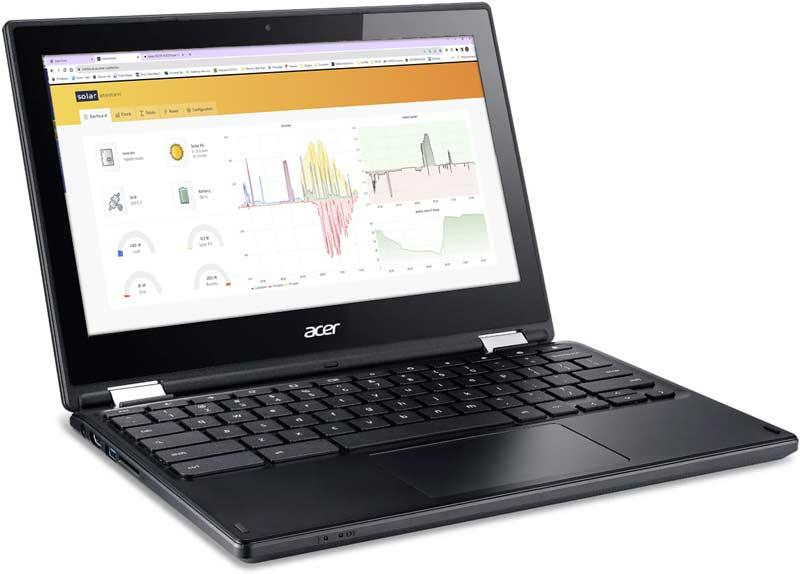
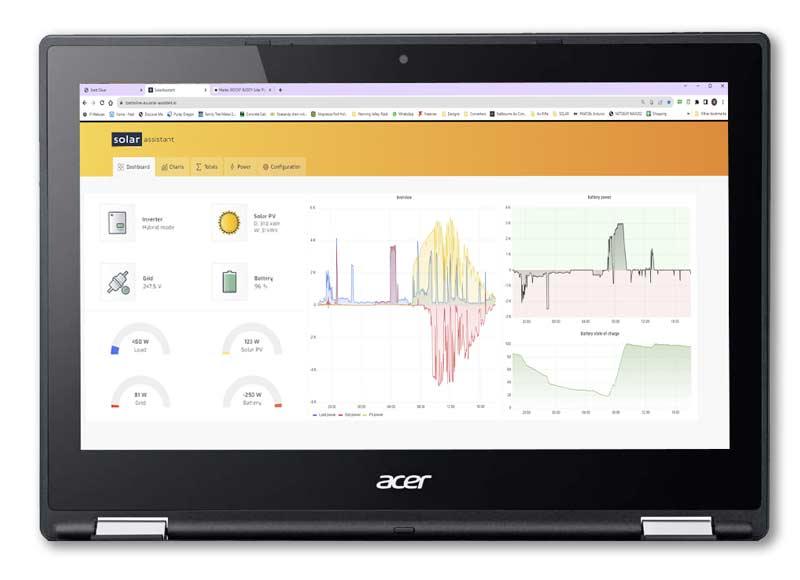
Pic 1 My solar system is located far from the WIFI in my house and mobile signal reception is very poor. I have purchased a 2nd hand Chrome book and mounted it below the inverter to use as a system monitor/controller.
Pic 2 Chromebooks power up in seconds and are very cheap.
Pic 3 I used a Acer Foldable 2-in-1 Chromebook R11 C738T-C7KD 11.6 inch screen and it cost £70 on ebay 2nd hand inc a 2 year warranty. The chrome book is foldable so works as a tablet and has a touchscreen.
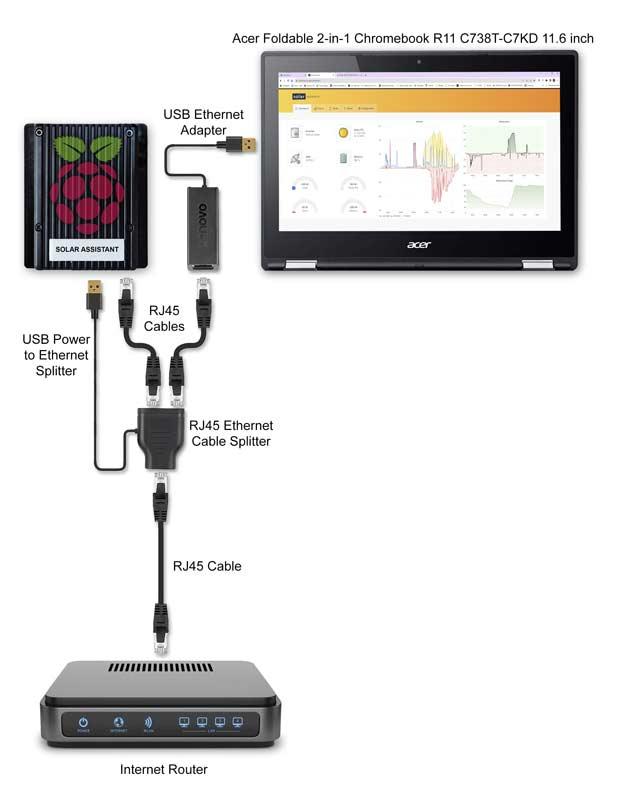
Pic 4 I used the LAN cable from the SolarAssistant split with a powered RJ45 cable splitter and then a RJ45 to USB ethernet adaptor to connect to the chrome book USB port.
Full Solar System Schematic
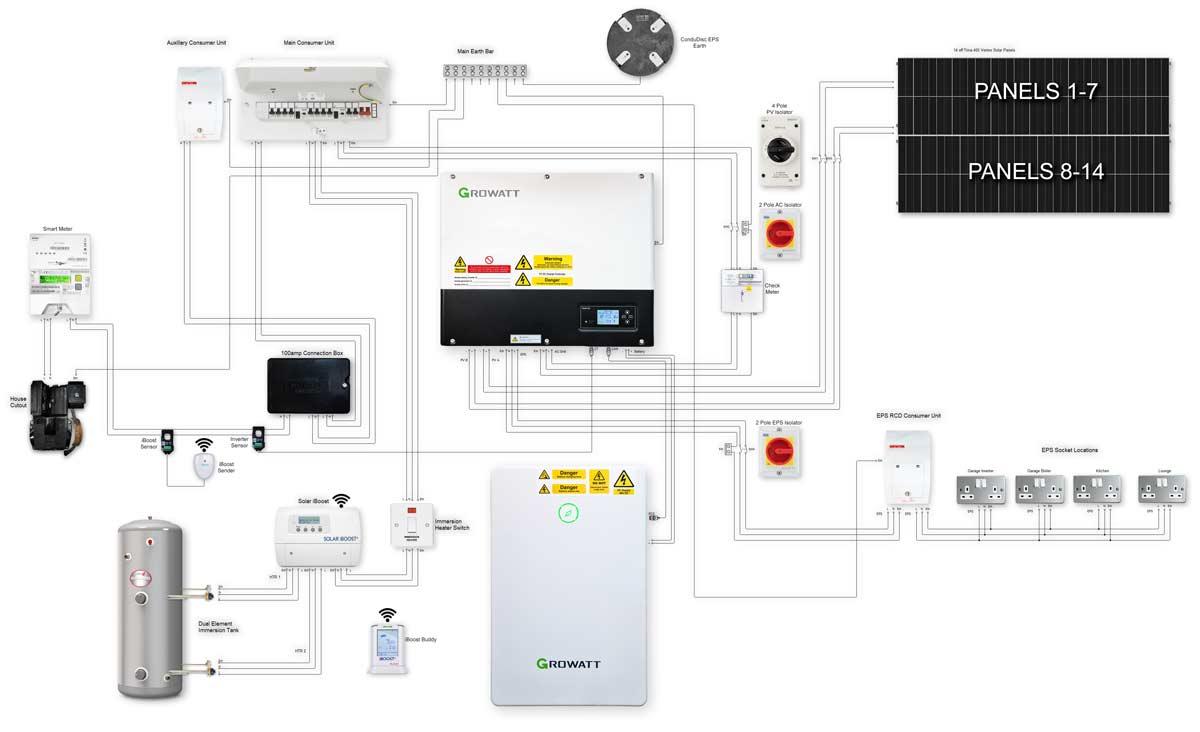
Pic 1 Shows my full system schematic. This may give you an idea of how all the parts of the system are connected together. In the UK the system has to be installed by a qualified person so I was abled to give this to my Solar installer so he could see in particular how I wanted my water heater and Solar/Battery backup connected.
The full size schmatic can be seen here http://www.brettoliver.org.uk/Solar_Power/imagies/SchematicSolarMains.jpg
Using Inverter Modes to Save Money All Year Round
Here in the South of England in the summer months we get plenty of sun to run the house and export power back to the grid.
In Autumn/Spring we can power the house and sometimes export a little power back to the grid.
In winter with the short days and low sun there is just not enough solar energy to power the house all day.
You can still save around 50% off your electricity bill all year round using the correct energy tariff, different inverter priority mode and your battery.
Pic 1 From SolarAssistant you can see I charge my battery and heat my water etc on cheap rate and export/use my battery at all other times. There are a couple of blips where the combined solar and battery otput could not cope with the demand from the house.
Tariff
In the UK there are many Tariff options availabe some especially for Solar Power that include a good export rate and some "cheap" hours at night.
I use a tariff that gives me 3 hours cheap electricity at night. 3 hours expensive electricity in the evening and 18 hours standard rate. The export rate gives 3 hours low export rate at night, 3 hours very high export rate in the evening and 18 hours standard export rate.
Using this tariff I try to use all my high power items water heating, cloths washing and dishwashing and battery charging in the 3 hour cheap period.
I then run off the battery and any available solar power during the day.
My export rate is always higher than the import rate at the time I charge my batteries.
On most days even in winter with a little solar top up my battery gets me through so most of my energy uses cheap rate electricity.
Inverter
There are three priority modes for inverter Load First, Grid First, and Battery First to meet different operational scenarios.
Using SolarAssistant or your Inverter software you can program your Inverter to switch to differnet priority modes to suite your energy tariff and solar level.
Battery
In winter your battery sits there idle for most of the time but using the correct Invertor Priority Mode/Energy Tariff to charge your batteries using cheap rate electricity keeps them saving you money all year round.
The Inverter Priority Modes are very confusing so the next few steps show in detail what each mode does.
Note different Inverters may use alternative names for the Priority modes.
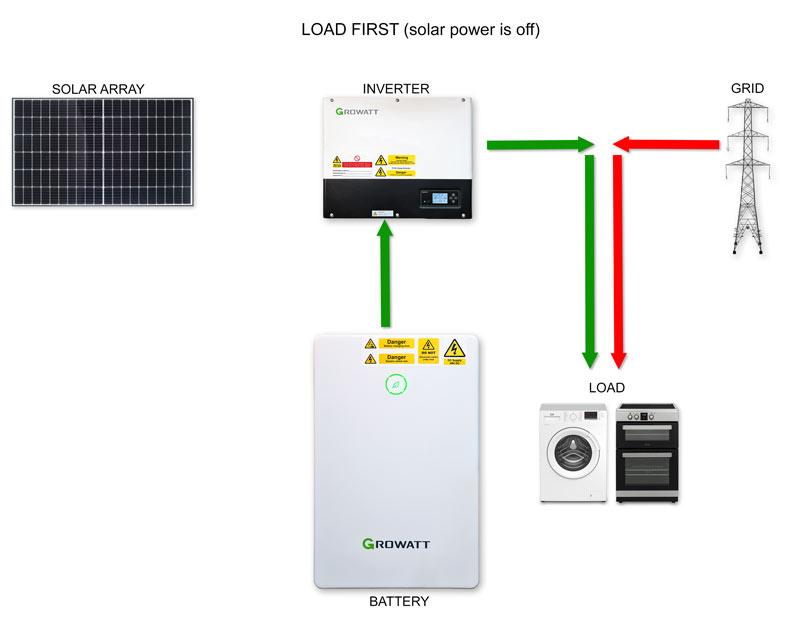
Inverter Priority Modes Load First
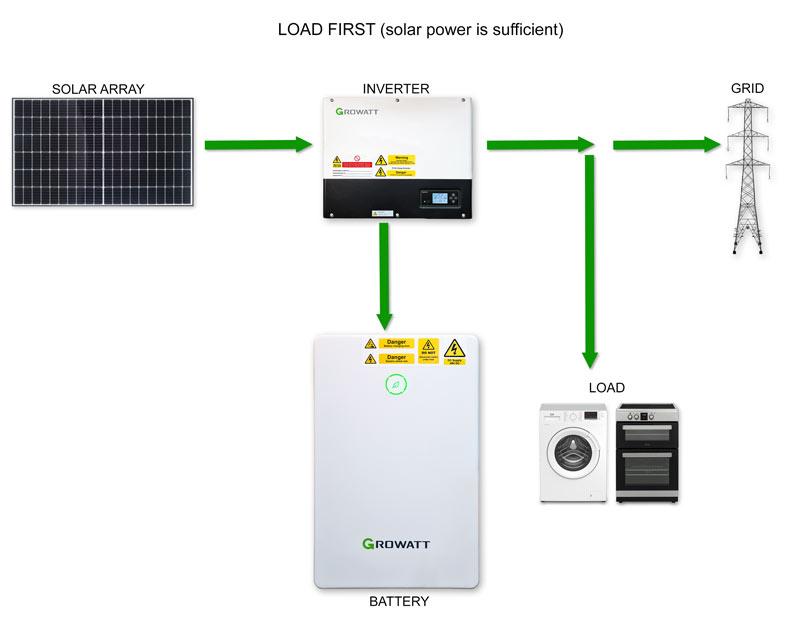
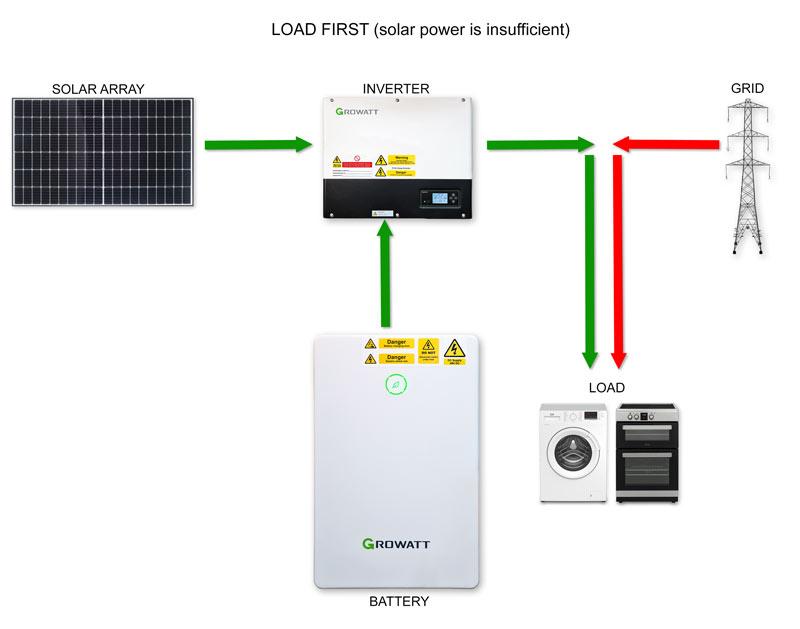
Load First
Load first is the default mode, when it's working in this mode, PV energy would be used for the load and then battery.
When PV is Insufficient the battery discharges.
Pic 1 When PV is sufficient for the load the excess energy is used to charge the battery. If there is no battery or battery is full, the excess energy is exported to the Grid.
Pic 2 When solar power is insufficient and lower than load power, the battery will be discharged automatically and support the load along with solar power.
If the battery discharges to the discharge-stop SOC*, it will stop, then the solar and grid will support the load.
Pic 3 When solar power is off and therefore lower than load power, the battery will be discharged automatically and support the load.
If the battery discharges to the discharge-stop SOC*, it will stop, then the solar and grid will support the load.
Note:The “Discharge Stop SOC” is available for setting.
*The battery power supply can be restored when the battery is charged to the value of “Discharge-stop SOC +3%” by solar.
Battery First
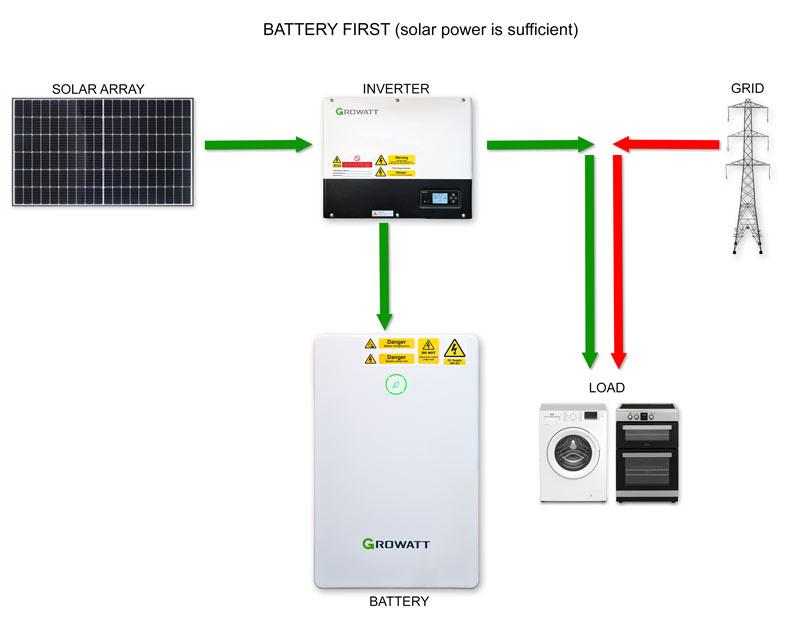
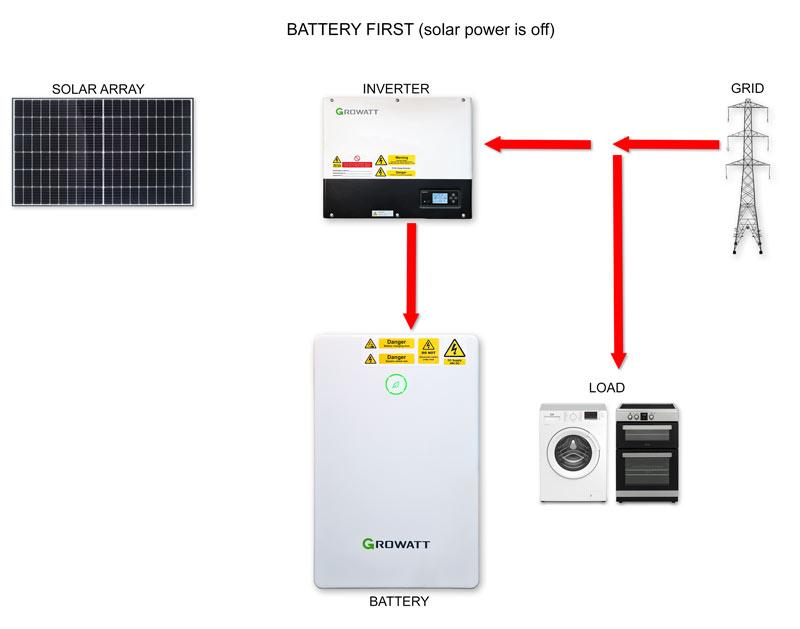
When SPH inverter is working in this mode the battery would be charged first, and is suitable for use when the when the electric import charge is low.
The user needs to set the mode ON and OFF time, and the end time of battery SOC.
Users can set power rate which is less than the battery maximum output power.
If the customer doesn't enable the AC CHG (AC grid charging functions) the Inverter will charge battery by PV power as much as is possible up to the "Charge Stop SOC" in the config.
If the customer enables the AC CHG (AC grid charging functions) the Inverter will charge battery by PV power and AC power from the grid as much as is possible up to the "Charge Stop SOC" in the config.
For multi-step electricity price tariffs , the SPH inverter can store the power into the battery when the electricity price is in the off-peak rate and use the power in peak rate time or save the energy for blackout.
Pic 1 When the solar is sufficient, solar will charge the battery at top priority, and the surplus solar power will support the loads with the grid.
Pic 2 When the solar is insufficient, the solar will charge the battery at top priority, while the load will be powered by the grid.
If you enable the AC Charge function, the grid will not only support the load but also charge the battery together with solar power until battery reaches “Charge Stopped SOC”.
Note:The “Battery Charge Power Rate”, “Charge Stopped SOC” “AC Charge Function” and “Charge Period” are available for setting.
Please do set the “Charge Period” otherwise the operation modes will be adjusted to “Load First” automatically.
Grid First
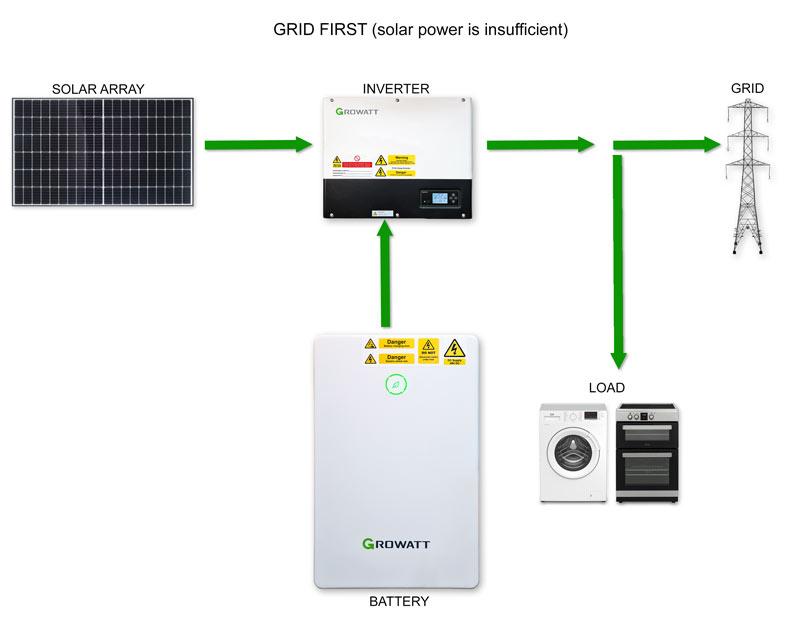
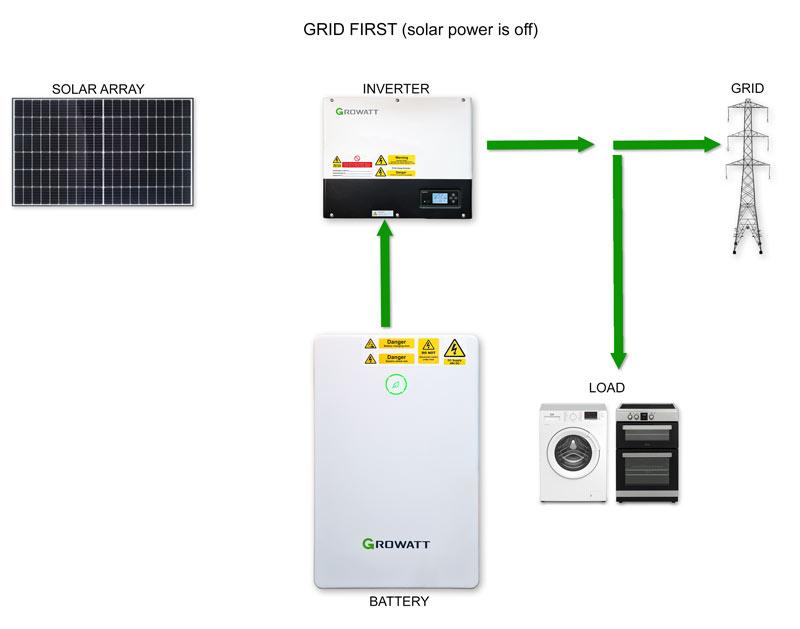
Grid First
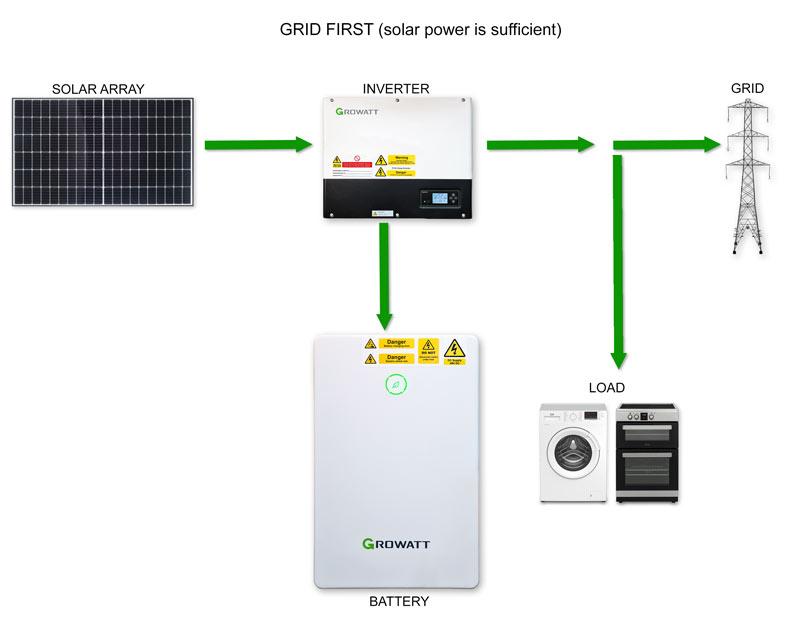
When SPH working in Grid-first mode, the PV energy would export to the Grid first. This can be used during the period when the electric import charge is at it's highest.
User need to set the mode ON and OFF time, and the end time of battery SOC.
User can set power rate which less than the battery maximum output power.
Pic 1 When solar power is sufficient, the solar power will supply the max. AC power output to the load and the grid, then the surplus solar power will charge the battery.
Pic 2 When solar power is insufficient, the solar and battery will work together to ensure the max. AC power output, supply power to the load and export power to the grid.
The “Battery Discharge Power Rate”, “Discharge Stopped SOC” and “Discharge Period” are available for setting.
The “Discharge Period” must be set otherwise the operation modes will be adjusted to “Load First” automatically.
Pic 3 When solar power is off, the battery will work to ensure the max. AC power output, supply power to the load and export power to the grid.
The “Battery Discharge Power Rate”, “Discharge Stopped SOC” and “Discharge Period” are available for setting.
The “Discharge Period” must be set otherwise the operation modes will be adjusted to “Load First” automatically.
Setting Priority Modes on SolarAssistant
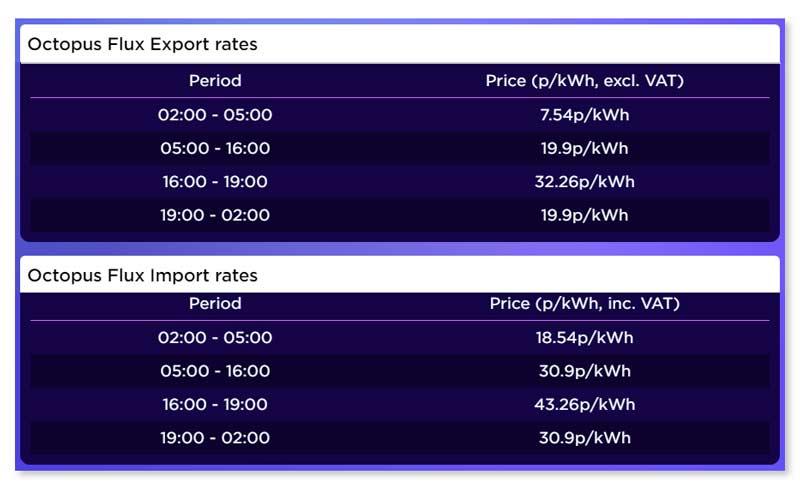
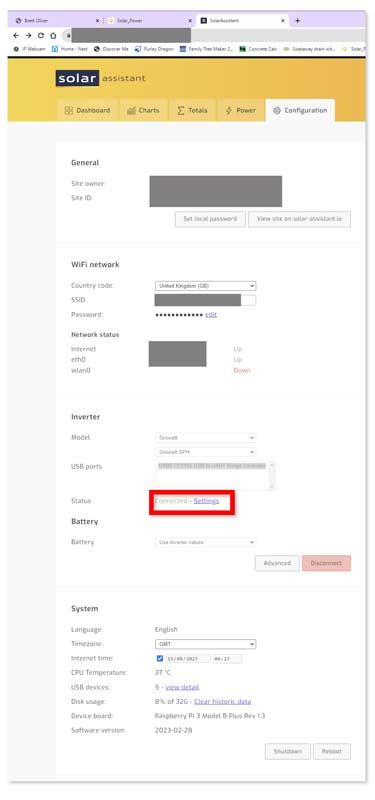
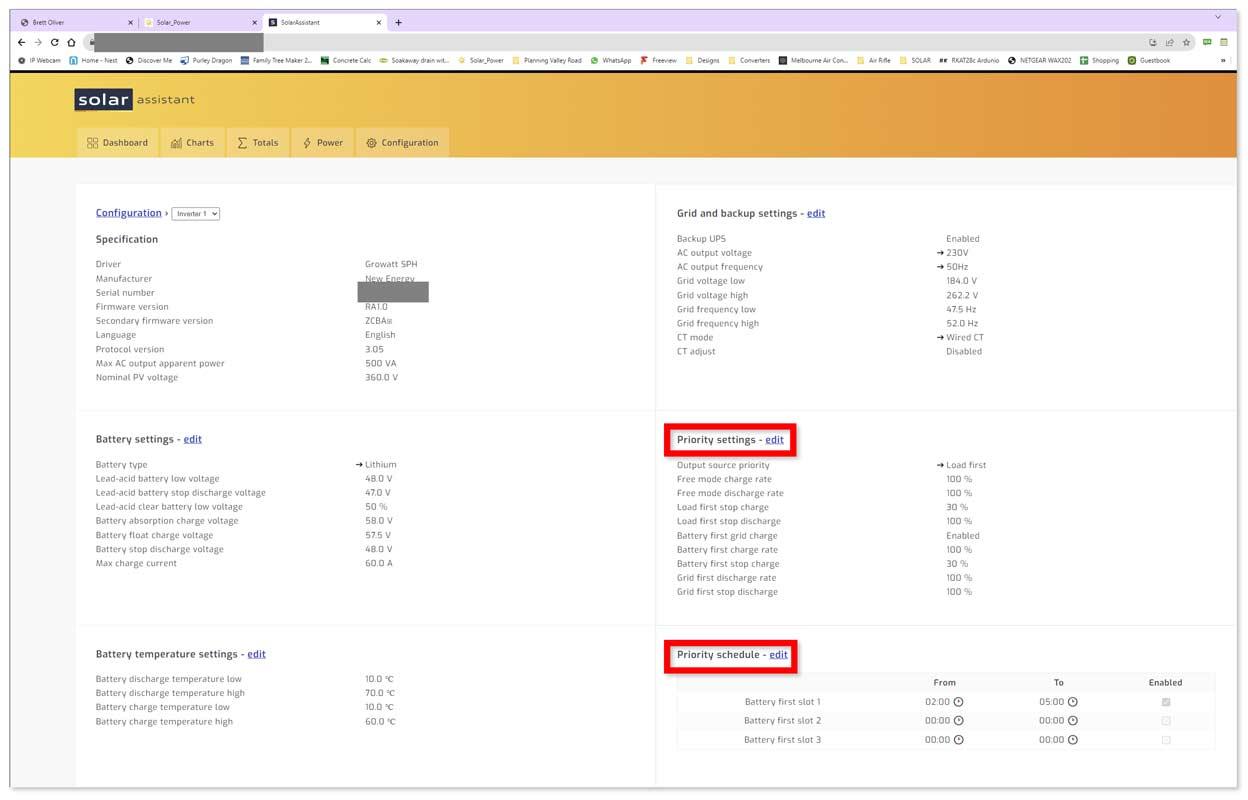
Depending on your energy tariff you will want to adjust your battery use to make the most of cheap rates.
Pic 1 shows the Flux tariff from Octopus energy.
Between 02:00 & 05:00 the import rate is set to 18.54p/kWh rather than the normal rate of 30.9p/kWh and the peek rate of 43.26p/kWh.
I use this period to heat my hot water (timer setting on my iBoost), top up my battery (using "battery first" priority mode on the inverter) and run the dish washer/washing machine.
I try to keep my batteries with enough power to cope during the peek period from 16:00 to 19:00 hrs and hopefully until the next cheap period when the batteries are topped up.
Pic 2 On SolarAssistant the settings can be found in the "Configuration" tab inder "Inverter".
Click on "Settings"
Pic 3 Clicking "Settings" opens the configuration window.
You will need to adjust the "Priority settings" and also the "Priority schedule"
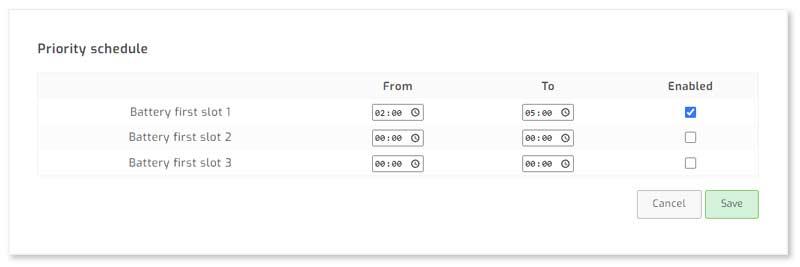
Pic 4 Go to the "Priority schedule" and click "edit".
Set the time you want the battery to stop discharging and get a charge if below a set level.
This is set to match the Octopus cheap tarrif time 02:00 to 05:00hrs.
Tick the enable box and then click save.
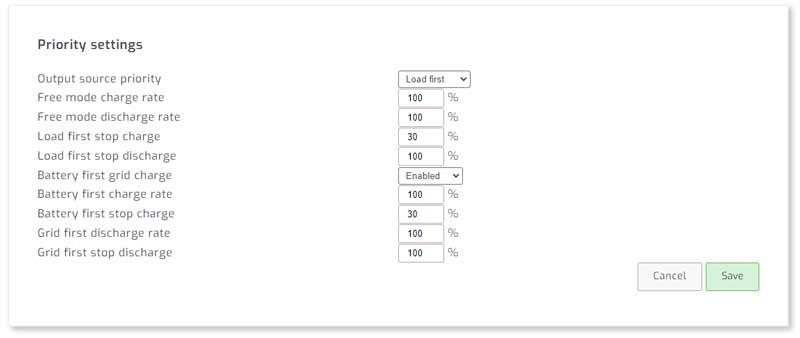
Pic 5 Go to the "Priority settings" and click "edit".
Set the "Battery first grid charge" to "Enabled"
Set the "Battery first stop charge" to 30%.
This will keep the battery at 30% charge until 05:00 when it will start to discharge again if required.
The % charge level may need to be adjusted up as the days get shorter in winter.
Note a 2nd charge "Battery first slot 2" may be required to get through the high tarriff rate from 16:00 to 19:00 if there is not much solar charge on a dull winter day.
Example Charts Showing Priority Modes in Use
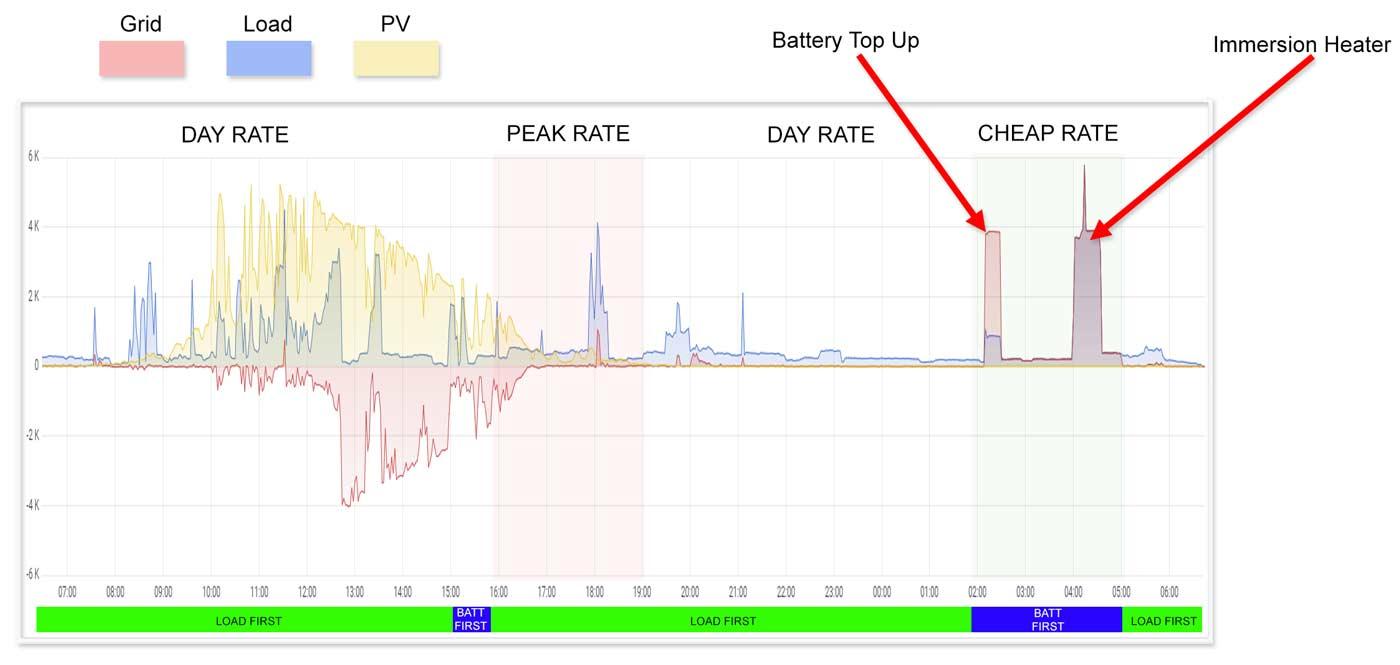
Once your priority modes are setup you can use the charts on SolarAssistant to check the settings are working as expected.
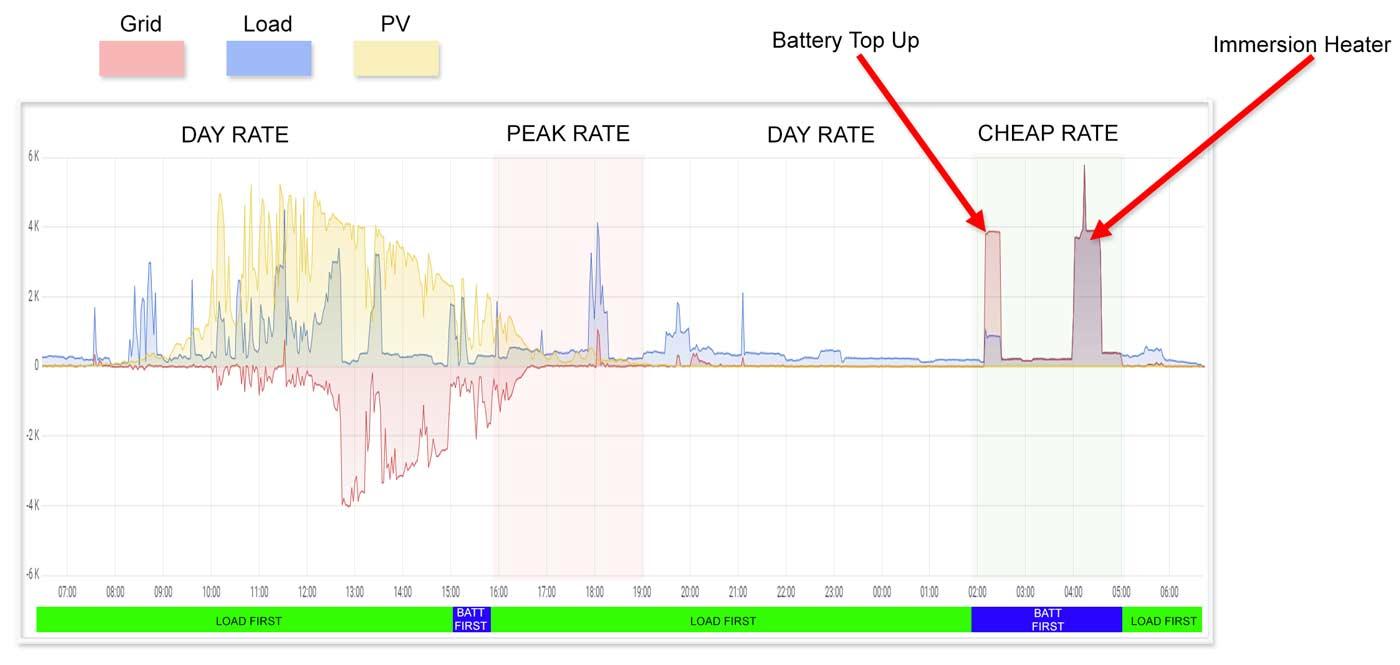
Pic 1 Days overview chart showing power from Grid,PV, Load and also the priority mode of the inverter
Between 07:00 and 16:00 this is day rate. In the summer the inverter is set to "Load first" during this period.
In winter where solar power is limited there is a short period from 15:00 to 16:00 where the inverter is set to load first. The charge level is set to charge the batt only if it falls below a set charge level.
The charge level set is enough to get through the 3 hour peak period from 16:00 to 19:00.
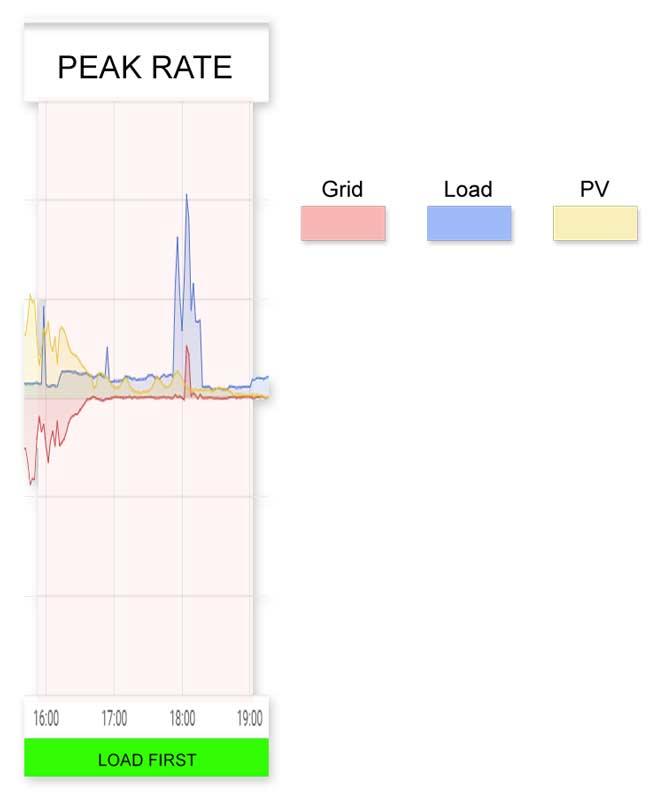
Pic 2 Peak Rate
The chart below shows the peak rate period where the electricity import and export cost is at it's max.
The "Priority Settings" on the inverter is set to "Load First" during this period.
In an ideal world the Red line (Grid) on the chart should be on 0watts or - ve watts (exporting).
The max output from the battery is 3kWh so as long as the battery has charge and less than 3kWh load is switched on no power will be taken from the grid.
In summer months there is also some residual PV power from my ESE facing panels to also give some extra power at least for a few hours in this period (yellow line) and also export to the grid (red line).
The chart shows a 4.1kWh load peak at about 18:10 where the batt combined with solar power could not keep up with demand and 1kW power from the grid was consumed for a few minutes.
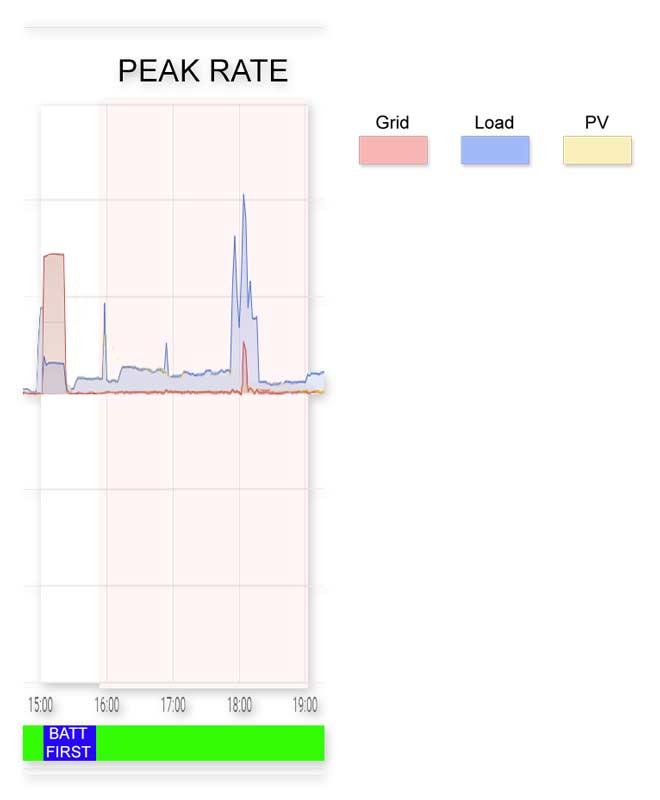
Pic 3 Peak Rate Winter
The chart below shows the peak rate period where the electricity import and export cost is at it's max.
The "Priority Settings" on the inverter is set to "Load First" during this period.
In an ideal world the Red line (Grid) on the chart should be on 0watts or - ve watts (exporting).
The max output from the battery is 3kWh so as long as the battery has charge and less than 3kWh load is switched on no power will be taken from the grid.
In winter months there is very little residual PV power from my ESE facing panels.
At 15:00 to 16:00 the inverter switches to "Batt First" and the battery will be topped up to a set charge level with enough stored power to get through the peak period.
The chart shows a 4.1kWh load peak at about 18:10 where the batt could not keep up with demand and 1kW power from the grid was consumed for a few minutes.
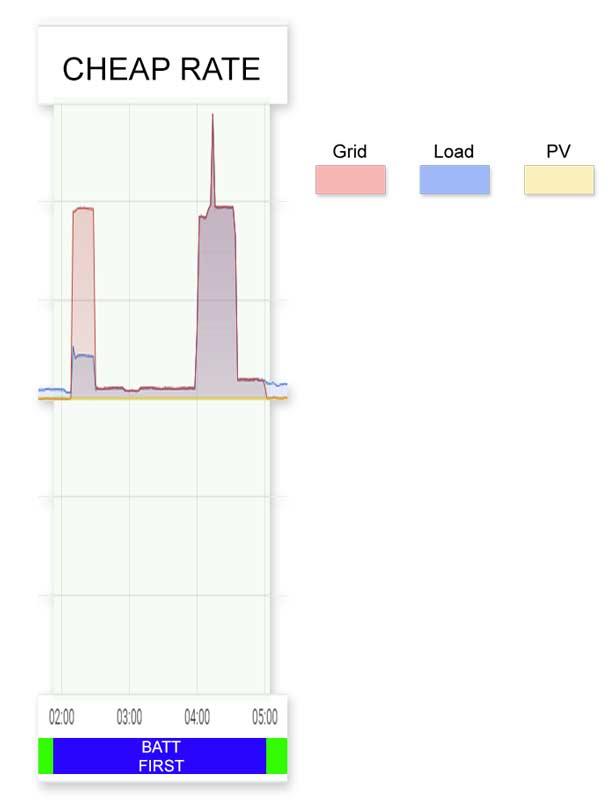
Pic 4 Cheap Rate
The chart below shows the cheap rate period where the electricity import and export cost is at it's max.
Using the "Priority Settings" and "Priority Schedule" on SolarAssistant the inverter is set to "Battery First" from 02:00 to 05:00.
During this period if the battery falls below a set charge level it will boosted to maintain it's charge at this set level until 05:00.
This allows the battery to maintain the load after 05:00 once the day rate begins until power from the panel kicks in early morning from my ESE facing panels.
The first peak in the chart is the batteries being boosted for 30mins.
The second peak in the chart is the iBoost Water heater kicking in to heat my hot water from 04:00 to 05:00.
The short spike at 04:30 is from the kettle going on for a cup of tea.
Once this 3 hour period is over the inverter switches to "Load First".
Emergency Power Supply EPS Setup

In Europe the "Grid" which supplies power to the network is switching to Green Power from Solar, Wind and Tide as well as nuclear power. There is still a reliance on Gas and a last resort coal when the others can't supply enough power.
With the war in Ukrane gas has been restricted and can be in short supply in periods of peak demand. Power network operators have the option of switching off parts of the grid for short durations to ration power.
There blackouts as well as other power outages caused by breakdowns and severe weather are a real nucence.
Most inverters connected to batteries have the option to supply emergency power during these periods.
Emergency power can be a single emergency socket, a few emergency sockets spread around the house or automatic swichover of the whole house supply.
Depending on your the country there are various rules which apply when using the Emergency Power Supply function of your inverter. Your solar installer will let you know what is permitted in your location. Normaly to ensure the safety of Power Network engineers in a power cut the solar system must be disconnected from the grid.
This is done internally by the inverter which will switch to EPS mode.
Your Inverter manufactuer may supply an automatic relay to switch EPS socket on.
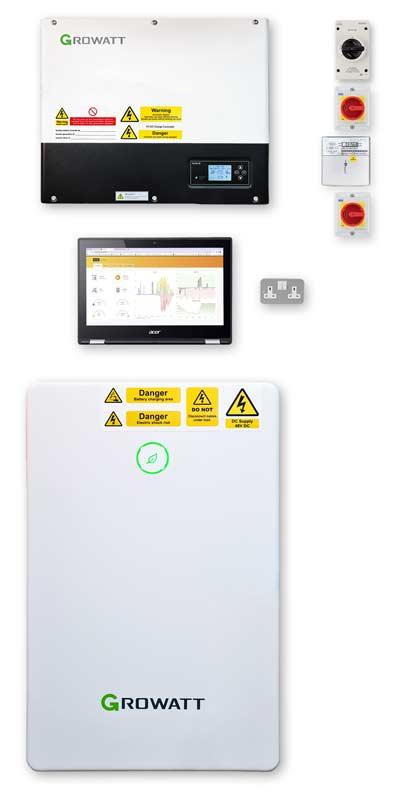
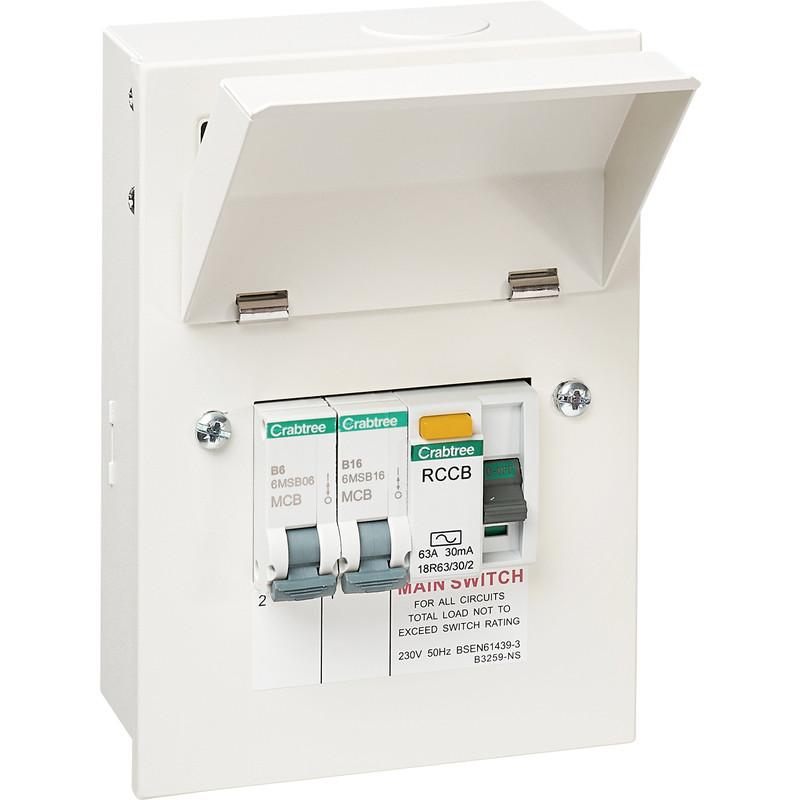
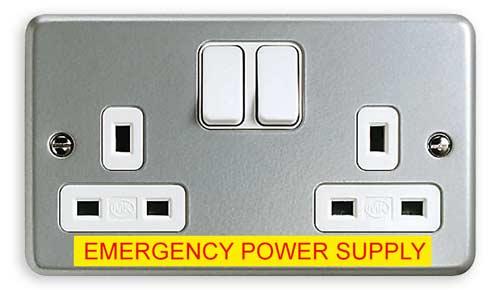
After talking to my installer I decided to go for a manual system which in the event of a blackout feeds power to an emergency consumer unit (pic 2) fitted with a RCD. The consumer unit is isolated by a switch (pic 1). The consumer unit feeds power to a few emergency double sockets (pic 3) in the house so I can run essential things like the boiler and lights during a power cut.
In the UK to use EPS you will need a seperate Eth as you can't rely on the earth provided by the network in the event of a fault. The usual way of providing an earth at the house is to install an earth rod but due to many services in the vicinity of the earth location I decided to use a Condudisc Earth video here .