Connecting to SQLite Database and Creating Tables Using C# (Csharp)
by xanthium-enterprises in Circuits > Raspberry Pi
2781 Views, 0 Favorites, 0 Comments
Connecting to SQLite Database and Creating Tables Using C# (Csharp)

In this 2part Instructable,
We will teach you How to Connect with an SQLite Database using the CSharp (C#) language and create tables in the database.
We will also talk about various connection states of the SQLiteConnection Class and how to use them in your C# program.
You can find the second part of our Instructable where we teach you how to insert data into SQLite database here
This Instructable is intended for somebody who wants to learn to use a simple database (SQLite) without the hassle of running a full fledged database server for storing data in your PC or Single Board Computer like Raspberry PI.
With the advent of .NET Platform on Raspberry PI, We can use C# language to create and run programs on Raspberry PI SBC.
Original tutorial on Connecting to a SQLite database from C# can be found here
Please note that, We also have SQLite tutorial using other Languages too, You can find the Complete SQLite3 Programming Tutorial using Python 3.xx here
Supplies


Here we assume that the user is familiar with basic C# language and database concepts like tables, Rows and Columns.
To use this tutorial , you will need to download the following tools from the internet all of whom are either free or open source
- Microsoft Visual Studio Community Edition (Download)
- or .NET SDK CLI (Download)
- or Visual Studio Code with C# Dev Kit (Download)
Here C# Dev Kit is an extension for Visual Studio Code that helps you manage your code with a solution explorer and test your code with integrated unit test discovery and execution.
DB Browser for SQLite for viewing tables and running SQL Queries. You can download it from here
C# Source Codes + Sample Database
- You can find all the C# source codes for SQlite database Access along with a sample database from our Github Repo
Installing System.Data.SQLite Library in Visual Studio

The C# Base Class Library do not have classes or methods needed to access the SQLite database and read and write data to it .
For Connecting to a SQLite Library and storing data into it we need to install the System.Data.SQLite Package using the Nuget Package manager.
This is the official SQLite database engine for both x86 and x64 along with the ADO.NET provider. This package includes support for LINQ and Entity Framework .
System.Data.SQLite.Core is the trimmed out version of the System.Data.SQLite Library
Please note that you can also use the Microsoft.Data.Sqlite package to communicate with the Sqlite DB too.
You can use the NuGet Package manager in the Visual Studio to install the required libraries.
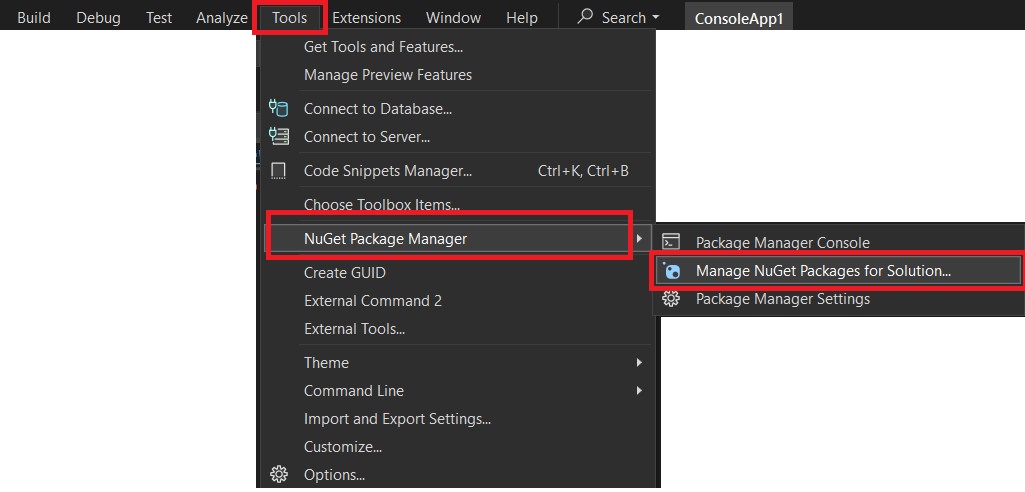
Go to Tools -> "Nuget Package Manager" ->"Manage NuGet Packages for Solution". As shown below

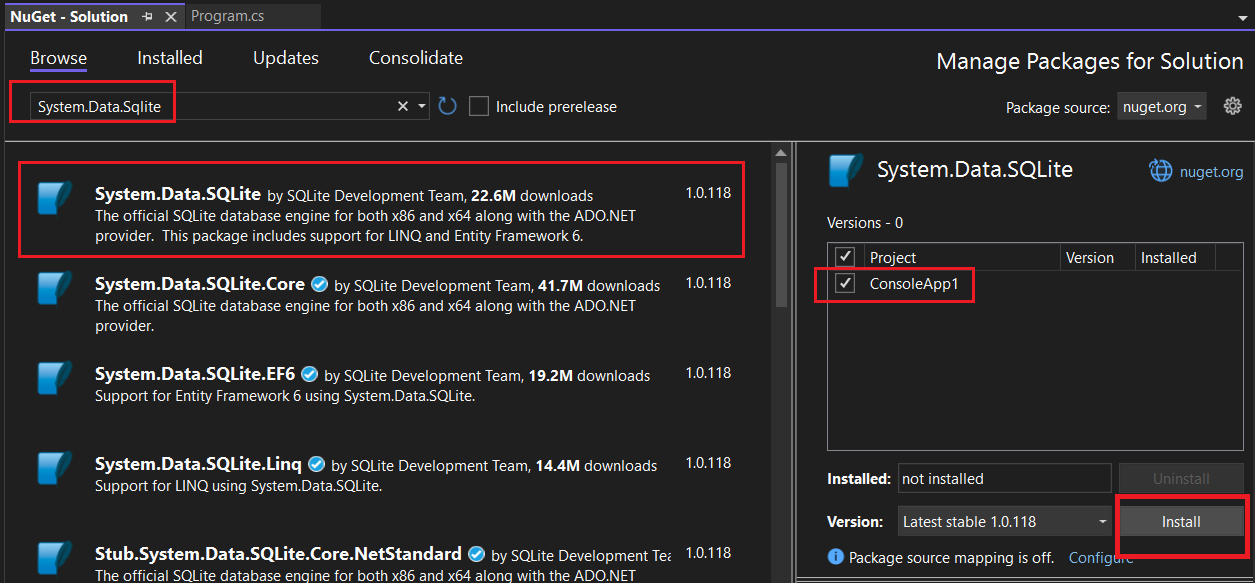
which will bring up another window as shown below

Now on the search bar, type the name of the data provider you want for example in our case System.Data.SQLite Now Click Install.
Now the Library installed for your specific Project and you can now start using them.
Installing System.Data.SQLite Library Using .NET SDK CLI


Not all platforms support Visual Studio or You want to have a light weight version of the development environment,For that purpose you can use the .NET SDK CLI for developing software using your console or command line .
Here we will teach you how to create a C# SQLite Project using .NET SDK CLI and install System.Data.SQLite Library.
If you are new to .NET SDK CLI ,Do check out this tutorial on How to use .NET SDK CLI for beginners
First we create a Console Project using .NET SDK as shown below
The go to the directory C#_Sqlite_DB_Project.
Now add System.Data.SQlite. Nuget package to your Project using the below command from that directory.
Now if you open the C#_Sqlite_DB_Project.csproj file you can see the references to package System.Data.SQlite as shown below
Now you are ready to program sqlite db using C#
Connecting to SQLite Database Using C# (Csharp)


According to ADO.NET terminology opening a database is called connecting to a database, this is because database's like MySQL, PostgreSQL usually run as separate processes on local machine or another machine on the network and your application will connect with it using TCP/IP protocol.
In our case, we are using SQLite database which is a Server less database that exist as a file on your disk.
You do not have to install any SQLite Database before running your C# Code.
When we connect to the database using specific name and the database of that name does not exist on the disk, a new database is created by the C# Code.
Connecting to SQLite DB from C#
Now we will connect to SQLite Database using the SQLiteConnection class provided by the System.Data.SQLite Library
To use the SQLiteConnection class , we need to provide the name of the database which we want to connect or create on our disk.
This is done by using a specifically formatted string called Connection String. The format of the connection string is shown below.
Now we will create a connection to SQLite database using C# and attempt to open it. Here SqliteDatabase.db is the name of the database you want to create or open.
If Database with the name SqliteDatabase.db exists, it is opened .If no database exists a new one called SqliteDatabase.db is created on disk.
The code is shown below
here the line
creates a connection object called MyConnection which opens a connection and closes it
You can find the database in your directory that contains the exe file. In Visual Studio ,you will find the database in
Connection States of SQLite Database
In C#, when working with SQLite, the connection states are primarily managed through the SQLiteConnection class. These states represent the current condition of the connection to the SQLite database.
SQLite connection states are represented as an enum in the System.Data.SQLite library.
Here is a list of connection states provided by SQLiteConnection
- Closed - Connection to the database is closed. This is the default state.
- Open - Connection is open and ready for database operations.
- Connecting - Connection is in the process of being established but has not yet been fully opened
- Executing - Connection is in the process of executing a command
- Broken - this state indicates that the connection has been compromised, and it is no longer valid
Code to check the status of the connection in sqlite using C#
Connection states help ensure that the database connection is in the right state before performing an operation. For example, you want to make sure that the connection is open before attempting to execute a query.Properly checking the connection state ensures that you close the connection when it's no longer needed.
If you don't handle states correctly, you might end up with open connections or unnecessary database interactions, which can lead to resource leaks and reduced application performance
Creating a Table in SQLite Database Using C# (CSharp)


In a Relational Database Management System (RDBMS) like SQLite, a table is a collection of related data organized into rows and columns. Each table represents an entity (such as a person, product, or order) and holds the data for that entity.
A table consists of
- Columns (Fields)-Each column represents a particular attribute or property of the entity. Each column has a defined data type, which dictates the type of data it can store
- Rows (Records)- Each row represents a unique record or entry in the table. A row contains values corresponding to the columns in the table
Here is an example of a table in a sample sqlite database opened in DB browser.
Gaps in the database are intentional and is to show how to read null values from SQLite databases.

Major steps involved in the process of creating a table in SQlite DB using C# are the following
- Create a SQL Query to Create a Table
- Create a Connection Object using SQLiteConnection Class
- Create a Command Object to Execute the SQL Query using SQLiteCommand Class
- Open the Connection to SQlite database
- Execute the SQL Query using ExecuteNonQuery() Method
- Close the connection to database
SQlite Table Structure


Here we will design a simple table to store our data and define the datatypes used to store the values. After the table structure is finalized we will create a SQL Query that will create that table inside the SQLite database.
Our Database will look as shown in the below image. It will contain 6 columns to store various types of data
- Id is the PRIMARY KEY and uses INTEGER datatype. A primary key is a column (or a combination of columns) in a table that uniquely identifies each row in that table. The primary key ensures that each record (row) in the table is distinct and can be referenced efficiently
- Name uses VARCHAR (255 characters) datatype. Here VARCHAR is short for Variable character and is used to store strings
- Age uses INTEGER
- DateOfBirth, uses TEXT and stores date in ISO8601 format (YYYY-MM-DD)
- Email uses VARCHAR (255 characters) datatype
- Price uses REAL datatype
Now we will craft an SQL Query to create the above table and name it as Customers.
CREATE TABLE This is the basic command used to create a new table in a database.
IF NOT EXISTS This condition prevents an error if the table Customers already exists. If the table exists, the command does nothing. If the table does not exist, it is created.
Customers: This is the name of the table being created. It will store data related to customers. In this case, each row in the table will represent one customer, with their specific information (ID, Name, Age, Date of Birth, Email, and Price).
Now we will store this command in a string variable and execute it using SQLiteCommand Object.
You can also use DB browser to design and create table ,if you prefer a GUI interface
Create a SQLiteCommand Object to Execute the SQL Query

To Execute the SQL Query for table creation inside the SQLite Database ,we have to use the SQLiteCommand Class provided by the System.Data.SQlite Library.
SQLiteCommand requires two parameters to work
- A Connection Object (SQLiteConnection)
- A String containing the SQL Query
Now we have already learned how to create a connection in the previous step. Now we will open the connection to database and then execute it using the ExecuteNonQuery(); method .
Partial code for creating a table inside the sqlite database using C# is shown below
here
executes the create table SQL query
Please download the full source code from our Github
Once you run the Program a table is created inside the SQLite database and you can view them using the DB Browser for SQLite as shown in the below image.

The database is unpopulated and you have to add data to the table. In the next Instructable, we will learn how to populate the SQLite table using C#.