Compile the Source Code for Microgranny Sampler
by anyway59 in Circuits > Arduino
366 Views, 2 Favorites, 0 Comments
Compile the Source Code for Microgranny Sampler

The Bastl Microgranny is a fun and quirky arduino-based granular sampler, ideal for electronic music-making.
It is based on the atmega328p, the microcontroller chip used in an Arduino Uno. To make the Microgranny hackable, Bastl have generously made the source code publicly available.
Being able to modify the source code opens up great potential for hacking and enhancing the sampler, limited mostly by your imagination and programming skill. This Instructable describes a way to compile the source code and upload it to a Microgranny, which is the starting point for any hacking journey.
In another Instructable I described a way to make a home-built Microgranny using an Arduino Uno:
https://www.instructables.com/Microgranny-Sampler-Completely-Home-built-not-a-Ki/
... such a home-built device would be a great platform for testing and using modified source code, as described here.
WARNING & DISCLAIMER: The steps described below are experimental ideas. You follow them entirely at your own risk. Uploading new code may affect functionality and potentially make your device unusable, as well as invalidating warranties. Do not follow the steps on this Instructable unless you completely understand and accept responsibility for these risks.
Supplies
Microgranny (e.g. home-built) - or purchased but please see warnings above
USB-A to USB-B cable and/or FTDI USB adaptor
Laptop / PC or equivalent with the following software installed:
- Arduino IDE (e.g. Arduino IDE 2.0.2)
- Git (e.g. Git for Windows)
Internet connection
Download Source Code & Libraries

The first step is to download necessary files and libraries from Github. For this it's helpful if you have a basic understanding of Git (the version control software) but if not you can just use the commands as given.
On Github you can find the official repository of the Microgranny source code at:
https://github.com/bastl-instruments/bastlMicroGranny
It's useful to give some background explanations before moving on to downloading stuff. As you'll see below, there remain several open questions and areas needing guesswork. If anyone can shed light on some of the uncertain points please comment or get in touch!
If you want to use the Source code above, the immediate big challenge is to find a compatible SDFat library (code which interacts with the SD card). This is because the code is apparently dependent on an undefined version of the SDFat library from 2014 or thereabouts. Recent SDFat releases are not compatible!
I've found two workable approaches for the SDFat dependency problem:
- Recommended: You can use the repo kindly supplied by the user weskoop on Github (this is the approach covered here). This is: https://github.com/weskoop/SdFat_bastlMicroGranny I created a fork (copy) of this repo: https://github.com/anyway59/SdFat_bastlMicroGranny
- You can clone the SDFat library and roll-back to a commit from 2014: e.g.
git clone https://github.com/greiman/SdFat.git
git checkout -b tempbranch 1fe7842035568
#Then the files should be usable as the SDFat library
When you have a compatible SDFat library, the official source code will still need some edits before it compiles successfully (errors like: "error: 'prog_char' does not name a type"). This is probably due to changes in the Arduino IDE / AVR platform for the Arduino UNO board which have occurred since 2014.
Once you have software which compiles and you upload it to a device, it still may not work exactly like the official hex file release and you'll need to make a few further tweaks to the code to get a device which behaves similarly to the hex release. I have no idea why this is so, but I am also including details of the needed tweaks in step 5.
Enough background info, now to download some code!
Any Git client can be used, but the examples here use the Git command line. I have a Windows laptop and 'Git for Windows' which provides the 'Git Bash' command line tool, but any other Git client or command line with Git available should be usable with the same end results.
On your PC / Laptop, create an empty folder. A Git client is now used to clone the needed repositories from Github.
We will refer to the path of this folder as the <REPOSITORY-HOME>
On my Windows 10 laptop, for the purposes of illustration:
REPOSITORY-HOME = "C:\Users\phili\OneDrive\Documents\MG_Build"
In Git Bash, clone the SDFat dependency repo (https://github.com/weskoop/SdFat_bastlMicroGranny or https://github.com/anyway59/SdFat_bastlMicroGranny):
cd "C:\Users\phili\OneDrive\Documents\MG_Build"    # substitute with your REPOSITORY-HOME

git clone https://github.com/weskoop/SdFat_bastlMicroGranny
In Git Bash, clone the Microgranny source code repo (https://github.com/anyway59/bastlMicroGranny). This is a fork of https://github.com/bastl-instruments/bastlMicroGranny with compilation errors corrected.
cd "C:\Users\phili\OneDrive\Documents\MG_Build"    # substitute with your REPOSITORY-HOME

git clone https://github.com/anyway59/bastlMicroGranny
Prepare the Arduino Sketch Folder


After following the step above, your REPOSITORY-HOME should have all the code you need. It now needs rearranging before you can create a build with it.
First identify the folder which your Arduino IDE is using for the sketches and libraries.
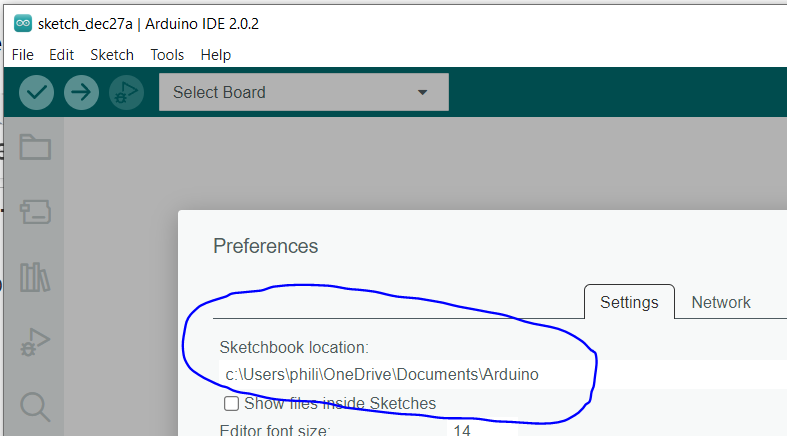
Using the Arduino IDE 2+ , if you go to File > Preferences there should be a field showing the Sketchbook location.
In my case it is: "c:\Users\phili\OneDrive\Documents\Arduino" ... but obviously it will be different for you.
If you have used the Arduino IDE for other projects, there will be sketches and libraries already in your Sketchbook location folder. Since it is possible that existing libraries may conflict with the libraries needed for Microgranny, you may choose to back-up your Sketchbook location folder and then clear it out before re-populating it in the way described below.
See the following article for more general information about how the data in the Sketchbook location is organized:
A. Now you need to create a folder called "SDFat" in <Sketchbook-location>/libraries, and then copy all the files and folders from <REPOSITORY-HOME>/SdFat_bastlMicroGranny to <Sketchbook-location>/libraries/SDFat (There is a screenshot illustrating this.)
B. You then need to create a further folder called "microgranny" in <Sketchbook-location>/libraries, and then copy all the files from <REPOSITORY-HOME>/bastlMicroGranny (but not the 'examples' folder) to <Sketchbook-location>/libraries/microgranny (There is a screenshot illustrating this.)
NOTE: You will have to repeat this copy each time you edit the source repo in REPOSITORY-HOME
Finally, choose one of the sub-folders of <REPOSITORY-HOME>/examples to use. If you are not sure, I recommend you choose microGranny2_5 and the rest of this instructable assumes this. However you could choose any of the microgranny versions as a starting point.
C. So now copy <REPOSITORY-HOME>/examples/microGranny2_5 to <Sketchbook-location> (so that you have a folder called microGranny2_5 at the top of <Sketchbook-location> ). There is a screenshot illustrating this.
NOTE: You will have to repeat this copy each time you edit the source repo in REPOSITORY-HOME
Compile the Software


If you have followed the previous steps correctly, you should now be able the compile the software for the Arduino Uno (or atmega328p).
Open the Arduino IDE. You do not have to have any hardware connected at this point, but you need to select the board via Tools > Boards > Arduino AVR Boards > Arduino Uno (see screenshot)
Now open the microGranny2_5 software via File > Open and select the file microGranny2_5.ini which should be in <Sketchbook-location>/microGranny2_5 (see screenshot)
To try compiling, now click on the large tick button or do Ctrl+R. A new window should open and compilation should start. After a few seconds, if all is well, you should see something like:
Sketch uses 28216 bytes (87%) of program storage space. Maximum is 32256 bytes.
Global variables use 1811 bytes (88%) of dynamic memory, leaving 237 bytes for local variables. Maximum is 2048 bytes.
See also screenshot. If you do, congratulations!
If compilation fails with text in red font, then carefully recheck that you have followed all the steps correctly.
Upload to Hardware


Congratulations! You should now have software which compiles and which can be uploaded to a device e.g. Arduino Uno or Microgranny.
However, as mentioned earlier, this is not quite the end of the story, since it seems that a few further tweaks are needed to the code to get a device which behaves in a stable fashion. These tweaks are outlined in Step 5.
For now let's discuss uploading the software. For a home-built device with a standard Uno, you just use a USB-A to USB-B cable, as you would use to upload any sketch.
The following link has a post (dated Wed Aug 24, 2016 7:23 am) describing how to upload new software to a shop-bought microGranny:
This process involves using an FTDI USB adaptor, something which I have not yet tried myself (please see warnings at the start)!
After your device is connected, you should be able to choose the big arrow button or Ctrl+U from the Arduino IDE to start an Upload.
The Arduino IDE should indicate clearly when uploading is happening and completed and you may also see a message like "avrdude done. Thank you.". See also the screenshots.
Tweaks & Going Forward
Once you have uploaded your software, you should try out how the device behaves.
This is currently an area full of guesswork and experimentation (at least for me), but I will update this article and the Github fork if I can establish better fixes and explanations for what is observed. I would welcome any feedback and help here or via Github.
In the meantime I've noticed two types of problem when using the software built in the manner described above with a home-built Microgranny (using a standard Uno and a wave-shield):
1. Samples do not always load properly
Loading samples is found to be unreliable. Looking at the forks on Github I found a fix which seems to address this by the user calvinkosmatka. It is applied to the branch calvinkosmatka-fix-search in the repository https://github.com/anyway59/bastlMicroGranny
2. Device stops working at higher sample rates
The device stops working properly when the sample rate is increased beyond a certain point. As a workaround, I've made a change which stops the sample rate increasing beyond a certain value. It is applied to the branch limit-sample-rate in the repository https://github.com/anyway59/bastlMicroGranny
It would be great to understand the causes of this better and make a 'proper' fix.
It is possible that you may not see the same problems for your device, so the fixes above are provided as suggestions only.
If you wish to apply a fix, use Git Bash and navigate to inside your clone of the Microgranny source code repo (e.g. called 'bastlMicroGranny') then use Git comments to merge the fix. The following commands provide an example of how to do this for the limit-sample-rate fix:
cd "C:\Users\phili\OneDrive\Documents\MG_Build\bastlMicroGranny"   # <REPOSITORY-HOME>/bastlMicroGranny
git checkout master
git checkout -b tempbranch
git merge limit-sample-rate     # do further merges here to merge in other fixes
Then repeat the copy you did in Step 2-C above, and re-compile and upload as in steps 3 and 4.
Going Forward
If you have followed this Instructable you hopefully now have some working software that can form the starting point for a lot of future software-based hacks and enhancements to your sampler.
Areas which may be interesting to explore include customizing the MIDI implementation and building in a software-based LFO to modulate the pitch. And there are surely a lot of other ideas I cannot think of right now.
If you can please share any interesting updates via public Github forks!
Have fun!