Comovis (Co2 ,Temperature and Humidity Sensor for EspHome)
by Nayel Khouatra in Circuits > Arduino
5261 Views, 37 Favorites, 0 Comments
Comovis (Co2 ,Temperature and Humidity Sensor for EspHome)


Keep your home safe and healthy with Comovis! The air quality sensor gives you insight into the air you breathe; monitor PM2.5 particles, temperature, humidity, and more. With the lights indicator, you'll be able to know at a glance whether your air is safe or hazardous. You can also use Home Assistant platform to check air quality on your phone or PC. Let Comovis give you peace of mind when it comes to the air you breathe at home!
Supplies
 - Pour TV fête Noël etc. - 1 m 30 LED_m Amazon.fr Luminaires et Éclairage.png)


Adafruit breakout board usb-c female : https://www.adafruit.com/product/4090
Led strip WS2812 : https://www.amazon.fr/ws2812b/s?k=ws2812b
Grove Air_Quality_Sensor_v1.3 :https://www.seeedstudio.com/Grove-Air-Quality-Sensor-v1-3-Arduino-Compatible.html
AHT10 temperature and humidty sensor : https://www.amazon.fr/Pr%C3%A9cision-Digital-capteur-temp%C3%A9rature-dhumidit%C3%A9/dp/B08716SL9T
Seeed XIAO ESP32-C3: https://www.seeedstudio.com/Seeed-XIAO-ESP32C3-p-5431.html
ESPHome : https://esphome.io/
Overview

Home Assistant :
Home Assistant is an Open source home automation that puts local control and privacy first. Powered by a worldwide community of tinkerers and DIY enthusiasts. Perfect to run on a Raspberry Pi or a local server.
Features
Home Assistant integrates with over a thousand different devices and services.
Once started, Home Assistant will automatically scan your network for known devices and allow you to easily set them up.
- INTEGRATIONS
- AUTOMATIONS
- ADD-ONS
- DOWNLOAD APPS
ESPHome:
ESPHome is a simple yet powerful system that allows users to control ESP boards using YAML configuration files. It allows users to quickly and easily build custom firmware for sensors and devices without any programming skills.
SETUP


The first thing that we need to do is to configure Home assistant and EspHome. In order to that you need to install a (VM) Virtual Machine.
Step 1 : Installation
Click on the link below for the installation of the virtual machine OS, you can use the virtual machine of your choice but I prefer to use Virtualbox instead of the others :
https://www.home-assistant.io/installation/windows/
Then click on the link below to install the actual Virtual Machine :
https://www.virtualbox.org/wiki/Downloads
And finally create a folder called "Home assistant" and past all the files that you have downloaded.
Step 2 : Configuration for the Virtual Machine
Note: I will only show how to install home assistant with Virtual box, so the different steps could be different depending on your virtual machine.

Once you finished to install the Virtual Box, launch Virtual Box and in "New Tab" ,click on "expert Mode" and give your virtual machine a name then pick the directory where your copy the os of the virtual machine change the "type" by Linux and choose other Linux in the "Version" section, then select 2000 Mb of ram and click on "Use an existing disk"
Then click on add and select the OS of the Virtual Machine
And finally click on "Create".
Once you created the virtual machine you need to specify the network service that you use. Note: That Home assistant only accept ethernet port.
So in the setting go to system click on EFI and then click on network and select "bridge connector" and choose "Ethernet Controller" and Finally click on "ok" and lauch your virtual machine.
Voila ! You have configured your Virtual machine.
Step 3 : Configuration of Home Assistant and ESPHome :
Once you have launched The VM (Virtual machine) after the boot of the VM, You should see an IP address and also see the Home assitant URL :
This IP adress is in fact the IP adress of your Home Assistant local Server. In order to see your dashboard you need to copy The URL and to change the http://homeassitant.local by your IP adress and to past this IP address on the search bar :
PS : don't forget to add the :8123 after your IP address
Then you should see this:
Then type you name user name ect... and click on "Create account", this step can take a long time.
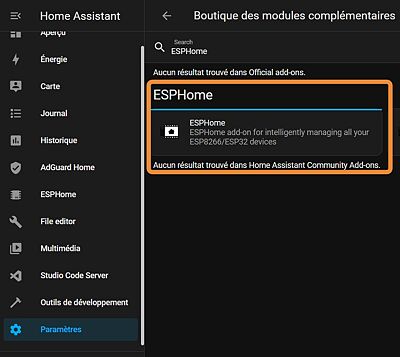
Now your are officially in Home Assistant now you have to install EspHome :
- Go to Settings
- Search for add-ons and click on it
- Search for ESPHome
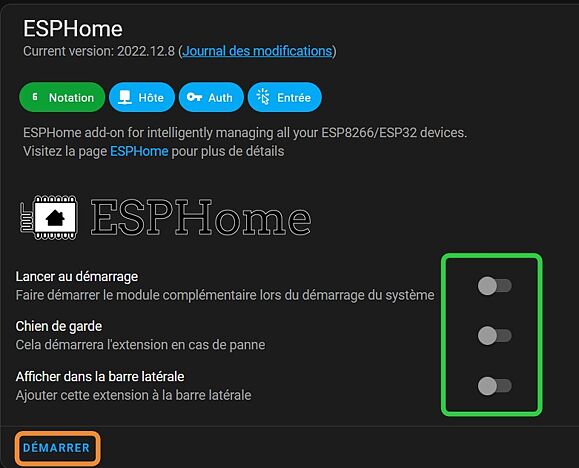
- Click on install
- And click on BOOT
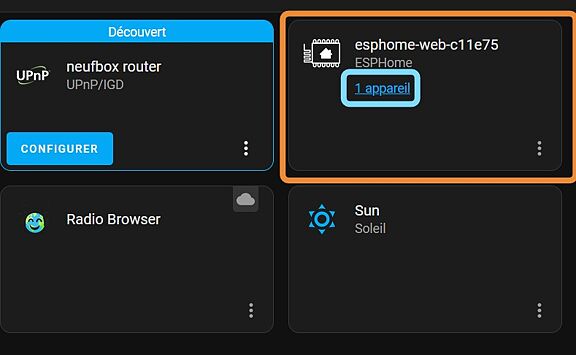
In your Home Assistant Dashboard you should see a notfication like this :
It's normal you didn't setup your ESP to be visible to do this, clic on the notification and click on "check it out" , once that is done you should see this :
After that you will see this :
Your Esp it is now ready to be use.
And Voila you have your esp configured and both Home assistant and ESPHome installed and configured !
Flowchart,Schematic and Circuit
![2023-01-28-23-16-38-400[1].jpg](/proxy/?url=https://content.instructables.com/FFO/9N4B/LDFYRPF9/FFO9N4BLDFYRPF9.jpg&filename=2023-01-28-23-16-38-400[1].jpg)


Flowchart :
The Comovis is link to EspHome (and also HomeAssistant). The esp32 (or esp8266) will take data from the two sensors (AHT10 and Air_Quality_Sensor_v1.3), based on the temperature, Humidity, and CO2, the status of the three LEDs strips will change of colors and at the same time send the data to HomeAssistant.
Note: If your device is well connected to wifi and home assistant, you should receive a notification about the appearance of a new device then what do you have to do is check your dashboard to see the differents data.
Circuit and schematic :
You will need the Seeed XIAO ESP32-C3 for this project, of course the other's esp are compatible with this project but I really do prefer this board for his performance and well done documentation .
Here is the pinout of the board :
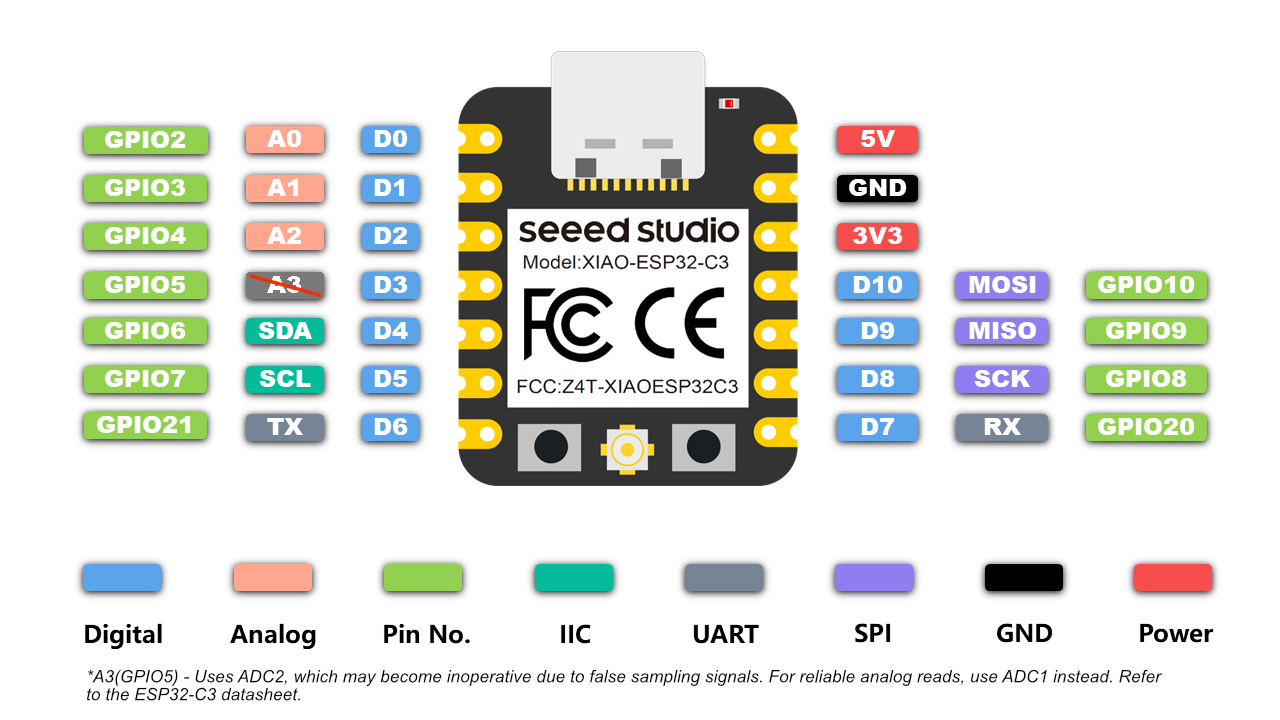
you will also need an AHT10 wich is a temperature and humidity sensor and the Air_Quality_Sensor_V1.3 wich is like the name suggest a air quality sensor that mesure PM.2 particules.
and a usb-c breakout board for the power.
In order to use those components you will need to connect the AHT10 to the SDA and SCL pin of the Seed XIAO esp32-C3 wich is GPIO 6 for the SCL and GPIO 7 for the SDA and connect the +5V and GND to the USB-C breakout board.
For the Air_Quality_Sensor_V1.3 you just have to connect the SIG pin of the sensor to the Analog pin of the ESP wich in this case is GPIO 2 and finnaly connect the GND and +5V to the USB-C breakout board.
Fusion360


3D printing of the comovis
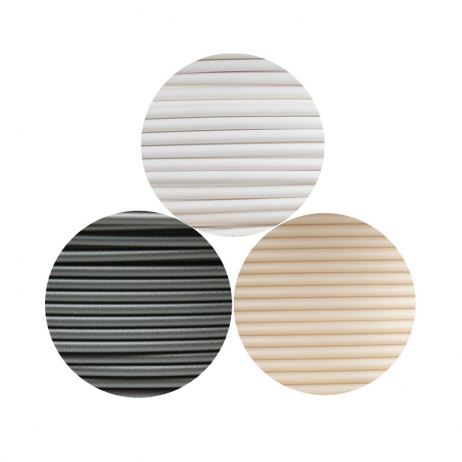
The Comovis was 3D printed with the filament ColorFabb AllPHA from ColorFabb wich is a recycled and biodegradable biodegradable filament wich is a pretty good for the environement it is also a strong and durable filament but it come with a high cost (around 47 euros).
Here is a link in case you wanted to 3D print the Comovis https://www.makershop.fr/filament-3d/5483-colorfabb-allpha.html
Filament ColorFabb AllPHA
The photos cannot be placed on the page so I added the photos but int the media , don't worry you juste have to follow the the chronology of the photos.
So, the first Screenshotis just the entire box with all the components, you can see in the second Screenshot the arrangement of all the Components thanks to the tools "section analysis" provided by "Fusion360".
On the third Screenshot we can see in the front one part of the diffuser this part is really important because you will be able to see more clearly the colors of the differents LED strips which is important for example if we want to know the temperature.
On the fourth Screenshot, we have the socket for the ESP8266 this part has his own location in the box has we can see on the fitfh Screenshot.
Finally the two last Screenshot represent the socket for the sensors.This tiny part have his own location on the very top of the box.Why this ? you may ask. To have better value when we take infos from the esp, you can see that we have holes in there wich help with the detection of particules in the air.
That's all for this part, all the 3D files are below, but wait a little bit because I will create a new version of this.Because the 3D model have big issue's that I need to fix.
CO2 Box
![2023-01-28-23-34-29-225[1].jpg](/proxy/?url=https://content.instructables.com/F1H/K7Y9/LDFYRW75/F1HK7Y9LDFYRW75.jpg&filename=2023-01-28-23-34-29-225[1].jpg)
![2023-01-28-23-35-44-866[1].jpg](/proxy/?url=https://content.instructables.com/FB0/MFXI/LDFYRW7U/FB0MFXILDFYRW7U.jpg&filename=2023-01-28-23-35-44-866[1].jpg)
![2023-01-28-23-38-17-099[1].jpg](/proxy/?url=https://content.instructables.com/FDP/8M11/LDFYRW7V/FDP8M11LDFYRW7V.jpg&filename=2023-01-28-23-38-17-099[1].jpg)
![2023-01-28-16-17-23-809[1].jpg](/proxy/?url=https://content.instructables.com/F7J/FZPM/LDFYRW7W/F7JFZPMLDFYRW7W.jpg&filename=2023-01-28-16-17-23-809[1].jpg)
![2023-01-28-23-38-32-859[1].jpg](/proxy/?url=https://content.instructables.com/F0I/SVCR/LDFYRW7X/F0ISVCRLDFYRW7X.jpg&filename=2023-01-28-23-38-32-859[1].jpg)
![2023-01-28-23-39-25-969[2].jpg](/proxy/?url=https://content.instructables.com/FBY/4D4Q/LDFYRW7Y/FBY4D4QLDFYRW7Y.jpg&filename=2023-01-28-23-39-25-969[2].jpg)
![2023-01-28-23-42-01-920[1].jpg](/proxy/?url=https://content.instructables.com/FTO/9PLD/LDFYRW9Y/FTO9PLDLDFYRW9Y.jpg&filename=2023-01-28-23-42-01-920[1].jpg)
RGB Lights :
For the lights you will need to use an iron in order to make the leds work together.
Cut the LED strips and glue them into the diffuser, then solder the diffferents wires with their paires.
Then clips the two pieces of the diffuser and put the diffuser into the front of the CO2 box.
ESP32-C3 :
I designed a small socket, you just have to put the ESP on his socket and glue the socket in the small notch provided in the base of the Comovis.
Sensors :
Then, I designed a small socket that can slide into the back of the Comovis so you juste have to Glue the two sensors into the socket and slide the socket inot the back of the Comovis
And finally make the cable management and closed the Comovis.
Programmation
/////////////////////// This part is still under developpement ! /////////////////////////////
For the programations part on ESPHome. first you have to setup your ESP8266 (or ESP32 and other's )
Then to modify the .YAML file of the esp8266 and add the sensors and LED as it shown here :
 esphome:
  includes:
    - Air_Quality_v1.h

/ you add your stuff here//

sensor:
  - platform: aht10
    temperature:
    id: Temp
      name: "PSalon Temperature" //the name of the Infos
      accuracy_decimals: 1 //The precision of the number that is showned
 on_value_range:
      - below: 10
        then:
          - light.addressable_set:
              id: Strip_Temp
              range_from: 0
              range_to: 11
              red: 0%
              green: 0%
              blue: 0%
          - delay : 100ms
          - light.addressable_set:
              id: Strip_Temp
              range_from: 0
              range_to: 1
              red: 0%
              green: 0%
              blue: 50%
      - above: 10
        below: 17
        then:
          - light.addressable_set:
              id: Strip_Temp
              range_from: 0
              range_to: 11
              red: 0%
              green: 0%
              blue: 0%
          - delay : 100ms
          - light.addressable_set:
              id: Strip_Temp
              range_from: 0
              range_to: 3
              red: 0%
              green: 50%
              blue: 50%
      - above: 17
        below: 22
        then:
          - light.addressable_set:
              id: Strip_Temp
              range_from: 0
              range_to: 11
              red: 0%
              green: 0%
              blue: 0%
          - delay : 100ms
          - light.addressable_set:
              id: Strip_Temp
              range_from: 0
              range_to: 4
              red: 0%
              green: 50%
              blue: 0%
      - above: 22
        below: 27
        then:
          - light.addressable_set:
              id: Strip_Temp
              range_from: 0
              range_to: 11
              red: 0%
              green: 0%
              blue: 0%
          - delay : 100ms
          - light.addressable_set:
              id: Strip_Temp
              range_from: 0
              range_to: 6
              red: 50%
              green: 50%
              blue: 0%
      - above: 27
        then:
          - light.addressable_set:
              id: Strip_Temp
              range_from: 0
              range_to: 11
              red: 0%
              green: 0%
              blue: 0%
          - delay : 100ms
          - light.addressable_set:
              id: Strip_Temp
              range_from: 0
              range_to: 11
              red: 50%
              green: 0%
              blue: 0%

    humidity:
      name: "Humidity"
      id: Hum
     on_value_range:
      - below: 35
        then:
          - light.addressable_set:
              id: Strip_Hum
              range_from: 0
              range_to: 11
              red: 0%
              green: 0%
              blue: 0%
          - delay : 100ms
          - light.addressable_set:
              id: Strip_Hum
              range_from: 0
              range_to: 1
              red: 50%
              green: 0%
              blue: 0%
      - above: 35
        below: 45
        then:
          - light.addressable_set:
              id: Strip_Hum
              range_from: 0
              range_to: 11
              red: 0%
              green: 0%
              blue: 0%
          - delay : 100ms
          - light.addressable_set:
              id: Strip_Hum
              range_from: 0
              range_to: 2
              red: 50%
              green: 50%
              blue: 0%
      - above: 45
        below: 65
        then:
          - light.addressable_set:
              id: Strip_Hum
              range_from: 0
              range_to: 4
              red: 0%
              green: 50%
              blue: 0%
      - above: 65
        below: 75
        then:
          - light.addressable_set:
              id: Strip_Hum
              range_from: 0
              range_to: 11
              red: 0%
              green: 0%
              blue: 0%
          - delay : 100ms
          - light.addressable_set:
              id: Strip_Hum
              range_from: 0
              range_to: 7
              red: 50%
              green: 50%
              blue: 0%
      - above: 75
        then:
          - light.addressable_set:
              id: Strip_Hum
              range_from: 0
              range_to: 11
              red: 0%
              green: 0%
              blue: 0%
          - delay : 100ms
          - light.addressable_set:
              id: Strip_Hum
              range_from: 0
              range_to: 7
              red: 50%
              green: 0%
              blue: 0%
    update_interval: 1s
      accuracy_decimals: 1
    update_interval: 20s //the delay
    address: 0x38 //the adress of the sensor
    i2c_id: bus_b //the way we use the i2c


  - platform: custom
    lambda: |-
      auto my_sensor = new Air_Quality_v1();
      App.register_component(my_sensor);
      return {my_sensor->Co2};
    sensors:
    id: CO2
      name: "CO2"
    unit_of_measurement: PPM //type unit of the info
      accuracy_decimals: 2 //the precision
      on_value_range:
      - below: 1400
        then:
          - light.addressable_set:
              id: Strip_CO2
              range_from: 0
              range_to: 11
              red: 0%
              green: 0%
              blue: 0%
          - delay : 100ms
          - light.addressable_set:
              id: Strip_CO2
              range_from: 0
              range_to: 1
              red: 0%
              green: 50%
              blue: 0%
      - above: 1400
        below: 1600
        then:
          - light.addressable_set:
              id: Strip_CO2
              range_from: 0
              range_to: 11
              red: 0%
              green: 0%
              blue: 0%
          - delay : 100ms
          - light.addressable_set:
              id: Strip_CO2
              range_from: 0
              range_to: 3
              red: 25%
              green: 50%
              blue: 0%
      - above: 1600
        below: 1800
        then:
          - light.addressable_set:
              id: Strip_CO2
              range_from: 0
              range_to: 11
              red: 0%
              green: 0%
              blue: 0%
          - delay : 100ms
          - light.addressable_set:
              id: Strip_CO2
              range_from: 0
              range_to: 4
              red: 50%
              green: 50%
              blue: 0%
      - above: 1800
        below: 1900
        then:
          - light.addressable_set:
              id: Strip_CO2
              range_from: 0
              range_to: 11
              red: 0%
              green: 0%
              blue: 0%
          - delay : 100ms
          - light.addressable_set:
              id: Strip_CO2
              range_from: 0
              range_to: 8
              red: 50%
              green: 25%
              blue: 0%
      - above: 1900
        below: 2100
        then:
          - light.addressable_set:
              id: Strip_CO2
              range_from: 0
              range_to: 11
              red: 0%
              green: 0%
              blue: 0%
          - delay : 100ms
          - light.addressable_set:
              id: Strip_CO2
              range_from: 0
              range_to: 9
              red: 50%
              green: 0%
              blue: 0%
      - above: 2100
        then:
          - light.addressable_set:
              id: Strip_CO2
              range_from: 0
              range_to: 11
              red: 0%
              green: 0%
              blue: 0%
          - delay : 100ms
          - light.addressable_set:
              id: Strip_CO2
              range_from: 0
              range_to: 11
              red: 50%
              green: 0%
              blue: 0%

light:
  - platform: fastled_clockless
    chipset: WS2812b
    id: Strip_CO2
    pin: GPIO13
    num_leds: 10
    rgb_order: GRB
    name: "Strip_CO2"
  - platform: fastled_clockless
    chipset: WS2812b
    id: Strip_Temp
    pin: GPIO14
    num_leds: 10
    rgb_order: GRB
    name: "Strip_Temp"
  - platform: fastled_clockless
    chipset: WS2812b
    id: Strip_Hum
    pin: GPIO12
    num_leds: 10
    rgb_order: GRB
    name: "Strip_Hum"
Don't forget to add the library.h of the sensor !
You can download the Library.h here : https://github.com/Nacros115/Comovis.git
Note : Of course you can use Arduino for programming the device, but I think it is way easier to this with ESPHome.
I will add the library for the arduino just in case you want to use the Air quality Sensor.
Here is the link to the Github repo : https://github.com/Nacros115/Comovis.git
Results
Hey ! You made it to the last step ! Now that your device and your server are ready, you will be able to see this type of informations in your dashboard :
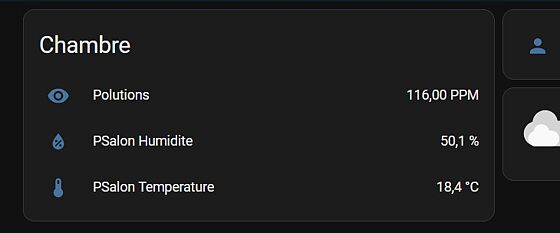
This is the differents infos of the esp, you have the Temperature, the Humidty and the Air Quality. Of course you can modify the design of your dashboard, but I think it is the best way to show infos.
Other Ideas & Upgrades
So we made it the top, now the thing is that the Comovis need to be more practical. What I mean by that, is we can find some new features like adding modules for other sensors to complete the product or make it easier to assemble. One thing that goes over my mind is that it is hard to find a solution to stick the diffuser in the front of the Comovis without gluing the part. I try to create some clips around the different parts but it was not the best solution.
So for the next improvents of the Comovis :
- Add features. (like Pressure sensor or an all in one temperature, humidty an air quality sensor)
- Make it more practical.
- Make it more easy to assemble.
- Maybe creat an app that send notification to the user.


