Coding Connections: DIY Geo-Caching Device for Community Storytelling
by lilyyrodd in Circuits > Arduino
184 Views, 2 Favorites, 0 Comments
Coding Connections: DIY Geo-Caching Device for Community Storytelling

Atla Arts is a program merging Science, Technology, Engineering, Arts, and Mathematics (STEAM) in a celebration of creativity and community. In this pilot project, we invite you to craft an Arduino Geo-Caching device that shares not only coordinates but also the personal stories tied to each location.
At Atla Arts, we value belonging, diversity, and communal connections. This isn't just a tech project—it's an exploration of self-expression and shared experiences. Join us in weaving a tapestry of urban stories and creating connections through the intersection of technology and art. Let the adventure begin!
Supplies
 9V Alkaline Battery
 9V Battery Holder
 Arduino Mega 2560 R3
 Hamburger Mini Speaker
 SparkFun MP3 Player Shield
  SparkFun GPS Breakout - Chip Antenna, SAM-M8Q (Qwiic)
 Basic 16x2 Character LCD - Black on Green 5V
 Jumper Wire Kit - 140pcs
 microSD Card with Adapter - 32GB (Class 10)
 Breadboard - Self-Adhesive (White)
 USB Cable A to B - 6 Foot (you can use a much shorter cable if you prefer)
A device with a microphone to record your stories.
An audio editing software if you wish to edit your recordings.
The Arduino IDE and a computer.
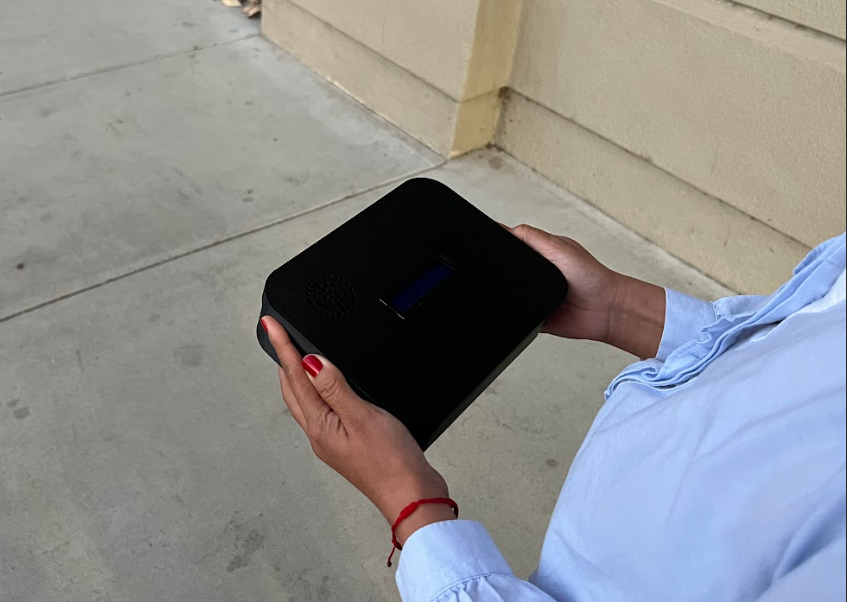
A box to hold everything in. I 3D printed a simple box.
You may see all the supplies listed in one place over at Sparkfun. You may also purchase any or all items needed for this project through my public 'Wish List.'
Capture Your Stories
Before diving into the technical aspects of the Community Stories Explorer Kit, take a moment to reflect on the stories you want to share. These could be personal anecdotes about a particular location, community stories, or reflections on significant locations in your city. Follow these steps to gather your thoughts:
- Choose Your Locations:
- Identify the places in your city that hold special meaning for you. They could be parks, landmarks, or hidden gems that evoke memories or emotions.
- Reflect on Your Connections:
- Consider why each location is important to you. Is it a place where you've made lasting friendships, experienced personal growth, or connected with your community? Jot down these reflections.
- Craft Your Stories:
- Write concise and engaging narratives for each location. Share anecdotes, memories, or the significance behind each spot. Be authentic and let your personality shine through.
- Consider Audio Elements:
- Think about incorporating audio elements such as recorded messages, sound effects, or even a snippet of a song that resonates with each location. This adds a dynamic and immersive dimension to your stories.
- Compile Your List:
- Create a list of the locations along with their corresponding stories and any audio elements you plan to include. This will serve as your roadmap when programming the Community Stories Explorer Kit.
Remember, this step is all about infusing your device with your unique narrative, creating a rich tapestry of stories that will be discovered by others as they explore the city through your eyes. Once your stories are captured, you're ready to move on to the next step!
Record Your Stories
Now that you've crafted your compelling narratives, it's time to bring them to life through recordings. Follow these steps to ensure your audio tracks are ready for integration into the Community Stories Explorer Kit:
- Recording Setup:
- Set up a quiet space for recording. Use a smartphone, computer, or any recording device of your choice. Ensure minimal background noise for clear recordings.
- Naming Convention:
- For consistency, name each audio track "track001.mp3," "track002.mp3," and so on. This naming convention will streamline the integration process later.
- Individual Tracks for Each Location:
- Record each story separately. Associate each recording with a specific location, capturing the essence of that place in your narrative. This approach ensures a personalized experience for users exploring your Geo-Caching device.
- Quality Check:
- Listen to each recording to ensure clarity and quality. Make any necessary adjustments to volume, eliminate background noise, and ensure that your voice resonates authentically.
- Save as MP3:
- Save each recording as an MP3 file to comply with the MP3 player's specifications. Most recording software or apps offer the option to save files in MP3 format.
- Organize Your Files:
- Create a dedicated folder for your audio tracks. Keep it organized with each track labeled and numbered according to the naming convention.
Once your recordings are polished and organized, you're ready to seamlessly integrate them into the Community Stories Explorer Kit during the programming phase. Prepare to enchant fellow explorers with the captivating stories of your city's hidden gems!
Connect the Components
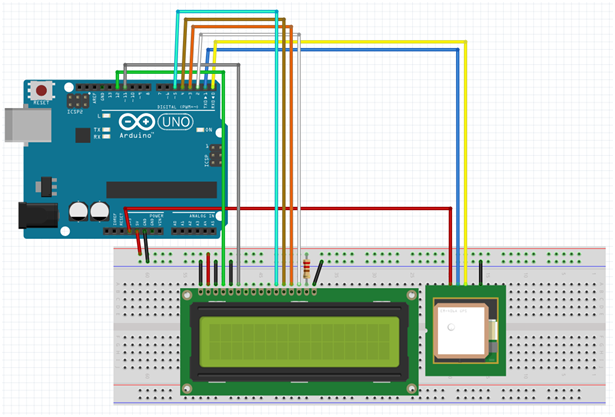

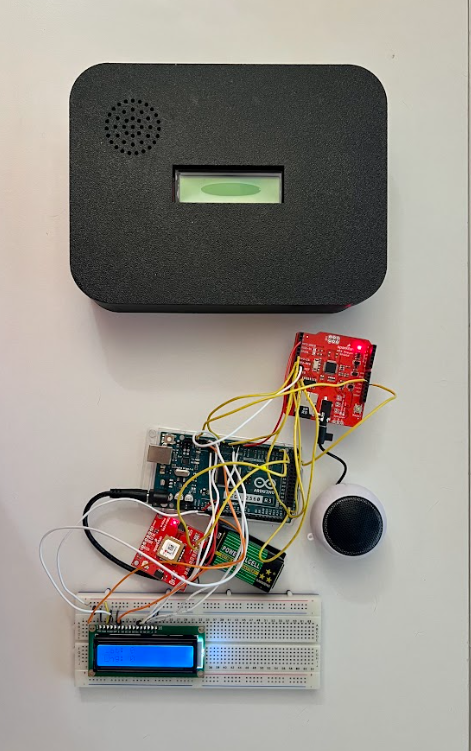
Now, let's bring your Community Stories Explorer Kit to life by connecting the GPS module, MP3 Player Shield, and LCD screen to the Arduino Mega. Ensure you have a half-size breadboard to mount the LCD screen. Follow the detailed connections below:
GPS Module:
- GND: Connect to GND on Arduino Mega.
- 3V3: Connect to 3.3V on Arduino Mega.
- SDA: Connect to SDA on Arduino Mega.
- SCL: Connect to SCL on Arduino Mega.
MP3 Player Shield:
- GND: Connect to GND on Arduino Mega.
- 5V: Connect to 5V on Arduino Mega.
- 2 MP3-DREQ to Digital 2
- 6 MP3-CS to Digital 6
- 7 MP3-DCS to Digital 7
- 8 MP3-RST to Digital 8
- 9 SD-CS to Digital 53
- 11 to Digital 51
- 12 to Digital 50
- 13 to Digital 52
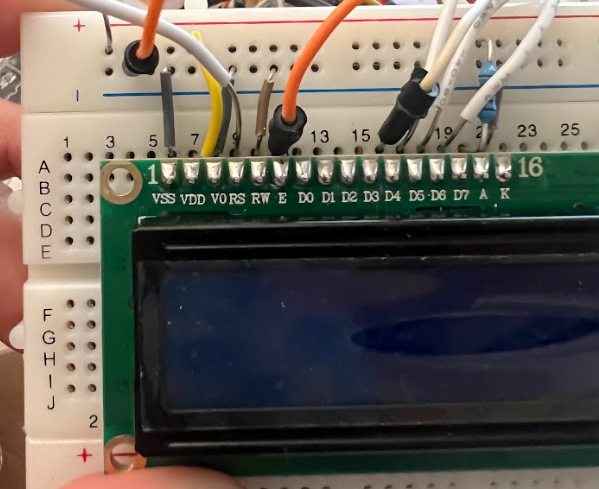
LCD Screen (Mount on Breadboard):
- VSS (Ground): Connect to GND (-).
- VDD (Power): Connect to Power (+).
- V0 to GND (-).
- RS to Digital Pin 12.
- RW to GND (-).
- E to Digital Pin 11.
- D4 to Digital Pin 10.
- D5 to Digital Pin 9.
- D6 to Digital Pin 5.
- D7 to Digital Pin 3.
- A goes to a resistor to power (+).
- K goes to GND (-).
Double-check each connection to ensure accuracy and security. I looked at this resource as well while setting all of this up. This step lays the foundation for seamless communication between the components, setting the stage for the interactive exploration that awaits with the Community Stories Explorer Kit. Once the connections are verified, you're ready to proceed to the next exciting phase of programming your device!
Program Your Community Stories Explorer Kit
Now, let's program your Geo-Caching device using the Arduino IDE. Don't forget to install the necessary libraries by including the following lines in your Arduino sketch:
#include <Wire.h> // Needed for I2C to GNSS
#include <SparkFun_u-blox_GNSS_Arduino_Library.h>
#include <LiquidCrystal.h>
#include <SdFat.h>
#include <SFEMP3Shield.h>
- Install Arduino IDE:
- If you haven't already, download and install the Arduino IDE from the official website (https://www.arduino.cc/en/software).
- Open a New Sketch:
- Launch the Arduino IDE and start a new sketch. This will be the canvas for your Community Stories Explorer Kit program.
- Include Necessary Libraries:
- To import libraries, go to Tools > Manage Libraries and search for the libraries listed above.
- At the top of your sketch, include the required libraries using the lines provided above. This ensures your code communicates seamlessly with the kit components.
- Write your code or copy and paste the starter code I've provided in the attached file. This code is meant to get you started therefore please edit it and customize it according to your needs.
- Check that your code compiles correctly.
Here's a brief explanation of what the code does:
- Library Inclusions:
- The code begins by including necessary libraries for communication and control:
- Wire.h: Required for I2C communication with the GNSS (Global Navigation Satellite System) module.
- SparkFun_u-blox_GNSS_Arduino_Library.h: Library for interfacing with the u-blox GNSS module.
- LiquidCrystal.h: Library for controlling LCD displays.
- SdFat.h: Library for working with SD cards.
- SFEMP3Shield.h: Library for controlling the MP3 player shield.
- Object Declarations:
- Objects for various components are declared:
- SFE_UBLOX_GNSS myGNSS: Object for the u-blox GNSS module.
- LiquidCrystal lcd(12, 11, 10, 9, 5, 3): Object for the LCD display.
- SdFat sd: Object for the SD card.
- SFEMP3Shield MP3player: Object for the MP3 player shield.
- Variable Initialization:
- Variables are initialized, including lastTime to keep track of time for periodic updates, SD_CS for the SD card chip select pin, and currentTrack to keep track of the current audio track.
- Setup Function:
- The setup function initializes the serial communication, waits for the user to open the terminal, and initializes the u-blox GNSS module, LCD display, SD card, and MP3 player shield.
- The volume for the MP3 player is set, and the program ensures that the necessary components are initialized successfully.
- Loop Function:
- The loop function continuously queries the GNSS module for latitude and longitude information.
- If a second has passed since the last update, the current latitude and longitude are printed to the Serial Monitor and displayed on the LCD.
- It then checks if the MP3 player is playing. If not, it plays the current audio track, increments the track number, and resets it to track 001 if the end of the track list is reached.
- The track number and playing status are printed to the Serial Monitor.
Downloads
Test Your Community Stories Explorer Kit
Now that you've successfully connected the GPS module, MP3 Player Shield, and LCD screen, it's time to ensure everything is functioning as intended. Follow these testing steps:
- Power Up:
- Connect your Arduino Mega to a power source, ensuring that it's properly powered.
- Upload the Code:
- Load the code.
- Select the correct board and port in the Arduino IDE.
- Upload the code to your Arduino Mega.
- Monitor Serial Output:
- Open the Serial Monitor in the Arduino IDE (Tools > Serial Monitor). Change the serial rate to 115200.
- You should see the latitude and longitude values printed at regular intervals.
- Check LCD Display:
- Confirm that the LCD screen displays the latitude and longitude information.
- The display should update at the same intervals as the Serial Monitor.
- Audio Playback:
- Ensure the MP3 Player Shield is playing the correct audio tracks.
- Track numbers and playback status should be visible in the Serial Monitor.
- Location Check:
- If possible, move to different locations to test if the GPS module accurately detects changes in latitude and longitude.
- Troubleshoot:
- If any component is not functioning correctly, double-check the connections.
- Verify that the required libraries are installed in your Arduino IDE.
- Ensure that the MP3 files are correctly named and placed on the SD card.
- Fine-Tuning:
- Make any necessary adjustments to the code based on your testing observations.
By completing this testing phase, you'll ensure that all components are working harmoniously together. A successful test means your Community Stories Explorer Kit is ready to embark on its journey of sharing stories and fostering community connections. If everything checks out, congratulations! You're now ready to share your unique creation with others and explore the city through the lens of your personalized stories.
Sharing Your Geo-caching Device
Congratulations on successfully testing your Community Stories Explorer Kit! Now, let's prepare it for the hands of an eager explorer. Follow these steps to enclose all the components and pass on the device:
- Secure Components:
- Use tape, glue, or other appropriate fasteners to secure the GPS module, MP3 Player Shield, Arduino Mega, and associated wires in a tidy and secure manner.
- Protect the Breadboard:
- If using a breadboard for the LCD screen, consider securing it within a protective enclosure to prevent accidental disconnections or damage.
- Secure the SD Card:
- Ensure the SD card is securely inserted into the MP3 Player Shield.
- Provide Clear Instructions:
- Prepare a simple set of instructions for the next explorer, explaining how to use the device and encouraging them to discover the city through the programmed locations.
- You may want to give them a list of the locations they'll need to go to.
- Enclosure Options:
- Consider placing the components inside a weather-resistant enclosure or case to protect them from environmental factors.
- Handoff and Share:
- Hand over the Community Stories Explorer Kit to someone else, perhaps a friend, family member, or community member.
- Encourage them to embark on the geo-caching journey, discovering the city through your stories and contributing their own.
- Document and Share Experiences:
- Ask the new explorer to document their experiences, take photos, and share their journey with others.
- Promote Community Engagement:
- Consider creating a platform or online space where participants can share their stories and experiences, fostering a sense of community around the project.
By enclosing your Community Stories Explorer Kit and passing it on, you're not just sharing a device but creating a shared experience and building connections within your community. Your project has the potential to inspire others to explore, learn, and contribute to the rich tapestry of stories within the city. Happy exploring!