Chess

This project is developed in the environment of fusion 360 of Auto desk.
I have used model and rendering environment of fusion 360.
I have prepared the rook, the king ,the pawn , the queen , the knight ,
the Bishop.
I have used red and blue glossy colors for the characters .
I have used black and white colors for the chess board.
ROOK Sketch.


In this step I am in the model environment of fusion 360.
In this step I have prepared the sketch for rook.
Rook Revolve.


In this step I am in the model work space of fusion 360.
Then I have revolved the sketch drawn in previous step.
Rook Finishing.


In this step I am in the model work space of fusion 360 and then gone to the rendering
work space for coloring the rook.
I have used sweep for removing some material from the base of the rook
and hence given good finishing to the rook.
After sweep operation ,I have used circular pattern to give sweep feature
all around the rook.
Then I have colored the rook with red glossy color.
Queen Sketch.

In this step I am in the model work space of fusion 360.
Then I have drawn the sketch of queen of chess.
Queen Revolve.


In this step I am in the model work space of fusion 360.
Then I have revolved the sketch of queen drawn in previous step.
As a result I have got the structure shown in figure.
Queen Crown.


In this step I am in the model work space of fusion 360.
Then I have drawn a circle.
Then i have applied the operation of pattern on the circle drawn.
Then I have extruded the profiles obtained by the circles.
Extrusion in this process resulted in cutting .
This cutting process gives nice crown to the queen.
Queen Coloring.


In this step I am in the render work space of fusion 360.
Then I have applied red glossy color to the queen.
Pawn


In this step I have prepared the pawn .
First , I have drawn sketch of pawn.
Then I have revolved the sketch about y axis.
Then I have removed some material from the base of the pawn with the operation sweep.
Then i have applied circular pattern to the structure obtained by sweep.
Then I have entered in the render environment of fusion 360.
Then I have applied red glossy color to the pawn.
Knight Sketch.


In this step I am in the model work space of fusion 360.
I have drawn the sketch of base of knight.
Then I have revolved the sketch.
Then I have drawn the upper sketch of knight .
Then I have symmetrically extruded the upper portion of knight.
Then I have applied chamfers to the edges of knight.
Then i have applied fillets to the rough edges of knight.
Material Removal From the Knight.


In this step I am in the model work space of fusion 360.
Then I have drawn two circles on the two separate offset plane , These two offset planes are parallel
to the top plane.
Then I have joined the centers of these circles by a line.
Then I have applied sweep operation to the circles drawn , following the path of line joining the
center of these two circles.
Then I have applied circular pattern to the feature obtained by sweep.
Color to KNIGHT.


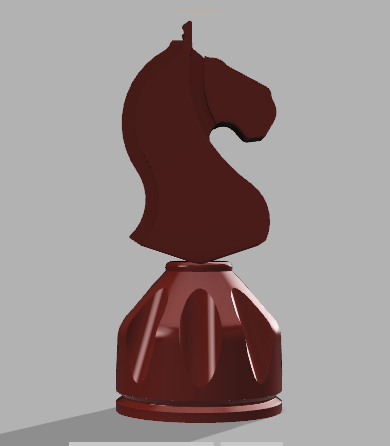
In this step I am in the render work space of fusion 360.
Then I have applied the red glossy color to the knight.
King Sketch.

In this step I am in the model work space of fusion 360.
Then I have drawn the sketch of king of chess.
King Revolve and King Crown.


In this step I am in the model work space of fusion 360.
Then I have revolved the sketch drawn in previous step.
As a result I have got the first structure as shown in first picture.
After revolving , I have drawn a circle on a offset plane parallel to top plane.
Then I have applied circular pattern to the circle.
Then I have extruded the circles obtained by pattern operation.
Extrusion In this case resulted in the cutting or material removal operation from the king.
This material removing operation resulted in the nice structure of crown.
Then I have applied some chamfer operation on the crown.
Then I have applied fillets on the rough edges to make them smooth.
Material Removal From the Base of King by Sweep Operation.


In this step I am in the model work space of fusion 360.
Then I have drawn two offset planes parallel to top plane.
Then I have drawn two circles on these two offset planes.
Then I have joined the two circles by a line from center to center.
Then I have applied sweep operation by taking circles as profiles sketch and
the line from their centers as the path of sweep.
Then I have applied circular pattern to the feature obtained by sweep.
This resulted in nice features all around the base of king.
Color to King.


In this step I am in the rendering work space of fusion 360.
Then I have applied red glossy color to the king in the rendering environment.
Bishop Sketch.

In this step I am in the model work space of fusion 360.
Then I have drawn the sketch of Bishop.
Revolve and Material Removal From the Upper Part of Bishop.


In this step I am in the model environment of fusion 360.
Then I have revolved the sketch drawn in previous step.
Then I have done some sketching on the upper part of Bishop.
Then I have removed the material from the upper part of Bishop , with the help of sketch
drawn and the extrude operation.
Then I have got the structure of Bishop as shown in picture.
Material Removal From the Bottom Part of Bishop.


In this step I am in the model work space of fusion 360.
Then i have drawn two offset planes parallel to the top plane but with different heights.
Then I have drawn two circles on these two offset plane .
Then I have joined these two circles , center to center by a line.
Then I have applied sweep operation by taking circle as a profile and, the line joining these
two circles as path for sweep.
Then I have applied circular pattern to the feature obtained by sweep.
This sweep and pattern operation gives a nice circular feature all around the base of Bishop.
Color to Bishop.


In this step I am in the render work space of fusion 360.
Then I have applied red glossy color to the bishop.
Chess Board Sketch.


In this step I am in the model work space of fusion 360.
Then I have drawn a central square of 24*24.
Then I have divided the the large square in 64 small squares.
Small squares have dimensions 3*3.


In this step I am in the model work space of fusion 360.
Then I have extruded the square having dimensions 24*24.
Then I have divided the large extruded square in small extruded squares with the help of
sketch drawn in previous step.
The operation used to divide the large extruded square is the split body operation.
Then I have got 64 small bodies .
Then I have entered In the rendering environment of fusion 360.
Then I have colored the small square bodies alternatively with black glossy color and white glossy
color.
As a result I have got the structure shown in picture.
Placing Different Characters on the Chess Board.


In this step I am in the model work space of fusion 360.
In this step I have prepared two or more no of characters , for Example I have prepared
two kings one for each side by the mirror operation.
Then I have prepared 16 Pawns , 8 for each side of chess board.
Then I have prepared 4 Knights.
Then I have prepared 4 Bishops.
Then I have prepared 4 Rooks by mirror operation.
Then I have prepared 2 kings and 2 queens by mirror operation.
Different Views of Chess Board

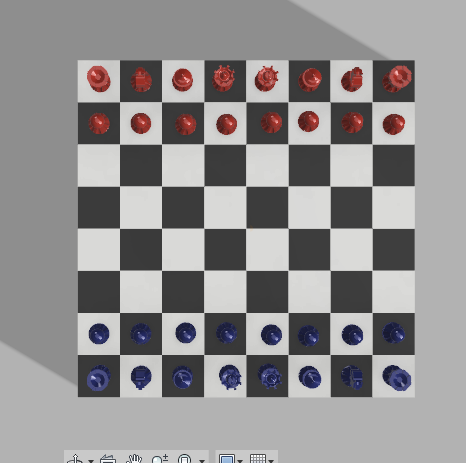


In this step I am in the render work space of fusion 360.
In this step I have provided different views of a chess board.