Changed Duke
.png)
We will be changing the image of the Duke logo to a whole new image and no one will be able to say that this was ever a Duke logo.
Open File
.png)
Open up the image from your files and place onto the poster in photopea. This is the image we will change and alter for this project.
Rotation

Rotate the image 90 degrees clockwise. You will do this by clicking on the image option on the menu and then you will click on transform. After you click on transform you will click the option that says, "90 degrees" clockwise. This will rotate the image as shown above. This is very important as the image will now start the process of change.
Placement

Next, you will be changing the physical look of the letter D. You will first click on the magnetic lasso effect. Then you will use that effect to crop out the bottom half of the letter. This means that you will crop out the curvy part of the letter. After cropping out the curvy part of the D, you will drag and place it above the other part of the letter as shown in the image. This is very important as now we have changed the physical look of the logo.
Background Color

Next, you will change the background color using the magnetic lasso effect and the hue and saturation tools. You will first use the lasso effect on the whole letter shown as a sideways "I". Once you select the image you will right click and select inverse. This will inverse the lasso effect and then you will go up to the option of "layer" You will click that and then you will click on "new adjustment layer". Once you have clicked that, you will click on "Hue/saturation". Once the dialog box opens up, you will use the bar to move the lightness option all the way down, creating the black background. This is very important as this makes the logo pop out and become bold.
Change of Color

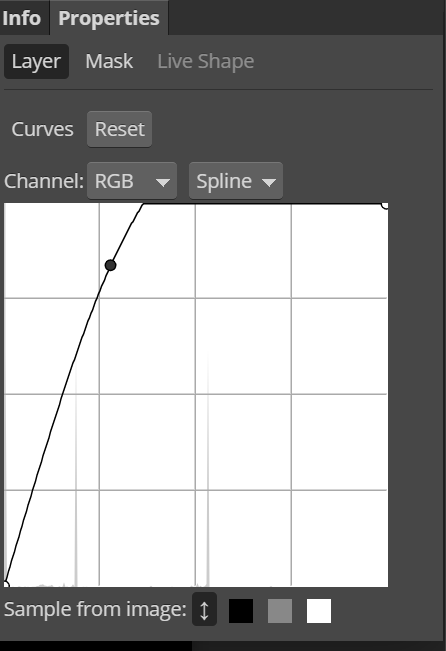
Next, we will change the color of the image using the magnetic lasso effect tool. Use the tool to select the whole letter "I" again. Next you will go up to "layer" again and then select "curves". Then you will change the line as shown in the image. Try getting it exactly like the image so then the color will be the same. This is very important as we are now changing the whole image to a new color.
Add Pattern

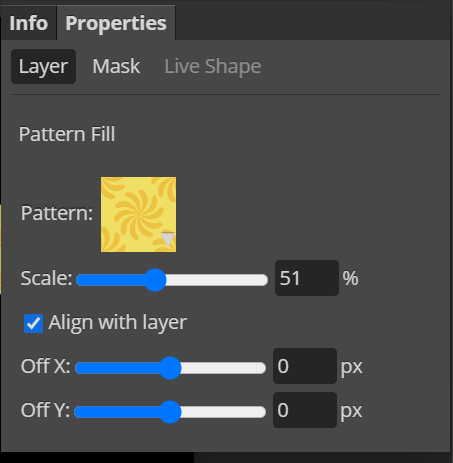
Lastly, we will add a pattern to our new image. You will do this by using the magnetic lasso effect to select the whole image of the sideways "I". Then, while its selected, you will click on "layer", and then "new fill layer". You will choose the first one and adjust it to the image shown. This is very important as this is the last step of the changed duke.