Cactus 2000

PROJECT MIDI-CONTROLEUR EISE4
Français :
Lors de notre quatrième année d'école ingénieur, nous avons réalisé un midi-contrôleur. Pour ce faire, nous avions à notre disposition :
- Une carte DE0 Nano Soc
- Des oscilloscopes, des multimètres
- Des composants de différents types (amplificateur, résistance, capacité...)
- Un micro et un haut-parleur
- Un petit ecran
Il nous a fallu passer par différentes étapes périlleuses afin de réussir le projet. Nous allons vous les présenter dans cet Instructable.
Pour commencer, le dessin du circuit de base était nécessaire afin de récupérer le son du micro et le rendre au haut-parleur. Une fois le circuit dessiner, le PCB était à faire sur le logiciel Altium. Pendant que deux élèves s'occupaient de gérer les PCB de l'entrée et de la sortie, les deux autres s'occupaient de faire fonctionner la carte DE0 Nano Soc afin que la carte puisse récupérer les echantillons du micro et redonner un signal pour le haut-parleur. Finallement, il nous a fallu créer des effets sonores pour modifier le son.
English :
During our fourth year of school, we realized a midi-controller. To do this, we had at our disposal:
- A map DE0 Nano Soc
- Oscilloscopes, multimeters
- Components of different types (amplifier, resistance, capacity ...)
- A microphone and a speaker
- A little screen
We had to go through various perilous steps to make the project a success. We will introduce you to this Instructable.
Firstly, the design of the basic circuit required to recover the son of the microphone and make the speaker. Once the circuit draw, the PCB was to be done on the software Altium. While two students were busy managing the input and output PCBs, the other two were working to run the DE0 Nano Soc card so that the card could pick up the mic samples and give a signal for the speaker. Finally, we had to create sound effects to change the sound.
Conception Du Circuit En Entrée / Entrance Circuit Design
Français :
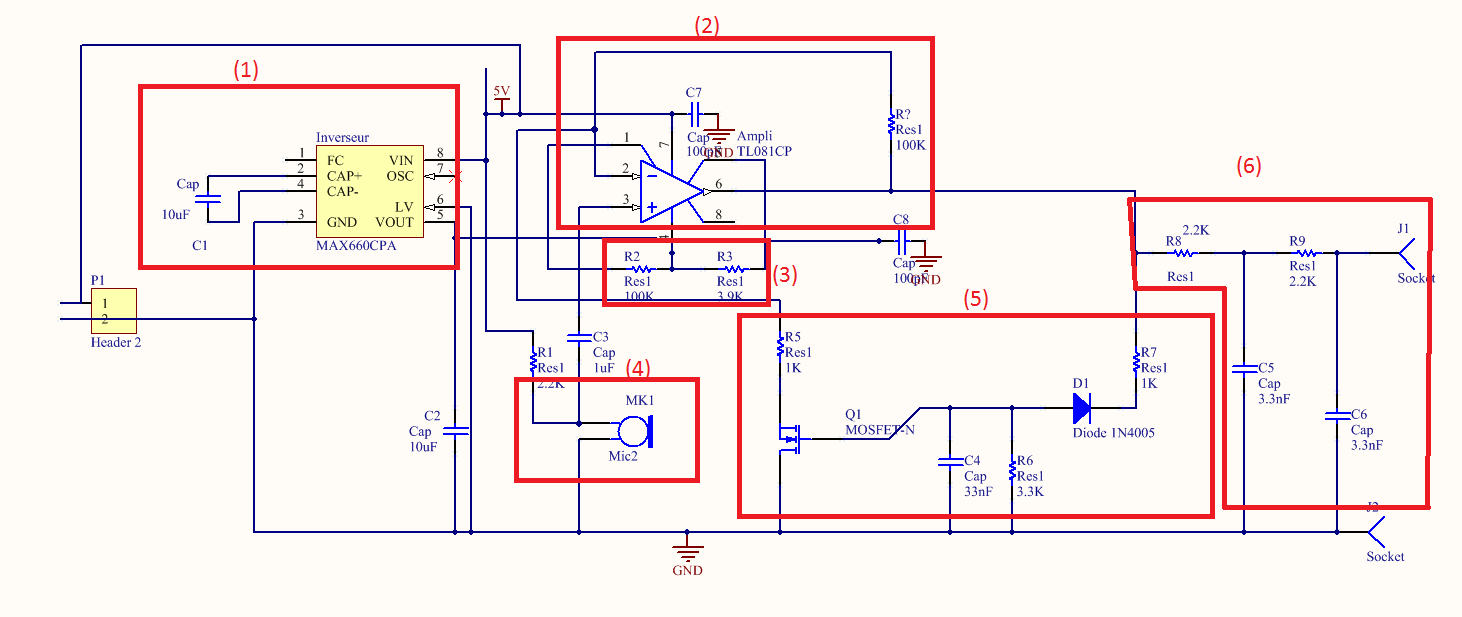
La première étape consiste à mettre en place un circuit qui puisse prendre le signal envoyer sur le micro pour le transmettre à la carte DE0 Nano Soc.
Ci-dessus le schéma de notre entrée.
(1) L'inverseur va permettre de récupérer le 5 Volt et le transformer en - 5 V. Le - 5 V servira pour l'amplificateur que nous verrons ci-dessous.
(2) Ici, nous avons un amplificateur non-inverseur. D'après la formule suivante :
Vs = Ve(1 + Z1/Z2)
On a choisit un gain de 101 en mettant R1 = 100 kOhm et R2 = 1 kOhm.
Cet amplificateur va servir a amplifier le son du micro.
(3) Les deux résistances vont créer un offset afin que la tension de sortie soit compris entre 0 et 4 V.
(4) Le micro qui va être amplifier par l'amplificateur.
(5) CAG (Controle Automatique de Gain)
(6) Pour finir, nous avons créé un filtre passe-bas du second ordre avec deux RC. L'ordre 2 était nécessaire pour avoir une atténuation de - 40db / decade. La fréquence de coupure choisit est 20 kHz.
English :
The first step is to set up a circuit that can take the signal send on the microphone to transmit it to the DE0 Nano Soc card.
Above the diagram of our entry.
(1) The inverter will recover the 5 Volt and transform it into - 5 V. The - 5 V will serve for the amplifier we will see below.
(2) Here we have a non-inverting amplifier. According to the following formula:
Vs = Ve (1 + Z1 / Z2)
A gain of 101 was chosen by setting R1 = 100 kOhm and R2 = 1 kOhm.
This amplifier will be used to amplify the sound of the microphone.
(3) The two resistors will create an offset so that the output voltage is between 0 and 4 V.
(4) The microphone that will be amplified by the amplifier.
(5) AGC (Automatic Gain Control)
(6) Finally, we created a second-order low-pass filter with two RCs. Order 2 was needed to have an attenuation of -40db / decade. The cutoff frequency chosen is 20 kHz.
Conception Du Circuit En Sortie / Design of the Output Circuit
Français :
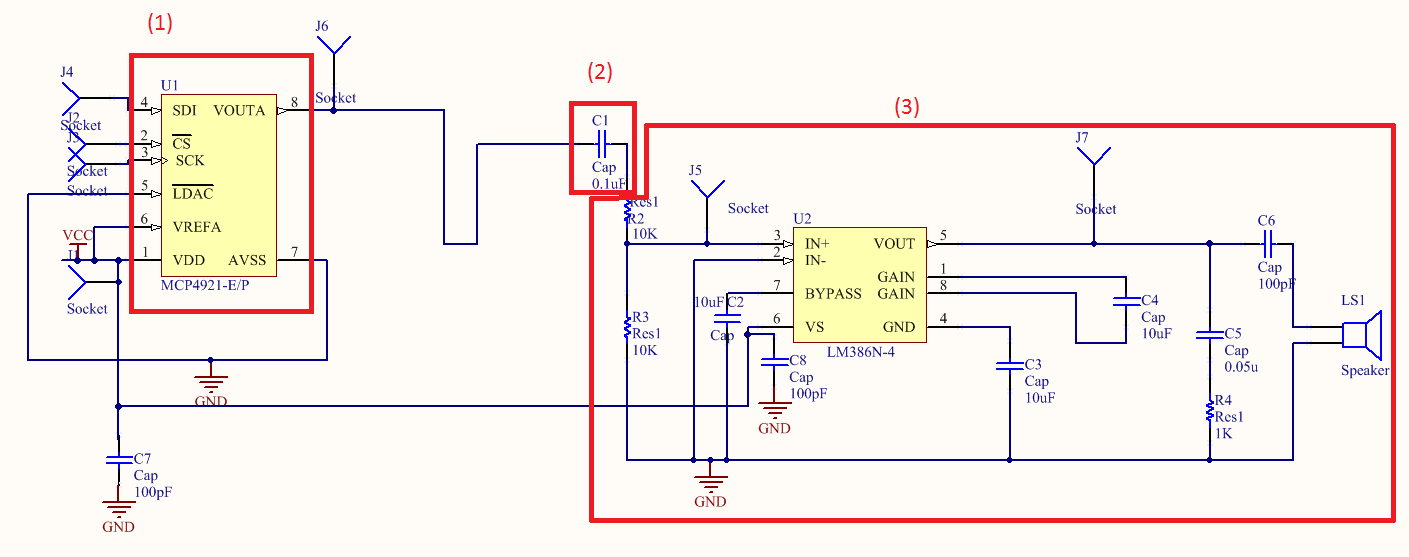
Dans un second temps, nous avons penser à la création du circuit en sortie.
Ci-dessus le schéma de notre sortie.
(1) Le DAC (Digital to Analog Converter) qui va permettre de récupérer le signal numérique envoyer par la carte DE0 Nano Soc et le convertir en signal analogique (nécessaire pour le haut parleur)
(2) La capacité va servir a virer la composante continue de notre signal.
(3) Montage qui va permettre d'amplifier la puissance de notre signal. Nous avons prit le schéma :
http://www.ti.com/lit/ds/symlink/lm386.pdf
page 10
Ce schéma permet d'avoir un gain de 200 qui est nécessaire car notre signal est vraiment faible.
English :
Above the diagram of our output.
(1) The DAC (Digital to Analog Converter) which will allow to recover the digital signal send by the DE0 Nano Soc card and convert it into an analog signal (necessary for the loudspeaker).
(2) The capacity will be used to transfer the continuous component of our signal.
(3) Mounting that will amplify the power of our signal. We took the scheme:
http://www.ti.com/lit/ds/symlink/lm386.pdf
page 10
This scheme makes it possible to have a gain of 200 which is necessary because our signal is really weak.
Conception Des PCB / Design of the PCB
Français :
Une fois que nos circuits ont été instanciés il nous a fallu les mettre sur des PCB.
Pour ce faire, nous avons utiliser le logiciel Altium. Il faut que tout soit correctement connecter puis cliquer sur :
Menu Design -> Update PCB Document.
Ensuite, cliquez sur «Validate Changes». Pour chaque changement validé, un crochet vert apparaît dans la colonne : «Check».
Après cela, vous aurez un nouvel onglet qui va s'ouvrir et il faudra placer les composants dans cette fenêtre.
Puis, il faut aller dans le menu "File" -> "Fabrication Output" -> "Gerber Files"
Une fenêtre s'ouvre, dans celle-ci vous trouverez ;
- Le menu "Layers" qui vous permettra de choisir sur quel layers va s'appuyer votre PCB.
- Le menu "Drill Drawing" dans lequel il faut que tout soit décocher.
- Le menu "Apertures" dans lequel il faut cocher "Embedded appertures".
Toute ses étapes sont complétées ?
Revenons maintenant à la fenêtre avec les composants sur celle-ci vous cliquez sur
File-> Fabrication Output -> NC Drill Files
C'est enfin finit, il ne reste plus qu'à donner à l'imprimante 3D les fichiers.
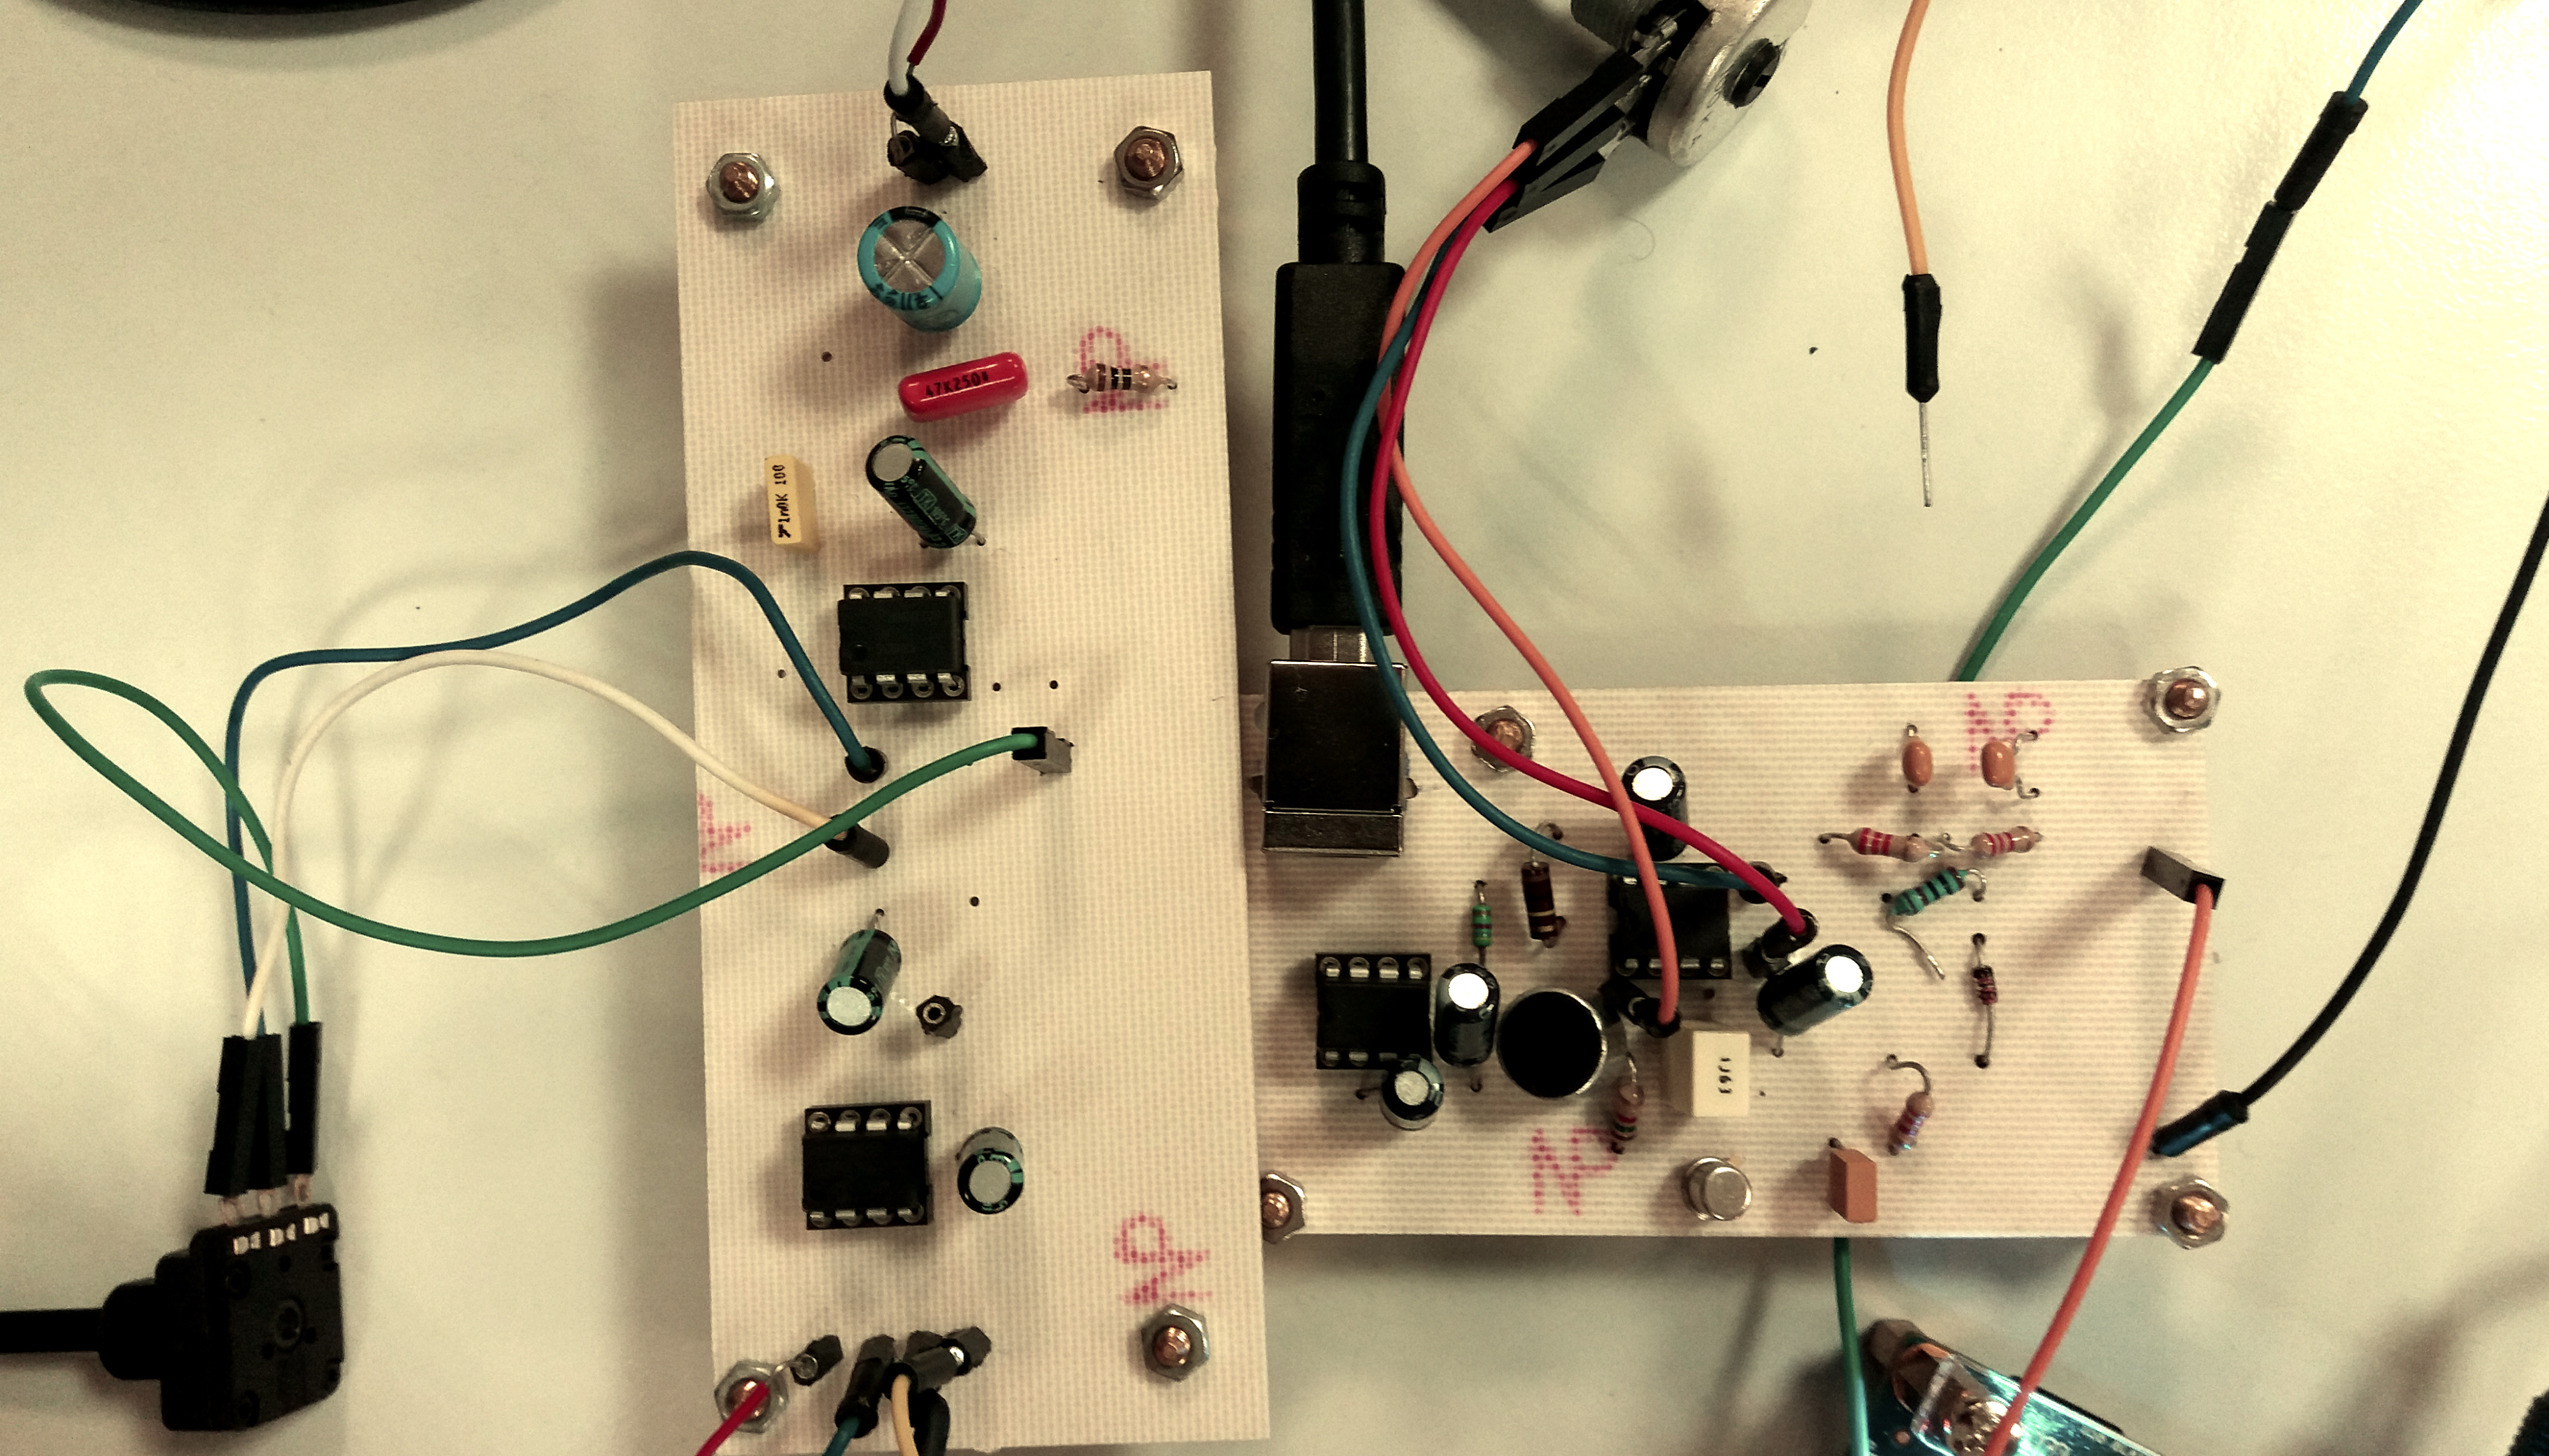
Vous trouverez ci-joint les photos de nos deux PCB.
English :
Once our circuits were instantiated we had to put them on PCBs.
To do this, we use the Altium software. Everything must be correctly connected then click on:
Menu Design -> Update PCB Document.
Then click on "Validate Changes". For each validated change, a green checkmark appears in the "Check" column.
After that, you will have a new tab that will open and you will have to place the components in this window.
Then you have to go to the "File" -> "Output Output" -> "Gerber Files" menu
A window opens, in this one you will find;
The "Layers" menu that will allow you to choose which layers will support your PCB. The "Drill Drawing" menu where everything has to be unchecked. The menu "Apertures" in which you have to check "Embedded appertures".
All his steps are completed?
Let's go back now to the window with the components on this one you click on
File-> Manufacturing Output -> NC Drill Files
It's finally over, all you have to do is give the 3D printer the files.
You will find attached the photos of our two PCBs.
Périphériques Pour La Carte DE0 Nano Soc / Peripherals for the DE0 Nano Soc Card
Francais :
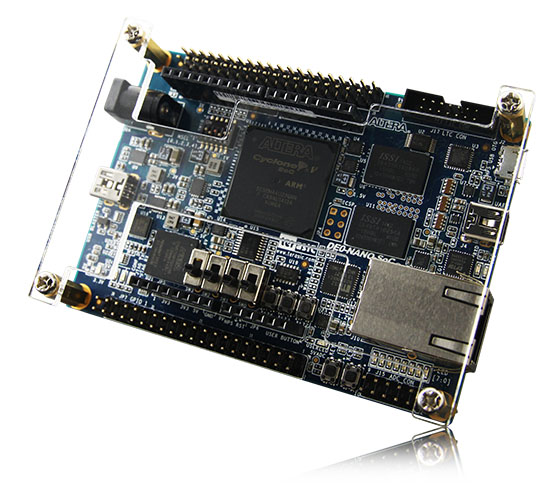
Les cœurs IP sont optimisés pour les périphériques Intel FPGA et peuvent être implémentés pour réduire la conception et le temps de test.
Grâce au logiciel Qsys nous avons pu créer des périphériques embarqués dans notre carte.
Voici une liste des périphériques que nous avons ajouter :
- Communication SPI pour le DAC
- ADC pour recupérer les valeurs analogique de notre signal et les convertir en donnée digitales
- HPS (processeur) pour gérer tout les codes
- GPIO pour les boutons qui vont servir à exécuter certains effets
- Mémoire (on chip memory)
English :
The IP cores are optimized for Intel FPGA devices and can be easily implemented toreduce design and test time.
Thanks to the Qsys software we were able to create embedded peripherals in our map.
Here is a list of the device we added:
- SPI communication for the DAC
- ADC to retrieve the analog values from our signal and convert them to digital data
- HPS (processor) to manage all codes
- GPIO for the buttons that will be used to cope with certain effects
- Memory (on the memory of the chip)
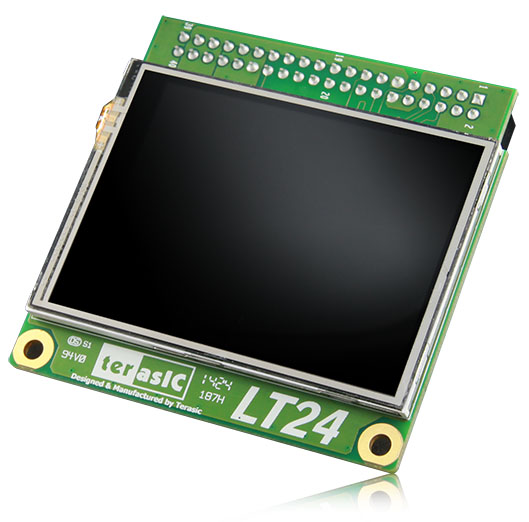
L'écran LT24
Français :
Il nous a fallu comprendre et gérer l'écran LT24 celui-ci sera guidé par un processeur simulé NIOS.
Pour l'initaliser, nous avons lu beaucoup de documentations sur celui-ci.
Au final, notre écran sert à afficher la FFT, à sélectionner l'effet voulu.
English :
We had to understand and manage the screen LT24 it will be guided by a simulated NIOS processor.
To initiate it, we read a lot of documentation on it.
In the end, our screen is used to display the FFT, to the desired effect.
Codes Utiles En C++ / Useful Codes in C ++
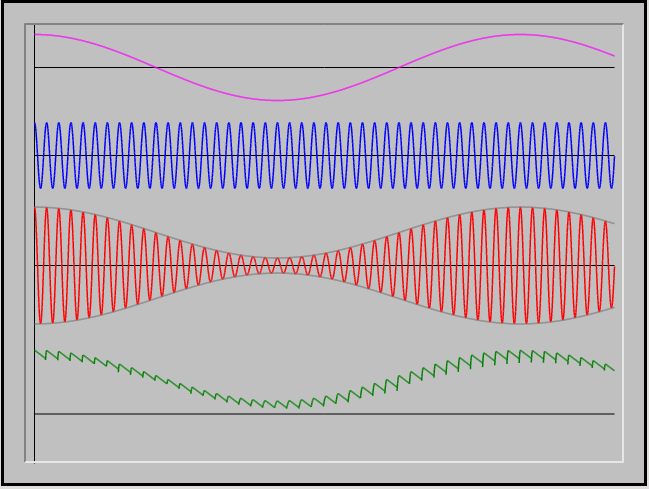
Je vais vous montrer les codes en C++ qui nous ont utiles afin de réaliser des effets sonores.
Voici d'abord toutes nos déclarations (oui un peu exhaustif...) :
I'm going to show you the codes in C ++ that were useful for us to create sound effects.
First, all our statements (yes a little exhaustive ...):
#include <stdio.h>
#include <string.h>
#include <stdlib.h>
#include <cmath.h>
#include <vector>
#include <string>
#include <cassert>
#include <list>
#include <queue>
#include "WavUtils.cpp"
#include "Biquad.cpp"
#include <unistd.h>
#include <fcntl.h>
#include <sys\mman.h>
#include "hps_0.h"
#include "hps.h"
#include "alt_gpio.h"
#include "hwlib.h"
#include "socal.h"
#include <math.h>
#include "kiss_fft.h"
#define nbpoint 1000
#define HW_REGS_BASE ( ALT_STM_OFST)
#define HW_REGS_SPAN ( 0x04000000 )
#define HW_REGS_MASK ( HW_REGS_SPAN - 1 )
#define PI 3.1415926535
#define NFFT 80
#define FE 41000
#define F2 10000
#define F1 5925
#define PH 5000
#define PB 15000
#define MOD 2000
using namespace std;

const long SAMPLE_RATE = 12500000;  // Création de la configuration et des buffers in et out pour s(t) et S(f)      const kiss_fft_cfg config = kiss_fft_alloc(NFFT, 0, NULL, NULL); const kiss_fft_cfg config_inv = kiss_fft_alloc(NFFT, 1, NULL, NULL);     kiss_fft_cpx* in = (kiss_fft_cpx*)malloc(NFFT*sizeof(kiss_fft_cpx));     kiss_fft_cpx* out = (kiss_fft_cpx*)malloc(NFFT*sizeof(kiss_fft_cpx));     kiss_fft_cpx* inv = (kiss_fft_cpx*)malloc(NFFT*sizeof(kiss_fft_cpx));<br>queueoutBuf; int global = 0; int i = 0 ;
short data,data2;
Ci-dessous une de nos fonctions permettant la modulation :
Below one of our functions allowing modulation:
void modulation(int freq)
{	if(i<NFFT)
	 { data=data*cos(2*PI*freq*i/FE);
	 in[i].r=data;
	 i++;
	 } else
		i="0" ;
}
Voici notre fonction main :
These our main function :
int main(int argc,char **argv)
{
volatile unsigned long *h2p_lw_spi_addr=NULL; <br>    volatile unsigned long *h2p_lw_led_addr=NULL;
    volatile unsigned long *h2p_lw_adc_addr=NULL;
    volatile unsigned long *h2p_lw_blue_addr=NULL;
    volatile unsigned long *h2p_lw_red_addr=NULL;
    volatile unsigned long *h2p_lw_black_addr=NULL;

    void *virtual_base;
    int fd;
    printf("1\n");
    // map the address space for the spi registers into user space so we can interact with them.
    // we'll actually map in the entire CSR span of the HPS since we want to access various registers within that span
    if( ( fd = open( "/dev/mem", ( O_RDWR | O_SYNC ) ) ) == -1 ) {
        printf( "ERROR: could not open \"/dev/mem\"...\n" );
        return( 1 );
    }
    printf("2\n");
    virtual_base = mmap( NULL, HW_REGS_SPAN, ( PROT_READ | PROT_WRITE ), MAP_SHARED, fd, HW_REGS_BASE );
    printf("3\n");
    if( virtual_base == MAP_FAILED ) {
        printf( "ERROR: mmap() failed...\n" );
        close( fd );
        return( 1 );
    }
    printf("4\n");

    printf("5\n");
    h2p_lw_spi_addr  = virtual_base + ( (unsigned long) (ALT_LWFPGASLVS_OFST + SPI_0_BASE)
                       & (unsigned long) ( HW_REGS_MASK) );
    h2p_lw_led_addr = virtual_base +  ( (unsigned long) (ALT_LWFPGASLVS_OFST + PIO_LED_BASE)
                       & (unsigned long) ( HW_REGS_MASK) );
    h2p_lw_adc_addr = virtual_base +  ( (unsigned long) (ALT_LWFPGASLVS_OFST + ADC_0_BASE)
                       & (unsigned long) ( HW_REGS_MASK) );
    h2p_lw_blue_addr= virtual_base +  ( (unsigned long) (ALT_LWFPGASLVS_OFST + PIO_BLUE_BASE)
                       & (unsigned long) ( HW_REGS_MASK) );
    h2p_lw_black_addr= virtual_base +  ( (unsigned long) (ALT_LWFPGASLVS_OFST + PIO_BLACK_BASE)
                       & (unsigned long) ( HW_REGS_MASK) );
    h2p_lw_red_addr= virtual_base +  ( (unsigned long) (ALT_LWFPGASLVS_OFST + PIO_RED_BASE)
                       & (unsigned long) ( HW_REGS_MASK) );

    //int i=0;
    int data;
     int i= 0,j;

    // Création de la configuration et des buffers in et out pour s(t) et S(f)
    const kiss_fft_cfg config = kiss_fft_alloc(NFFT, 0, NULL, NULL);
    kiss_fft_cpx* in = (kiss_fft_cpx*)malloc(NFFT*sizeof(kiss_fft_cpx));
    kiss_fft_cpx* out = (kiss_fft_cpx*)malloc(NFFT*sizeof(kiss_fft_cpx));
    while(1){
    data = *(h2p_lw_adc_addr+2);
      if(*h2p_lw_blue_addr == 1)
         data = echo(data,20);

      if(*h2p_lw_black_addr == 1)
         alt_write_word(h2p_lw_led_addr,0x0F);

      if(*h2p_lw_red_addr == 0)
         alt_write_word(h2p_lw_led_addr,0xF0);

     alt_write_word(h2p_lw_spi_addr+1, data | 0b111000000000000);
     }
     free(config);
     free(in);
     free(out);
    return 0;
}
Le Final / the Final
Français :
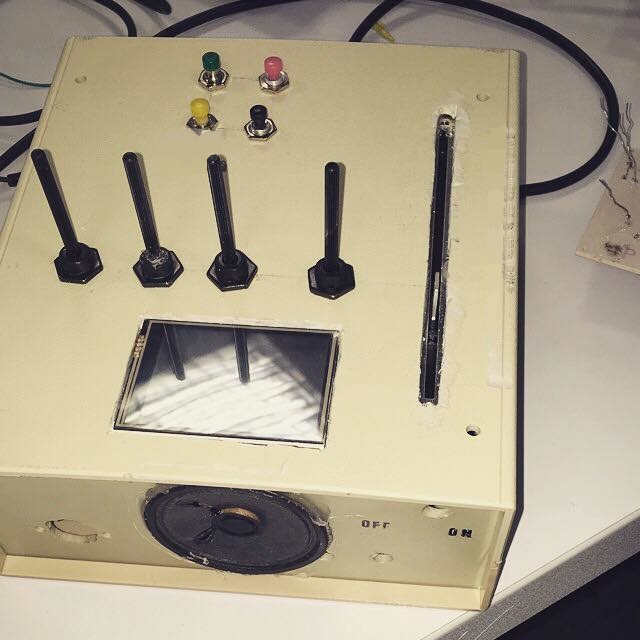
Eh voilà (enfin) le rendu final de notre Cactus 2000.
Nous avons mis les PCB entrée et sortie qui sont reliés à la carte DE0 Nano Soc.
Ensuite, ses composants sont placés à l'interieur d'une boite jaune.
Sur la boîte on trouve un potentiomètre glissière, qui permet de gérer le volume du son, des potentiomètres et des boutons qui permettrons de lancer certains effets, ainsi que un ecran qui permettra d'afficher la FFT.
Le haut-parleur est positionné perpendiculairement par rapport aux boutons. Le micro est positionné de l'autre coté de la boîte par rapport au haut-parleur.
C'est tout pour aujourd'hui.
En esperant que cet Instructable vous soit utile.
English :
Here we are (finally) the final rendering of our Cactus 2000.
We put the input and output PCBs that are connected to the DE0 Nano Soc board.
Then, its components are placed inside a yellow box.
On the box is a slide potentiometer, which can manage the volume of the sound, knobs and buttons that will launch some effects, and a screen that will display the FFT.
The speaker is positioned perpendicular to the buttons. The microphone is positioned on the other side of the box relative to the speaker.
That's all for today.
Hoping that this Instructable is useful to you.