CATCUBE Internet Clock

.gif)
.gif)

Hey everyone, and welcome back.
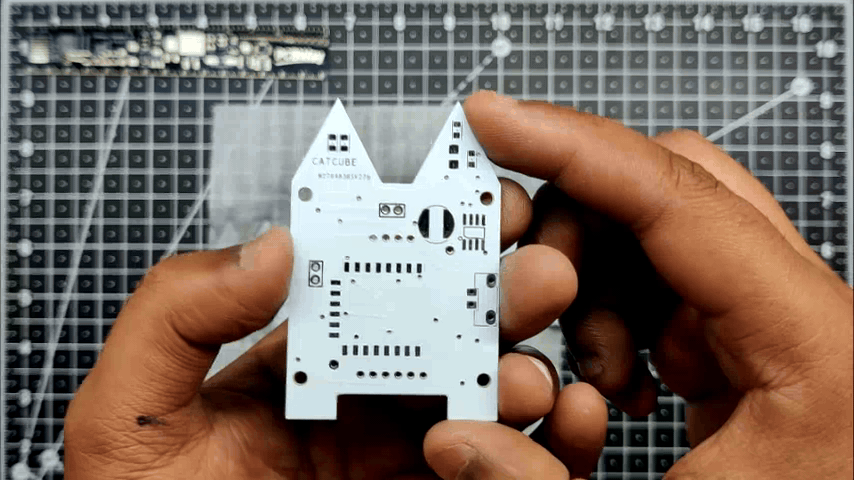
This is CATCUBE, a miniature cube-shaped desk clock with a cat theme that was created entirely from scratch and has an ESP8266 module for a brain.
A desk clock like this one pulls time readings from the internet and displays them on the 0.96-inch SSD1306 OLED; its front is made of a custom PCB, and its back is covered with a hollow 3D-printed holder that can accommodate a small Li-Po battery.
This project was built around a custom PCB that houses all the electronics, including a Li-Po charging IC, an AMS1117 setup that steps down voltage to 3.3V, and an ESP8266 setup. The PCB serves as the top part of the project and even has some unique aesthetic features, like CAT Ears and PAWS, that give this small CUBE its own individuality.
This Instructables is about how this project was made, so let's get started with the build.
Supplies
these were the materials used in this built-
- ESP12F Module
- Custom PCBs
- AMS1117
- 10k Resistors
- SDM 0603 LEDs
- 100nf Capacitors
- Li-ion Cell
- Li-ion cell holder smd
- 3D-printed parts
- threaded inserts
- TP4333
- NODEMCU
PCB Design


The first step in this project was to create the schematic, which was actually rather easy to do. This device's OLED display will be controlled by an ESP12F Minimum Setup.
In order to power the entire setup, we needed a 3.3V source for the ESP8266 and a 5V source for the display. We used the TP4333 IC, a power management IC with a consistent output of 3.7V to 5V 1A from a single lithium cell.
The ESP8266 Module arrangement will be powered by a straightforward AMS1117 3.3V Regulator setup that we use to obtain 3.3V from the TP4333.
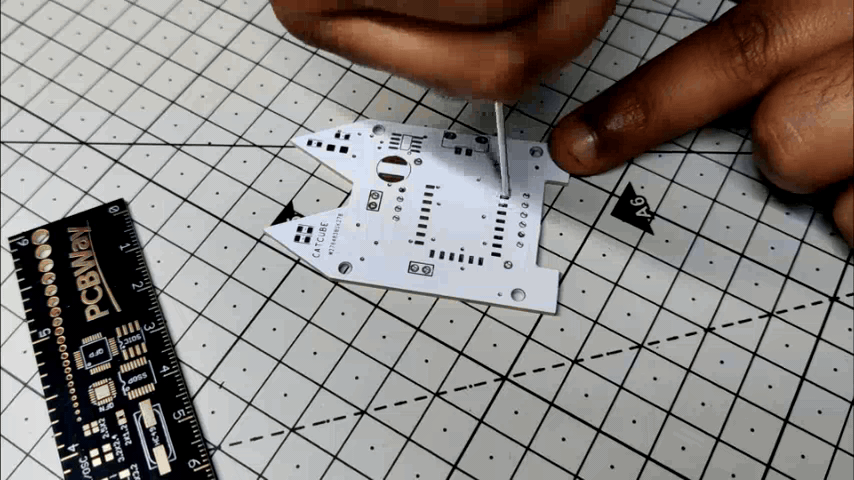
After the schematic is complete, it is converted into board files so that we may work on the PCB file, which is created in accordance with the CAD Design.
To evaluate how this arrangement will look, we first created a model in Fusion 360. Once the model was complete, we exported the DWG file of the front PCB and loaded it into the PCB Cad software, which provided us with the outline of the PCB with CAT Ears at the top side and paws on the bottom.
We had to position components on both sides of the PCB because it was a small PCB; normally, I avoid doing this because it makes assembly more difficult and time-consuming and mandates the use of two soldering techniques.
OLED was mounted on the front along with the AMS1117 Regulator and a few other necessary components, and the ESP8266 module and TP4333 configuration were mounted on the back.
PCBWAY
.gif)
.gif)
After the PCB Design was completed, Gerber data was generated and then sent to PCBWAY for samples.
An order was placed for the PCBs with white solder masks and black silkscreen, as they look pretty cool in general.
The PCBs were received within a week, and they were excellent, as expected.
I really love the quality of PCBs made by PCBWAY. There are other manufacturers available, but their service is always on another level.
check out PCBWay service for getting great PCB service at a lower cost.
PCB Assembly
.gif)
.gif)
.gif)
.gif)
.gif)
.gif)
.gif)
.gif)
.gif)
.gif)
- We start the PCB assembly Process by first adding solder paste to the component pads on the bottom side.
- Next, we add all the SMD components on the bottom side to their locations using an ESD tweezer.
- In order to heat the PCB to the solder paste melting temperature, we carefully lift the Board and place it on an SMT hotplate. Solder paste melts, and components are attached to their pads as soon as the Board reaches that temperature.
- now we add solder paste to all the component pads on the top side
- Next, we pick and place all the SMD components on the top side of the board.
- We couldn't reflow this PCB using an SMT hotplate due to the components on the bottom side. Instead, we will melt the solder paste using a hot air soldering station, which will allow the components to be soldered to their pads.
- The other THT parts are then connected to the circuit and soldered into place using a soldering iron.
PCB Assembly has been completed.
Programming the ESP12F With NODEMCU
.gif)
You might not be aware that any ESP board can be programmed using the NODEMCU Board.
By taking a NODEMCU board and connecting a jumper with its GND Pin and EN Pin, which puts the onboard ESP8266 of the NODEMCU into sleep mode, we may utilize the NODEMCU to program the external ESP12F module.
This enables us to connect an external ESP Board to NODEMCU; so essentially, we are turning off the ESP board on the NODEMCU and connecting a second ESP Board to a few of its pins.
You can read the article below for additional information about this process.
CODE
This code is an Arduino sketch that displays the current time and day of the week on an OLED display using an ESP8266 board. The code uses the NTPClient library to fetch the time from an NTP (Network Time Protocol) server, and the Adafruit_SSD1306 library to control the OLED display.
Let's go through the code step by step:
1. Libraries:
- The code includes necessary libraries for using NTPClient, ESP8266WiFi, WiFiUdp, Wire, Adafruit_SSD1306, and Adafruit_GFX.
2. Definitions and Constants:
- The code defines the width and height of the OLED display.
- OLED_ADDR is the I2C address of the OLED display, which is usually 0x3C.
- The ssid and password variables store the Wi-Fi network credentials that the ESP8266 will connect to.
- utcOffsetInSeconds represents the time offset from UTC in seconds. In this case, it's set to 19800 seconds, which corresponds to UTC+5:30 (Indian Standard Time).
3. Initializing the Display and Wi-Fi:
- In the `setup()` function, the OLED display is initialized, and the display is cleared.
- The Serial communication is started at a baud rate of 115200 for debugging purposes.
- The ESP8266 connects to the Wi-Fi network specified by the `ssid` and `password` variables using `WiFi.begin()`.
- The while loop waits until the ESP8266 successfully connects to the Wi-Fi network (WL_CONNECTED status).
4. NTPClient Initialization:
- The `timeClient` object of the NTPClient class is initialized with the UDP client (`ntpUDP`) and the NTP server address (`pool.ntp.org`).
- The UTC offset is set using `utcOffsetInSeconds`.
- The `timeClient` is then started with `timeClient.begin()`.
5. Loop Function:
- The `loop()` function is the main part of the code that runs repeatedly after setup.
- It calls `timeClient.update()` to fetch the current time from the NTP server.
- The OLED display is cleared using `display.clearDisplay()` to prepare for the new time to be displayed.
- The current day of the week is obtained from the `timeClient` using `timeClient.getDay()` and displayed on the OLED display.
- The current hour, minute, and second are obtained from the `timeClient` and displayed on the OLED display in a digital clock format.
6. Display Update:
- After updating the OLED display with the current time, the `display.display()` function is called to show the updated content on the screen.
- A delay of 1000 milliseconds (1 second) is added using `delay(1000)` to pause the loop for a second before updating the display with the new time.
In summary, this code connects the ESP8266 to a Wi-Fi network, fetches the current time from an NTP server, and displays the day of the week and current time (hour, minute, and second) on an OLED display in a digital clock format. It will continue updating the display every second to show the real-time clock.
#include "NTPClient.h"
#include "ESP8266WiFi.h"
#include "WiFiUdp.h"

#include <Wire.h>
#include <Adafruit_SSD1306.h>
#include <Adafruit_GFX.h>

#define OLED_WIDTH 128
#define OLED_HEIGHT 64

#define OLED_ADDR   0x3C

Adafruit_SSD1306 display(OLED_WIDTH, OLED_HEIGHT);

const char *ssid = "YOUR SSID";
const char *password = "YOUR PASS";

const long utcOffsetInSeconds = 19800;

char daysOfTheWeek[7][12] = {"Sunday", "Monday", "Tuesday", "Wednesday", "Thursday", "Friday", "Saturday"};


WiFiUDP ntpUDP;
NTPClient timeClient(ntpUDP, "pool.ntp.org", utcOffsetInSeconds);

void setup(){

  display.begin(SSD1306_SWITCHCAPVCC, OLED_ADDR);
  display.clearDisplay();
  Serial.begin(115200);
  WiFi.begin(ssid, password);

while ( WiFi.status() != WL_CONNECTED ) {
delay ( 500 );
Serial.print ( "." );
}

timeClient.begin();
}

void loop() {
timeClient.update();

display.clearDisplay();
display.setTextSize(2);
display.setTextColor(WHITE);
display.setCursor(13, 0);
display.println(daysOfTheWeek[timeClient.getDay()]);

display.setTextSize(3);
display.setTextColor(WHITE);
display.setCursor(20, 30);
display.println(timeClient.getHours());

display.setTextSize(2);
display.setTextColor(WHITE);
display.setCursor(50, 30);
display.println(":");

display.setTextSize(2);
display.setTextColor(WHITE);
display.setCursor(60, 30);
display.println(timeClient.getMinutes());

display.setTextSize(2);
display.setTextColor(WHITE);
display.setCursor(85, 30);
display.println(":");

display.setTextSize(2);
display.setTextColor(WHITE);
display.setCursor(95, 30);
display.println(timeClient.getSeconds());


display.display();
delay(1000);
}
FINAL ASSEMBLY
.gif)
.gif)
- The final assembly process starts by connecting the OLED to the circuit, then attaching the Switch to the 3D-printed body and connecting its wire harness connector to the circuit's CON2 Port.
- We then use four M2 Screws to secure the circuit to the 3D-printed base, and this project is completed.
RESULT

.gif)
.gif)
.gif)
Here's the final result of this project, a mini-working CUBE Clock that kind of looks like a CAT.
With this configuration, an OLED display is linked to an ESP8266 board, allowing us to display a variety of other things in addition to the clock, such as custom animation, random quotes, and other such things.
This is it for today folks.
Do leave a comment if you need any help regarding this project.
Thanks PCBWAY for supporting this project, you guys can check them out if you need great PCB and stencil service for less cost and great quality.
And I'll be back with a new project pretty soon!