Build Your Own Pocket SID Audio Player
by Propellerpowered in Circuits > Gadgets
17781 Views, 52 Favorites, 0 Comments
Build Your Own Pocket SID Audio Player
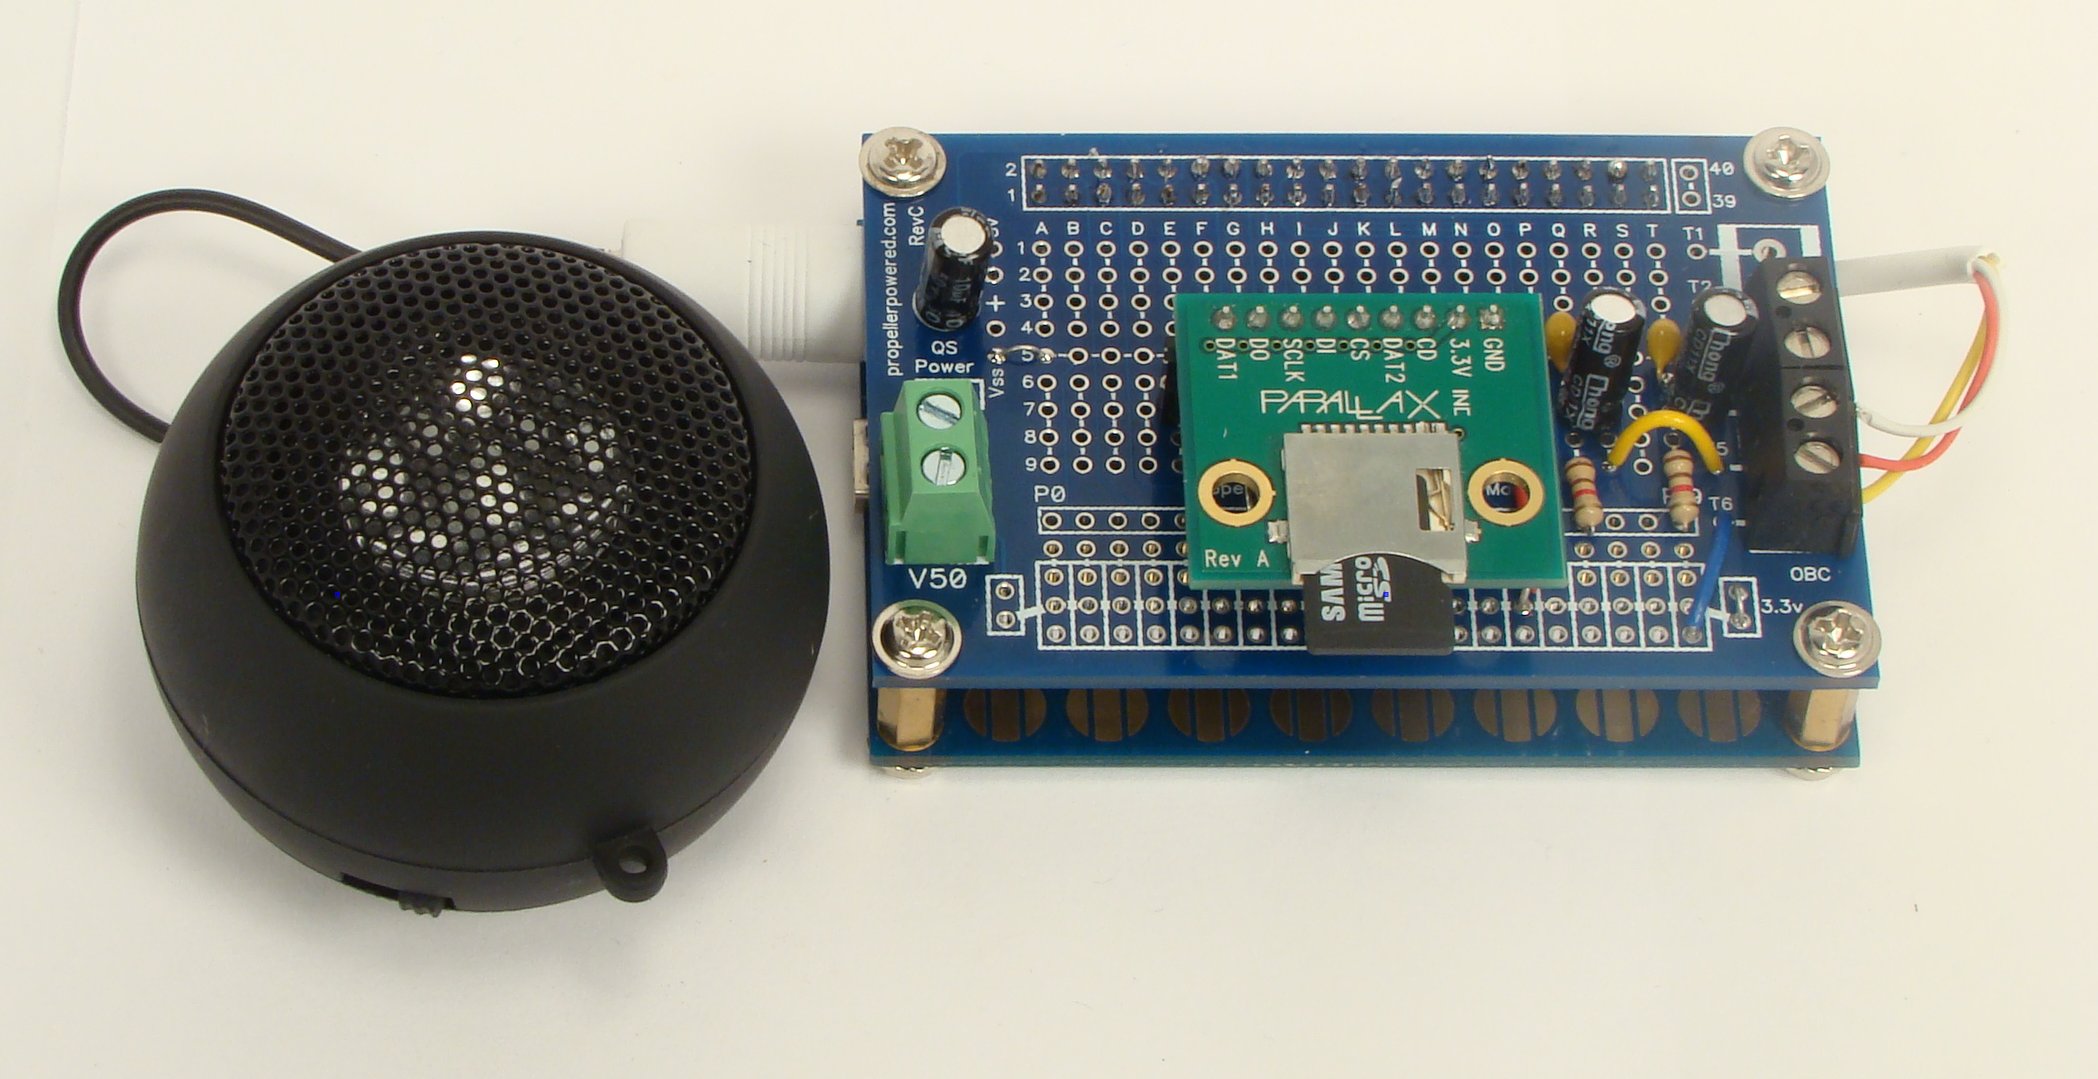
Let's time travel back to the 80's again by creating your own Propellerpowered Pocket SID Audio Player.
]
The Guinness Book of World Records lists the Commodore 64 as the best-selling computer model of all time. One of the C64's most compelling features was it's SID (Sound Interface Device) chip. This tiny, 3-voice synthesizer, created by Robert "Bob" Yannes is still loved and recognized today.
This Instructable will teach you how to build your own pocket-sized Propellerpowered SID player that you can even take on the go. This is a fun and easy-to-build project that will have you rocking out to SID tunes!
Requirements:
- Your favorite Propeller board w/SD capability. (I'm using a Quickstart with Servo & More Board)
- An amplified speaker (A Veho or similar speaker)
Propellerpowered has everything included for this project, but I'm also including full schematics, source code, and parts list for anyone wanting to "roll their own" Pocket SID Audio Player.
Here's what you can look forward to: (SIDplayer in action.... and some tunes to help you build.)
SIDstickMedley by propellerpowered
Schematics
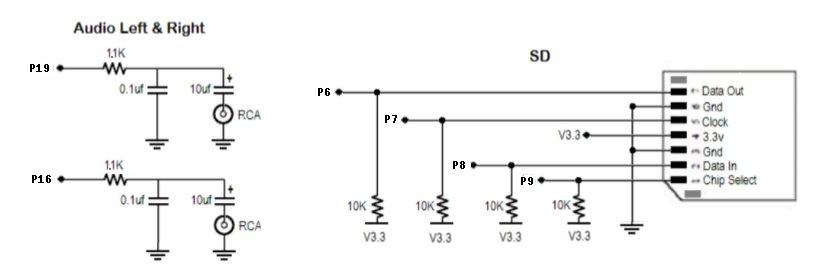
The Quickstart is highly recommended as your starting point, as I'm using two of it's touchbuttons for controls, but isn't required, the player will work in "automatic" mode without requiring interaction.
If you are creating your own version of the Pocket SID Audio Player, you'll need to replicate two circuits:
The next few steps use the "Servo and More" board from Propellerpowered, but may be replicated using a piece of "perf" board. Keep in mind that your numbers may/may not match the SAM board and adjust accordingly as your build this project.
If you are creating your own version of the Pocket SID Audio Player, you'll need to replicate two circuits:
- R/L Channel Audio out P16 and P19
- MicroSD (or SD) interface on P6-P9
- 2- 0.1uf Capacitors
- 3- 10uf Electrolytic Capacitors
- 3- screwterminal connectors
- 2- 1.1k Resistors
- 4- 10K Resistors
- 1- SD adapter connection
- 1- Propeller board (Quickstart recommended for full features)
- 1- Breadboard or Prototyping board
- 1- Wire and basic tools
The next few steps use the "Servo and More" board from Propellerpowered, but may be replicated using a piece of "perf" board. Keep in mind that your numbers may/may not match the SAM board and adjust accordingly as your build this project.
Building the Audio Circuit: Step 1
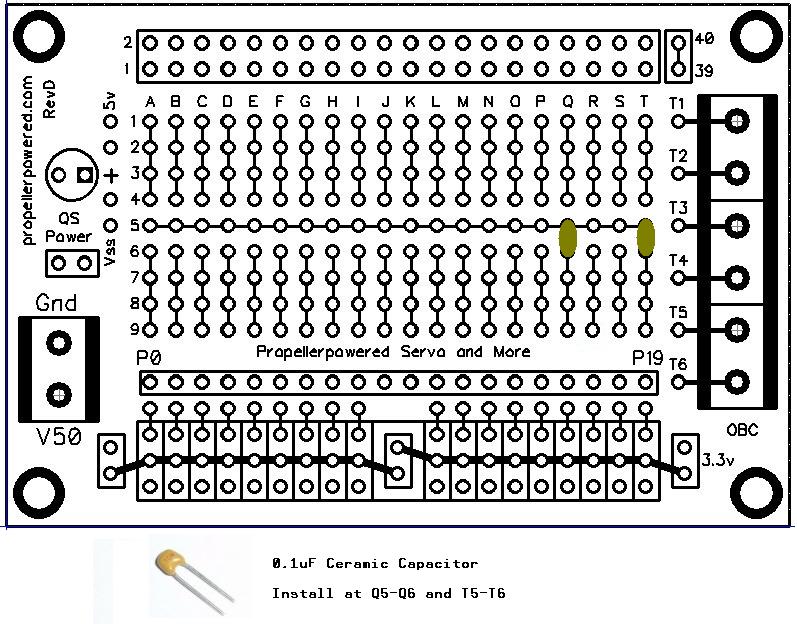
From this point, I'll assume you are building the Pocket SID Audio Player using the SAM Audio Kit from Propellerpowered.com: If you've got a piece of "perf" board, you may also be able to replicate these instructions, adjusting the numbers to match your board.
Step 1:
Step 1:
- Insert the two 0.1uf caps into Q5 to Q6 and T5 to T6 as shown
- Solder into place from the button and cut the excess leads.
Building the Audio Circuit: Step 2
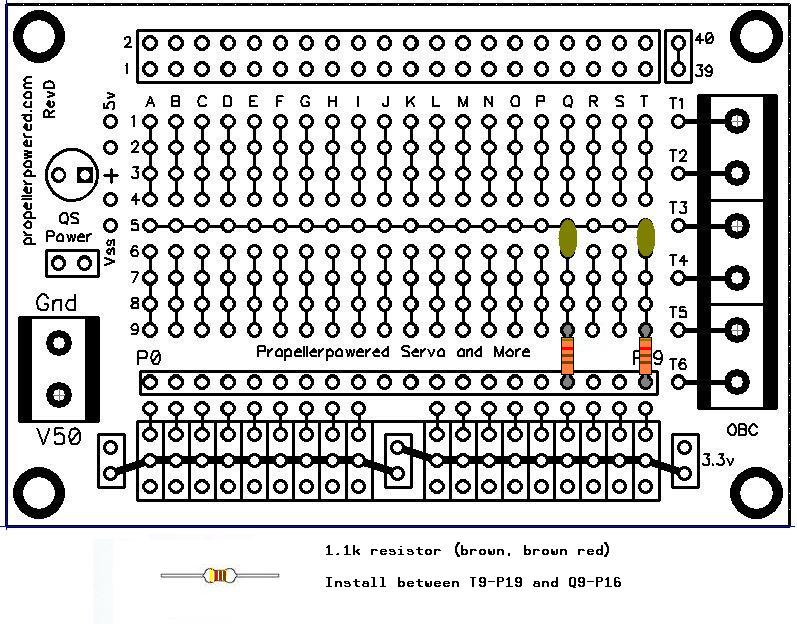
Step 2:
1.1k resistors are BROWN, BROWN, RED
- Insert the two 1.1k resistors into T9 to P19 and Q9 to P16 as shown
- Solder into place from the button and cut the excess leads.
- As you cut the excess leads, save them as we'll use them later.
1.1k resistors are BROWN, BROWN, RED
Building the Audio Circuit: Step 3
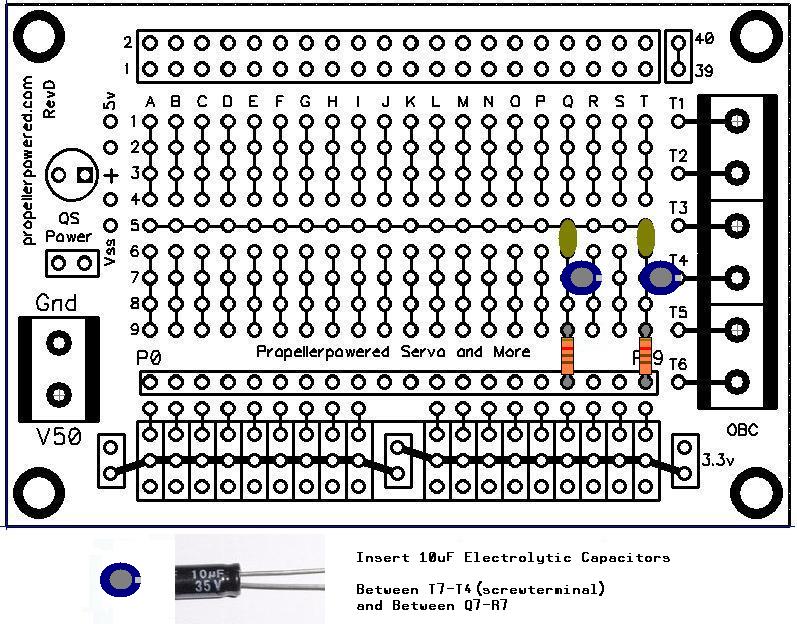
Step 3
Important note! Electrolytic Capacitors must be inserted in the correct direction!
The white stripe (negative side) should be in T4 and R7 as shown in the image.
- Insert the two 10uf Electrolytic Capacitors between T7-T4(screwterminal) and Q7-R7
- Solder into place from the button and cut the excess leads.
- As you cut the excess leads, save them as we'll use them later.
Important note! Electrolytic Capacitors must be inserted in the correct direction!
The white stripe (negative side) should be in T4 and R7 as shown in the image.
Building the Audio Circuit: Step 4
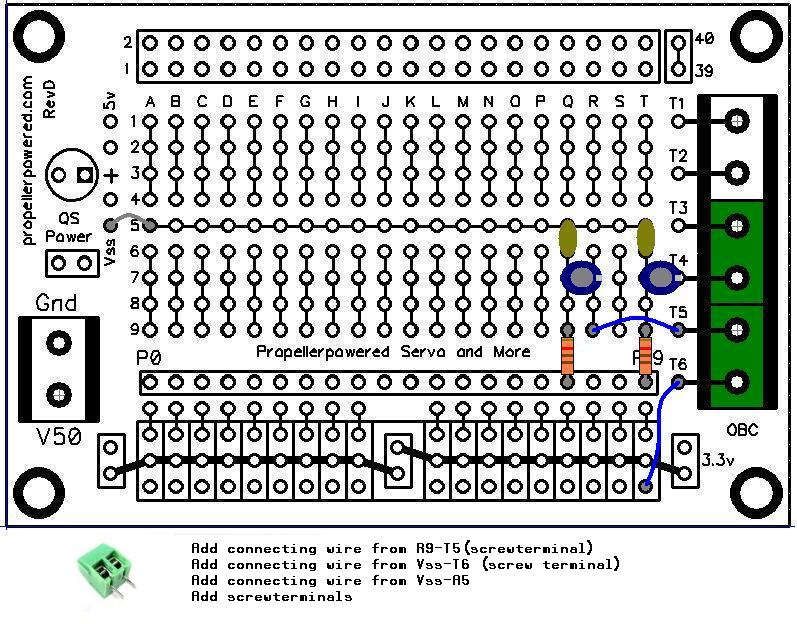
Step 4
Congratulations! You've completed the audio circuit!
The audio circuit is the most challenging of the this build. It's all down-hill from here.
Just a few more connections and we'll be rockin' to SID tunes!
- Add a connecting wire from R9 to T5 (screwterminal)
- Add a connecting wire from Vss-T6
- Add a connecting wire from Vss-A5 (use one of those lead snippets)
- Add the screwterminals to T3-T4, T5-T6
Congratulations! You've completed the audio circuit!
The audio circuit is the most challenging of the this build. It's all down-hill from here.
Just a few more connections and we'll be rockin' to SID tunes!
Building the MicroSD Connection: Step 1
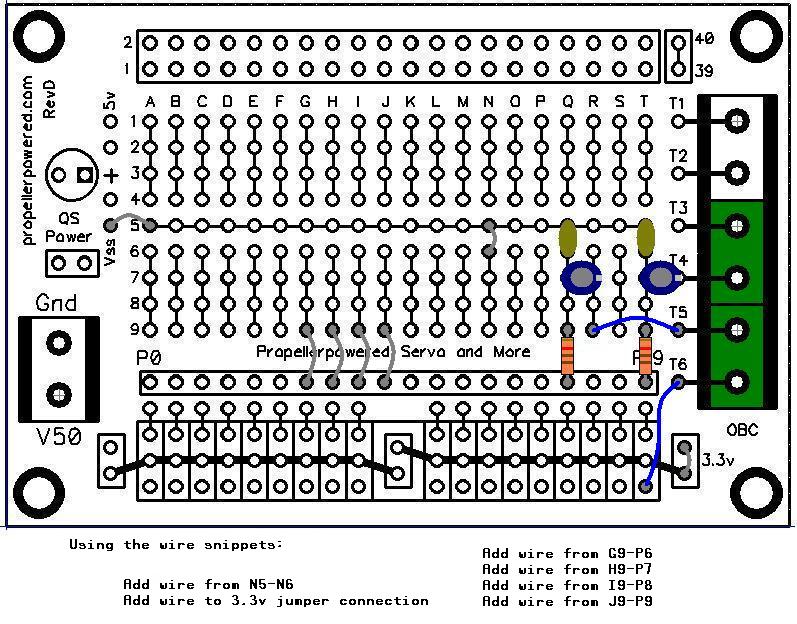
Next, let's add all the tiny jumper connections..
Using those wire snippets you saved from the resistors and capacitors, make the following connections:
Using those wire snippets you saved from the resistors and capacitors, make the following connections:
- Add a wire from N6 to N6
- Add a wire to the 3.3v jumper connection (lower left corner)
- Add a wire from G9 to P6
- Add a wire from H9 to P7
- Add a wire from I9 to P8
- Add a wire from J9 to P9
Building the MicroSD Connection: Step 2
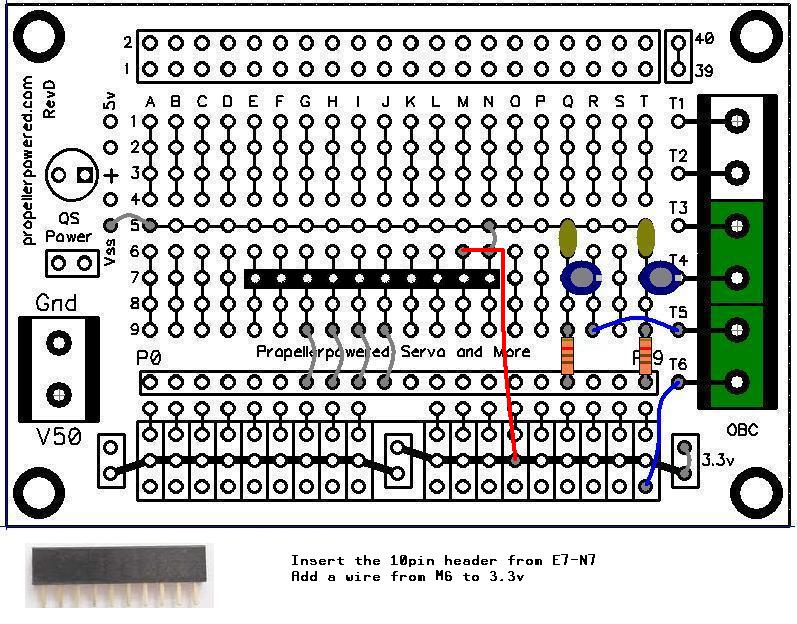
Finish the MicroSD connection by completing the following:
- Insert the 10pin female header from E7 to N7
- Add a wire from M6 to 3.3v (center of the 3-wire connection across the bottom)
Adding the Quickstart Connection
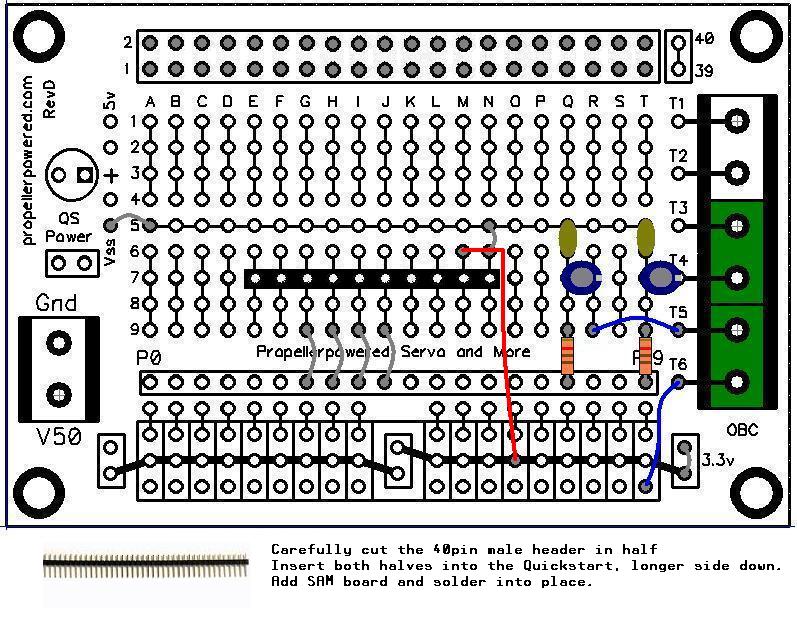
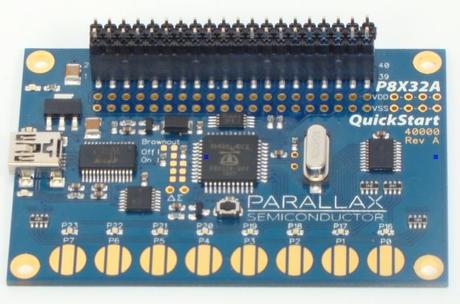
Almost done! Now, we'll add the connector to plug our board into the Quickstart.
If the 40pin header doesn't snap correctly in half, don't worry. Just make sure both rows of holes are filled.
Once soldered into place, it will become a single connection.
- Carefully cut the 40pin male header in half
- Insert both halves into the Quickstart board, longer side down. (see second photo)
- Place the "Servo and more" board we've been working on on top, and solder into place.
If the 40pin header doesn't snap correctly in half, don't worry. Just make sure both rows of holes are filled.
Once soldered into place, it will become a single connection.
Optional: Make It Portable
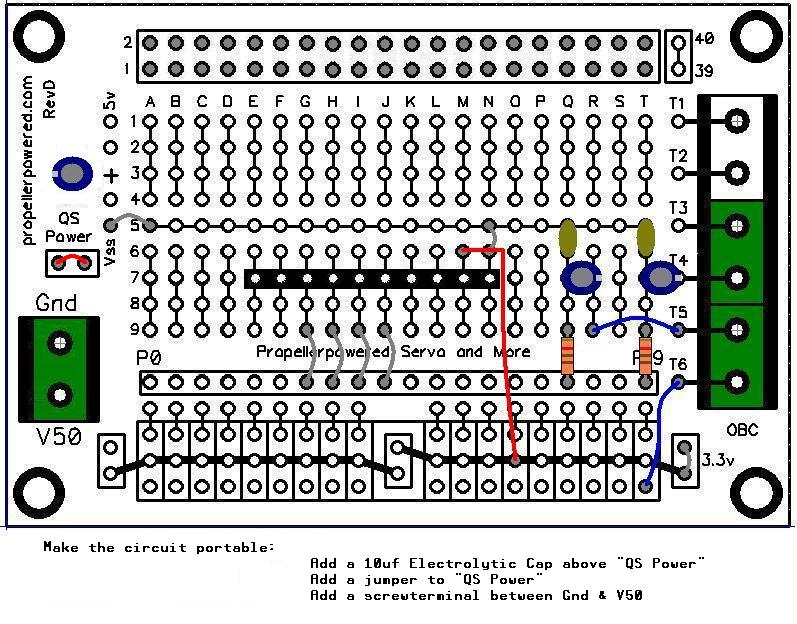
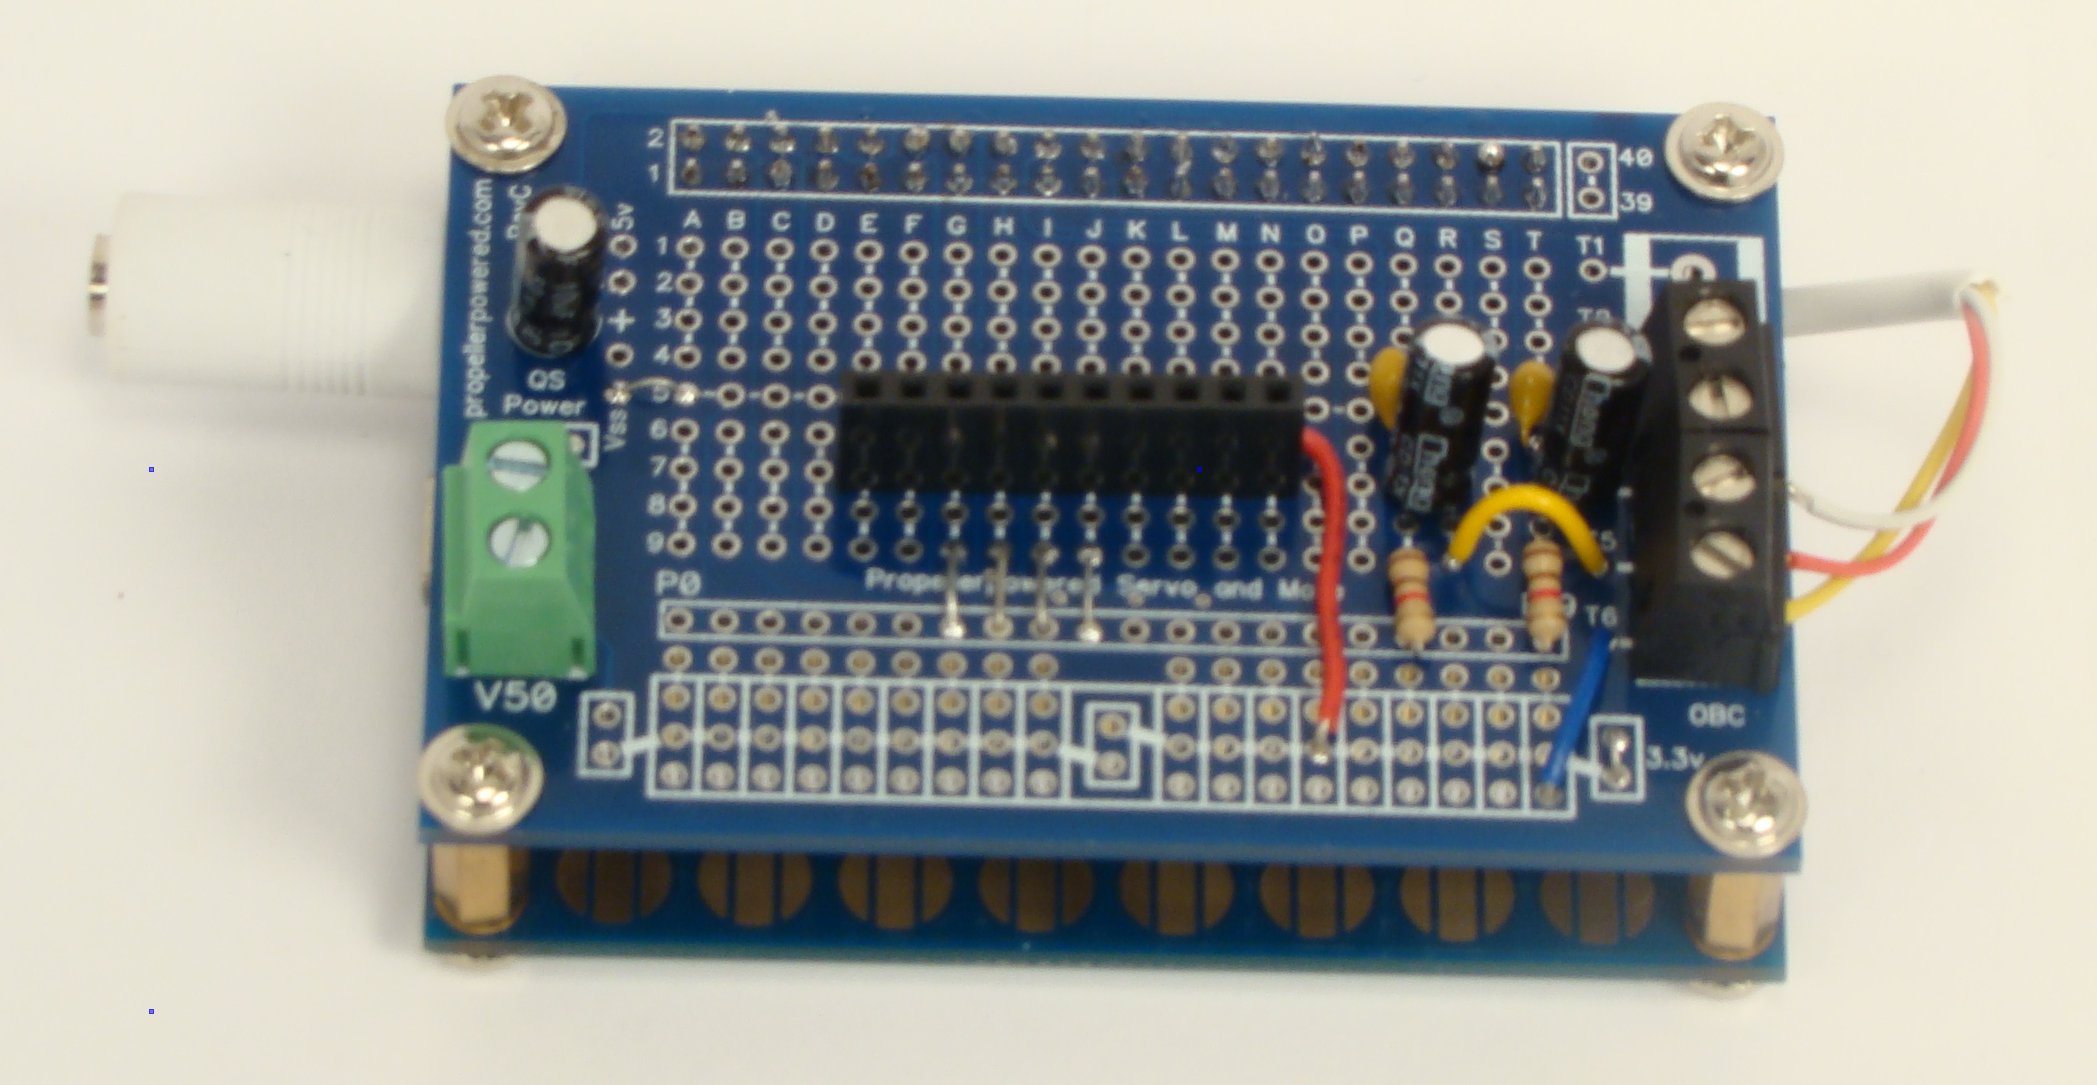
Planning to take your SID tunes on the go?
Make this project portable with the following connections:
Make this project portable with the following connections:
- Add a 10uf Electrolytic Capacitor above "QS Power" (note the white stripe "negative" faces left.)
- Add a jumper to "QS Power"
- Add a screwterminal between Gnd and V50
Adding the Audio Adapter
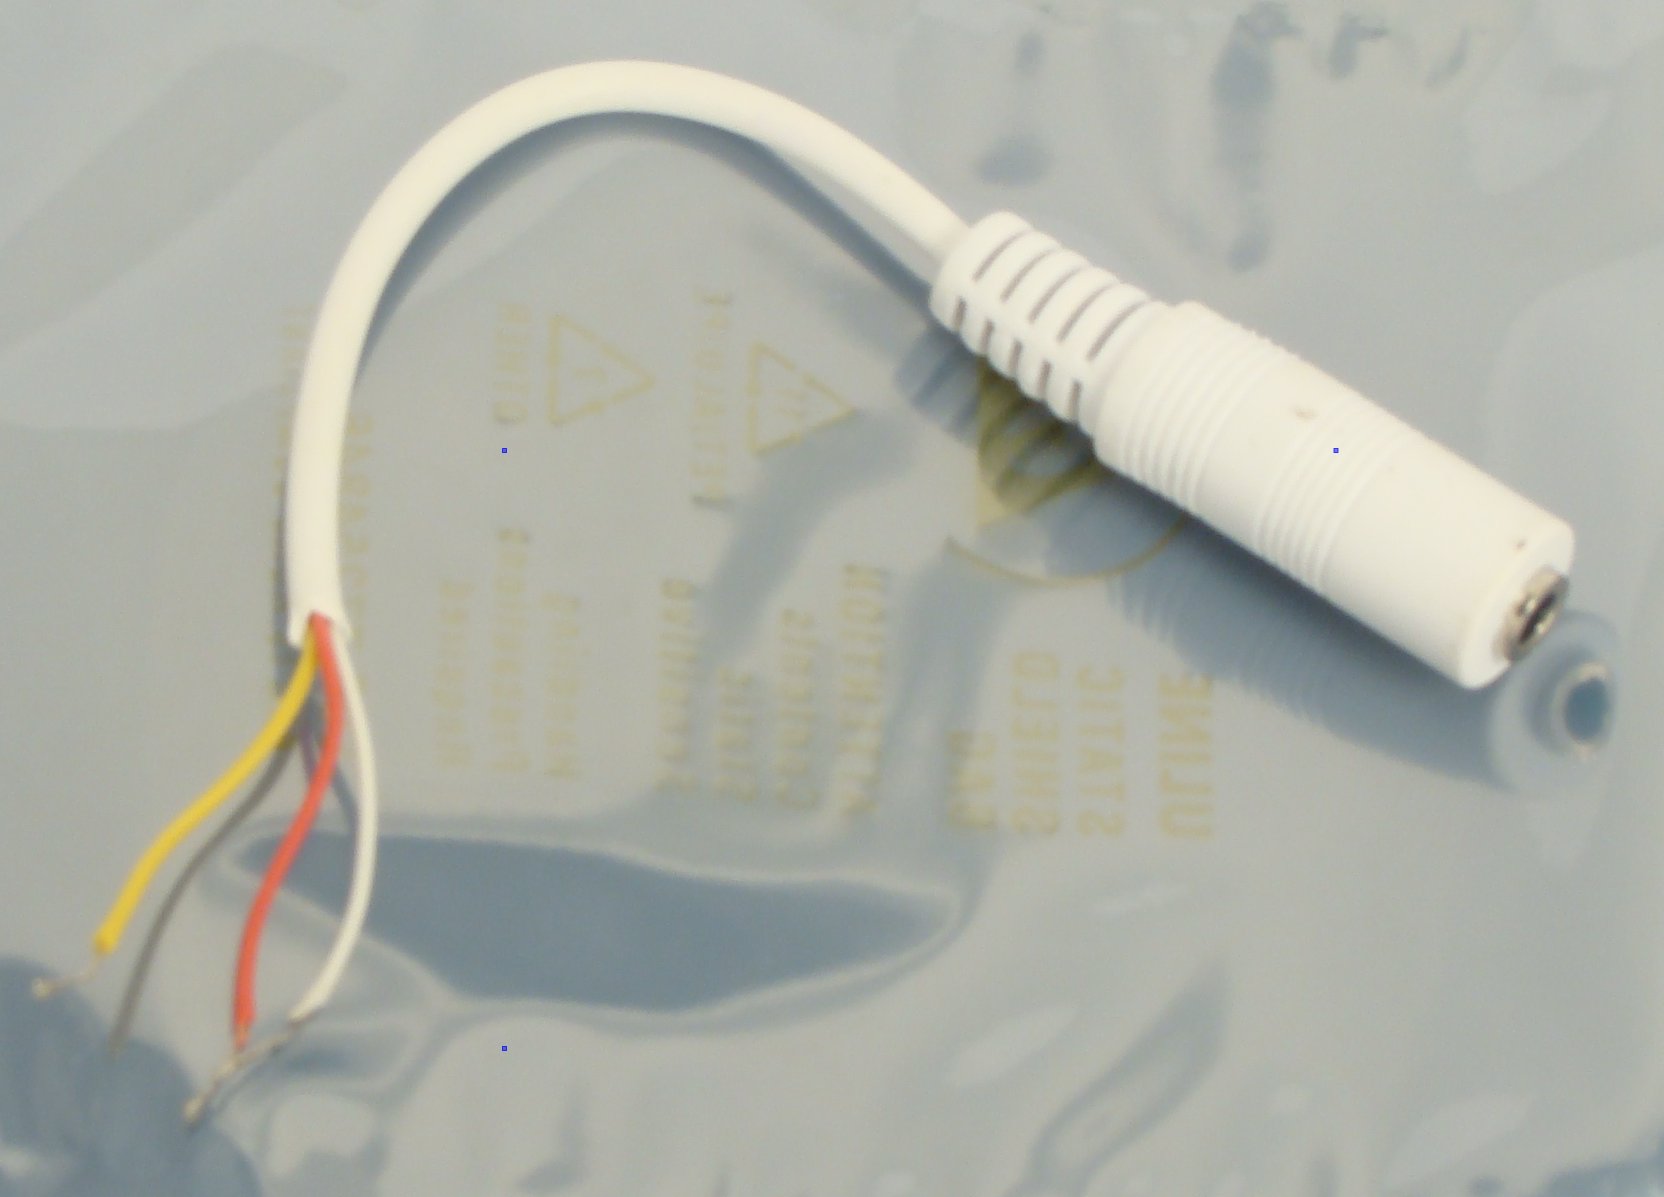
Included in the SAM Audio Kit, is a headphone jack with wire.
Carefully strip the end exposing three wires. It is recommended that you "strip and tin" each wire with the soldering iron.
Carefully strip the end exposing three wires. It is recommended that you "strip and tin" each wire with the soldering iron.
- Insert the yellow wire (ground) into screwterminal T6
- Insert the red wire (right) into screwterminal T5
- Insert the white wire (left) into screwterminal T4
Installing the SID Player Software
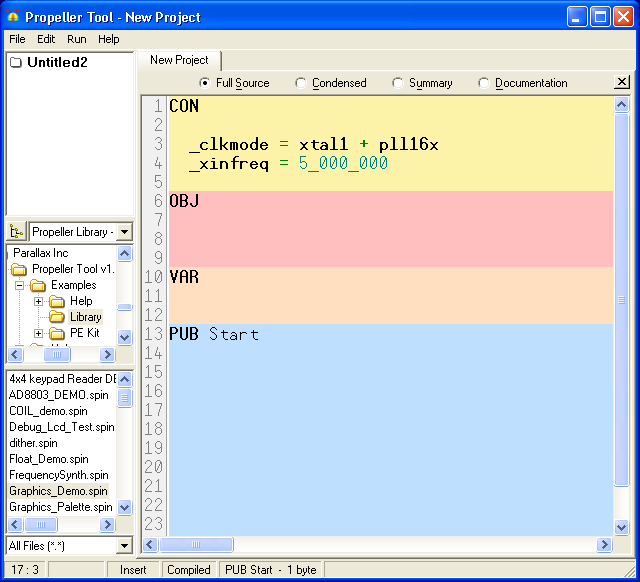
If you bought the Propellerpowered kit, the SAM Sidplayer software comes pre-installed on the Quickstart. (skip ahead to the next step, you don't need to do this step to get it working! :) )
If you built your own, you'll need to preform the following steps:
If you built your own, you'll need to preform the following steps:
- Download and Install The Propeller Tool
- Download the source code and extract to an empty folder.
- Using the Propeller Tool, open SAM Sidplayer.spin and use F11 to send it to your Propeller Board.
Add the Tunes!
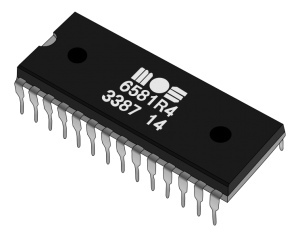
It's time to add the SID tunes!
The Commodore 64 uses .MUS and .SID files which contain 6502 code in them. That's a lot for a little microprocessor like the Propeller to have to handle, while reading the music from the microSD and generating the tones. A simple conversation program was written to convert .SID files into something very easy to process on the Propeller, making this SIDplayer possible.
The good news is that a TON of SID tunes have already been converted for you!
Here's two sources for them.
Pick the ones you want from my personal collection:
https://www.dropbox.com/sh/qwhixzvtlrvp1u1/stJtXVM87I/SID%20DMP%20files
Download the entire collection:
http://depositfiles.com/files/43nohb5bf
Create a folder on your microSD card called dmp and copy all of your SID .DMP files into this folder.
SID Emulation:
The Propeller is using an MIT licensed object called, SIDcog. SIDcog is a software emulation of the original SID chip written by Johannes Ahlebrand. SIDcog is an excellent sounding emulation, allowing many of the unique nuances of the 6581 to be replicated. More information about the SIDcog release can be found here.
Using the Portable SID Audio Player
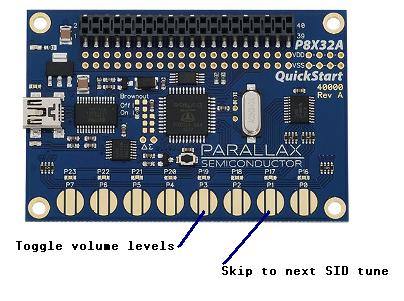
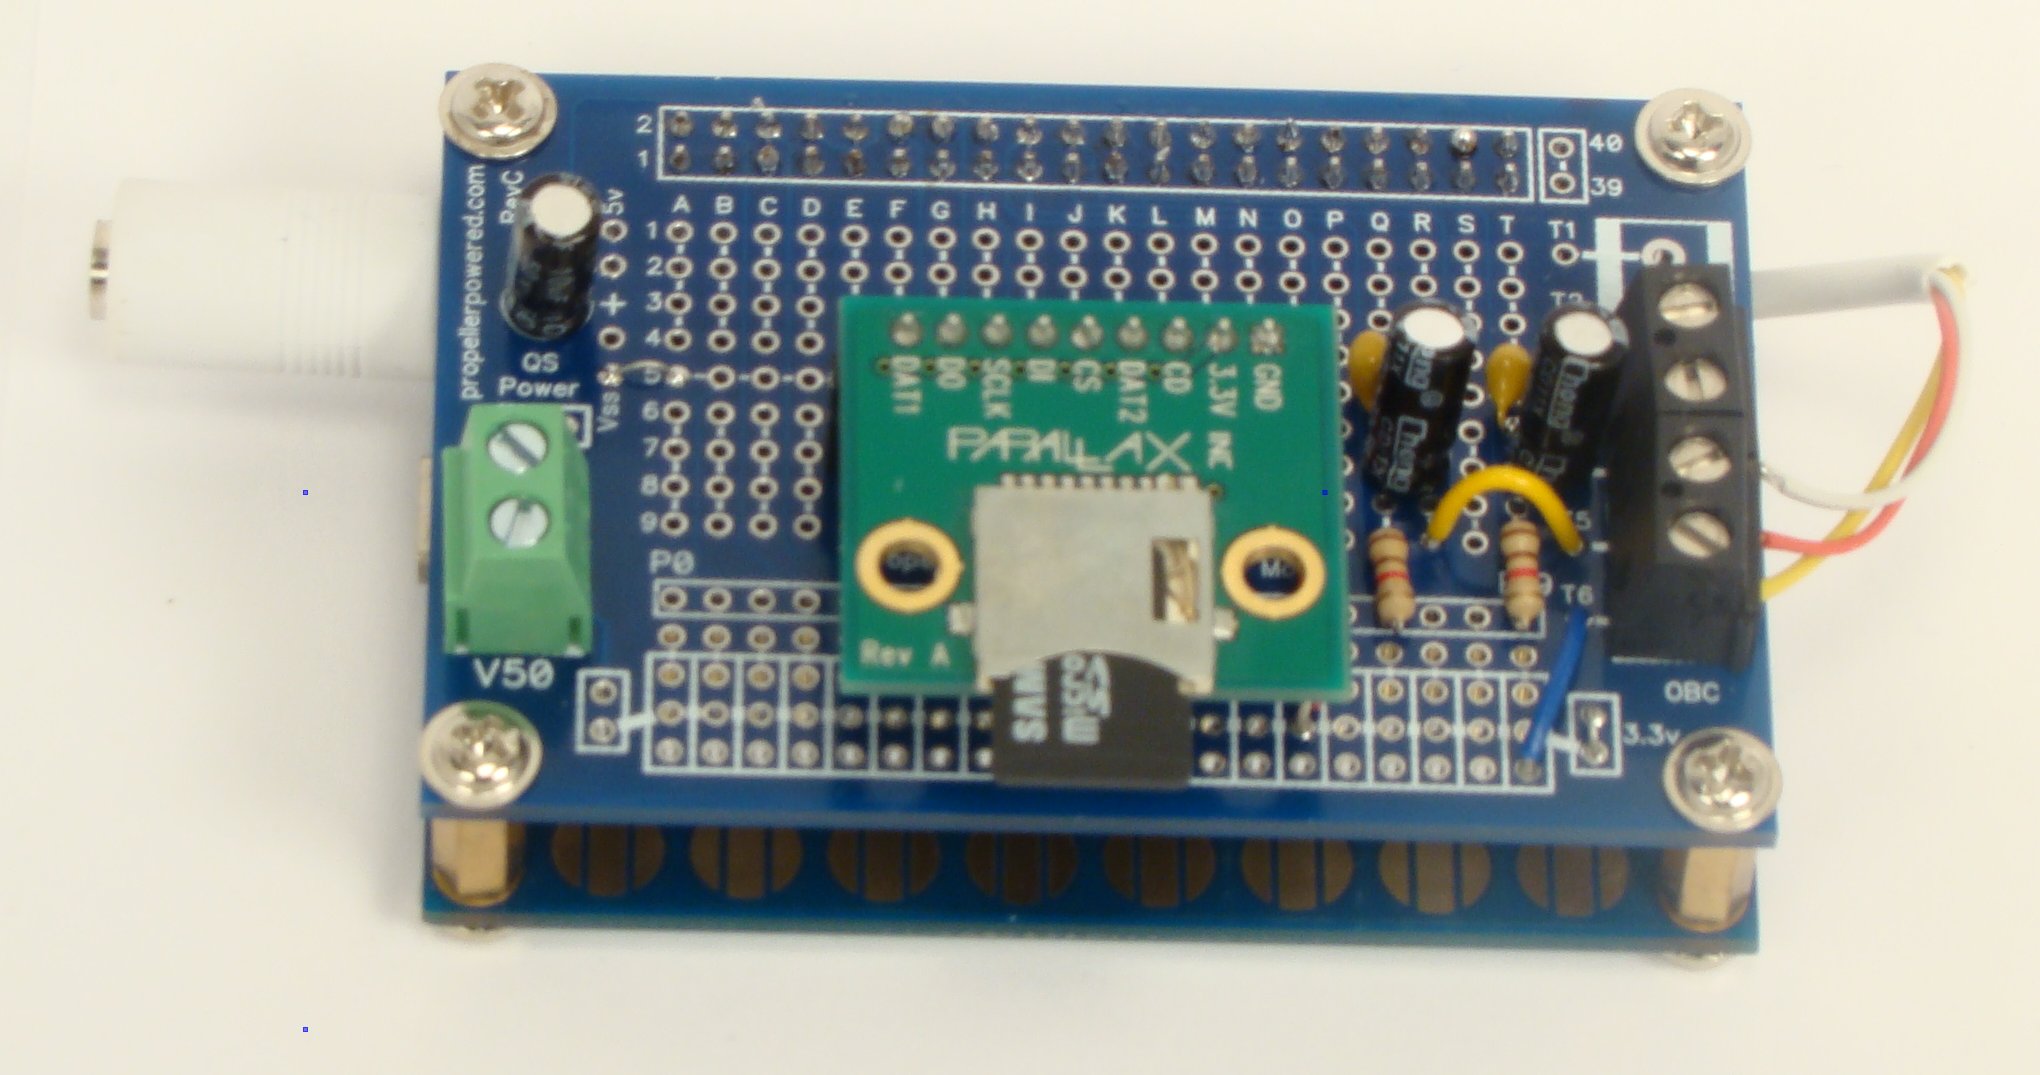
It's time for the tunes!
Upon power-up, the player should detect the DMP folder of SID tunes and start playing the first one immediately.
If you are using the Quickstart: (or the kit)
There is just enough room between the two boards to trigger the touchbuttons with your fingers.
Note: if you didn't build the Quickstart/Kit version of this, the player will automatically start at a reasonable level and play each tune sequentially.
- Plug the microSD adapter board into the 10pin header. Align the right side with the right-most hole. (GND)
- Connect your amplified speaker (or a set of computer speakers) to the headphone jack.
- Power with either external battery, USB power supply, or computer USB source.
Upon power-up, the player should detect the DMP folder of SID tunes and start playing the first one immediately.
If you are using the Quickstart: (or the kit)
There is just enough room between the two boards to trigger the touchbuttons with your fingers.
- Use button P3 to control the volume. Tapping it will cycle the volume levels.
- Use button P1 to skip to the next tune.
Note: if you didn't build the Quickstart/Kit version of this, the player will automatically start at a reasonable level and play each tune sequentially.
Credits
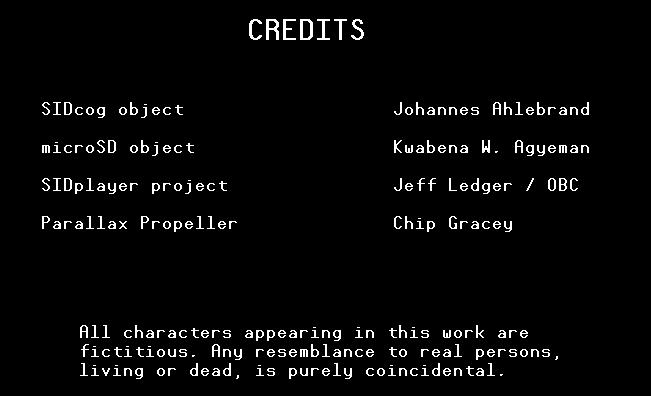
Of course we're kidding about the characters appearing in this work. (But there were no animals hurt during production.) The Portable SID Audio Player project uses MIT (open) licensed objects which do the "heavy lifting" of handling the audio playback and microSD control on this project.
I'd like to take a moment to recognize these authors and the fine work which they contribute to this project.
Without their contributions to the community, this project would not have been possible. Thank you.
Need help with your Portable SID Audio Player build? Visit the forums at http://forums.propellerpowered.com
Spin on!
Jeff
I'd like to take a moment to recognize these authors and the fine work which they contribute to this project.
- Johannes Ahlebrand creator of the SIDcog object code
- Kwabena W. Agyeman creator of the SD-MMC File Allocation Table Engine object code.
Without their contributions to the community, this project would not have been possible. Thank you.
Need help with your Portable SID Audio Player build? Visit the forums at http://forums.propellerpowered.com
Spin on!
Jeff