Build a Professional Website: Part 3 CSS
by htmlinc in Design > Websites
23822 Views, 15 Favorites, 0 Comments
Build a Professional Website: Part 3 CSS

CSS ( Cascading Style Sheets) are like the bread in a PB&J sandwich. Sure, tables are okay but the code is much cleaner and efficient with CSS.
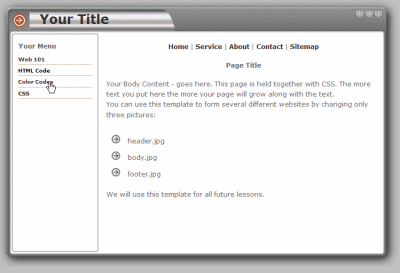
Now it get's really fun! You are about to build a professional grade web site! You can use this template to build endless web sites by only changing a few pictures!
Table of Contents:
Basic HTML code cheat sheet
Build a professional website: Part 1
Build a professional website: Part 2
Build a professional website: Part 3 CSS
- CSS is a simple method of adding style (eg fonts, colors, spacing) to Web documents.
- CSS allows you to make changes to several pages by only changing one style sheet.
- With CSS you can build multiple different web sites using the same style sheet.
Now it get's really fun! You are about to build a professional grade web site! You can use this template to build endless web sites by only changing a few pictures!
Table of Contents:
Basic HTML code cheat sheet
Build a professional website: Part 1
Build a professional website: Part 2
Build a professional website: Part 3 CSS
Let's Build a CSS Web Page!

(preview your page)
Start by pasting this code into my Live Page Builder or Notepad:
<!DOCTYPE HTML PUBLIC "-//W3C//DTD HTML 4.01 Transitional//EN" "http://www.w3.org/TR/html4/loose.dtd">
<HTML>
<HEAD>
<meta http-equiv="Content-Type" content="text/html; charset=iso-8859-1">
<TITLE>My First CSS Page!</TITLE>
<link rel="StyleSheet" type="text/css" href="stylecss.css" media="screen">
</HEAD>
<BODY>
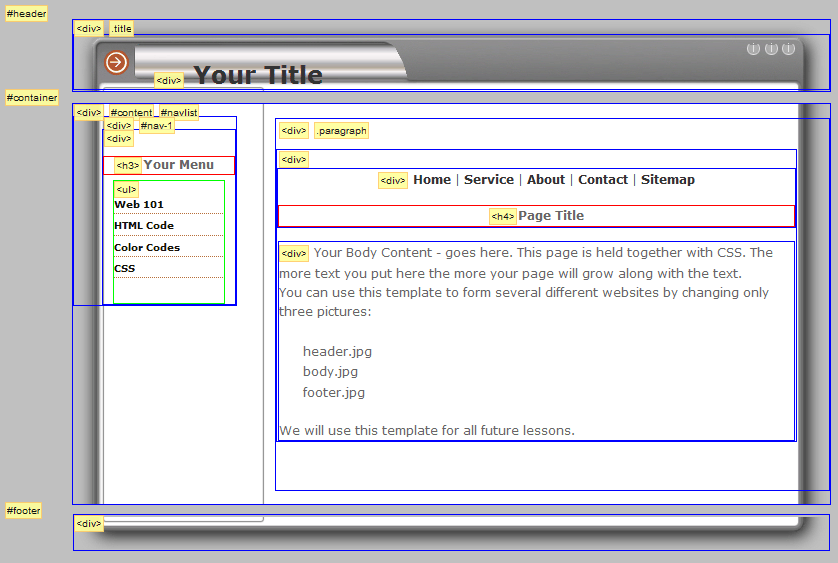
<DIV id=header>
<div class="title">
<a href="http://htmlinc.com" >Your Title</a>
</div>
</DIV>
<DIV id=container>
<DIV id=content>
<DIV class="paragraph">
<DIV align="center">
<a href="http://htmlinc.com/index.php">Home </a>|
<a href="http://htmlinc.com/services.php"> Service </a>|
<a href="http://htmlinc.com/aboutus.php"> About </a>|
<a href="http://htmlinc.com/contactus.php"> Contact</a> |
<a href="http://htmlinc.com/sitemap.php"> Sitemap</a>
<H4 style="text-align:center">Page Title</H4>
</div>
<DIV>
Your Body Content - goes here. This page is held together with CSS. The more text you put here the more your page will grow along with the text.<BR>
You can use this template to form several different websites by changing only three pictures:<BR><BR>
<img src="images/bullet.jpg" alt="Bullet" style="padding:10px 10px 0px 10px"> header.jpg<BR>
<img src="images/bullet.jpg" alt="Bullet" style="padding:10px 10px 0px 10px"> body.jpg<BR>
<img src="images/bullet.jpg" alt="Bullet" style="padding:10px 10px 0px 10px"> footer.jpg<BR><BR>
We will use this template for all future lessons.
</DIV>
</DIV>
</DIV>
<DIV id=navlist>
<DIV id=nav-1>
<H3>Your Menu</H3>
<UL>
<LI><A href="http://htmlinc.com/web101.php">Web 101</A></LI>
<LI><a href="http://htmlinc.com/code.php">HTML Code</a></LI>
<LI><a href="http://htmlinc.com/htmlcolorcodes.php">Color Codes</a></LI>
<LI><a href="http://htmlinc.com/css.php">CSS</a></LI>
</UL>
</DIV>
</DIV>
</DIV>
<DIV id=footer>
</DIV>
</BODY>
</HTML>
I hope you are but if not get into the habit of saving your work religiously!
- Create a folder on your desktop and call it CSS (or anything you want)
- Now download these IMAGES to the folder named CSS
- Go to the folder and double click the self extracting file named imagescss.exe, this will extract the
- Now select all (ctrl+a) the code from the page builder > Copy (ctrl+c) and paste (ctrl+v) into notepad ( PC | Start > Programs > Accessories > NotePad )
- After you have made changes such as title, menu names and links save as index.html inside of the folder CSS
The CSS Code

Staying with the flow of this multi-part instructable. I gave you the end result first! That way those of you who just wanted the template can stop there and those who wish to learn a little can keep going.
Ok, let's take a look at the CSS you saved to your hard drive named stylecss.css:
/* CSS Document */
body {
background-color: #c0c0c0;
}
.title
{
padding-left:80px; font-size:24px; padding-top:25px
}
body,td,th {
font-family: Verdana, Arial, Helvetica, sans-serif;
font-size: 12px;
color: #666666;
}
ul {
margin: 0;
padding: 0 0 10px 0;
list-style: none;
line-height: 1.2em;
}
li {
padding-bottom: 7px;
}
a:link {
color: #333333;
text-decoration: none;font-weight:bold
}
a:visited {
text-decoration: none;
color: #333333;font-weight:bold
}
a:hover {
text-decoration: none;
color: #990000;font-weight:bold
}
a:active {
text-decoration: none;
color: #993300;font-weight:bold
}
#header {
width: 755px;
height: 71px;
color:#4d5863;
background: #D8DDE1 url("images/header.jpg") no-repeat;
margin: 0px auto;
}
#container {
position: relative;
width: 755px;
color:inherit;
background: #D8DDE1 url("images/body.jpg") repeat-y;
margin: 0 auto;
text-align: left;
min-height: 400px; /*ADDED FOR IE8*/
}
#content {
line-height: 1.6em;
float: right;
width: 550px;
padding: 0px 0px;
}
div.paragraph {
margin: 10px 35px 50px 0px;
padding: 0;
}
/* NAVIGATION STYLES */
#navlist {
font-size: 0.85em;
float: left;
width: 160px;
padding-left: 30px;
}
#navlist ul {
margin-right: 10px;
margin-left: 10px;
}
#navlist ul li {
display:block;
margin: 2px 0;
}
/* CATEGORY NAVIGATION */
#nav-1 ul {
padding-bottom: 20px;
}
#nav-1 a:link, #nav-topics a:visited {
color: #000000;
background-color:inherit;
}
#nav-1 h3 {
padding-left: 10px;
}
#nav-1 li {
color: #AC4444;
background: url("images/nav_bg.gif") repeat-x left bottom;
background-color:inherit;
}
#nav-1 a:hover, #nav-topics a:active {
color: #6A0909;
background-color:inherit;
}
#footer {
margin: 0 auto;
width: 755px;
height: 33px;
background: url("images/footer.jpg") no-repeat;
}
CSS Is Made Up of Three Parts:
A selector, property and value.
You make the selector into a class. You can use this to make different sections of your page appear different by specifying the "class" start with a period such as .title
Keep your CSS clean and organized by placing comments that are not seen by anyone but you to divide different sections of your style sheet.
/* This is a comment */
FANTASTIC JOB! Use the sheet you downloaded and really tear it apart. Try different things and watch what happens to your html page. I know this is not an in depth course on HTML and CSS but then again it was meant to be a "To the point" instructable on building a professional website. I will be happy to be more elaborate if I get enough requests or answer questions. Look for the samples I will be making. Chances are I will be re-creating something of use to you.
- selector {property: value}
- body {color: #c0c0c0}
- body {color: #c0c0c0}
- body,td,th {font-family: Verdana, Arial, Helvetica, sans-serif}
- body,td,th
- {
- font-size: 12px;
- color: #666666;
- }
You make the selector into a class. You can use this to make different sections of your page appear different by specifying the "class" start with a period such as .title
- .title
- {
- padding-left:80px; font-size:24px; padding-top:25px
- }
Keep your CSS clean and organized by placing comments that are not seen by anyone but you to divide different sections of your style sheet.
/* This is a comment */
FANTASTIC JOB! Use the sheet you downloaded and really tear it apart. Try different things and watch what happens to your html page. I know this is not an in depth course on HTML and CSS but then again it was meant to be a "To the point" instructable on building a professional website. I will be happy to be more elaborate if I get enough requests or answer questions. Look for the samples I will be making. Chances are I will be re-creating something of use to you.