Build a Web Enabled High Temperature Kiln Controller
by botheredbybees in Craft > Clay
22336 Views, 45 Favorites, 0 Comments
Build a Web Enabled High Temperature Kiln Controller
Turns a Raspberry Pi into a cheap, universal & web-enabled kiln Controller.
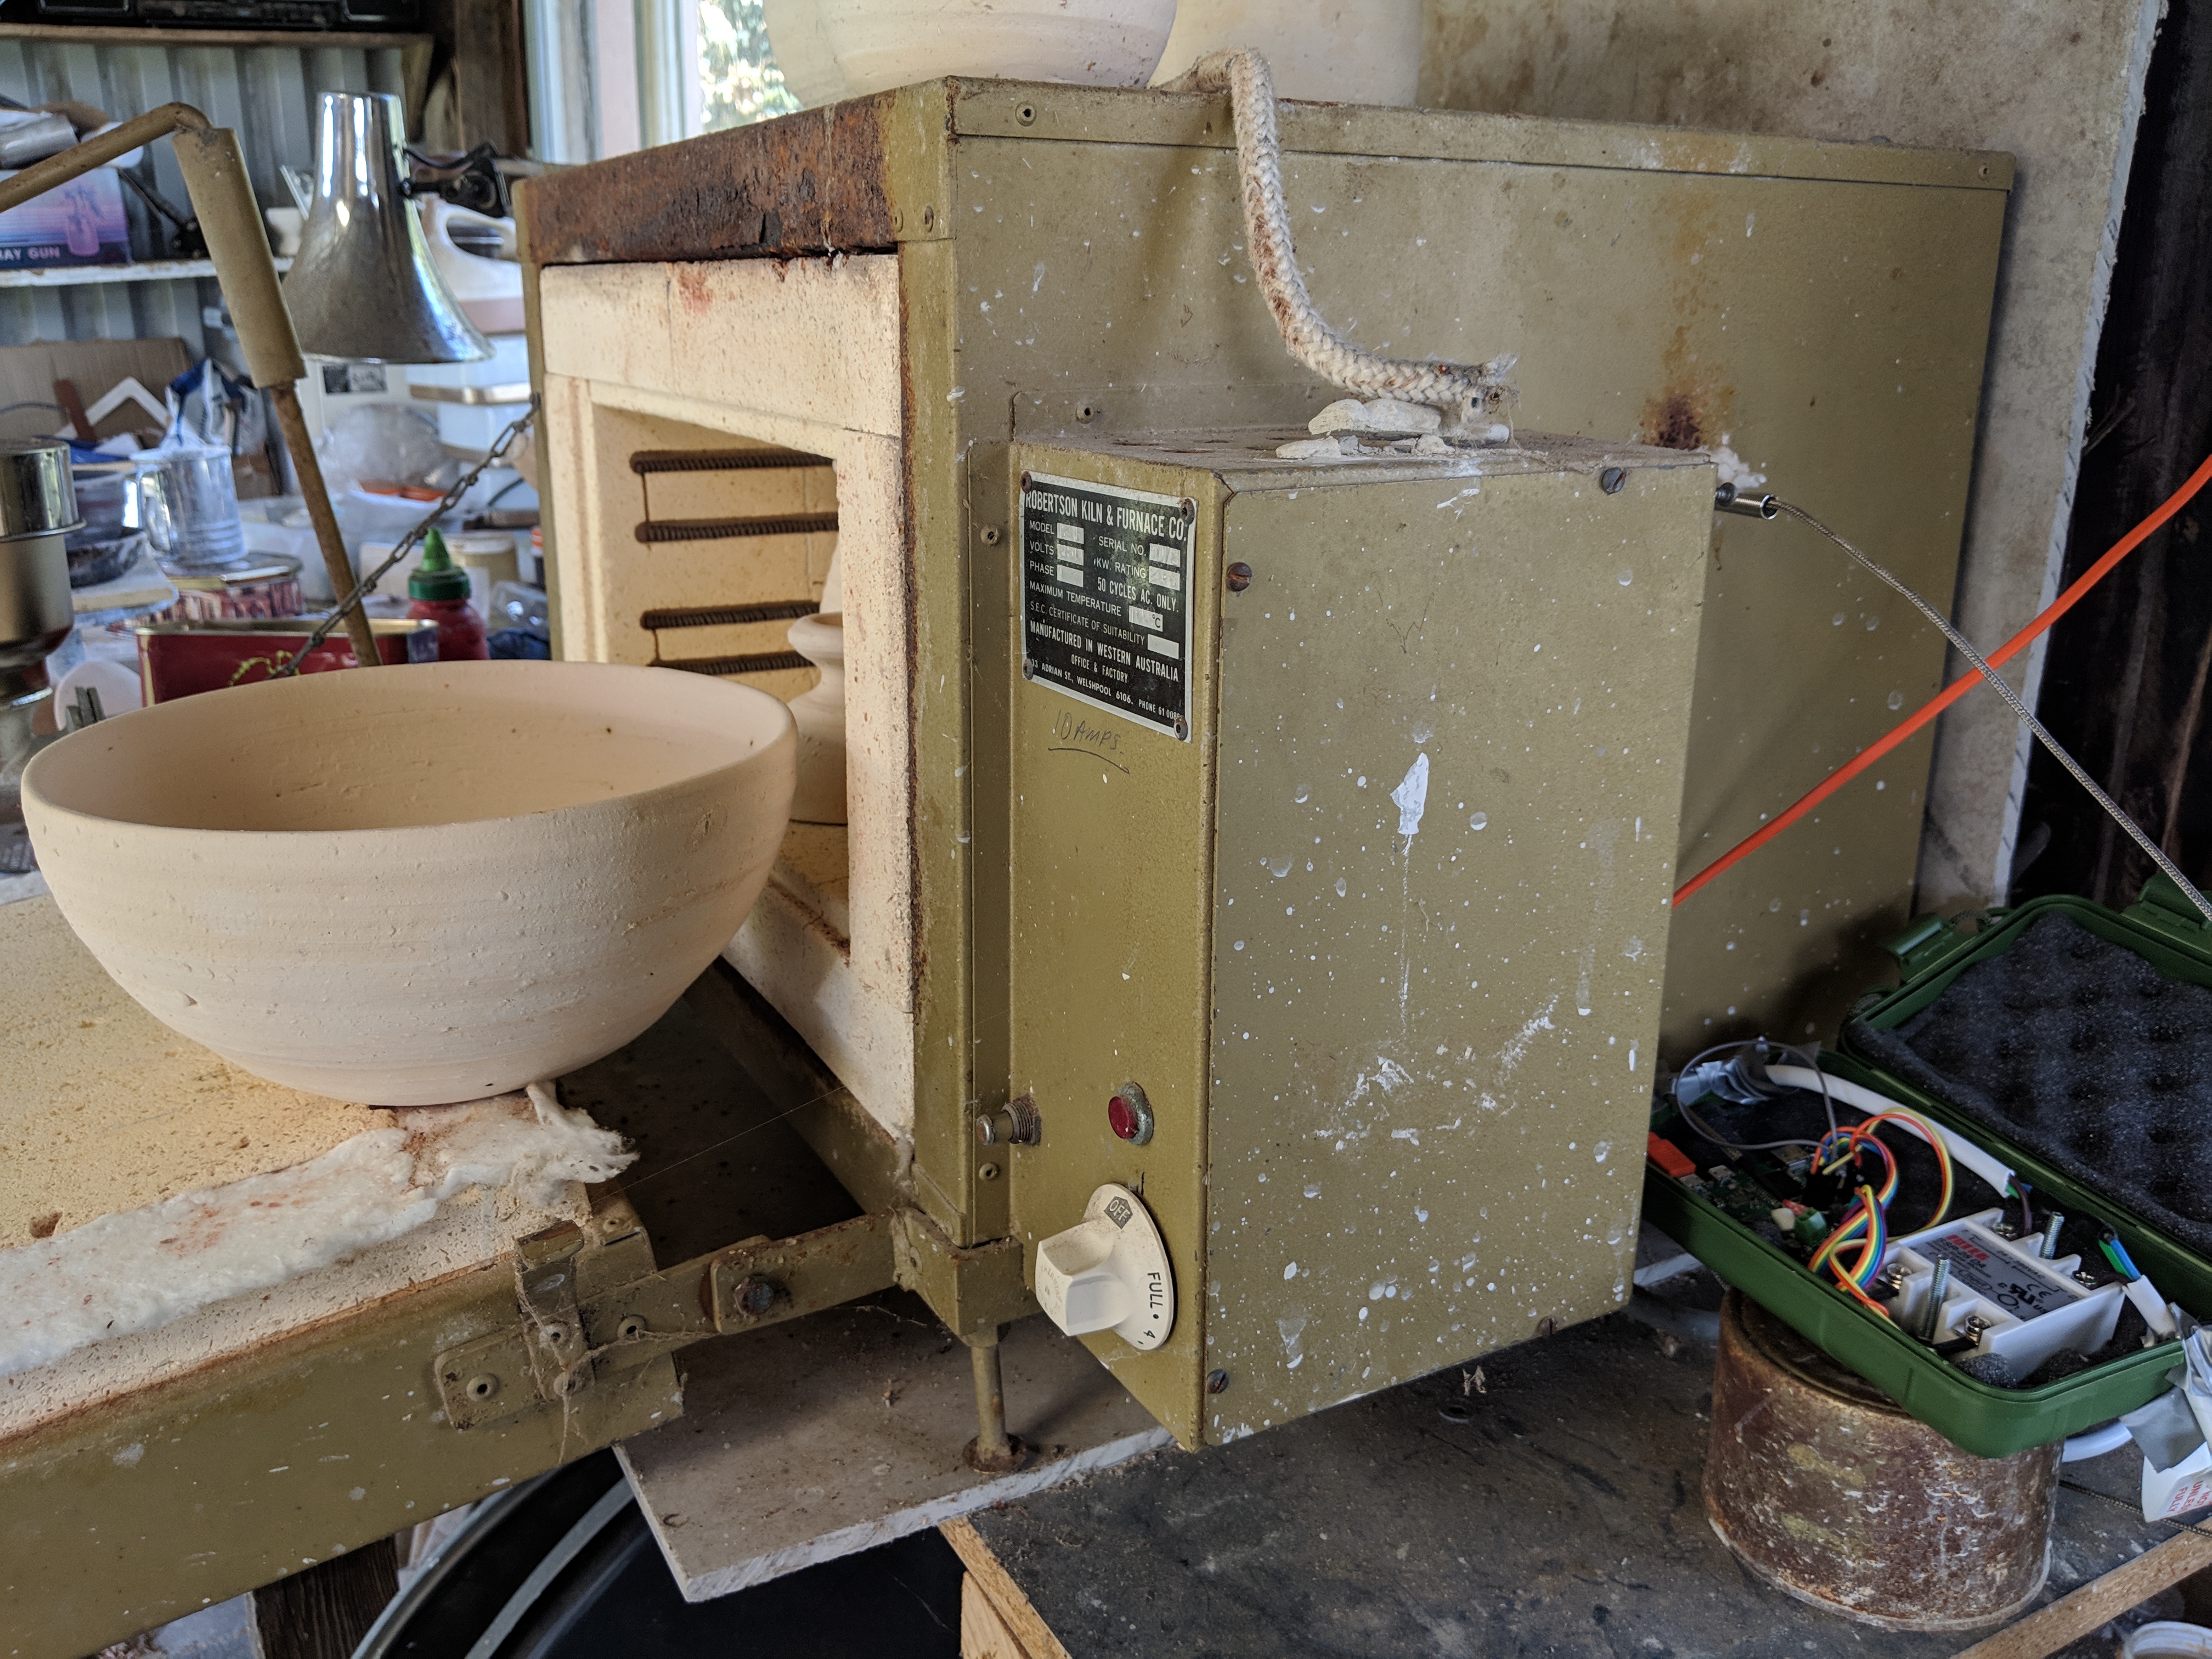
I used this to add a firing schedule control to a little pottery kiln I picked up second hand. The kiln is 10A/240V rated to 1000 degrees C. It has a door switch and a basic thermostat which allows for 25%, 50%, 75% or 100% power but no timer, which means constant monitoring if you want to ramp the temperature up slowly or soak the wares at any point. With the kilnController I can now set it up for a bisque or low temperature glaze firing and leave it to its own devices, checking progress every now and then on my mobile phone or PC.
Hardware
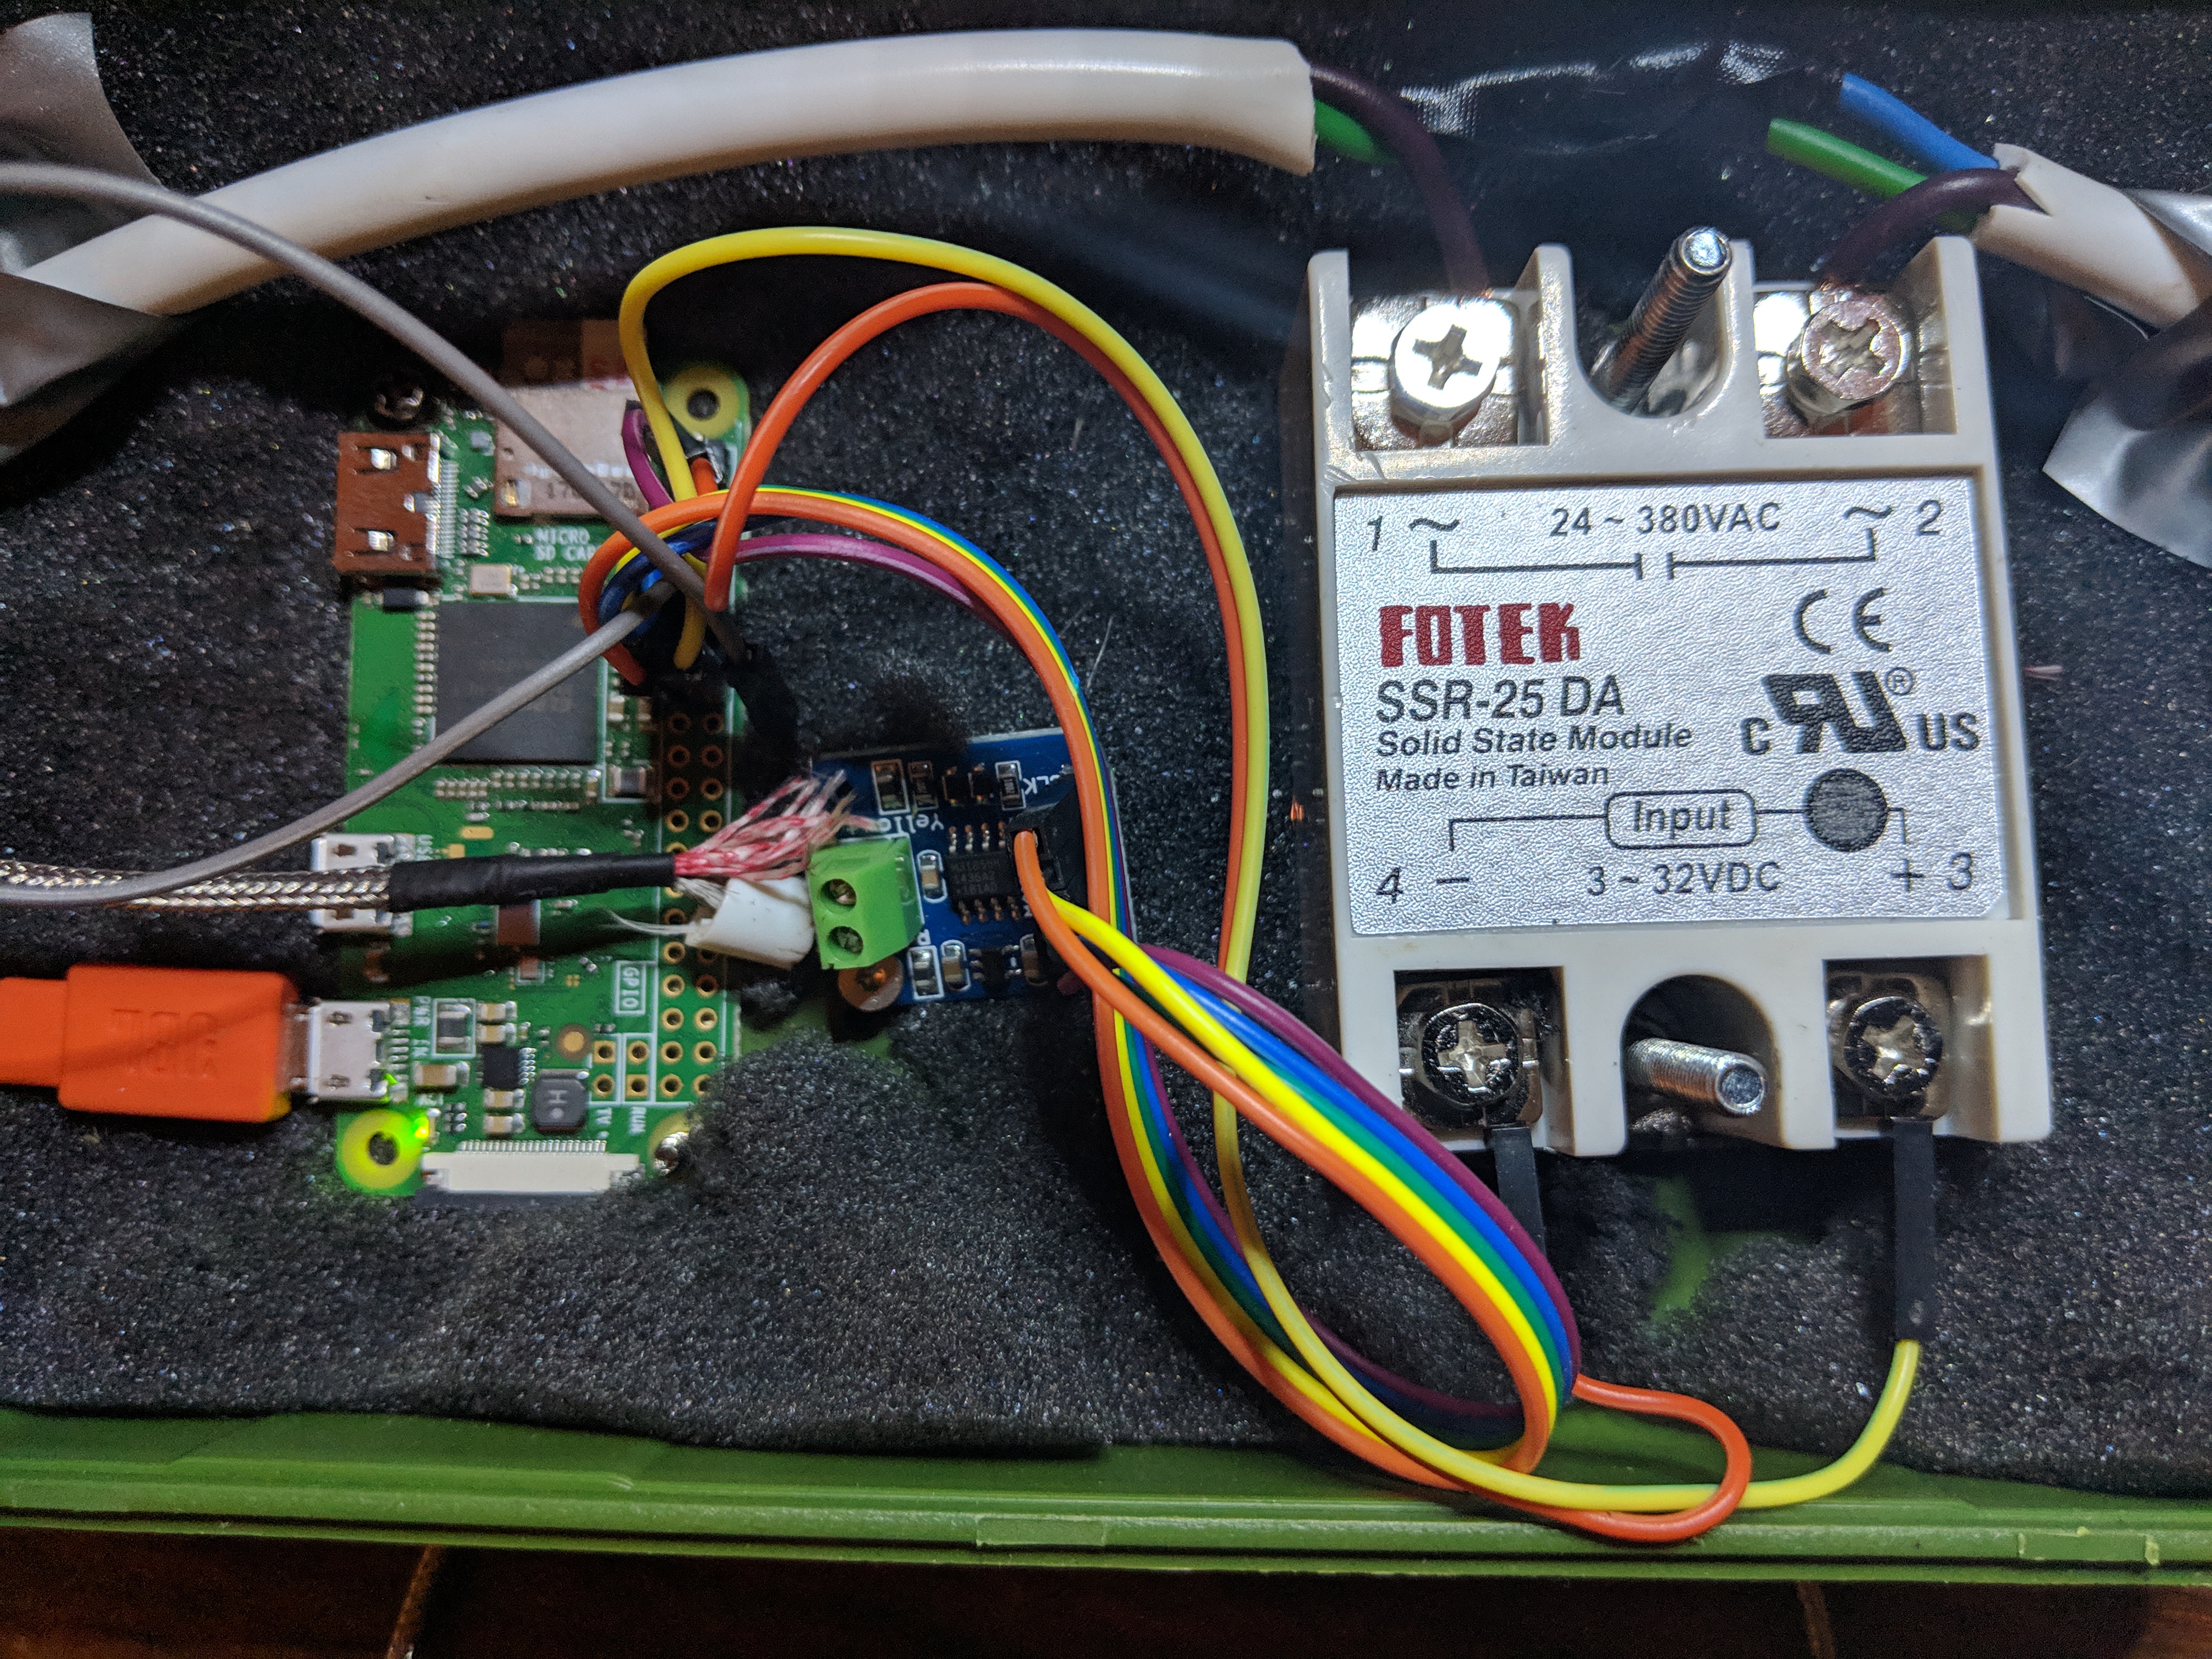
- Raspberry Pi Zero W running Raspbian. Any pi will do but the zeros are the cheapest at about $15 here in Australia
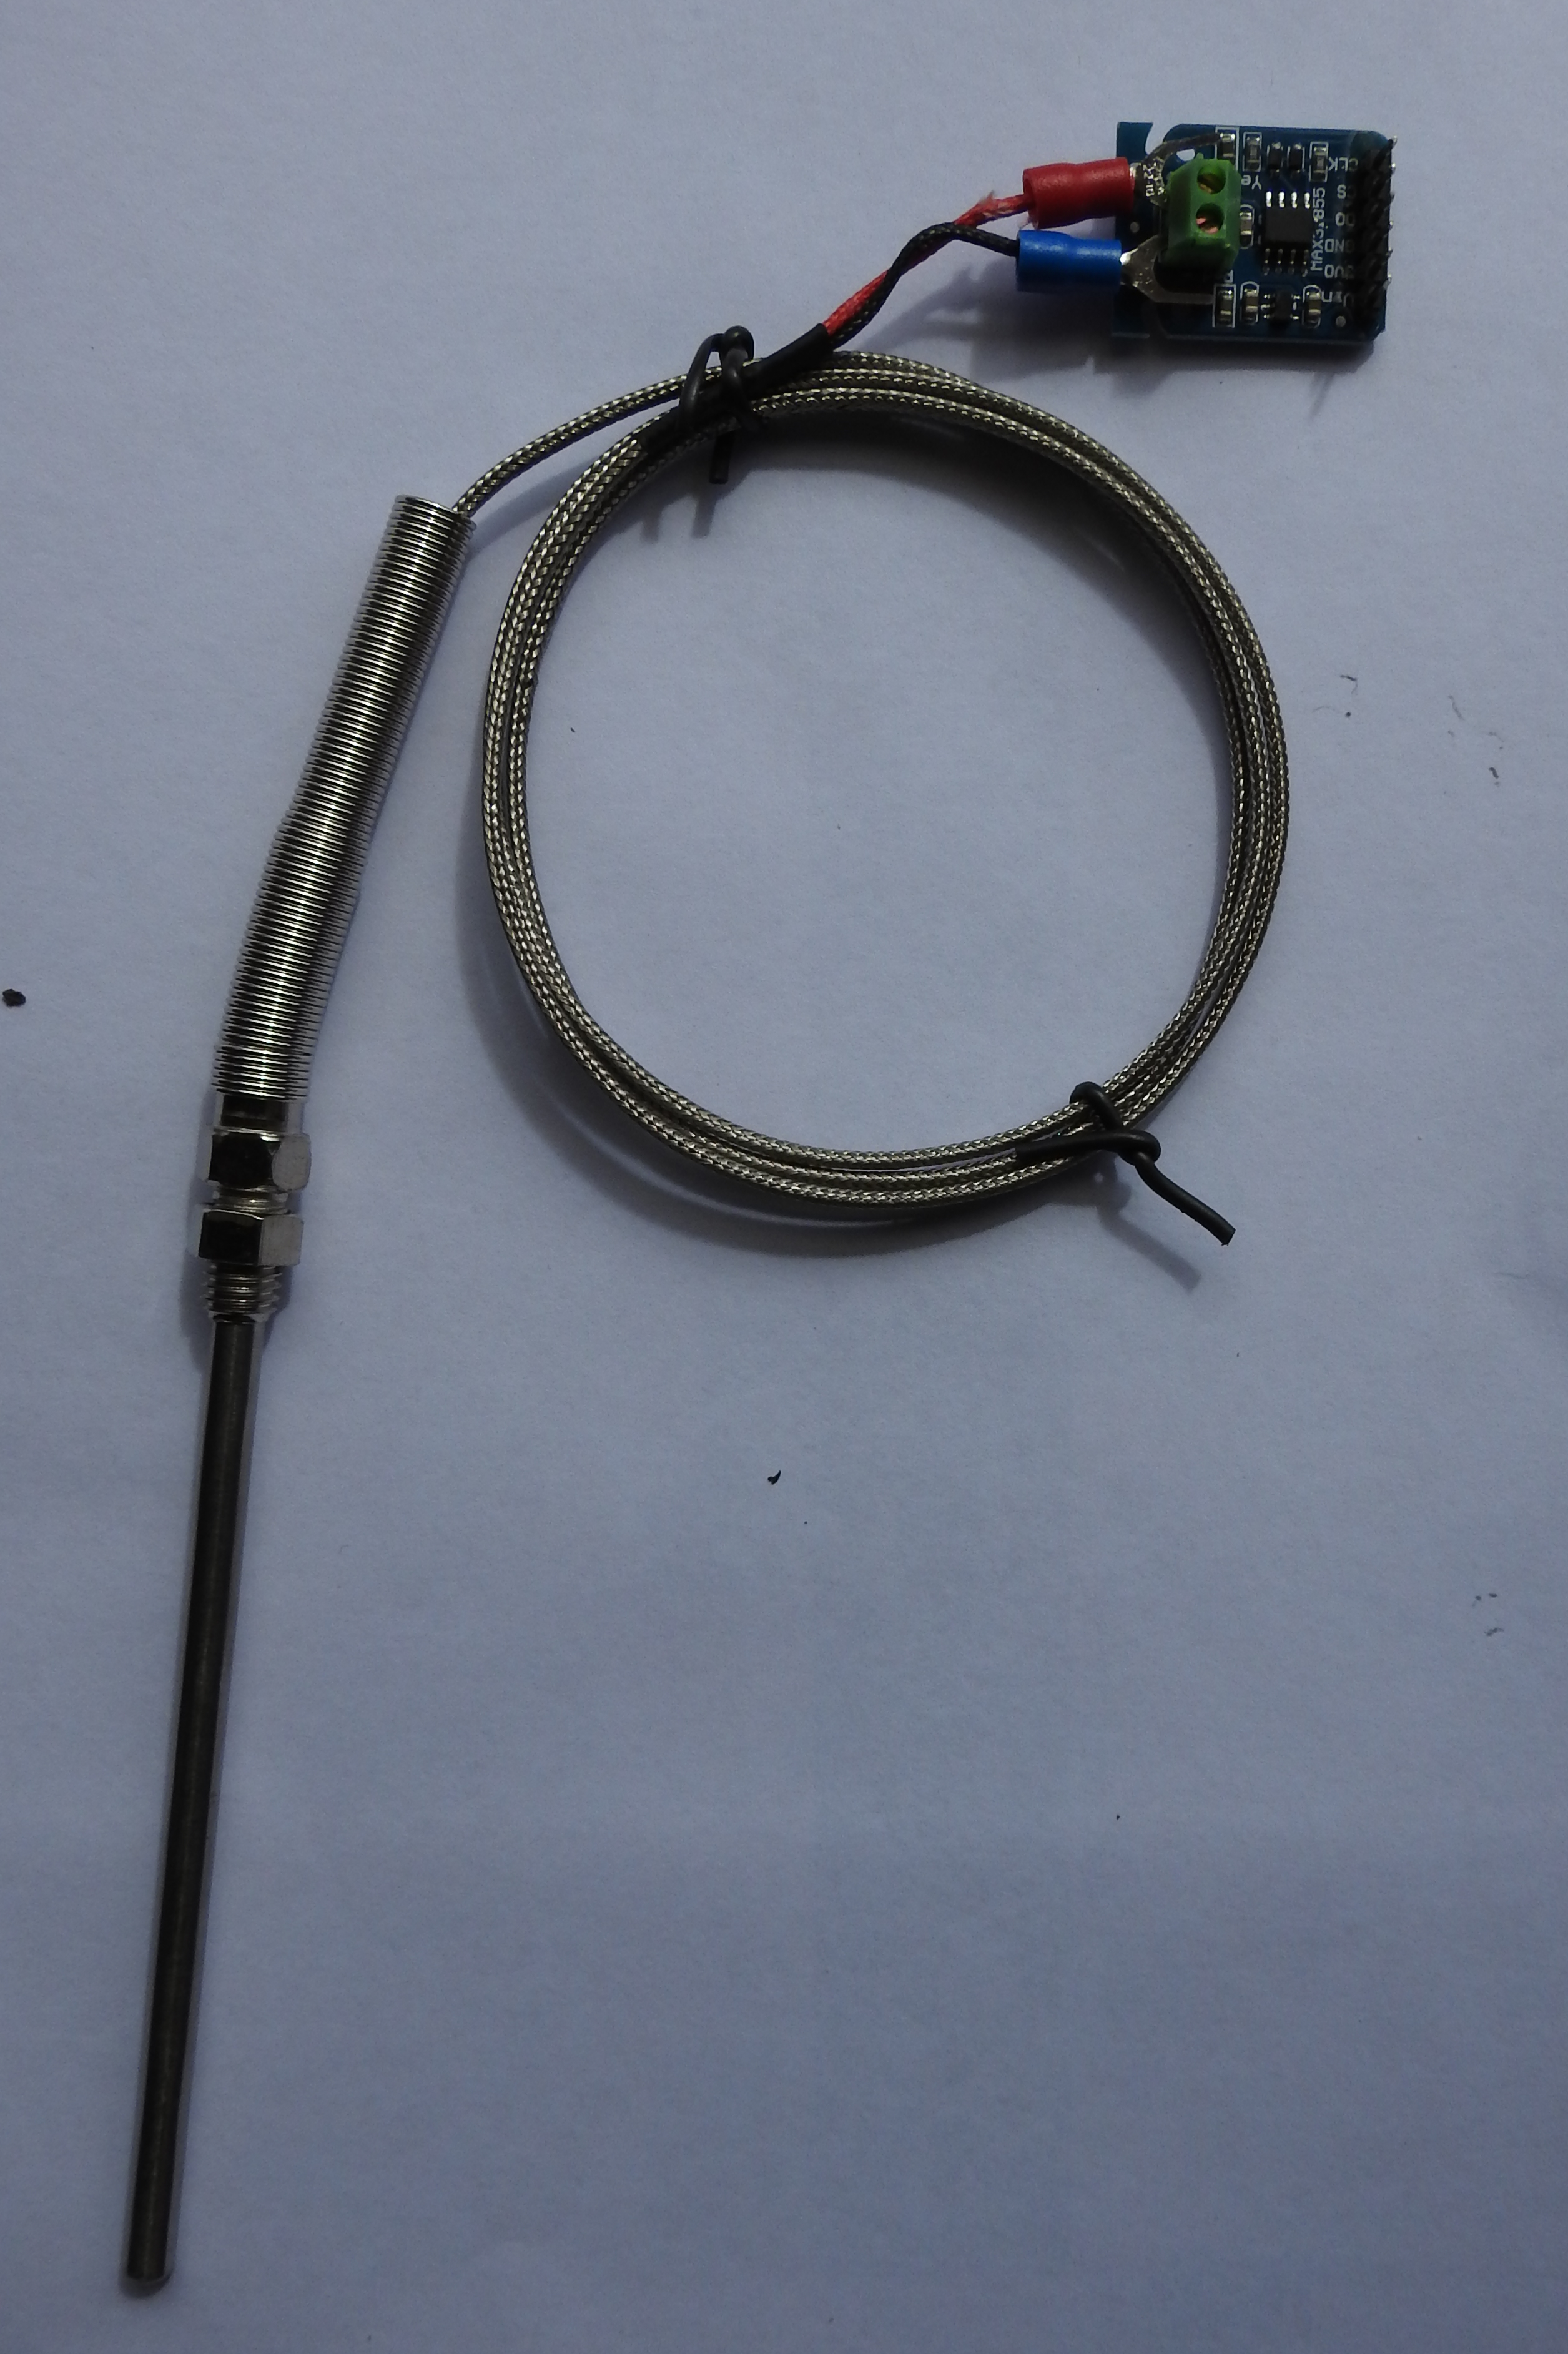
- MAX 31855 Cold-Junction K-Type Thermocouple (about $6 on eBay)
- K-Type Thermocouple Sensor -100°C to 1250°C ($3 on eBay)
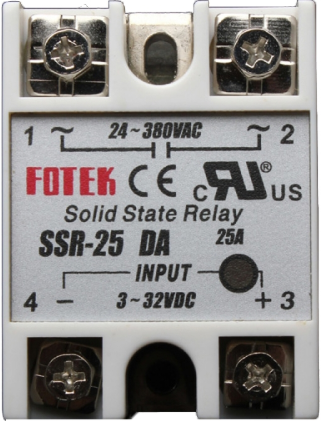
- Solid State Relay Module SSR-25DA 25A /250V 3-32V DC Input 24-380VAC Output (again, about $6 on eBay)
- Half a dozen bits of wire
- A tupperware box to house it all
To put it all together you'll need a soldering iron, screw drivers and some wire cutters
Wiring Up the Thermocouple
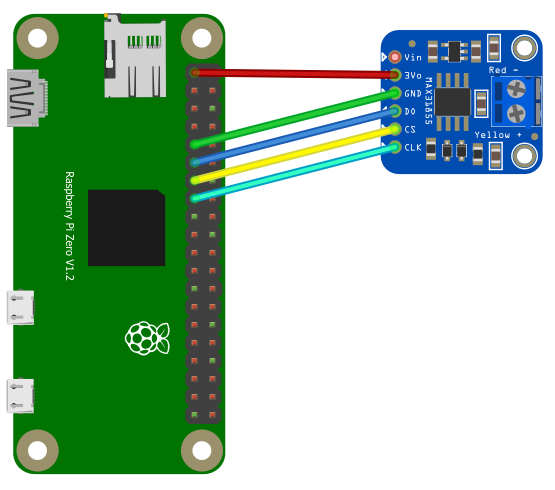
MAX31855 to Raspberry Pi
Vin not connected
3Vo to Pin 1 (3.3v DC)
GND to Pin 9 (Ground)
DO to Pin 11 (GPIO 17)
CS to Pin 13 (GPIO 27)
CLK to Pin 15 (GPIO 22)
DO (data out) is an output from the MAX31855 (input to the microcontroller) which carries each bit of data
CS (chip select) is an input to the MAX31855 (output from the microcontroller) which tells the chip when its time to read the thermocouple data.
CLK (clock) is an input to the MAX31855 (output from microcontroller) which indicates when to present another bit of data
For this project I've used the MAX31855 python library from https://github.com/Tuckie/max31855.
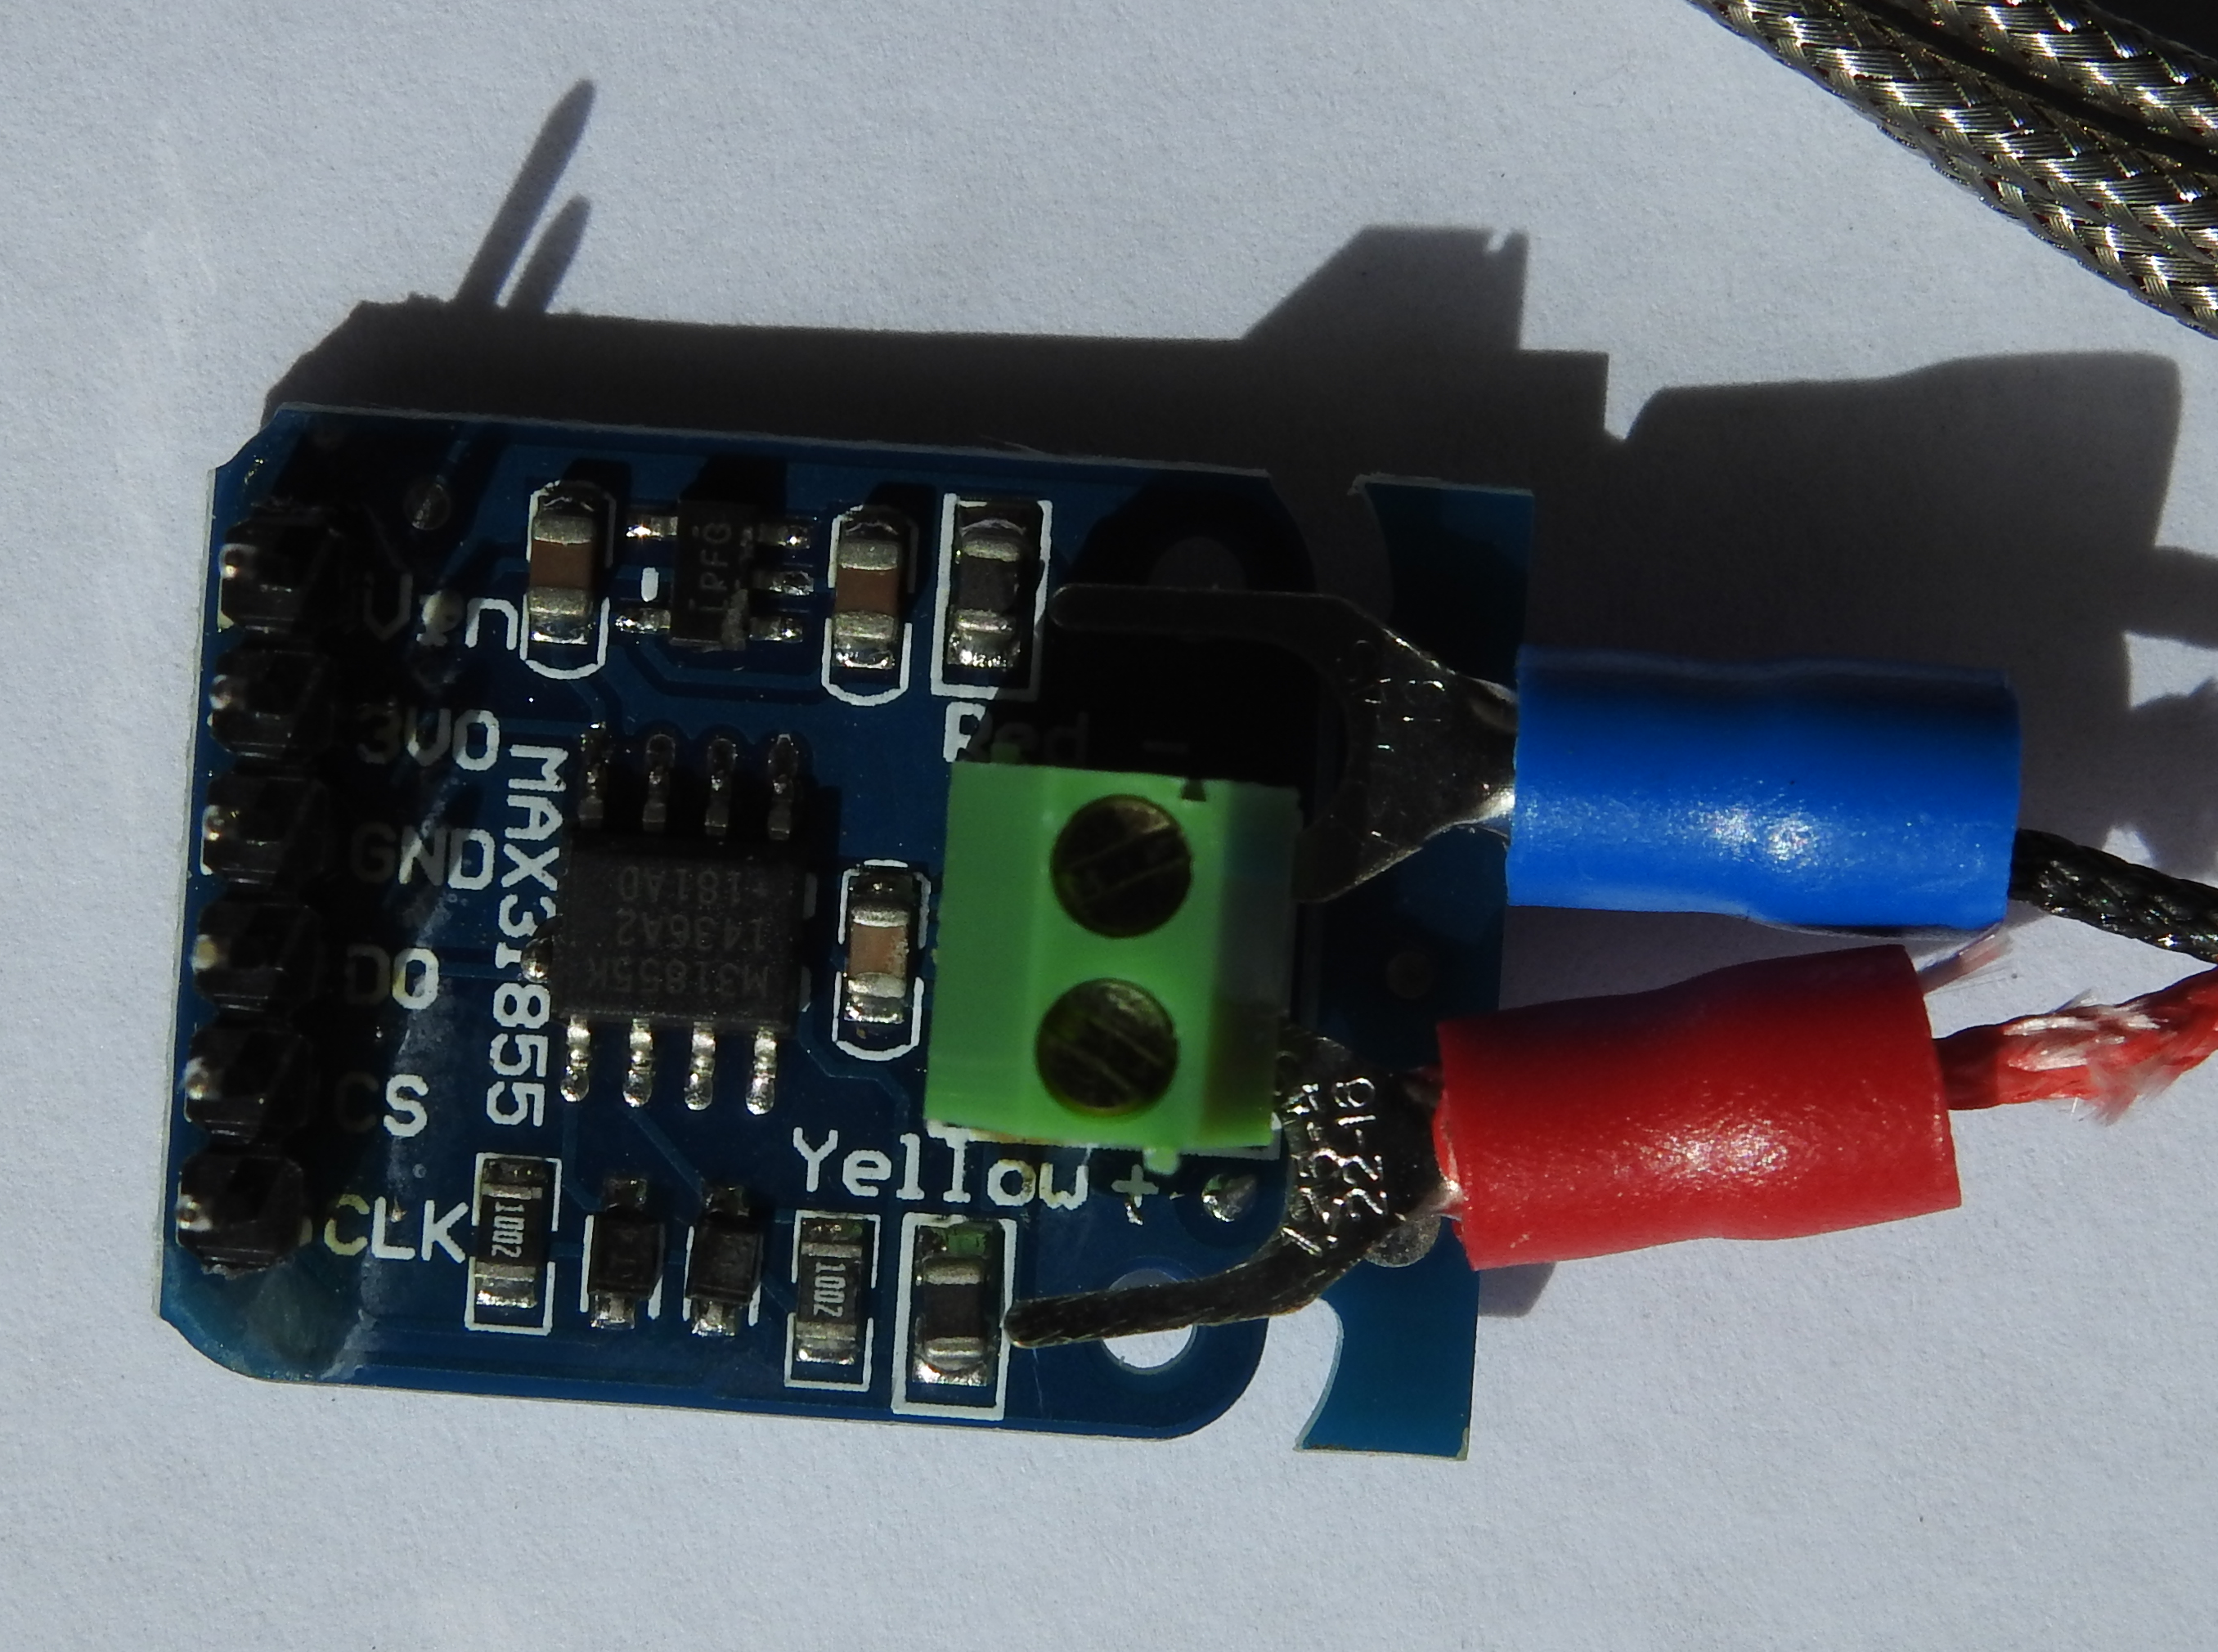
Thermocouple sensor to MAX31855
The MAX31855's terminals are marked 'Yellow +' and 'Red -', but my thermocouple sensor came with red and black wires, each with a little tab on the end. If you have the same sort of sensor, you'll need to put the red wire into the 'Yellow +' terminal, and the black one into the 'Red -' terminal.
While you can cut the terminations off the ends of each wire, I don't recommend it, as the insulation will unravel, leading to possible short circuits. Connect the tabs as shown in the picture above and everything should be sweet.
For now we've done enough wiring up to be able to start testing. But first, we'll need to install the web interface on the Pi...
Installing the Web Interface Software on the Raspberry Pi
Note: there is a better version of the software on https://github.com/jbruce12000/kiln-controller/tree/main
You should use the jbruce version and installation instructions, but I've left the old instructions for the original version below, in case it's of any use...
I built my controller on a 16GB SD card with raspbian installed but all the software would fit on an 8GB card if that's what you've got (df -h is showing less than 5GB of files).
After getting raspbian installed and connecting to your wireless network, run the following commands in a terminal on the pi:
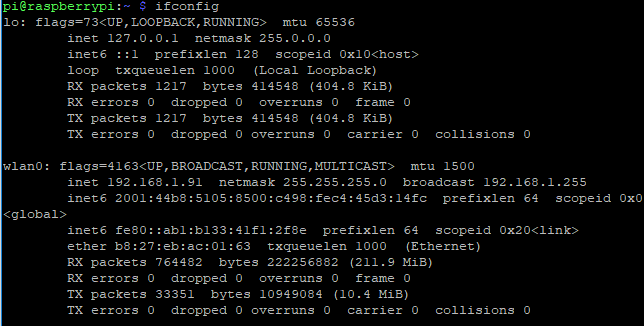
Just about ready to start, but first get the IP address of your Pi by typing the following command in your terminal session:
Write down the IP address for your wlan0 connection. It should look something like: 192.168.1.91 (the last couple of numbers might be different)
Note: kilnController is a forked and then modified version of the reflow oven project: picoReflow which I found out about through a blog post on succulent ceramics. Because the original project was for a solder reflow oven, it had quite a bit of code for for driving cooling fans and monitoring a door switch. I didn't need these for my project, but the code's still there (commented out) if you feel the need for a cooling fan. I added more code so that it would display nicely on my mobile phone.
Running the Web Server and Testing the Thermocouple
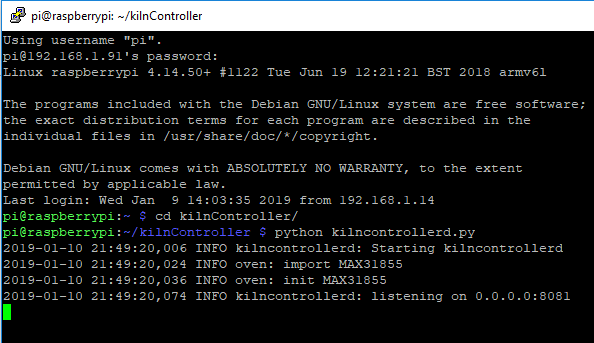
Time to start the web server. Type the following into your terminal window:
cd kilnController
python kilncontrollerd.py
You should see a couple of lines saying something like:
2019-01-10 21:49:20,006 INFO kilncontrollerd: Starting kilncontrollerd
2019-01-10 21:49:20,024 INFO oven: import MAX31855
2019-01-10 21:49:20,036 INFO oven: init MAX31855
2019-01-10 21:49:20,074 INFO kilncontrollerd: listening on 0.0.0.0:8081
Now, go to a mobile phone or computer that's using the same wireless network as the pi. Open a web browser and enter the IP address you wrote down earlier, followed by a colon and the port number 8081. For example: 192.168.1.91:8081
After a short wait you should see the temperature displayed on the top left of the web page. Warm up the thermocouple sensor by holding it in your hand or putting it on a lamp or a soldering iron. You should see the temperature increasing at 1 second intervals.
Wiring Up the Solid State Relay

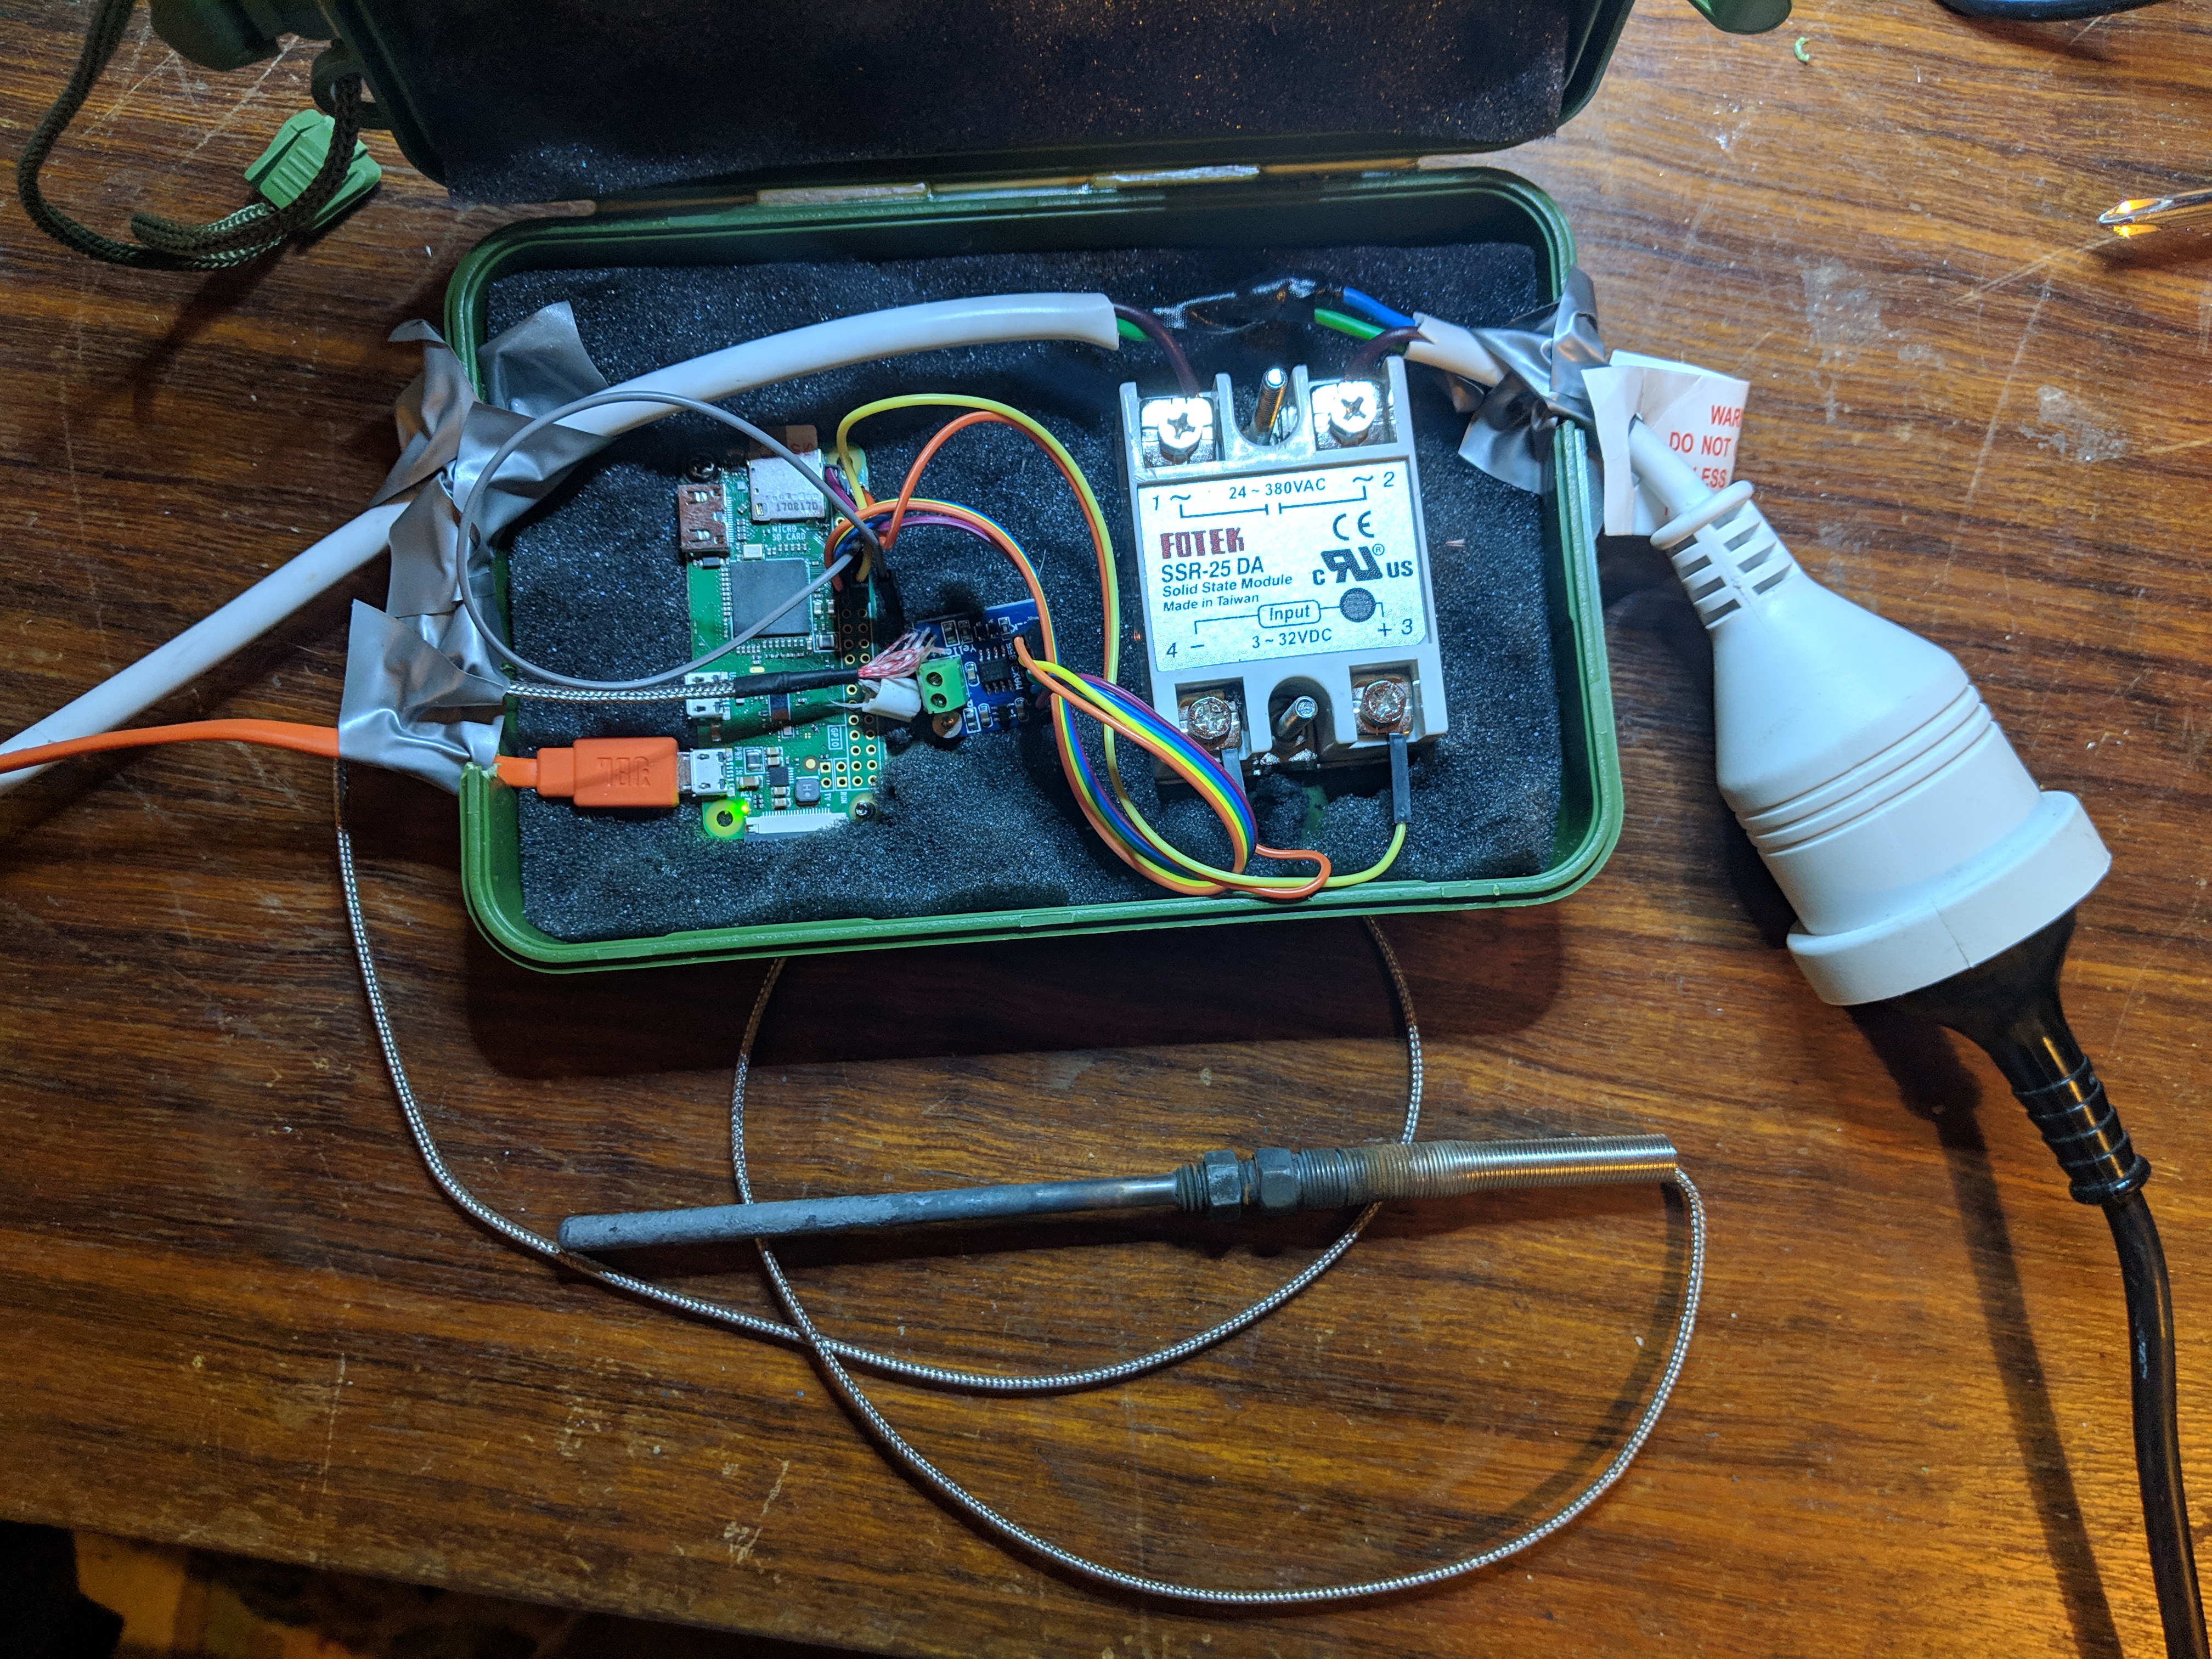
So far no-one would be hurt if you got things wrong, but this step involves electricity at voltages and currents that could kill you if not handled properly, so please be careful. Make sure that nothing is plugged in while you work on the circuit and that there are no exposed wires or short circuits when you start using it on the kiln. I put my project inside a plastic box that I had sitting around (but I'm thinking that I might make a nice ceramic container now that I have the kiln running again :)
The solid state relay (SSR) turns the power to the kiln on and off. For my setup I wired in a short extension cord and plugged the kiln into that. I did this by carefully removing the outer insulator just behind the female socket on the power cord. Then I cut through the active wire and connected the ends to terminals 1 and 2 on the SSR. The Active wire (high potential) is coloured brown here in Australia (used to be red).
Connect pin 16 on the Pi (GPIO 23) to the '+' terminal on the SSR (terminal 3) and pin 6 on the Pi (Ground) to terminal 2 on the SSR.
Note: the SSR can get quite hot when in operation so you might want to put it on a heat sink. I sit my plastic box on a tin can when firing.
Danger image: public domain from Max Pixel
Final Test
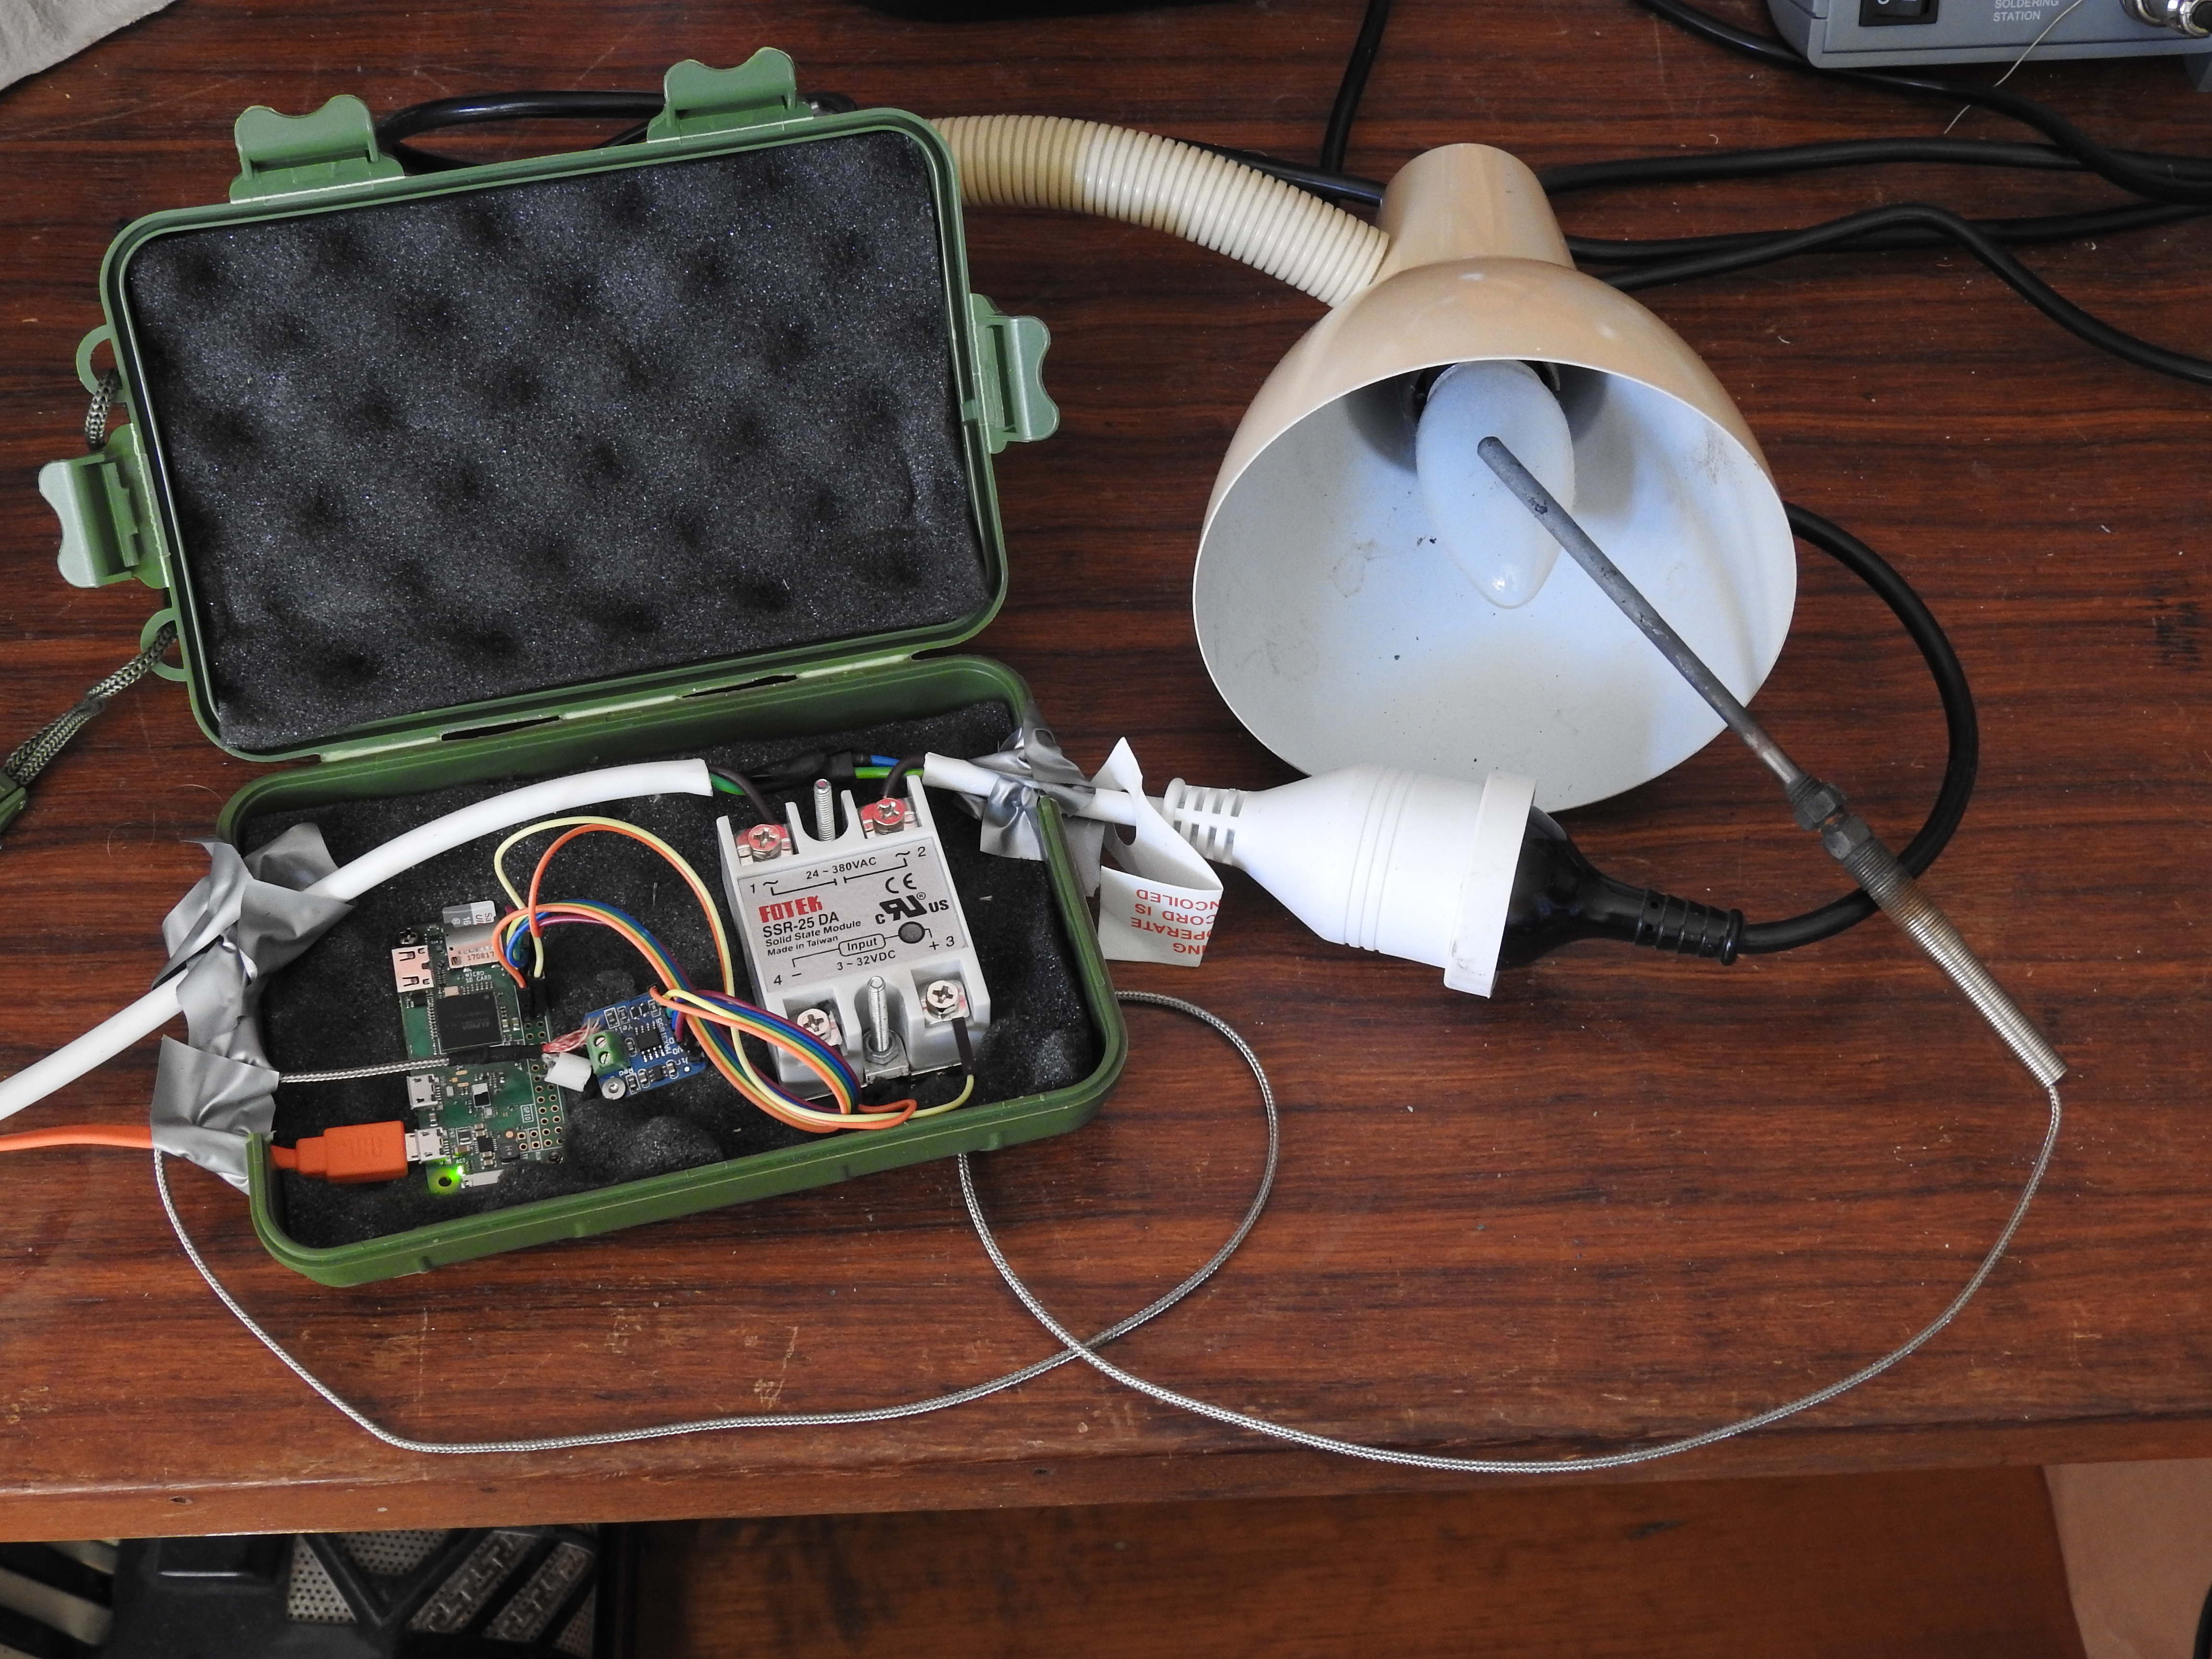

One last test before we can use our kiln controller in anger.
Plug a desk lamp into the controller. Plug the other end into a wall socket. Watch for any obvious signs of problems (the smoke getting out of components, funny smells etc.), if all is going well tun on the lamp and rest the thermocouple sensor on the lamp's bulb. At this stage the lamp should not be illuminated.
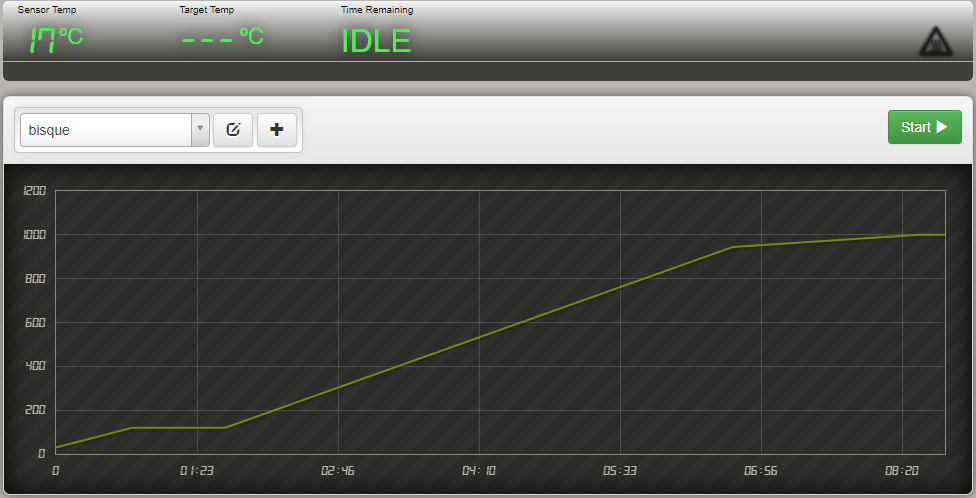
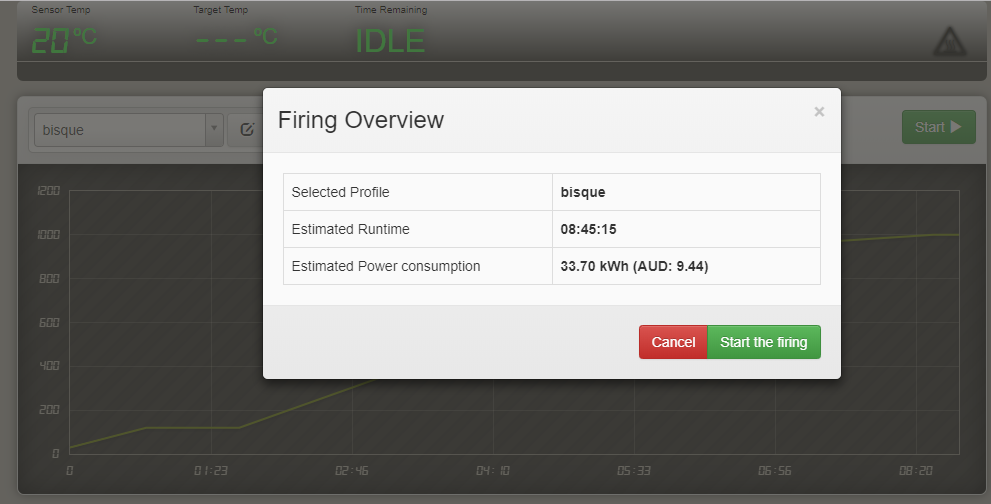
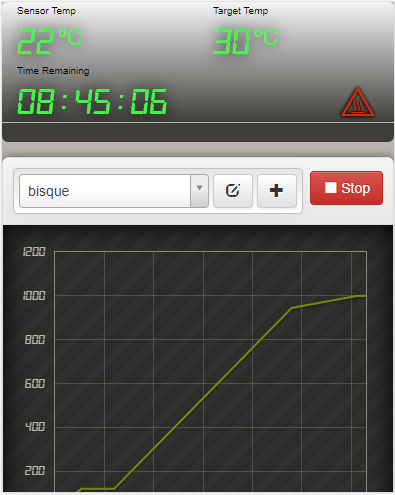
If it's not already running, start up the kiln controller software on the pi. Select a profile and click on 'Start' on the top right and then on the 'Start the firing' button on the Firing Overview modal.
Now, the bisque profile I've set up has a start temperature of 30 degrees Celsius. I live in Tasmania, where it's almost always cooler than that so the controller should immediately turn on the lamp to warm up the sensor. If you live in a warmer clime you might have to wait a while until the profile calls for something higher than your current ambient temperature. Either way, if everything's working to plan, you'll eventually see the light turn on and a 'kiln on' icon light up on the interface.
Leave it running for a while and you'll see the lamp turn on and off while the controller tracks the temperature profile.
Click on the 'Stop' button on the top left when you're done and go forth and fire up your kiln!