Build a Giant, Colorful Seven-Segment Display With Neopixels
by anoofc in Circuits > Arduino
2477 Views, 22 Favorites, 0 Comments
Build a Giant, Colorful Seven-Segment Display With Neopixels

Ever get stuck on a project because a key component just isn't available? That's exactly what happened to me. I needed a BIG 7-segment display for my project, but stores were empty, and online orders faced a two-week wait. Ugh!
Then, inspiration struck! I stumbled upon a video showcasing a giant LED clock built from scratch. Lightbulb moment! Why not use Neopixels to create my own customizable 7-segment display?
Here's why this is a total win:
- Cost-effective: Building it myself is way cheaper than buying a pre-made display.
- Color Chameleon: Neopixels offer complete control over color, letting me unleash my creativity.
- One-Pin Wonder: Using a single ESP32 pin simplifies wiring and control – hello, project efficiency!
- The Custom Arduino Library: I Have written my own Custom Arduino Library to make the hassle of integrating this display with any other project.
Of course, there are always challenges:
- The Build: Creating a sturdy frame to hold all those Neopixels and form a perfect 7-segment shape requires some planning.
This is where the fun begins! Now it's time to:
- Design Time: Sketching out the perfect display size, figuring out the structure, and calculating the Neopixel army I need.
- Component Hunt: Picking the right Neopixels for the job and finding a power supply that won't wince at all those LEDs.
- Coding Challenge: Write the code to control the Neopixels and transform them into mesmerizing numbers, letters, or even custom symbols.
Supplies
Hardware components
 Espressif ESP32 Development Board - Developer Edition
Neopixel LED Strip (3 LED/Pixel)
 Digilent 60W PCIe 12V 5A Power Supply
Software apps and online services
Hand tools and fabrication machines
CNC Wood Engraving Machine
 Laser cutter (generic)
 Soldering iron (generic)
 Solder Wire, Lead Free
 Wire Stripper & Cutter
Design Your Display
- Determine the size: Decide on the desired dimensions of your display. Larger displays require more LEDs and power.
- Choose the configuration: Sketch out the arrangement of your seven-segment display. Consider factors like spacing between segments and the overall shape. I made the draft design in Solidworks Software. Then used CNC machine software (Aspire) to slice it for CNC engraving.
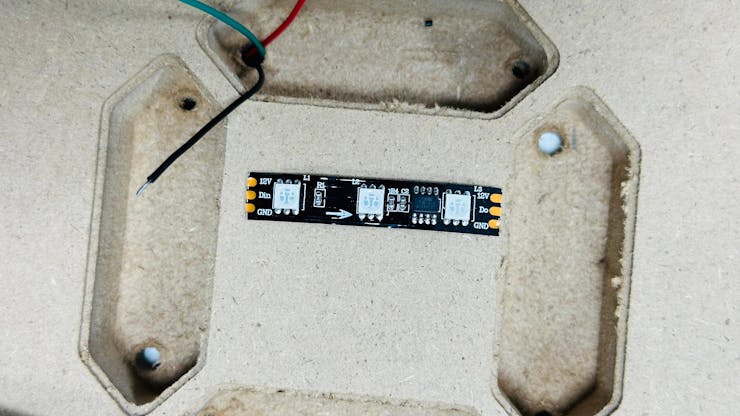
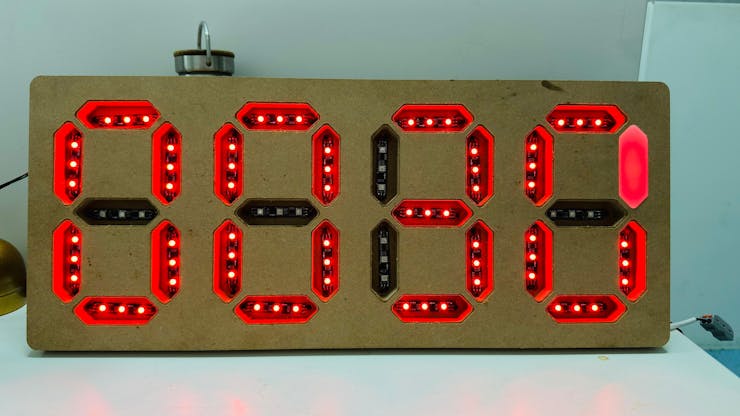
- Calculate the number of LEDs: Based on your design, determine the total number of LEDs needed for each segment and the entire display. I used the one that comes with a 3 LED's per Pixel layout. So I can use one pixel for one Segment of the digit and I will have enough brightness since I have 3 LED's per Pixel. See the picture below.


Gather Materials
- ESP32 development board: This will be the brain of your project. You can use any Arduino-supported Board for this project.
- Neopixel LED strips: Choose the appropriate type (WS2812B, WS2811, etc.) and length based on your display size.
- Power supply: Ensure it provides sufficient voltage and current for your number of LEDs. I used a 12v 16A Power Supply.
- Wires: For connecting LED Strips.
- 25mm MDF Wood Piece: To give grove for sitting the LED Strip so that the LED Pixels should not be Visible.
- Light Pass Acrylic Sheet: To diffuse the light.
Prepare the Neopixel Strips
- Cut the strips: Carefully cut the Neopixel strips to the desired lengths for each segment.
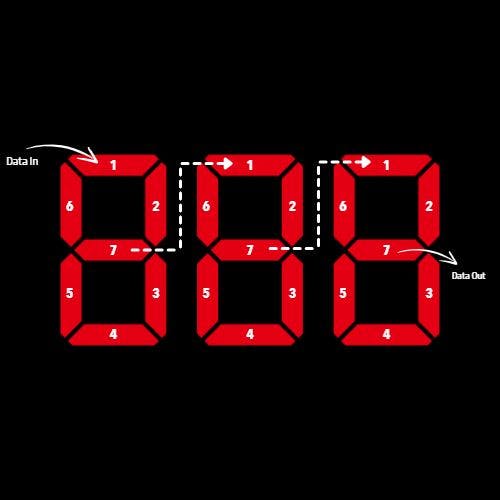
- Connect the strips: Solder to join the segments together, maintaining the correct data order. make sure the arrow is in the correct order as shown in the picture below.
- Prepare power and ground connections: Ensure each strip has proper power and ground connections.


Connect the Hardware
Connect the Neopixel strip: Connect the data pin of the first LED to the GPIO pin of your ESP32. Connect the power and ground of the strip to the appropriate power supply connections. make sure to common the 12v ground and ESP32 Ground.

Wiring Diagram
Power the ESP32: I powered the ESP32 using the USB port of my laptop. You can use a Step-down DC-DC converter that gives 5v output to power the ESP32.


Install the Arduino IDE and Libraries
- Download and install: Install the Arduino IDE on your computer. In my case, I'm using VS code with Platform IO IDE Extension installed.
- Install the Neopixel library: Search for the Adafruit Neopixel library in the Arduino Library Manager and install it.
- Go to Sketch > Include Libraries > Library Manager
- Install Seven Segment LED library: I have given the link to the custom Library I wrote to make the integration to other projects Easy. As of now, this library is not available on Arduino Library Manager. I will be uploading it soon.
Write Arduino Code
Include necessary libraries: Include the SevenSegmentLED library in your code. You should have installed Adafruit NeoPixel Library because SevenSegmentLED Library depends on Adafruit NeoPixel Library. But you don't have to include it since it's already done in the SevenSegmentLED Library.
Define parameters: Set the number of LEDs, data pin, and other relevant parameters.
Create a SevenSegmentLED object: Instantiate a Display object with the specified parameters.
Begin the display:
Define functions: Create functions to control individual segments and display numbers or characters. I'm not explaining the code in detail. I will just introduce how you can use the basic functions of this library.
Define the number to display, the color of the lit segments (red, green, blue), and the digit number (0-based, leftmost digit)
Example: Display the digit 5 (red) on the second digit (from left)
Alternatively we can use the Colors mentioned in macros earlier to make the code more readable.
Define the number to display and the color of the lit segments (red, green, blue)
Example: Display the number 1234 (green)
Alternatively we can use the Colors mentioned in macros earlier to make the code more readable.
Clear Display: Clear the current number on display.
Set brightness: You can set the display brightness by setting the value from 0 to 255 for maximum brightness.
Finishing Touches
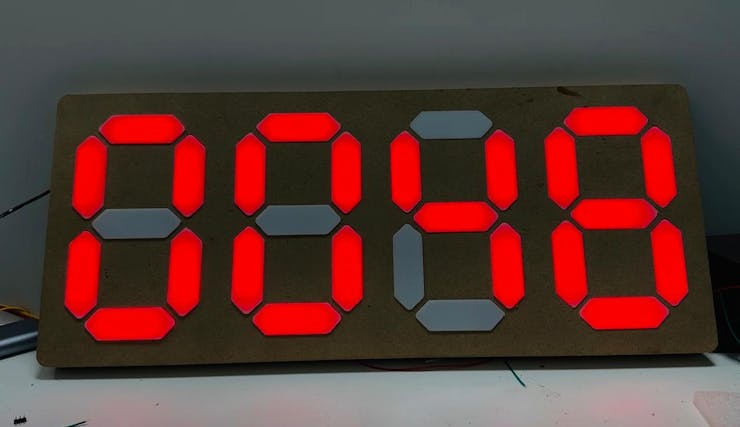
- Cover the Top with a 2mm thick Light Pass acrylic sheet laser cut with the design for fitting inside the grove on the wooden slots.
- Here is the final look.


Suggestions/feedback
If you have any suggestions or feedback feel free to comment down below. If you encounter any problems during the making of the project, don't hesitate to contact me. I will be updating this library to improve efficiency and include more functions soon.
Connect me on LinkedIn: Connect Now
