Build Surveillance Camera and Save All Images on MCS Cloud
by AngieChiu in Circuits > Remote Control
1903 Views, 16 Favorites, 0 Comments
Build Surveillance Camera and Save All Images on MCS Cloud

Hello everyone, this instructable describes how to build a surveillance camera base on a LinkIt Smart 7688 which captures pictures automatically and saved it in MCS cloud. This is very useful especially when you are going out for a vacation and you would like to at the same time make sure your house is under your watching.
The advantages of building this surveillance camera:
1. You are able to view the latest image capture via browser or mobile app anytime anywhere
2. You are able to view the historical images captures and save them in a free cloud
Items Needed

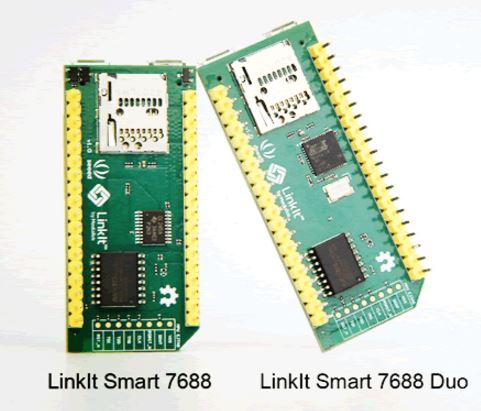
a. A LinkIt Smart 7688 or LinkIt Smart 7688 DUO development board
b. an USB OTG line
c. a web cam (in this instructable, I use logitech C310)
Connect the power line to PWR on 7688 development board, connect web camera to USB OTG then plug it into the HOST on 7688 development board.
Create a Prototype for Image Captured on MCS Cloud

I believe some of you already know the convinience the MCS free cloud provided.
Login to your MCS account.
Click Development on the top menu bar, and click Prototype. Enter the prototype information and Save.
Or you can simply import the attached prototype and continue to Step 4.
Downloads
Add a Image Display Data Channel

After the prototype is created, add a image data channel.
Click Add, and select Display.
Enter the information for the image display data channel. Please make sure the data channel ID is Image which we will need it later when compiling the Node.js code. (You can change the data channel ID as you wish, but you will need to replace the ID in the sample Node.js code I will provide later in Step 5.)
Select the data type as Image. And Save.
Create a Test Device

After adding the data channel, now create a test device. This test device is just like your development board. When your development board is connected to MCS, you can received data from your development board and also give command to your device as well.
Here you need to keep the deviceId and deviceKey which is unique for each device. You will need them when calling MCS RESTful APIs in the code on your development board later in Step 5.
Prepare the LinkIt Smart 7688 Development Board
a. Make sure the 7688 development board has been switched to station mode and connect to the same network as your computer successfully.
b. Connect to the console of 7688 development board through ssh command on your computer.
ssh root@mylinkit.local
c. Install the fswebcam.
opkg update
opkg install fswebcam
d. Install the mcsjs and bluebird package.
npm install mcsjs
npm install bluebird --save
e. Try to capture a screenshot.
fswebcam -i 0 -d v4l2:/dev/video0 --no-banner -p YUYV --jpeg 95 --save /tmp/test.jpg
Then you will see a test.jpg file in your root directory.
Hint: Some of you may wonder why we need to store the file to /tmp/test.jpe. The reason is bebause the limitation of the flash on the LinkIt Smart 7688 development board. If we frequently write data to the flash, it will reduce the lifetime of the flash. That is why we suggest to store in the memory where /tmp folder is under. Also, please be reminded that the flash will be reset once no power supplied.
f. Create a file app.js using an editor, vi is used in this example:
vim app.js
g. Type i and Copy/paste the following code in the editor, then type :wq to save and exit.
var mcs = require('mcsjs');
var exec = require('child_process').exec; var Promise = require('bluebird'); var fs = Promise.promisifyAll(require("fs"));var myApp = mcs.register({ deviceId: 'Input your deviceId', deviceKey: 'Input your deviceKey', });
function takePic() { exec('fswebcam -i 0 -d v4l2:/dev/video0 --no-banner -p YUYV --jpeg 95 --save /tmp/test.jpg', function (error, stdout, stderr) { console.log('stdout: ' + stdout); console.log('stderr: ' + stderr); if (error !== null) { console.log('exec error: ' + error); } fs.readFileAsync('/tmp/test.jpg') .then(function(data) { myApp.emit('album01','', new Buffer(data).toString('base64')); }); }); takePic(); };
function loop(time) { setTimeout(function () { takePic(); }, time); }
loop(5000); // Capture every 5 seconds.
Run Your Application to Capture Images.

You are now ready to execute the Node.js program. In the system console, type the following command:
node app.js
Go back to MCS console, click Development on top menu bar, and click test device.
Go to the test device you just created. You will see the image display data channel which will display and stored all the images captured by the web cam! Use your android mobile to download the MCS app, then you can see the images via your mobile phone anytime anywhere.
With the image display on the MCS cloud, you can now see the surveillance images captured by the web cam with the historical data. See the screenshot above that I invite a lady in my office to do a catwalk in front of the web cam and the images are stored in the MCS cloud.