Build RFID Door Lock Using Arduino
by Nextpcb in Circuits > Arduino
3976 Views, 9 Favorites, 0 Comments
Build RFID Door Lock Using Arduino


In this project, we will be using an Arduino board to control an RFID door lock. The lock will be activated when the correct RFID tag is presented to the reader, and will stay locked until the tag is removed.
Thank You, NextPCB:
This project is successfully completed because of the help and support from NextPCB. Guys if you have a PCB project, please visit their website and get exciting discounts and coupons.
1. Only 0$ for 5-10pcs PCB Prototypes https://www.nextpcb.com
2. Register and Get $100 from NextPCB: https://www.nextpcb.com/register
3. See more info about PCB Assembly Capabilities: https://www.nextpcb.com/assembly
This project is great for security applications, or simply to create a locked door that can only be opened by authorized users.
Hardware Components


Here is the list of components required to get started with the Instructable,
Hardware Components
- Arduino
- MFRC522 RFID Reader
- RFID Tags ( 13.56 MHz )
- Bread Board
- Jumper Wires
- Micro USB Cable
To get high-quality electronic components at an extremely low cost, hqonline.com is the perfect site. They have labels from all the international brands, so you can find the best components for your device without spending a lot of money. This offers you the best value for your money.
Software Components
- Arduino IDE
Description

RFID stands for Radio Frequency Identification and is a contactless technology widely used in many industries for personnel tracking, access control, supply chain management, library book tracking, toll systems, etc
An RFID reader is a device used to gather information from an RFID tag, which is used to track individual objects. Radio waves are used to send data from the tag to a reader.
How RFID works?
An RFID system consists of two main components: a transponder or tag located on the object we want to identify and a transceiver or reader.
The RFID reader consists of a radio frequency module, a control unit and an antenna coil that generates a high-frequency electromagnetic field. On the other hand, the tag is usually a passive component, consisting only of an antenna and an electronic microchip, so when it comes close to the electromagnetic field of the transceiver, due to induction, a voltage is generated in its antenna coil and This voltage serves as power for the microchip
Specifications
- Input voltage: 3.3v
- Frequency: 13.56MHz
That's all guys let's get into the Connections & Coding part.
RFID With Arduino
So that's the basic working principle and now let's see how we can use RFID with Arduino and build our own RFID door lock. We will be using tags based on the MIFARE protocol and the MFRC522 RFID reader, which cost only a couple of dollars.
These tags have 1kb of memory and have a microchip that can perform arithmetic operations. Its operating frequency is 13.56 MHz and the operating distance is up to 10 cm depending on the geometry of the antenna. If we bring one of these labels closer to a light source, we can see the antenna and microchip we discussed earlier.
Circuit Diagram

.jpg)
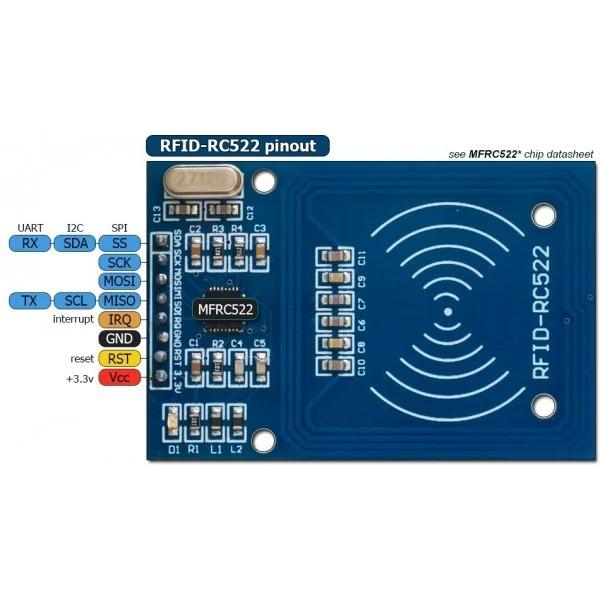
The RFID reader module uses the SPI protocol for communication with the Arduino board and this is how we must connect them. Note that we need to connect the VCC of the module to 3.3V and as for the other pins we don't have to worry as they are 5V tolerant.
Check the schematic and pin configuration to make connections.
Connect the pins with the following :
- MOSI ---> PIN 11
- MISO ---> PIN 12
- SCK ---> PIN 13
- SS/SDA ---> PIN 10
- RST ---> PIN 9
- LED ---> PIN 4,5& GND
- Relay / Output power ---
- GND connect to GND pins,
Library Download
Before you download the library you need Arduino IDE to get started.
Here’s the library you need for this project:
- Download the RFID library here created by miguelbalboa.
- Unzip the RFID library.
- Install the RFID library in your Arduino IDE.
- Restart your Arduino IDE
Reading Data From a RFID Tag

After having the circuit ready
Go to File > Examples > MFRC522 > DumpInfo > Upload the code.
This code will be displayed in your Arduino IDE (after installing the RFID library). Then, open the serial monitor.
Write down your UID card ( " Card UID: xx xx xx xx " )
Arduino Program
The Arduino code for the RFID door lock can be copied here.
#include <SPI.h>
#include <MFRC522.h>

#define SS_PIN 10
#define RST_PIN 9
#define LED_G 5 //define green LED pin
#define LED_R 4 //define red LED
#define RELAY 3 //relay pin
#define BUZZER 2 //buzzer pin
#define ACCESS_DELAY 2000
#define DENIED_DELAY 1000
MFRC522 mfrc522(SS_PIN, RST_PIN);   // Create MFRC522 instance.

void setup()
{
  Serial.begin(9600);   // Initiate a serial communication
  SPI.begin();          // Initiate  SPI bus
  mfrc522.PCD_Init();   // Initiate MFRC522
  pinMode(LED_G, OUTPUT);
  pinMode(LED_R, OUTPUT);
  pinMode(RELAY, OUTPUT);
  pinMode(BUZZER, OUTPUT);
  noTone(BUZZER);
  digitalWrite(RELAY, LOW);
  Serial.println("Put your card to the reader...");
  Serial.println();


}
void loop()
{
  // Look for new cards
  if ( ! mfrc522.PICC_IsNewCardPresent())
  {
    return;
  }
  // Select one of the cards
  if ( ! mfrc522.PICC_ReadCardSerial())
  {
    return;
  }
  //Show UID on serial monitor
  Serial.print("UID tag :");
  String content= "";
  byte letter;
  for (byte i = 0; i < mfrc522.uid.size; i++)
  {
     Serial.print(mfrc522.uid.uidByte[i] < 0x10 ? " 0" : " ");
     Serial.print(mfrc522.uid.uidByte[i], HEX);
     content.concat(String(mfrc522.uid.uidByte[i] < 0x10 ? " 0" : " "));
     content.concat(String(mfrc522.uid.uidByte[i], HEX));
  }
  Serial.println();
  Serial.print("Message : ");
  content.toUpperCase();
  if (content.substring(1) == "83 23 38 BB") //change here the UID of the card/cards that you want to give access
  {
    Serial.println("Authorized access");
    Serial.println();
    delay(500);
    digitalWrite(RELAY, HIGH);
    digitalWrite(LED_G, HIGH);
    delay(ACCESS_DELAY);
    digitalWrite(RELAY, LOW);
    digitalWrite(LED_G, LOW);
  }

 else   {
    Serial.println(" Access denied");
    digitalWrite(LED_R, HIGH);
    tone(BUZZER, 300);
    delay(DENIED_DELAY);
    digitalWrite(LED_R, LOW);
    noTone(BUZZER);
  }
}
Upload the code. Attach the Arduino, battery, and lock valve on the inside of the door. And attach the RFID reader to the outside of the door. This way the RFID tag can be used to open the door easily.
You're Done!

That was fantastic! So now you have an Arduino that accesses your home. What else can you do next? How about adding a keypad for code entry, that'd be so excellent. Would you like to integrate Bluetooth so that you can open the door using your phone? There are a lot of items you can add, and thanks for sharing your inventions with us! watch video here