Pepakura 101: the Basics of Cosplaying With Pepakura
by ManufacturedArtists in Craft > Costumes & Cosplay
17765 Views, 81 Favorites, 0 Comments
Pepakura 101: the Basics of Cosplaying With Pepakura
Hey Minions!
I love pepakura! It is, in my opinion, one of the coolest things to come out of the 3D modeling world. Some of the sharpest costumes coming out of cons nowdays are made with peps. I am convinced anyone can use this program to turn out professional grade, scaled armor and props.
I have been playing around with my own peps for about 2 years now and I am by no means a pro, but I have picked some helpful tips and tricks along the way. So hopefully what's taken me 2 years to learn I can teach you in about 20 minutes. This instructable will cover the basics of getting started with Pepakura Designer 3.
I love pepakura so much because it takes essentially no artistic talent to put them together. None, literally, if it did, I'd be screwed. It's quite literally glue by number. So read on to learn to make some really cool stuff!
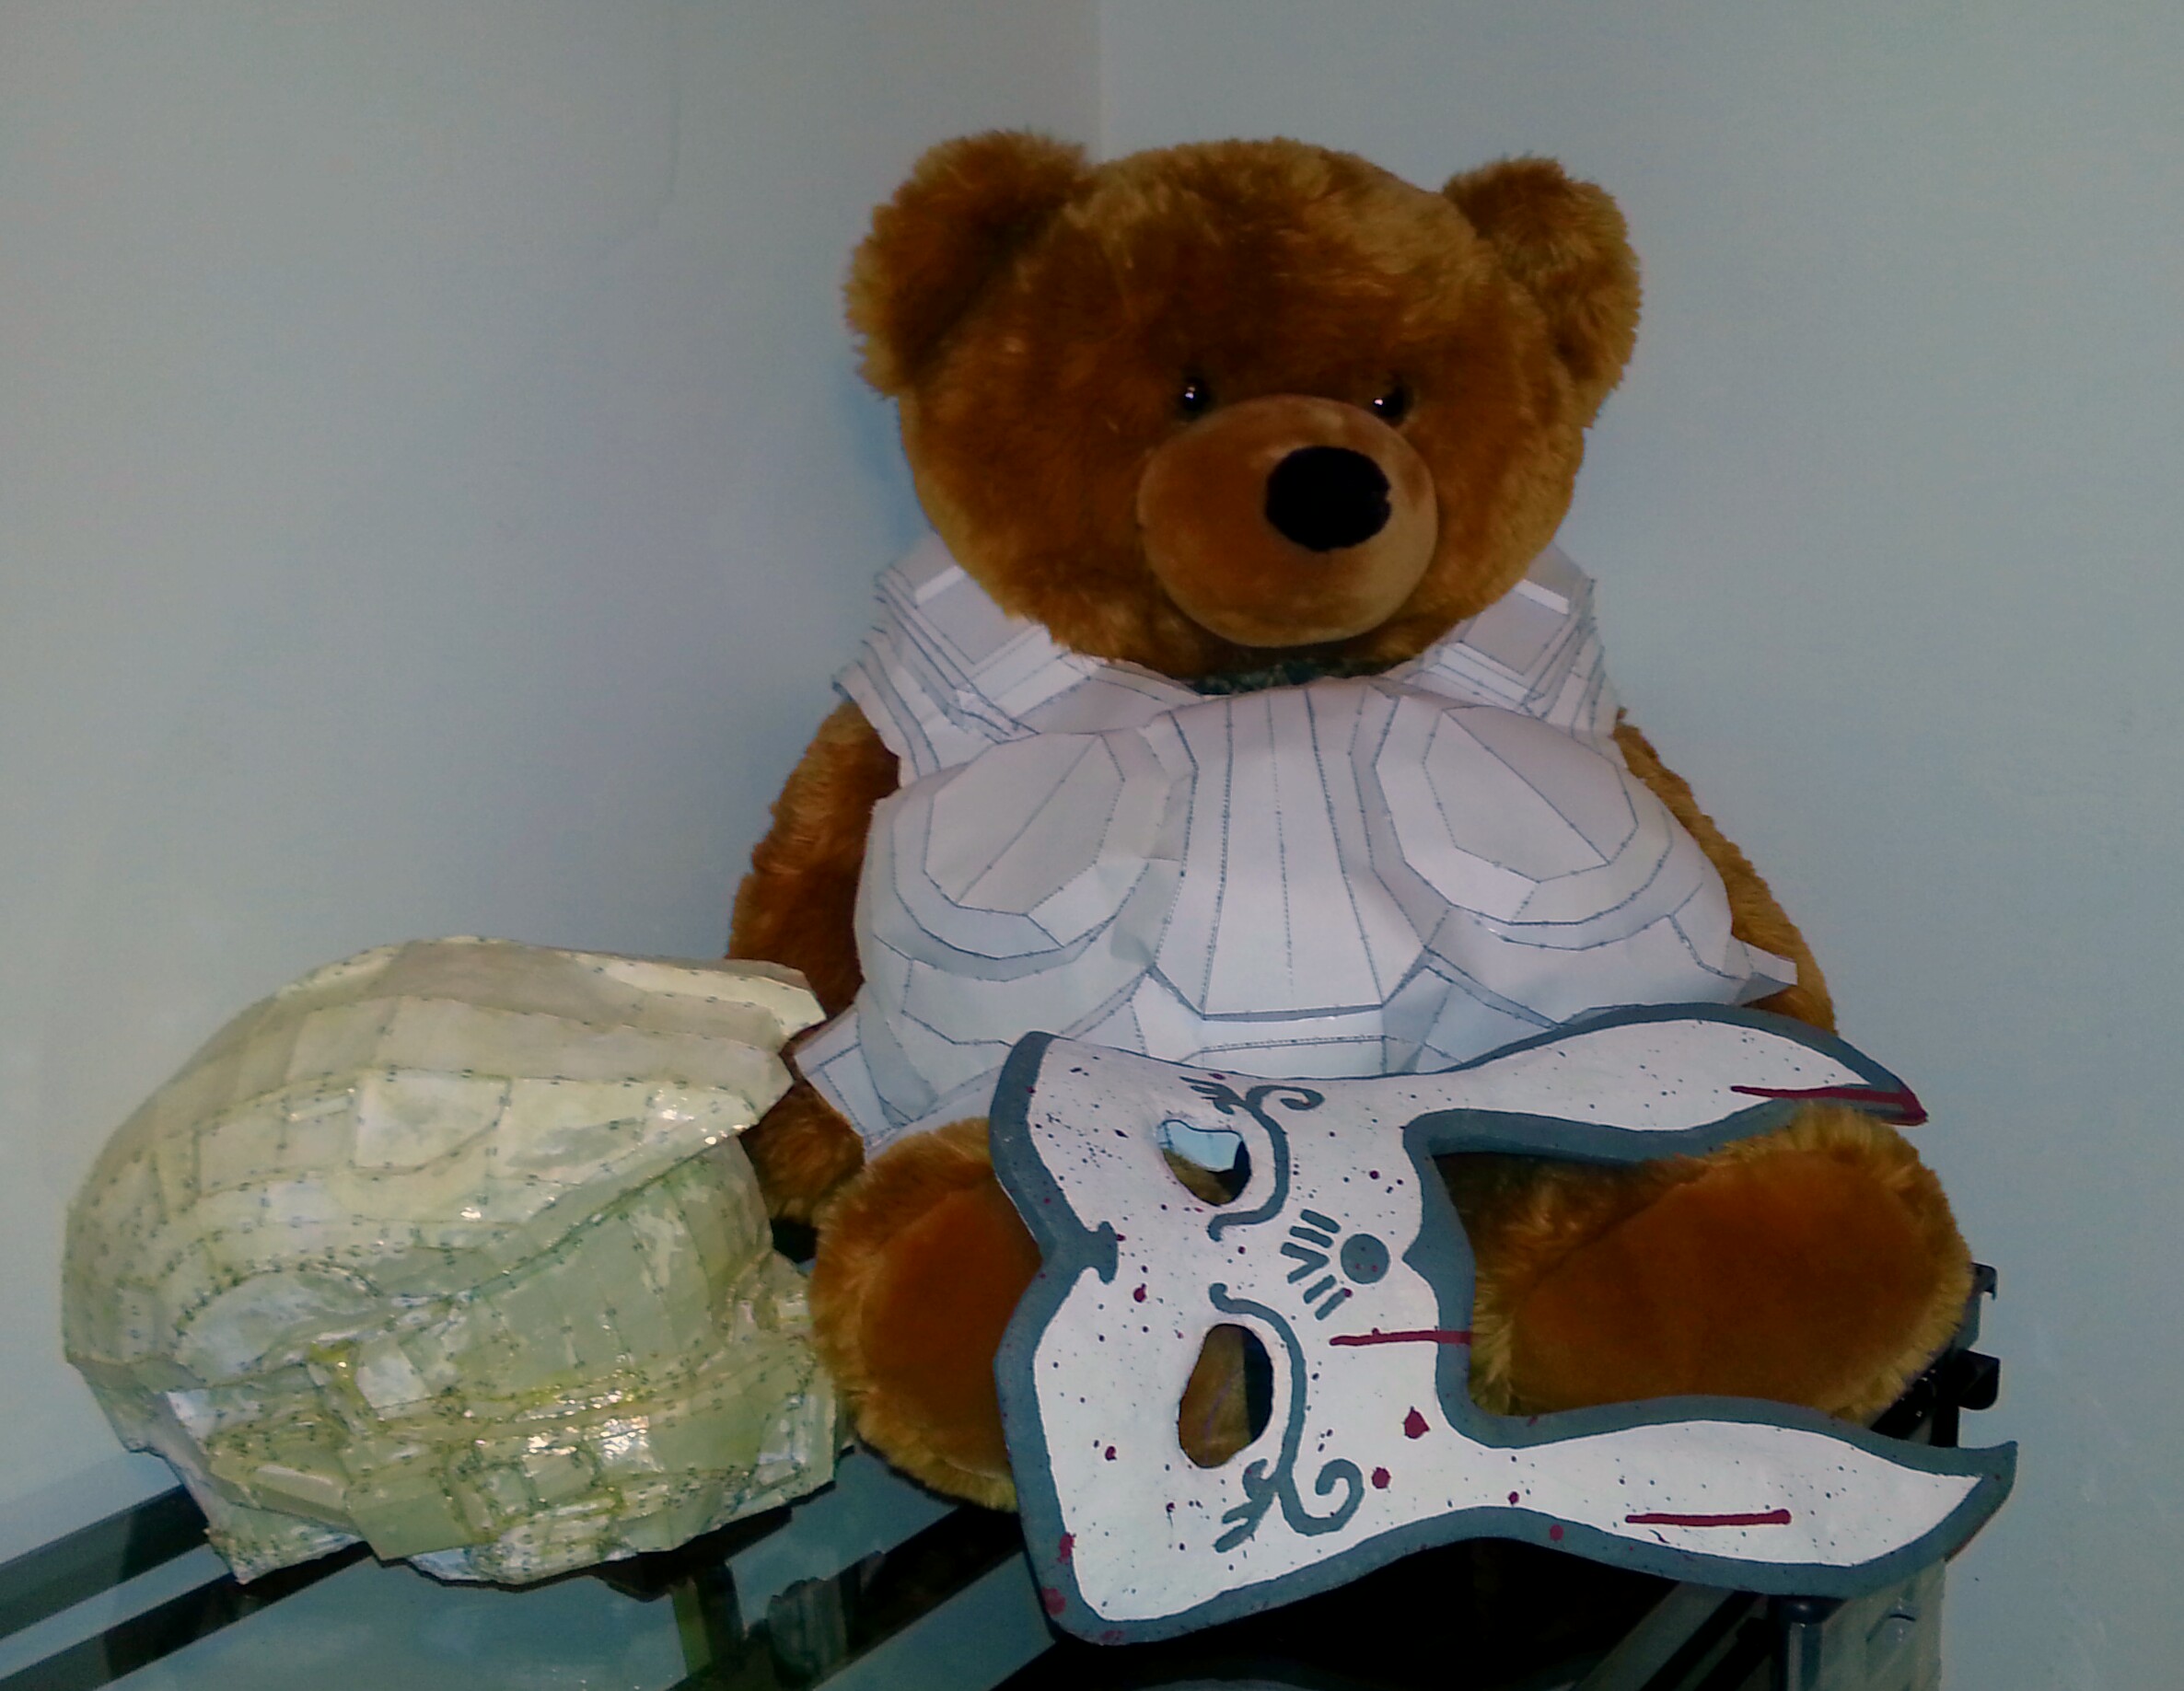
*In the pics below are some of the projects I have done in various states of finish. Geary is styling a not so sized for him version of Damon Baird's armour from Gears 2, it's just been put together. Master Chief's helmet is one of the most complex pieces I have ever done(totally worth it), it's in the first stage of hardening, I'm using a poly resin. The bunny mask is from Bioshock, it's finished, pep'ed,resined, clayed, and painted.*
The Necessities
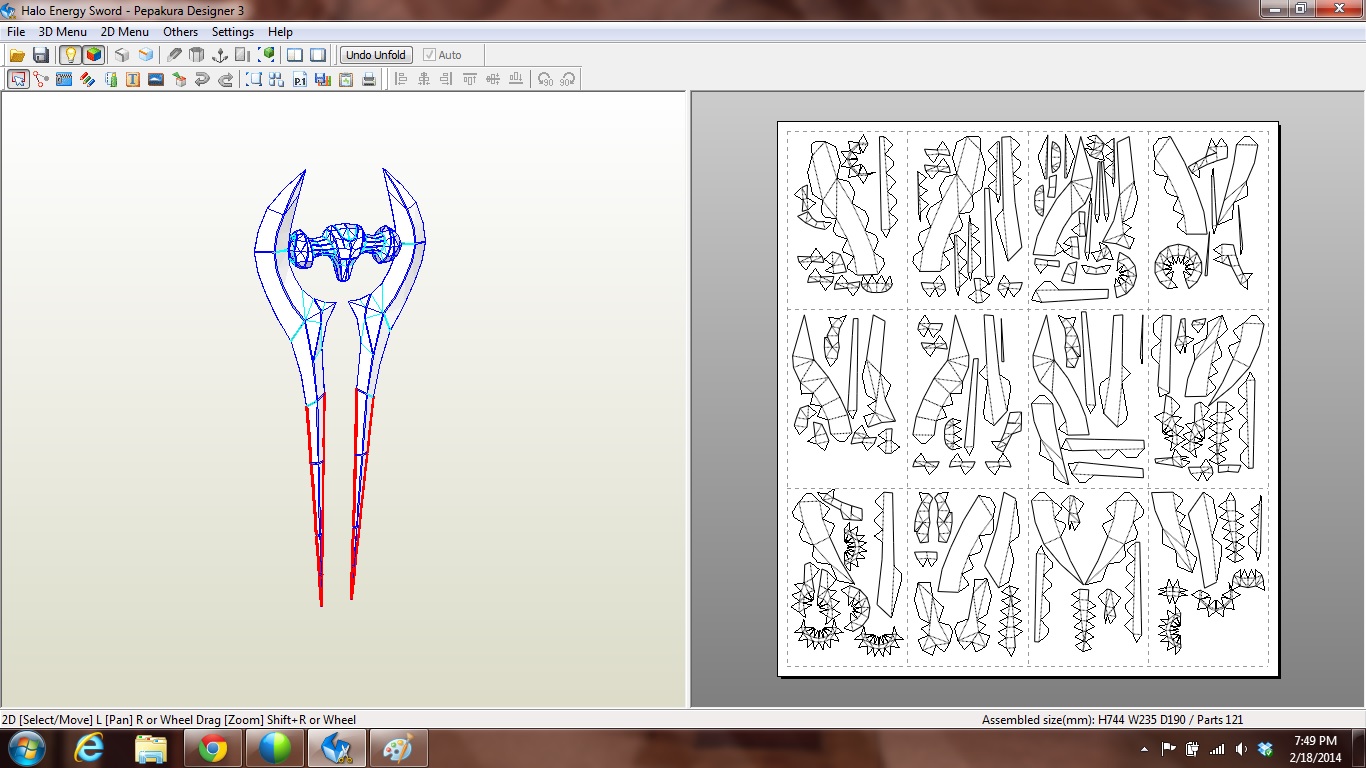
Before you get lost in the amazing world of pep, let's cover some housekeeping.
This great company called Tama Software Ltd. publishes this incredible collection of software that makes pepakura so simple. I will be using all of their software for my tutorials.
Most important: Pepakura Designer 3 This is the best program I can currently find for modifying .pdo files. The only thing that some people get upset about is that it is not free. I think its around $30 USD, which as far as 3D integrated software goes, is pennies. IF YOU WANT TO SAVE YOUR WORK, YOU MUST BUY A KEY! It it not necessary to purchase the key, but it is highly recommended. It saves you from having to redo hours of work each time you login. It it well worth it... trust me.
If you can't afford a key, you can use Pepakura Viewer, it's free, but you cannot save your project files.
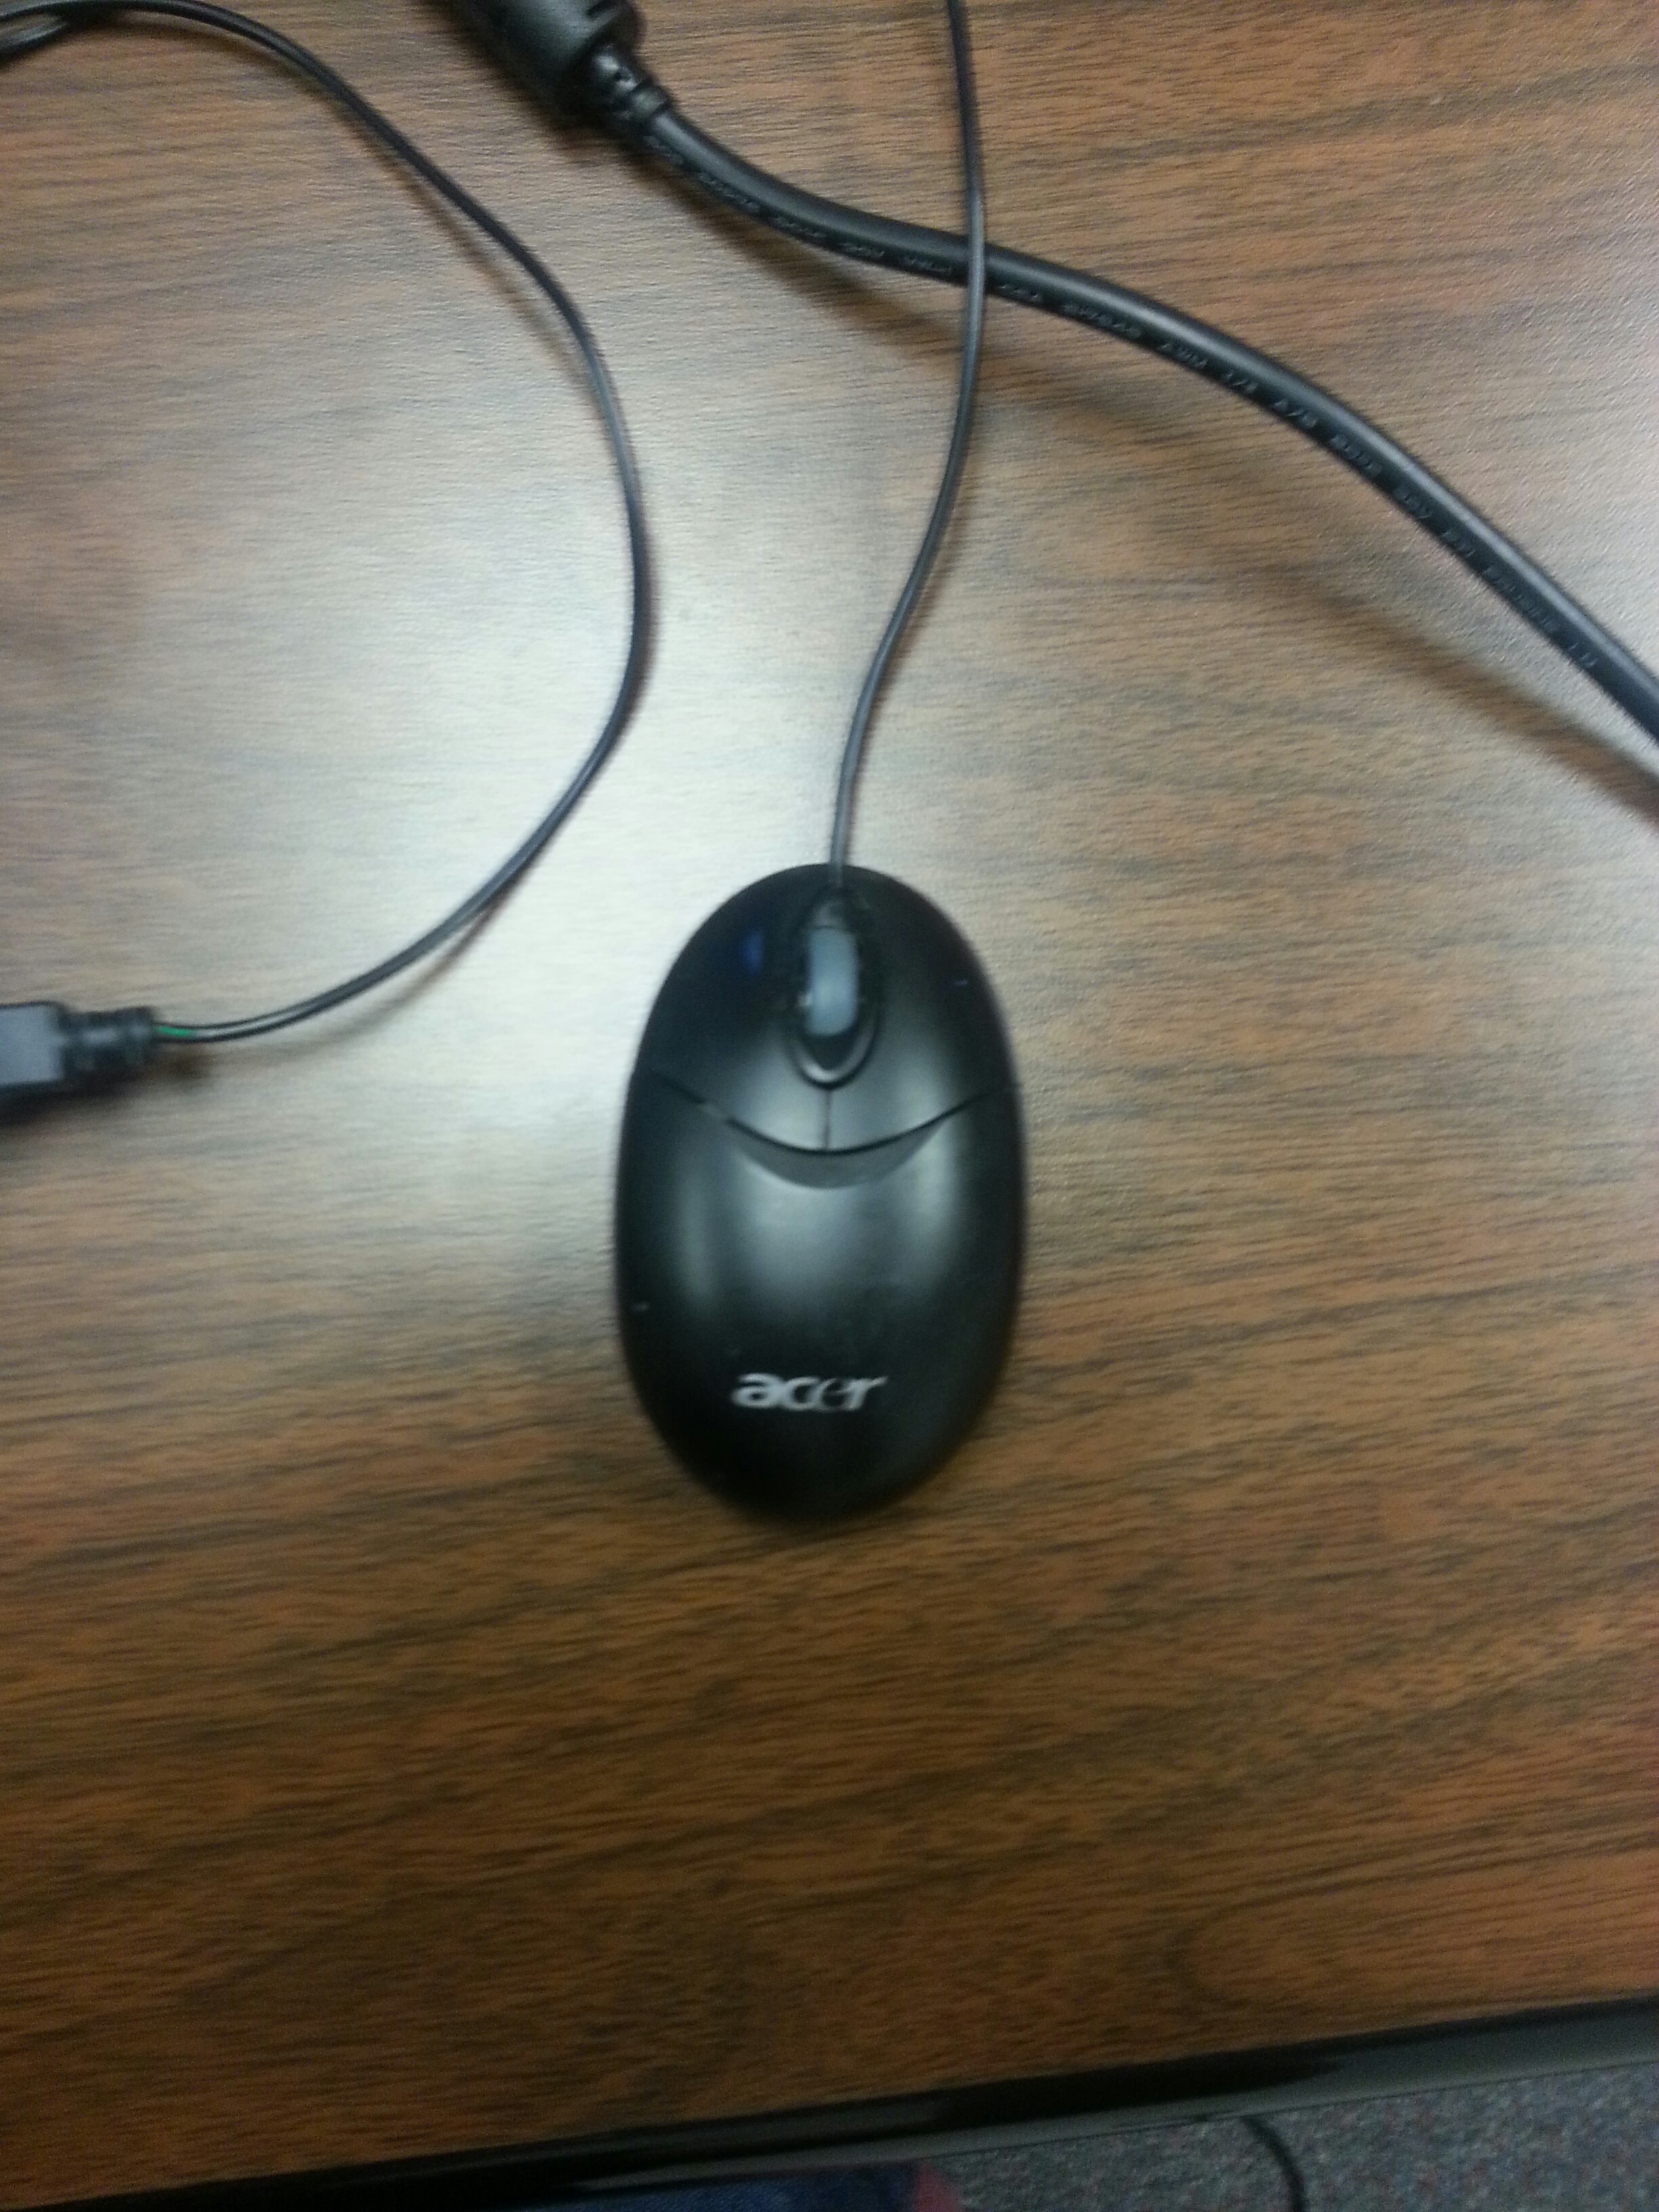
Next bit, you can use this on a laptop, but you really need a mouse. Any mouse with a rolling scroll, its integral for manipulating the 3D files.
If you want to follow along with me in the tutorial, go ahead and download this:
Halo Energy Sword
Opening a Pep
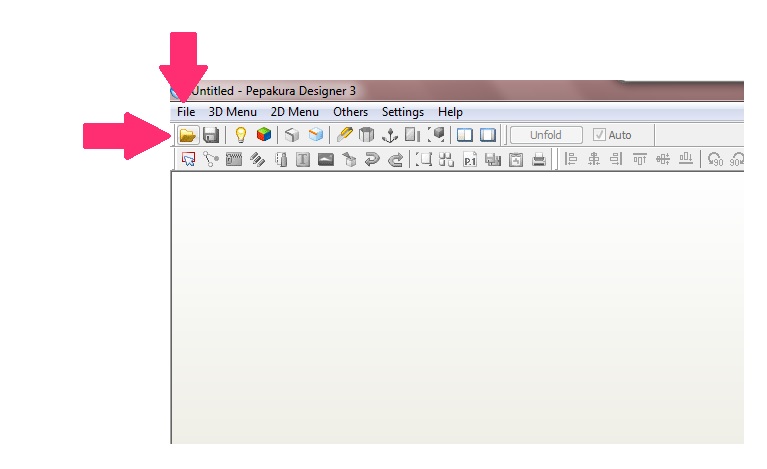
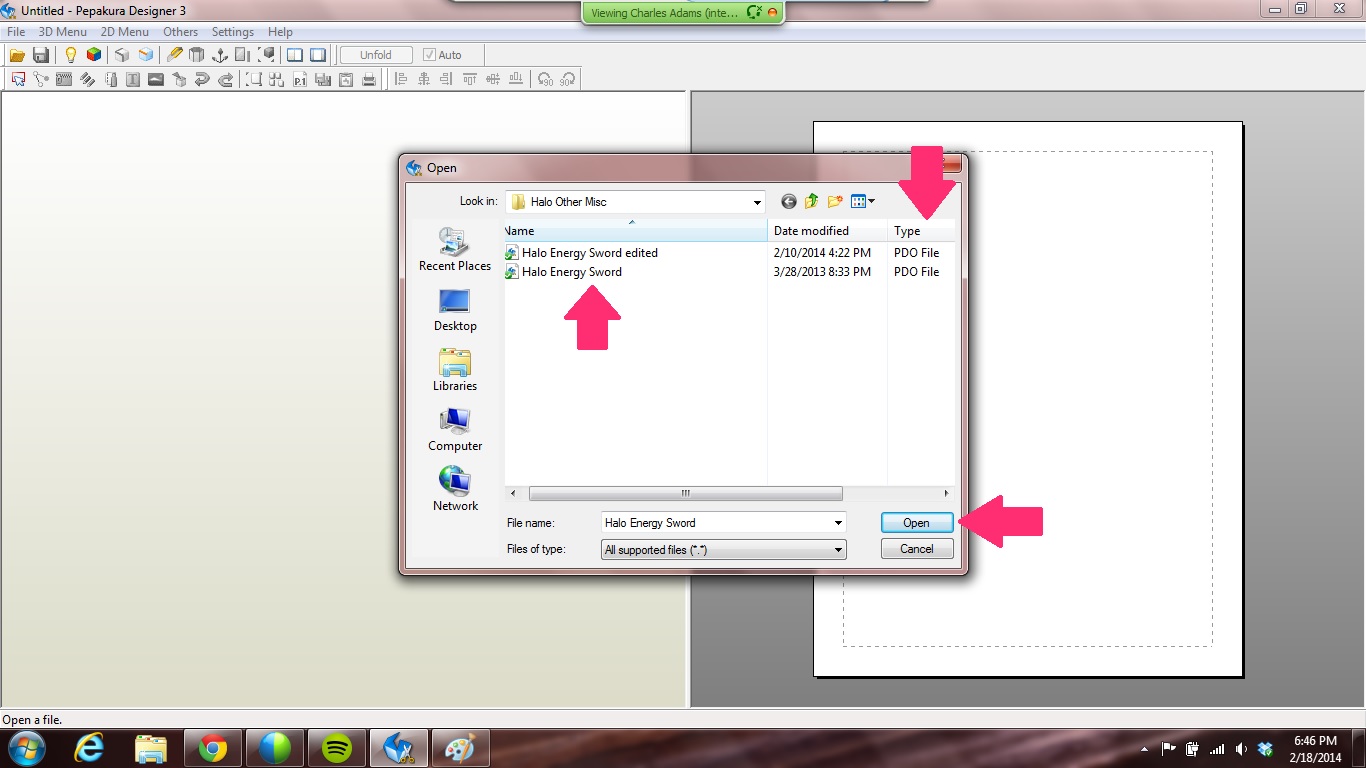
If you have used basically any windows based program, you'll blow right through this. Opening a file in Pepakura Designer 3 is really simple. You can do it one of 2 ways. Through the Open Folder button or through the File tab, Open is the first link.
After you click one or the other of these, you'll get a prompt window asking you to select a file. Head to wherever you put your downloaded the Energy Sword File.
Tip 1: Create a new folder, Pep Projects or whatever, in an easily accessible area. Mine is on my desktop. In that main file, create a subfile either for the videogame/movie/tvshow your creating from. It helps you keep your peps organized and saves you time later hunting for stuff.
Note that the file type is PDO or .pdo, this is one of the most commonly supported file types. Most files you come across in forums will have this ID. Once you highlight the file you want to open, either double click it or hit the open button.
Settings
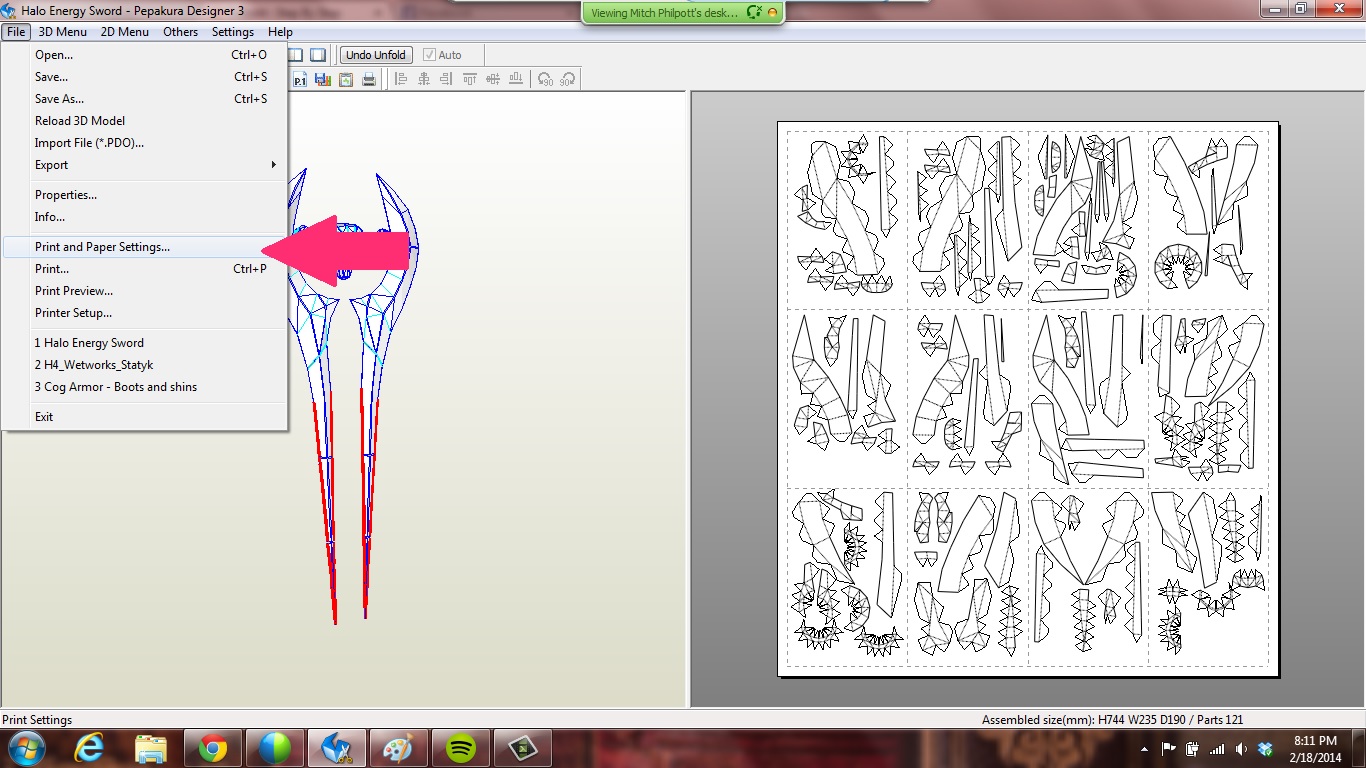
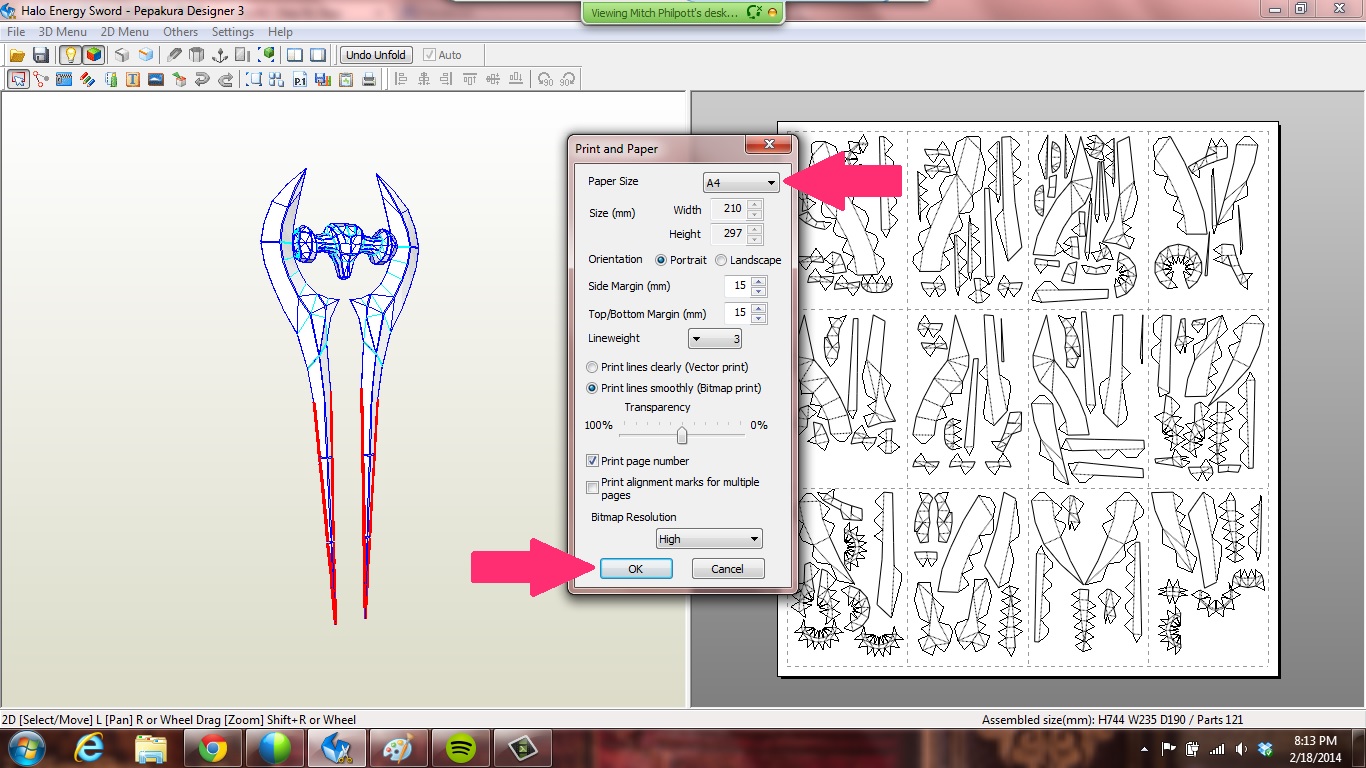
I failed miserably with this for like the first 2 months of doing peps. I printed stuff over and over because I couldn't figure out this and nobody seemed to cover it.
CHANGE YOUR PAPER SIZE
Quite literally that simple. By default Designer is using A4 size, but most household printers are set by standard for Letter. It's also much cheaper for me to get Letter size cardstock in my hick town than it is to get A4.
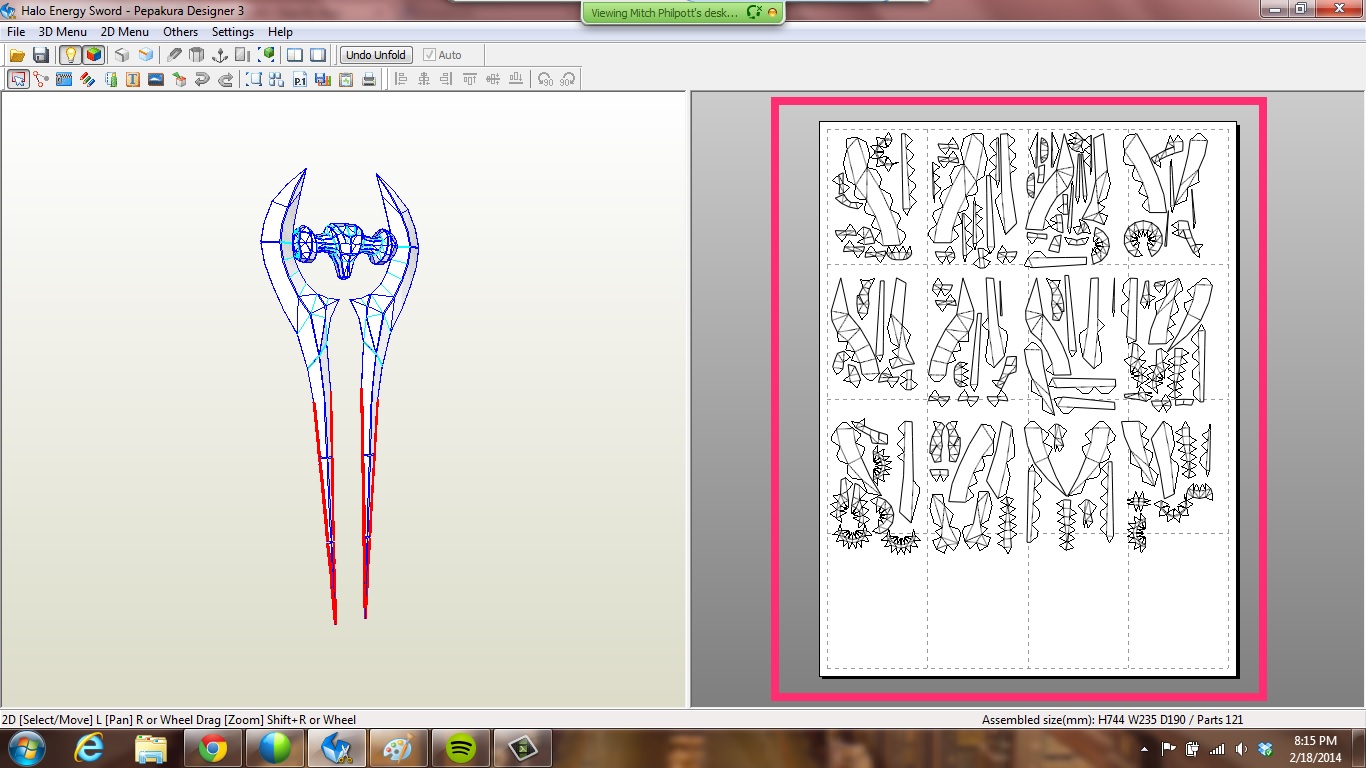
Notice how your paper size shrinks in the right half of the screen. This is why you always want to do this step before you do any scaling or moving pieces around!
Scaling
This is a really brief introduction to scaling that I plan to build on more in a future tutorial. This method of scaling is all you really need to know for doing basically any weapon or prop in pep. Armor scaling gets a bit more complicated, so I'll cover it more in depth later.
Tip 2: Measure the Distance Between Two Points. This is by far the most helpful thing I have found in the 2 years I've been at this.
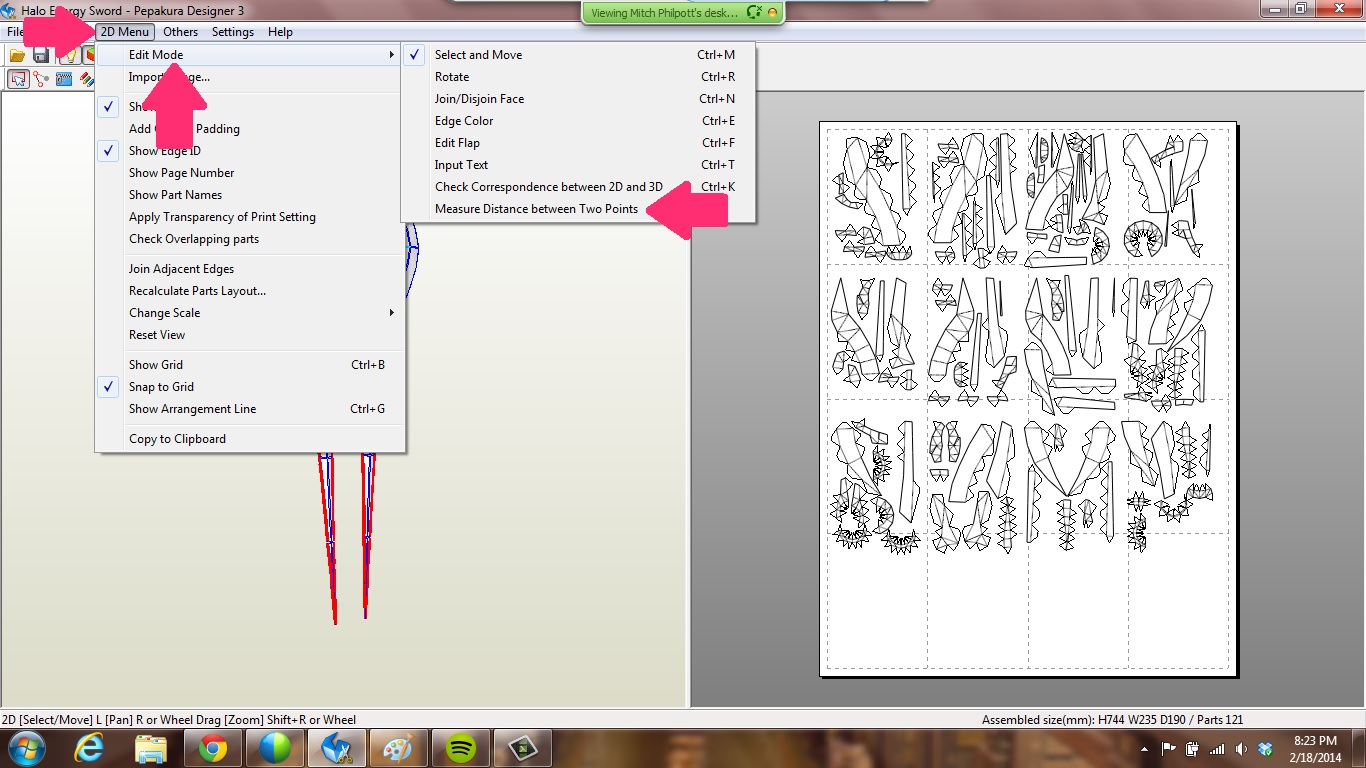
Under the 2D menu, click Edit Mode, this opens up a new menu. At the bottom is "Measure Distance Between Two Points." Click it and hover over the 3D model, you'll see a red dot appear.
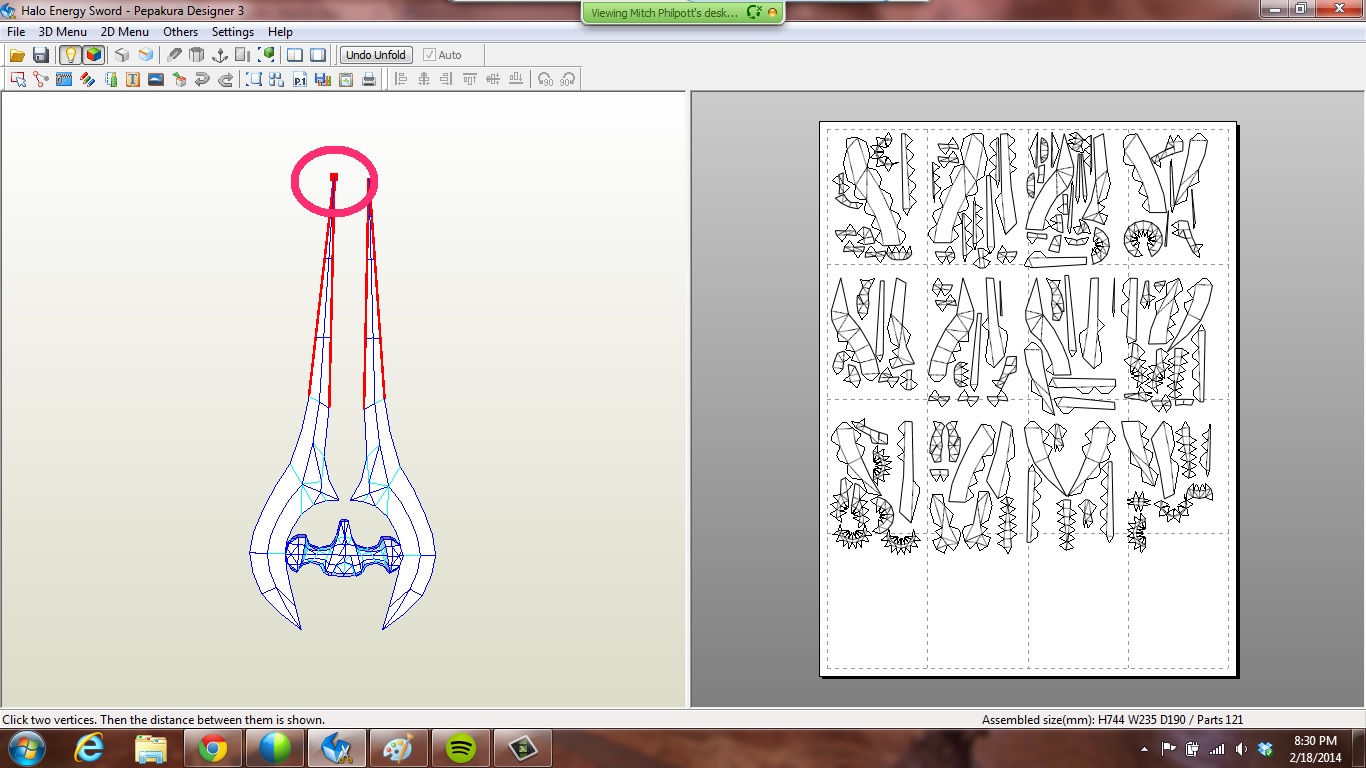
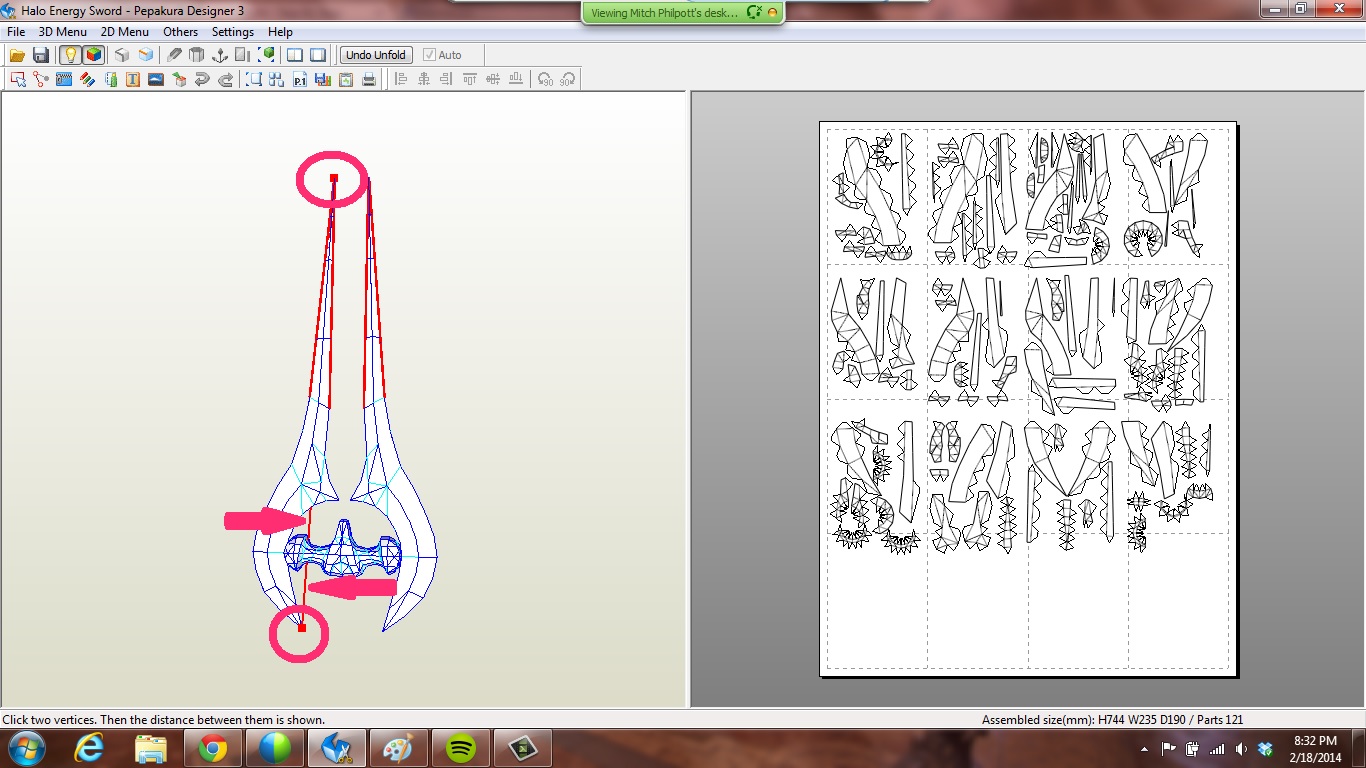
Let's see how big our sword is. Click once at the top point. Then again at the lowest point directly under the point. Note the red line that runs the whole length between the two dots. In this file we can only see it where the handle opening is because the rest of the line is inside the model. If you zoom into between the edges of the sword you can see the whole line.
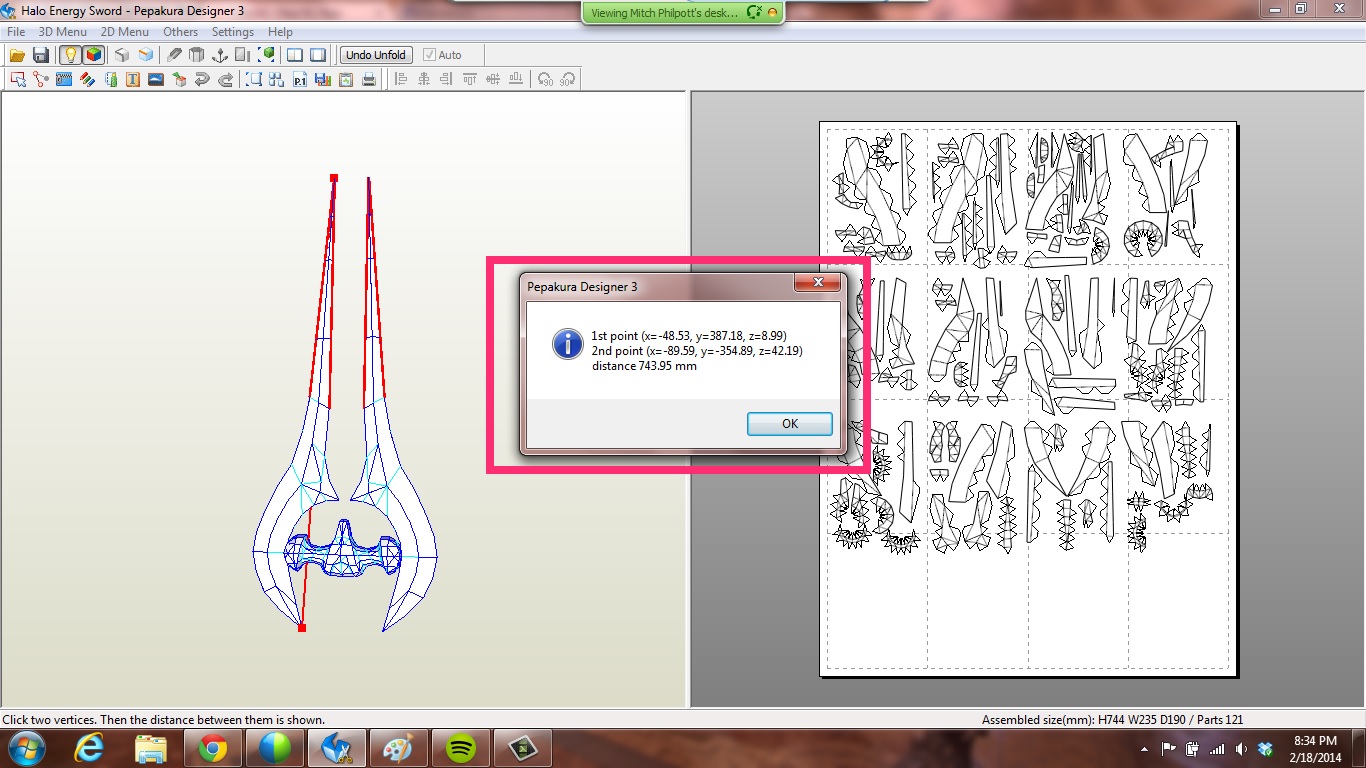
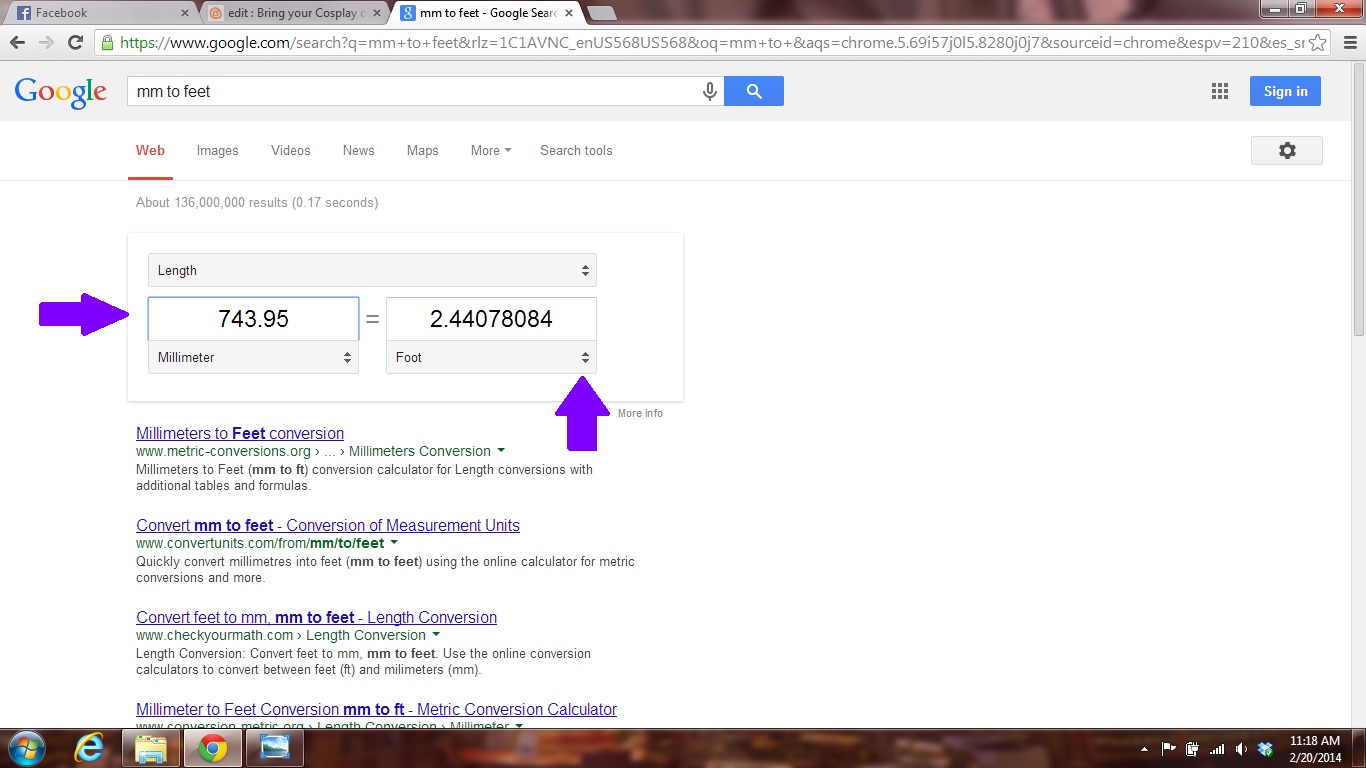
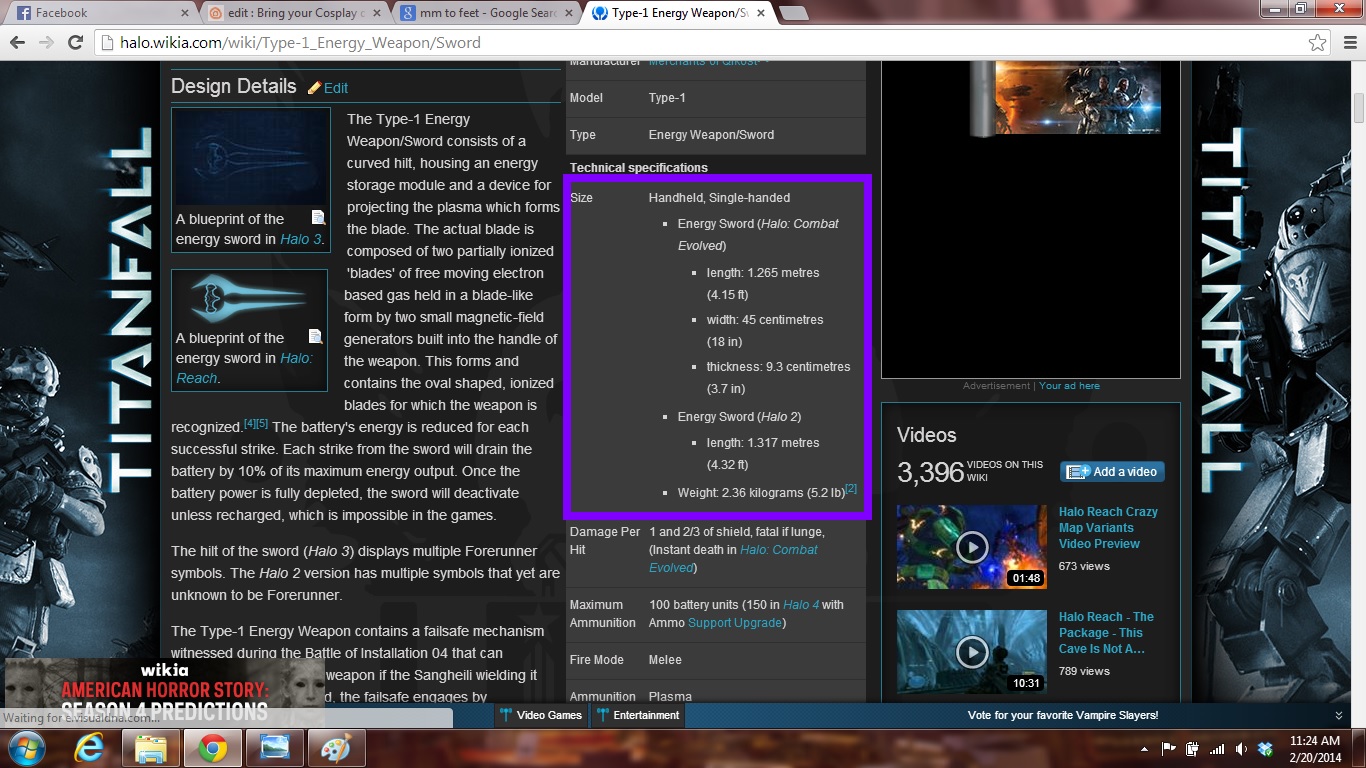
When we click again it automatically opens a window showing us the distance in millimeters, and also the x,y,z coordinates of both points(not super important till you get into advanced modeling). The distance is 743.95mm. That's dandy, but for us American's with our rebel measuring system what exactly is 743.95 mm in something more relate able, like feet? Thank goodness for Google. Search mm to ft, this pulls up a conversion window. In the left half of the conversion, type the 743.95, notice it auto converts it for you. So it's saying the sword is right about 2 and a half feet, which in my mind seems a little small when you start considering that the guys carrying them in the game are 8ft tall. So at two foot that sword would be like a dagger to them. It would also be not so proportionate to an average sized guy. So let's scale it up.
Scaling Cont.
Let's make it more relative to a guy that's around 5'8", if it's 4.5 feet for an 8ft guy, then 3.5 feet will roughly be able proportional
Tip 3. Making sure you can navigate.
As with any prop or costume, if you are planning it for a specific con, you need to make sure that it fits within their size requirements. Some places limit you on the size of the props or weapons you can carry. It's also a good practice to make sure a prop you're planning to make is something you can personally handle. I do this by either marking and cutting a cardboard strip about 4 inches wide the same length as my prop or marking a broom stick and carrying it around. Try fitting through doorways and especially into bathrooms, it's also a good idea to try and make sure it will fit as a whole unit into your vehicle, or whether you need to make it in parts.
I used this method and a friend that's average guy height to make sure the sword would be long enough. He and I both settled on 3.5 feet as a good length for him to carry for long periods of time and look proportional.
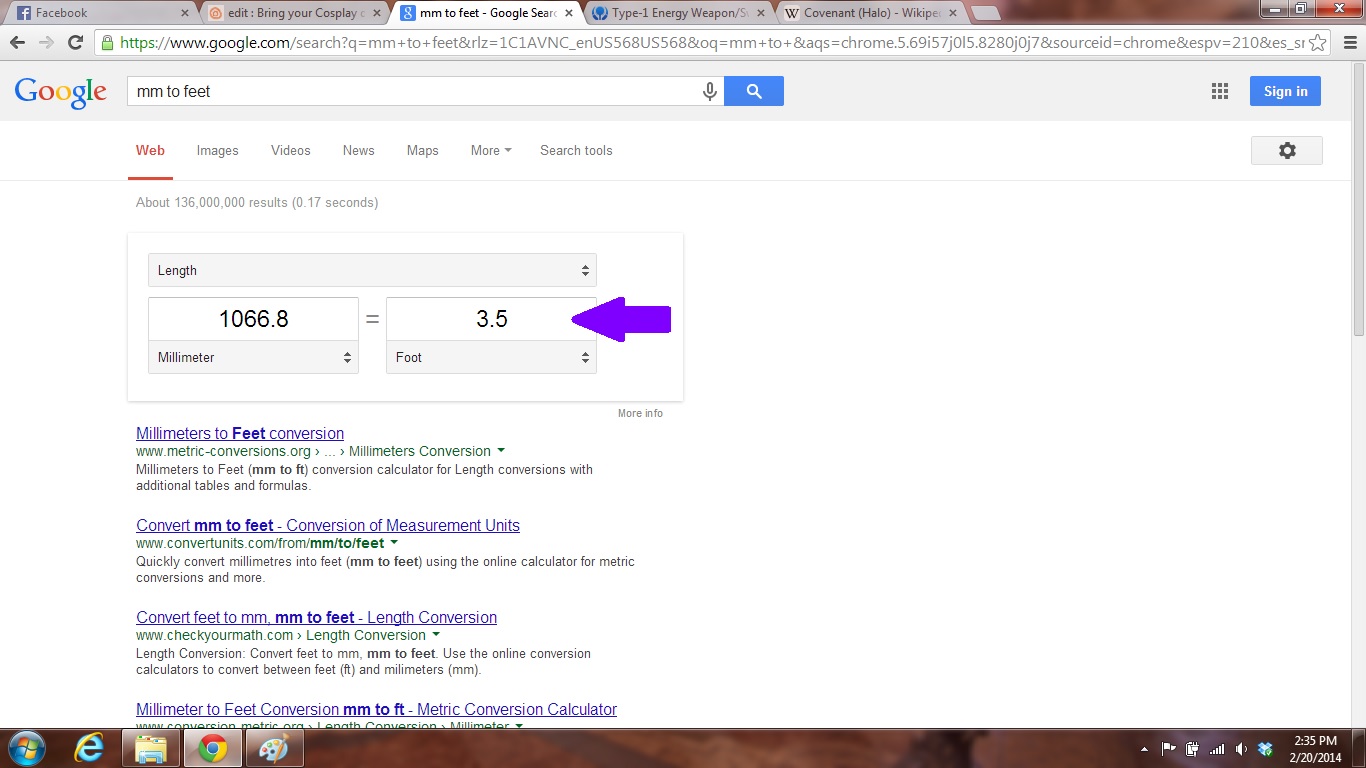
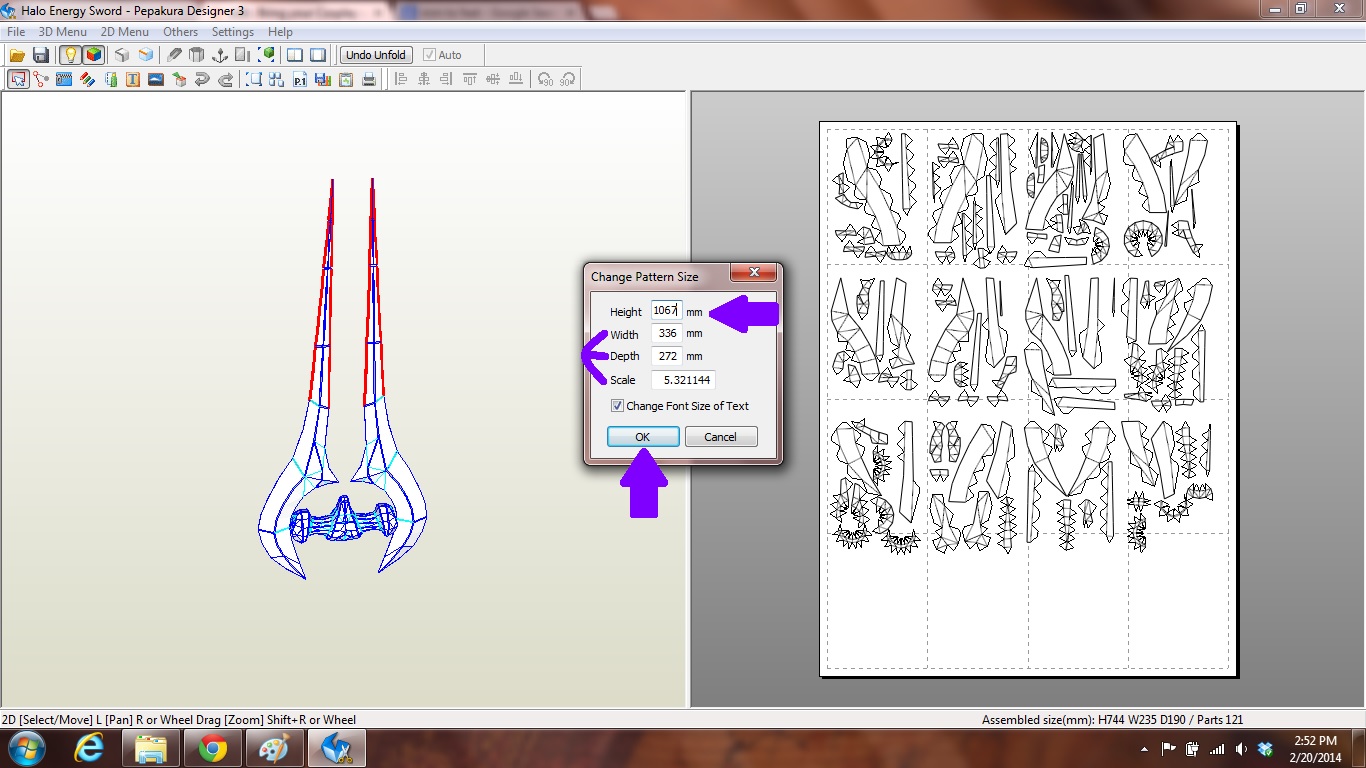
To achieve this scale up, go back to your Google conversion page and type in the foot measurement, you'll see that gives us a millimeter measurement of 1066.8 mm. This is the measurement we will need to use to scale our piece up.
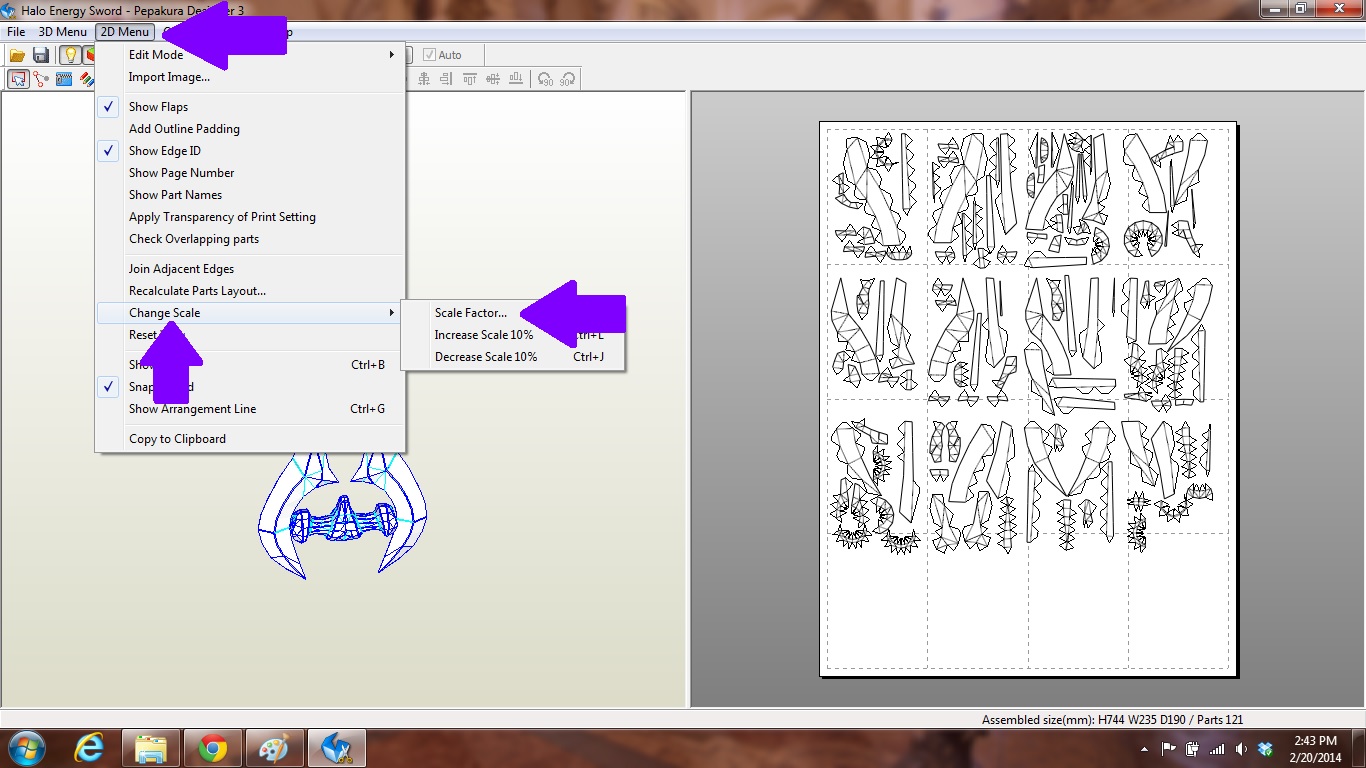
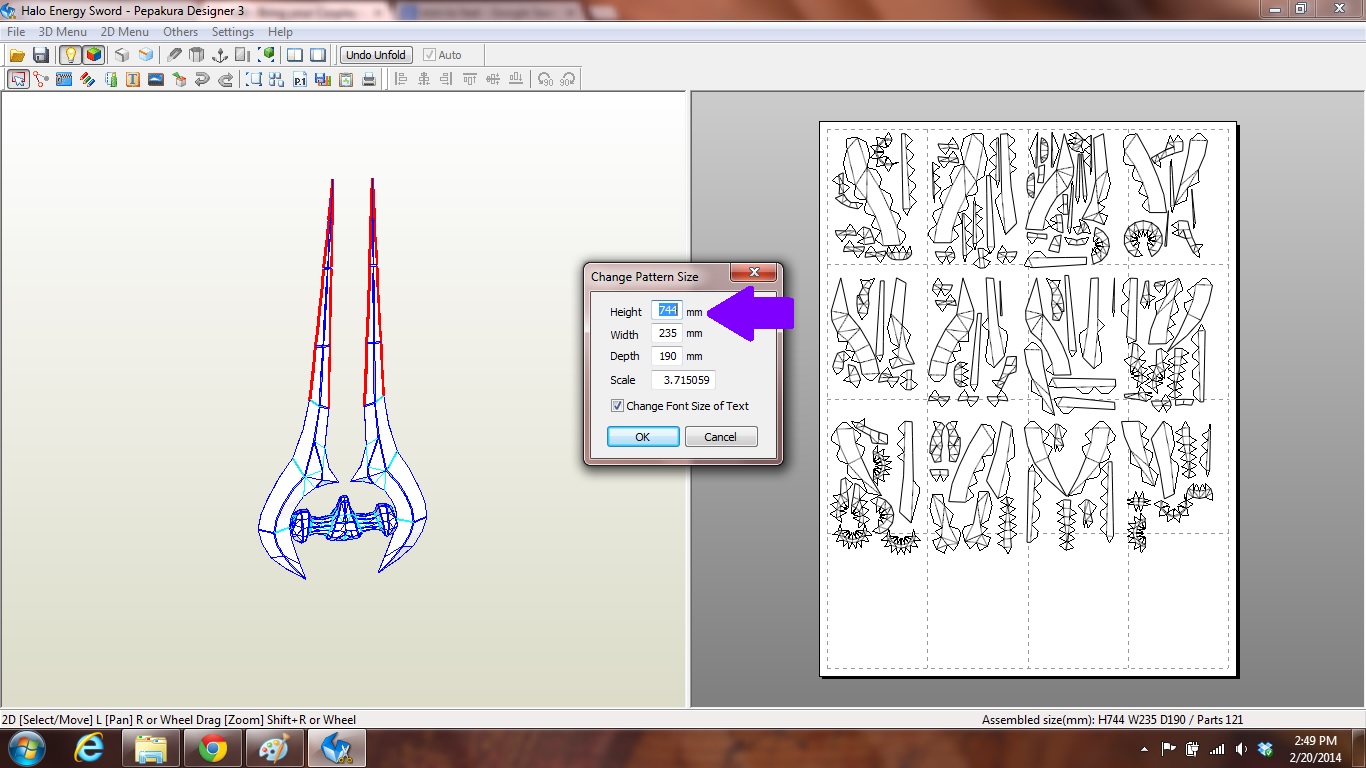
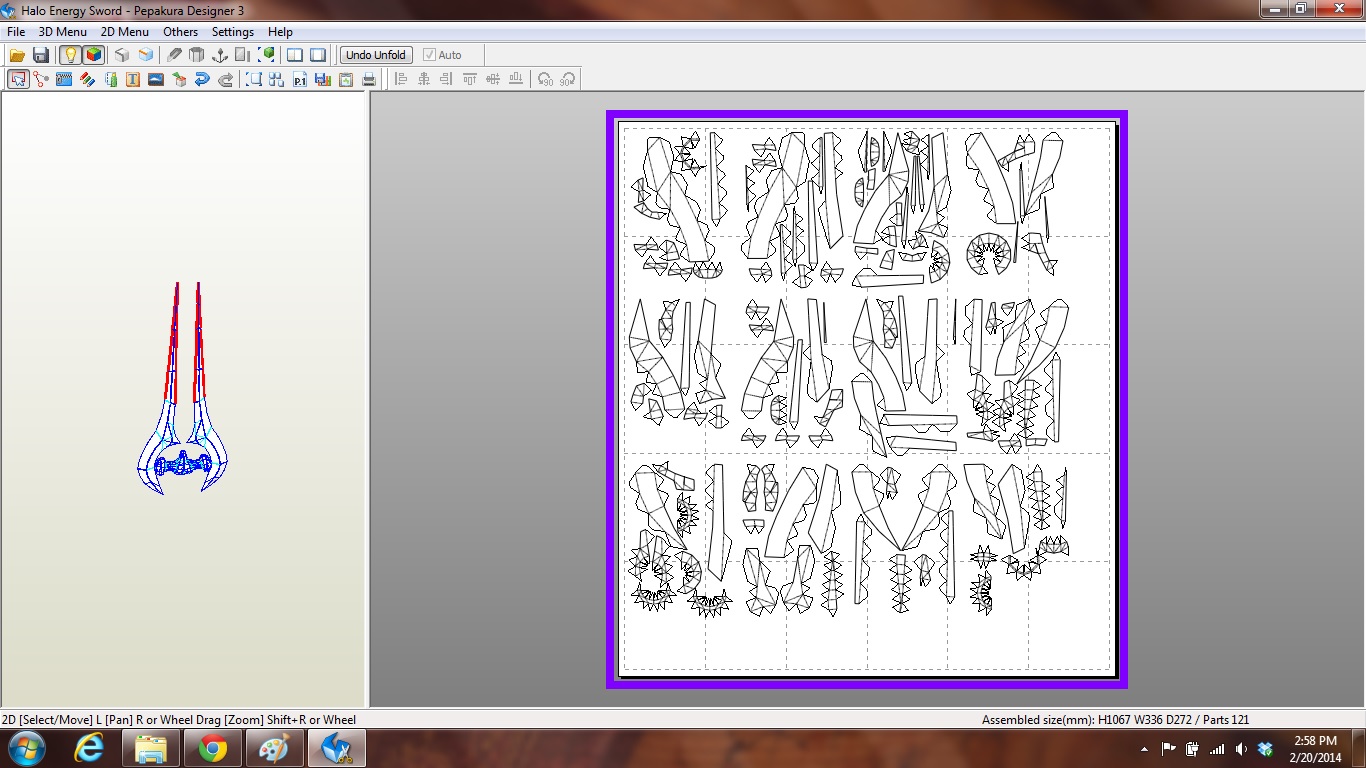
Under the 2D menu there Change Scale, hover over this and another menu will open, with the top choice being Scale Factor, click on this. A prompt window appears with Height, Width, Depth, and Scale. Notice that the 743.95 mm measurement is very close to the 744 mm that's in the Height box. In the Height box, type in the 1067 mm (rounded up the 1066.8), you'll see the other numbers change too, the software auto corrects the other boxes to keep them proportional. After you click OK, you can see that the pieces have gotten bigger.
Manipulating Pieces
This is one of the most important sections in this tutorial.
Tip 4. By manipulating pieces you can save a lot of paper.
This might not be all important to you, but to a struggling college student with no cash to spare, I have to conserve my supplies at every turn. This is one way you can shrink your paper budget.
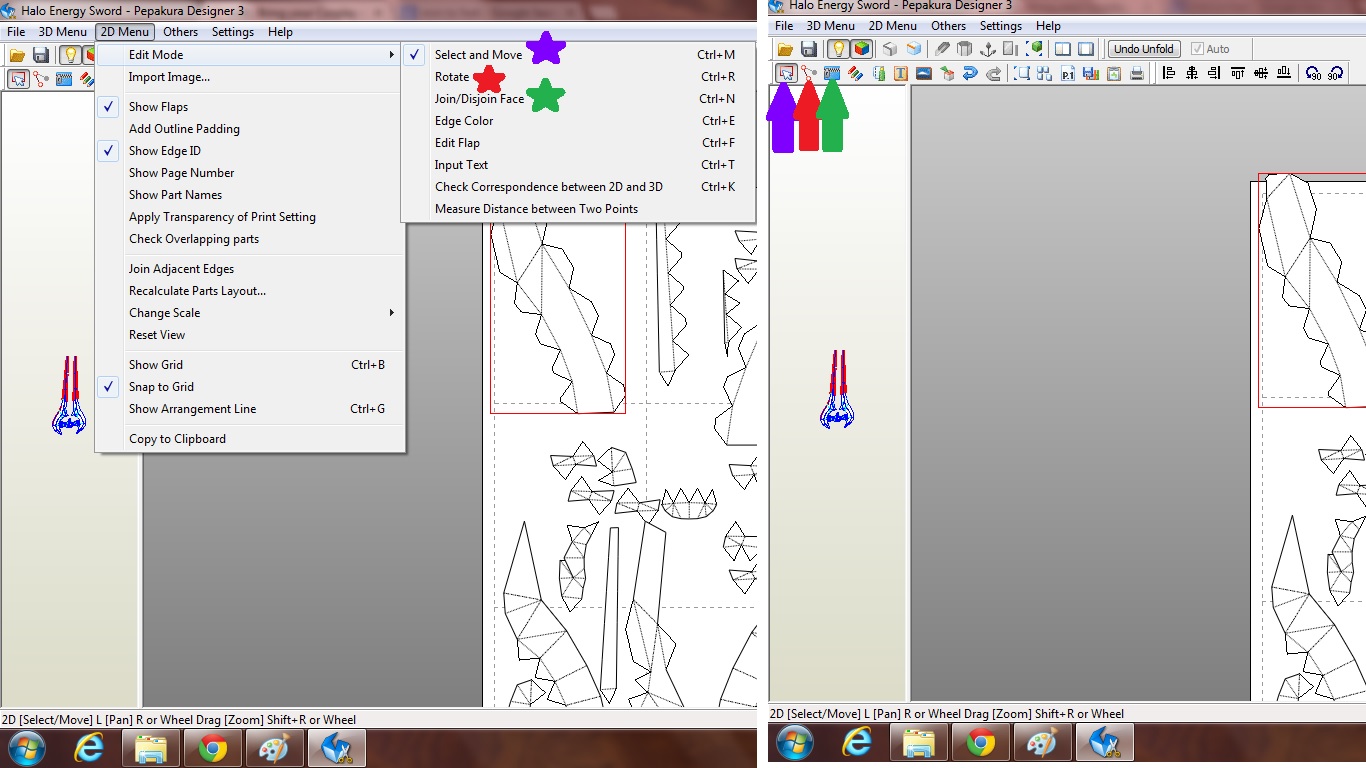
You can manipulate the 2D pieces using a couple different methods.
Select and Move (Purple)
Rotate (Red)
Join/Disjoin (Green)
You can access these either on the toolbar or under the 2D drop down menu, in Edit Mode.
Select and Move is the default setting, you can use it by clicking and holding down on the piece, then just drag it around wherever.
Join/Disjoin
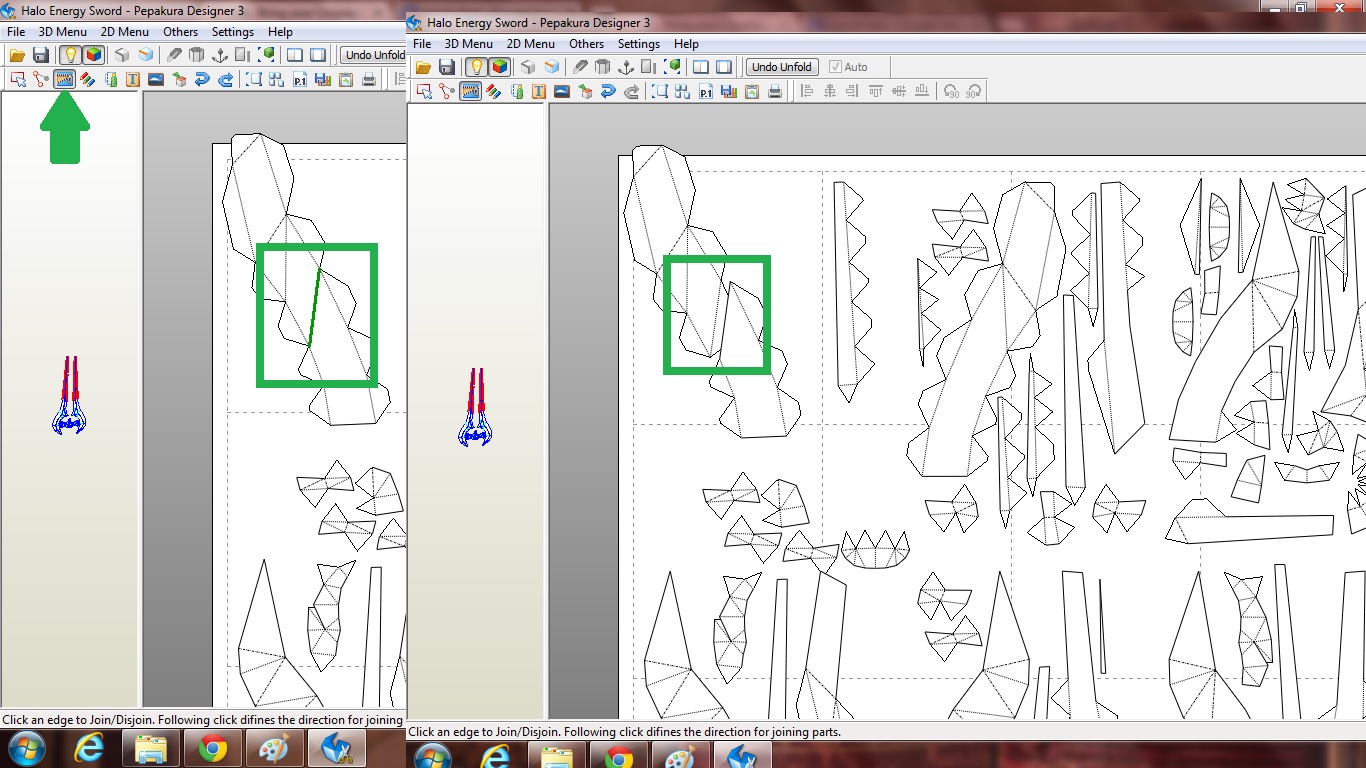
This is a really handy tool for manipulating the pieces pre and post printing. Many times when you're changing the scale and paper sizes your pieces will end up bigger than the paper. This is a serious problem. If you just print it as is, you'll have parts of the pieces missing. To remedy this you'll need to use a combo of the join/disjoin tool and moving the pieces around with the Select and Move tool.
Tip 5. Try to make your separations at the fold lines.
I have found, through trial and error, that the best place for me to split pieces is at an existing fold line. I feel like, especially in large fairly flat pieces, it leads to cleaner seams and a better finished product.
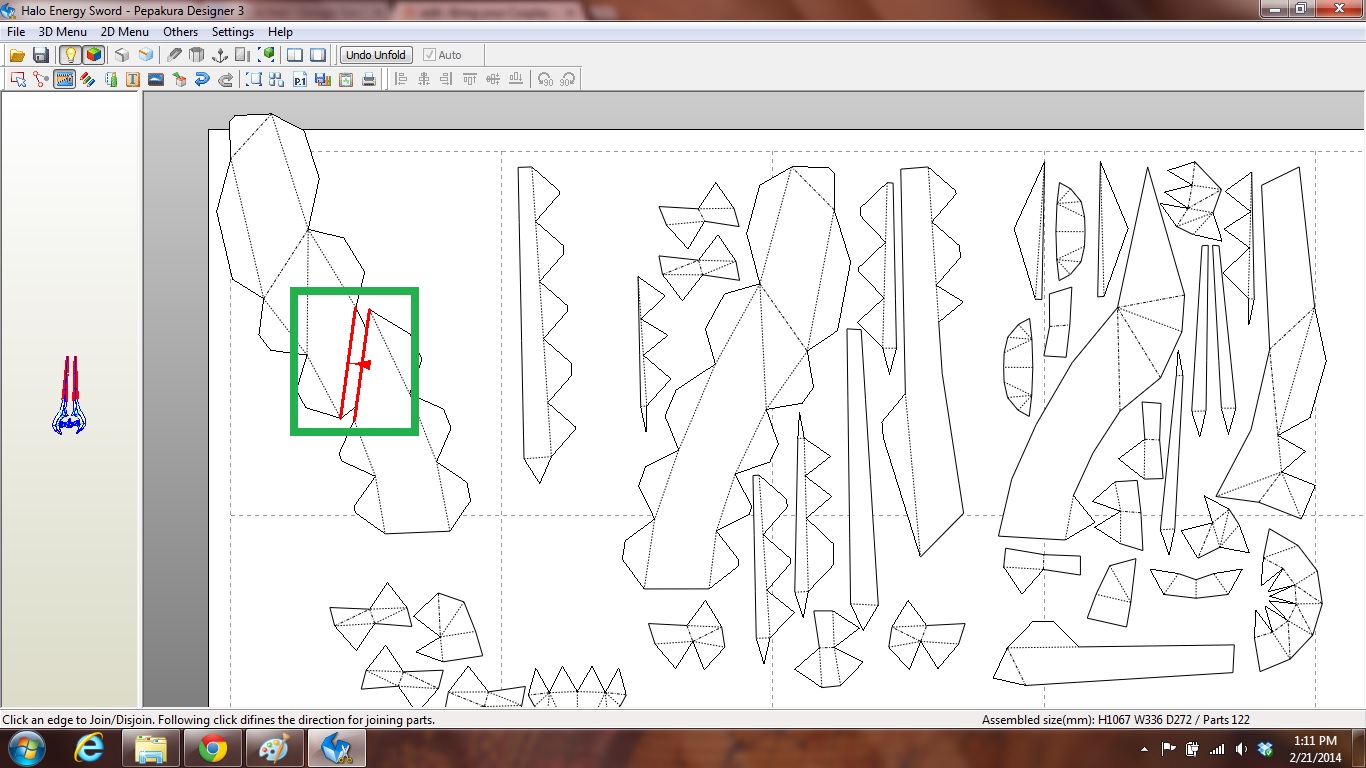
Let's start with this big piece in the corner. First we need to get it split into a smaller piece. I picked a spot in the middle of the piece so it would be easier to show what I was doing. Click the join/disjoin tool, when you hover over pieces you'll notice that a green and red line start to appear. Pick a spot in the piece that has a green line and click again. You can see how the piece separates at that line, it auto generates a new tab on one of the sides of the split. If you hover over the same area you'll see two red lines appear with a line between them, this is the join function. If you don't like the way a piece splits, just click again and it will fix itself.
Tip 6. Use the join function during assembly.
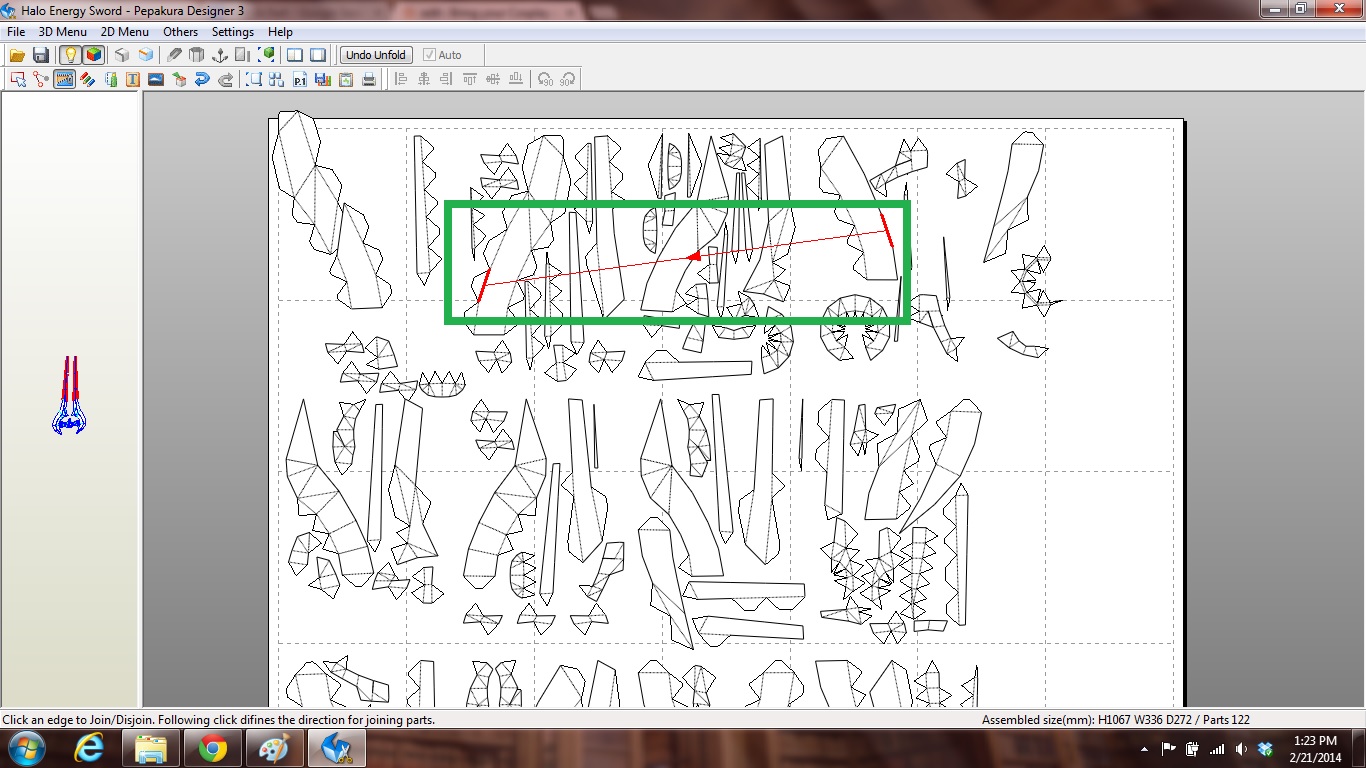
I love this function! It saves me sooooo much time. Instead of spending hours hunting through all the pieces for this one tiny set of numbers, all I have to do is pull this up and use the join function. It shows me exactly what pieces go together. Even if they are on completely opposite sheets of paper.
Rotate
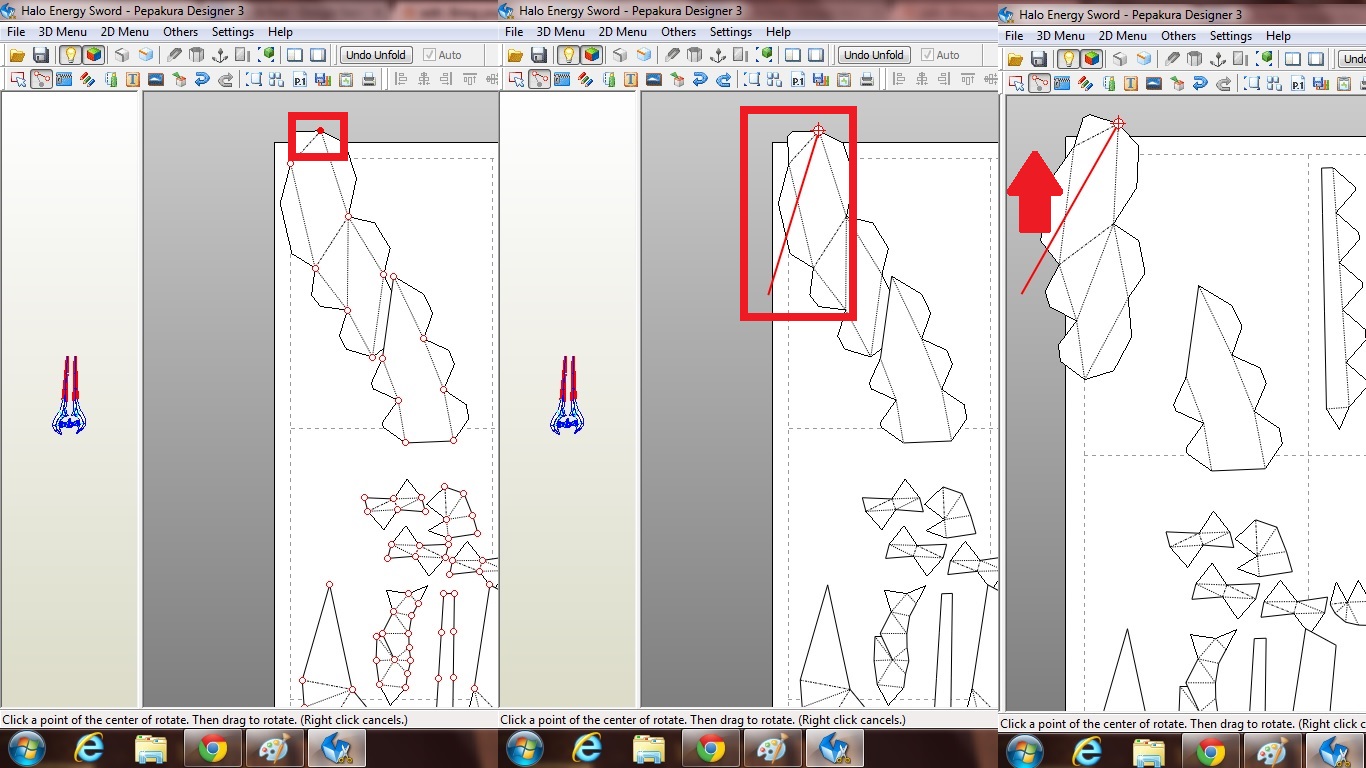
This is another really hand thing I've learned how to use. You can rotate pieces around any one of the predefined axes. To do this select the rotate tool. Once it's active when you hover over any of the red outlined circles on the pieces, you'll see them get solid red. This tells you that when you click, this will be the axis you rotate around. So pick one and click, then drag your mouse a little way away and click and hold. You'll see a red line appear. This lets you actually rotate the piece, so while you have the click held, drag your mouse and you'll see the piece swing around on that point. When you let go of the click, it will hold the angle you picked.
Tip 7. When using the Rotate tool, you don't have to switch back to the Select and Move tool to move pieces.
This is something that's really nice about this tool, as long as your just rotating and shuffling pieces around on your page you don't have to keep changing back and forth. This can save you alot of time if you're really OCD about squeezing the pieces in like me.
Adult Tetris
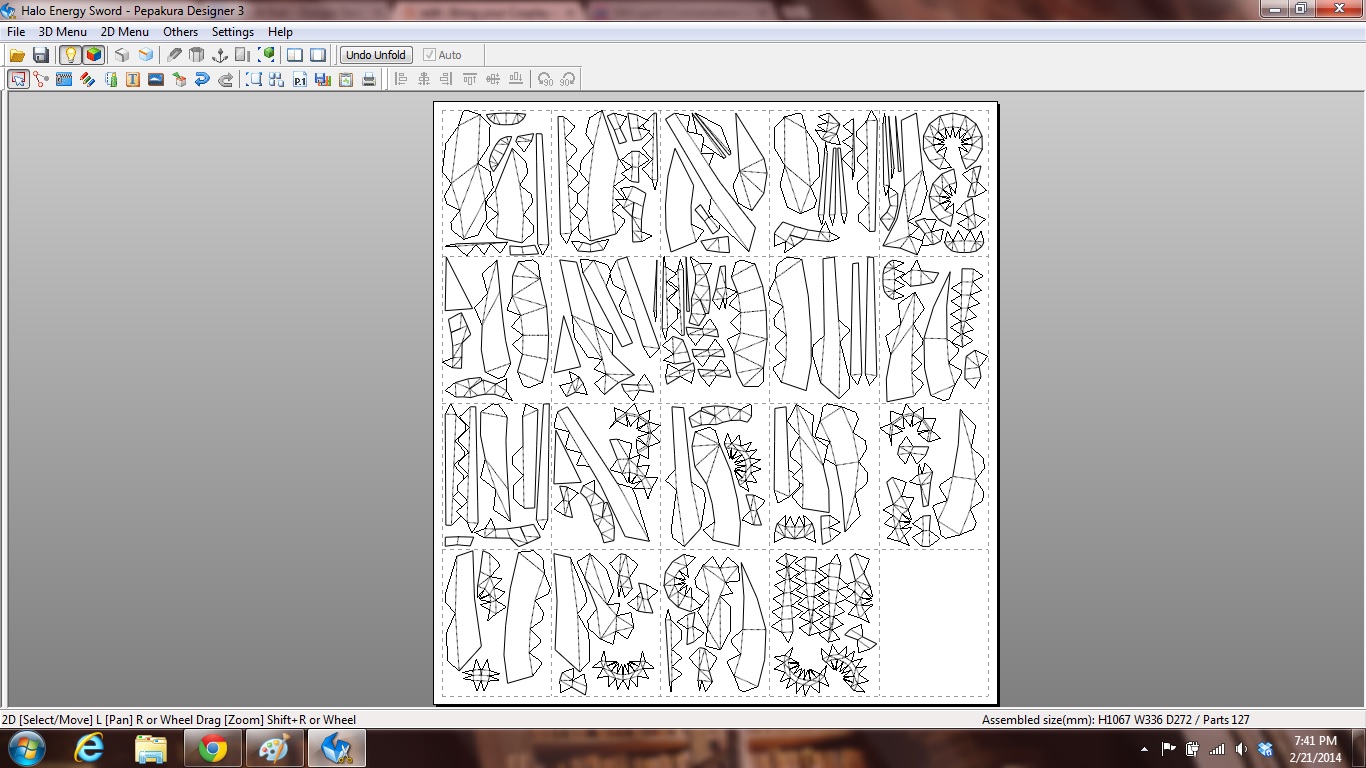
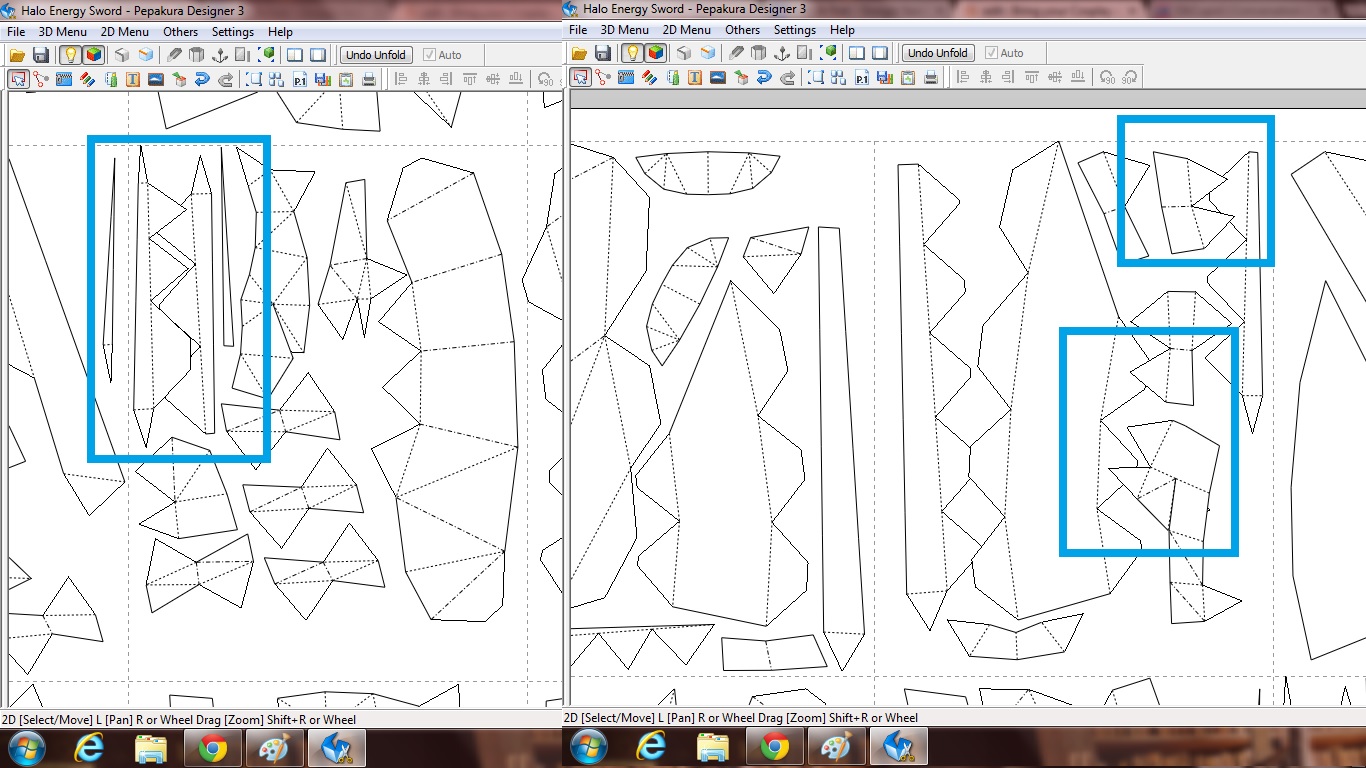
I took a few minutes and did my file up how I would to print it so I could show you guys how tightly you can pack the pieces in together. All in all I got this file down to 19 pages, which I'm happy with.
Tip 8. Tabs can overlap.
I actually found this out by accident one day. When I was cutting my peps by hand, I would overlap the tabs and the pieces because I knew the pieces were the important part. IF YOU ARE USING A CUTTER(Silhouette, Cricut) THIS IS IMPORTANT! Only the tabs can overlap. The cutter software does not know the difference in importance between the pieces and the tabs. So when you're lining up you pieces keep an eye on this. Saves you a lot of heartache in the future. If you are cutting by hand, you can put about half the tab under another piece as long as you can remember not to cut the whole tab, because when you print it, it prints all the lines.
So, since I plan to use this file in my next tutorial with my cutter, you can see that I was careful to only let my tabs overlap. For first timers, I recommend no overlap. It allows for more errors. If you have wielded a hot glue gun before and you know your way around an exacto knife, you should be fine using an overlap.
Finishing Touches
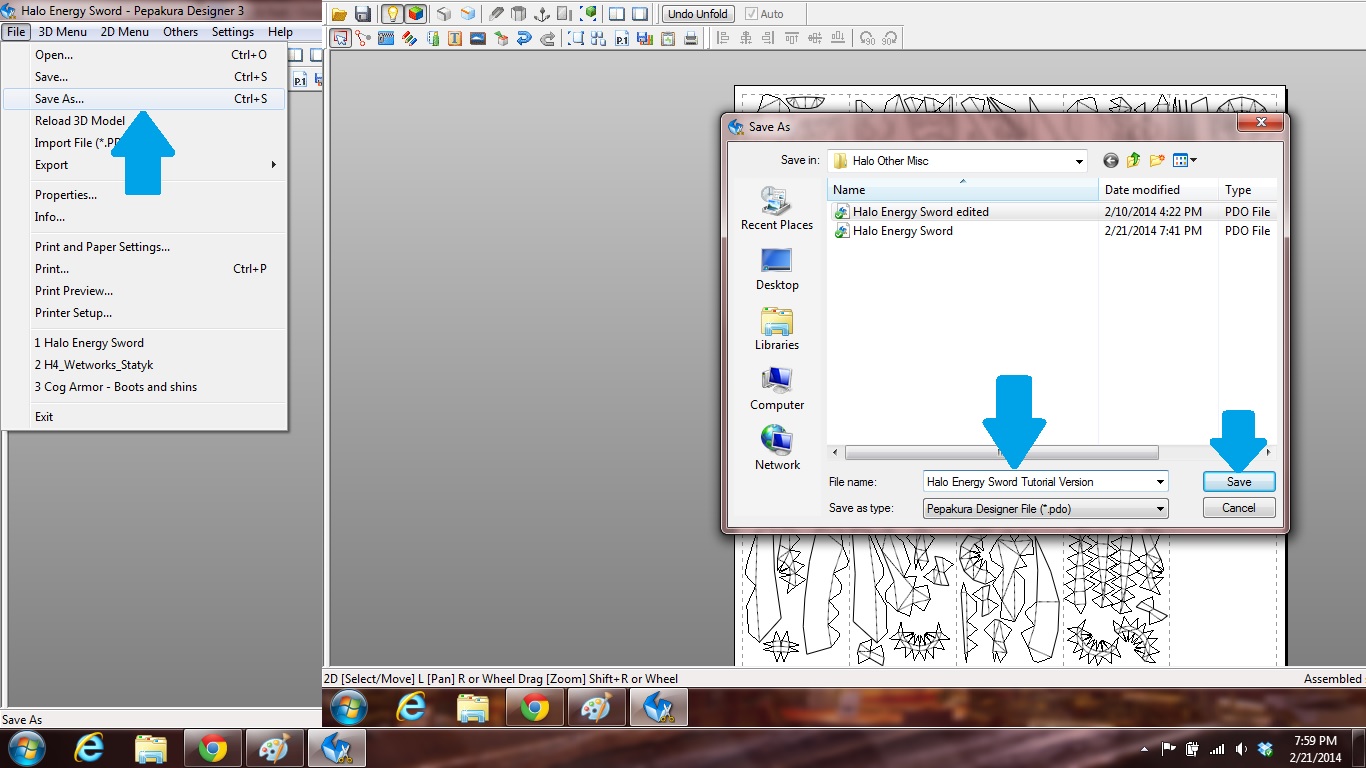
I always like to save my files under a new name, so I go to the Save As, under the Edit menu. This opens up a Save window. Rename your file, something with the original name and either the date or edited or what project or person it's for. That will always keep your originally downloaded file untouched if you need to go back to it for reference or to start a new project.
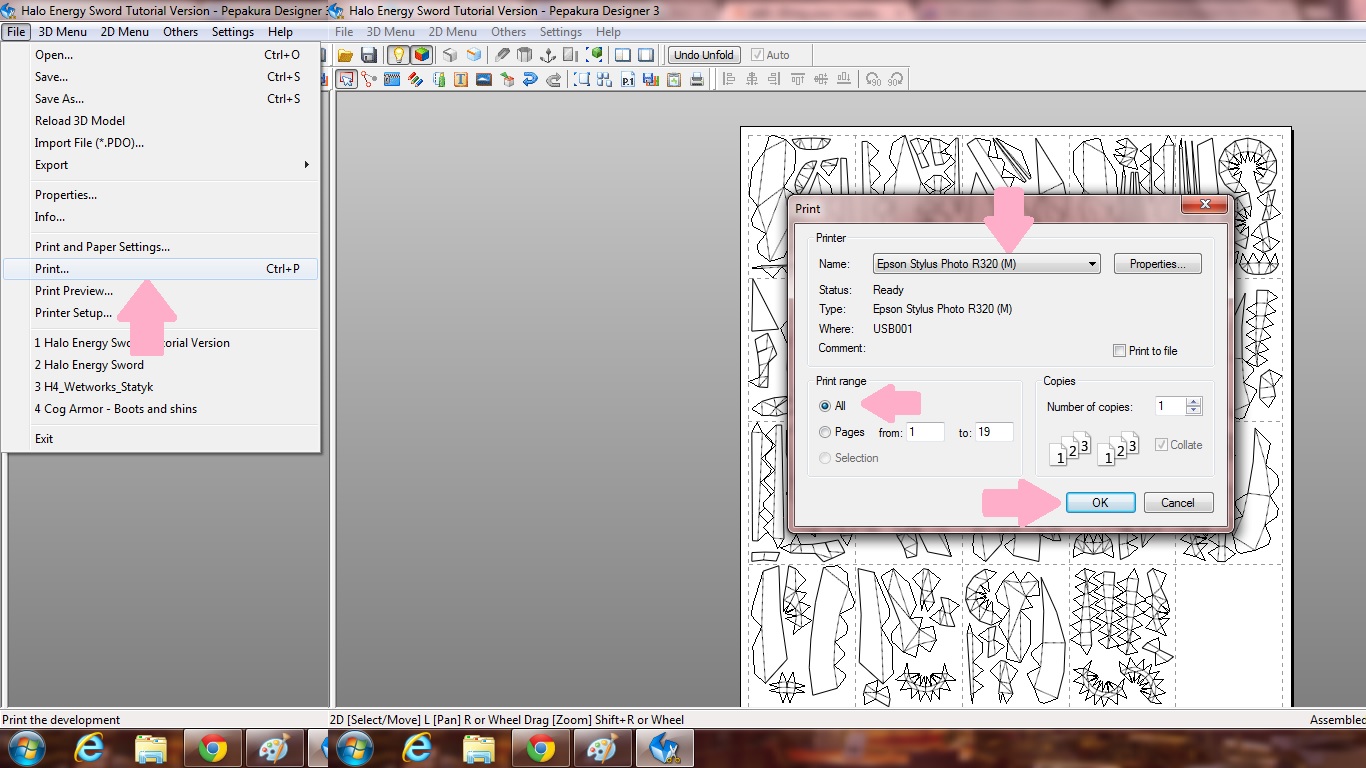
To print, grab some cardstock, whatever your local Walmart-esq place carries is fine. Make sure you printer is hooked up and the drivers are up to date. The under the Edit menu, click print. Double check you have the right printer and the pages are selected, whether you're printing them all or just one you mess up. Click OK and you're off!
This tutorial gets you to the printing stage for hand cut out pieces. I'll be adding some more tutorials, hopefully within the next week about using Viewer for Silhouette and how to assemble your piece.
Thanks for looking through this. I promise I don't know everything about this stuff, but if you have a question, please feel absolutely free to leave it in the comments below or message me. I will do my absolute best to help you. Also, if you know of something that I don't cover that you think is good for people to know, leave it in the comments! This place is about sharing knowledge! If you learned anything or enjoyed it, please go vote for me in the Makerlympics, the Papercraft, and Game Life contests.
Much love Minions!
Sunshine