Borderless Envelope Printing: Photoshop & Canon (possibly Others) Inkjet Printer Without Smudging
by adntigger710 in Craft > Cards
20272 Views, 4 Favorites, 0 Comments
Borderless Envelope Printing: Photoshop & Canon (possibly Others) Inkjet Printer Without Smudging
This is how I was able to get borderless printing on an envelope using Photoshop and a Canon Pixma inkjet printer without smudging. You may be able to use other graphic design software, such as Illustrator etc, as well, and I believe many other Canon printers have the settings necessary for the task. If you have a different kind of printer, look at the settings I've got here and see if your printer offers settings like it.
Note: I can't confirm if this will work with ALL the edges borderless, as I only needed one. But if you get the placement right in step 6 I imagine it would work.
Note: I can't confirm if this will work with ALL the edges borderless, as I only needed one. But if you get the placement right in step 6 I imagine it would work.
Go to Print in Photoshop, Then Print Settings
Create your design in photoshop on the exact canvas size as your envelope in landscape, so you can see visually how you want it to look printed out and to be sure it will actually print that size.
Design tip:
If printing on the back as well (as I was), Make sure there isn't any artwork along where the edges of the envelope flap will be. I can't confirm if it will smudge or not, so better safe than sorry if you can help it. When I did this, I just stuck an envelope to my screen and zoomed to the exact proportions in photoshop (I actually had to input the actual numbers, in the very bottom left corner you can see and edit the zoom proportions...mine was 44.3%) From here I used the rectangular marquee tool and traced along the bottom of the envelope flap then brought the mouse to the top of the canvas and let go of the mouse button. This left me with a rectangle that represented the top of the envelope to the bottom of the flap. I made a new layer via copy out of it, brought it to front, and then filled it with a color, and would tun it on and off as I moved the elements of my envelope to make sure nothing was too close to or crossing the threshold. Be mindful, though, of the left and right diagonal edges as well, if your envelope flap is die cut and doesn't go all the way to the edge. You can tweak if necessary during test prints. You may even be able to find templates that show this edge online, I don't know. Sorry for no pics and if it's not descriptive enough, but I wasn't planning on writing a photoshop tutorial =)
On to the printing:
When you first go to print in photoshop, select Print settings on the right-hand side.
Choose Print Settings Etc
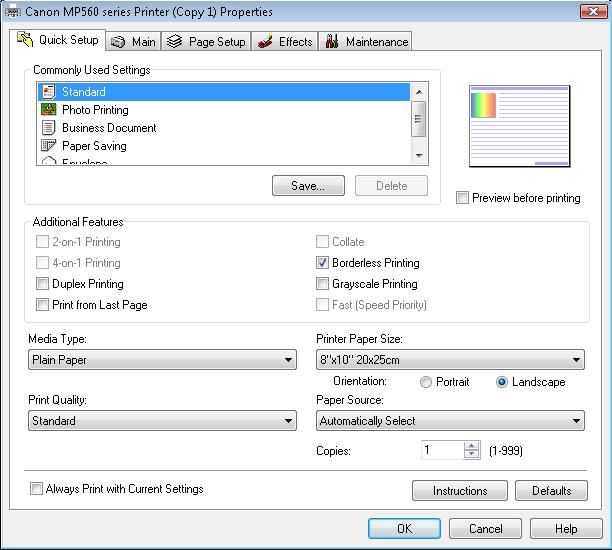
As you may have already noticed (since you're reading this tutorial) if you select "envelope", it won't let you print borderless. I went through a ton of setting combinations until I got to these settings, but if you want to try and play around on your own and find other combinations let us know =)
You may have two options here. The first is:
Standard settings, plain paper, standard print quality (paper size and source will be addressed later).
Make sure you check off "borderless printing". When you do, you will get a pop-up advising about the paper you are printing on. Choose plain paper.
Your second option is:
Photo printing, matte photo paper, high print quality. (don't forget to choose borderless printing here too). This setting will use more ink, causing a higher saturation and more possibility to smudge. It will also take much longer, but the print quality is deeper darker printing. It looks good, but may smudge. Mine didn't but I didn't care that much to waste even more ink and take 3 times as long (I was printing 80 envelopes front and back). If it does smudge, go back to the regular settings above.
Printer Paper Size
This is a setting that all depends on the size and shape of the envelope you yourself are actually printing on. You may have noticed that you can actually set a custom size when you choose envelope settings, but can't choose borderless. Likewise, you can choose borderless with standard printing, but can't choose a custom paper size.
As you can see I chose 8x10. This was because I was printing on a 6x9 envelope. Choose the setting that matches closest to the proportions of your envelope, as long as its OVER the size of both proportions (I would not choose a 4x6 for a 6x9 envelope...I would have had to tweak other settings unnecessarily).
Right under this you will see "Orientation". You will see this a few places, but make sure "landscape" is checked here.
Go Into "page Setup"

Hit the "page setup" tab. Make sure you check "landscape" here as well. You should also see "borderless" selected under layout if you did the intial steps already. If not, check it.
What Made Them Smudgeless...
I finally had the layout perfect and it was printing borderlessly (if that's a word), but when I started to print on actual envelopes (more detail later on this) it kept smudging black ink mostly on or within 2" of the edges and along the envelope flap (when printing on the back). Here's the big step that made my artwork stop smudging.
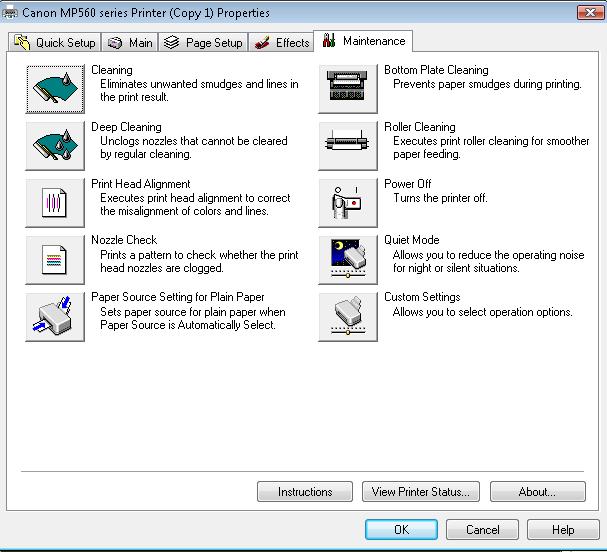
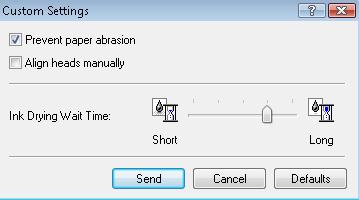
Hit the "Maintenance" tab. Click "Custom Settings"
Check "prevent paper abrasion". This makes the printer head back off a bit from the paper.
My smudges were coming from the printer head. But if you find they are coming from the next envelope landing on top because the ink hasn't dried, either remove each envelope as it prints, or move the ink drying time a bit to the right. Leave this as is at first until you see if this is the problem, as this adds to print time.
Click "send". You will get a popup asking to send to printer. Confirm this. When you actually go to print, you will get a popup advising this setting is on. Just hit ok.
NOTE: When you are done printing your envelopes, change these settings back to normal.
Play Around With the ACTUAL Print Section
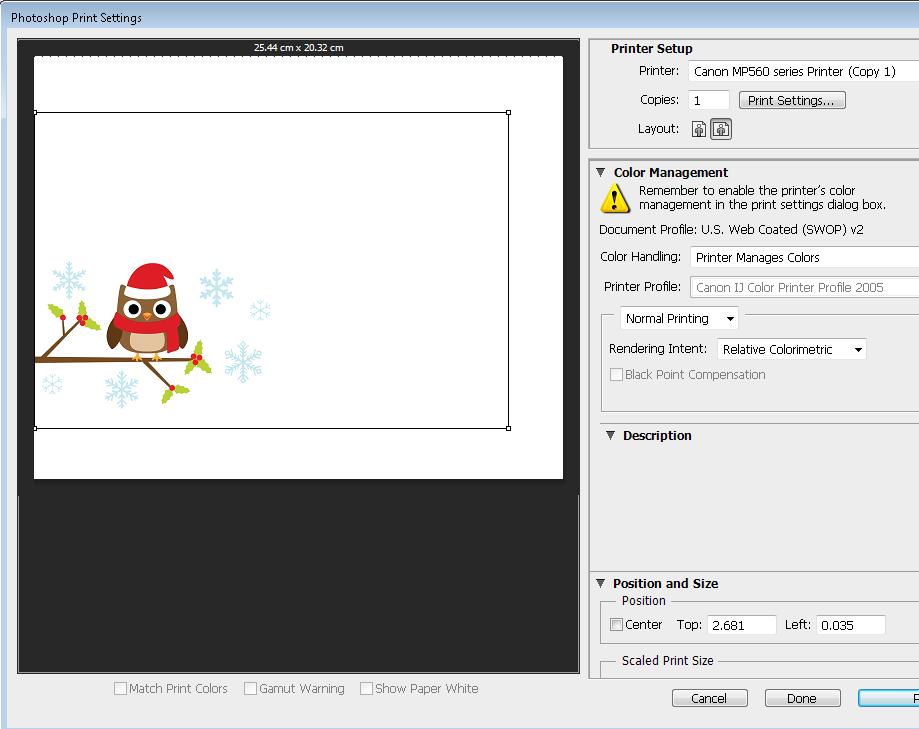
Hit "ok" to save these settings and get back to the photoshop print settings.
Note: I suggest doing this with the standard paper settings first so you dont waste ink and time, if you plan on printing with the photo settings.
On the right side under printer setup you see Layout. Make sure this is set to landscape. This allows you to feed through the back of your printer, front of the envelope facing you, inserting the left edge in first. Otherwise it won't print in the right place.
Because you have a bigger paper size than your actual envelope set, this is where you have to play around a bit to get it just right.
First, in the box to the left, drag your artwork to the very edge, so that the left edge of the box JUST disappears (or whatever edge you're trying to print on).
The next part is the trickest of the tutorial, and requires just a little thinking. I was able to center my image, because the height of my envelope was 6 and the height of my paper was 8, even numbers and easy math. So in the picture you see that when printing it is "leaving" 1 inch margins blank (since theres no paper actually there anyway). Play around with your placement with the quicker standard print settings I described before until you have your placement the way you want it.
In order to save envelopes, when I was tweaking this specific setting I had cut pieces of paper out to the exact size of my envelope, 6x9. This is fine and dandy for testing, but when printing the actual envelopes, that's when I ran into the smudging.
You're Ready to Print!
Make sure to hit ok to confirm these settings and get out of the printer settings. You're back to photoshop print settings. Confirm, again, that you have the correct landscape layout.
My paper loads through the rear as described previously with the settings I already had. If yours is pulling from the tray, make sure you change that as well under "paper source" in the "quick setup" tab of the printer settings.
My paper loads through the rear as described previously with the settings I already had. If yours is pulling from the tray, make sure you change that as well under "paper source" in the "quick setup" tab of the printer settings.
You Should Now Have Smudgeless, Borderless Prints
Here's some shots of before and after. The difference between the 2nd and 3rd photo is the difference I got between standard and photo print settings (difference in size is just from how I cropped the scan of the envelopes). Notice the deeper colors (even though the scanner scanned them way too bright you can still tell the difference here). It wasn't noticeable enough to bother me and not worth the extra time and ink, but maybe you'll love how it looks!
Hope this helped...I decided to write this since I spent days researching and trying to get this just right. Hopefully this will save at least one person that much time and effort.
Hope this helped...I decided to write this since I spent days researching and trying to get this just right. Hopefully this will save at least one person that much time and effort.