Bookmarks and Anchors With the Instructables Editor
by AaronHaras in Design > Websites
1355 Views, 4 Favorites, 0 Comments
Bookmarks and Anchors With the Instructables Editor


Tired of scrolling up and down giant long Instructables? Wouldn't it be satisfying to jump directly to any step you want? And jump Back To Top?
I will show you how to build navigation into your next Instructable with just one step. Ok, Ok, one step is not enough to demonstrate bookmarks in action. To show you how " to fix " your next Instructable, I will just have to stretch this out to 6 steps... or you could go directly to the solution in step 4 or jump to the Table of Contents. ( wink wink, cool eh?)
Quest: Show how to create hyperlinks to each of your steps.
Bonus: Replicate a footer link that can navigate to multiple locations.
.
Although the Instructable's Content Editor has some mechanisms for creating and managing links, there are a few.. well, glitches, and minimal documentation about Bookmarks or navigation! I can fix that.!
Ok, this might seem a little sassy, because the Editor is not actually broken. ;o)
Enjoy Navigating through my Instructable.
Table of Contents, (aka List of Steps)
First I created all the steps of my Instructable. Then I list all the steps out into a Table of Contents. After that, I made a Link (hyperlink) to the Anchor(Bookmark) for each of my steps ( step1, step2, etc ).
Introduction - the previous step - Link to Top of Page
Step 1 - TOC. You are here.
Step 2 - Overview and Glossary - Link to Step 2.
Step 3 - The Glitches - Step 3
Step 4 - The Solution - Link to Step 4
Step 5 - Bonus - Footer Replication - Link to Step 5
Step 6 - Final Words.
.
Overview and Glossary
You really only need to know 3 things;
- Each step is automatically given a unique ID ( this step's ID is "step2" ).
- How to create a link to an ID. ( Similar to regular Hyperlinks ).
- The Links only work after the project is Published and goes Live.
Note: You are able to edit your Instructable after it is published
Link (or Hyperlink) - A Link is a pointer to another document or a location in the current document. Clicking a Link will navigate the user to that location.
Hint: Mouse over a link, and you will see the Link's address in the bottom left corner of your browser.
Bookmark / Anchor - A Bookmark in HTML typically refers to a specific location in a document. Essentially it is a local hyperlink. The Anchor(bookmark), is the place the Hyperlink points to. In the Instructables Editor, the Bookmark is is referred to as an Anchor. For example; the ID of the Anchor for this section is "step2".
Anchor Tag - Links are implemented in HTML using the Anchor Tag and it's attribute "href".
For example: This link --> My Other Project, is shown below in HTML. The clickable text is the area between the anchor's start and end tag (My Other Project). The "href" attribute of the Anchor tag indicates where to navigate when mouse is clicked on the text.
<a href="https://www.instructables.com/Gandalfs-Magic-Staff/">My Other Project</a>
Here is a link to some HTML Basics
.
-- Back To Top -- Table of Contents -- Comments --
The Glitches
The Glitches
- The Editor might remove un-recognizable HTML. ( I'm being polite. It will remove it.)
- You can only navigate your bookmarks in the Published, live version of instructable.
About the Instructable's Editor
When you press the publish button for your Instructable, the Editor generates an HTML webpage for your project. It assembles all your images, text, links and steps magically into one big html document. Fantastic!
Furthermore, the Instructable's Editor allows us to view and edit the HTML for our Content.
That's Super Cool. But.... while current HTML lore says we can assign an ID to an HTML Element and create a Link to that element. The Instructables Editor has some other ideas (aka the glitches).
Below is an sample of some valid html;
- Assign an id of "S4" to an HTML Element (h2 in this case).
<h2 id="S4">Step 4</h2>
- Reference the ID using the Anchor tag and href attribute.
<p><a href="#S4">Jump to Step 4 </a> </p>
Note: The # symbol indicates to the browser that the link is a local Bookmark.
Here is where the Glitch happens.
This is not really a glitch, just how the Instructables' rendering engine handles things. When the engine generates the final webpage, the ID created above for h2 is removed. Dang.
<h2>Step 4</h2>
Likely this is because you can't just let any old hack, (like me), insert rogue HTML into the system. But, I have found a solution, ha ha ha hah ahahahahahah....
.
-- Back To Top -- Table of Contents -- Comments --
The Solution

There are only 3 things you need to know in order to create links to your steps.
1) Naming Conventions for the Instructables Editor.
When the Instructables' Editor generates the html for your webpage, it uses a specific naming sequence. Each step is broken into sections and given a unique ID.
These are the IDs of the main sections of Instructables. (refer to these in your links)
- intro - The Introduction and supplies section.
- step1 - I tend to put my Table of Contents here, but it could be in the intro.
- step2 - the IDs are case sensitive.
- step3 - IDs have no spaces and no capitals.
- step4 - <-- your probably getting the picture.
- step5 ..... and so on,... for each step you create.
- comments - Once comments arrived, you can link to this section. *see Final words
2) How to Create a Link to each Step
- Place the curser where you want your link.
- Click the Link Button (looks like a chain, second from the right)
- Choose Insert Link
- Select Anchor button
- Type in the name of the step you want to navigate to. (see list above)
- Add or edit some descriptive text.
- Click the Insert button
3) You must Publish your Instructable to see Bookmarks in action.
- Links on how to Publish your Instructable
- You can Edit your Instructable once it has been Published.
Warning / Hint: Moving steps can break existing links. Best practice;
- Make your whole Instructable,
- then add the Table of Contents,
- then add the links.
- Publish,
- Test,
- Make edits if required.
.
-- Back To Top -- Table of Contents -- Comments --
Bonus Round - That Pesky Footer Link

There can be a fair amount of work to create a footer for each step in you Instructable. Especially if your like me, and make long epic Instructables. Then factor in multiple Hyperlinks for each step and that's a lot of linking... Fortunately, I worked out a simple hack that speeds this up. However, it does require a little HTML knowledge, which I hardly cover in the video.... cause you don't need to know a lot! (kidding) Wait, What?
Check out the video above to see it start to finish in 4 minutes.
Here are the steps
- Create an initial Navigation Footer (Same idea as Links to Steps)
- go to the step with your working footer.
- Click the HTML button
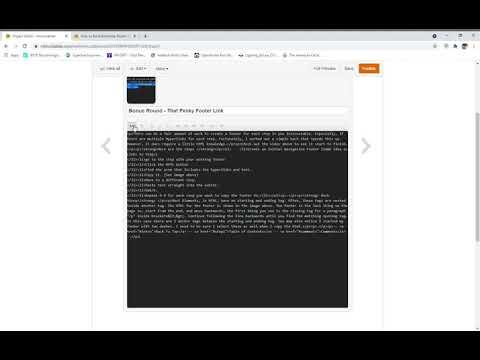
- Find the area that Includes the hyperlinks and text.
- Copy it. (See image above)
- Move to a different step.
- Paste text straight into the editor.
- Smirk.
- Repeat 6-8 for each step you want to copy the footer to.
.
Back Story
Most Elements, in HTML, have an starting and ending tag. Often, these tags are nested inside another tag. The HTML for the footer is shown in the image above. The footer is the last thing on the page so, starting from the end, and move backwards, the first thing you see is the closing tag for a paragraph "/p" inside brackets<>. Continue following the line backwards until you find the matching opening tag. In this case there are 3 anchor tags between the starting and ending tag. You may also notice I started my footer with two dashes. I need to be sure I select these as well when choosing the html to copy.
.
-- Back To Top -- Table of Contents -- Comments --
Final Words
A great big thanks to instructables for the supplying the perfect Contest topic! Fix It ! ha hahhahaha....I have been hoping for a contest to enter this Instructable into. I Fixed It !
But seriously, this could become the "most made Instructable" of all Time!
Is there a contest for that? If so, count me in!
Notes:
- Links only work Live - Did I say that before? When you are in the instructables' Editor, the various steps have not been generated yet. This means the ID's for each step do not exist. You need to Publish first.
- Everything about HTML - Click here..
- Comments link - The link will work AFTER there are some comments to go to. This is a rendering engine thing. Until someone adds a comment, the engine does not make the section.
- How Did I do It - I looked at the HTML for some various instructables, squinted my eyes, and looking from 20,000 feet, watched for patterns. Steps are grouped within an Element called "section", given an "ID" and named sequentially. Made a link to those. Seemed Logical Captain.
- If you use this - Please click the "I Made It" link below.
.
-- Back To Top -- Table of Contents -- Comments --