BluBerriSix - a TFT TouchScreen / Arduino Tutorial
by hausofpayne17 in Circuits > Arduino
13866 Views, 38 Favorites, 0 Comments
BluBerriSix - a TFT TouchScreen / Arduino Tutorial
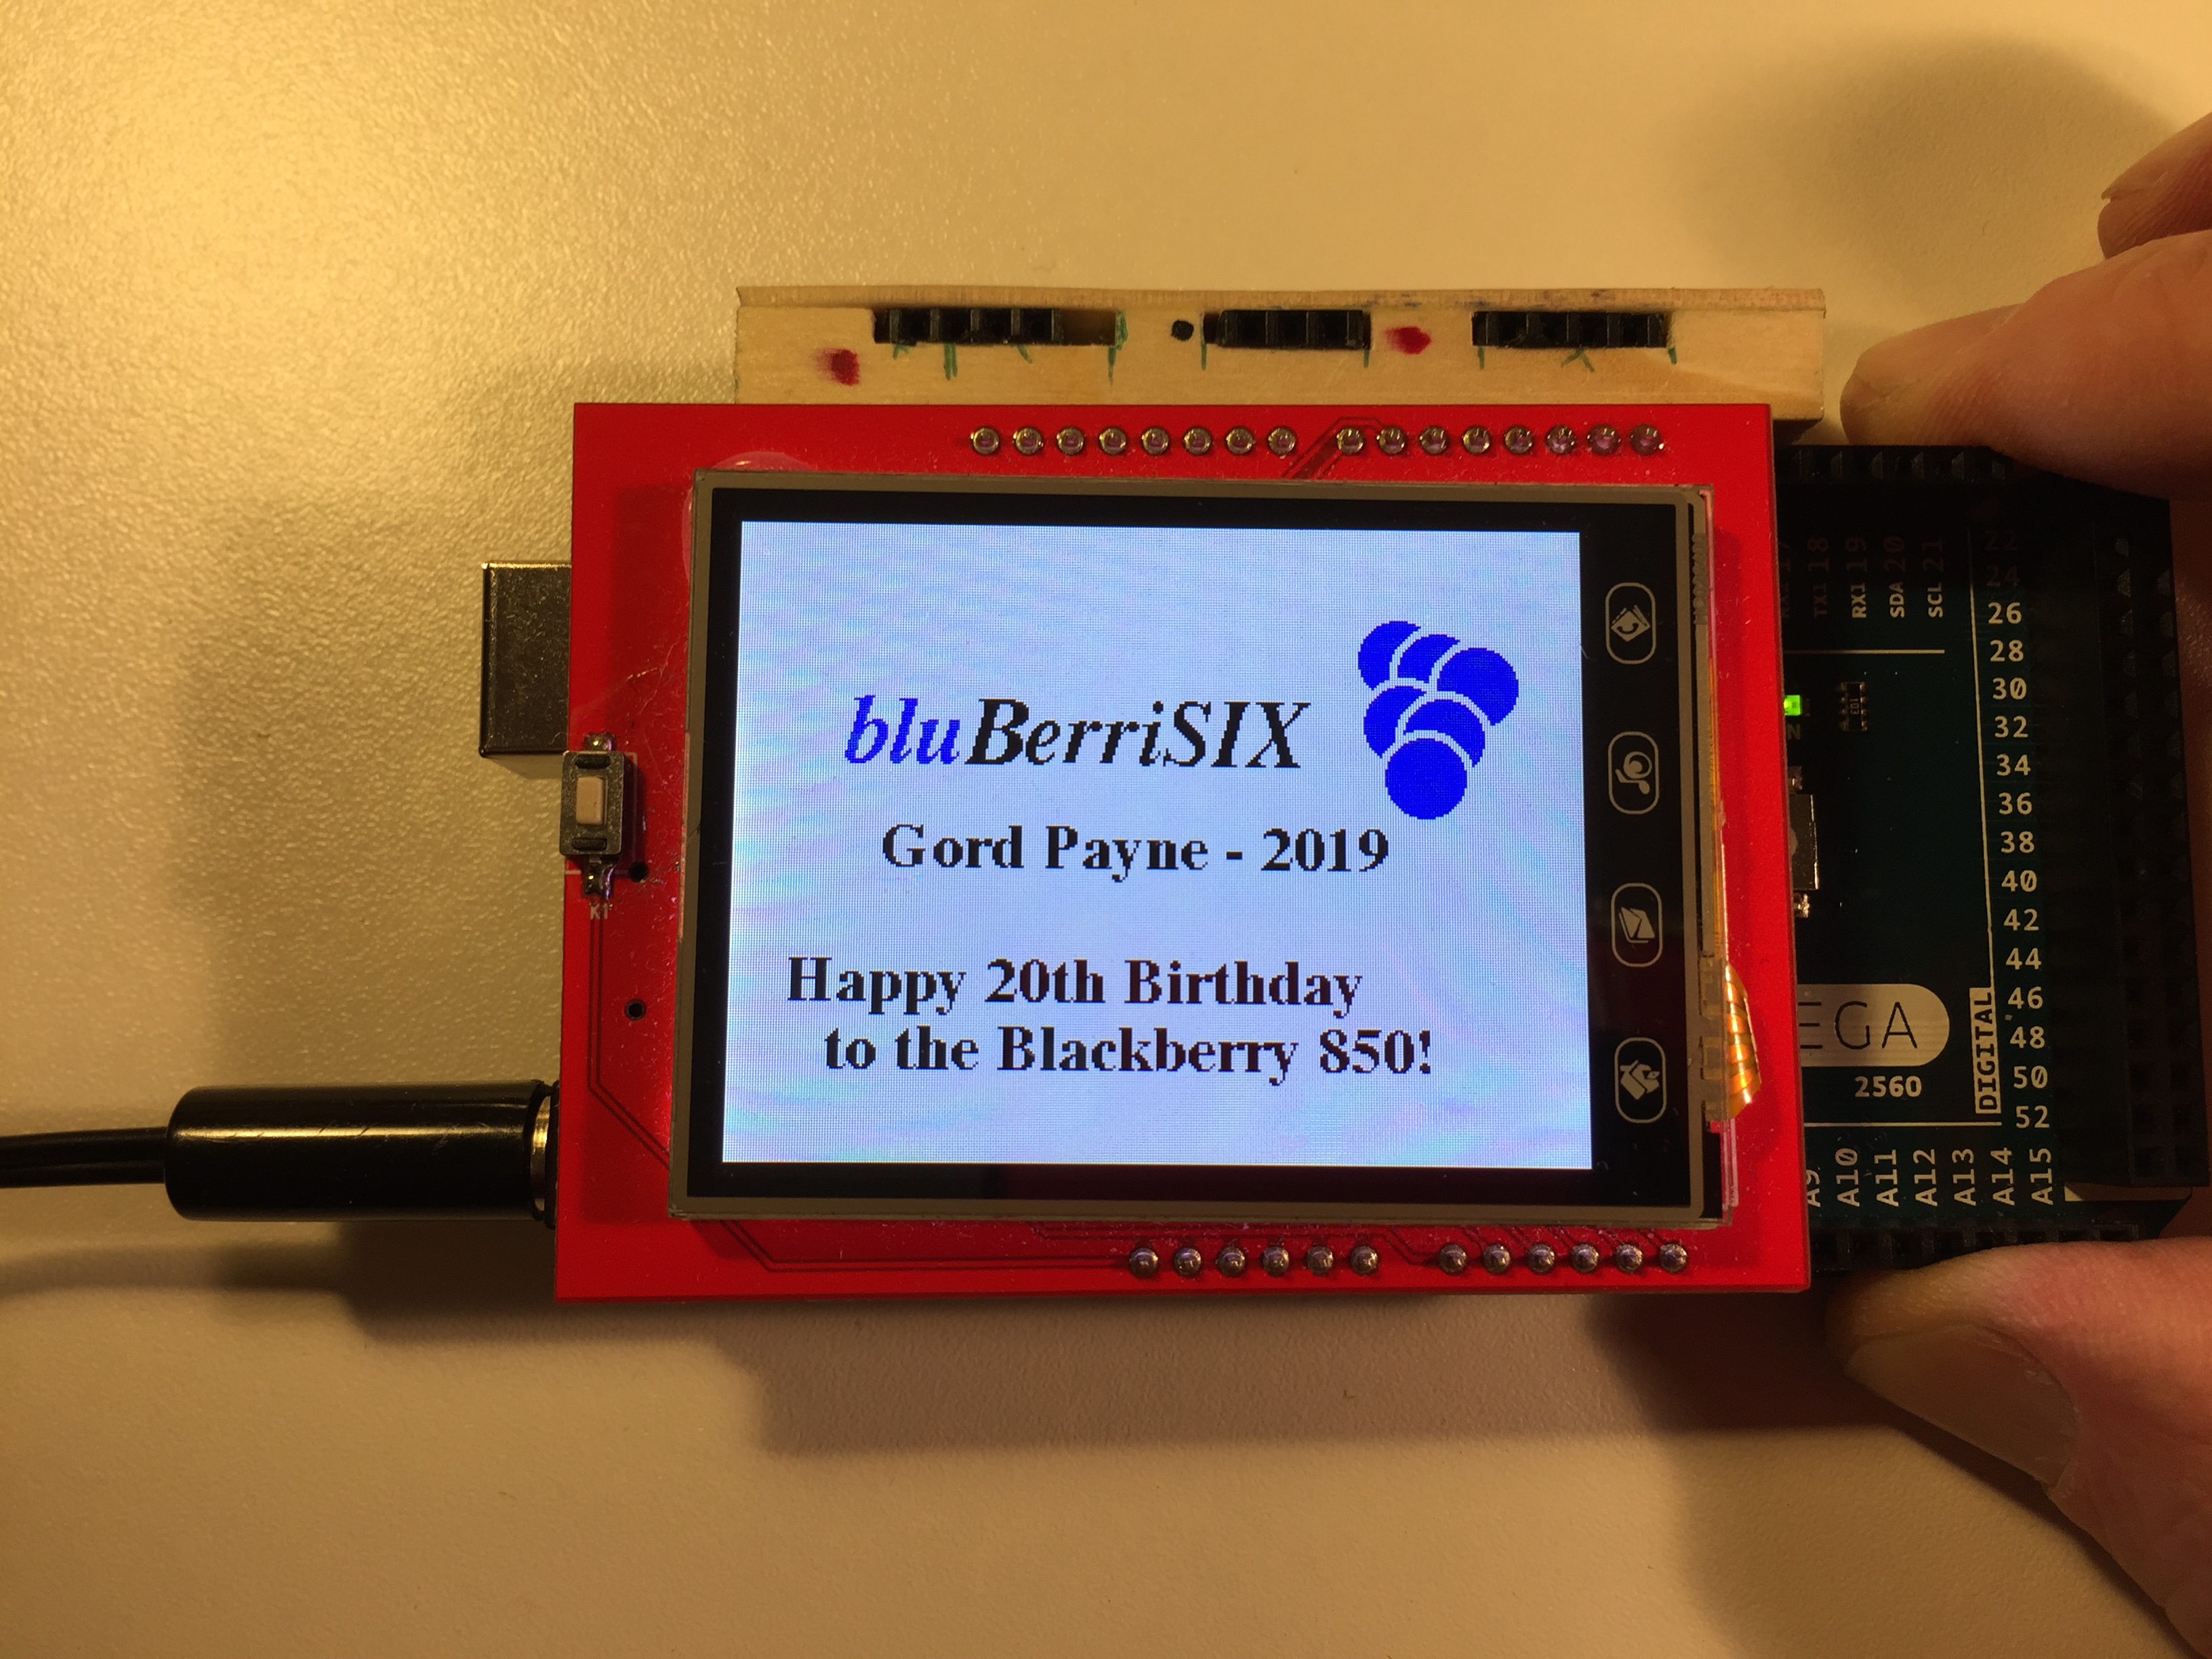
2019 is the 20th anniversary of the RIM Blackberry 850! This little Canadian invention changed the way the world communicates. It's long gone, but its legacy continues!
In this instructable, you'll learn how to use the MCUfriend.com 2.4" TFT display shield for the Uno/Mega. You'll learn how to display graphic objects and text and how to receive touches and act on the touch events. This screen is very similar to Adafruit and other TFT shields/screens. So if you're here, stick around for the show.
We'll build a simplified 2 app version of my bluBerriSIX sketch.
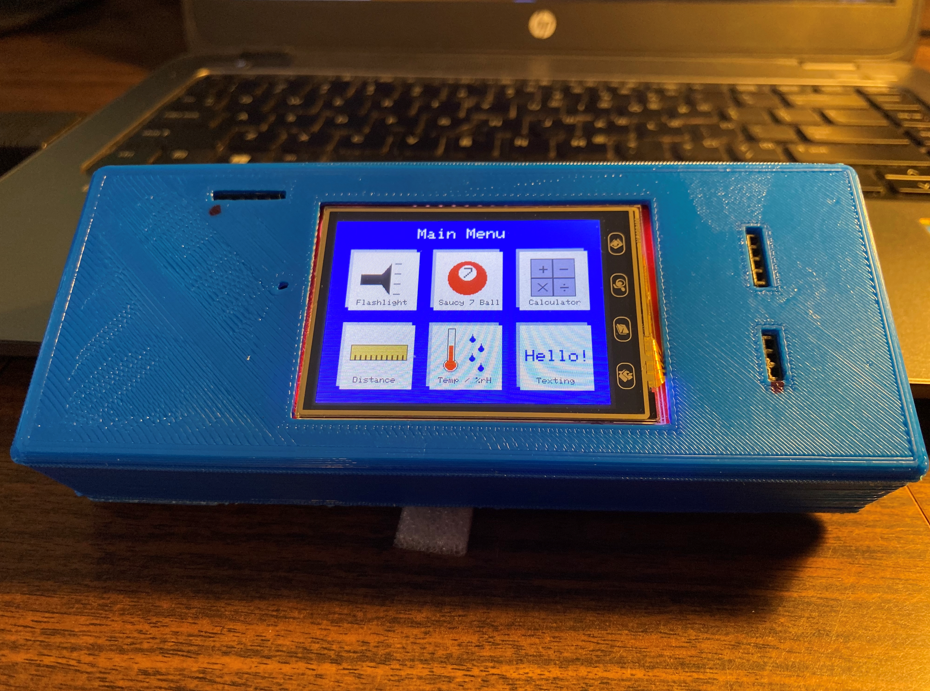
Check out my February 2022 Update section at the end where I show photos of 3D enclosures I designed for the units. They turned out very well.
Let's get started!
BluBerriSIX - Overview
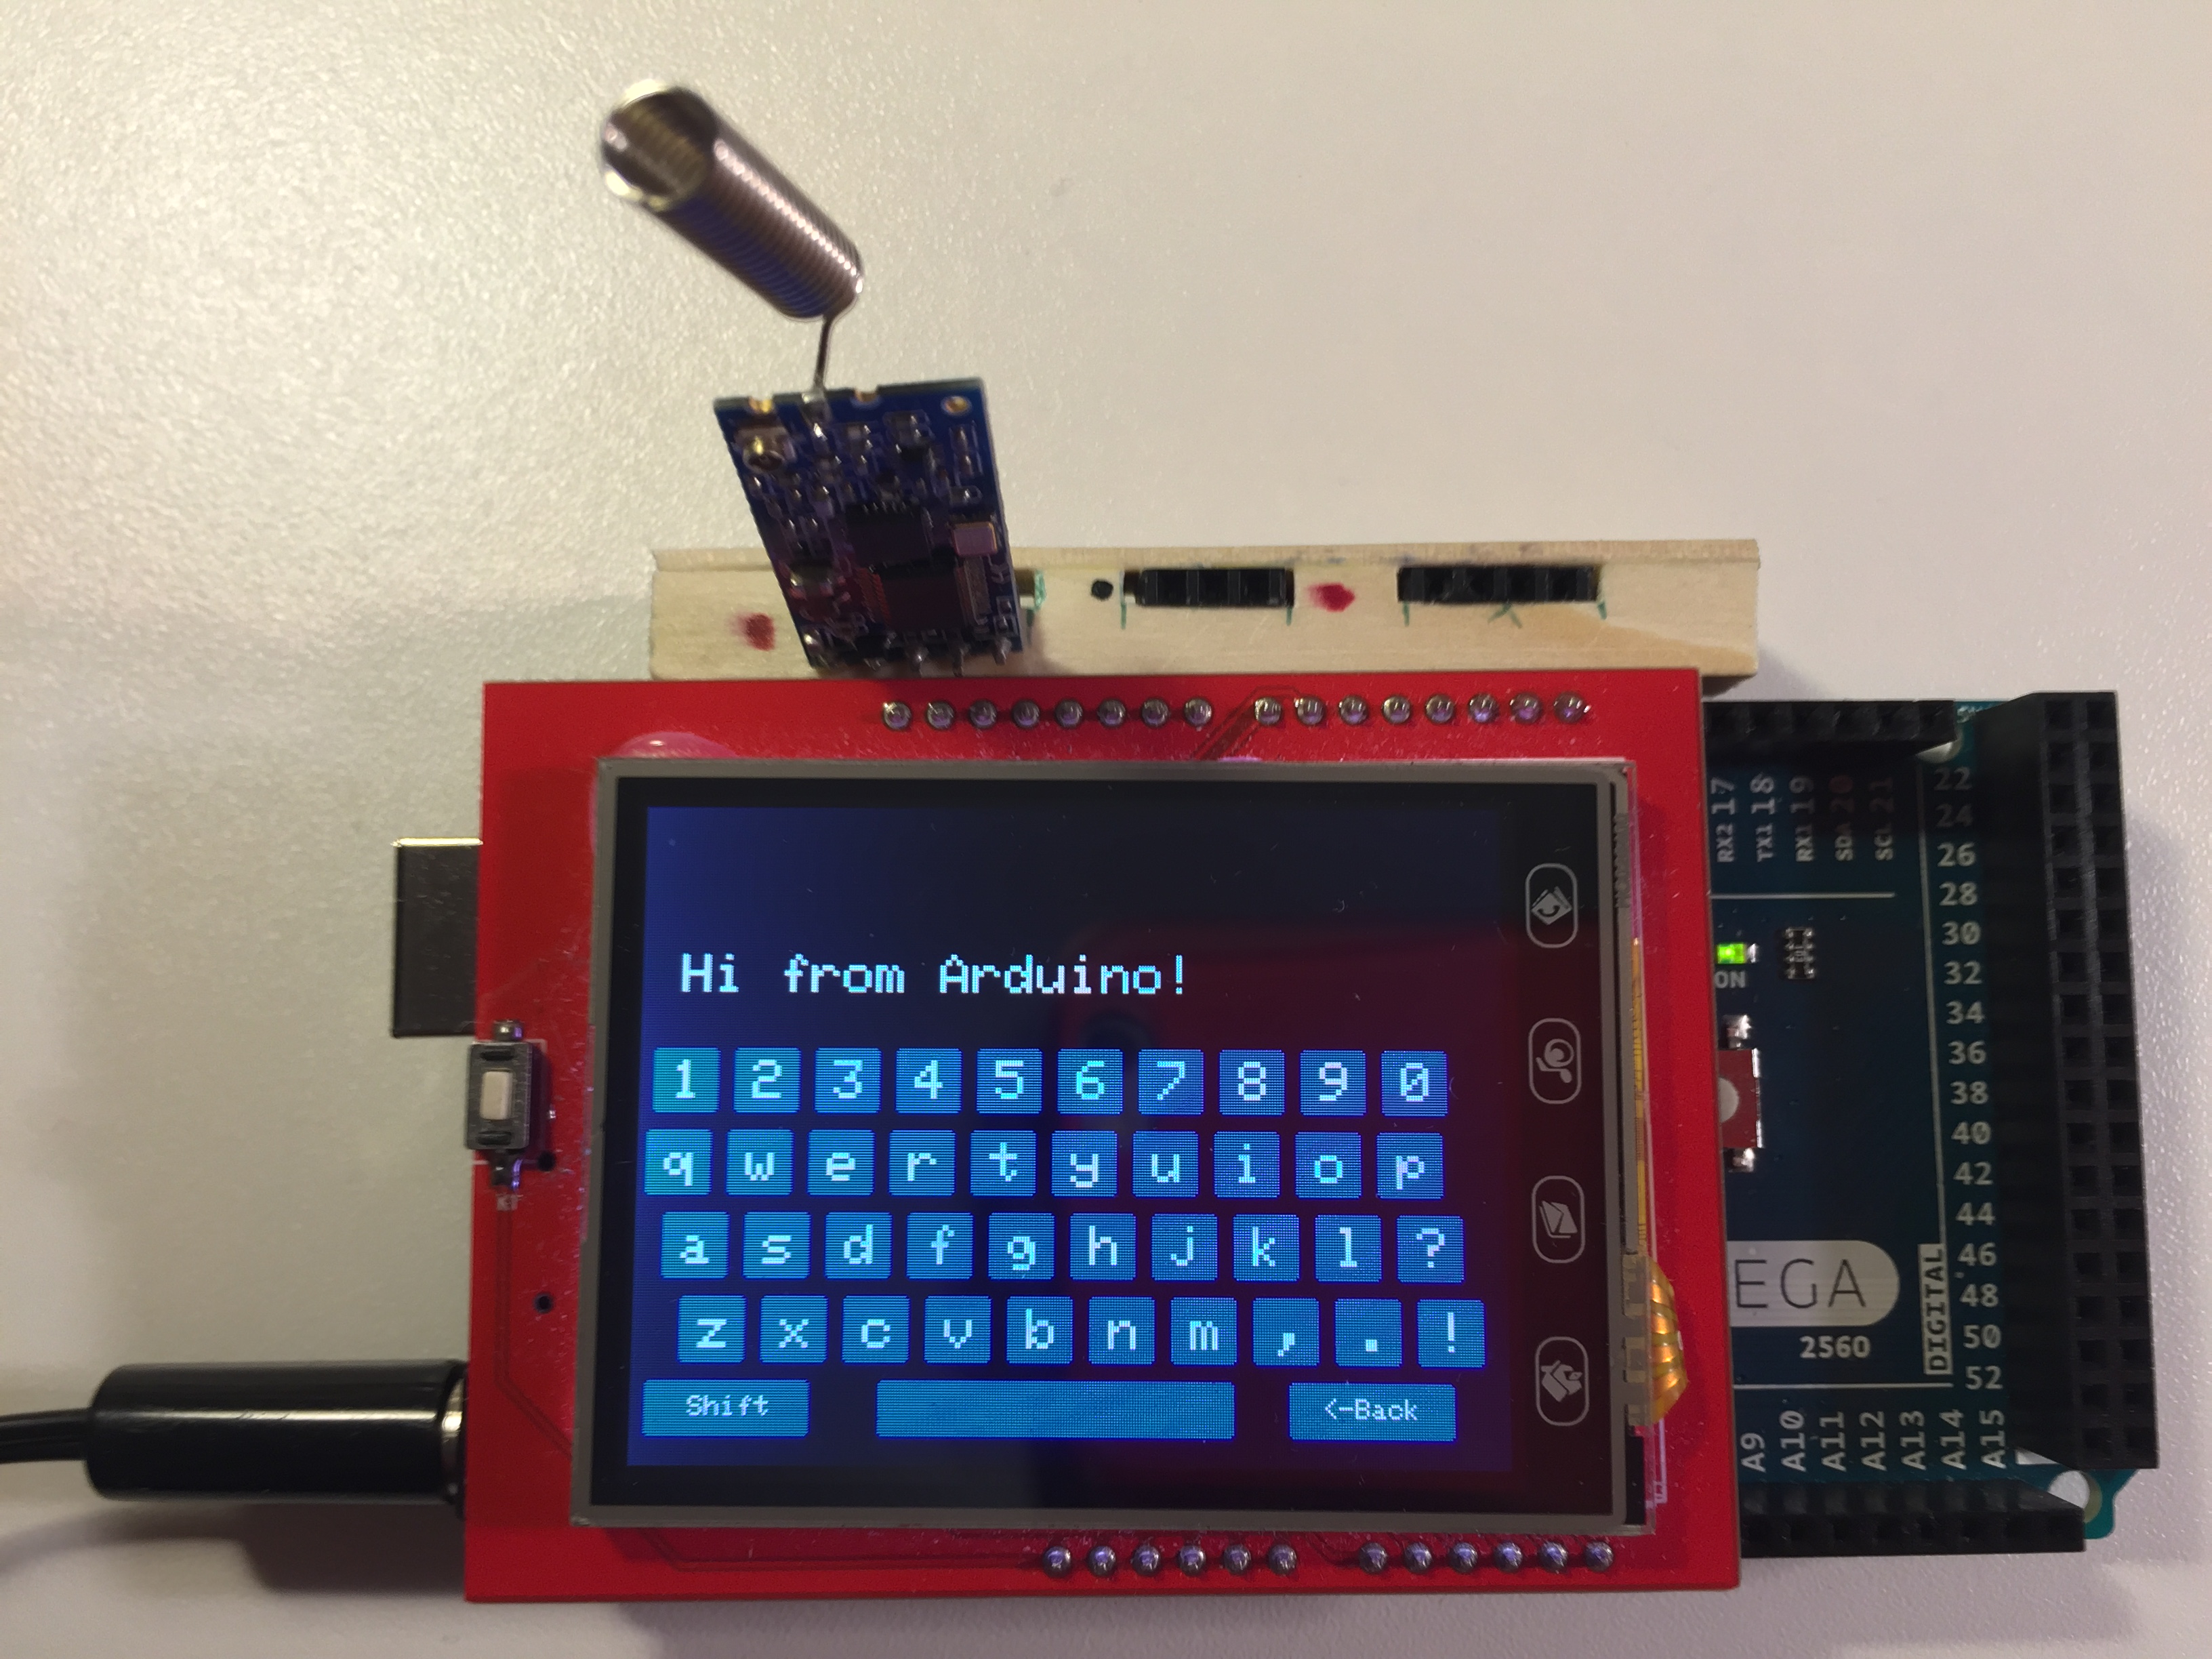
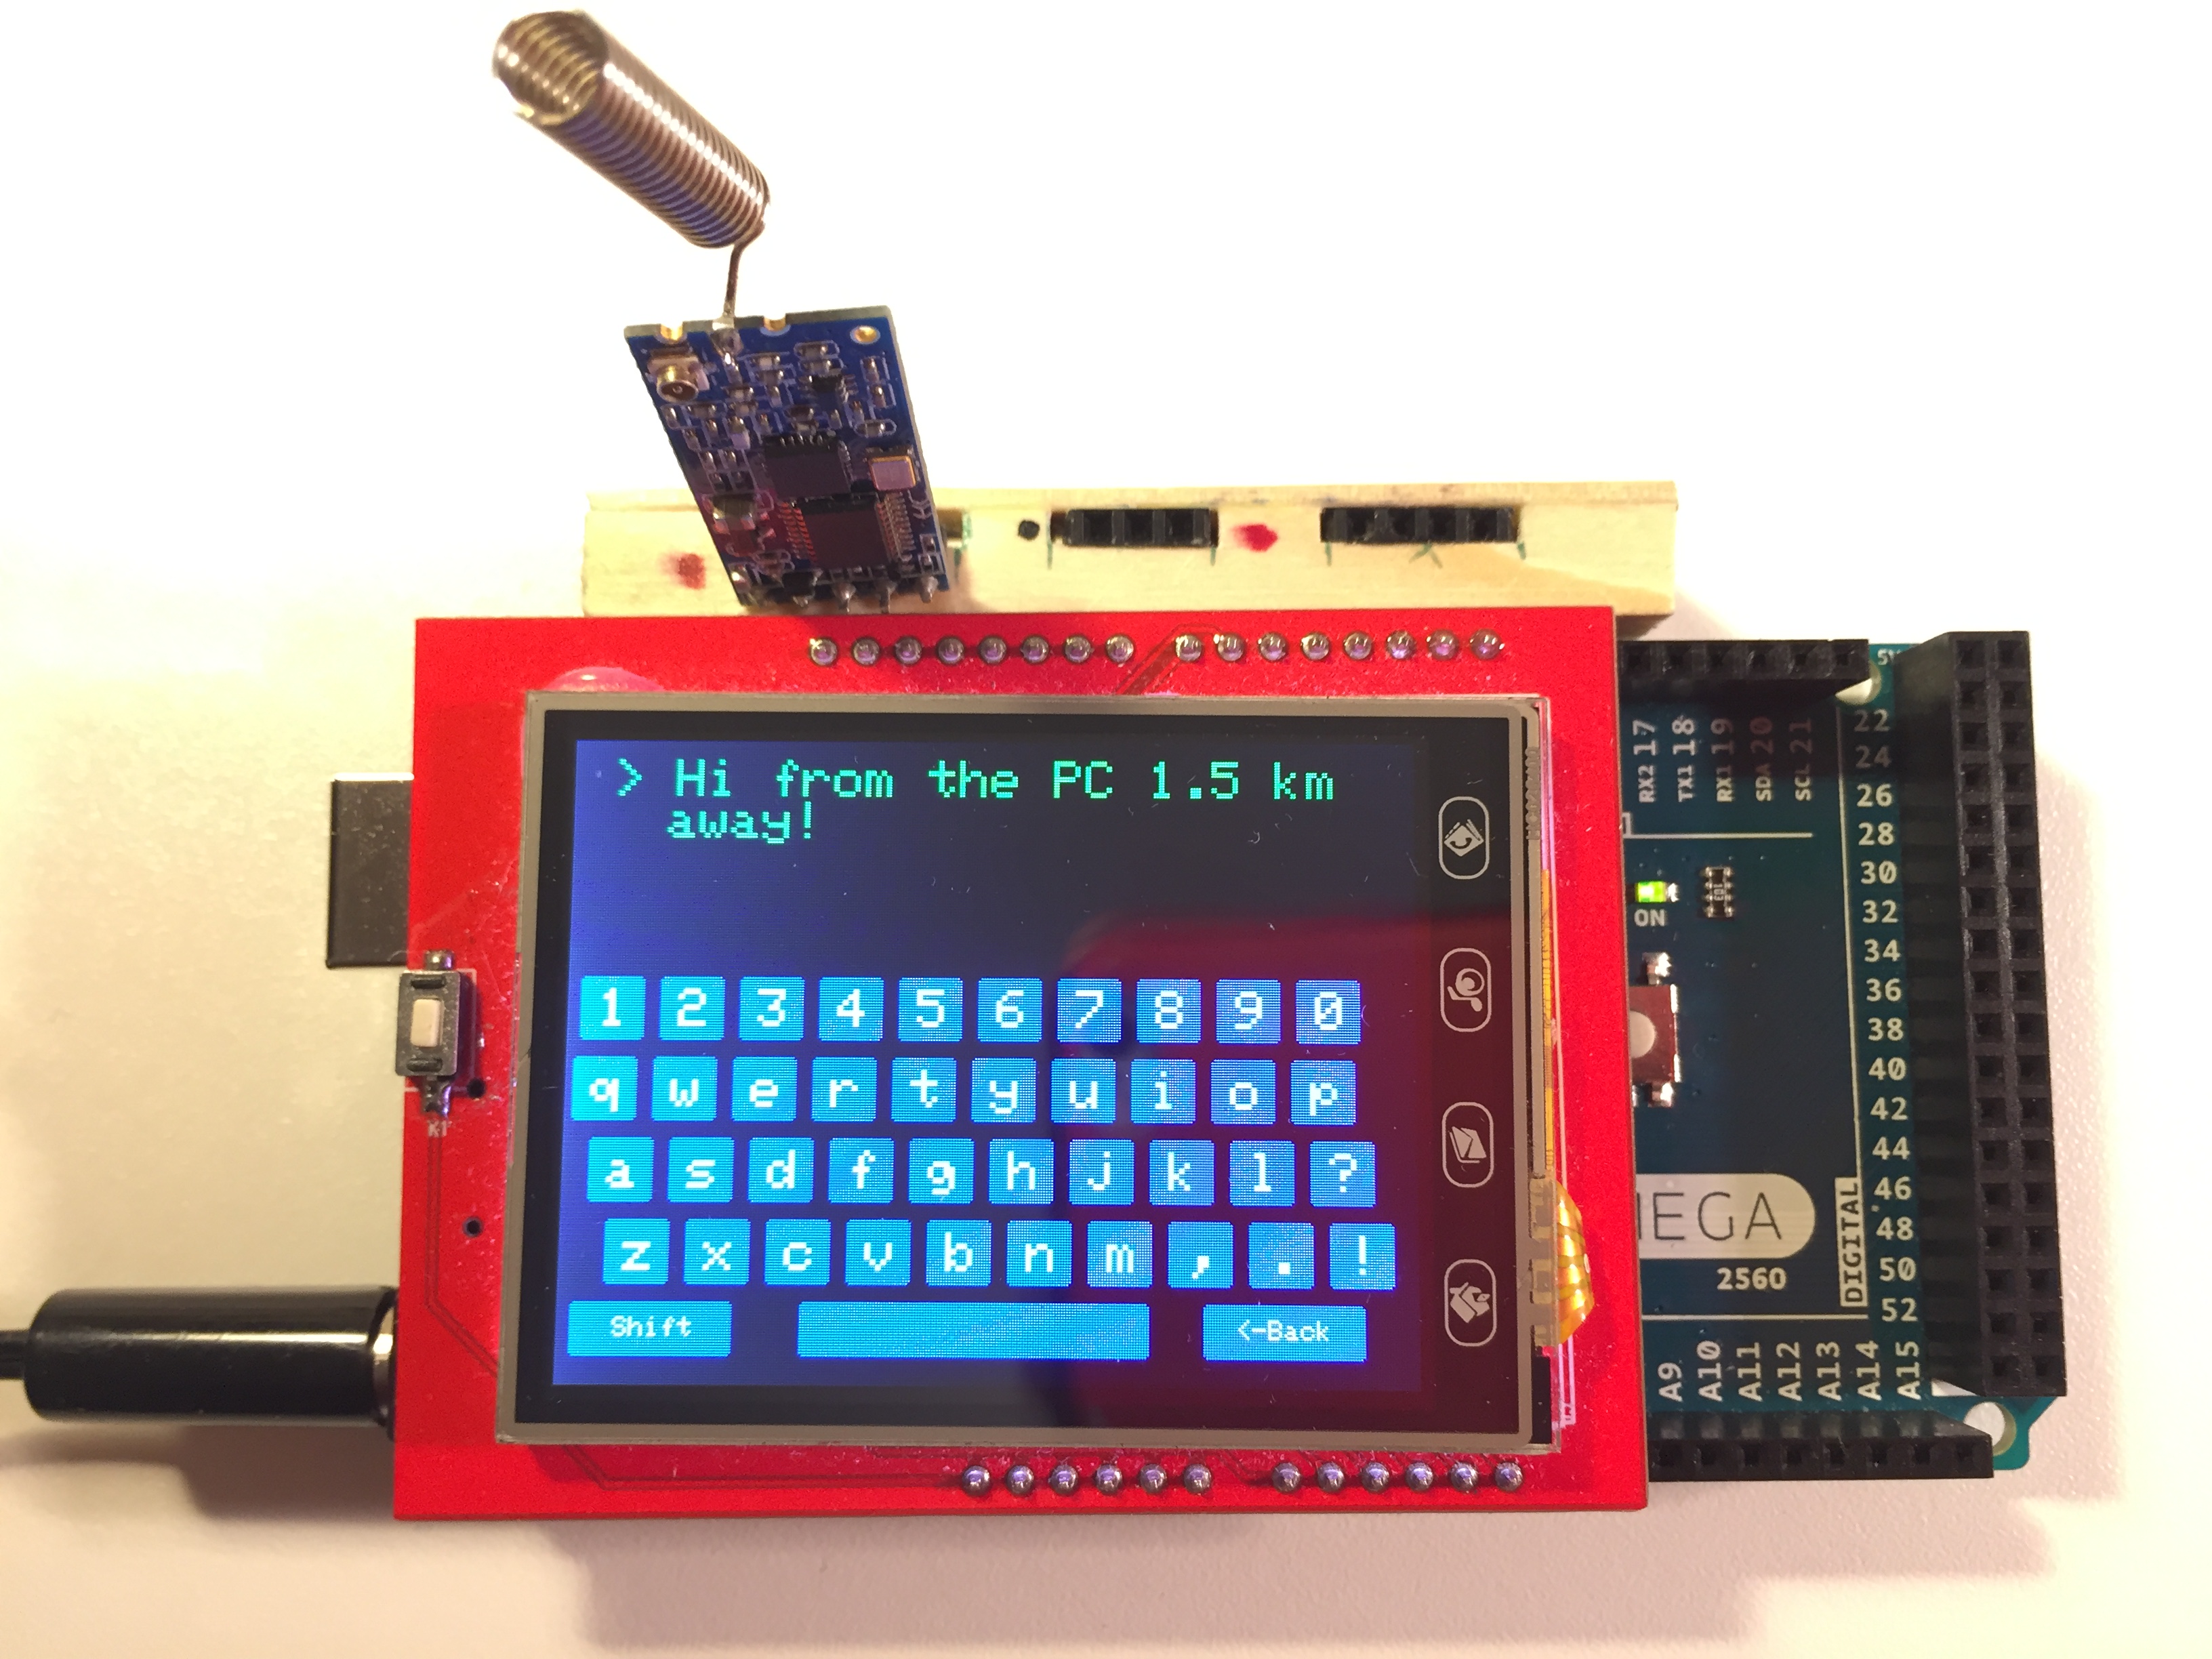
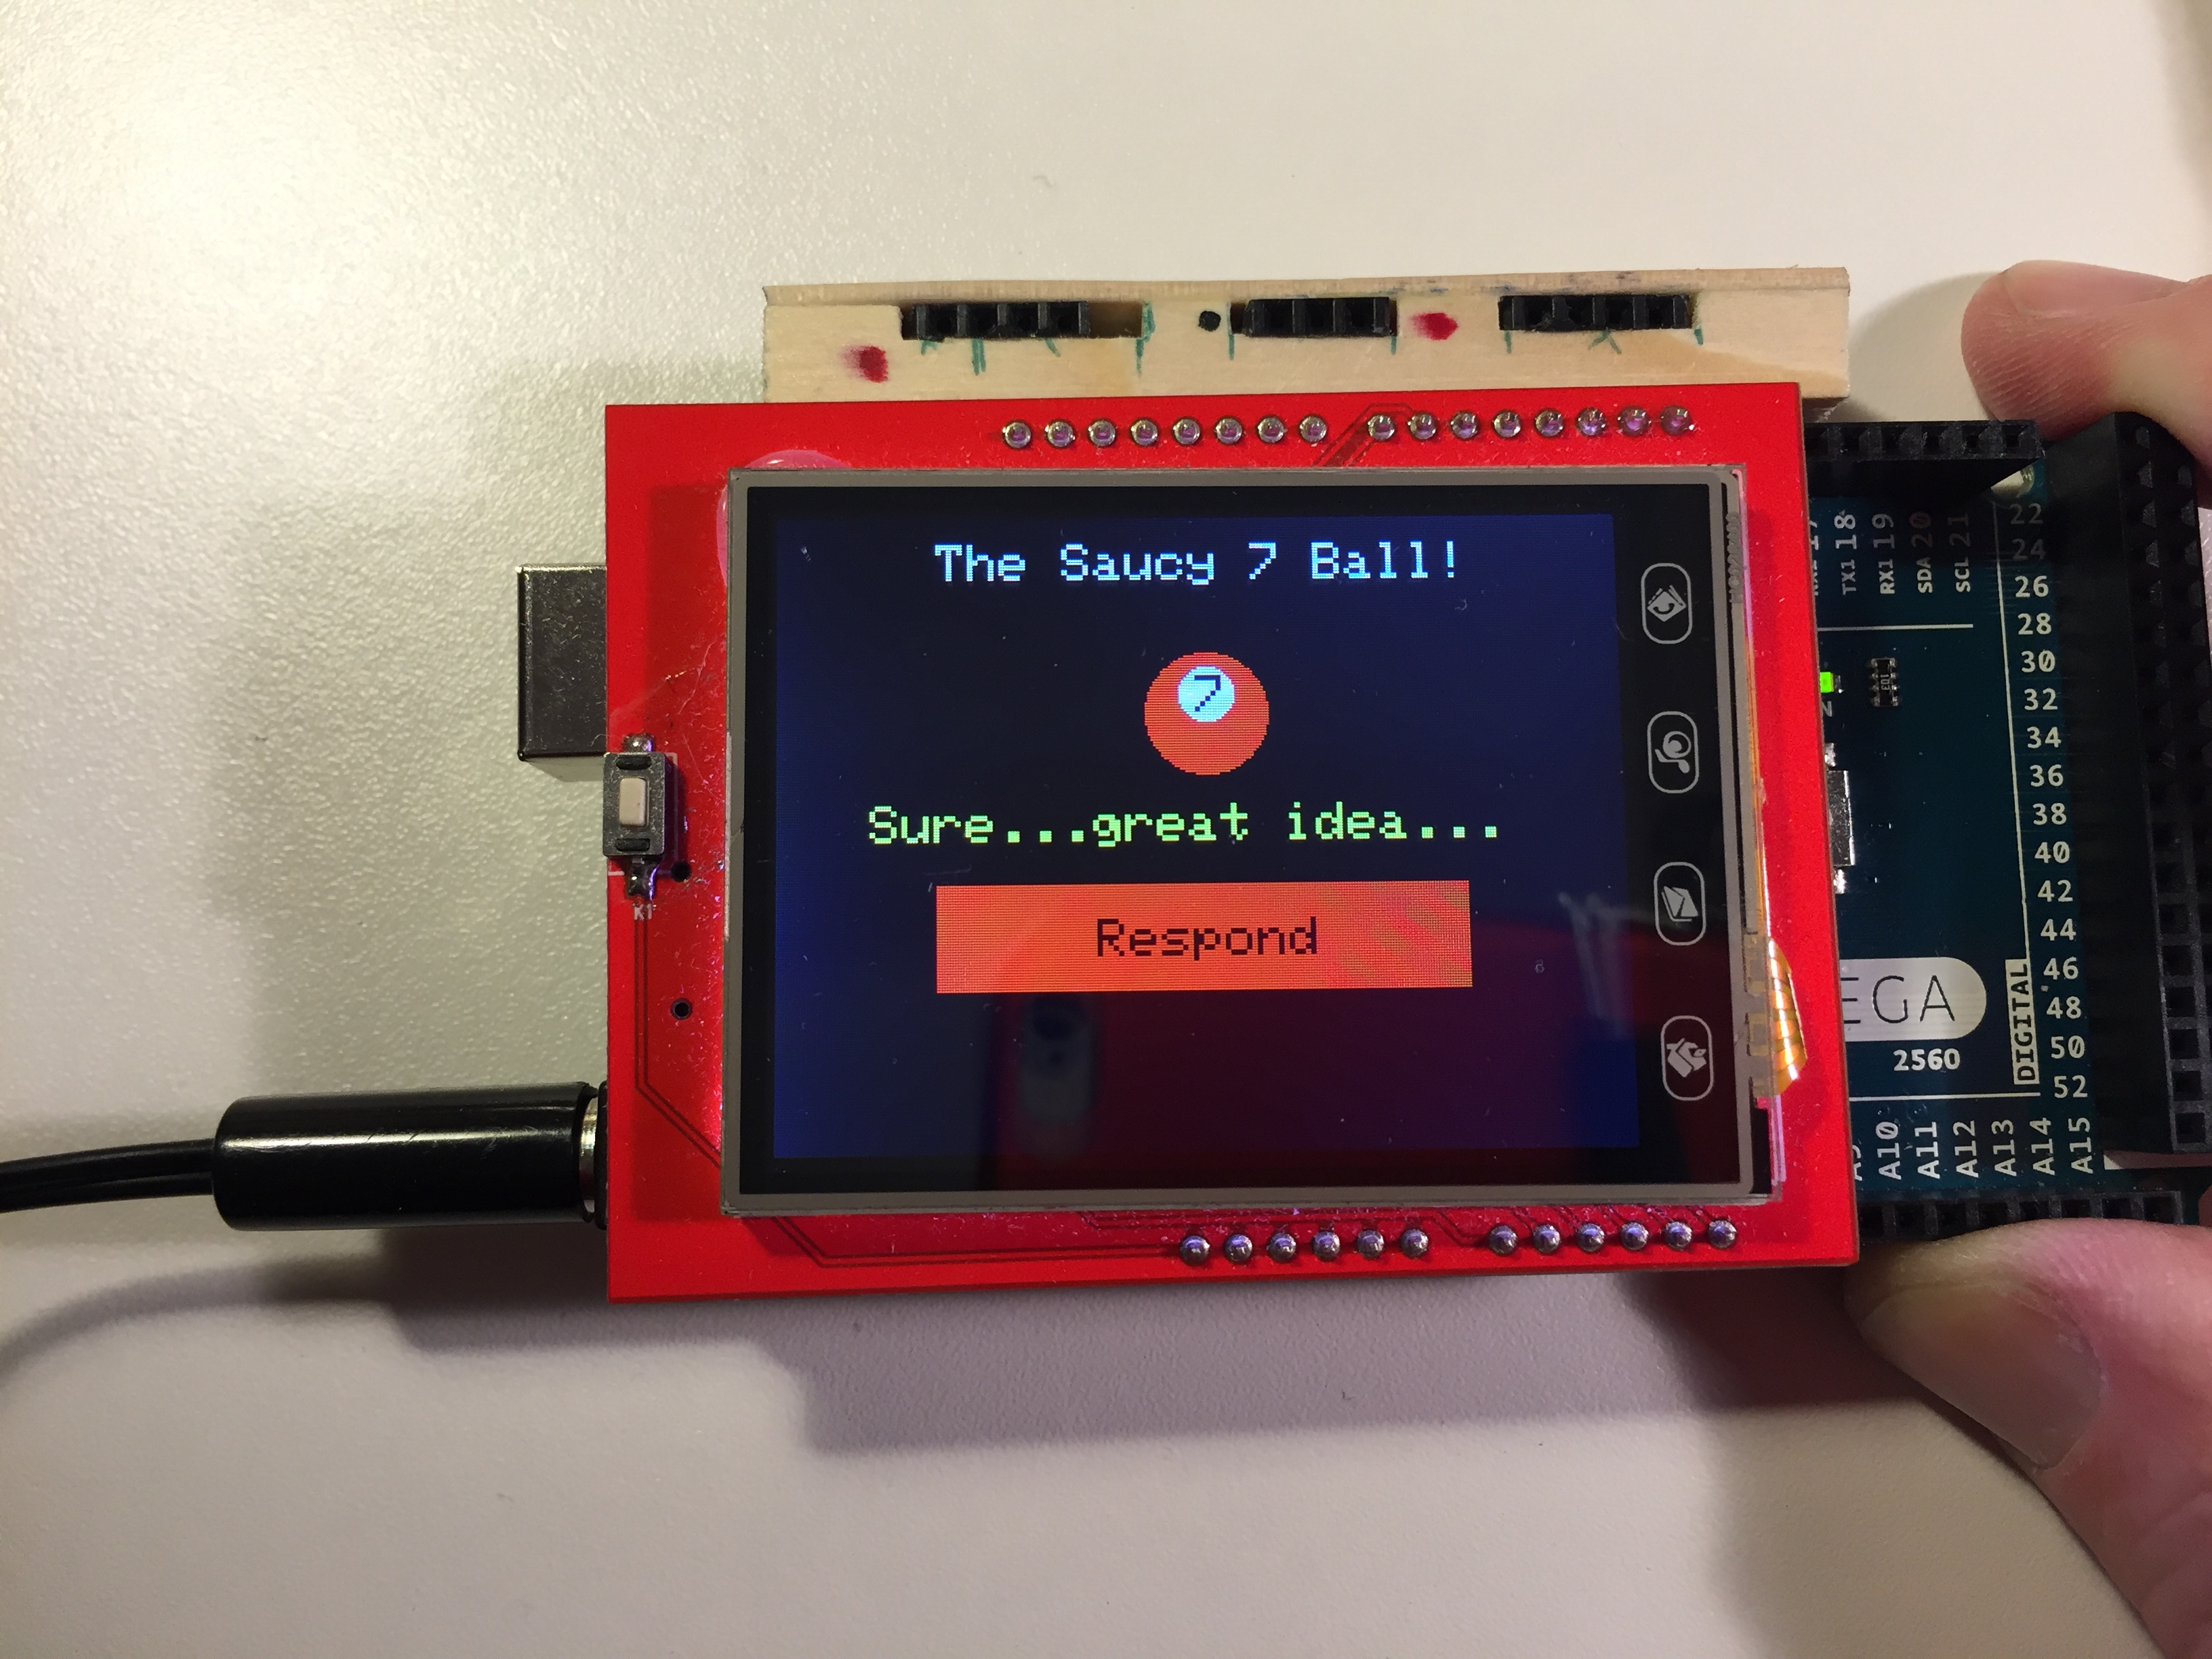
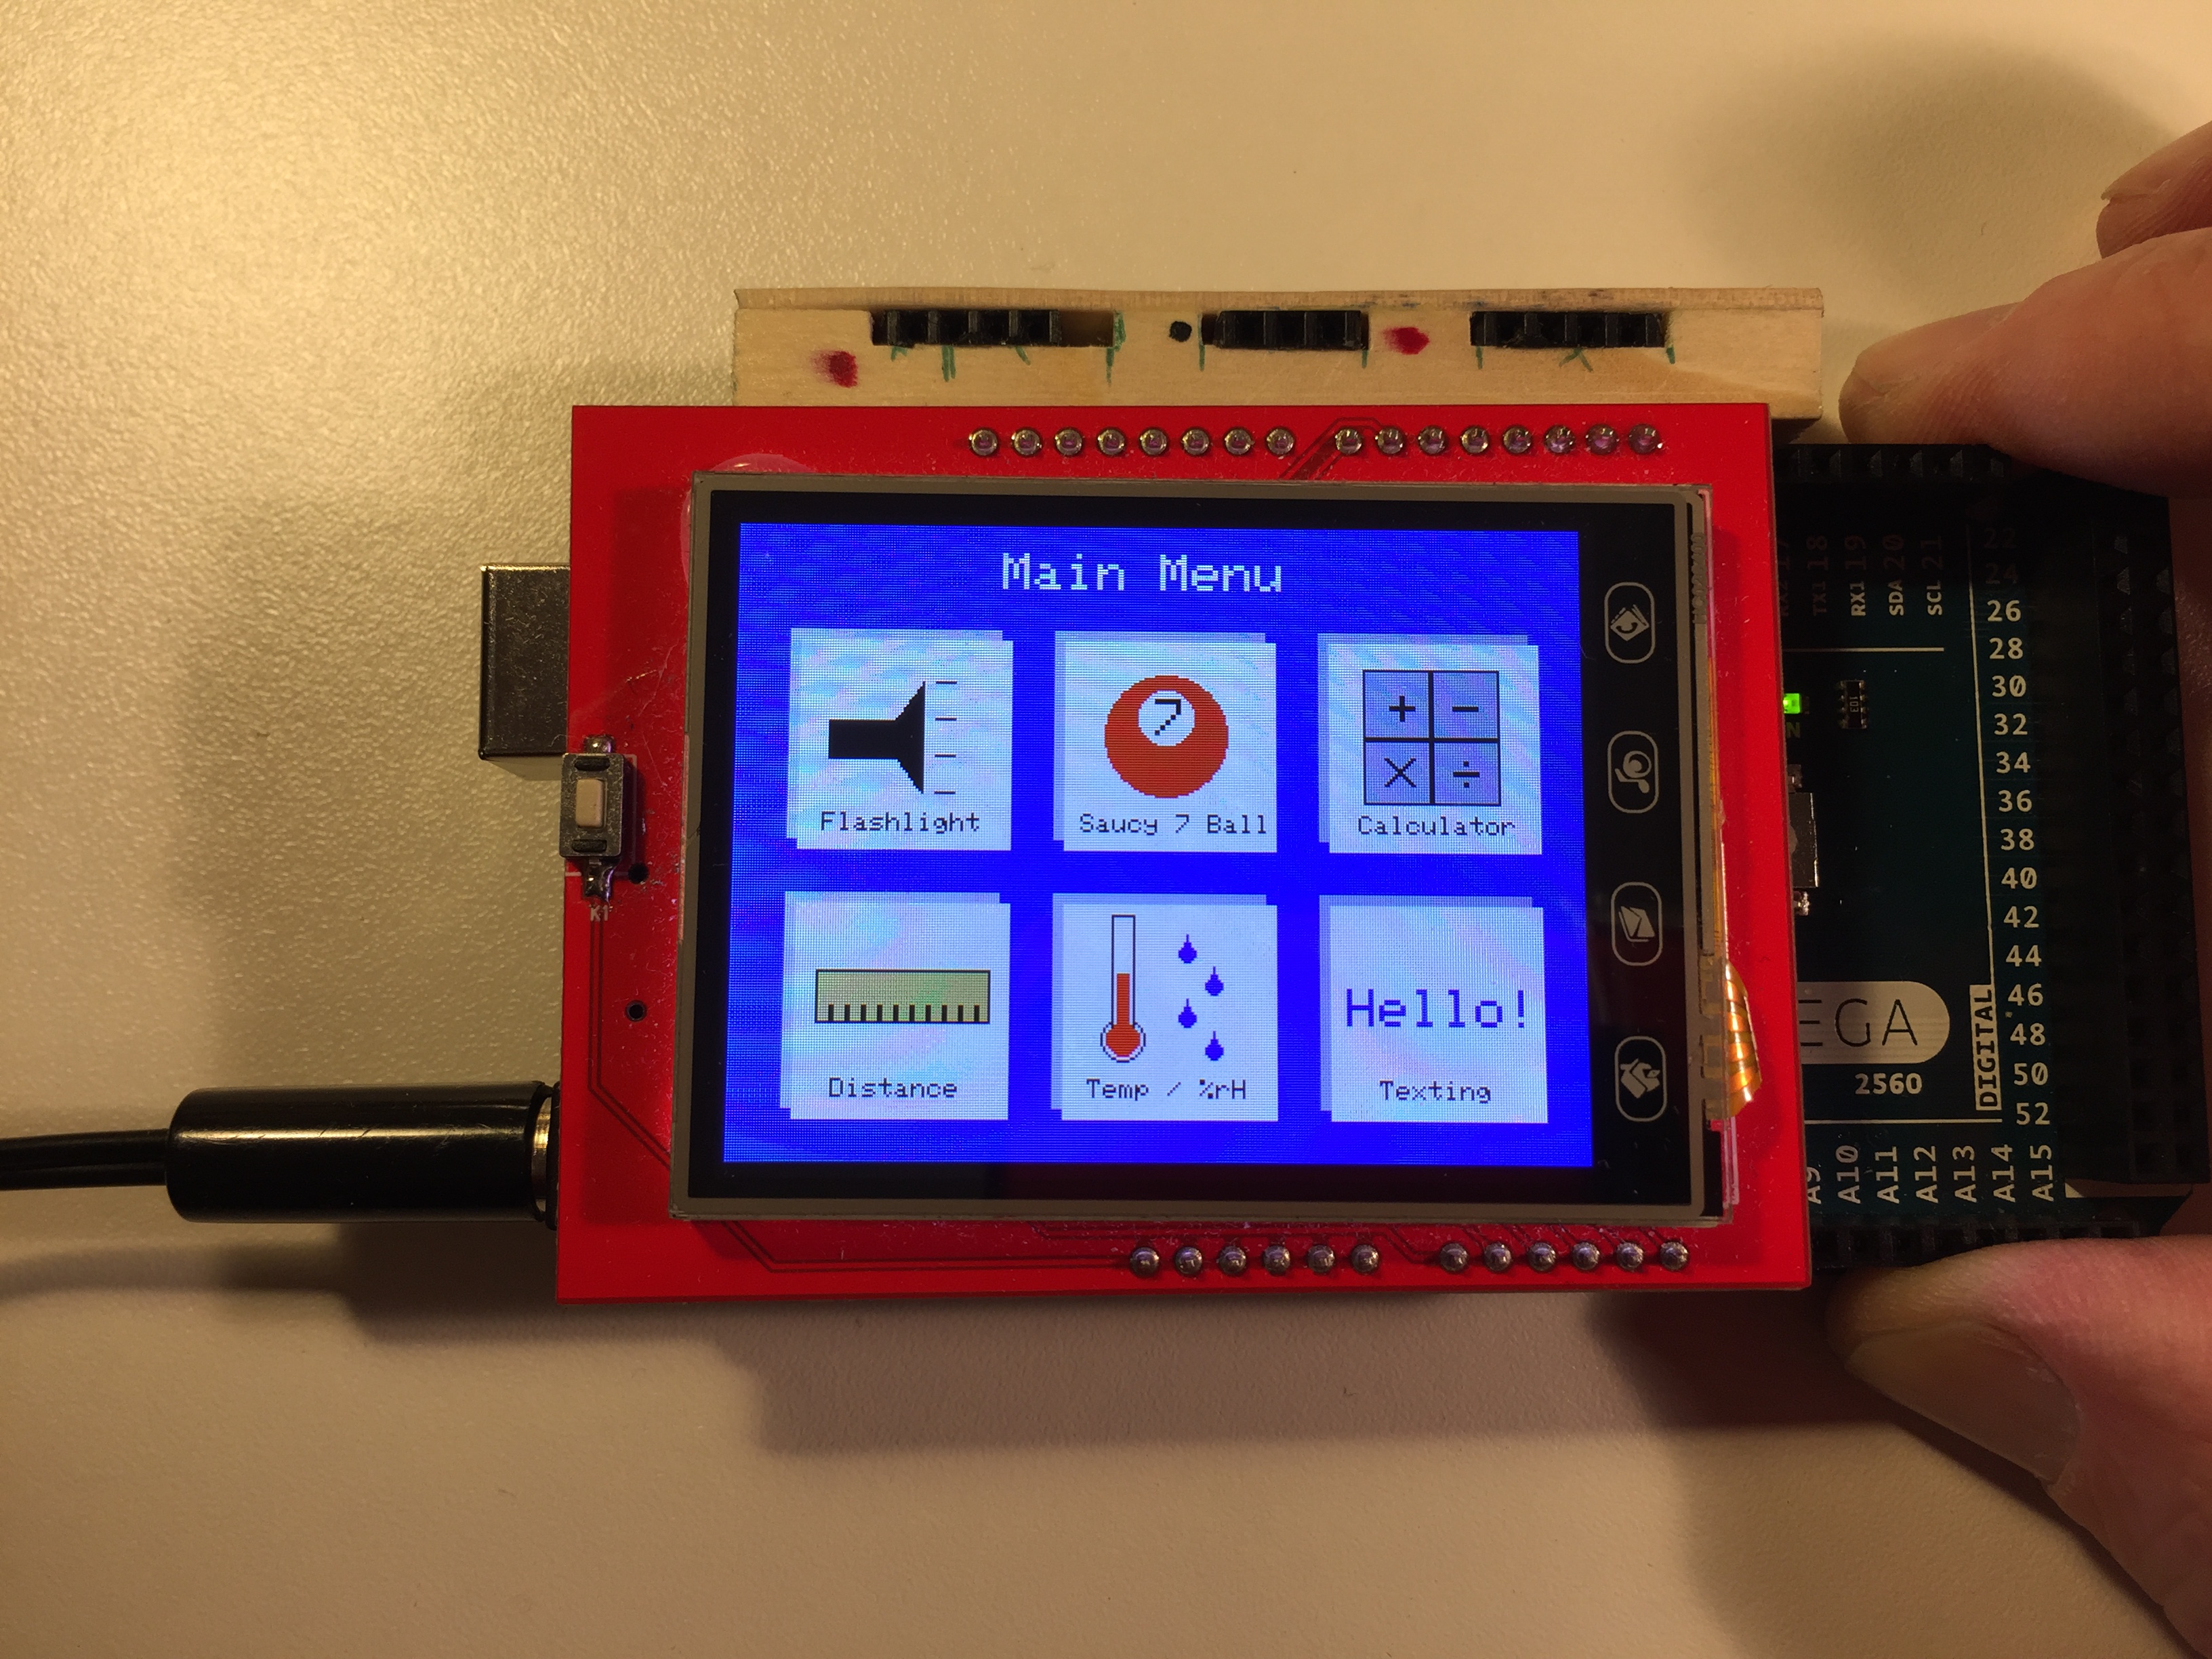
The bluBerriSIX app is a six function TFT project.
It includes:
A flashlight
A Saucy '7' app (like a Magic '8' Ball)
A Calculator
A Distance Measurement app using the SR-04 ultrasonic distance sensor
A Temperature and Humidity app that also does real-time data logging up to 1.5km with the HC-12 transceiver
A texting app using HC-12.
This project took 1100 lines of code. We'll build a considerably simpler version that still demonstrates TFT display and touch sensing concepts.
What's Needed?
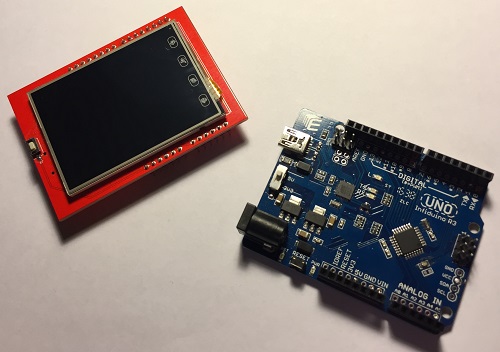
- An Arduino Uno or Mega 2560
- An MCUfriend 2.4" TFT shield
The following libraries:
- Adafruit_GFX library
- Adafruit Touchscreen library
- MCUFRIEND_kbv library
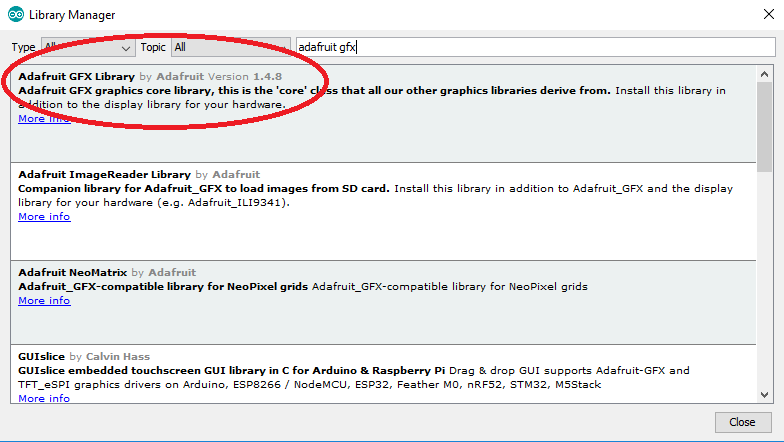
These libraries can be installed with the Library Manager inside the Arduino IDE.
To load a library, go to the Sketch -> Include Library -> Manage Libraries... menu option.
In the 'filter your search...' field, enter the first few characters of the libary's name and then select and install the appropriate library. When done, just back your way out of this screen.
When mounting the TFT shield on the Uno/Mega, BE VERY CAREFUL to make sure you're lining up the pins correctly. I misaligned my first shield and fried it. I spent two weeks of growing frustration trying to find correct libraries before realizing that the screen was dead. BE CAREFUL!
Our Project
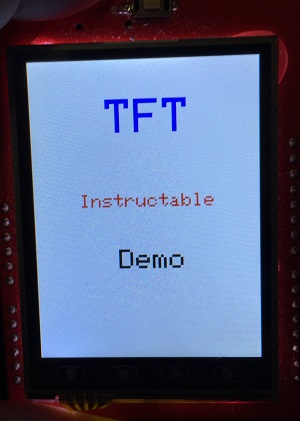
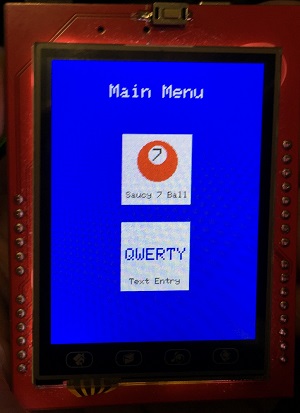
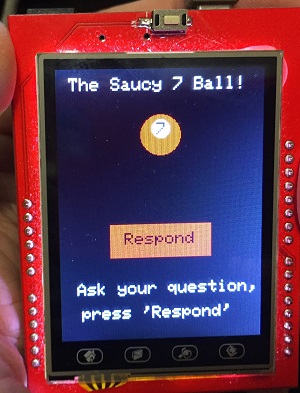
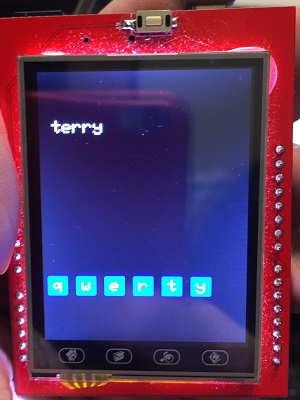
We'll build a simpler version of the bluBerriSIX sketch.
It'll have,
- a splash screen
- a main menu screen with two buttons
- a Saucy 7 app
- a simplified text entry app
You'll also be able to return to the main menu by pressing the 'Home' icon in the lower left of this particular display. If you don't have such an icon, you'll just have to define a 'home' region of your screen. You'll learn how to determine screen touch regions in this tutorial.
Although this is a simplified project, it's still rather long. I'll provide versions of the Arduino sketches at each major stage so you can upload them if you wish.
Header Code, Global Variables, Screen Setup
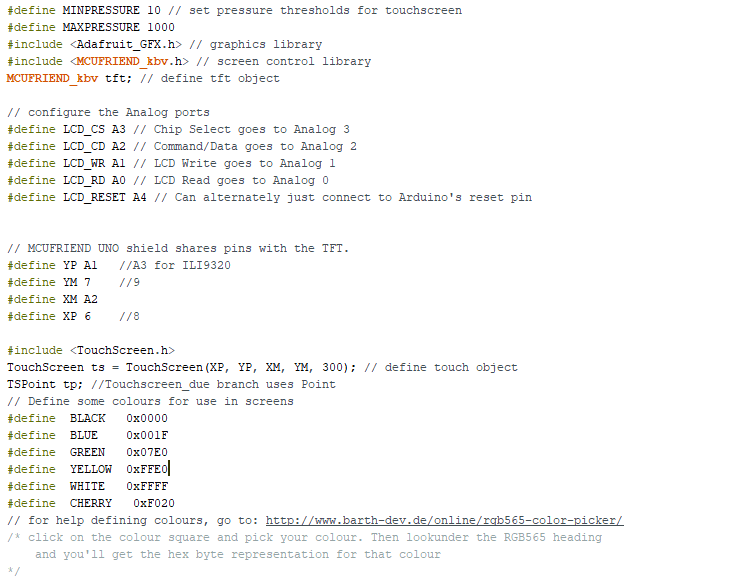
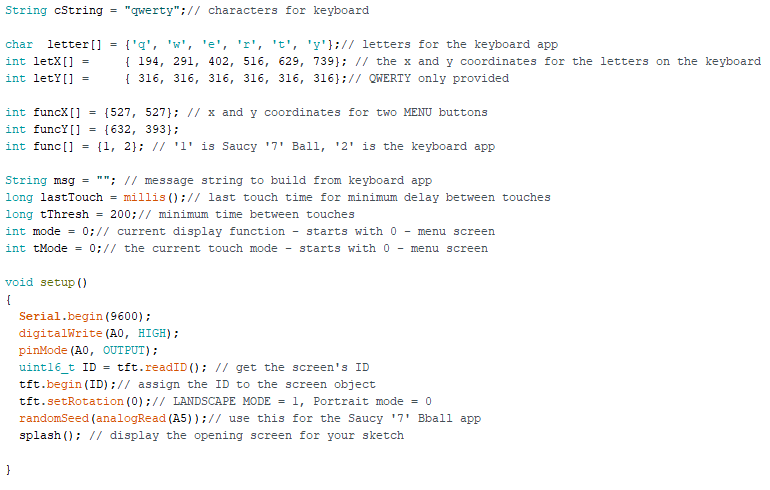
The whole project is highly documented. But the details follow.
Start a fresh Arduino project and call it 'tft demo' or any other name you'd like.
The first code panel above shows us defining global variables. We also add in the libraries we'll need to use for both the display function of the screen and the touch detection of the screen.
We also define the Analog Pins with reference to their screen-specific purposes.
We define the tft object (display) and the ts object (touch) as references for their respective functions.
We define some 16 bit colour constants to make it easy to render the colours for the screen and for text and graphics objects. You'll notice there is a URL to a website that has a Colour Picker and converter to convert visible colours to their 16 bit hexadecimal values. It's a very helpful tool.
In the second code panel, we define the global variables for our app-specific purposes.
The cString, letter and letterX and letterY strings and arrays are used to a) display the letters on the buttons for the text entry app and b) match the x and y coordinates of a touch with the x and y coordinates of each respective letter on the keyboard. More about this when we get to that section of the sketch.
funcX[], funcY[] and func[] are arrays that work to determine which app button was pressed on the main menu screen and then use that information to launch the respective app.
lastTouch and tThresh are used in the touch methods to make sure we don't get multiple touches from pressing the screen too long. More on that later.
The mode variable will control which screen is displayed and the tMode variable will control which touch methods are being used at any given time.
In the setup() block, we open a Serial channel should we want to use Serial.println() commands for debugging. You don't need this line should you not wish to do Serial Monitor debugging.
The next four lines are just setup code for the tft object.
Next we set the orientation of the screen to Portrait mode.
The randomSeed() command just starts the random number generator for later use by the Saucy 7 app.
Finally we call the splash screen method.
Building the Spash Screen and Understanding Display Versus Touch Mapping
We'll now start building the spash screen.
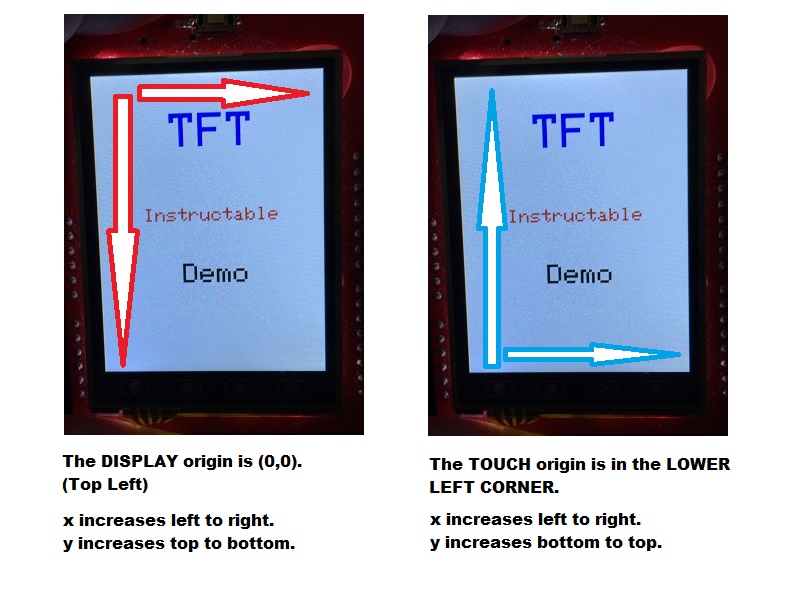
But first, please look at the picture for screen and touch mapping. Notice that the origins are in different locations. For display, the origin (0,0) is in the top left of the screen (when the RESET button is on top) and grows from left to right and from top to bottom.
For touch detection, the origin is in the lower left corner of the screen and grows from left to right and bottom to top.
So DISPLAY AND TOUCH MAPS ARE DEFINED SEPARATELY and have different resolutions. The display has a resolution of 240 by 320 and the touch has a much higher resolution as you'll soon see.
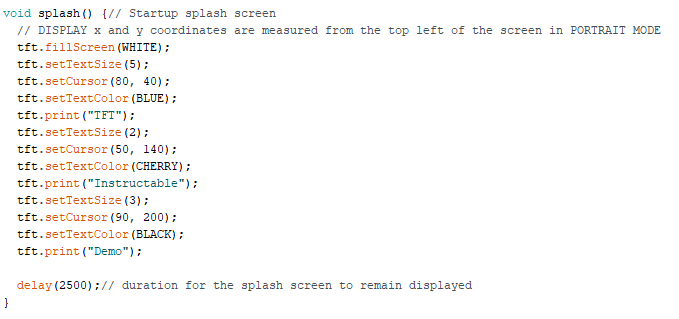
Go to an area of your sketch below the loop(){} method and we'll enter the splash() method code.
We start by doing a fillScreen() command to fill the screen with the WHITE colour we defined in the header code.
Then we set the text size to '5'. This is a relatively large basic text size. We set the x and y position for the text cursor and we set the text colour. Finally the print("TFT") command actually draws the blue, size '5' text at the specified position.
As you increase text size, you'll see that the characters get more and more chunky. So going above 5 is probably not helpful. At the end of this tutorial, I'll show you how to use bitmap fonts to get nicer looking text in your apps.The tradeoff is that using bitmap font sets takes up a lot of memory in your Arduino which will limit your sketch sizes.
We repeat similar commands for the other two text items on the splash screen.
Finally we delay for 2.5 seconds to give the user a chance to read the screen's contents before the app moves to the main menu screen.
Go ahead and upload this sketch to your Arduino. It should display the splash screen.
Downloads
Making a Touch Mapping Diagnostic Tool
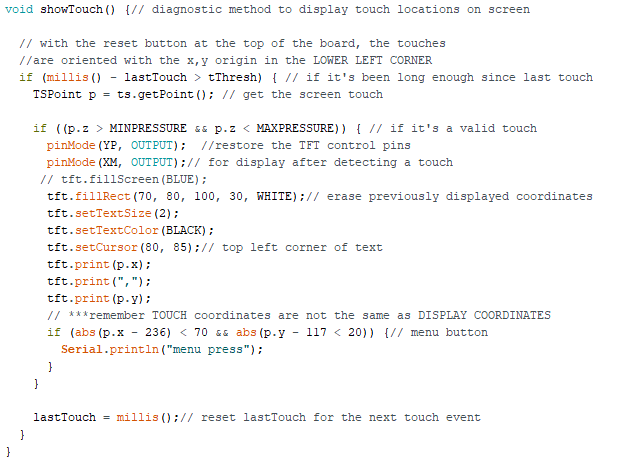

The showTouch() method is very useful to help you get the touch coordinates of different parts of the screen. You'll need to do this for defining the touch regions for your buttons.
Go ahead and enter this method below your splash() method done previously.
Here's how it works.
The if statement determines if a sufficient time has passed since the last touch. It takes the current system time millis() and subtracts the lastTouch time. If it's greater than the tThresh value (200 milliseconds), it accepts the touch. Otherwise, it will disregard accidental multi-touch events.
Next, the getpoint() command gets the x,y and z coordinates of the touch. The z coordinate is a measure of touch pressure.
If the pressure is within the max and min constants we defined in the sketch header, the method will first change the YP and XM pins back to OUTPUT, putting the screen in DISPLAY mode.
Next it will draw a white rectangle to erase any coordinates that may have been displayed previously.
The sketch then sets the font to size 2, black colour and displays the x (p.x) and y (p.y) coordinates on the screen. You can then make a note of these locations to help you program your touch zones for your own sketches.
The if statement at the bottom of the method check to see if the 'Home' button on the screen was pressed. the '<=' operators allow for the width and height of the Home button. The coordinates specified are the x-centre and y-centre coordinates of the Home button. If it's pressed, mode is set to 0 which will eventually mean 'Go to Main Menu Screen'. More on that later.
Finally we update lastTouch to the current system time millis() to get ready for a later touch event.
Please now go the the loop() block and add the line showTouch();
At this point, upload your sketch and try it. It will draw the splash screen and if you start touching the screen, the TOUCH x and y coordinates will be displayed on the screen.
Before moving on, let's revisit two important lines of code:
pinMode(YP, OUTPUT); //restore the TFT control pins
pinMode(XM, OUTPUT);// for display after detecting a touch
Any time you want to display something on the screen, you MUST execute these two commands to change the screen from TOUCH mode into DISPLAY mode. Otherwise, your display commands won't work.
Well done so far! Take a break!
Downloads
Build the Main Menu Screen
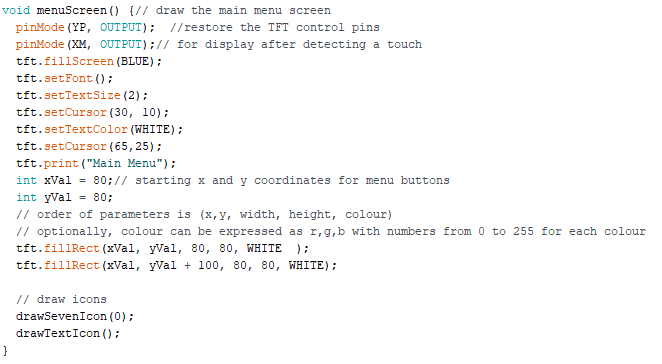
We'll now build our Main Menu screen with two buttons you can press to activate each app. The method is called menuScreen().
We start by putting the screen in DISPLAY mode.
Then we set the font size, colour and position and print the 'Main Menu' text.
We now draw two rectangles that are the buttons.
All graphics commands have a similar structure:
graphicShape(x coordinate, y coordinate, width, height, COLOUR)
- x coordinate - top left for rectangular objects, centre for circles
- y coordinate - top left for rectangular objects, centre for circles
- width - width of the object in pixels
- COLOUR - a colour constant we defined in the header
Finally we call two methods to draw the Saucy 7 icon and the QWERTY Text Entry icon. Those are separate methods.
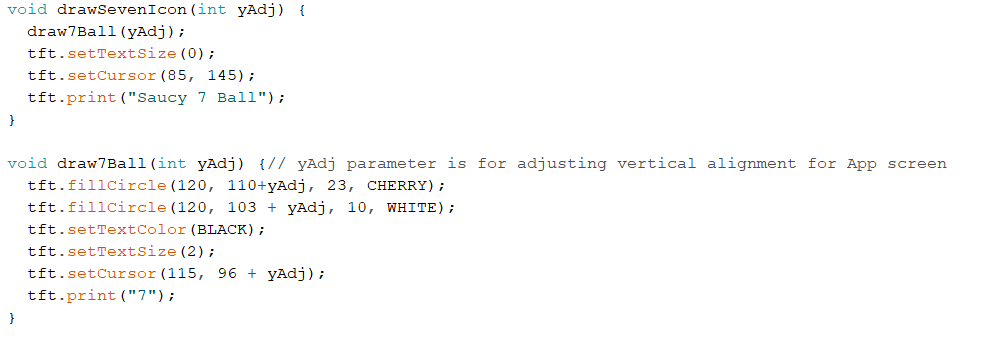
The draw7icon(0) method takes an integer parameter which is the y-offset for drawing the ball. We do this so that we can use the same method for drawing the ball on the menu screen AND on the Saucy 7 app screen. The offset just allows us to programatically adjust the y-coordinate of the ball up or down.
The draw7Ball(0) method is called from within draw7Icon(0). It also takes a parameter which allows us to adjust the vertical position of the ball depending on if we drawing it on the menu screen or on the app screen.
The fillCircle() command takes 4 arguments.
- x coordinate of the centre of the circle
- y coordinate of the centre of the circle
- radius of the circle (in pixels)
- COLOUR - a colour constant we defined in the header
Finally the drawTextIcon() method is called to draw the icon for the Text Entry app.
You can try running the method by commenting out the splash() method in setup() and adding menuScreen().
Upload the sketch to your Arduino and try it out!
Downloads
The Saucy 7 App and the Main Menu Methods
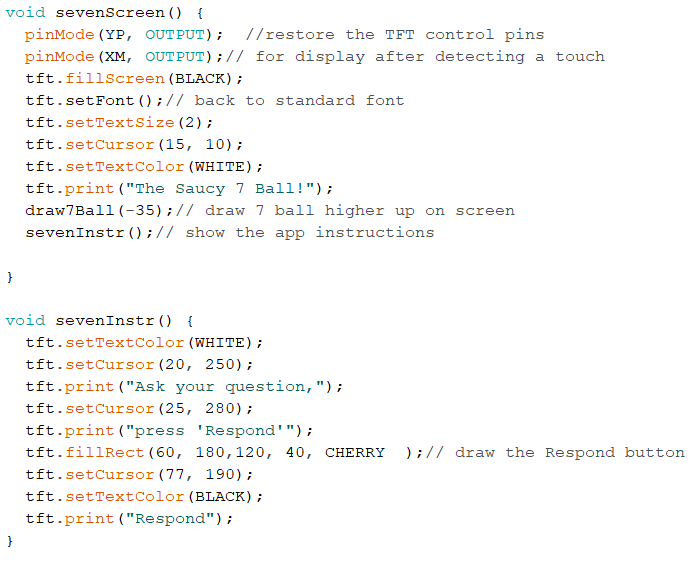
The sevenScreen() method will draw the screen for the app, including drawing the ball and then displaying the instructions.
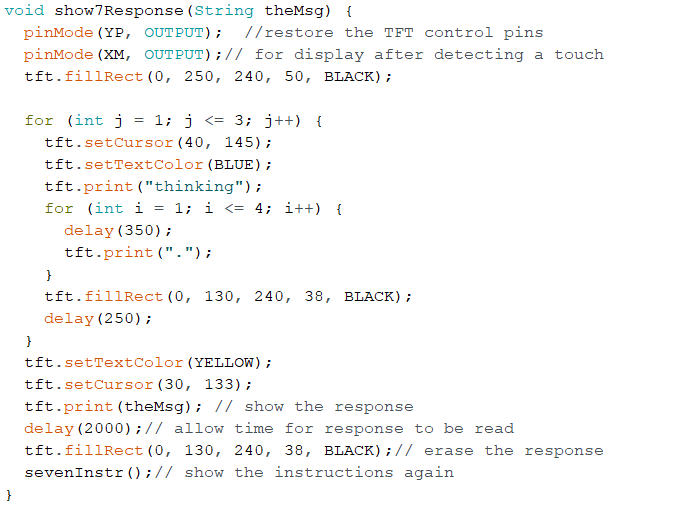
The sevenInstr() method displays the instructions as well as clearing the screen from previous responses. It also draws the 'Response' button.
The show7Response() method handles clearing the previous response method from the screen, displaying an animated 'thinking...' message and then displaying the randomly chosen response message.
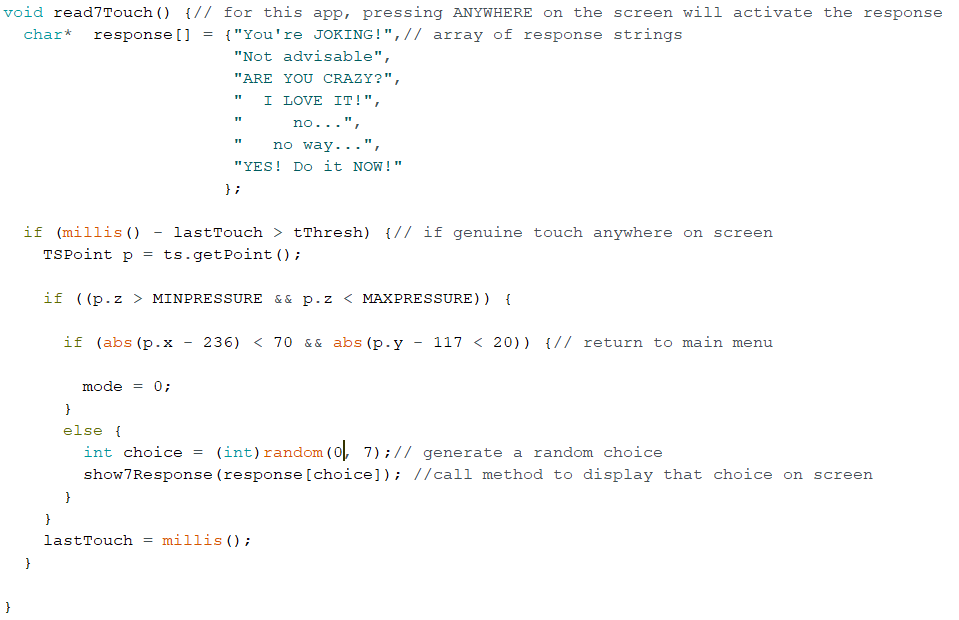
read7Touch() is the method that waits for a touch event to produce the randomly generated message. The touch code is very similar to the showTouch() diagnostic method described earlier. For simplicity, the method will accept a touch anywhere on the screen as the 'Respond' button touch.
At the top of the method, we define a response[] array of strings that are the messages that can be generated from a touch event.
If the Home button is pressed, it will end the app and return to the main menu screen. Otherwise, the method will generate a random number between 0 and 7(exclusive) and pass the corresponding text message from the response[] array to the show7Response() method.
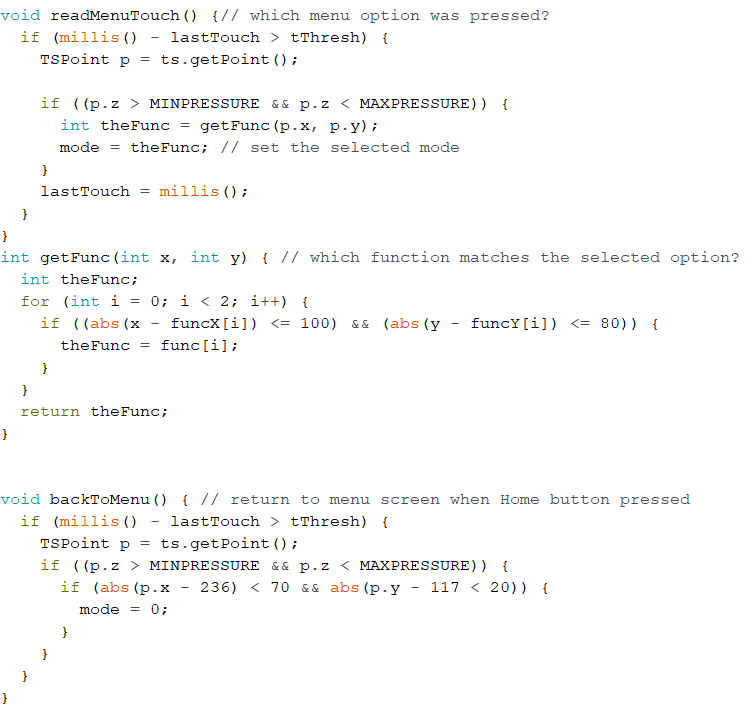
Finally, the backToMenu() method watches for a touch of the Home button and returns control to the main menu screen.
The readMenuTouch() method watches for a touch event when you're on the main menu screen. When a touch is detected, it passes the x and y coordinates to the getFunc(x,y) method which looks in the funcX[] and funcY[] arrays to match the x and y coordinates of the touch. It then returns the number from the func[] array for the app that was selected. '1' is Saucy 7 and '2' is the text entry app. It then sets the mode to that app's value so that the app will be executed.
The Loop() Block
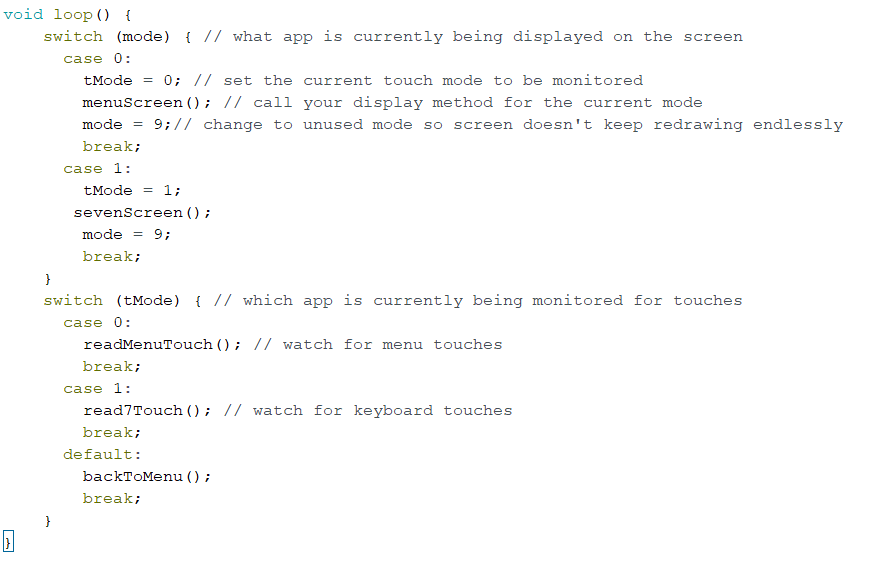
We'll now start to build the loop() block code to handle displaying the appropriate screen and then calling the appropriate touch methods based on the option currently selected.
The loop() method consists of two switch() structures.
The top switch structure handles displaying the appropriate screen depending upon which option is selected. It also sets the tMode value for the appropriate touch method to run for the current selected option. Finally it sets the mode value to 9 so that the display screen doesn't endlessly redraw.
The bottom switch structure controls which touch methods are being executed based on the user-selected app option as represented by the value of tMode.
Load the sketch into your Arduino and you should be able to select and use the Saucy 7 app.
You've done a lot of work! Take a break :-)
Downloads
The Text Entry App - We're in the Home Stretch!
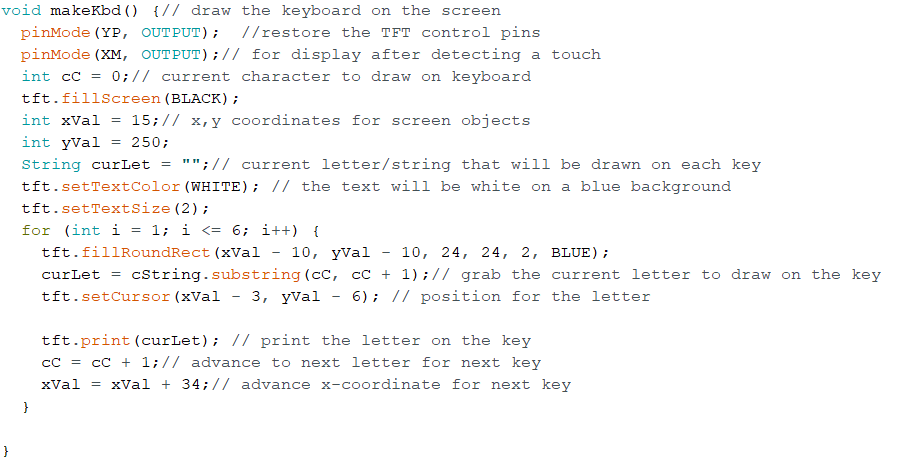
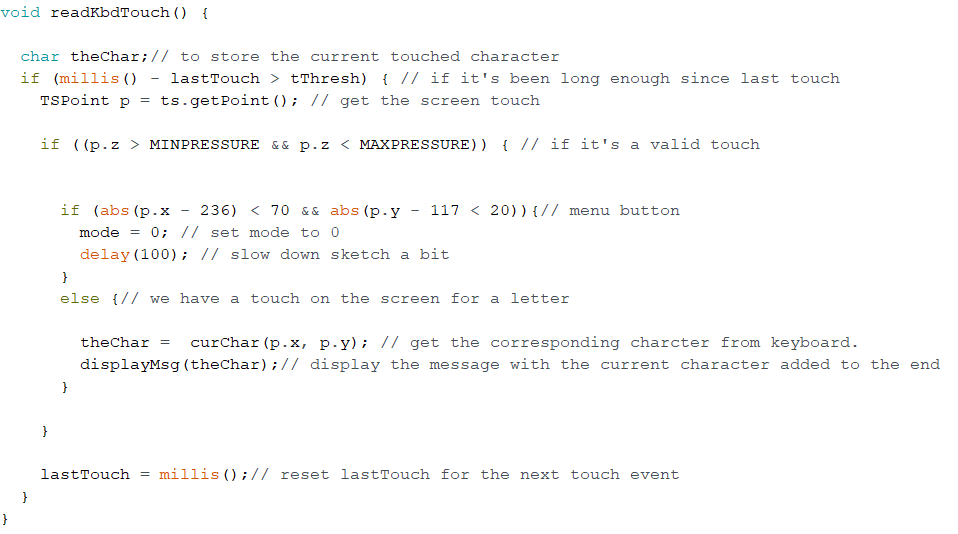
We'll now incorporate the text entry app's methods.
makeKbd() draws the keyboard on the screen.
It draws six filled rounded rectangles and then overlays the appropriate letter on each 'key' by getting the letter from the cString string which it prints on the screen over the key. Notice that the second last parameter in a fillRoundedRect() command is the radius of each corner in pixels. The higher this value, the more rounded the corners.
The readKbdTouch() method works similar to the other touch detection methods.
If a touch is detected that's NOT on the Home button, it passes the x and y coordinates to the curChar(x,y) method which returns the character that corresponds to that x and y location on the screen. The message that has been 'typed' is then displayed on the screen using the 'displayMsg(theChar) method.
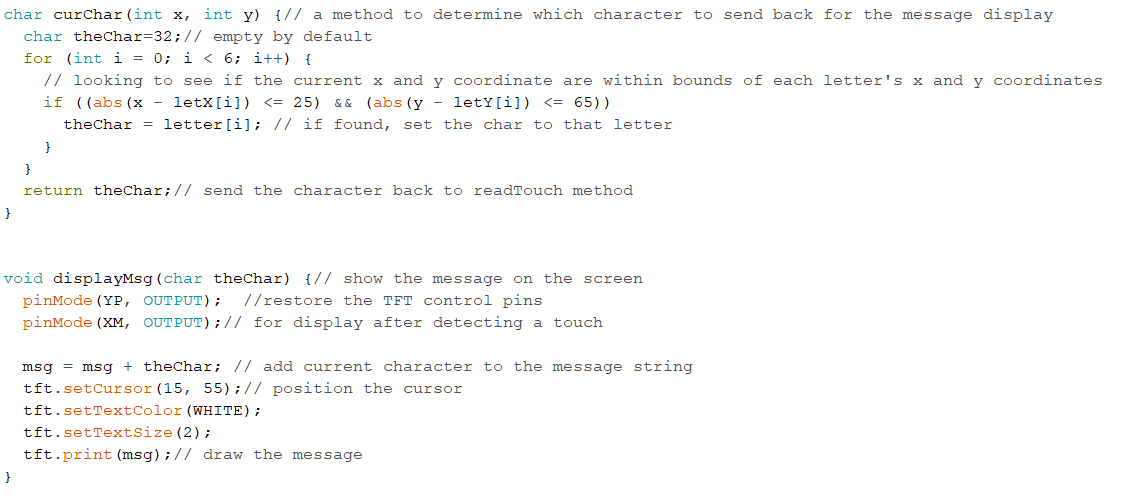
The curChar(x,y) method searches through the letterX[] and letterY[] arrays to trying a find a match that is close to the x and y coordinates passed from readKbdTouch(). If it finds a match, it returns the corresponding letter to the readKbdTouch method.Notice that we initialize the theChar variable to 32 which is the ASCII code for a space character, ' '. We do this so that if the user touches an area away from the keyboard, it won't display non-available characters.
The displayMsg(theChar) method takes the character returned from curChar(x,y) and appends it to the msg string. It then displays the message on the screen.
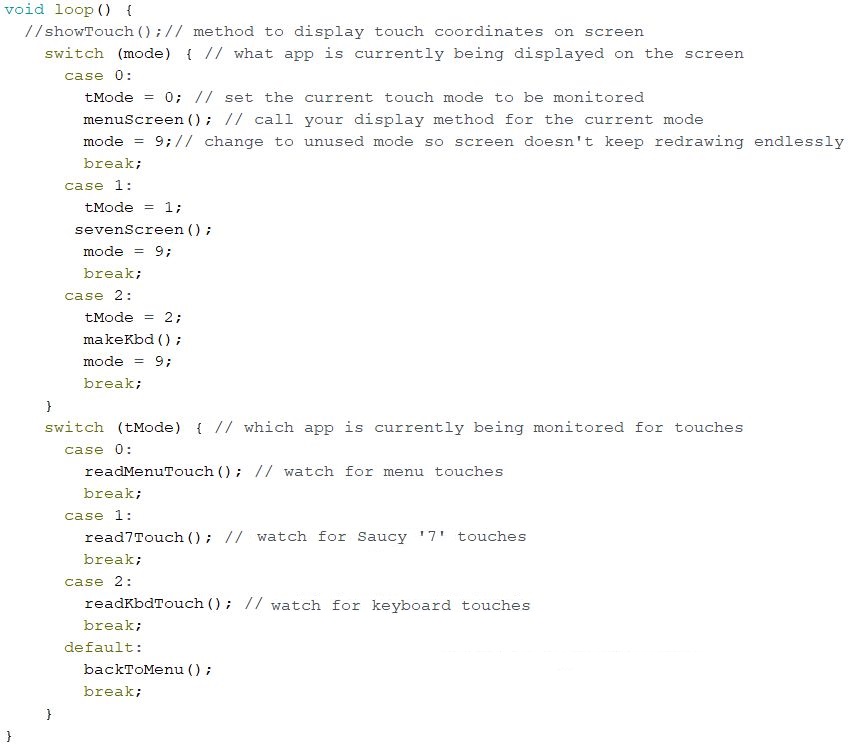
Finally, we'll update the loop() block to accept the text entry app selection.
Upload the tftDemo sketch to your Arduino and you should be able to use the completed app.
Congratulations! you've built a TFT touchscreen app! Take the rest of the day off!
Downloads
Gettin' Slick! - Using Adafruit Bitmap Fonts in Your Sketch.
The standard tft font set is okay. But it's nicer if we can use proper bitmapped fonts in our TFT sketches.
The downside is that loading font sets into the Arduino memory takes up significant space. In fact, it's very easy to fill your sketch with so many fonts that it won't load into the Arduino.
The fonts are available inside the Adafruit_GFX library folder that you already installed for this project. An excellent tutorial on using fonts is at this site.
In the Header area of your sketch, add the font reference for the font you wish to use. We'll use the FreeSerifBoldItalic18p7b font for this example.
#include <Fonts/FreeSerifBoldItalic18pt7b.h>
In your splash() method, comment out the tft.setTextSize(); command.
Add the following command,
tft.setFont(&FreeSerifBoldItalic18pt7b);
Now any print() commands will use the currently specified font. To change to a different font, you would use another tft.setFont() command with the next font you would want to use.
To set the font back to the standard tft font, just use a tft.setFont(); command with no parameter.
Upload the sketch to your Arduino and you should see the splash screen now uses the bitmap font for rendering the text on the screen. You'll notice that the size of the sketch is significantly larger now that you've included a font.
Final Thoughts
There are many other graphic object commands available to you. They include:
tft.drawRect(x, y,width,height, COLOUR);
tft.drawLine(x1, y1, x2,y2, COLOUR);
The following examples use the tft.color565 method to let you specify the colour based on red, green and blue values. This is an alternative way to using the constant defined HEX colour values we used in our sketch.
tft.drawRoundRect(x, y,width,height,radius, tft.color565(255, 0, 0)); // this would be red
tft.drawCircle(x, y, radius, tft.color565(0, 255, 0)); // this would be green
tft.drawTriangle(vertex1x, vertex1y ,vertex2x, vertex2y, vertex3x, vertex3y, tft.color565(0, 0, 255)); // blue
tft.fillTriangle(vertex1x, vertex1y ,vertex2x, vertex2y, vertex3x, vertex3y, tft.color565(255,0,0);
Play around with these commands and explore how they can add to your TFT projects.
Learning to use a TFT screen is challenging and you should be proud of yourself for taking the time to learn these first steps.
TFT screens can add an attractive and useful Graphical User Interface aspect to your Arduino projects.
Thanks for working through this tutorial.
NOW GO OUT AND MAKE SOMETHING WONDERFUL!
3D Printed Cases! - February 2022 Update
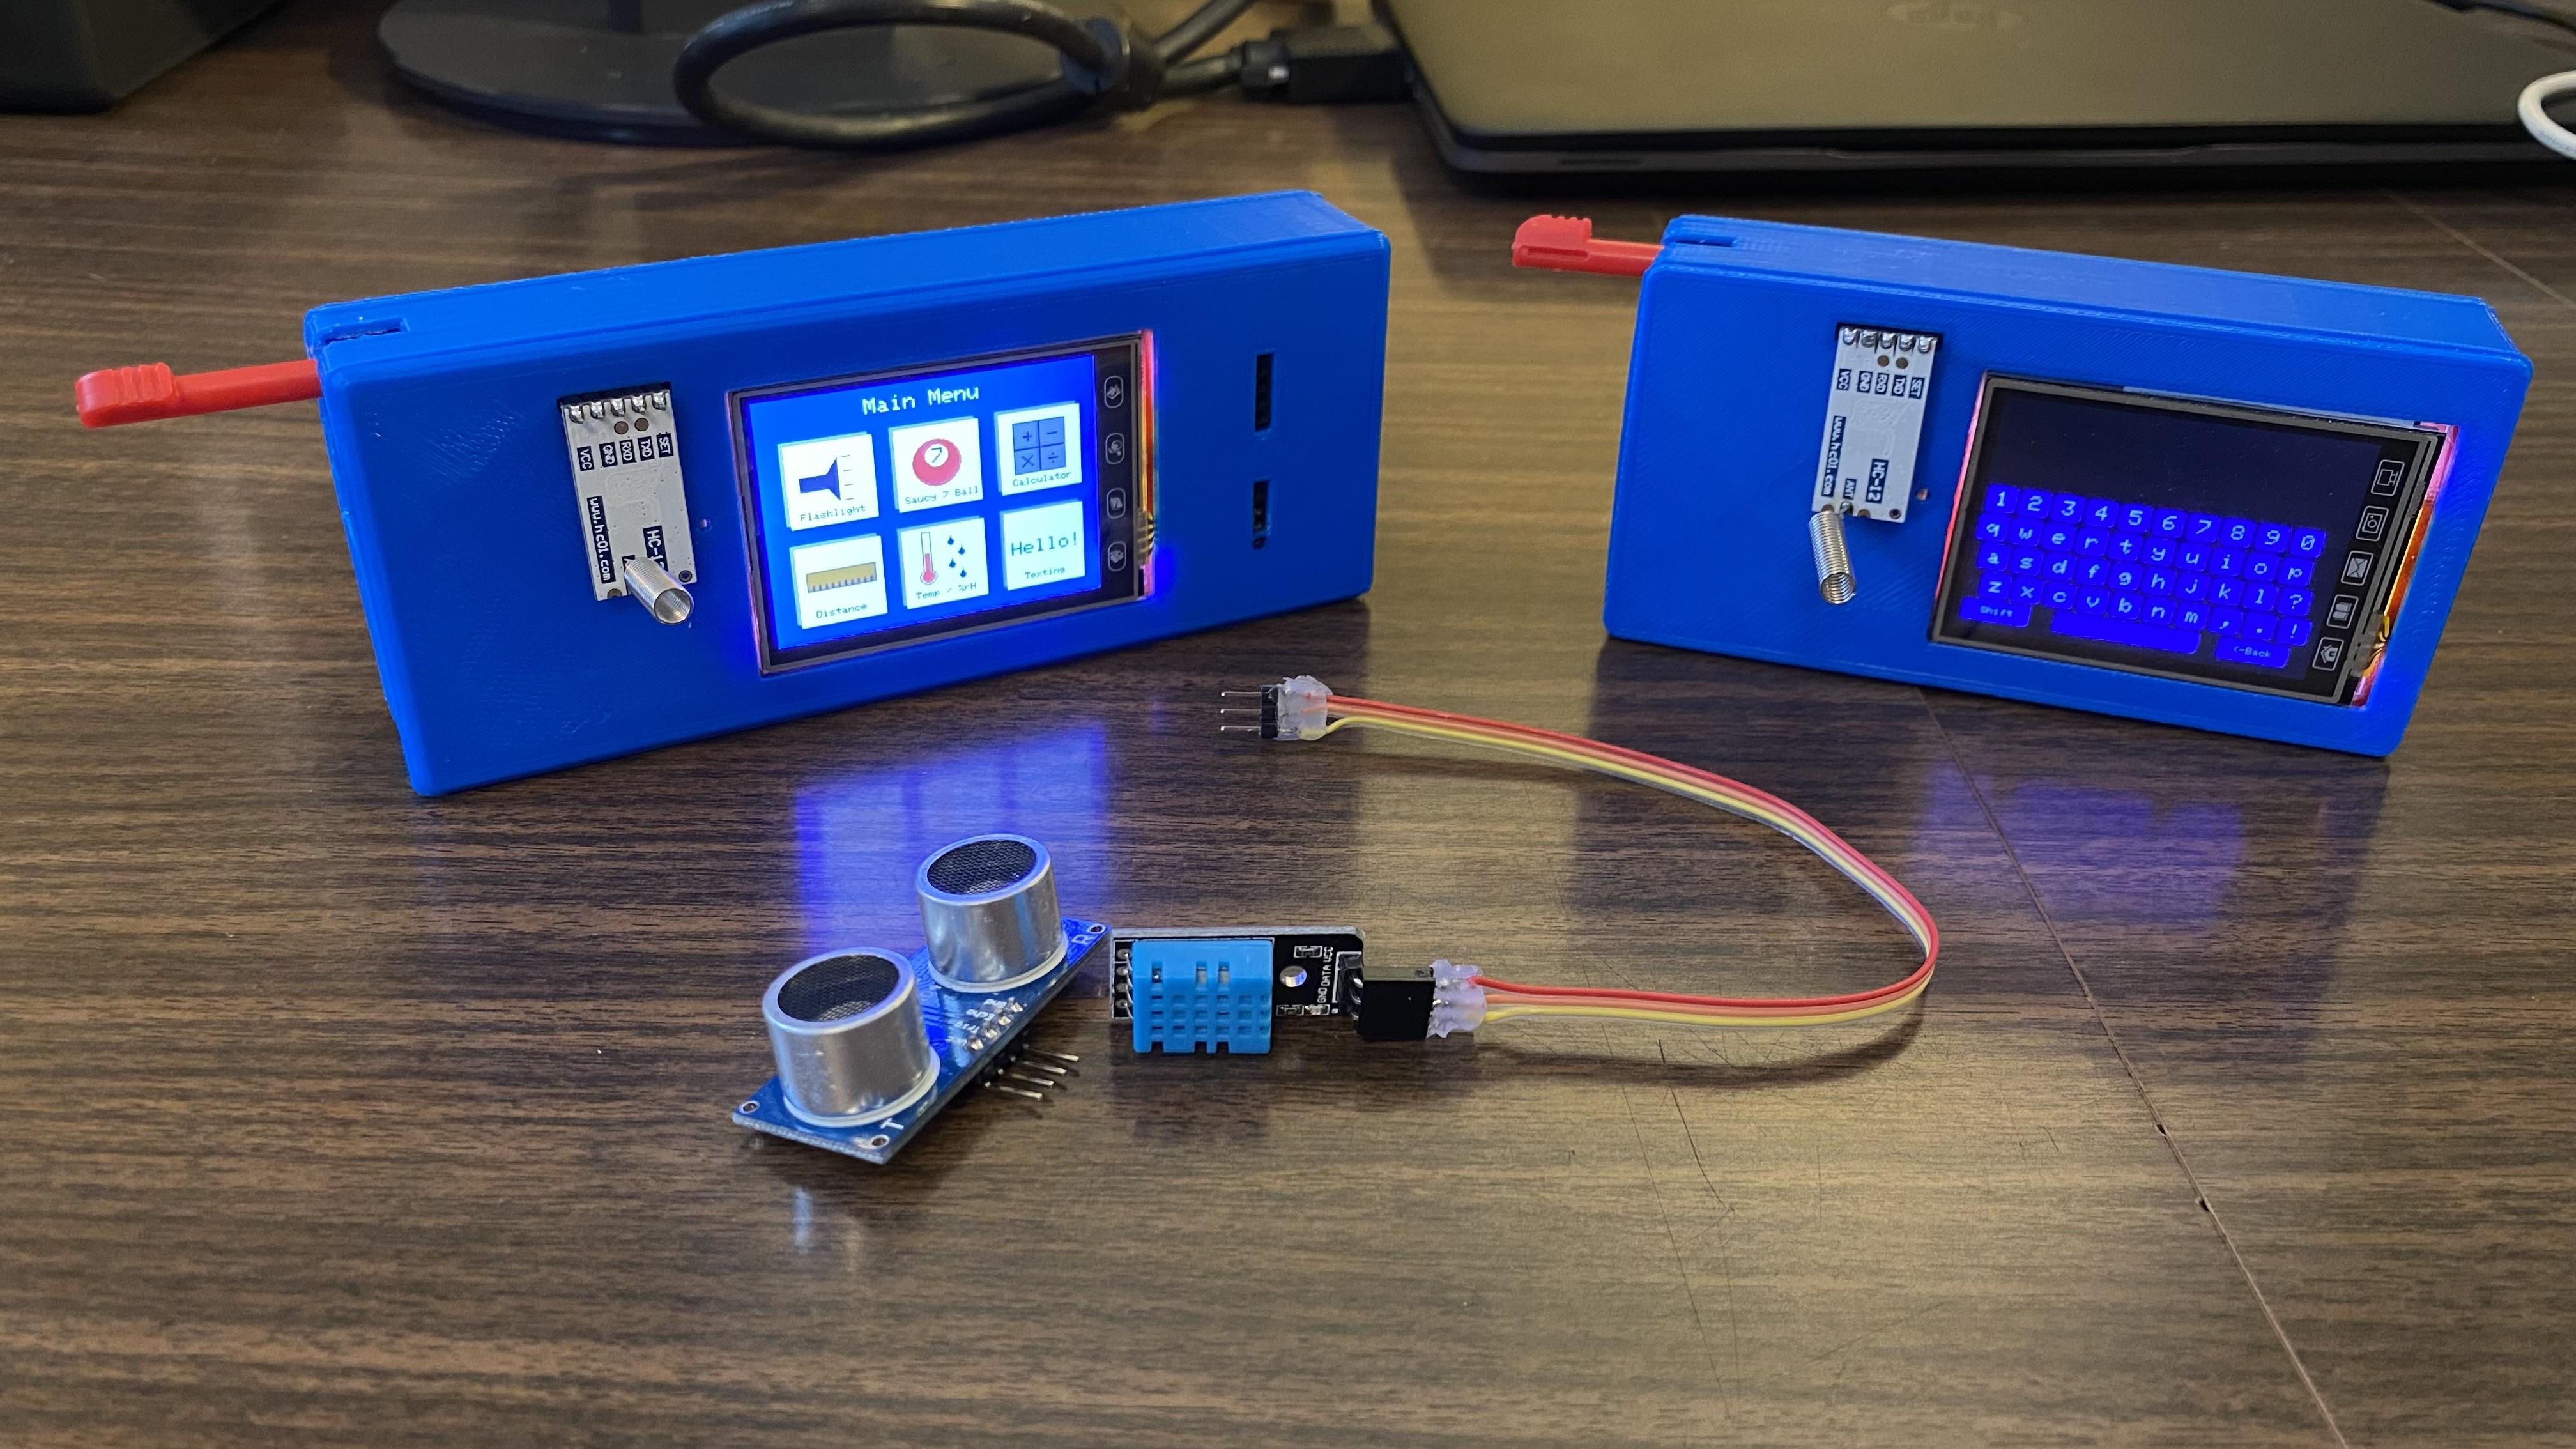
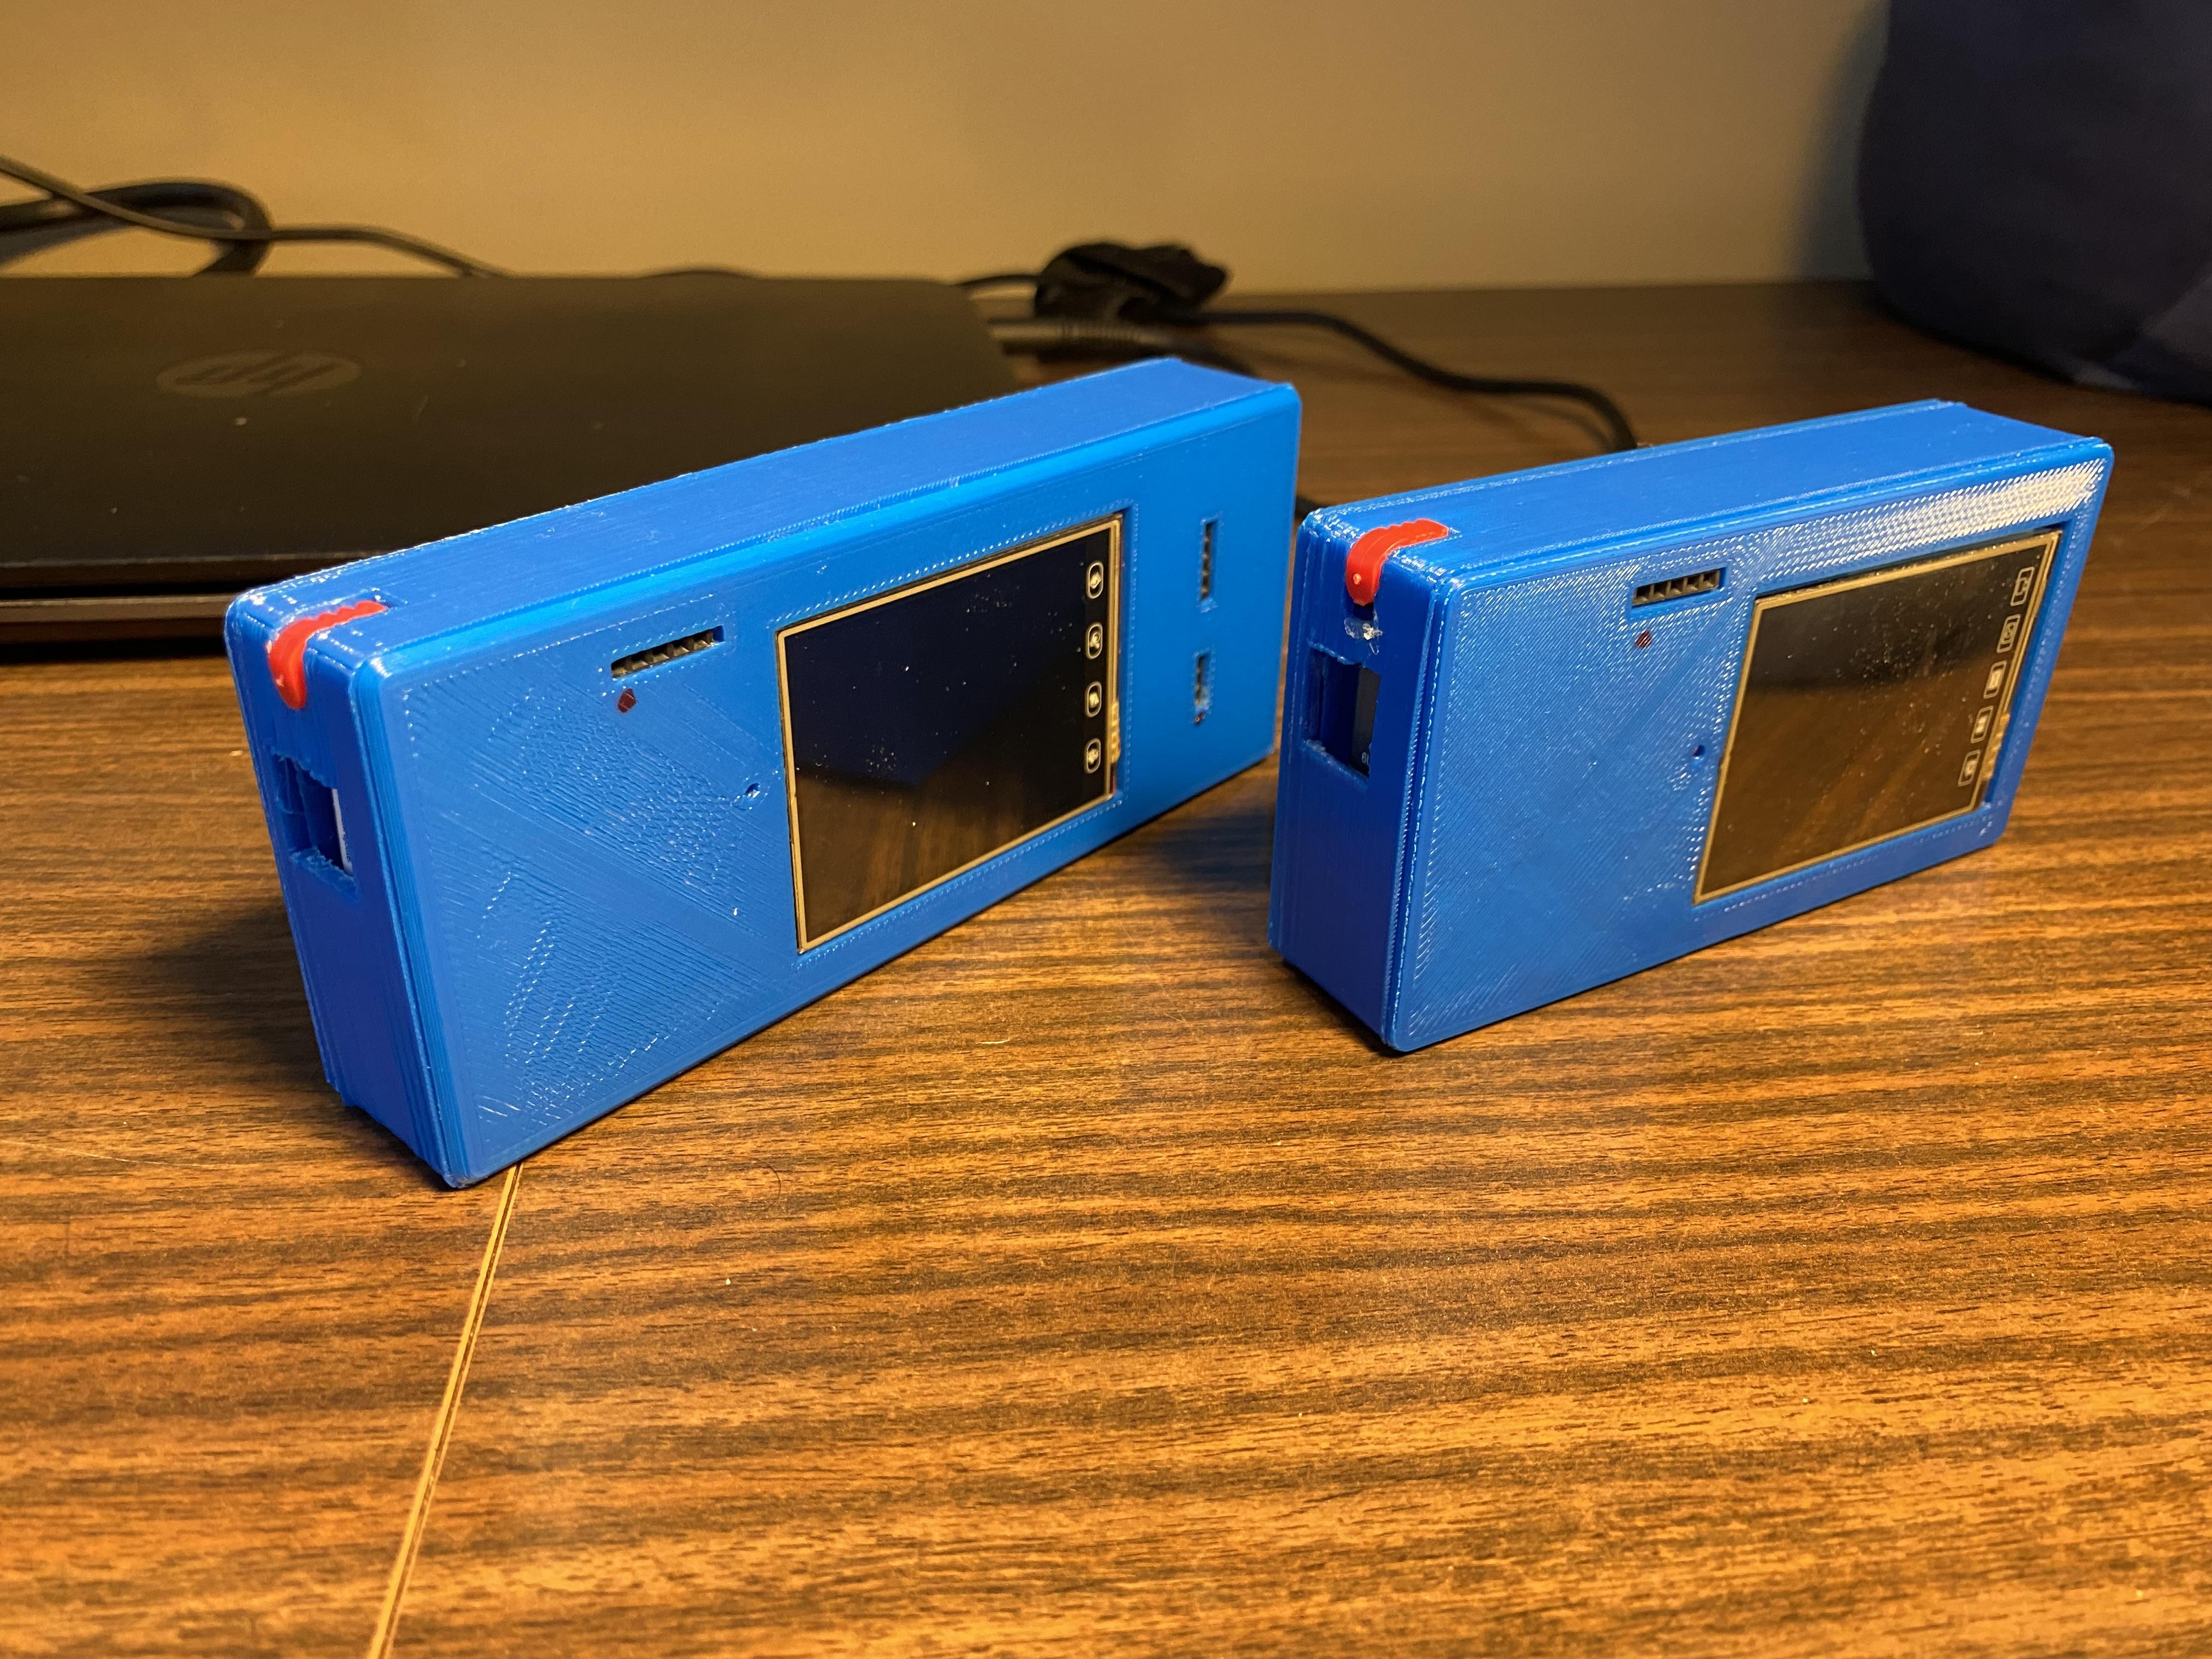
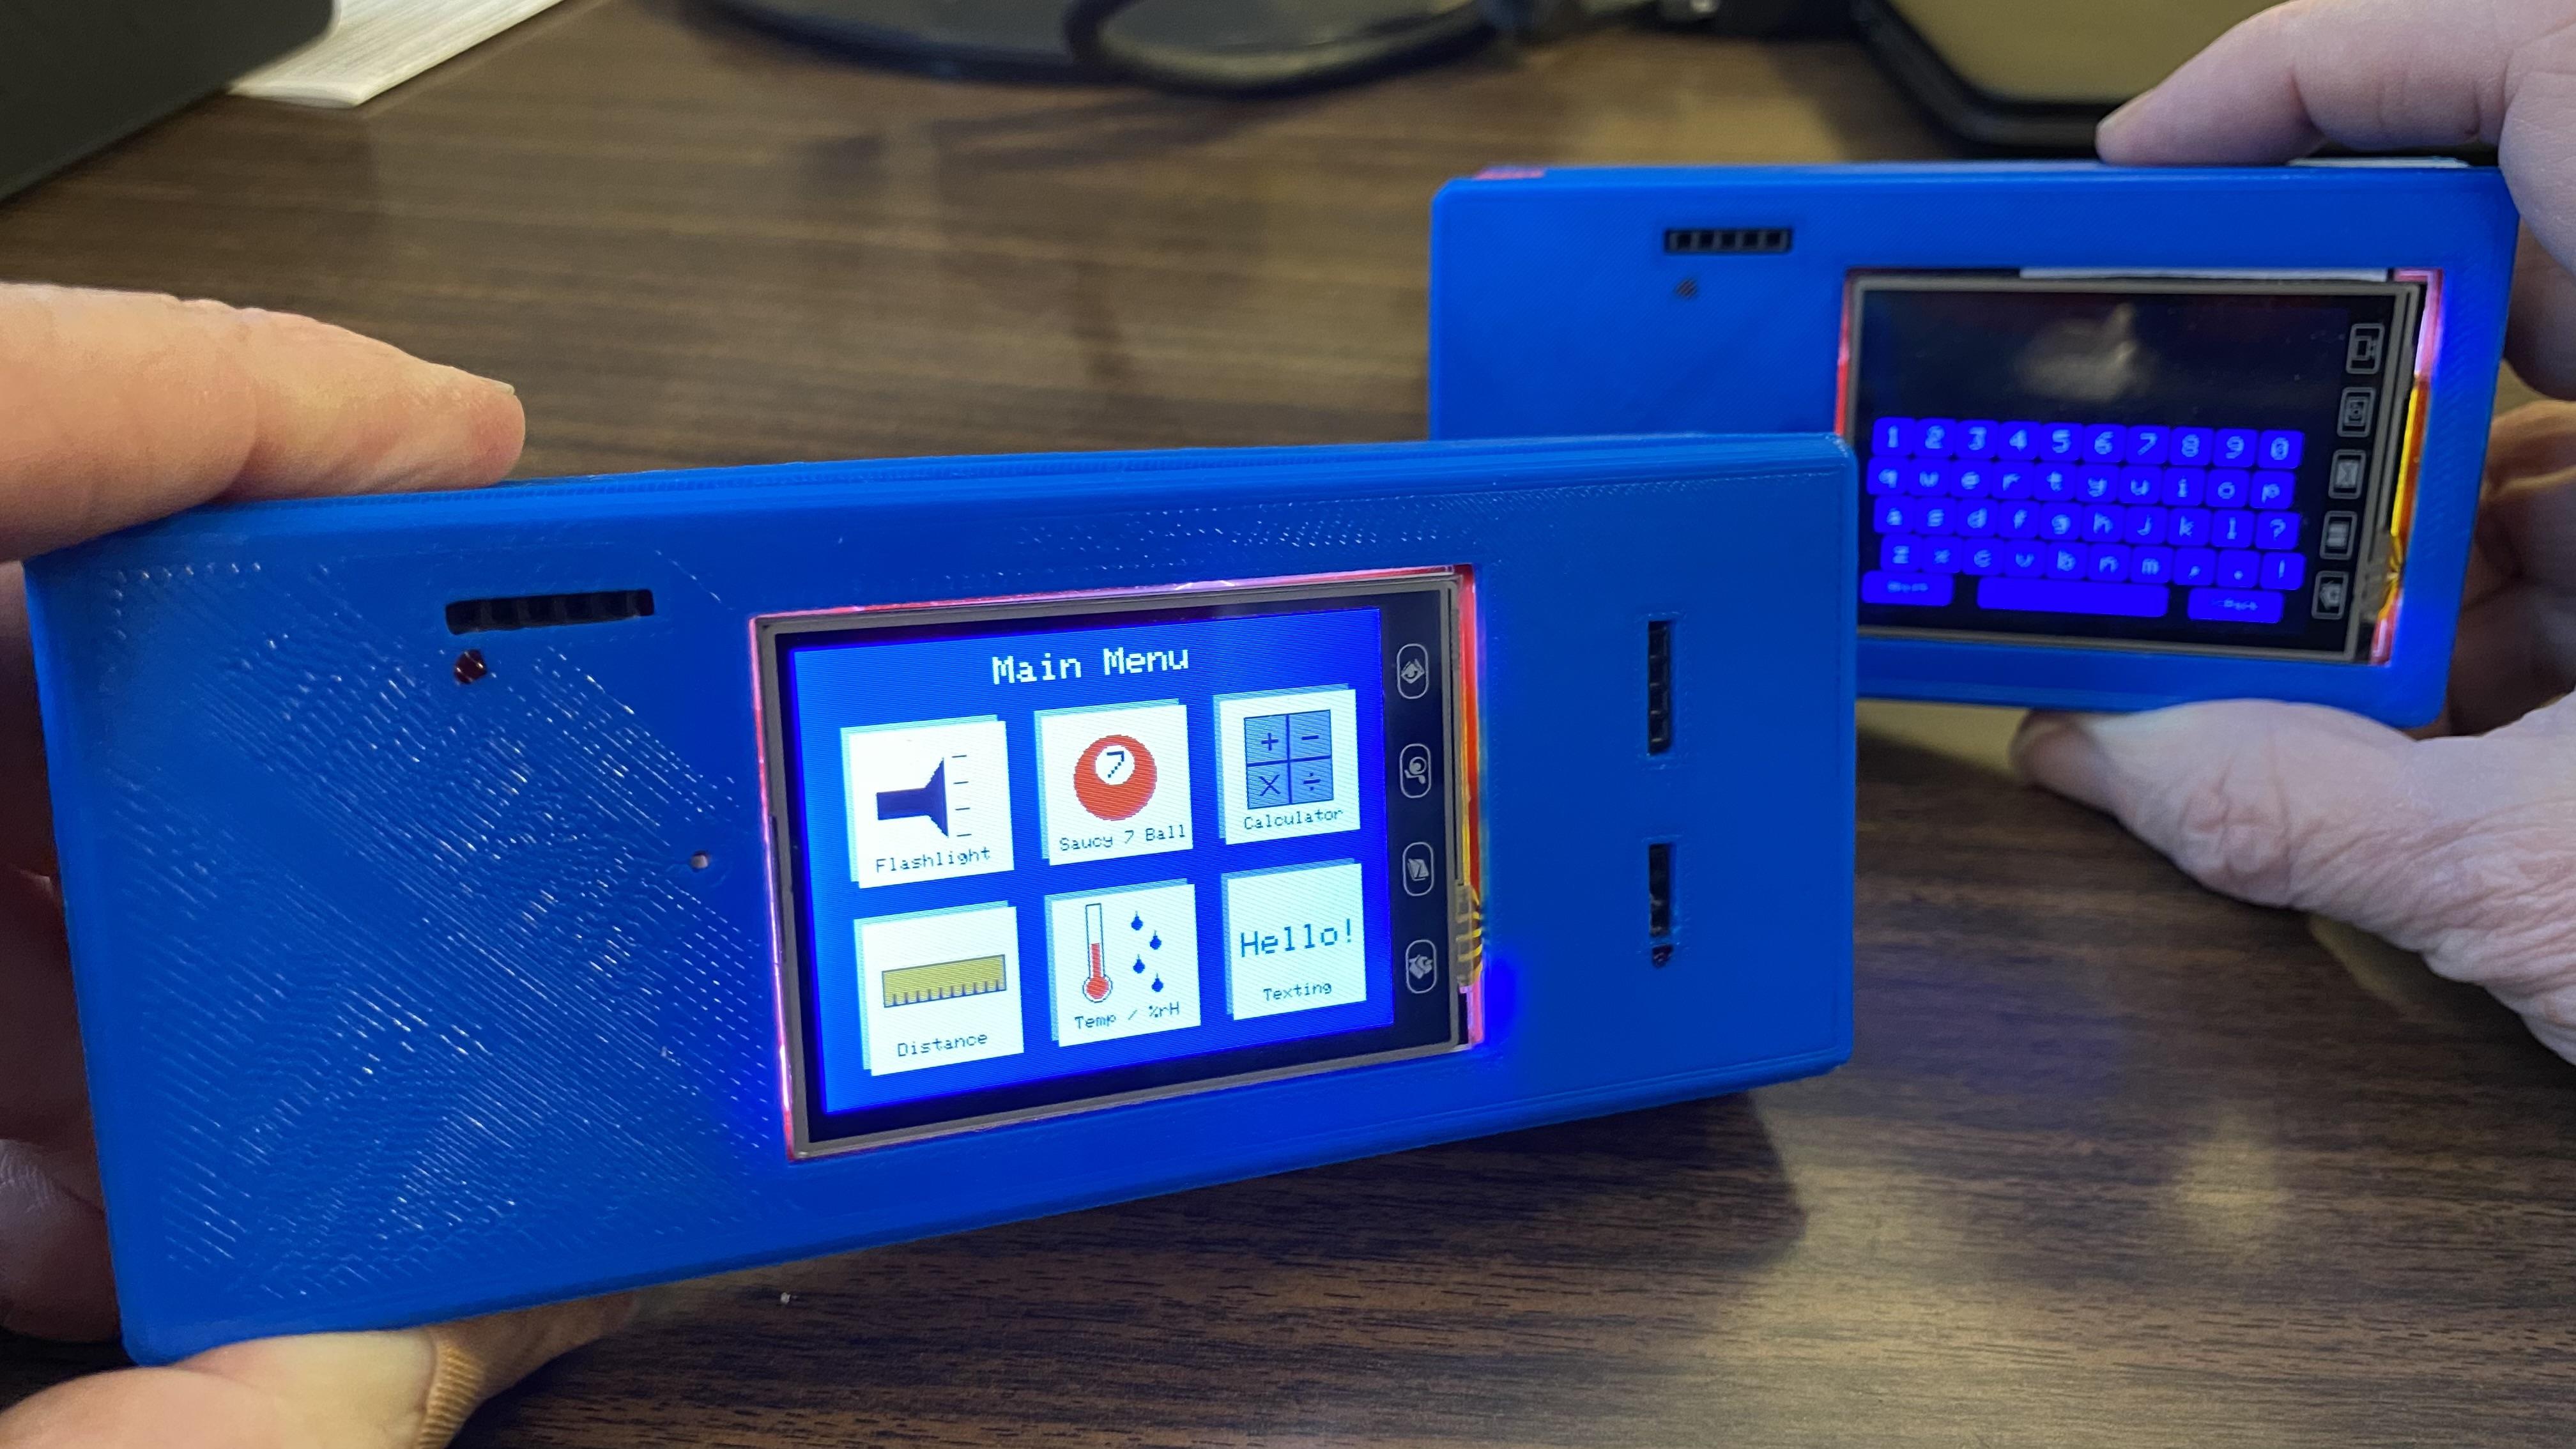
I did some further work to improve the reliability of the touch sensing, adding code to map the touch points to display points. Check out my Instructable on how to do this and how to improve accuracy with 9V power sources for the Arduino/Display.
Try JLC3DP for your 3D printing projects!
https://jlc3dp.com
The last update was to produce 3D printed enclosures for the BlueBerris, including a notched side to store the stylus.
Turned out great!