Blinking an LED Using Arduino UNO
by Mohit Mehlawat in Circuits > Arduino
583 Views, 0 Favorites, 0 Comments
Blinking an LED Using Arduino UNO

In this project we would be blinking an LED using Arduino Uno development board. The program is written in two languages:- Arduino programming language and C language.
Components
- Arduino Uno
- Light Emitting Diode(LED)
- Resistor(330 ohm)
- Jumper wires
Explaination

Before interfacing our LED to the pins of the Arduino board, we need to first understand what do we want our LED to do. As the title of the project makes it very clear, we only want our LED to switch between ON(logic 1) and OFF(logic 0) position. The operation is digital in nature. Therefore we have to interface the LED to digital input/output pin of the board.
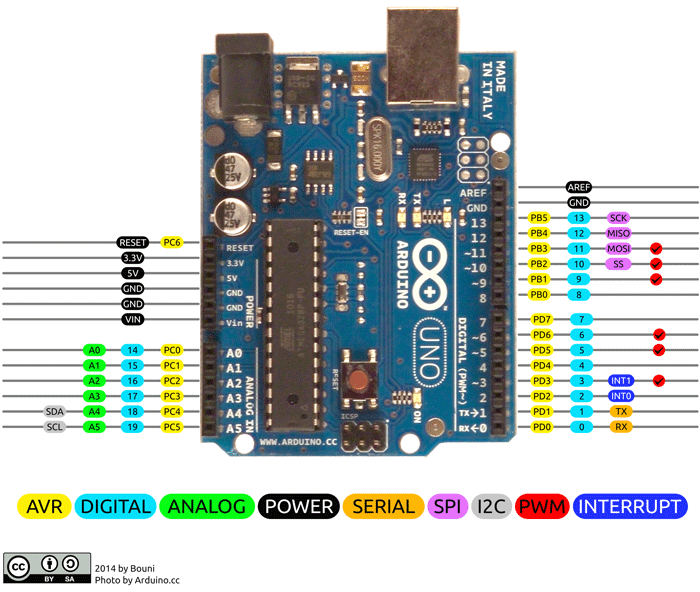
If we go through the datasheet of the Arduino Uno, there are 14 digital I/O pins. So lets assume that we interface led to pin 8(shown on the board). Before interfacing we need to check what voltage does digital pin 8 generates for logic 1 and logic 0.
- Logic 1 = 5V
- Logic 0 = 0V
The electrical specification of led
- Operating voltage = 1.5V - 3V
- Operating current = 1 - 50mA
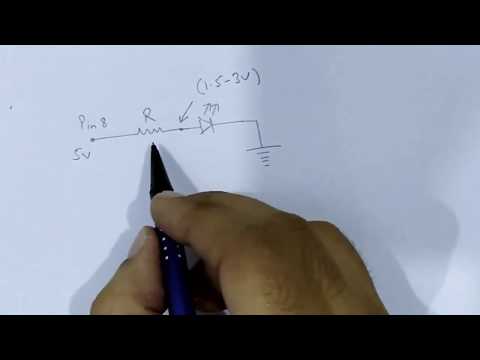
so we cannot directly interface the led to the pin. We need to drop-down this voltage. For this a resistor is placed in series with the led.
Assuming, the current flowing through the led is 10mA and we know the operating voltage range(in pic).
Applying Kirchhoff's voltage law(KVL), we can get the range of the value of resistor. The value of resistor obtained is, 200ohm < R < 350ohm. So we take the value of resistor as R = 330ohm. So this defines the complete hardware interfacing. We will now move on to programming the board.
Program Using Arduino Programming Language

Before programming the microcontroller, we have to first go through the datasheet of the microcontroller (ATMega328P-PU). In the datasheet jump to the section of I/O ports. There you will find on how to configure the pins of the controller(in pic).
- Define the direction of the pin operation :- Input/Output
- The data to be transferred/received from the pin.
In this section we would be writing the code in arduino programming language, so we would refer to the function lists provided in the link https://www.arduino.cc/reference/en/
/* Turn the LED ON for one second and turn OFF for one second, do it repeatedly */

void setup()
{
  // put your setup code here, to run once:
  pinMode(8, OUTPUT); //pin 8 is configured as output
}

void loop()
{
  // put your main code here, to run repeatedly:
  digitalWrite(8, HIGH); // turn the LED ON (HIGH is the voltage level)
  delay(1000); // wait for a second
  digitalWrite(8, LOW); // turn the LED OFF by making the voltage LOW
  delay(1000); // wait for a second
}
Program Using C Language

The picture given above represents the mapping of the ports on ATMega328P with the pin description given on the Arduino board. So, while writing the code in C language, we can only access the pin by using the information provided by the controller.
Pin 8(arduino board) = PB0(Port B pin 0)
/* Turn the LED ON for one second and turn OFF for one second, do it repeatedly */
#include<avr/io.h> //library that contains all the information about avr microcontrollers
#include<util/delay.h>
int main(void)
{
DDRB |= (1<<DDB0); //Data direction register for PORTB is DDRB and pin0 of PORTB is set as output
while(1)
{
PORTB |= (1<<PB0); //initially pin0 of PORTB is set to logic 1(+5V)
_delay_ms(1000); //1 second delay
PORTB &= ~(1<<PB0); //this complements the pin0 to logic 0
_delay_ms(1000); //1 second delay
}
}
Working
