Bike Overtaking Distance Sensor
by millmore in Outside > Bikes
13097 Views, 69 Favorites, 0 Comments
Bike Overtaking Distance Sensor
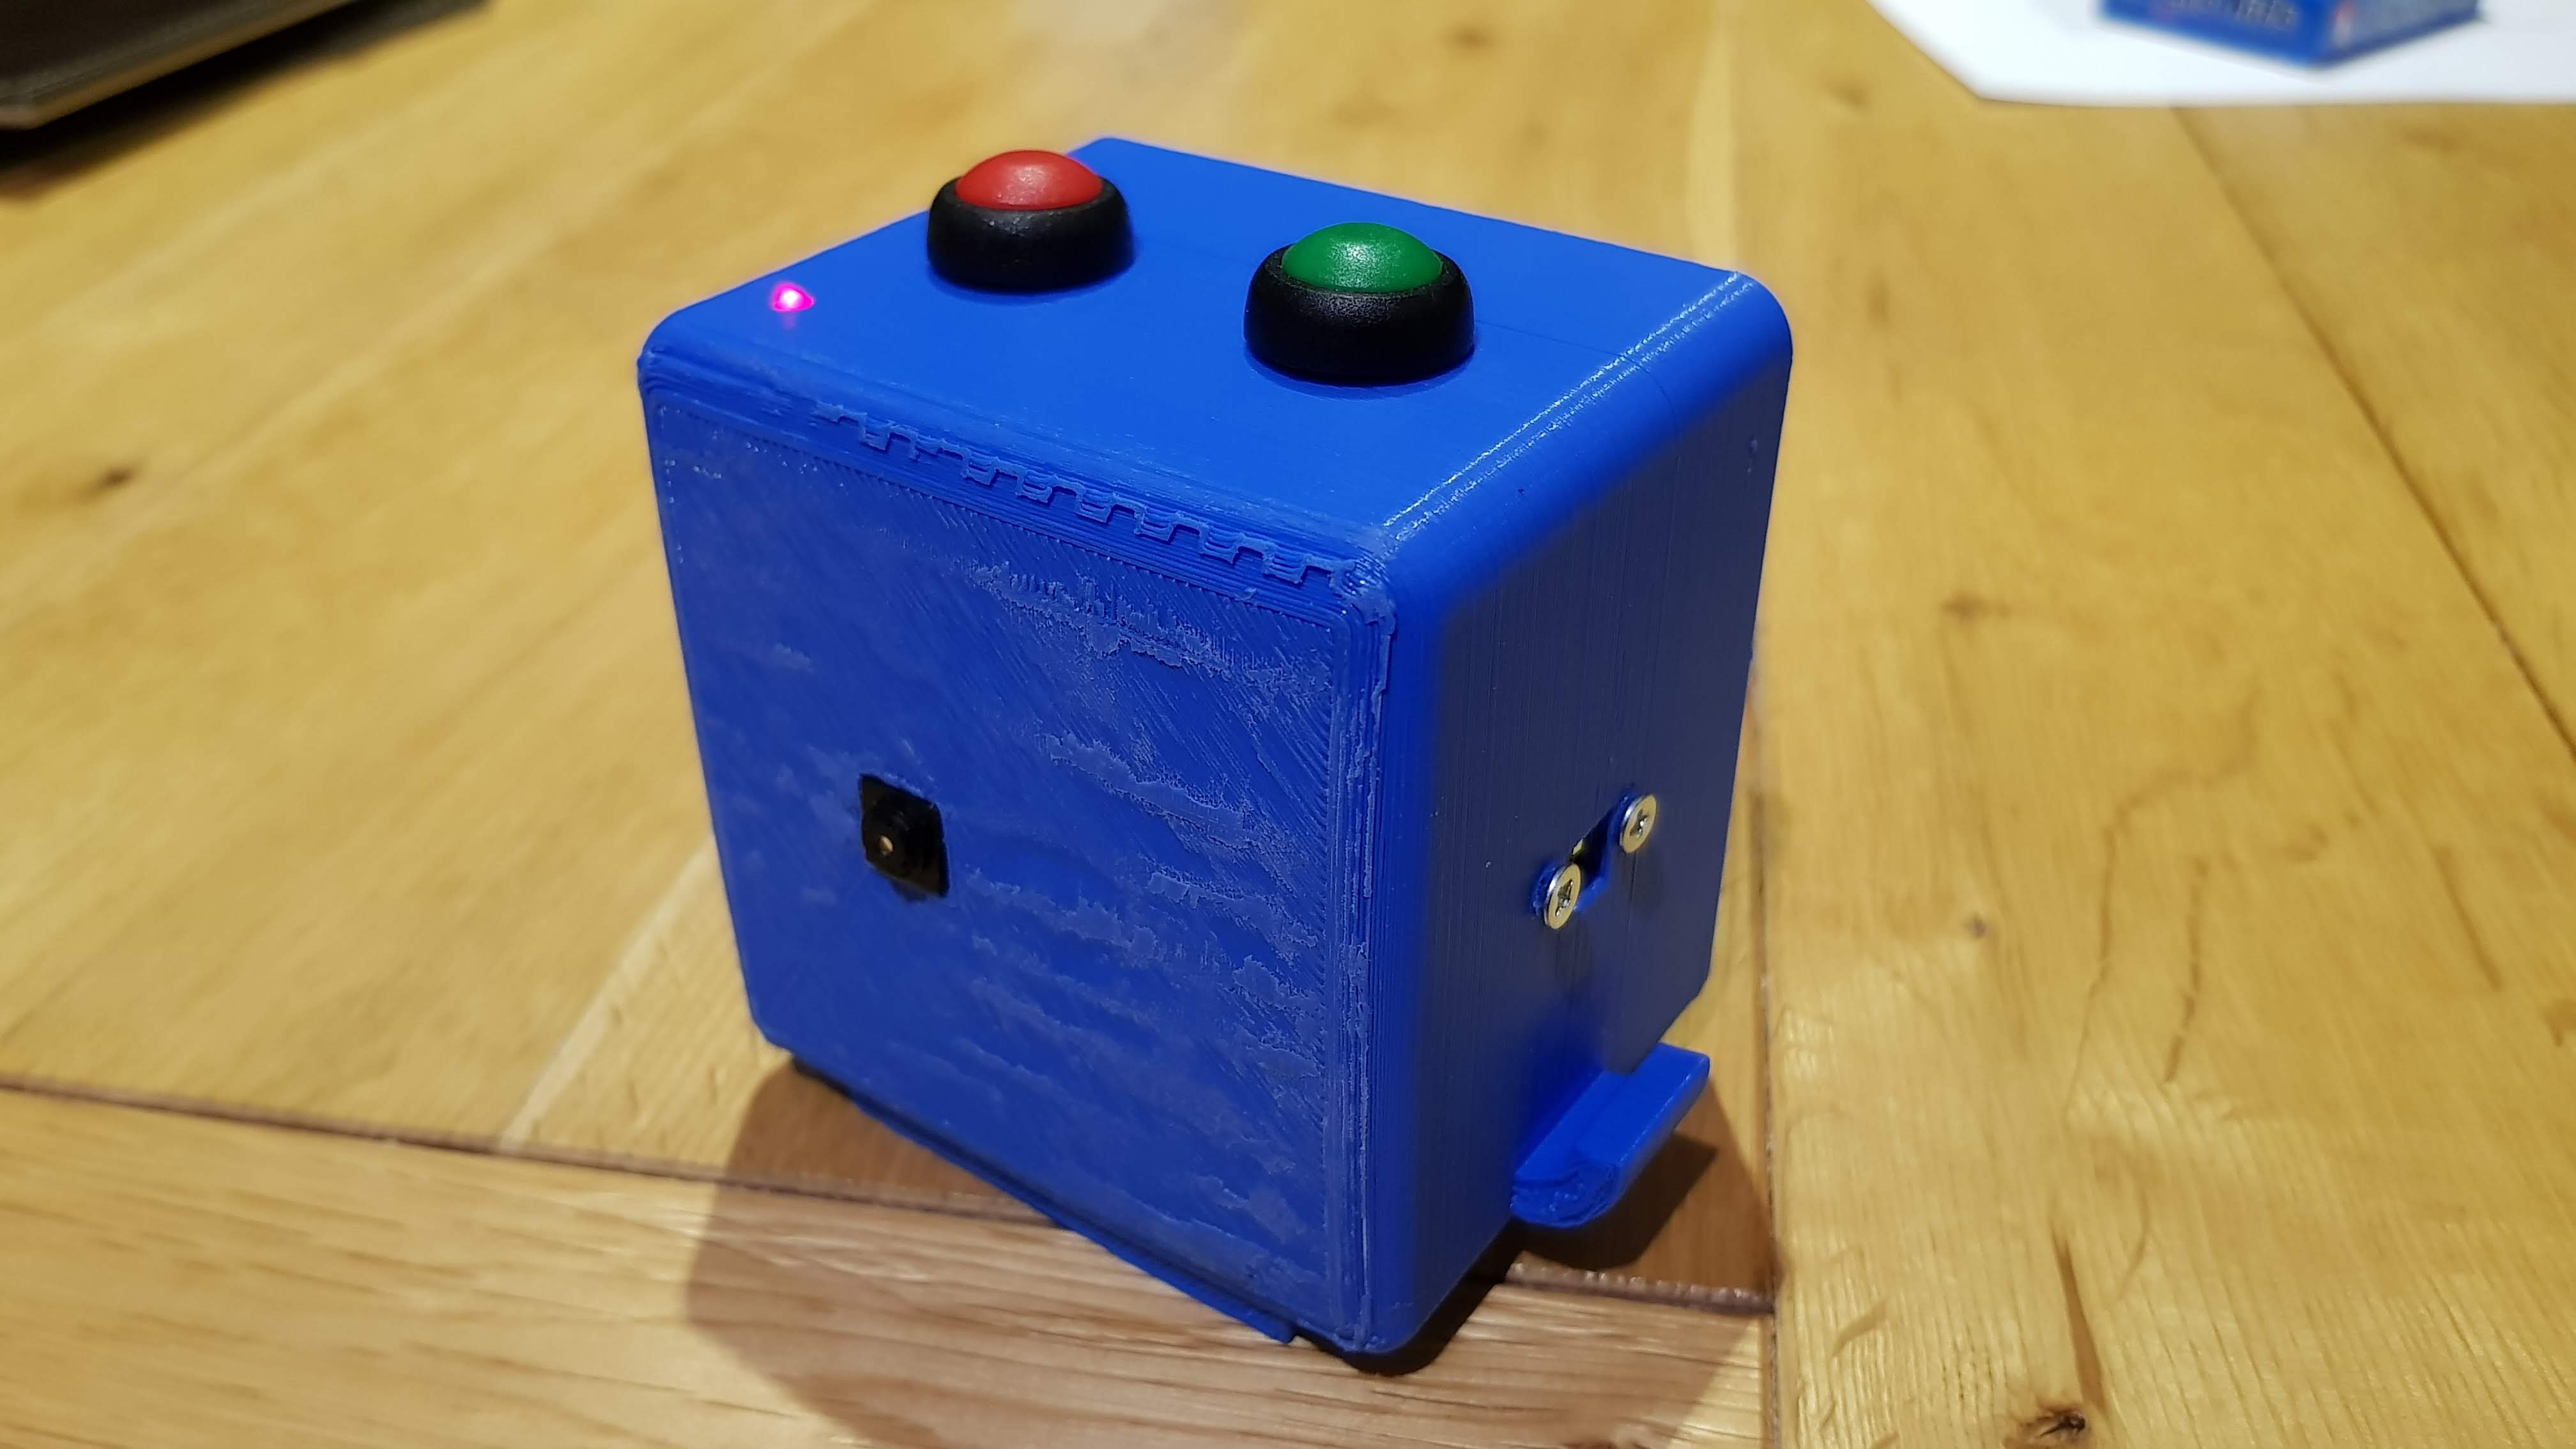
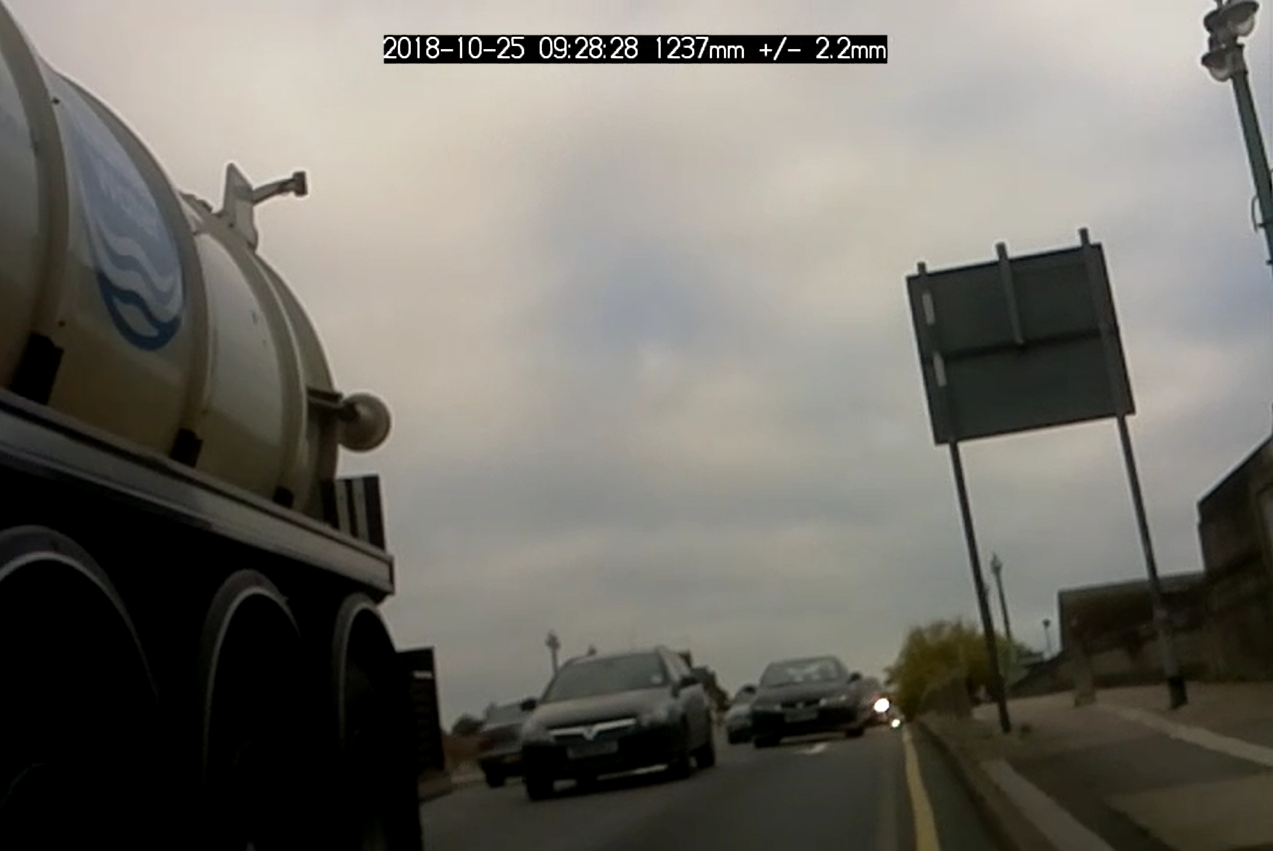

If you ever cycle on main roads, you will be familiar with the occasional car or truck who decides they need to get past you just one foot from your elbow. That probably seems like lots of space to them, but if I had to swerve to miss a pot hole or ironworks in the road, I'd be in trouble. 99.9% of vehicles are in fact very careful, but for those 0.1% of people who drive badly, I decided to build an overtaking sensor for my bike.
The overtaking sensor uses a laser time of flight distance sensor to see how far away the other vehicles are, and a camera to record the vehicle going past. I needed to record (and more importantly retrieve) the data easily, so I decided to use a Raspberry Pi Zero Wireless to manage the recording and to make the results available wirelessly. Lastly, I 3D printed a case to fit it all in.
Components
- Raspberry Pi Zero Wireless
- 64GB micro USB card
- Pi Zero Camera
- Pimoroni VL53L1X sensor on a breakout board
- 2 push buttons (Normally Open)
- An led and a suitable resistor (e.g. 560 ohm).
- Breadboard wires
- Heatshrink
- Elastic bands
- Screws and bolts
- 3D printer
- A rechargeable USB battery pack
- A 90 degree USB connector
- Soldering iron
How it works
The overtaking sensor uses an infra red laser for optical distance measurement. The VL53L1X chip sends an eye safe laser beam, and measures the time it takes to get a reflection, allowing it to measure distances from 40mm to 4m. This LIDAR detection is fast, and can take measurements up to 50 times a second - ideal for recording fast moving vehicles.
The sensor data is captured by a Raspberry Pi, which also uses a camera to record the passing traffic. The code overlays the distance measurement on the video so that the measurements and the activity are always tied together.
The Raspberry Pi uses a web interface to make the files available to download for you to view afterwards. All of the recording and viewing happens through a simple python piece of code.
Get Soldering
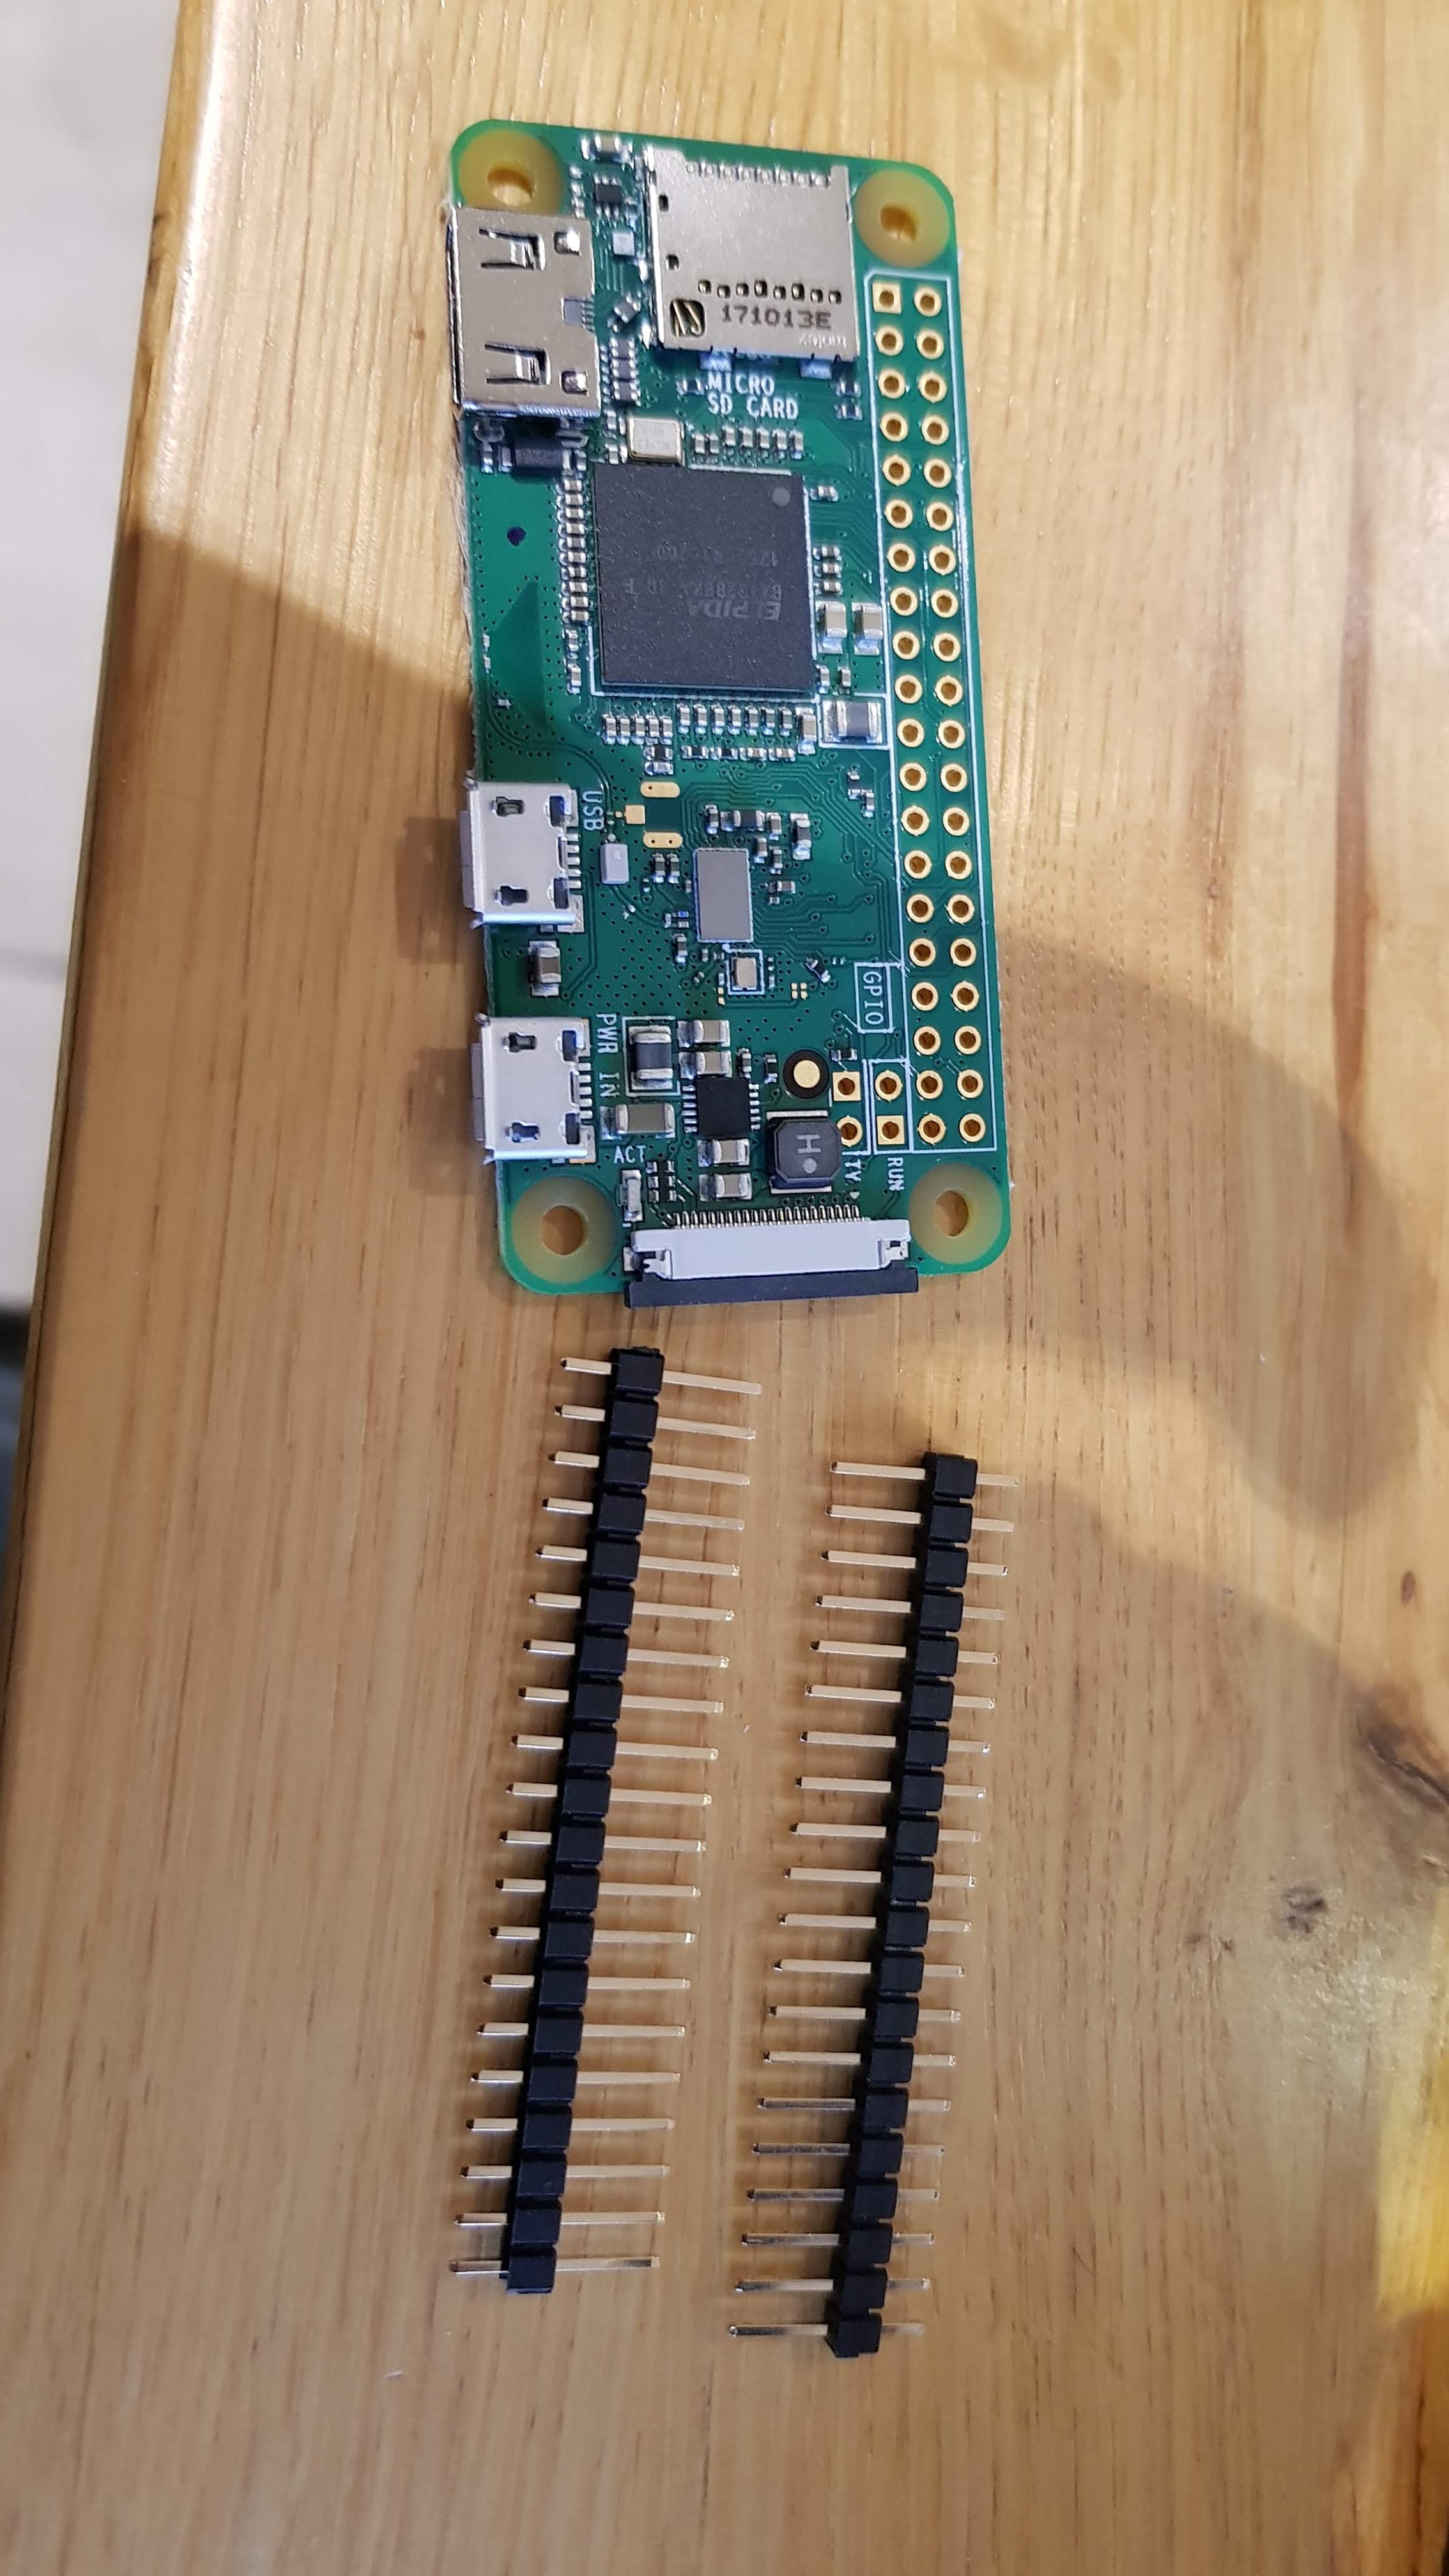
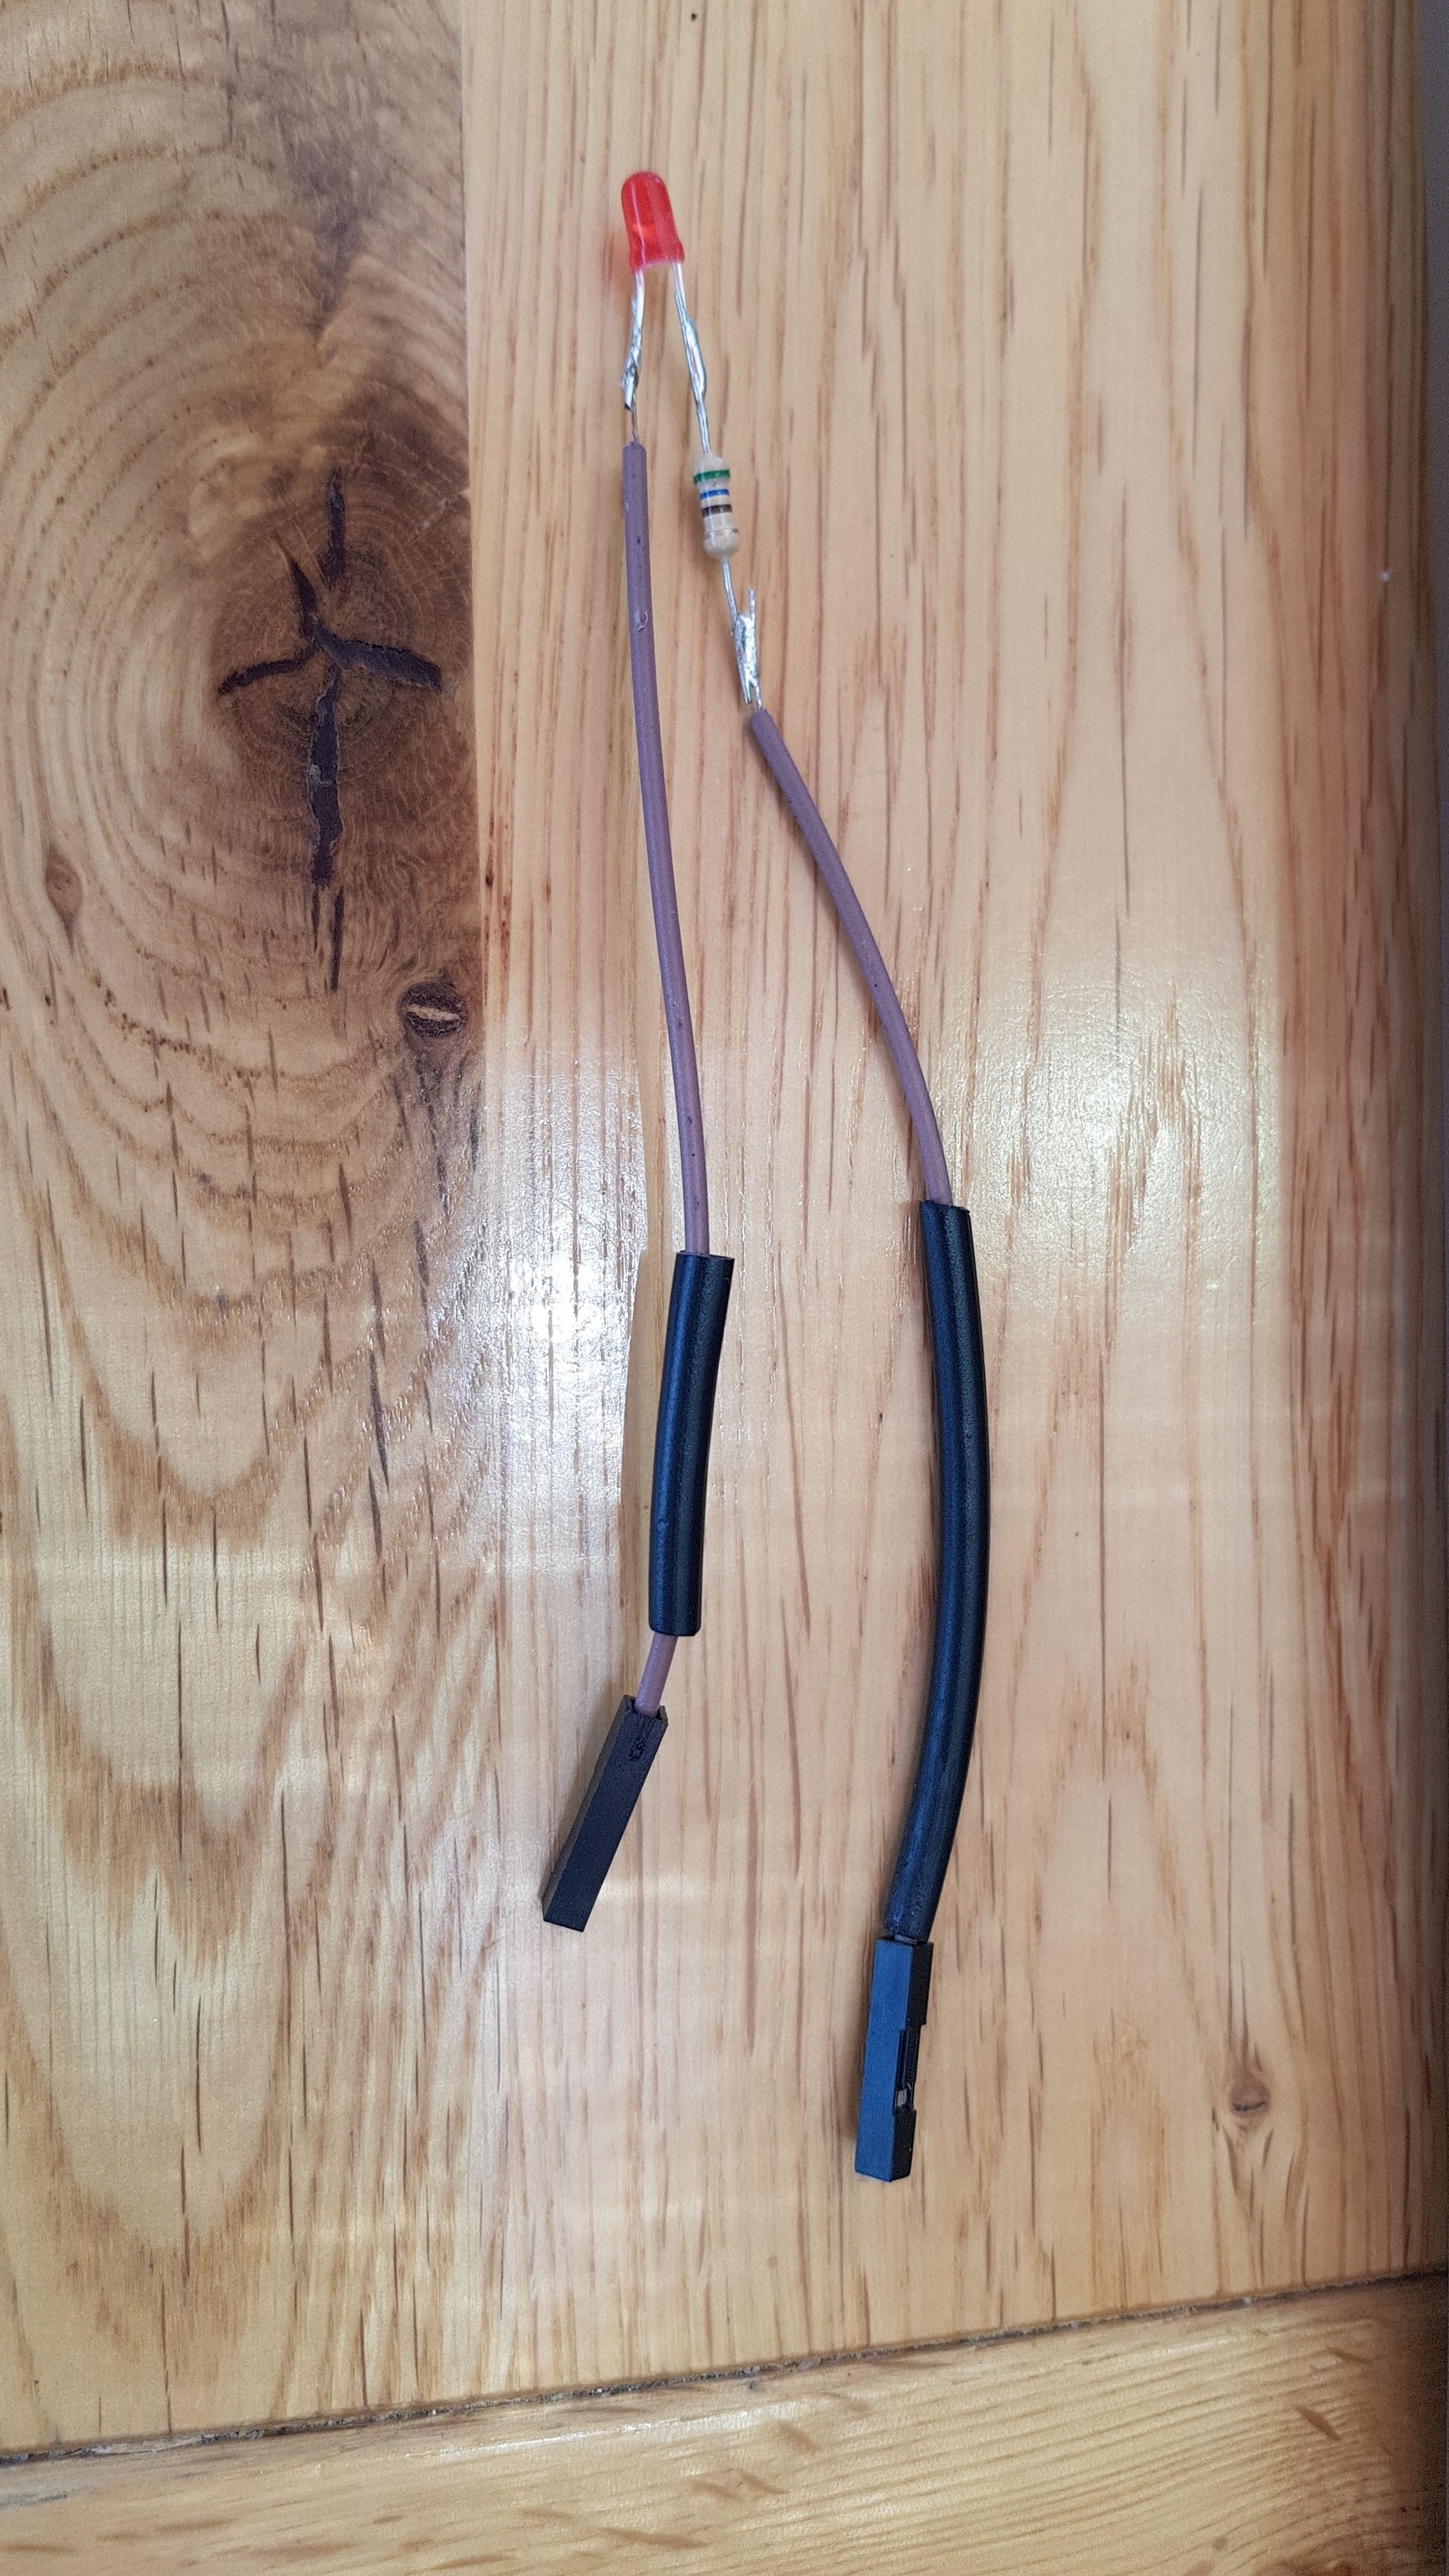
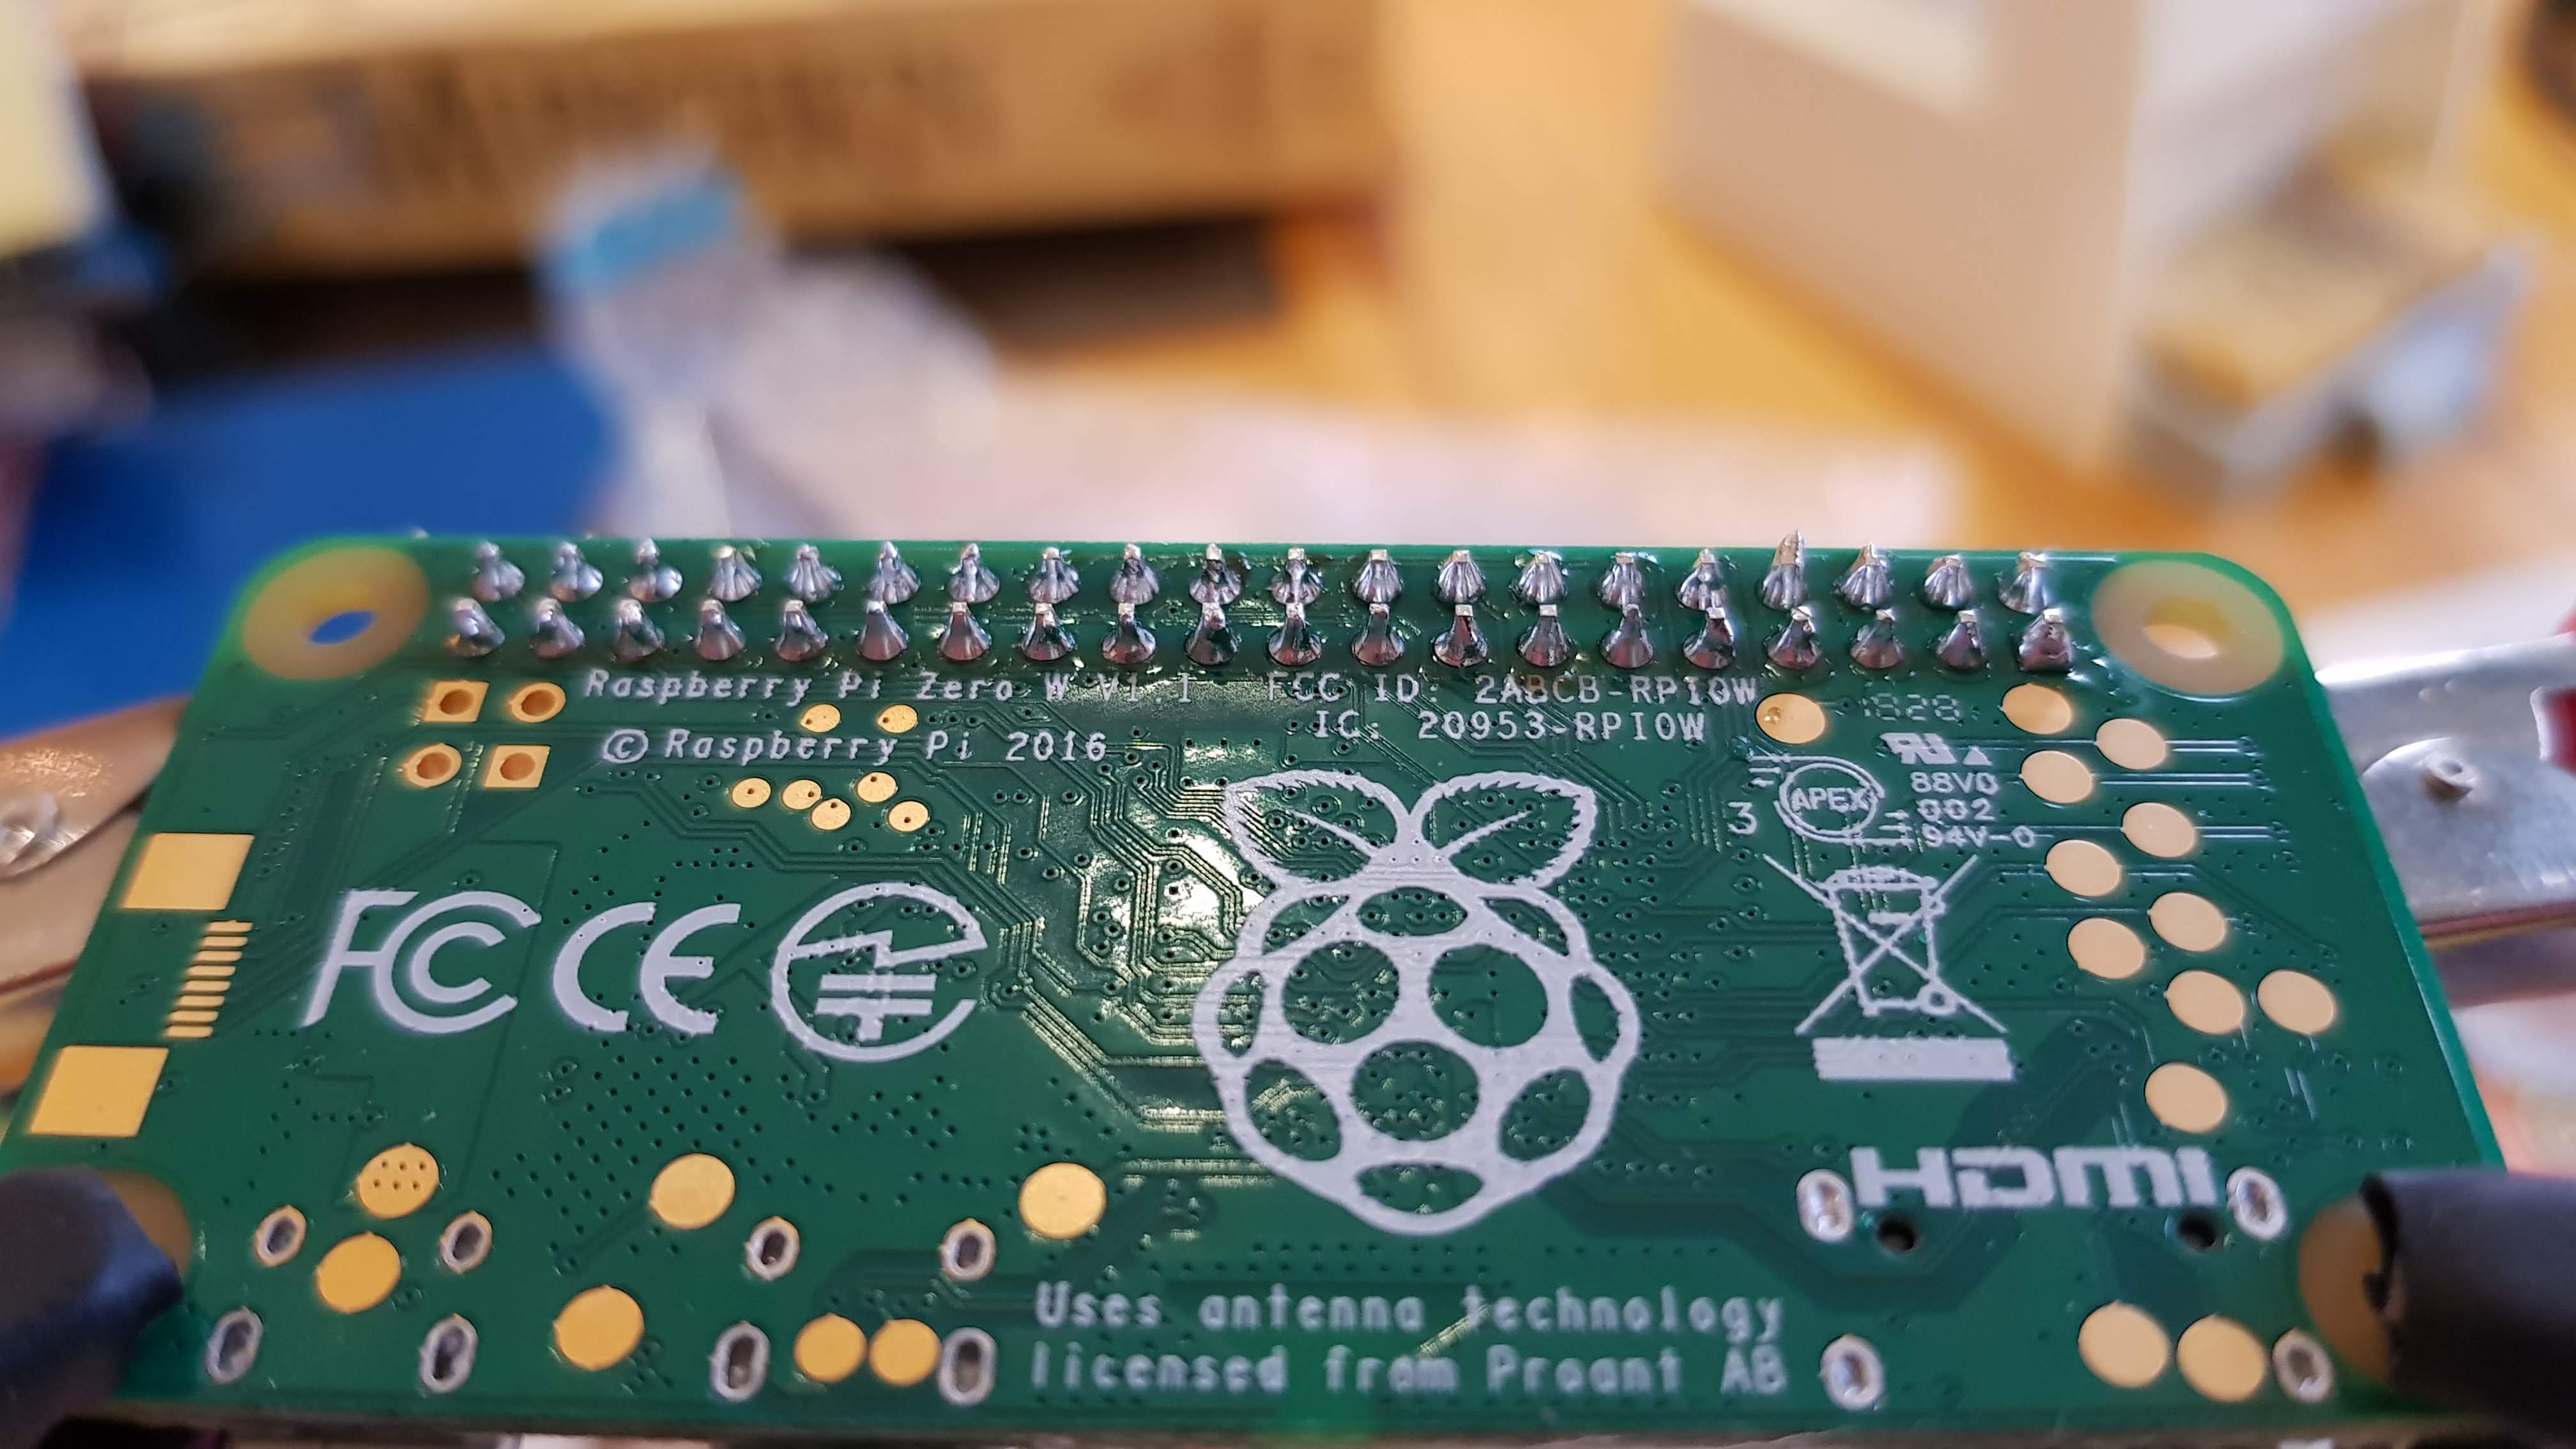
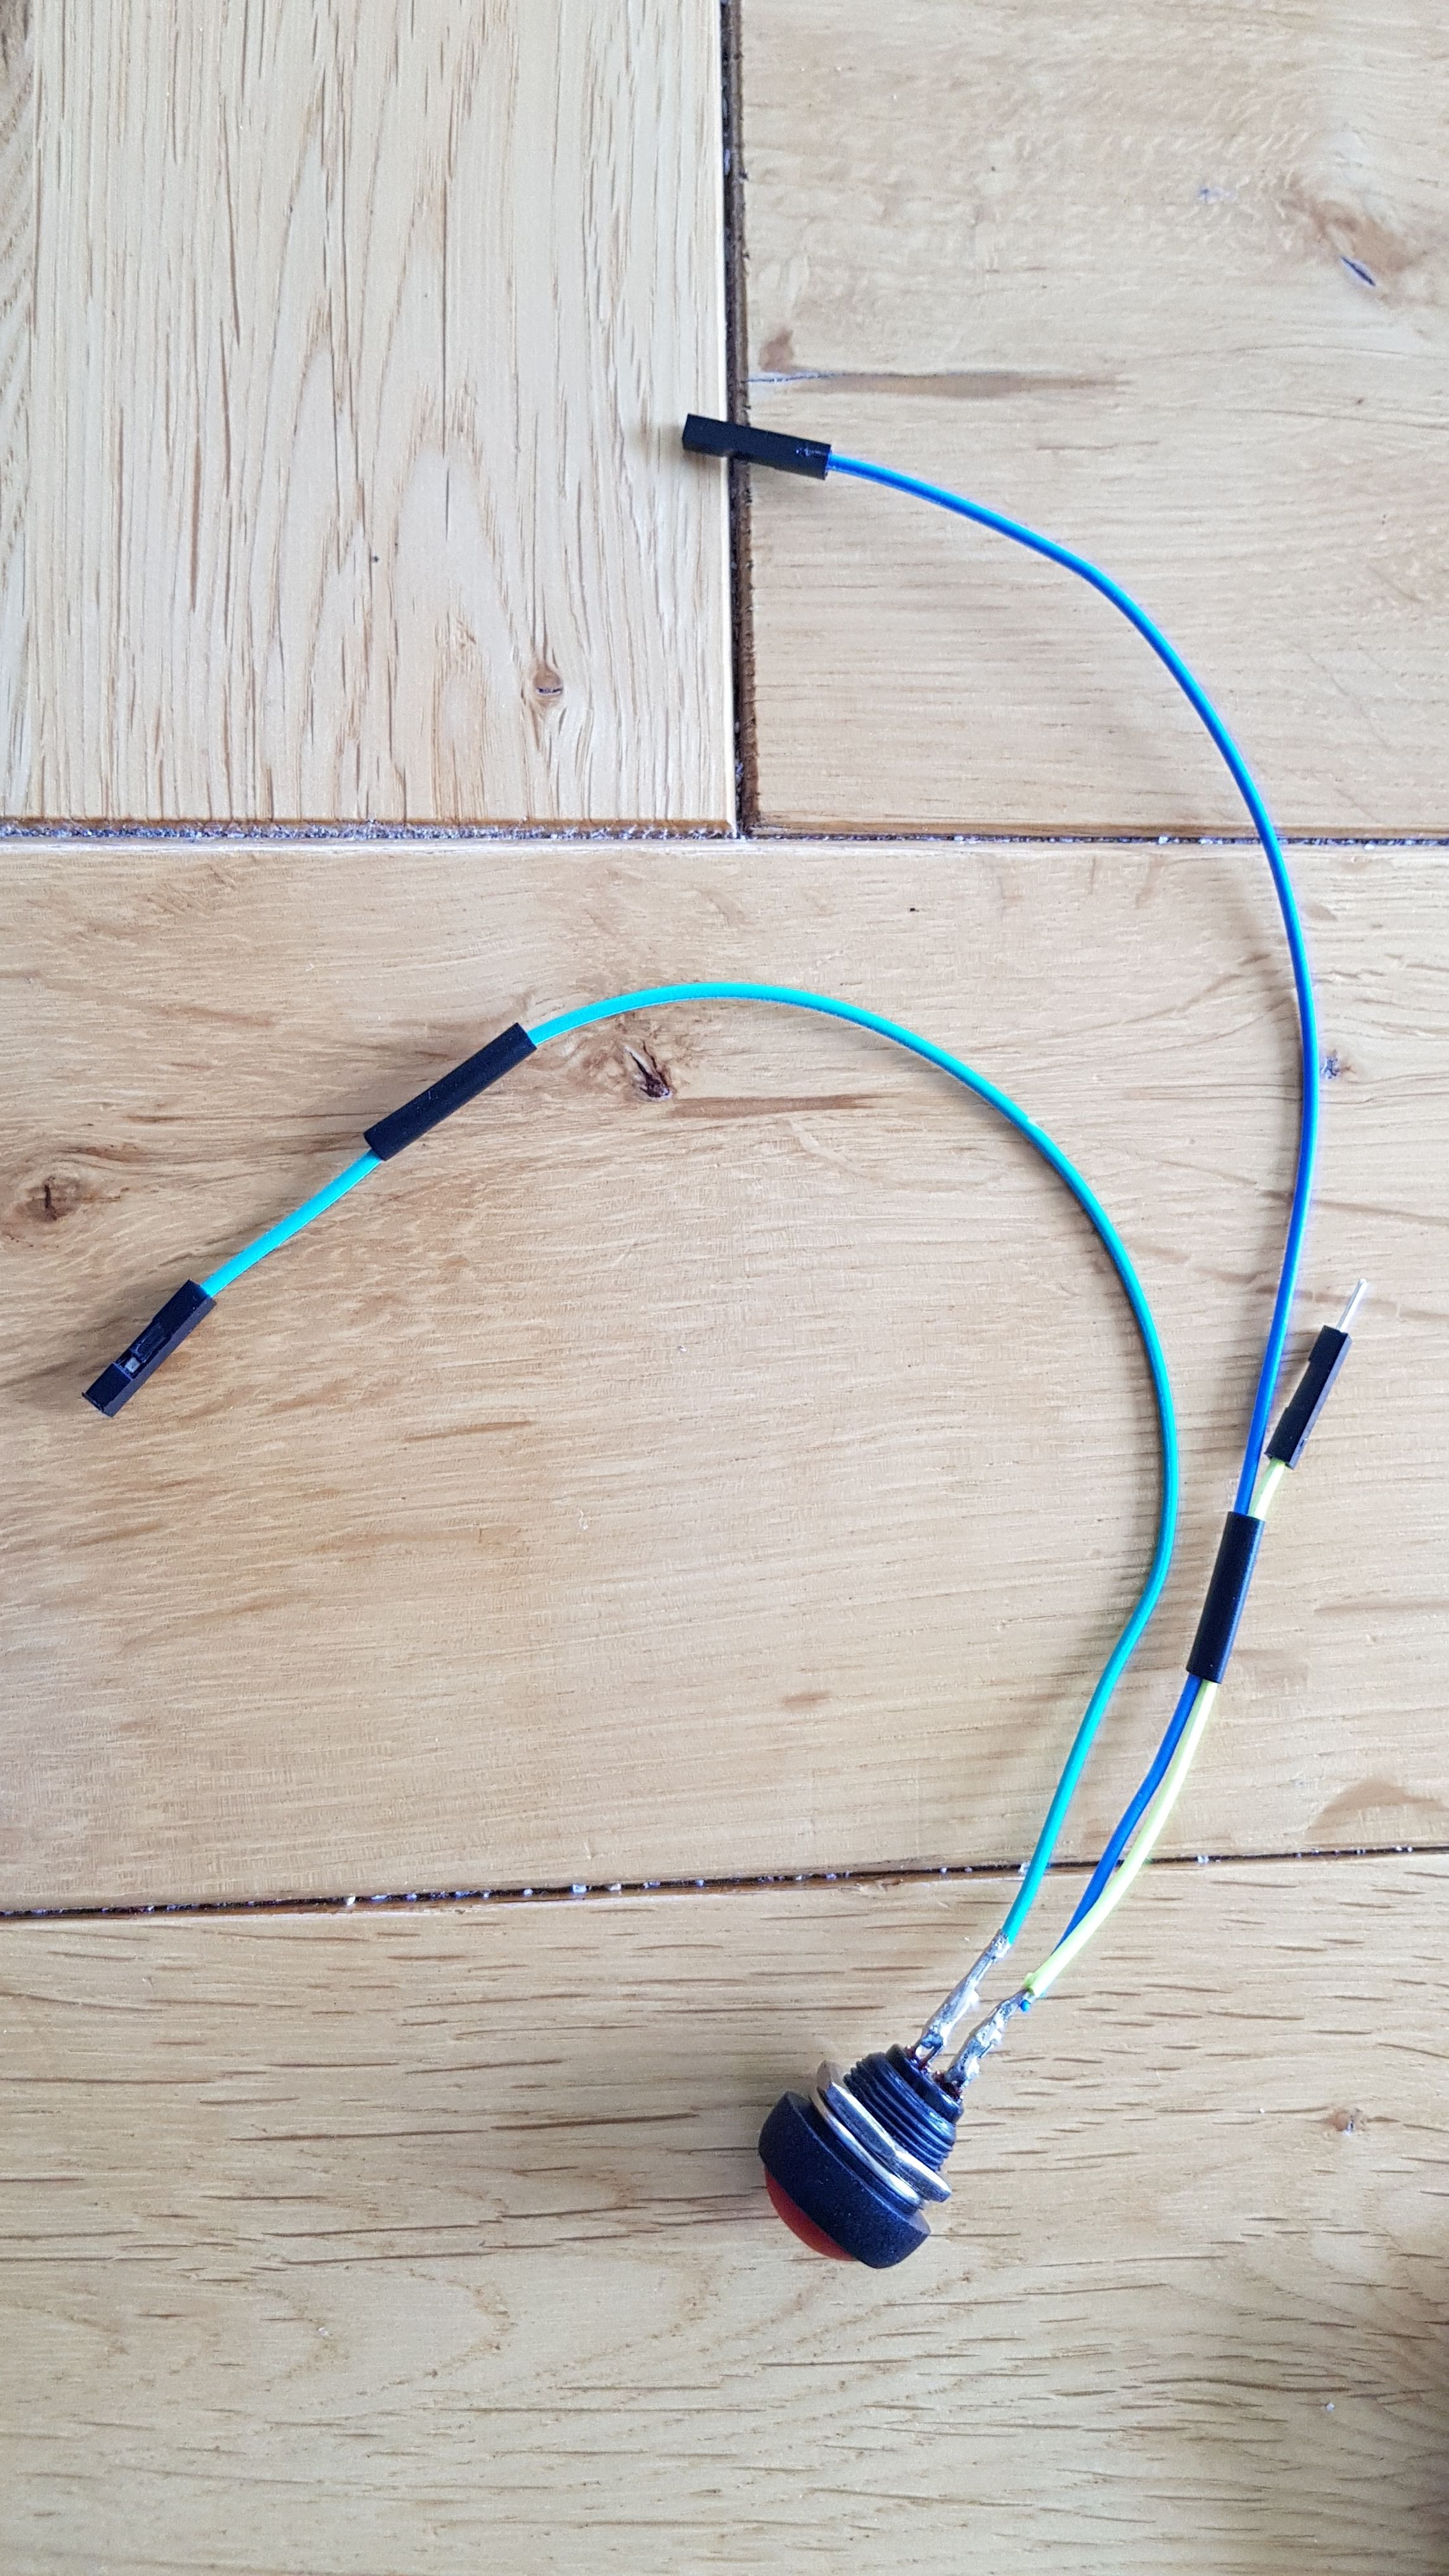
The Raspberry Pi, the distance sensor and the switches likely come un-soldered, so get your soldering iron out and start building. First of all, solder header pins on to the raspberry pi.
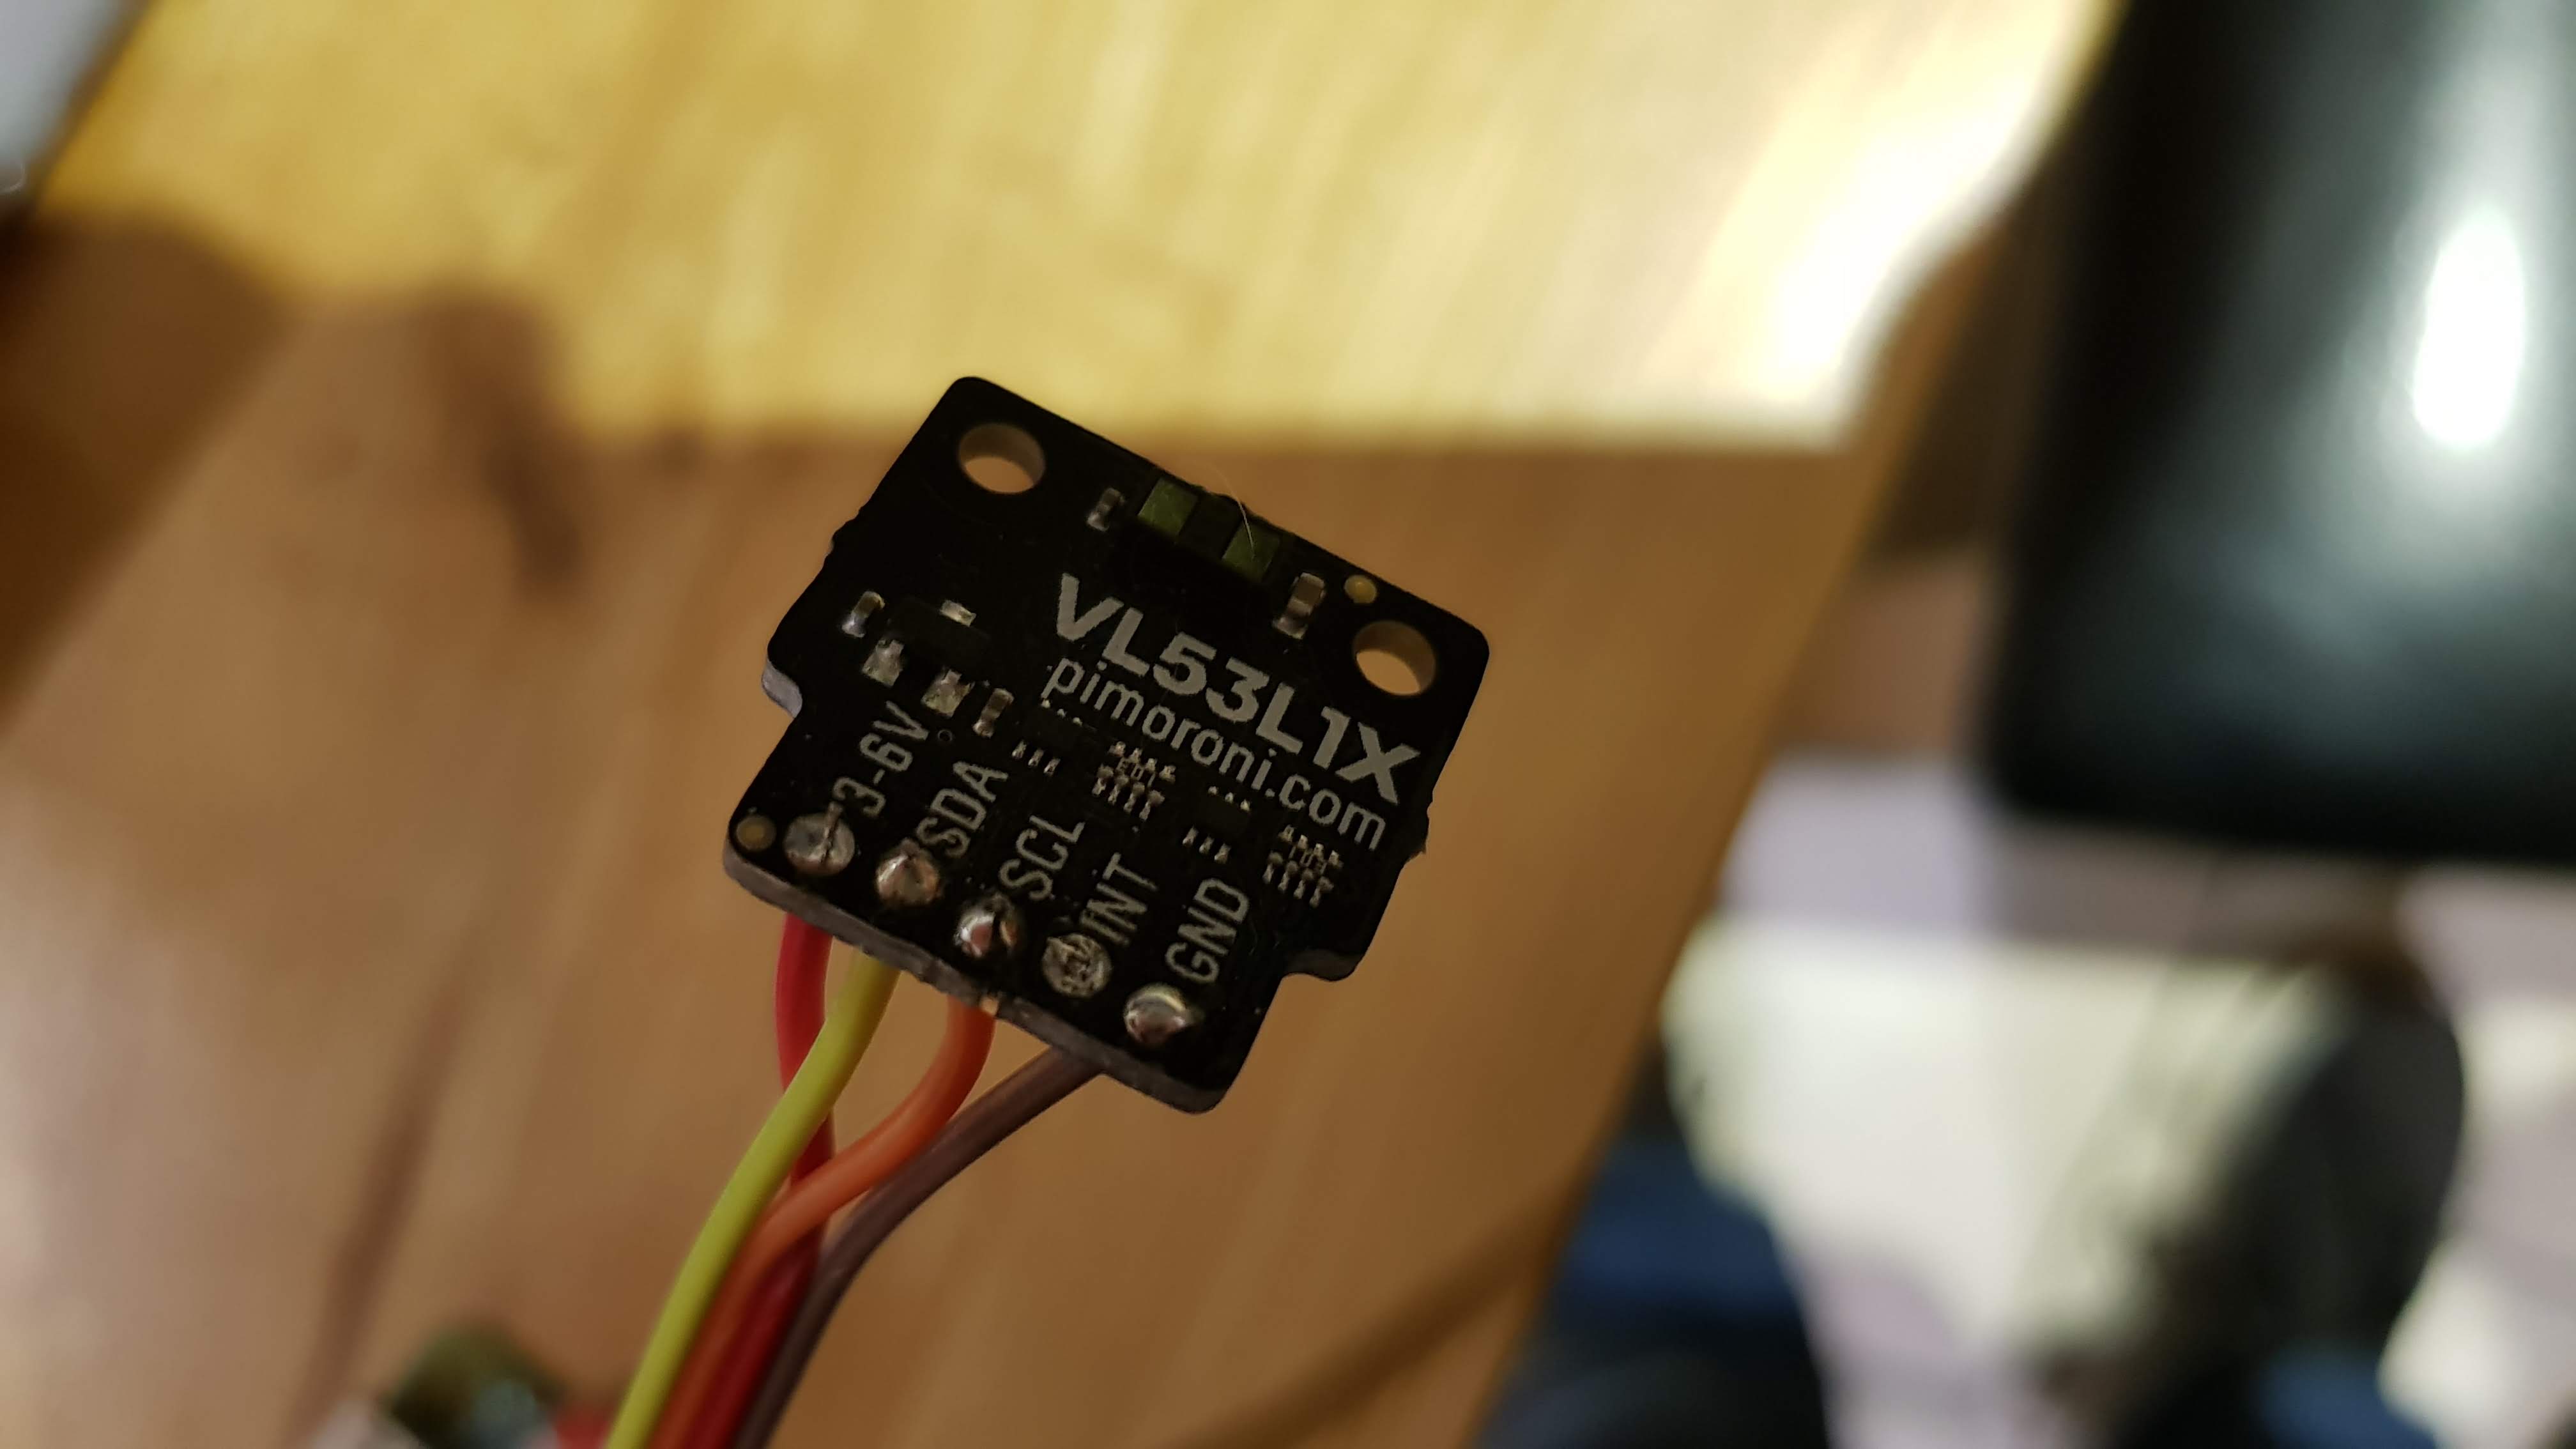
Next get some breadboard wires with female ends, and cut off whatever is on the other end, and solder the wire on to the VL53L1X. I did this so that it was easy to test and prototype, but you can easily just solder wires directly to the raspberry pi if you prefer - just don't do it yet, because some of the raspberry pi pins are dual purpose.
Next solder up the LED. Attach the resistor to the cathode - the side with the shorter leg and with the flat side. Then solder on female breadboard connectors to the anode and to the other end of the resistor. I added some heatshrink to go round the legs of the LED to avoid the bare wires from touching other components.
Lastly, solder up the two switches. One of the switches will be to start and stop recordings, and also to power down the device. The other will be to turn on the device. Choose your switch colours accordingly. For the switch to start and stop, just solder two female breadboard wires to it. For the turn on switch, we need something more complicated. Solder a female breadboard wire to one side. On the other side, solder both a male and a female connector. Again, I used heatshrink round the connections.
Set Up the Raspberry Pi
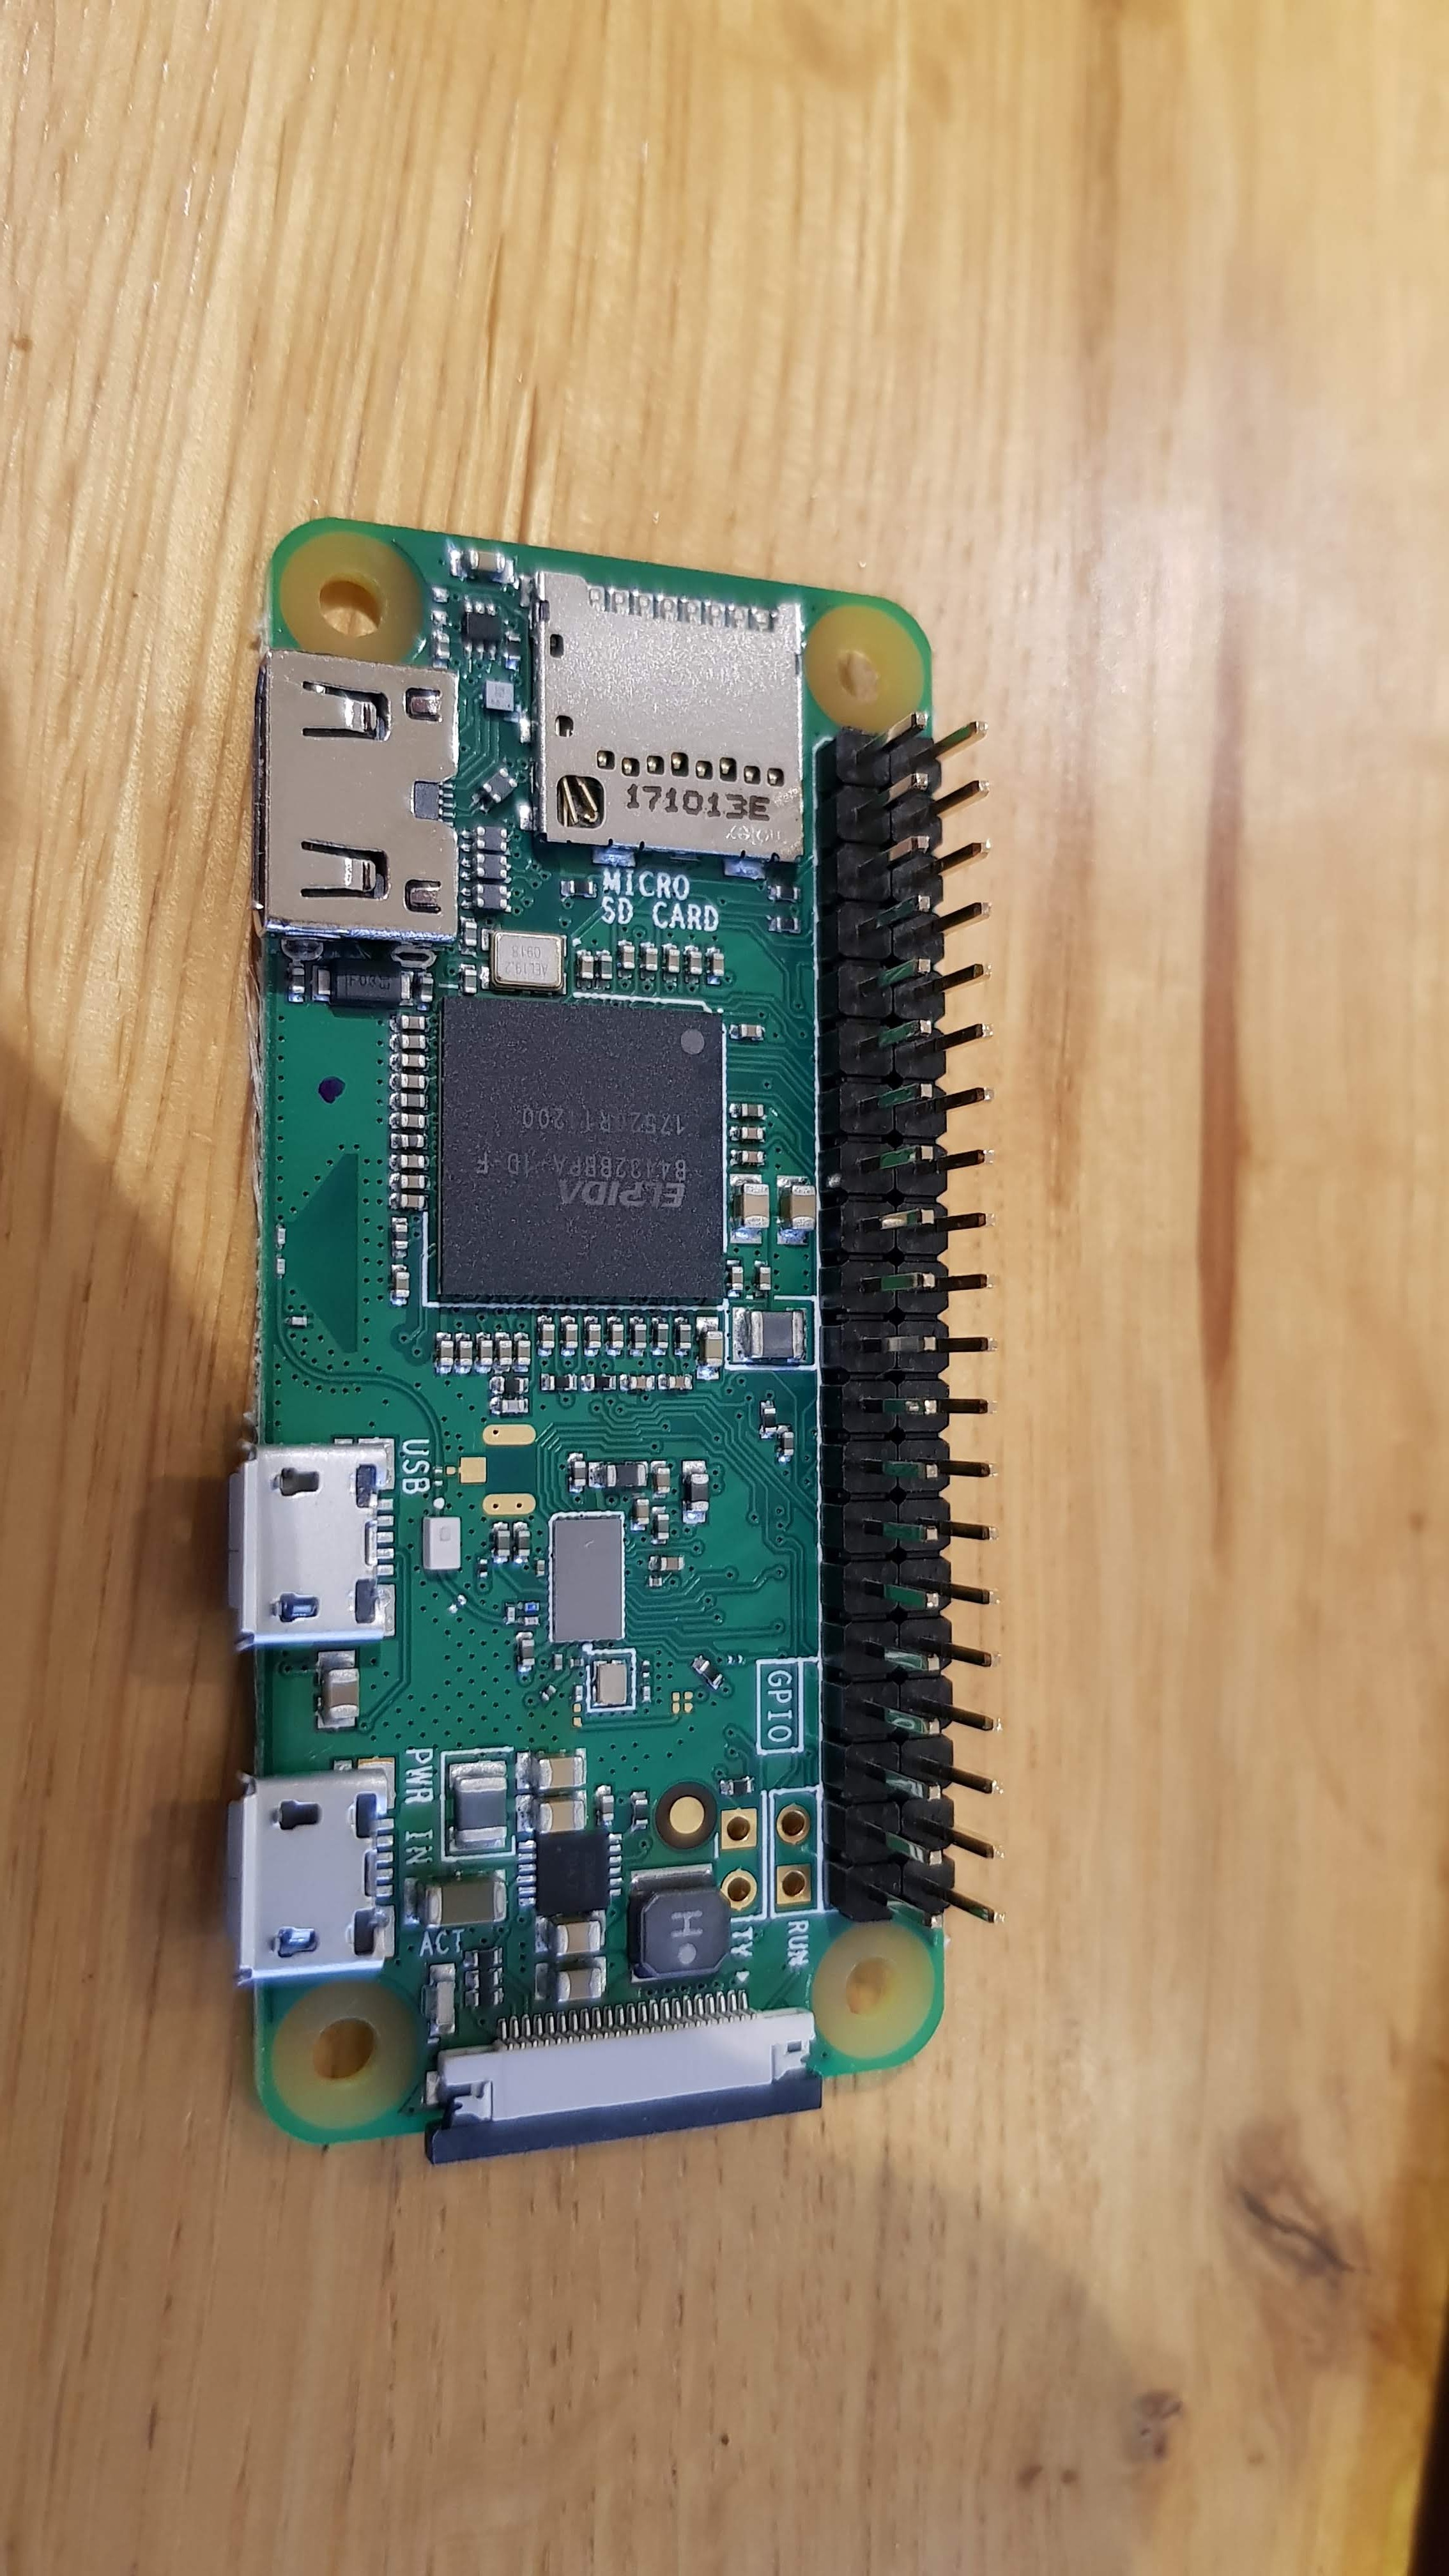
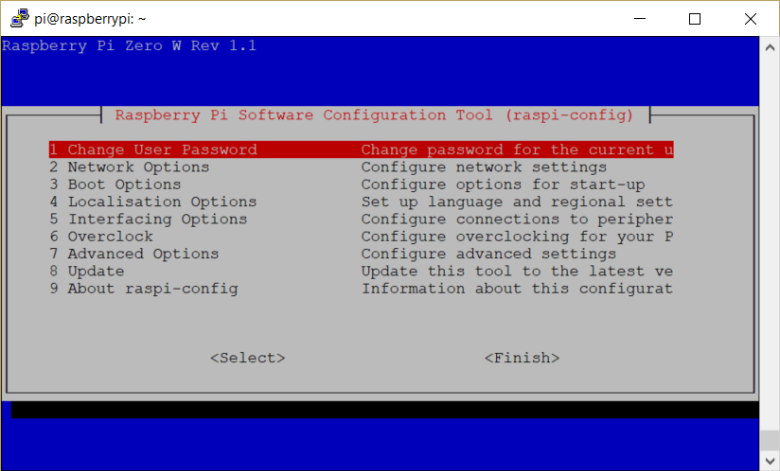
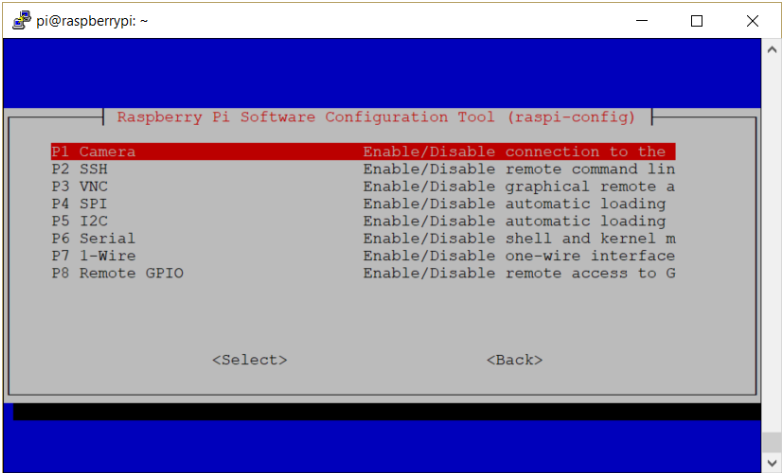
We want the Raspberry Pi to be headless (no screen required), low power, and accessible, so we're going to do a bunch of things;
1) Download the latest raspbian lite from https://www.raspberrypi.org/downloads/raspbian/
2) Install it on your SD card using the installation guide on the download page
3) Create an empty file with the name ssh in the root directory of the SD card
4) Add a file called wpa_supplicant.conf to the root directory of the SD card. Edit this file to add your WiFi settings, e.g.
ctrl_interface=DIR=/var/run/wpa_supplicant GROUP=netdev<br>update_config=1
country=«your_ISO-3166-1_two-letter_country_code»
network={
     ssid="«your_SSID»"
     psk="«your_PSK»"
     key_mgmt=WPA-PSK
}
5) Put the card in your Raspberry Pi and plug a power connector in to it.
6) Once it has booted, look on your router for a device named "raspberrypi". Using a tool like putty, ssh to it, with the username pi, and the password raspberry.
7) Update the pi and install some software we'll need
sudo apt-get update
sudo apt-get upgrade
sudo apt-get install -y python3-picamera python3-pip gpac python3-flask python3-rpi.gpio
sudo pip3 install smbus2
sudo mkdir -m 1777 /share
8) Update the pi configuration to turn on the camera and the I2C interface
sudo raspi-config
Then go to Interface options and enable the camera (option 1), and the I2C interface (option 5)
9) Download the attached file, overtaking_sensor.zip, and use a tool like FileZilla to sftp it to your raspberry pi. Unzip it so that the contents are in the the /home/pi/overtaking_sensor directory. I'll go in to what the code does in the next step, but if you don't care, just skip that step.
10) Create a file to control your service called /etc/init.d/overtaking.sh
<p>#! /bin/sh</p><p>### BEGIN INIT INFO
# Provides:          overtaking.py
# Required-Start:    $remote_fs $syslog
# Required-Stop:     $remote_fs $syslog
# Default-Start:     2 3 4 5
# Default-Stop:      0 1 6
### END INIT INFO</p><p># If you want a command to always run, put it here</p><p># Carry out specific functions when asked to by the system
case "$1" in
  start)
    echo "Starting overtaking.py"
    /home/pi/overtaking_sensor/app.py &
    ;;
  stop)
    echo "Stopping overtaking.py"
    pkill -f /home/pi/overtaking_sensor/app.py
    ;;
  *)
    echo "Usage: /etc/init.d/overtaking.sh {start|stop}"
    exit 1
    ;;
esac

exit 0
11) Make that file a service to start the code at boot time
<p>sudo chmod +x /etc/init.d/overtaking.sh</p><p>sudo update-rc.d overtaking.sh defaults</p><p>sudo /etc/init.d/overtaking.sh start</p>
Downloads
Assemble the Electronics
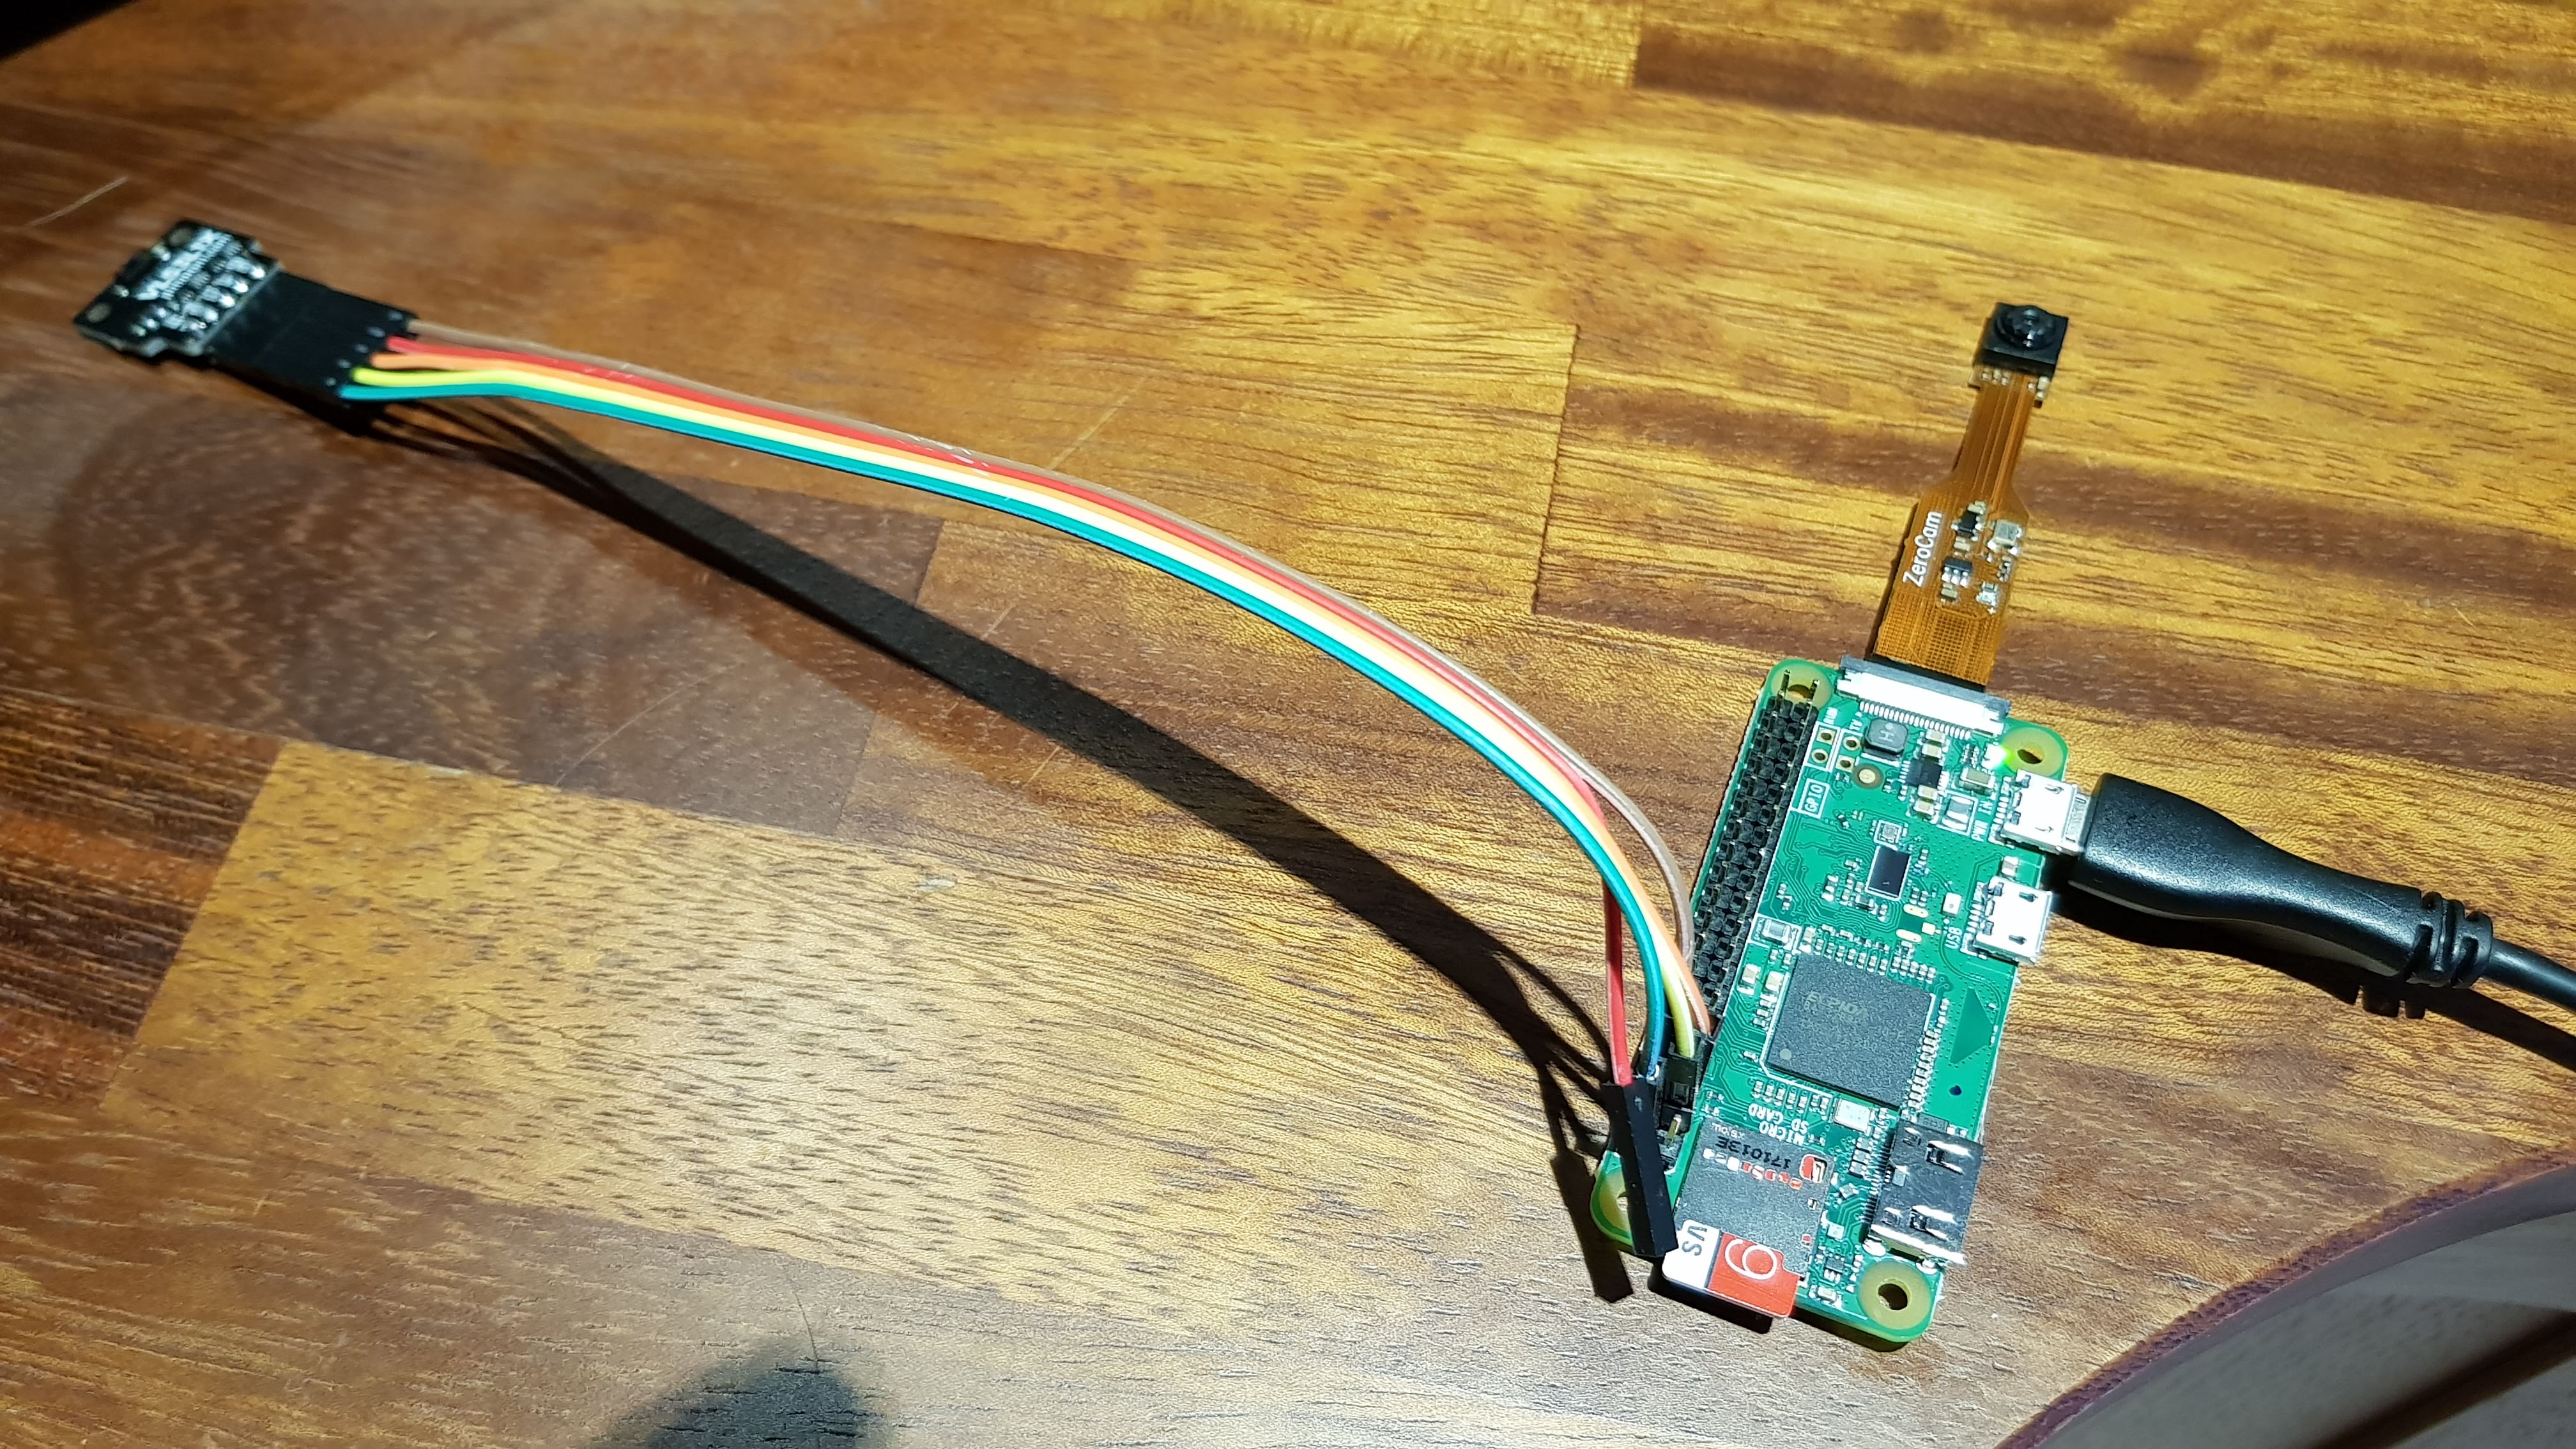
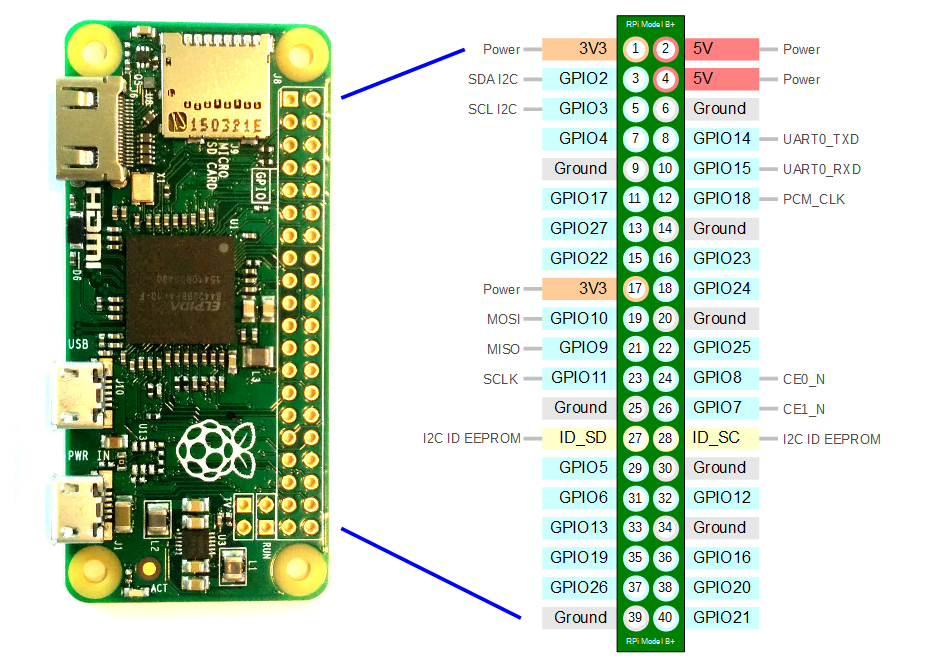
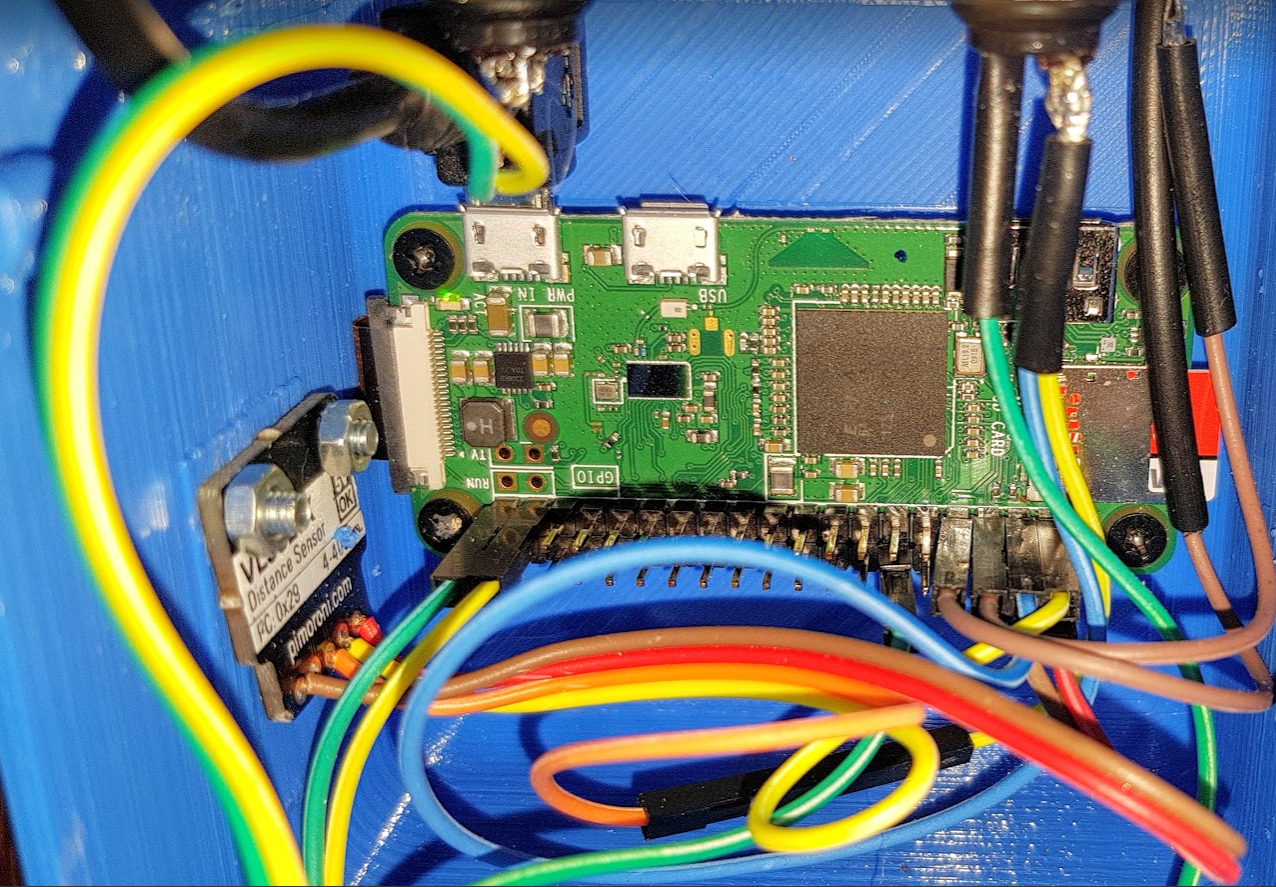
Good news - you've basically done the hard work now, and it's time to wire it all together.
First of all connect the ToF sensor to the pi. The connections are as follows;
Pi Pin 2 (5V, top left) to VL53L1X 3-6V pin
Pi Pin 3 to VL53L1X SDA pin
Pi Pin 5 to VL53L1X SCL pin
Pi Pin 6 to VL53L1X GND pin
Note, the VL53L1X INT pin is not used
Pi Pin 7 to the +ve LED pin (the one without the resistor)
Pi Pin 9 to the LED pin with the resistor.
Pi Pin 37 (second from the right on the bottom row) to one side of the start/stop button
Pi Pin 39 (right hand side, on the bottom row) to the other side of the start/stop button
and now the complicated bit - Plug the single wire side of the boot button in to Pi pin 14. Unplug the VL53L1X SDA pin from Pi pin 3, and plug the female connector from the other side of the boot in to that pin. Plug the VL53L1X SDA pin in to the male connector on the same side of the boot button. What you are doing is connecting the VL53L1X SDA pin still to Pin 3, and also allowing the button to be pressed to short it to Ground.
Test
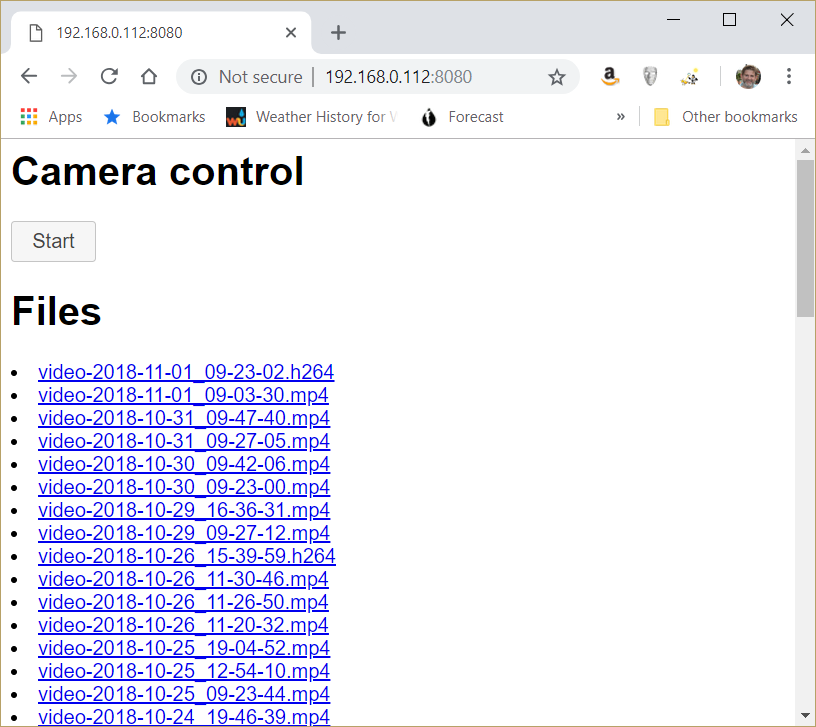
Connect the camera to the Pi too, using its ribbon connector, and power up the Pi. You should see your LED turn on after a minute. If you don't, something's wrong - check your connectors.
Next, the overtaking camera hosts a web page to allow you to view the status of the recording, and to download the videos. To access the web page, go to http://raspberrypi:8080/
You can click Start on the web page to start the video recording, or press the Start/Stop hardware button. The LED should start blinking. Try putting your hand closer and further from the distance sensor as you record, and you should see the distance change on the web page. Click the stop button on the web page to stop, or press the Start/Stop hardware button to stop. The LED will stop blinking, and if you refresh the web page, you will see the video you just recorded (this can take a few seconds, as it needs to convert it from h264 to mp4 format.
Press and hold the Start/Stop button for 5 seconds to shut down the Raspberry Pi. Press the Boot button to boot it up again.
Note, if you press the Boot button while the device is on, you will mess up the I2C messaging, and you will likely need to restart the Raspberry Pi. This was the most frustrating part of the build. I ideally wanted a single button to do everything, but the Raspberry pi only lets you boot by shorting pin 3 to ground, and the I2C messaging only works on pin 3, so the two conflict. I could add a relay to change what the button does depending on whether the device is on or off, but that seemed overkill. If anyone has a software solution, I'd love to know.
The Case
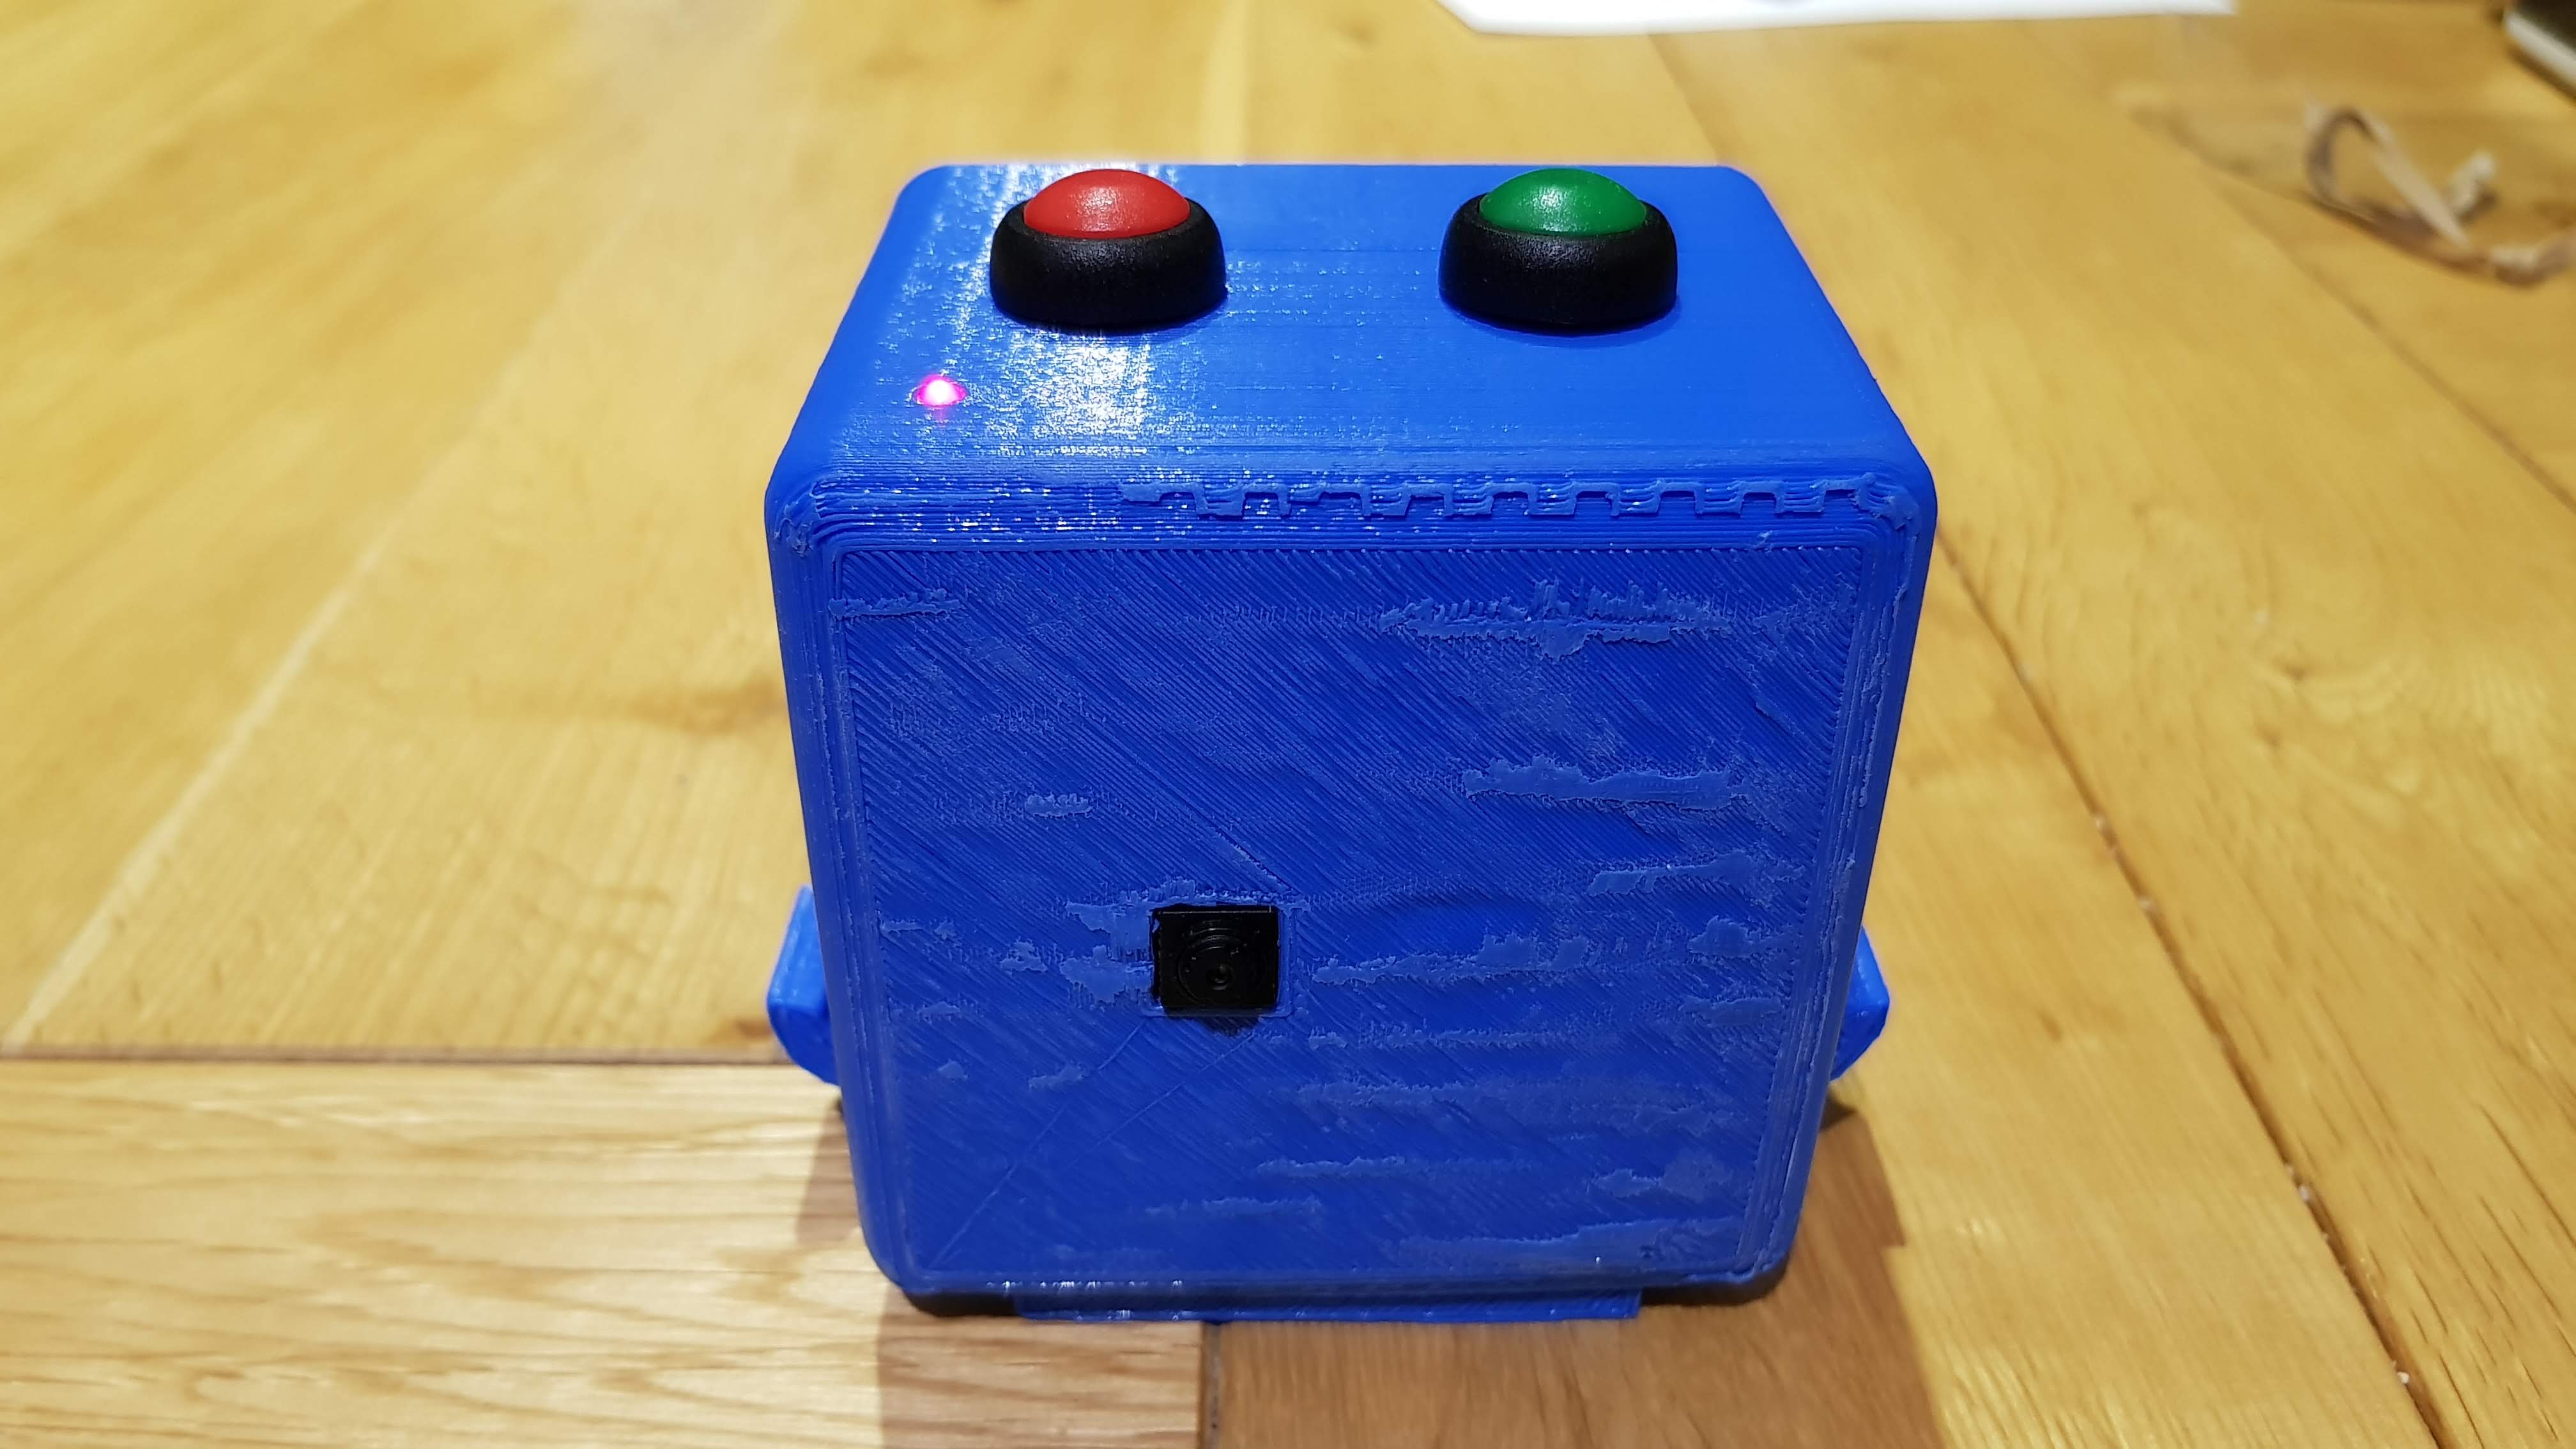
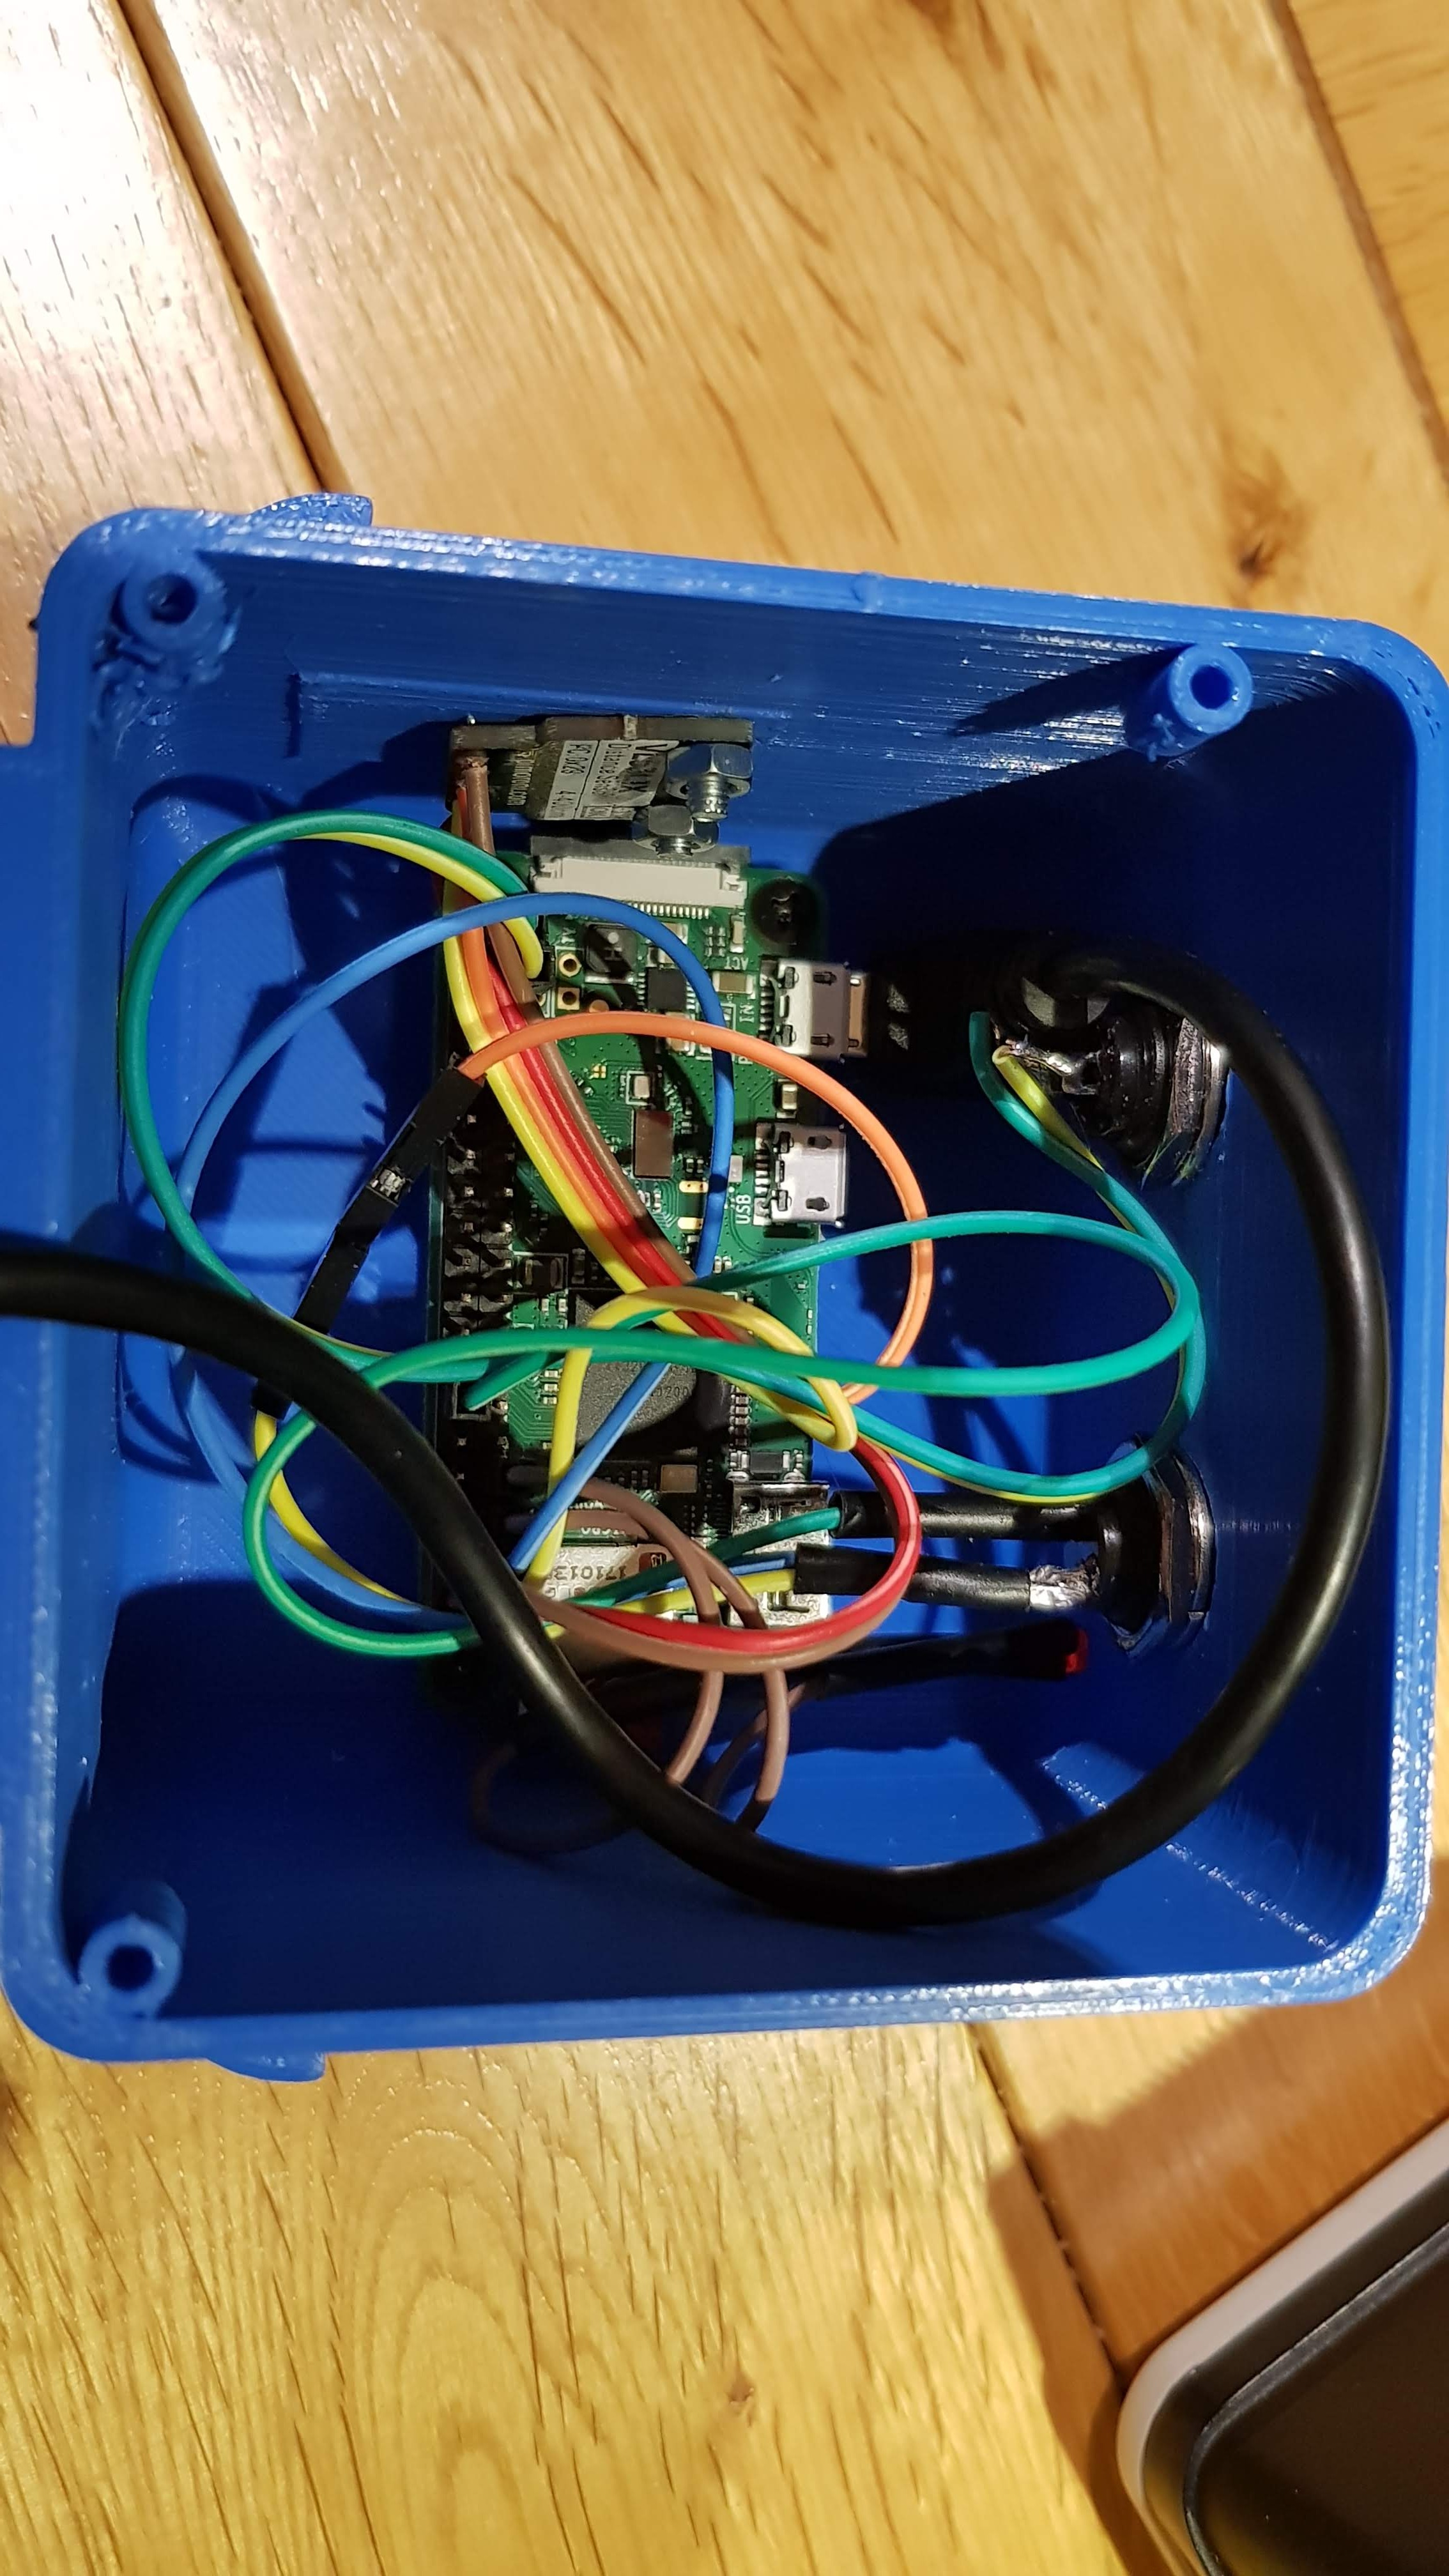
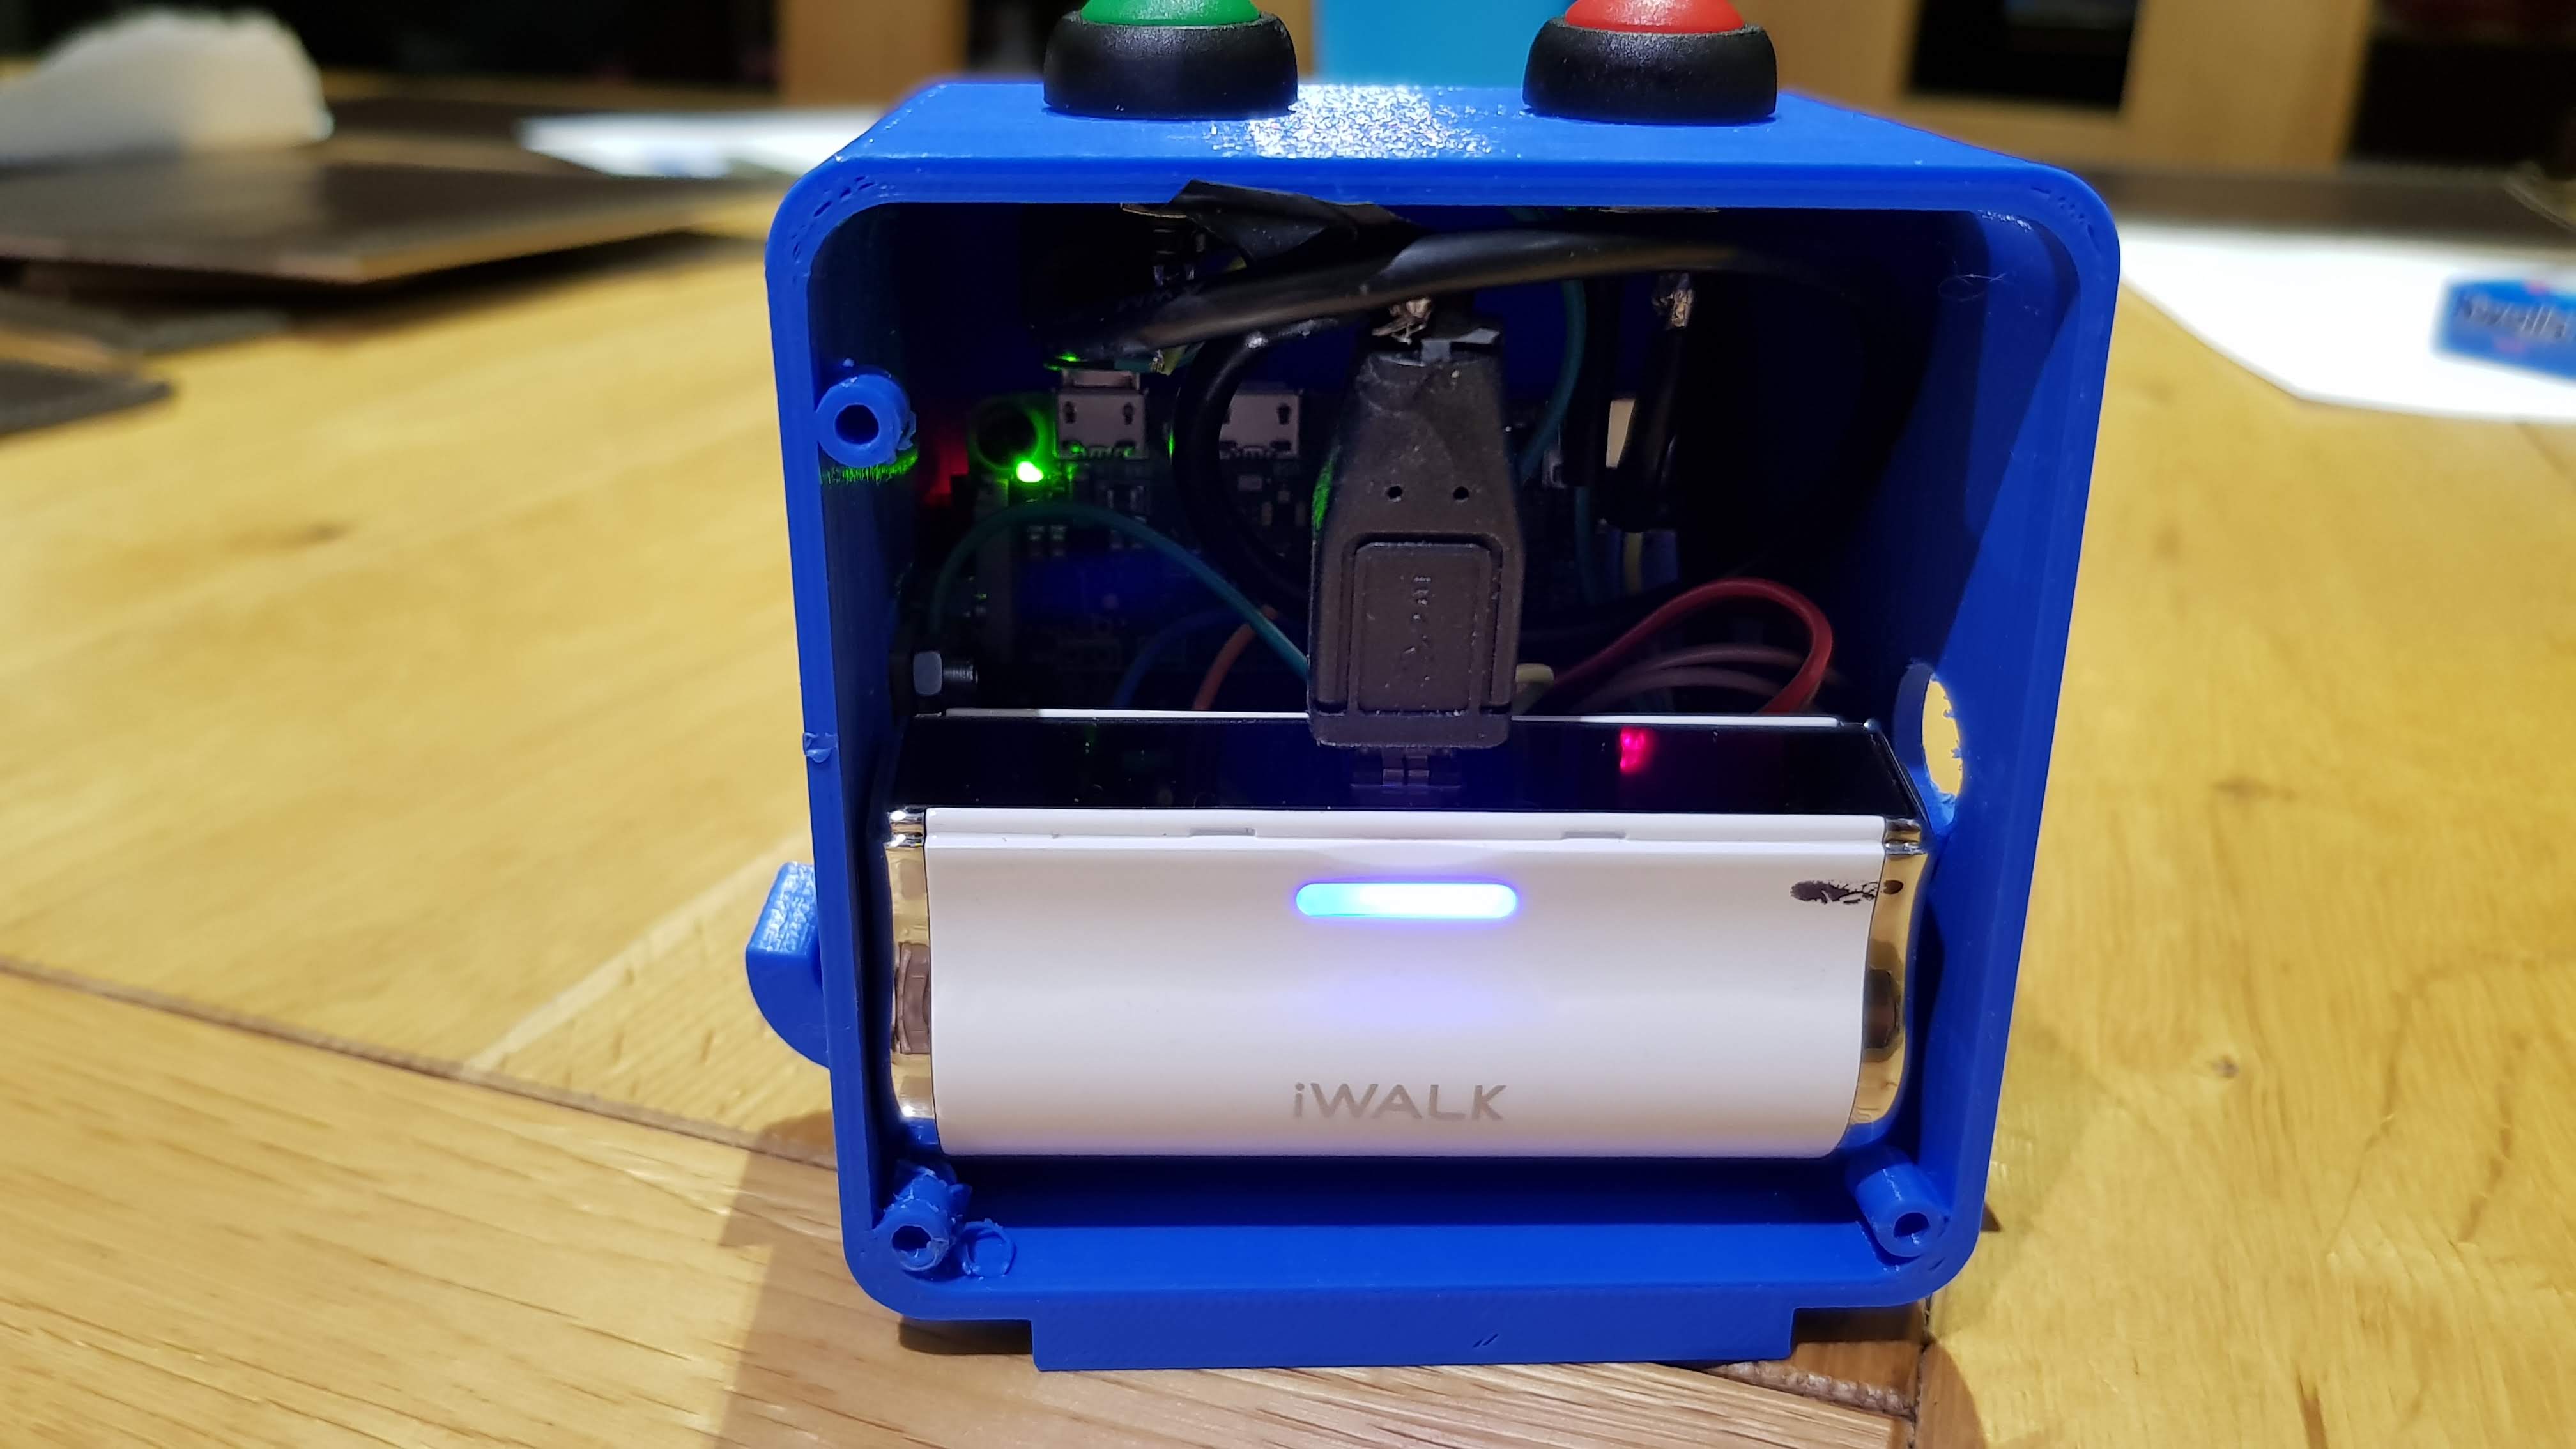
You've now got a jumble of electronics that works nicely, but you can't just duct tape that to your bike. The next step is to 3D print a nice box for it. I have a box I have designed for it. You'll find the slt files attached for you to print it. However, you probably don't want to print exactly this box for three reasons;
1) The bottom of the box has a block the width of the gap in my pannier bars. Depending on how you want to fix it on your bike, you'll want to adjust that to your own dimensions.
2) The hole in the side for charging the battery will need to be placed in the right place for whichever battery you buy.
3) I live in the UK where everyone drives on the left, and I want to detect traffic on the right. If you live in a right side driving country, you will want to move the hole for the camera to the left instead of the right. You could probably mirror image it, but I haven't tested.
I have made the original tinkercad design available here, so you can edit and adjust it to your own needs;
https://www.tinkercad.com/things/hsNXzdQCPpA
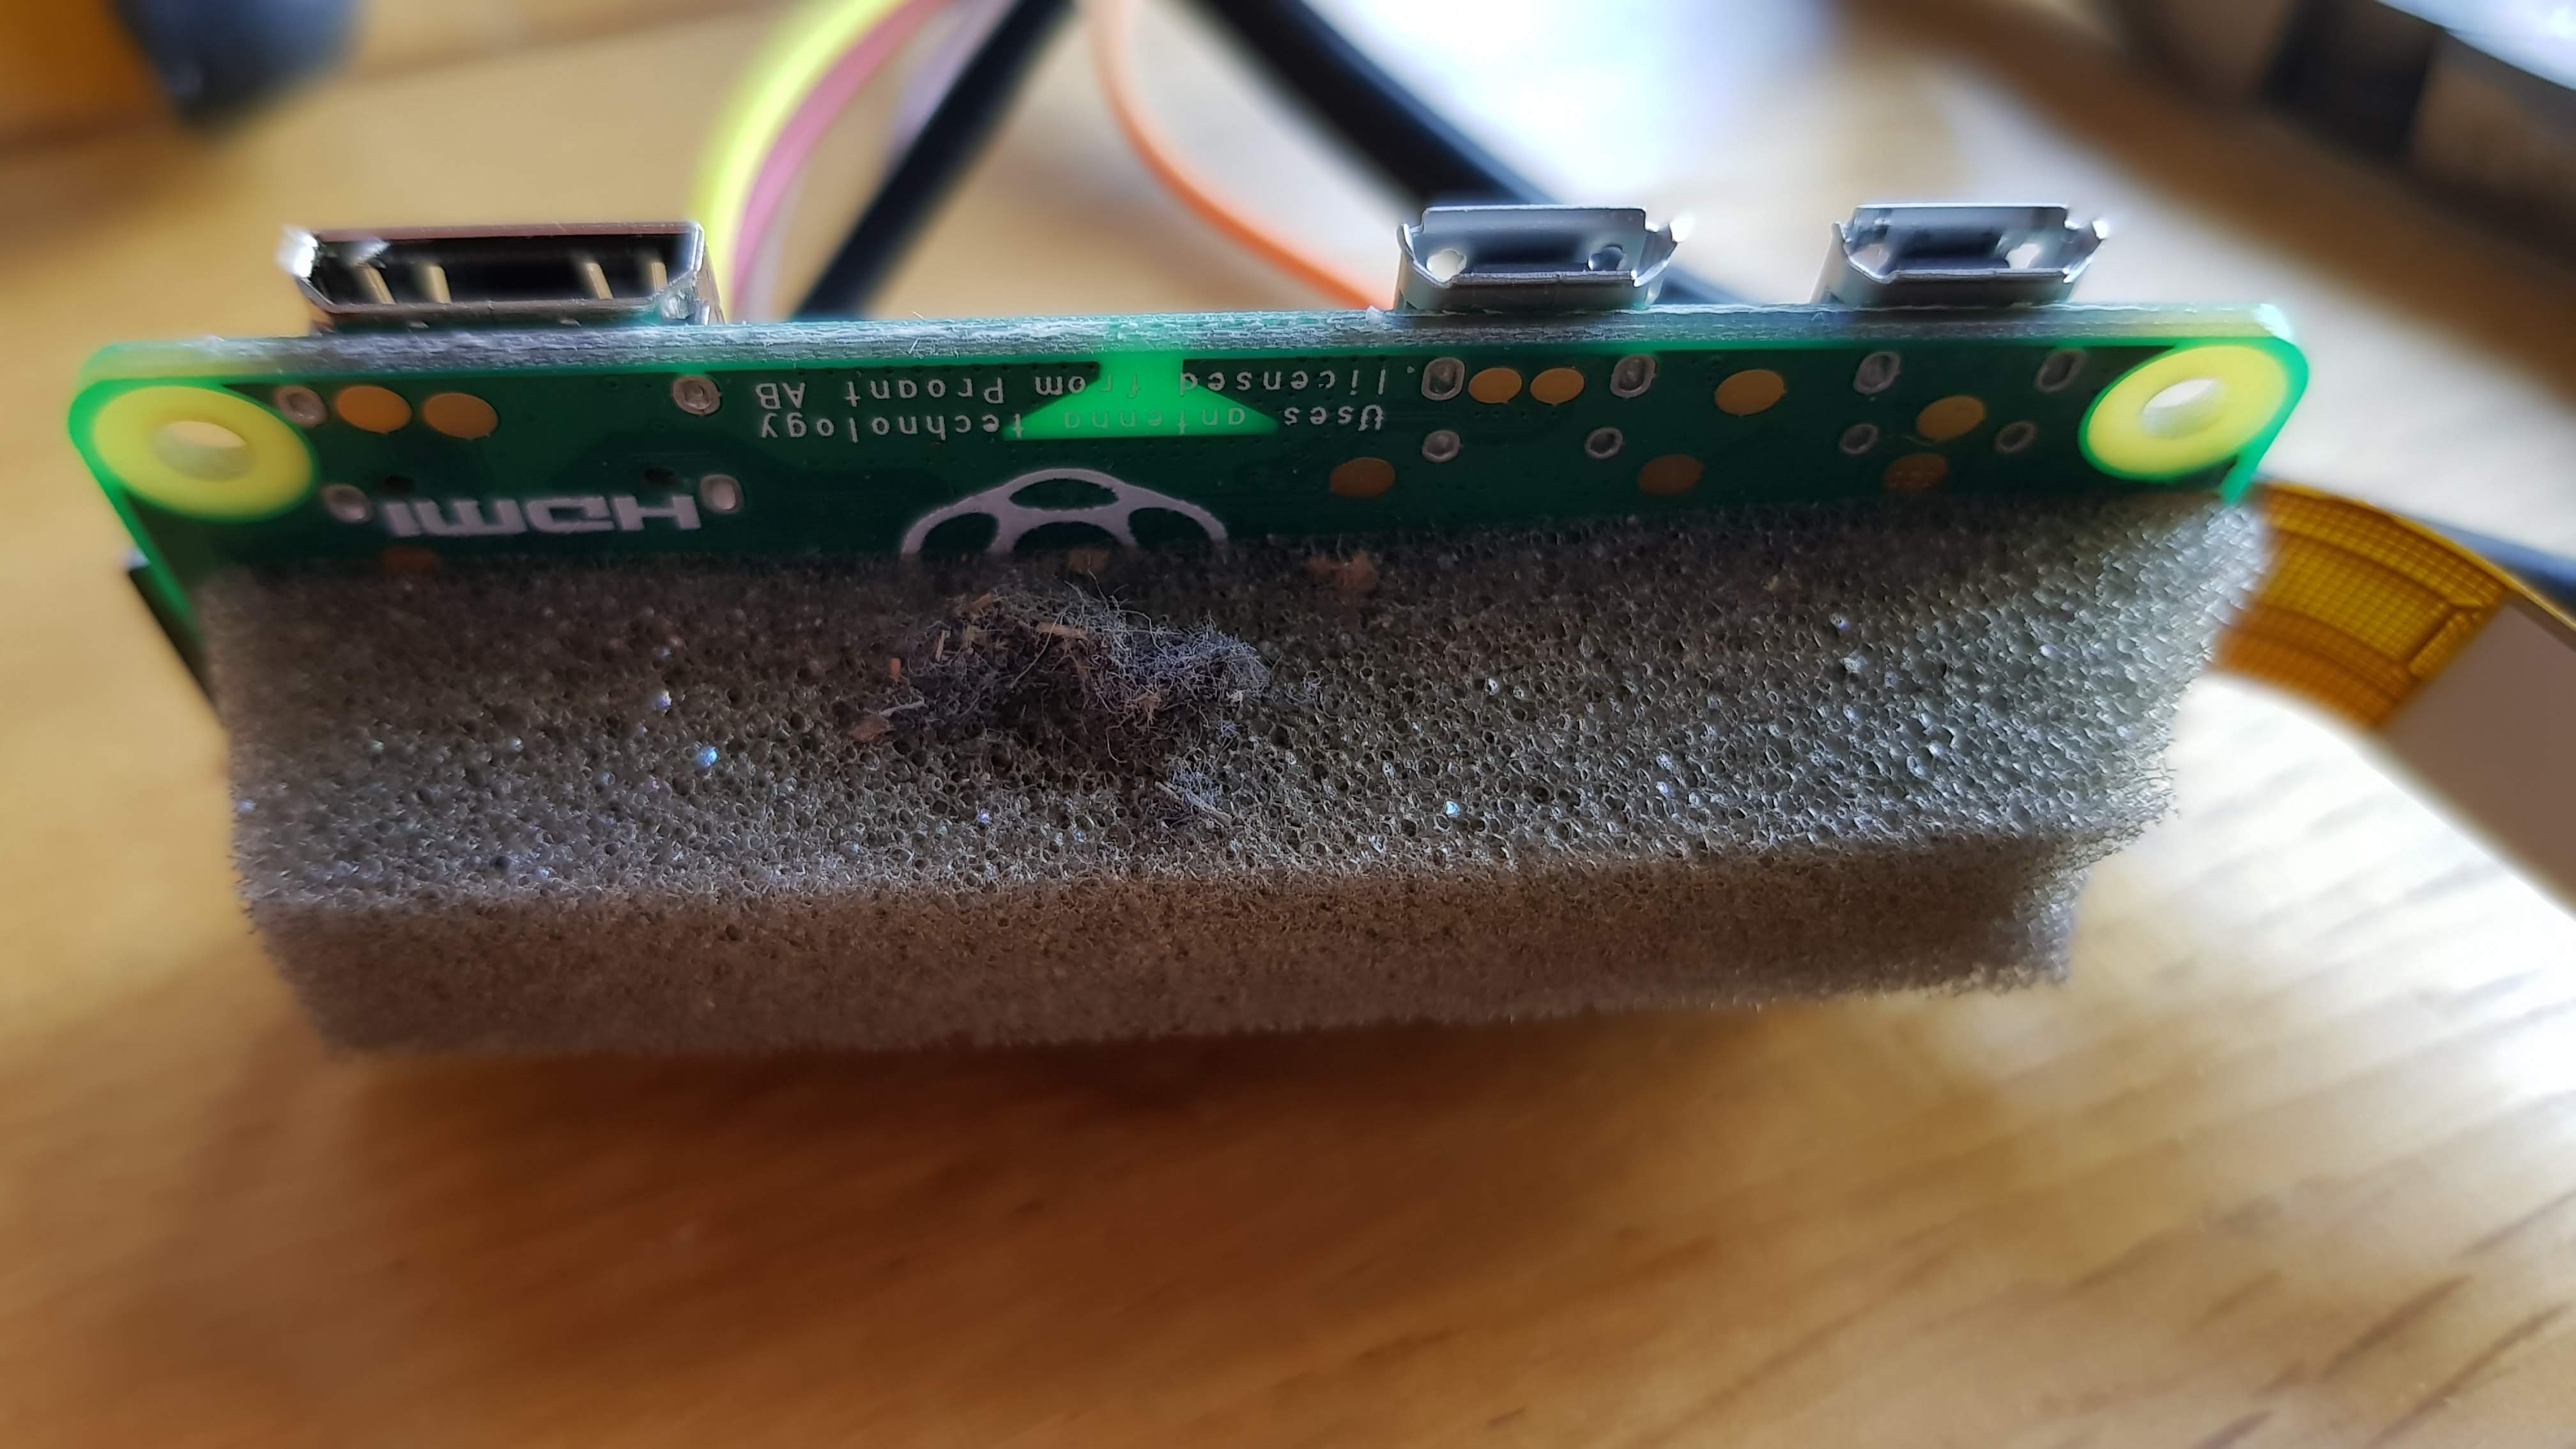
Once you have printed the box, you can start assembling everything. I put some adhesive foam weather strip on the back of the raspberry pi to press against the camera when it is in the hole - this keeps it nicely in place. Anything soft will do. Get some screws and screw the raspberry pi in to the box. You''ll want to attach the 90 degree USB connector to the power input before you do (adding a regular USB connector is possible, but it adds almost 2cm to the box size).
Next, fasten on the distance sensor to the holes in the side. To get it secure, I found it best to use some 2mm diameter bolts - that was stronger than just screwing in to the plastic like elsewhere, and allowed me to mount it closer to the edge.
Next, put the led in the hole, and add some glue to keep it in place. Screw on the buttons to the holes in the top too.
I chose a battery which has an input on the side, and an output on the top. This allowed me to have a connector inside to the raspberry pi, and a hole in the side of the box to charge it. I just connected the battery and slid it in to the box, which was designed to be snug to the battery.
Screw the lid on and you're done!
Mounting to the Bike
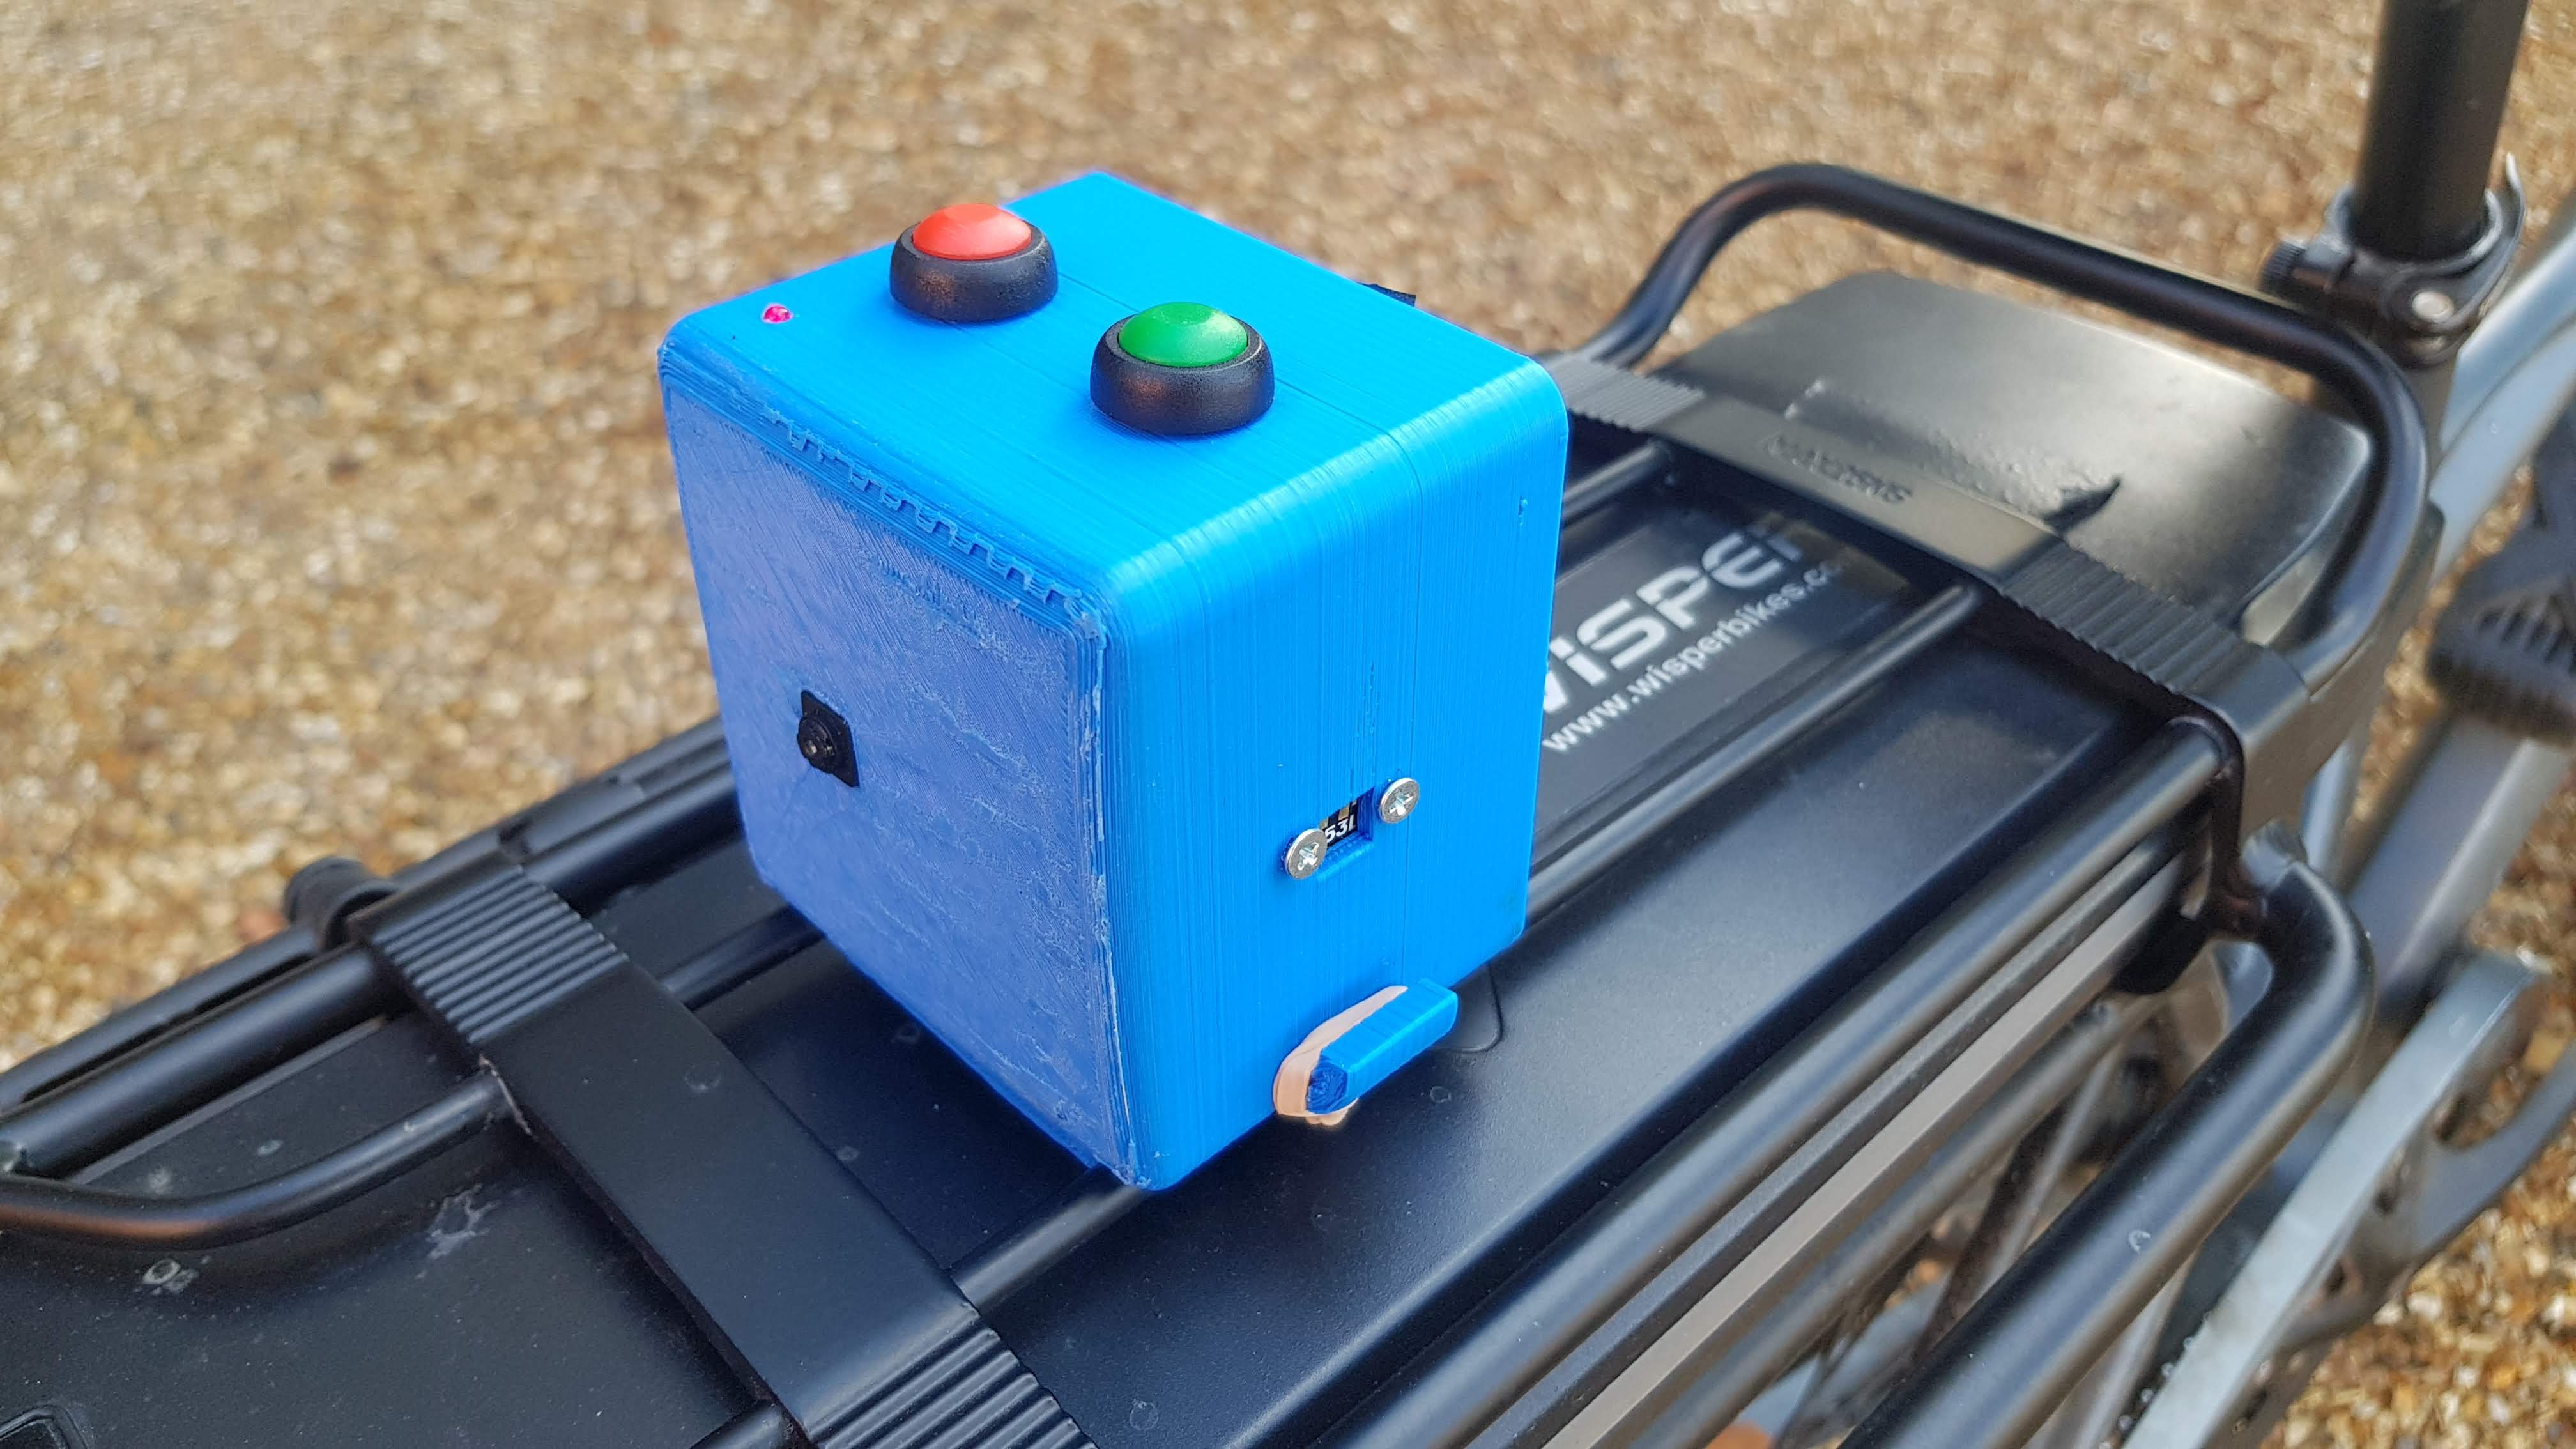
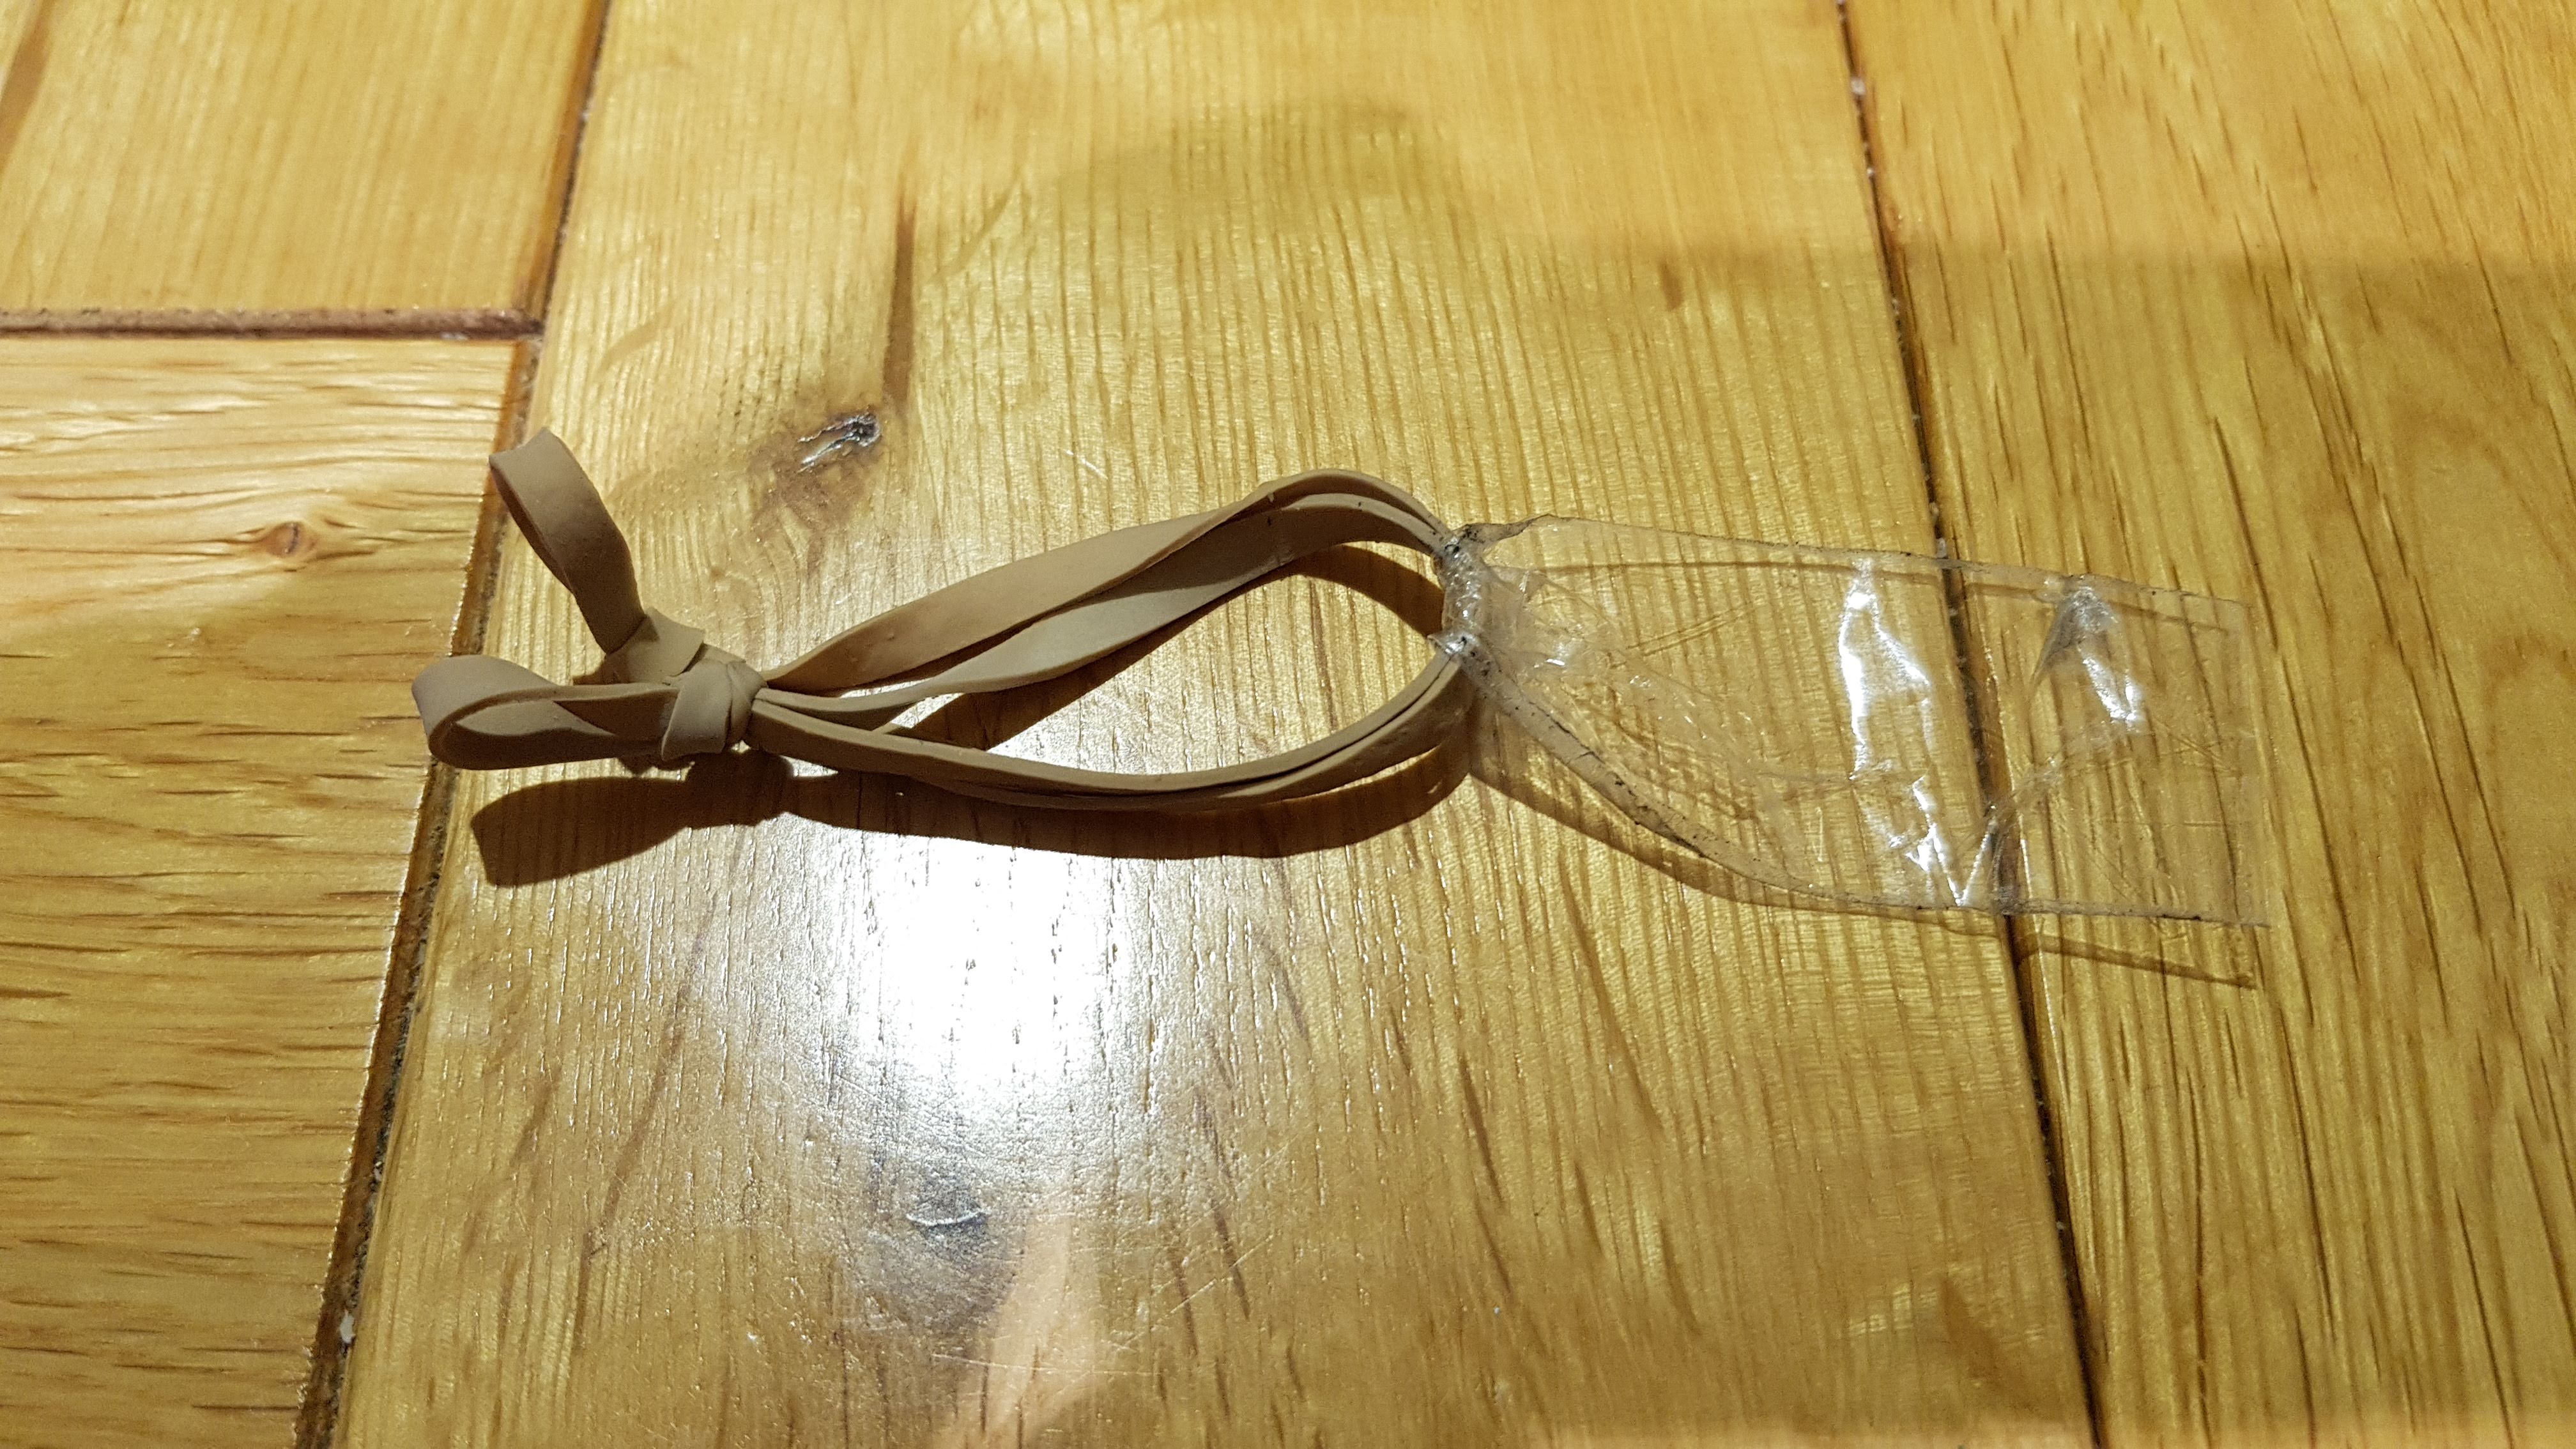
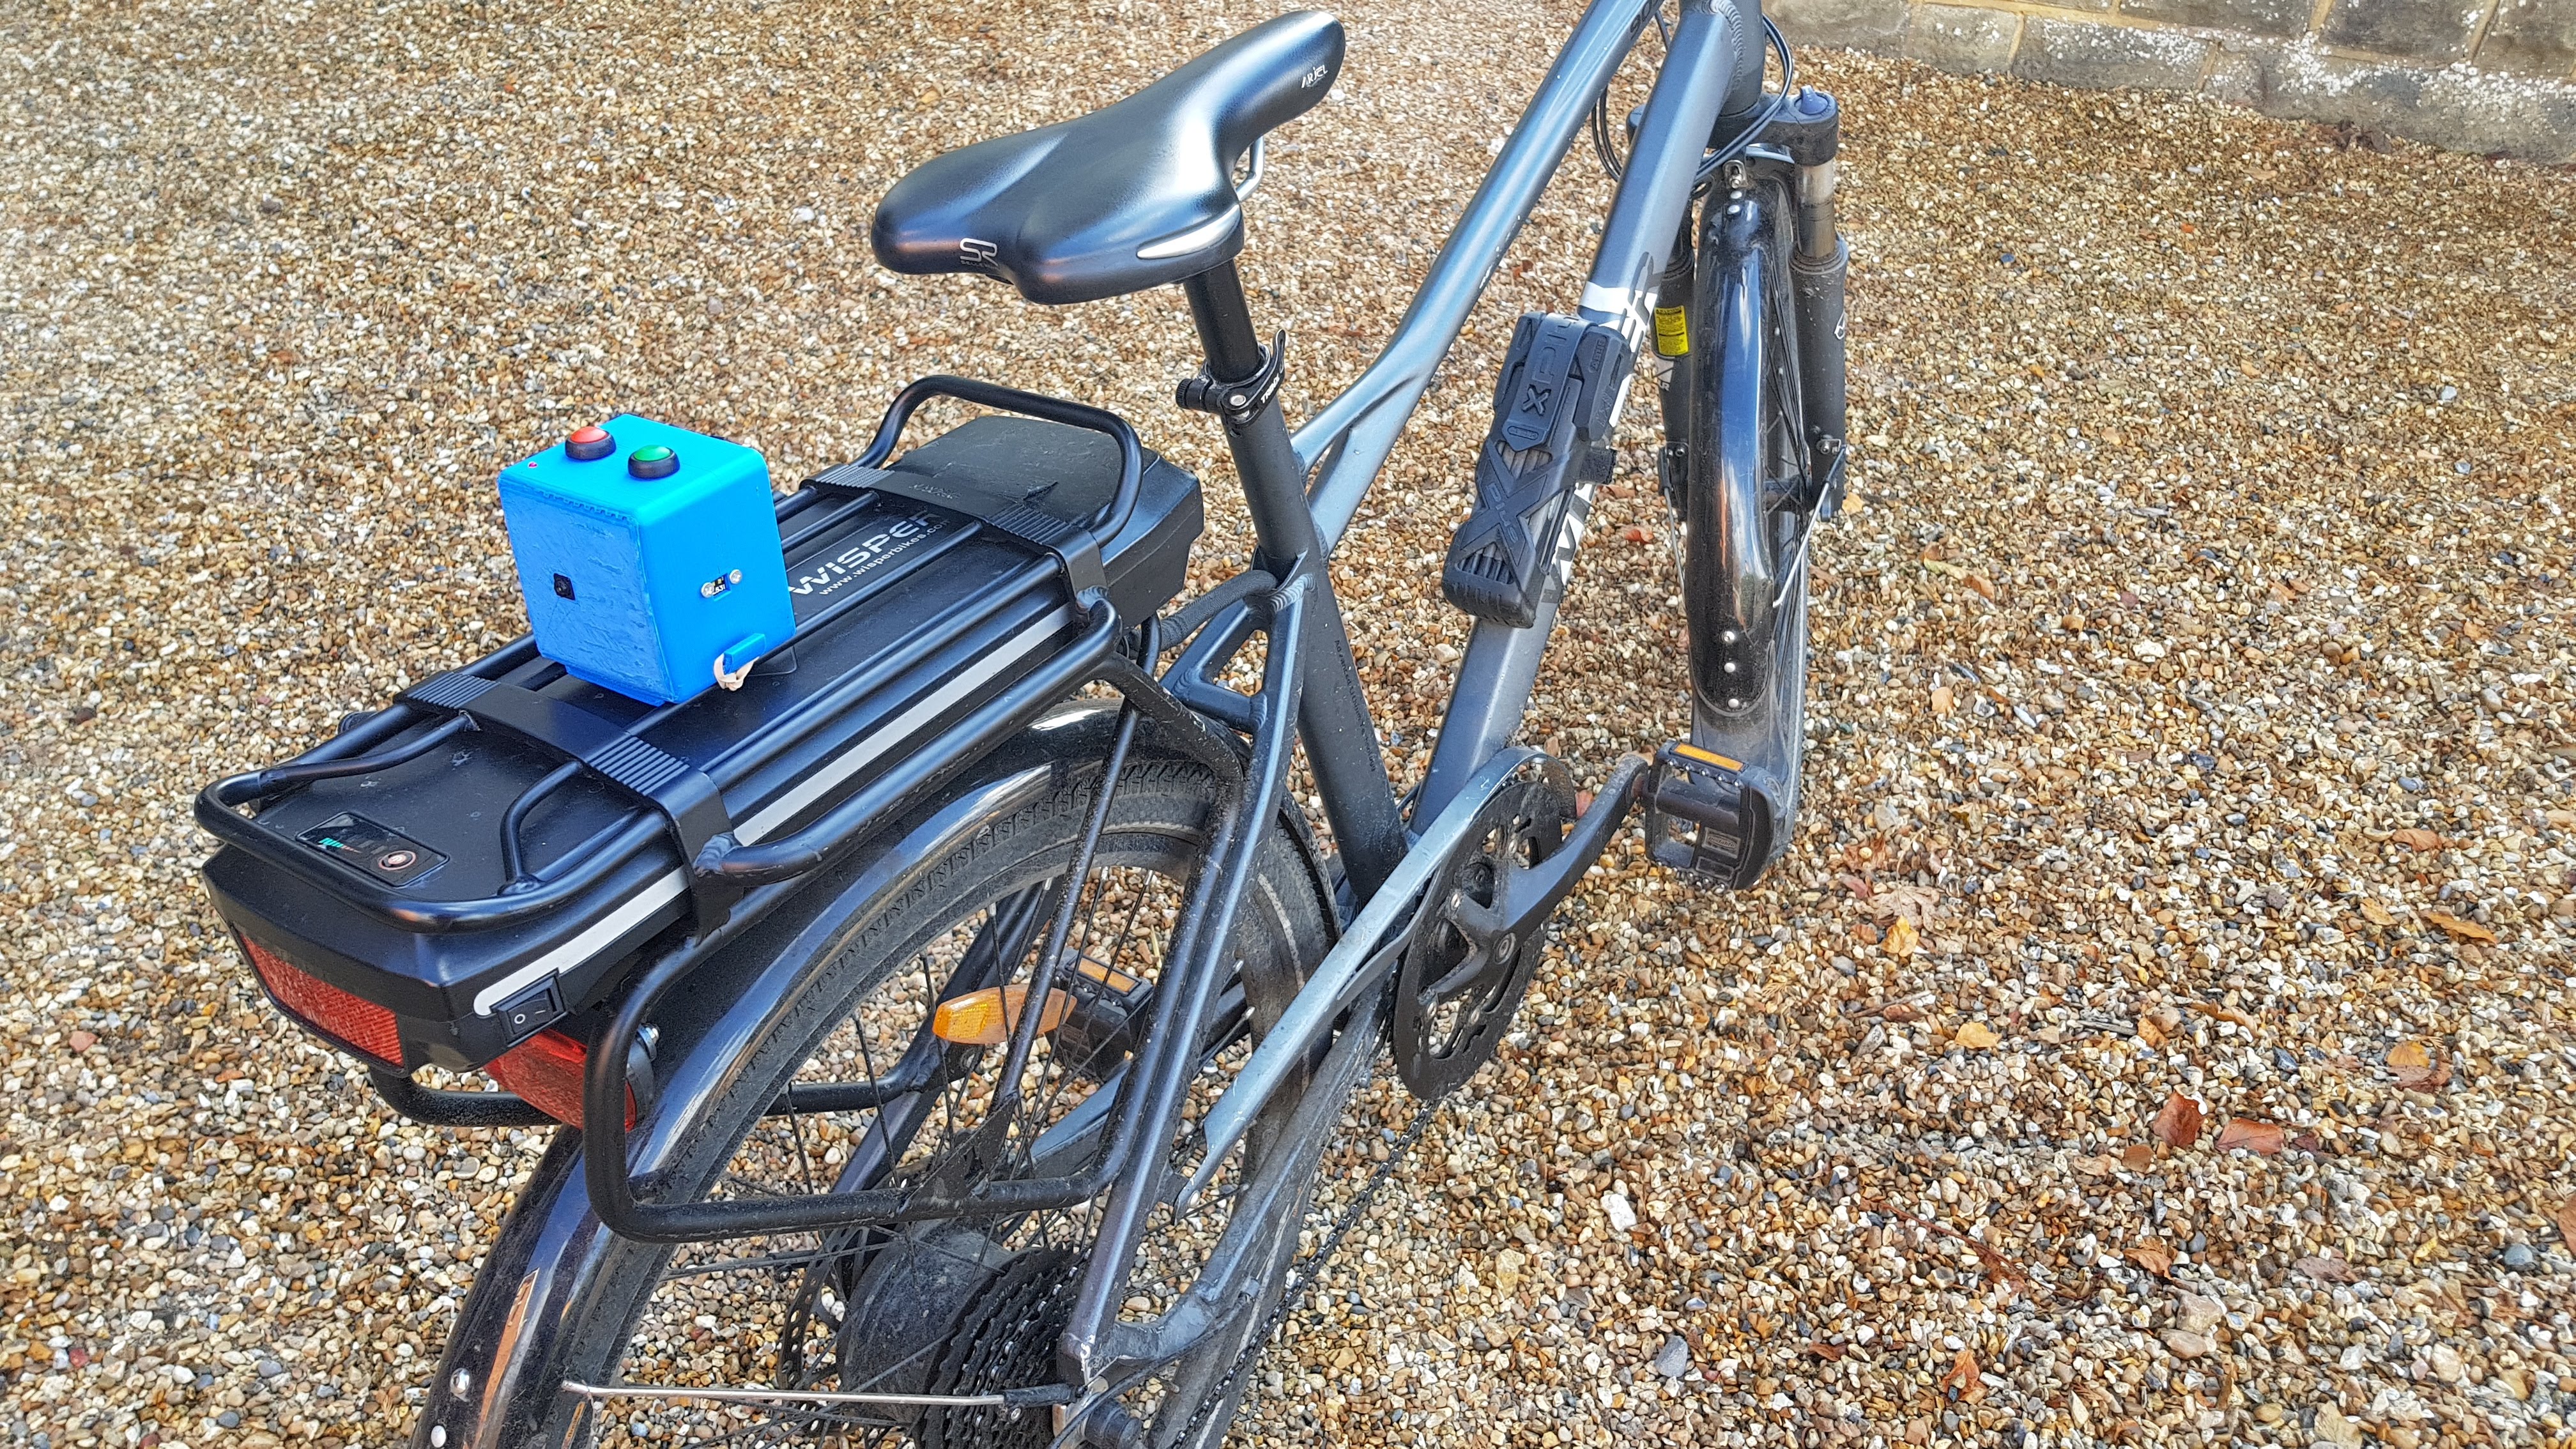
You were probably wondering what those hooks were for on the outside of the box. That's how we're going to attach the box to the pannier on your bike. To do that, get a couple of elastic bands and knot them about 1cm along. Then on the other end, put some tape. The tape is going to serve as a handle.
Put the knotted elastic band round the hook on the side where the distance sensor is. Then put the sensor on your pannier, pull on the tape, and hook it round the hook on the other side. As long as you pick the correct length of elastic band, this is really secure. And you're ready to go! Just press the Boot button to start the Raspberry Pi, then the Start/Stop button to begin recording. Press it again when you are done to stop the video recording.
The Code in Detail
You can skip this step, but for anyone interested in the internal workings of the code, here is a version with comments throughout.
#!/usr/bin/env python3
<br>from flask import Flask,render_template,request,Response,jsonify,send_from_directory
from picamera import PiCamera
from time import time,sleep, strftime,localtime
import VL53L1X_2 as VL53L1X
import subprocess
import os
from threading import Thread
import math
from stat import S_ISREG, ST_CTIME, ST_MODE
import RPi.GPIO as GPIO
app = Flask(__name__)

# start the time of flight sensor

tof = VL53L1X.VL53L1X(i2c_bus=1, i2c_address=0x29)
recording=False
converting=False

# start the camera

camera = PiCamera()
camera.rotation=90
camera.framerate=25
camera.annotate_background = True
camera.annotate_text_size=16
camera.annotate_text = strftime('%Y-%m-%d %H:%M:%S %Z', localtime(time()))
videoName=""
distance_in_mm=0
shutdown_pin=26
led_pin=4
GPIO.setmode(GPIO.BCM)
GPIO.setwarnings(False)
GPIO.setup(led_pin,GPIO.OUT)
GPIO.output(led_pin,GPIO.HIGH)
GPIO.setup(shutdown_pin, GPIO.IN, pull_up_down=GPIO.PUD_UP)
# this code watches for button presses. If not recording, it starts recording. If recording,<br># it stops. If you press for more than 5 seconds, it shuts down
def button_press_event(channel):
global recording
start_time = time()
elapsed_time=0
while GPIO.input(channel) == 0: # Wait for the button up
elapsed_time=time() - start_time
if elapsed_time>5:
shutdown()
if elapsed_time<0.1:
return
if(recording):
stop_recording()
else:
start_recording()
# this code does the shutdown, turning off the LED and stopping recording
def shutdown():
if(recording):
stop_recording()
GPIO.output(led_pin,GPIO.LOW)
subprocess.call(['shutdown', '-h', 'now'], shell=False)
# this adds the watch for the button press
GPIO.add_event_detect(shutdown_pin, GPIO.FALLING, callback=button_press_event, bouncetime=500) # this code starts the distance sensing, an the recording. <br># When the distance sensor gets a valid reading, it adds it to the display
# It also flashes the LED when recording
def start_recording_int():
global tof,recording,camera,videoName,distance_in_mm,led_pin
tof.open() # Initialise the i2c bus and configure the sensor
tof.start_ranging(3)
startTime=time()
videoName='/share/video-%s'% strftime("%Y-%m-%d_%H-%M-%S", localtime(time()))
camera.start_recording("%s.h264" % (videoName))
recording=True
i=0
while(recording):
i=(i+1)%6
if(i==0):
GPIO.output(led_pin,GPIO.HIGH)
if(i==3):
GPIO.output(led_pin,GPIO.LOW)
try:
fl = tof.get_full_measurement()
if(fl[1]==0):
distance_in_mm=fl[0]
sd=fl[2]
secondsSinceStart=time()-startTime
minutes=math.floor(secondsSinceStart/60)
seconds=secondsSinceStart%60
camera.annotate_text = '%s %.0fmm +/- %.1fmm'% (strftime("%Y-%m-%d %H:%M:%S", localtime(time())), distance_in_mm,sd)
except Exception as e:
print(e)
sleep(0.1) # This code is called if recording is started from the web browser
def start_recording():
print ("Starting recording")
t = Thread(target=start_recording_int)
t.start()
return "Processing" # This code stops the recording, an the range sensor.
# After recording is complete, it converts the file to an mp4.
def stop_recording():
global recording, camera,videoName,converting,led_pin
print ("Stopping recording")
GPIO.output(led_pin,GPIO.HIGH)
recording=False
converting=True
camera.stop_recording()
try:
tof.stop_ranging() # Stop ranging
except:
pass
command = "MP4Box -add %s.h264 %s.mp4"%(videoName,videoName)
output = subprocess.call(command, shell=True)
os.remove("%s.h264"%(videoName))
converting=False # This code adds a web service to display the home page, with the file contents
# from the /share directory
@app.route('/')
def index():
return render_template('index.html', tree=make_tree("/share"))
# This is the rest service for the start button
@app.route('/camera/start')
def start():
return Response(start_recording(), mimetype="text/html") # This is the rest service for the stop button
@app.route('/camera/stop')
def stop():
stop_recording()
return "Stopped"
# This is the rest service to get the camera status
@app.route('/camera/status')
def status():
global recording,converting,distance_in_mm
return jsonify(
recording=recording,
converting=converting,
distance=distance_in_mm
)
# This lists the files
@app.route('/files')
def files():
path = '/share'
return render_template('files.html', tree=make_tree(path))
# This service allows a file from the /share folder to be downloaded

@app.route('/files/
')
def static_proxy(path):
  print(path)
  # send_static_file will guess the correct MIME type
  return send_from_directory('/share',path)
def make_tree(dirpath):
    tree = dict(name=os.path.basename(dirpath), children=[])

    entries = (os.path.join(dirpath, fn) for fn in os.listdir(dirpath))
    entries = ((os.stat(path), path) for path in entries)
    entries = ((stat[ST_CTIME], path)
           for stat, path in entries if S_ISREG(stat[ST_MODE]))
    for cdate, path in sorted(entries,reverse=True):
      tree['children'].append(dict(name=os.path.basename(path)))
    return tree
# This starts the web service.
if __name__ == '__main__':
app.run(debug=False, port=8080,host='0.0.0.0')In addition to this main code, there is a web template to define the web page layout in the templates folder
The code also uses the pimoroni library for the VL53L1X sensor, with changes to allow detection of sensor accuracy, and we only use the sensor data if it is accurate enough. When the sensor gives an inaccurate reading (e.g. distance too far), we don't update the display, so you will only ever see accurate readings and timestamps on the screen.
Improvements
There are a few improvements that you might consider if you are making one too;
1) The box is not waterproof. A clear plastic screen could be added in front of the camera and the distance sensor. The distance sensor will have a reflection from the plastic which will impact the reading, but you can calibrate the sensor to account for that. Search for "VL53L1X API user manual" for instructions for that.
You'd also need a stopper for the USB charging port, and add sealant round the switches.
2) The raspberry pi doesn't have a real time clock. A battery powered RTC can be added so that the time is correct on boot. I use a wifi hotspot on my phone to allow it to connect to get the correct time instead, but an RTC unit would negate the need for that.
3) If you want to make the video file available to windows more easily, you can install a Samba server by running "sudo apt-get install samba samba-common-bin" and then editing the file /etc/samba/smb.conf to add the following content at the end of the file
[share]<br>Comment = Pi shared folder
Path = /share
Browseable = yes
Writeable = Yes
only guest = no
create mask = 0777
directory mask = 0777
Public = yes
Guest ok = yes
Then set the Samba password by typing "sudo smbpasswd -a pi" and then entering a password. Finally restart the Samba server with "sudo /etc/init.d/samba restart". You can then browse to \\raspberrypi\share in windows to see the files.
4) Some people have commented that all this does is records bad driving - it doesn't stop you getting hurt. That is true, and the next steps could be to print a bigger box and to put the words Overtaking Monitor in bright visible letters, perhaps with some flashing lights to attract attention to it.