BeAM 3DP Practice Project: Calling Card
by BeAM_UNC in Workshop > 3D Printing
236 Views, 0 Favorites, 0 Comments
BeAM 3DP Practice Project: Calling Card


YOU MUST COMPLETE THE ONLINE 3D PRINTER MODULE BEFORE ATTEMPTING TO MAKE THIS PROJECT AT THE BEAM MAKERSPACES.
After completing the online 3D Printer training and earning 100% on the final quiz, you must complete a training practice task. This guide will walk you through one option for completing your 3D Printer certification.
Objective: To design and 3D print a simple card that can be used either as a personal calling card or a business card.
Supplies
- TinkerCAD
- Ultimaker Cura
- Ultimaker S3 3D Printer (found at either the Carmichael or Murray makerspaces)
- CPE filament (provided by BeAM)
Please note: this Instructable is written with a focus on using TinkerCAD, but you can alternatively use a different 3D design software if if you prefer.
Download Design File
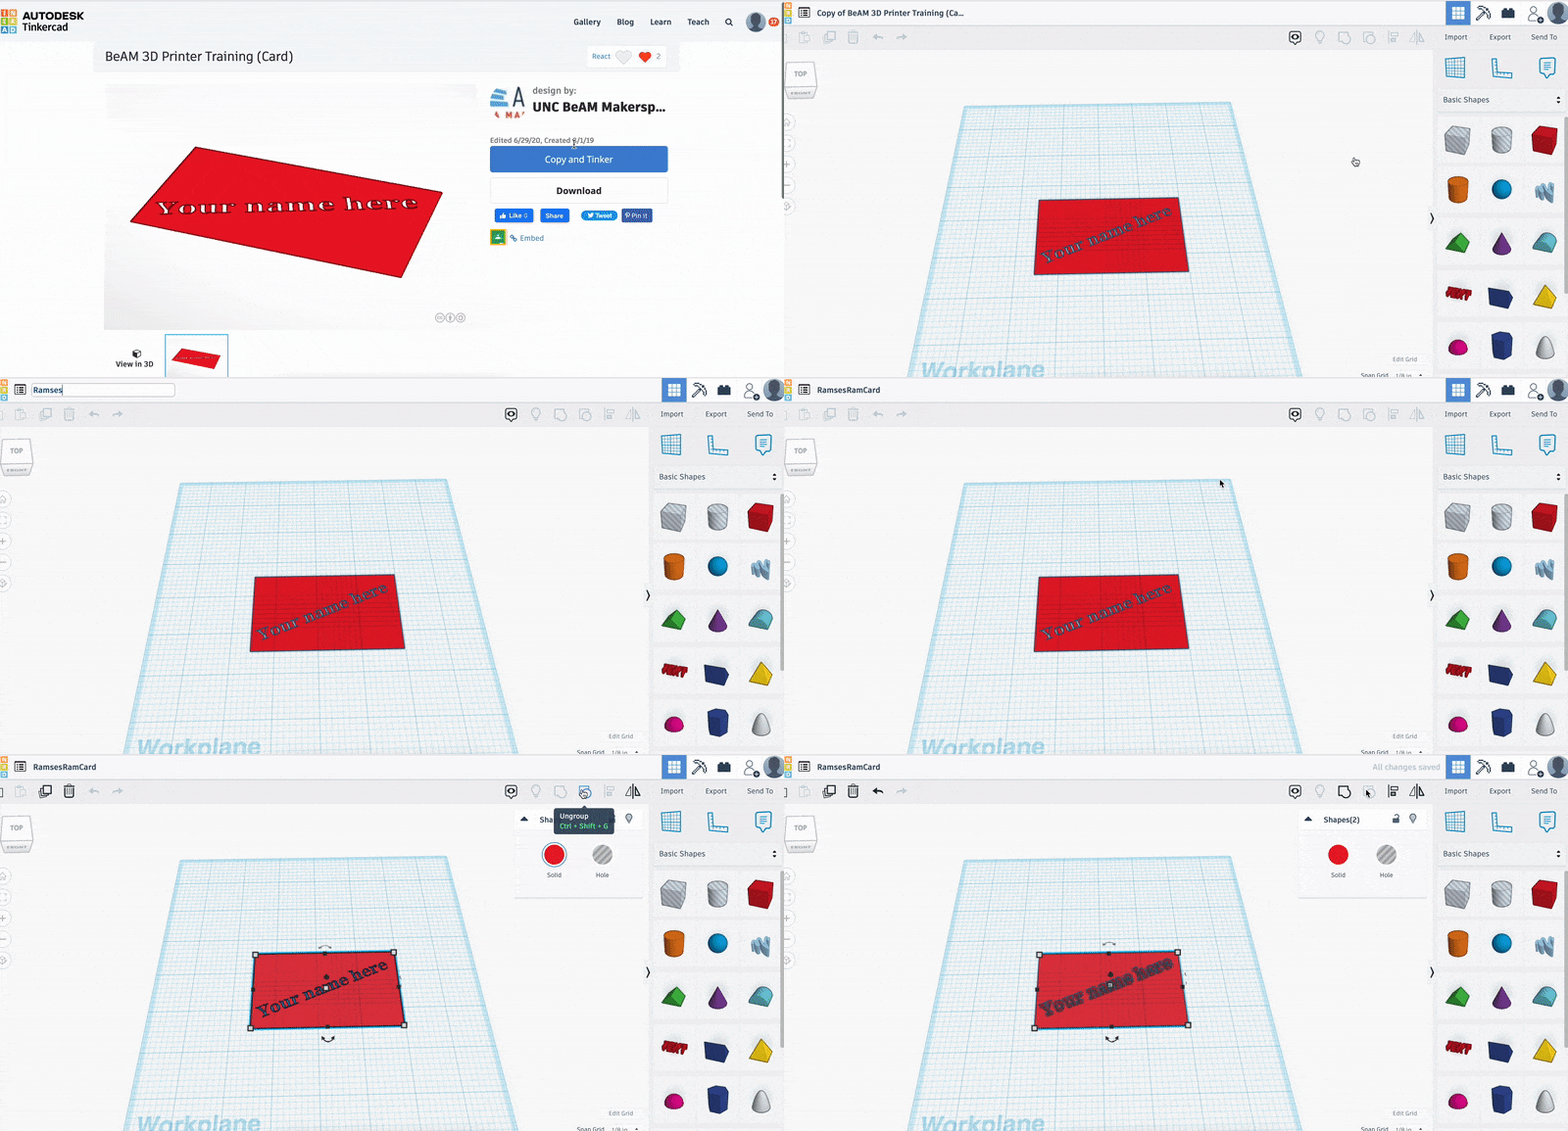
Download the design file for this practice project here: https://www.tinkercad.com/things/lio5sPvP9PP. If you use TinkerCAD for design, simply click ‘Tinker This.’
Rename your file by clicking on the filename and typing in the new name. The file currently has ‘Your Name Here’ written across it - you will need to ungroup it with the ‘ungroup’ button to start with a blank card.
Modify the Design File

Add text and symbols using the tools in the TinkerCAD tool palette. If you want to cut shapes or text out of the card, make sure those shapes are ‘Holes.’ If you want shapes or texts to be be raised off the card, make sure those shapes are ‘Solids’ (but be careful - make sure they aren’t too tall or your card will be very spiky.)
Once you have all the elements of your design arranged the way you want them, you have to use the ‘group’ button to combine them. If you don’t, the 3D printer won’t read your design correctly.
Looking for more TinkerCAD resources? Check out the TinkerCAD Keyboard Shortcuts Guide, or these helpful TinkerCAD tutorials.
Export the Design File
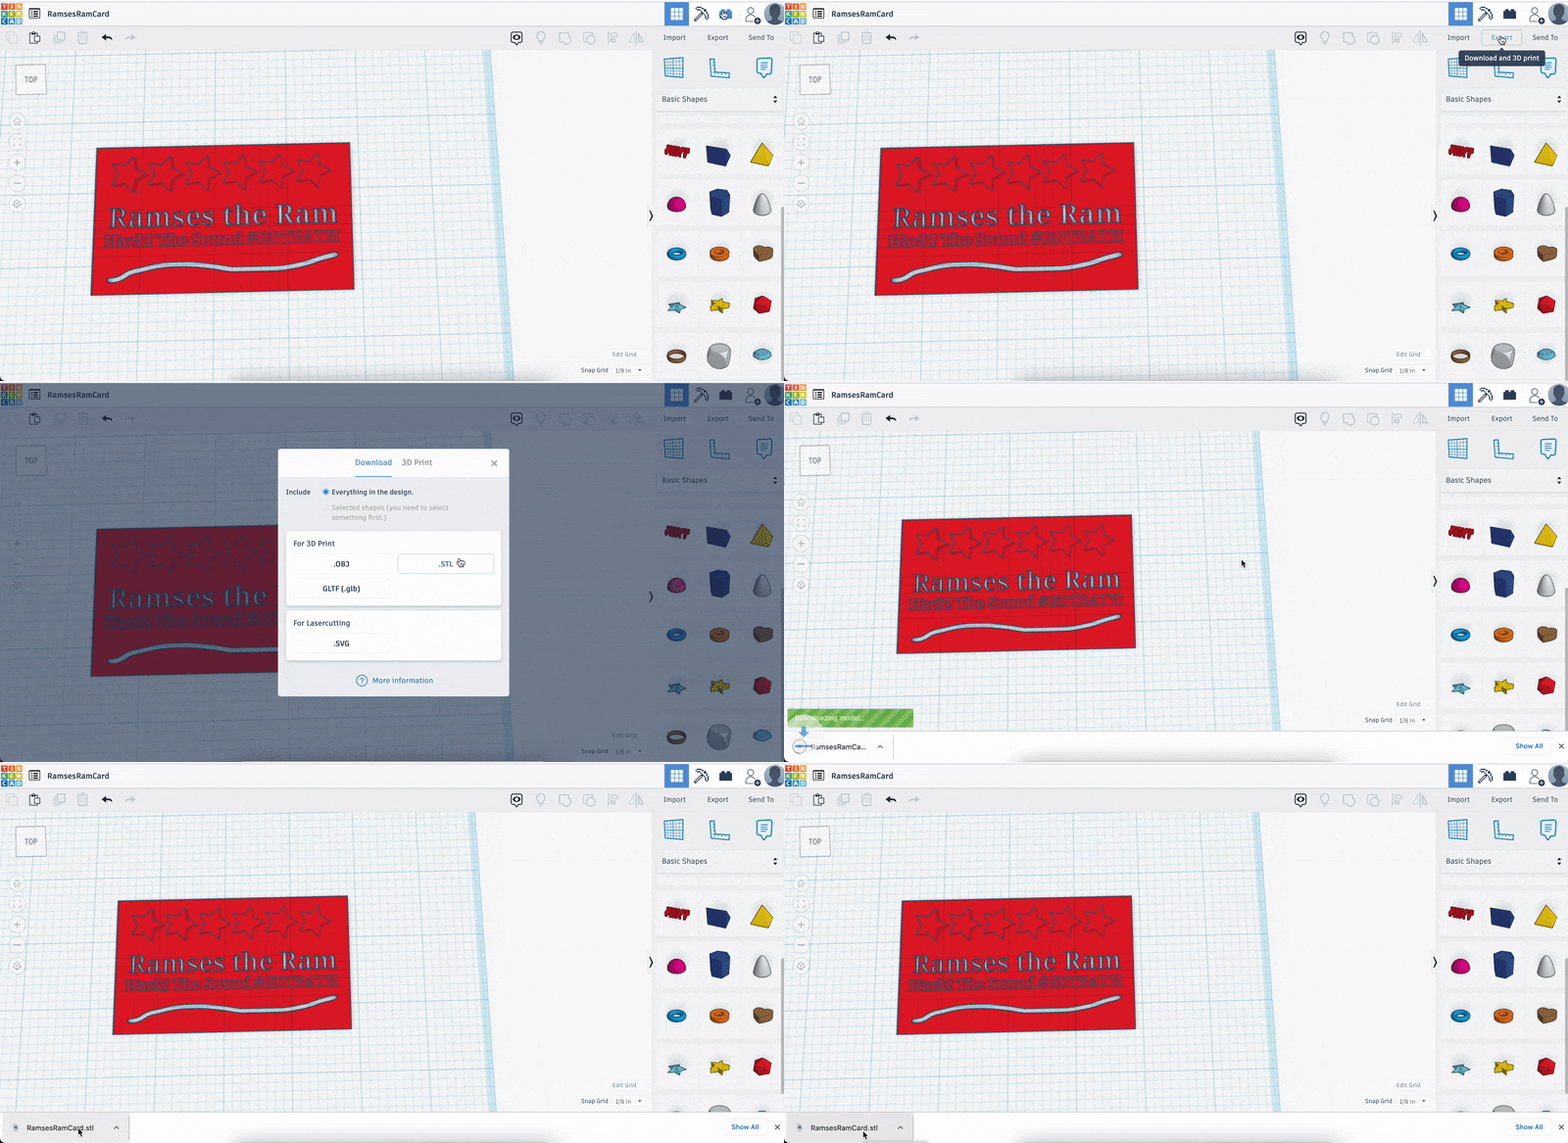
After grouping all your elements, you need to prepare your design for printing. To do this, click the ‘Export’, make sure you’re on the tab for ‘Download,’ and choose ‘.STL’ under 'For 3D Print.'
Set Up Ultimaker Cura
Make sure you have Ultimaker Cura downloaded on your device and that you have changed the default settings to BeAM settings. Need help? Check out the video included in this section. You can also consult the 3D Printer Extended Guide for Cura settings: https://beam.unc.edu/files/2019/01/3DPRINT_EBOOK5.pdf
Import Your Design File Into Cura
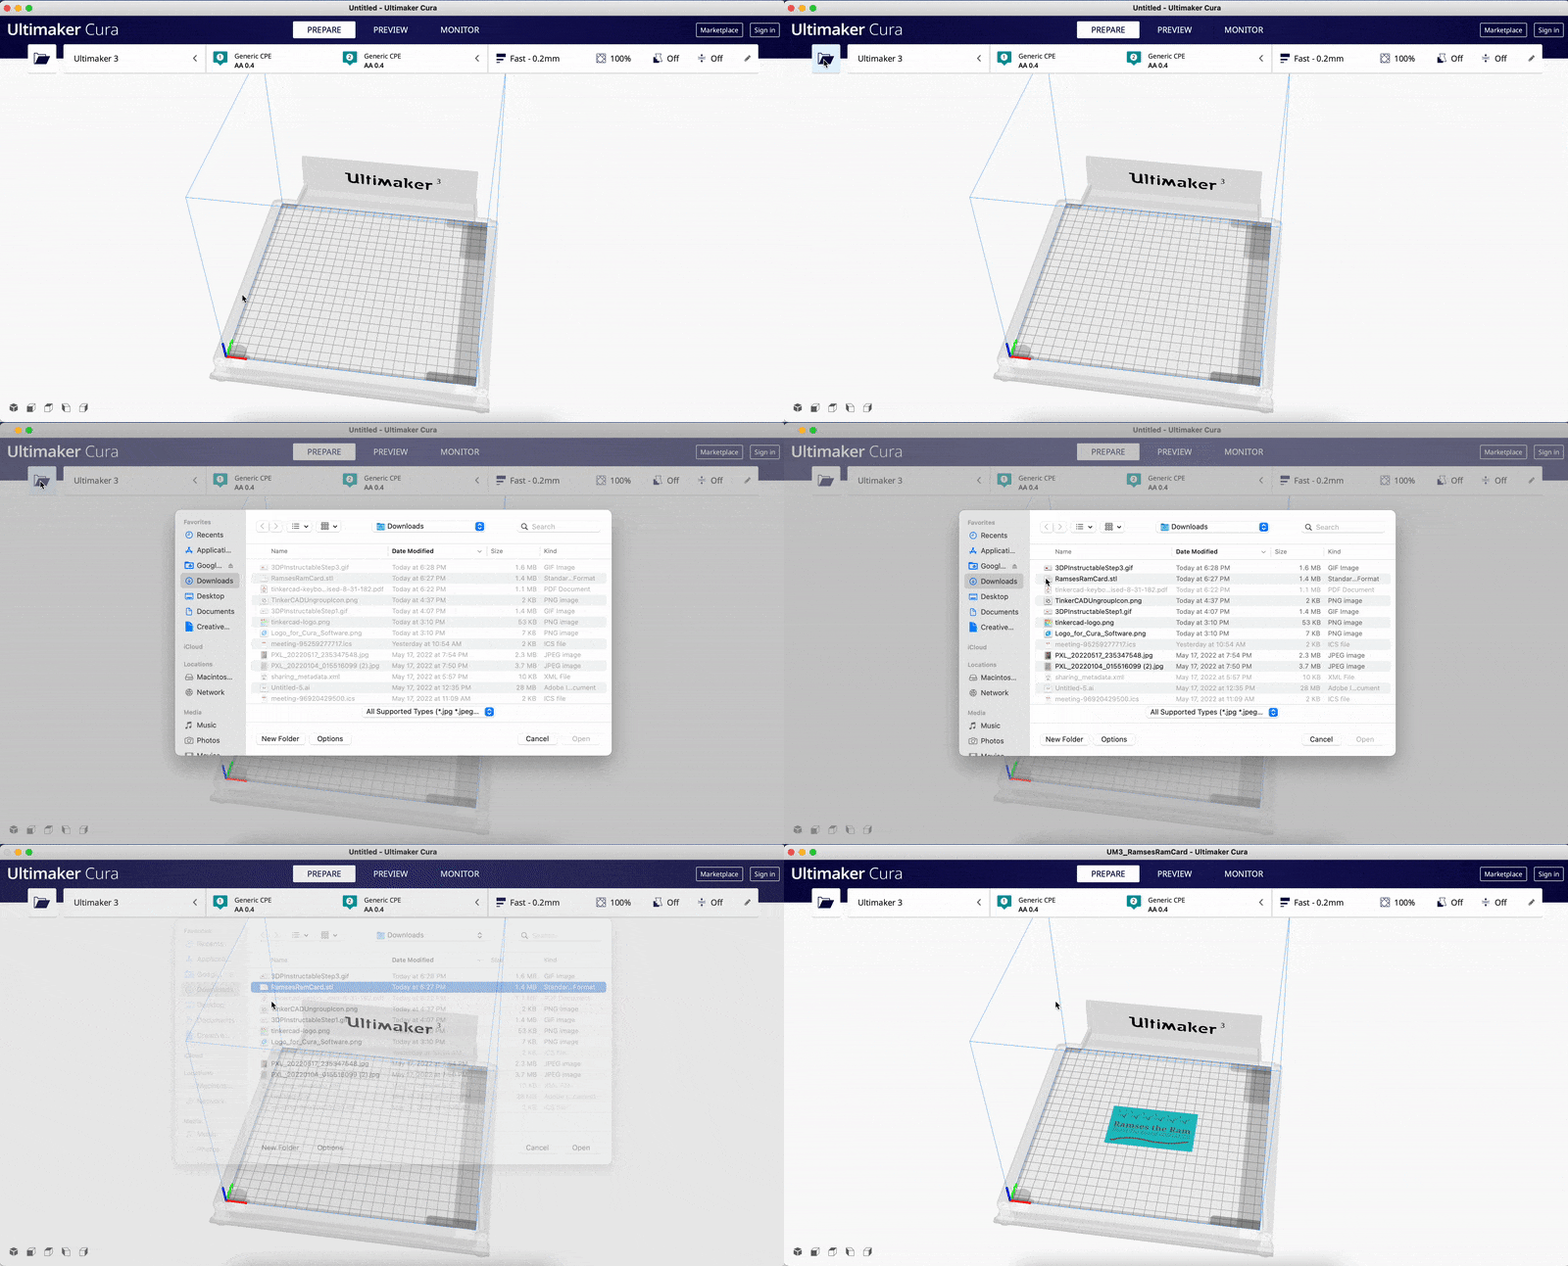
Open your file in Cura by clicking on the ‘folder’ icon and select your file (if you just downloaded it, it’s probably in your ‘Downloads’ folder.)
Make sure your design is centered on the build plate in Cura. For this project, you won’t need bed adhesion (a brim) or support, so make sure those settings are not enabled. Since this design is a flat shape, it should print easily and quickly.
Hit the 'Slice' button to see a 'time and materials' estimate for your print job.
Go to a BeAM Makerspace
Head to either of the BeAM Makerspaces that have 3D printers (either Carmichael Residence Hall or Murray Hall.)
Start filling out the online form for your 3D print at the following link: Ultimaker 3 3D Printer form. However, don’t submit the form until you press ‘print’ on the printer.
At this point, you should be able to see the amount of filament (both grams and meters) that you’ll need for your print, as well as your filename, material type (CPE), a description of your print, and the amount of time it’s expected to take.
Start Your 3D Print Job
Once you have your file set in Cura, you’ll pick one of the BeAM 3D printers that has enough filament, take the USB, load your Cura file onto it, and plug it back into the printer. Need a more detailed refresher on the rest of the 3D printing process? Check out the video in this section, or consult the BeAM 3D Printer Quick Guide here: https://beam.unc.edu/files/2020/06/3DPQuickGuide.pdf.
After pressing ‘print’ on your file, immediately submit your online form so that BeAM staff will have an accurate start time for your print. DON’T FORGET TO SUBMIT THE FORM - BeAM staff will cancel your print if they can’t find a record of it online.
Finish Your 3D Printer Training Certification
You must stay with your print for the first 25 minutes or until the first layer is completed, whichever takes longer. This should be a short enough print that it will complete before the required time limit. Wait until the bed has completely cooled and remove the print. Show it to BeAM staff and they will update your record in the BeAM database.