PCB Design in EAGLE
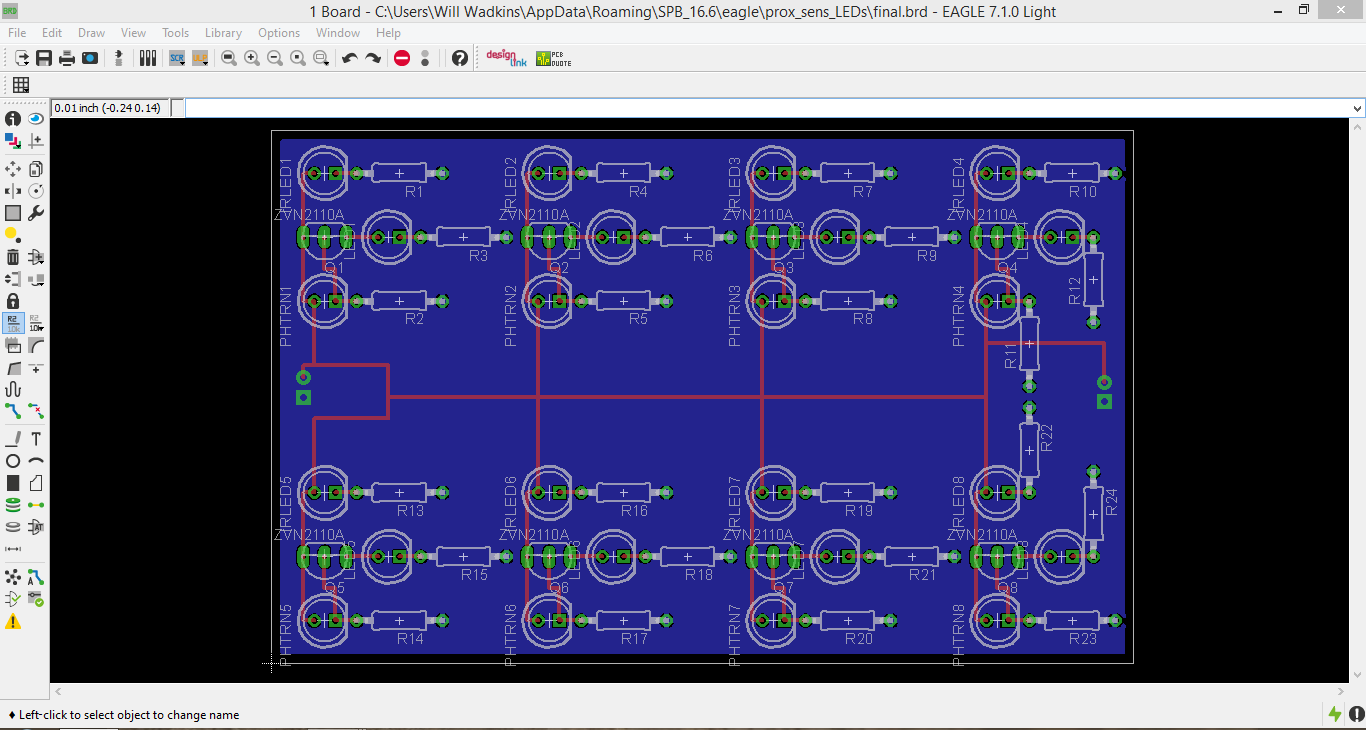
This Instructable covers the steps I made to create the PCB shown in the above picture. However, I wrote it with the idea in mind that people could adapt it to their own projects. Let me know if you have any questions specific to your project that I didn't cover in this Instructable.
Moving on... As I mentioned in my previous Instructable (Proximity-Sensing LEDs), I designed the circuit to eventually move it to a printed circuit board (PCB). This Instructable is a step-by-step guide to PCB layout for beginners. It follows the design I described in my previous Instructable, but the techniques can be used to design any project you choose. I will be doing the layout in EAGLE, a CAD software. There is a free version available of this software so anyone can use it!
Real quick, the general design process is to start a new project, draw a schematic, convert the schematic into board layout form, and then organize the components on the board however you want. Let's get started!
Download EAGLE
If you don't already have it, you can download EAGLE here. Download the appropriate file for your operating system and follow the instructions in the installation wizard. If you will be using the free version, make sure to click the box "Run as Freeware" when the installation wizard asks for a license.
Download Necessary EAGLE Library
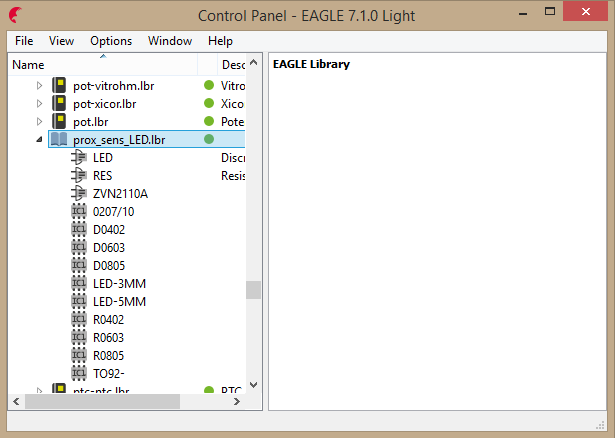
There are tons of different EAGLE libraries available and many of them should have installed with EAGLE by default. To keep things simple and make sure you have all the parts we will be working with, I put together my own library that you can download here.
Once you download the library, move it to the appropriate folder so that it is easily accessed in EAGLE. On my computer, this location was C:/EAGLE-7.1.0/lbr. It may be a different location on your computer, but the address should be somewhat similar. The main concern here is that it is in a library folder such as "lbr".
If you had EAGLE open already, close it and reopen it to refresh the libraries list. Click the drop-down arrow next to "Libraries" and scroll down searching for "prox_sens_LED.lbr" to make sure it downloaded. Click the drop down arrow here to to make sure everything in the library copied correctly as well. It should contain three simple devices: LEDs, resistors, and transistors. You'll notice that there's many more than just three items in the library though. This is because each device comes in different packages. For example, an LED (the device) comes in a 5mm bulb-like package that we will be using, but it also comes in a tiny surface-mount package (and other packages as well).
Starting a New Project
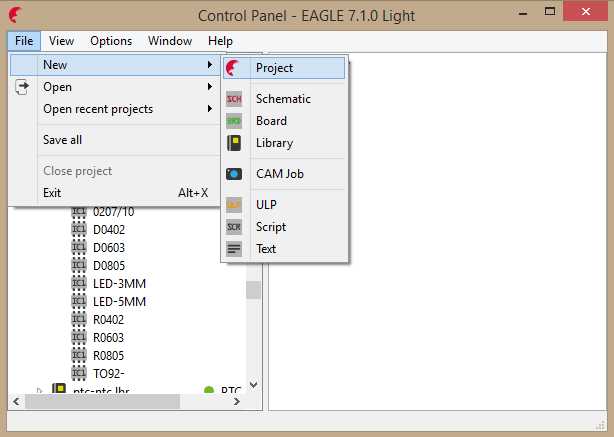
To start a new project, click "File" in the EAGLE command window, hover your mouse over "New", and click "Project" in the drop-down menu. After doing so, EAGLE will set up a new project called "New_Project". I renamed mine to be "prox_sens_LEDs".
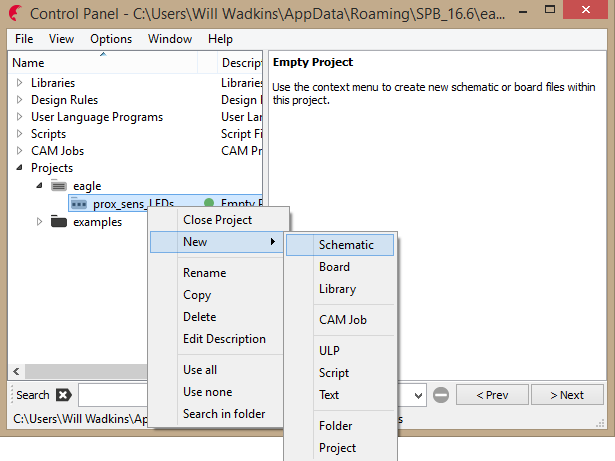
Now that we have our new project set up, let's begin the design process! We're going to begin by creating a new schematic. Right click on your project in the EAGLE command window, hover your mouse over "New" and click "Schematic". A new window will open with a blank work area to draw the schematic in.
What Are We Building?
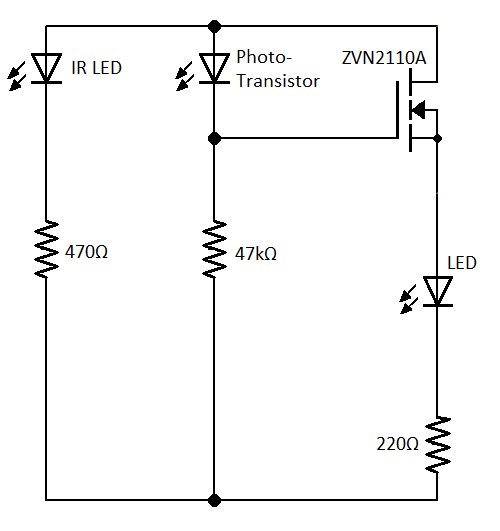
Before we get started with the actual design process, I wanted to briefly mention what I will be designing. As mentioned, this is a continuation of my proximity-sensing LEDs project from my last Instructable. The circuit of interest is composed of clusters that contain an IR LED, photo-transistor, LED, NPN transistor, and a few resistors. You can see the schematic of a single cluster above. For a description of how this works, check out my previous Instructable or this blog post. I explain it in both of those.
Schematic Layout- Adding LEDs
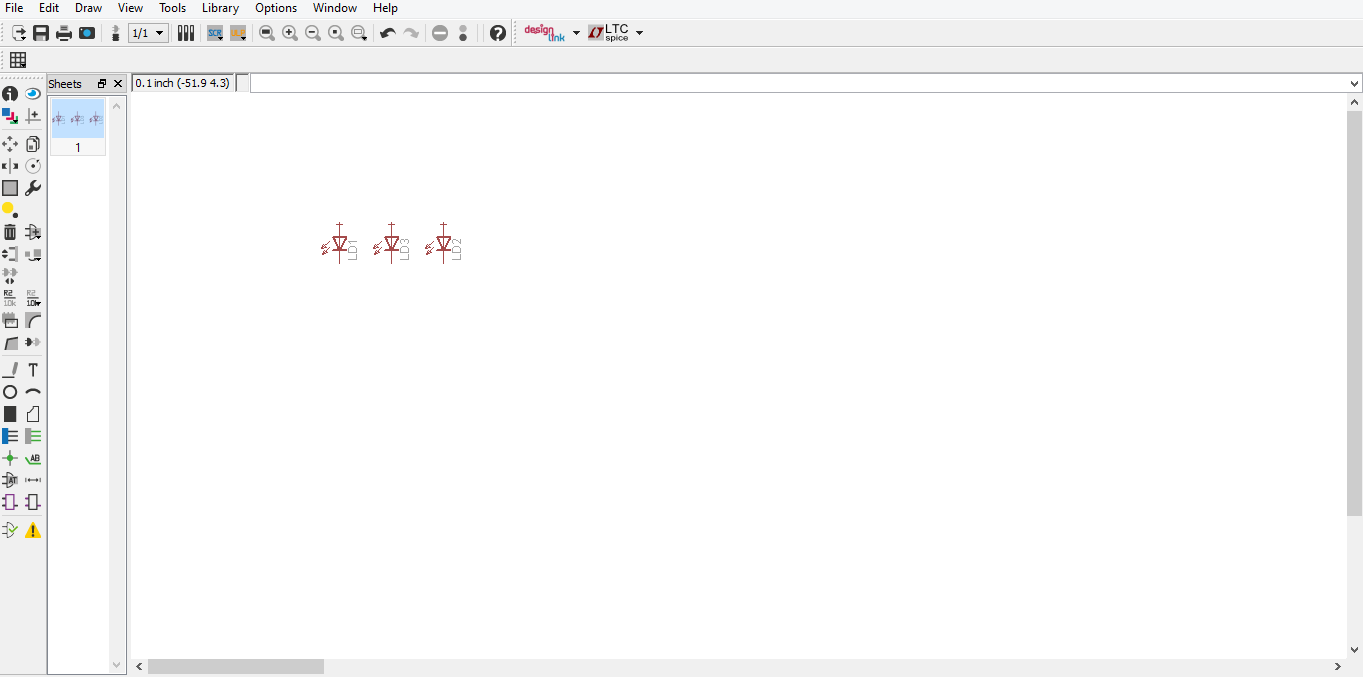
On the board I'm designing, there will be 8 separate proximity-sensing clusters. I'm going to layout one cluster first. Then after we put one together, we can copy and paste the group as a whole to add as many clusters to the future PCB as we want.
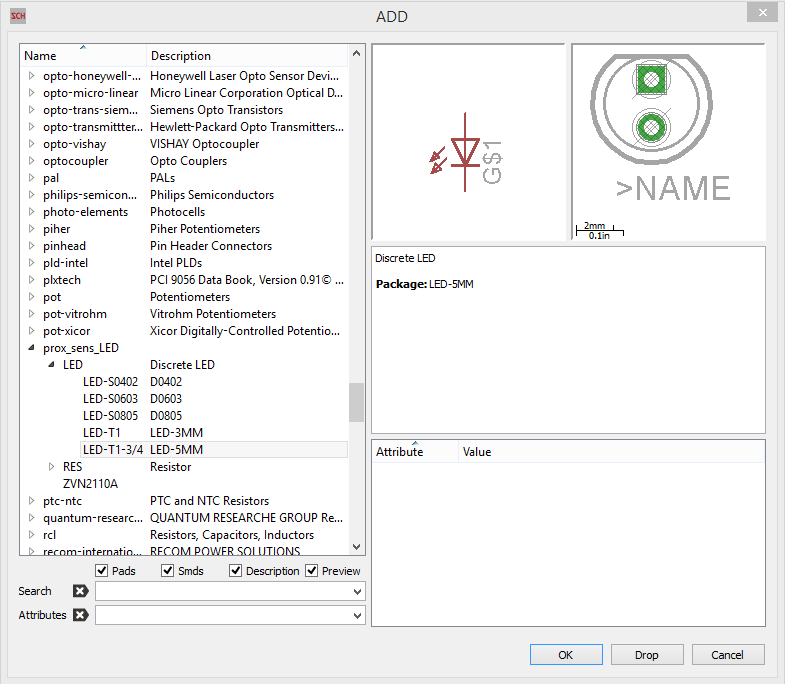
To add a component, start by clicking the "Add" tool. This will open a window that contains a list of all the libraries you have access to in EAGLE. Scroll down to the library you downloaded, "prox_sens_LEDs", and click the drop-down arrow next to the library name. You should now see a list of each of the three devices we have: LED, RES (resistors), ZVN2110A (transistors). Click the drop-down menu by LED.
All of the LEDs we are using (and the photo-transistor) are in 5mm packages, so click the package that says "LED-5MM" in the description. Once this is selected, click OK. The library window will close and you will have a schematic logo of an LED attached to your cursor. Click where you want to place the LED. Since the photo-transistor and IR LED share the same package, we will have three of these packages in each cluster. Click near the first one to add two more (make sure they are not touching). After you're done hit "Esc" on the keyboard. This will bring you back to the library window.
Schematic Layout- Adding Resistors
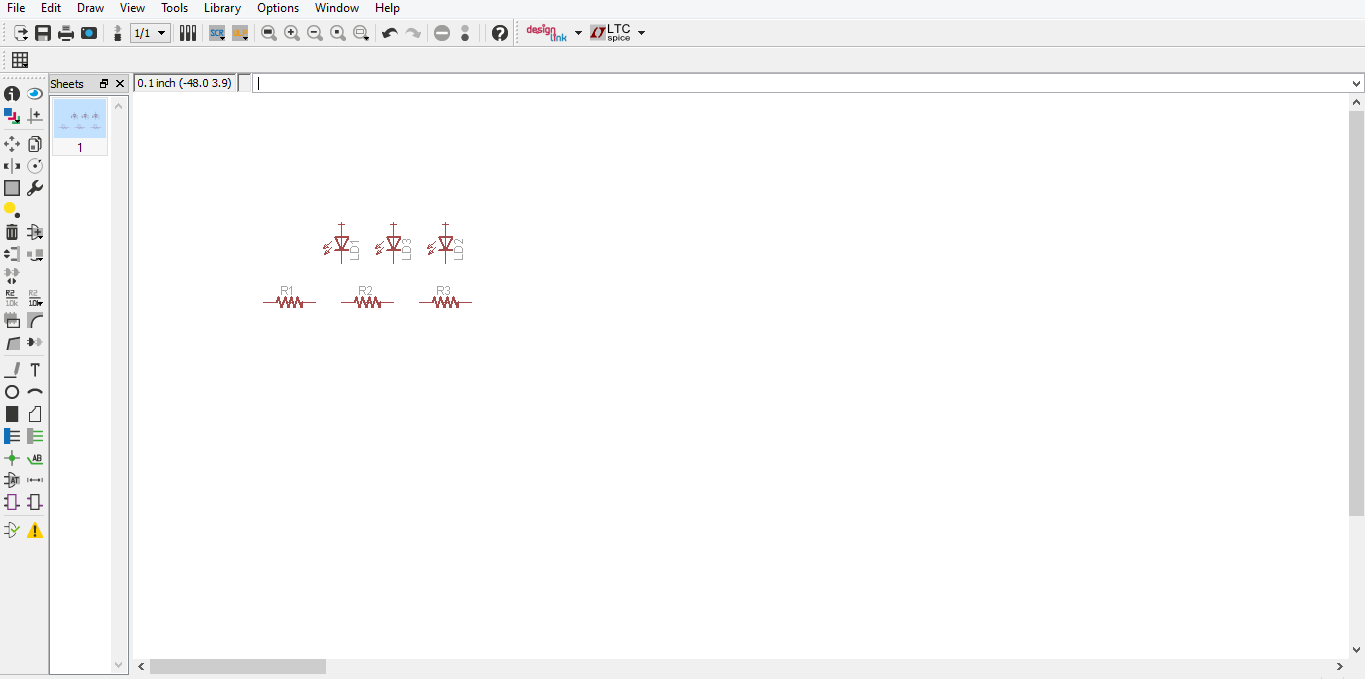
Now we're going to add some packages from the "RES" device in the "prox_sens_LED" library. First, click the drop-down menu next to RES. We will be using the first package, "RES-0207/10". Select this package and click OK.
Each LED we have will be connected to a resistor so add three of these symbols, each right next to an LED. Continue to make sure none of the parts are touching. We will draw connections later on. Note: all of the resistors we are using are the same size regardless of value, so don't worry about labeling the different values for now. Having the right package is all that matters at this step.
Hit "Esc" on the keyboard again to go back to the library window and move on to the next step!
Schematic Layout- Adding the Transistor
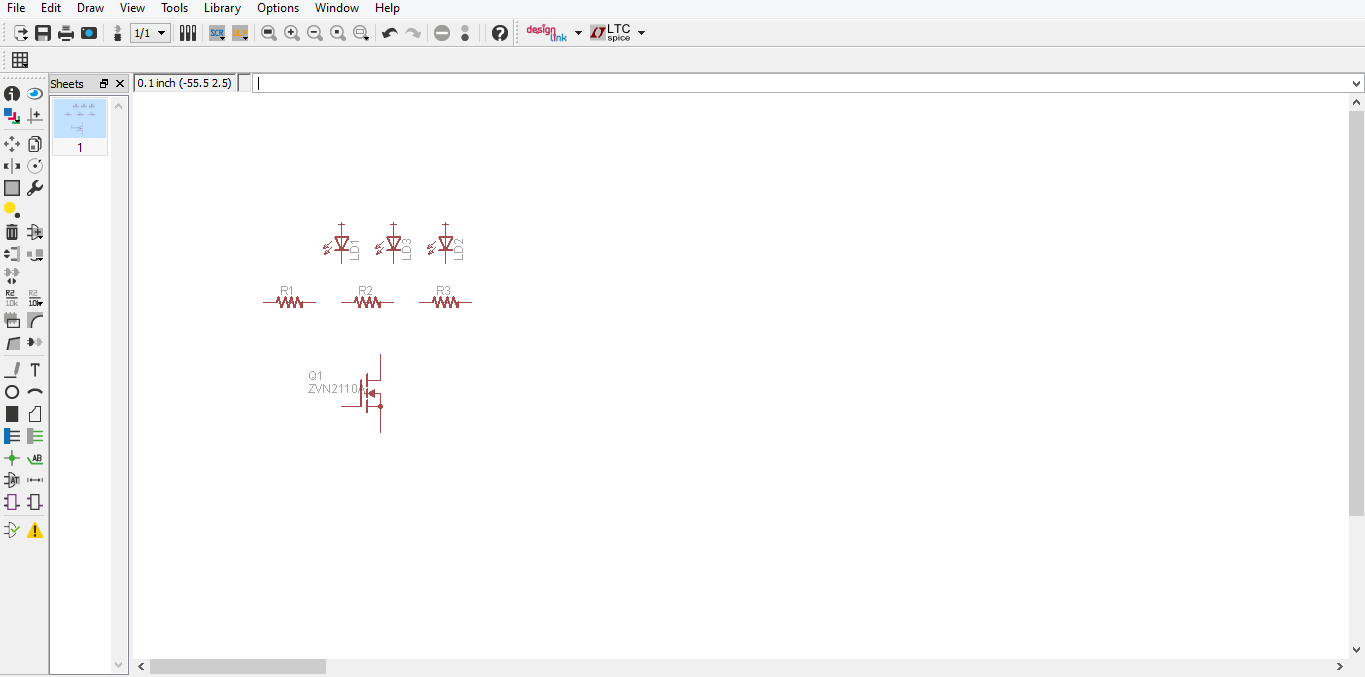
For the transistor, there is only one package available in this library, "ZVN2110A". Select it and click OK. Place just one near your LEDs and resistors making sure none of the components are touching. Press "Esc" and close out of the library window when it reopens.
Schematic Layout- Putting It All Together
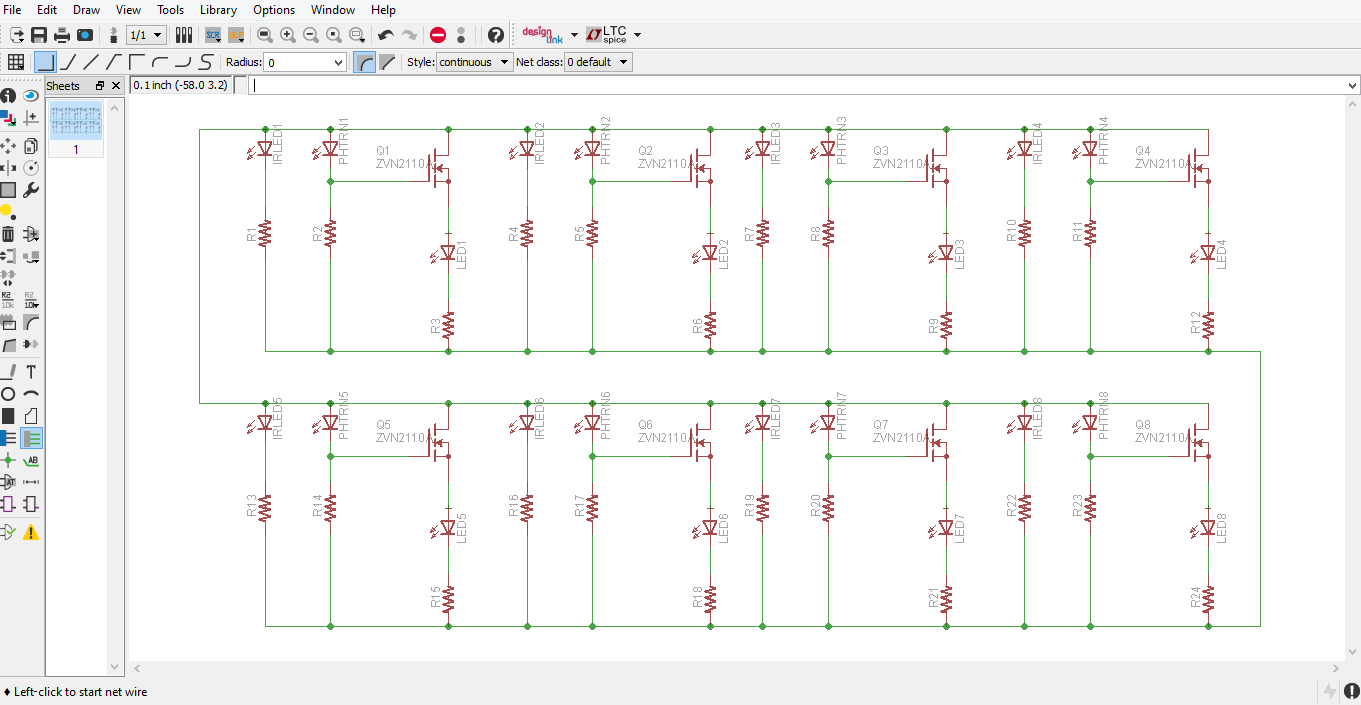
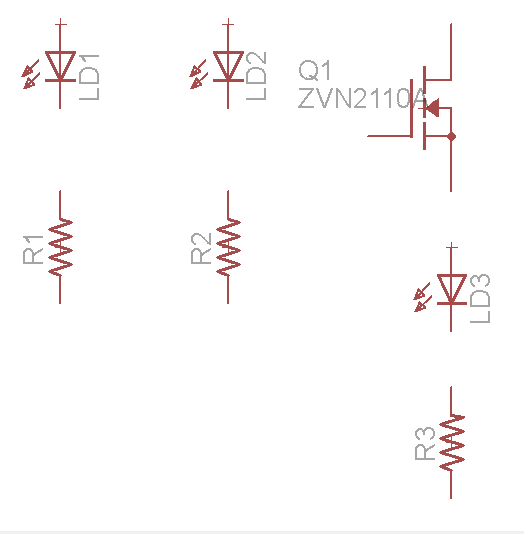
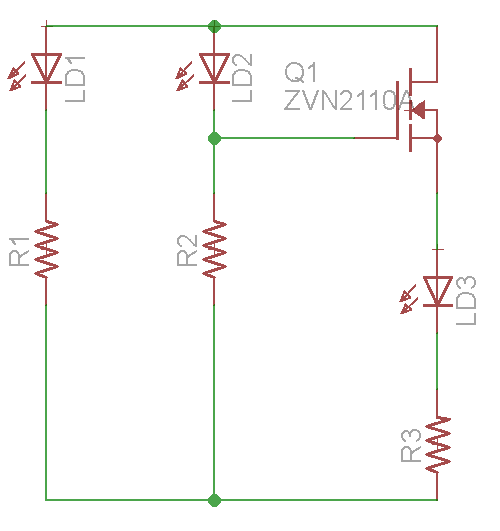
In this step we are going to organize the schematic and connect all of the components.
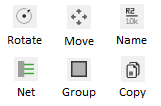
The general process for completing an action in EAGLE is to click the button of the desired action in the toolbar and then click the object that you want to apply that action to. For example, I started by rotating all of my resistors. So I clicked the "Rotate" button in the toolbar and then clicked the resistor. One click rotates the component by 90 degrees. Unless you select another tool, the last one you clicked will remain active and you can continue clicking objects without having to select the tool again each time. After rotating the resistors, I moved the components around. You can see my intermediate and final layouts in the pictures above. I also included an image that shows the buttons we will be using.
After I got the components where I wanted them, I connected each one using the "Net" tool. Note: There is another tool called the "Wire" tool. It may sound more reasonable to use this one, but using the Net tool will help make sure we have all of the right connections when we move to the circuit board layout.To use the Net tool, click the Net tool icon. Next, click the end of the component that you want to connect, slide your mouse over to the other component you want to connect to and click again. The final result should look something like the picture in the center on the right. Make sure there is a little dot at each point where the wires come together at a junction.
The next step is to rename our LEDs. Remember the LED packages represent, an LED, an IR LED, and a photo-transistor. Renaming these now will make things a lot easier in the future. In our current group we have LD1, LD2, and LD3. Using the "Name" tool, I renamed LD1 as IRLED1, this is the IR LED. I renamed LD2 to PHTRN1, this is the photo-transistor. Lastly, I renamed LD3 to LED1, this is the regular LED. Now, after we copy this group, EAGLE will automatically keep these names and change the following number. So IRLED1 automatically becomes IRLED2, then IRLED3 as it's copied again, and so on.
Next, group them all together using the "Group" tool. Since I will have 8 clusters on my final board, I copied this group (with the "Copy" tool) 8 times. Note: to do an action on a group, you generally have to hold Ctrl and right click the group rather than just a left click.
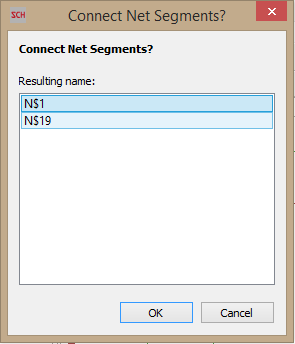
After you've copied the number of groups you want, you need to connect them all together. Note: We do not add any symbols for power or ground in a schematic in EAGLE. We will take care of this when we get to the actual board layout. For now, just make sure everything that will be connected to power is connected together and everything that will be connected to ground is connected together (as shown in the top image). As you are connecting the separate groups using the Net tool, EAGLE will ask you if you want to connect the net segments. Select the one you want and click OK. It does not matter which one you choose as long as they are the same. For example, the top of each row of the schematic will have power. So make sure all of those connections have the same name suchs as "N$1", or you can rename it to be "PWR". For the bottom of each row of the schematic, we want these to all be connected to ground. Again, make sure they all have the same name. By default EAGLE may call it "N$6", but you can rename it to something such as "GND".
Starting the Board!
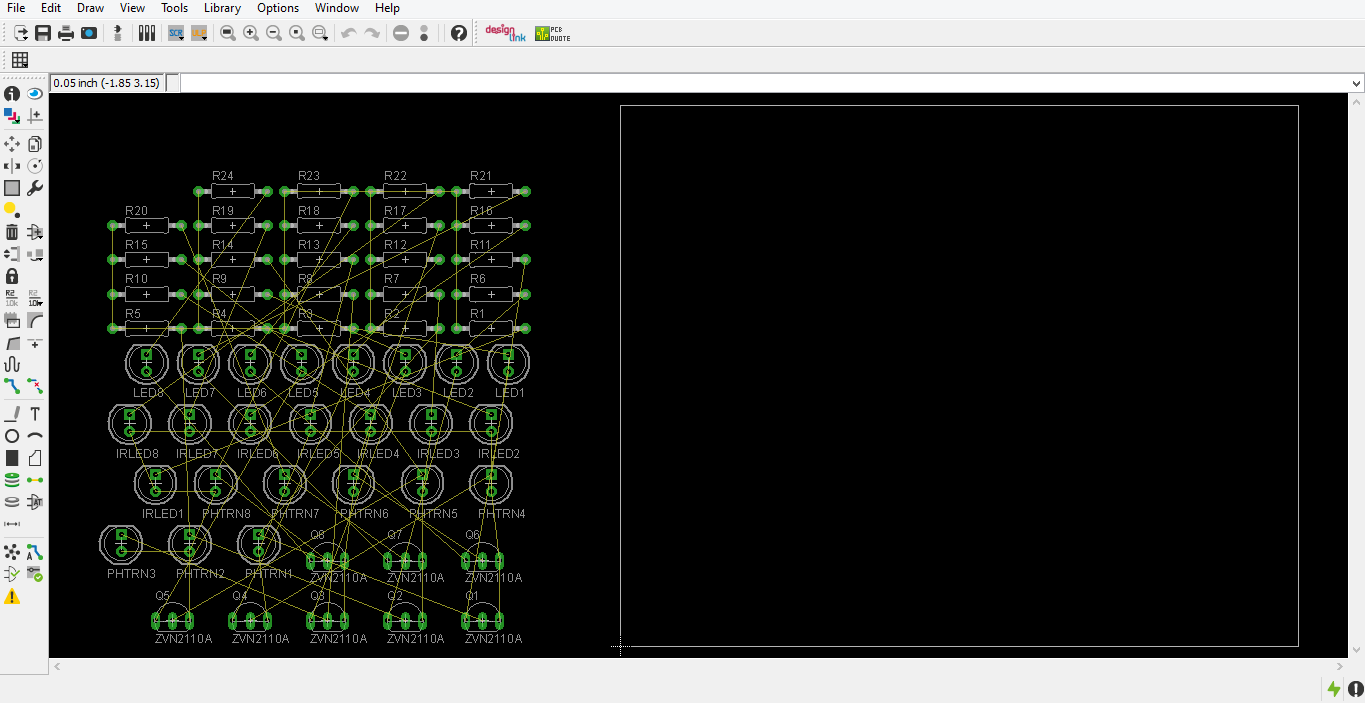
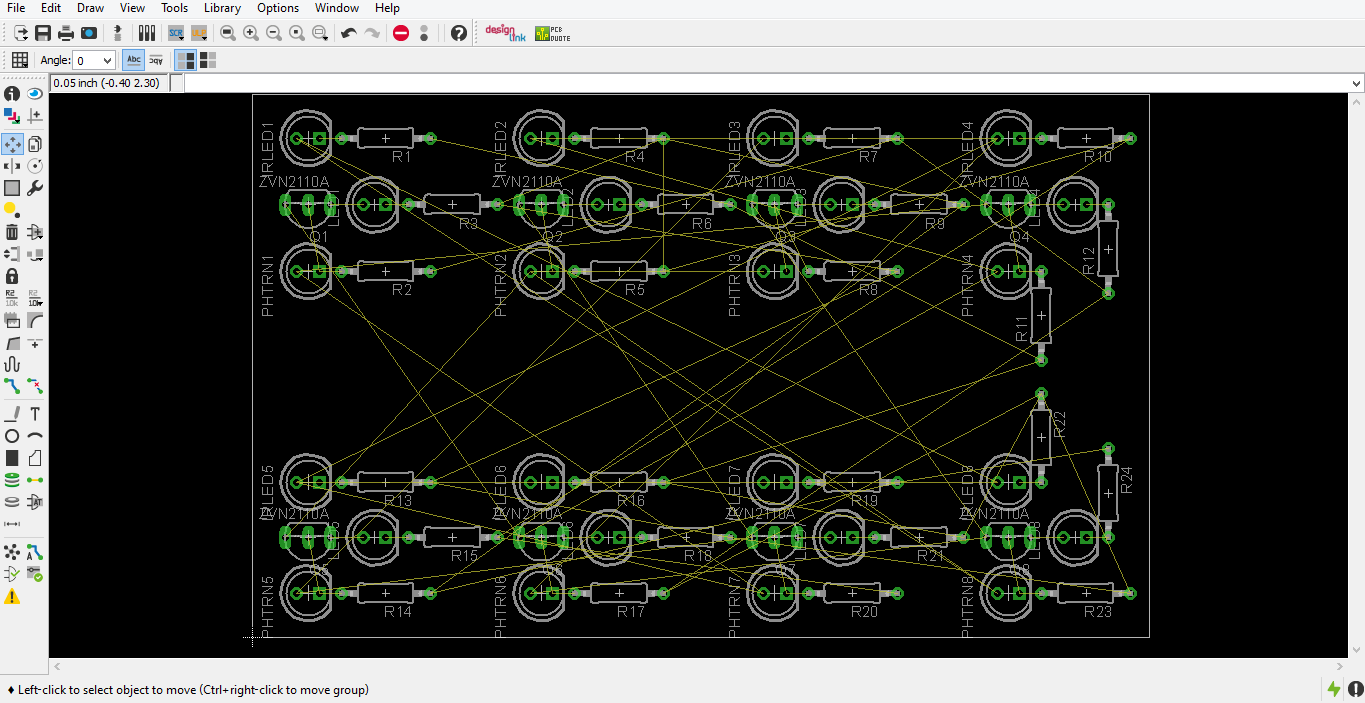
Now we are going to turn our schematic into a PCB! Go to "File" and click "Switch to board". EAGLE will say that a board does not yet exist and ask if you would like to create one. Click "Yes."
What you get at first will look like a mess.You will have all of your components on the left with a bunch of "wires" connecting all of them. On the right will be an empty white box. The first step is to move all of the components to the white box and organize them. We'll still be using the same tools (move, rotate, etc.) as we did when organizing the schematic.
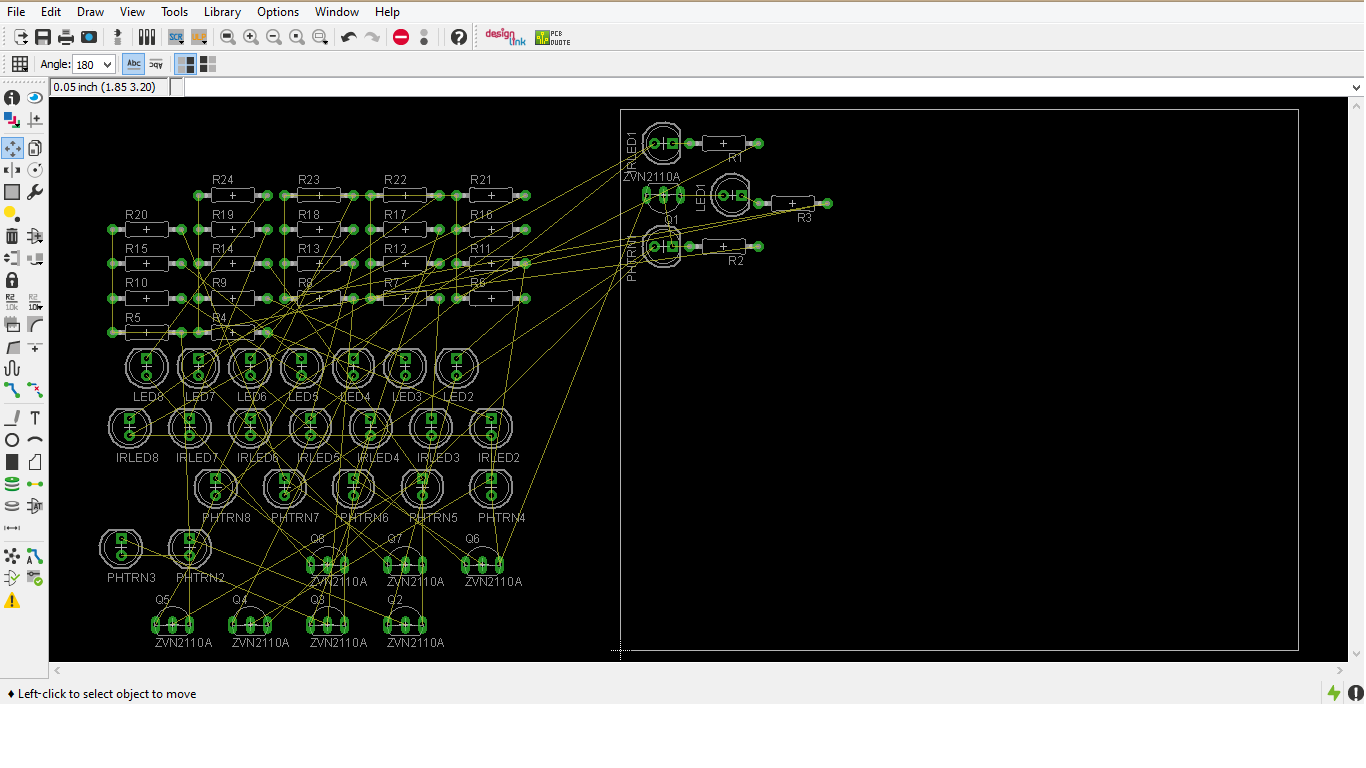
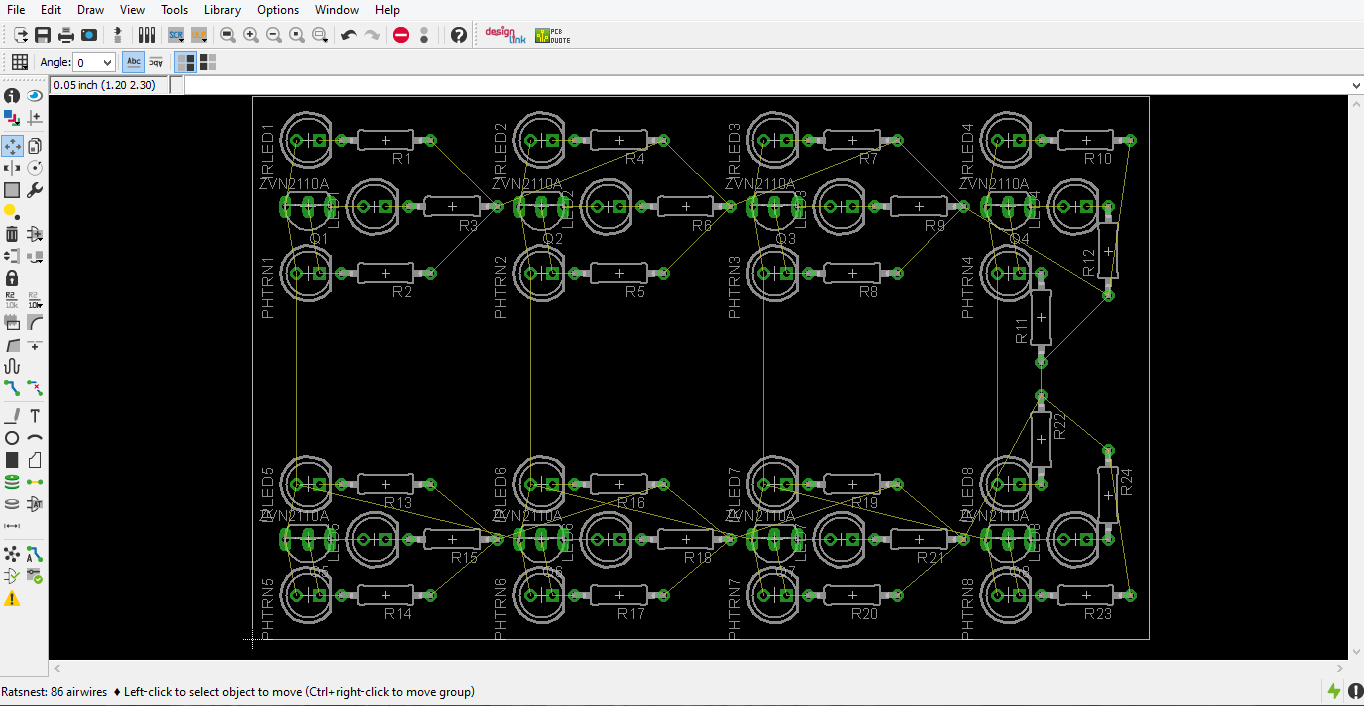
I prefer to work one cluster at a time. That being said, I move all of the LED packages labeled with a 1 (IRLED 1, PHTRN1, and LED1) to the approximate place that I want them. I will also move the first transistor, Q1, near them as well. The first components of the first cluster are connected to resistors 1-3, so I move R1, R2, and R3 nearby as well. You can see what I have so far in the second picture. Don't worry too much about lining up all of the components precisely right now. After we get all the parts moved over we can organize the components better.
After moving all of the parts of the first cluster, I moved the second cluster in just to the right of the first. As you might expect, the 2nd cluster contains IRLED2, PHTRN2, LED2, Q2, and resistors 4-6.
I continued moving the rest of the components cluster by cluster. Note: the numbering convention remains the same for each one. For example, the 3rd cluster contains IRLED3, PHTRN3, LED3, Q3, and resistors 7-9. And so on.
Once you have all of the components moved to the board area, you can fine tune the organization of the board and make everything line up nice and neat. I would recommend a layout like I have in the bottom left. This design works well with the proximity-sensing technology of each cluster. You may have to rotate some components as well to get them lined up right. You can see how it looks when I have all my parts moved over and organized in the picture on the bottom left.
It's important to make sure you have the LED packages oriented correctly, e.g., the anode to the left and cathode to the right (check my images for reference). Note: I had to rotate the resistors at the right edge of the board to make them fit. Another note: in the free-ware version of EAGLE, this is the biggest board you can make. If you have a paid license, you are allowed to adjust the white box and make a bigger board. Luckily though, this size of this board is perfect for the project we're working on.
One last thing, after you have all of your components lined up, click the "Ratsnest" button. By clicking this, EAGLE automatically organizes all of the "wires" and gives you a nice clean result like you can see in the picture on the bottom right. Beautiful, isn't it?
Routing the Traces
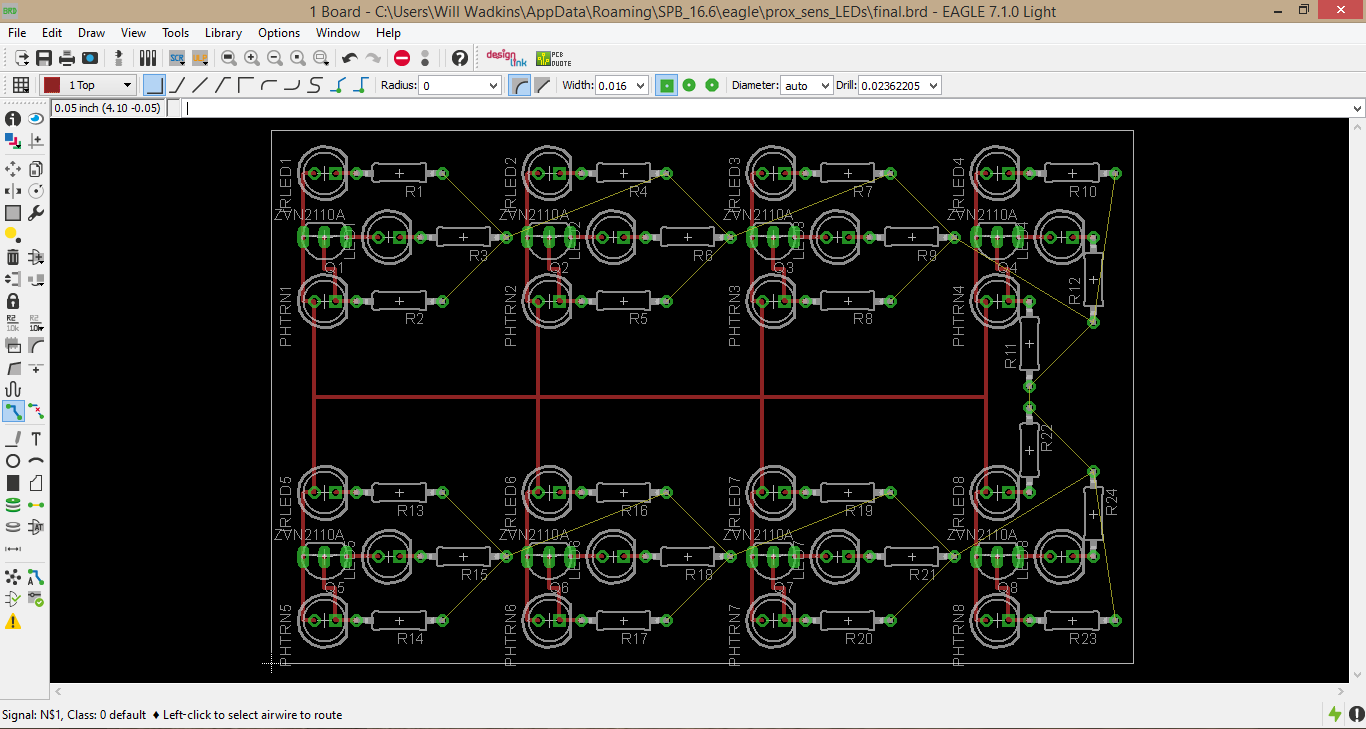

If you have ever seen a PCB before, you probably noticed the flat "wires" laid out over the board that connect all of the components. These are referred to as traces. As of now, EAGLE only knows what components should be connected, but it doesn't have any paths for connecting them. In this step we'll be "routing" the traces to tell EAGLE how to connect everything. This is my favorite part.
First, click the "Route" tool, and look at the toolbar at the top of the screen. You should see a drop-down menu that has a colored square and says either "16 Bottom" or "1 Top". This is where you select the layer of the PCB that you will be working on. Our board is simple enough that it only needs 2 layers, but some more complex boards may have up to 10 or more!
We are going to start by routing the traces on the top layer, so make sure the layer selection is set to "1 Top" as you can see in the second picture. The colored square is next to it is red, so everything we draw on this layer will show up in red.
The Route tool should still be selected, but if not then re-select it. Now click in one of the green circles of a component that will be connected to power such as the left side of the IR LED. Now drag your mouse to the drain of the ZVN transistor (this is the left-most pin). I prefer to lay everything out in right angles. To do this drag the mouse a little bit and click. This adds a corner and you can continue dragging your mouse from there. Check my picture above for reference. Notice, for example, I started at the anode of the IR LED, went a tiny bit to the left, clicked to add a corner, and then went down the rest of the way to the drain of the transistor.
On the top layer, we are going to connect everything that will be connected to power such as the anodes of all of the LED packages and the drains of the transistors. We also want to connect the cathodes of all of the LEDs to their respective resistors. Follow my picture above to make sure you get everything connected.
If you make a mistake, you can either undo your action with Ctrl+Z or use the "Rip-up" tool to remove the trace and re-route it.
You may notice that there's still some yellow lines on the other ends of the resistors. These will all be connected to ground and we'll take care of that in the next step.
Drawing a Grounding Plane
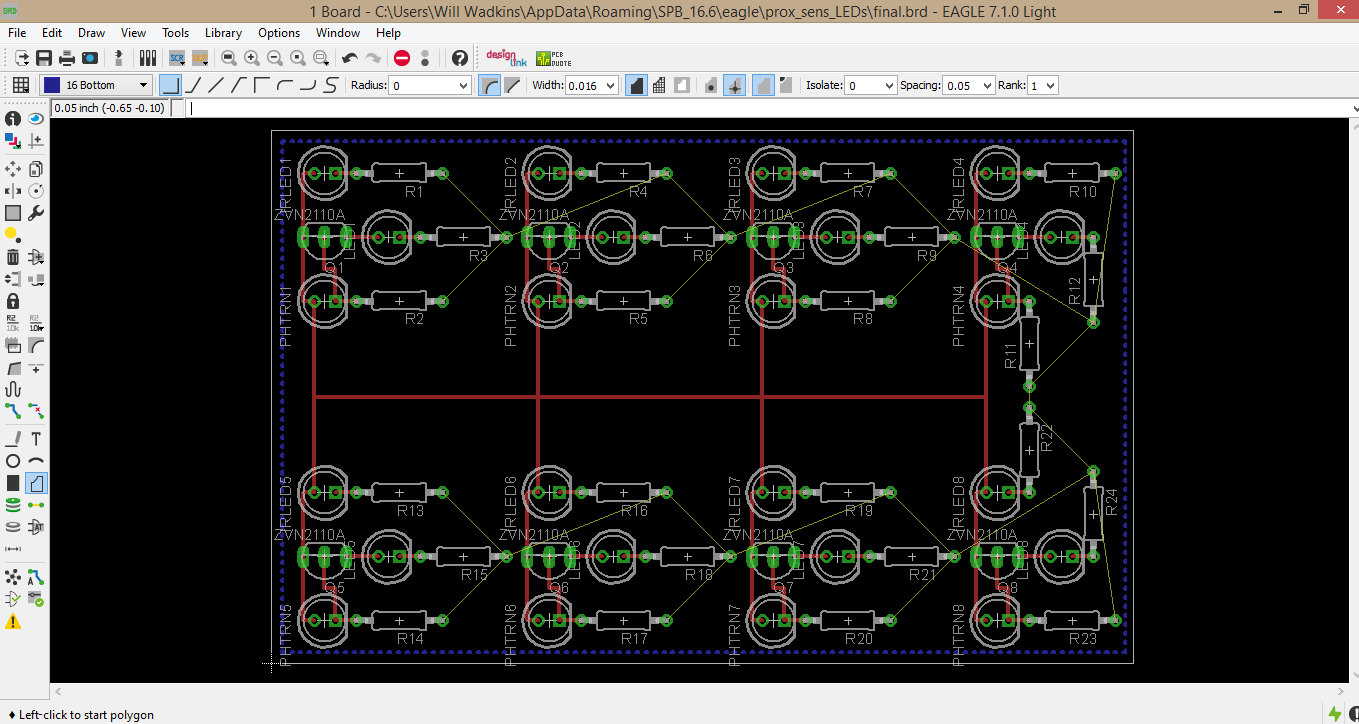
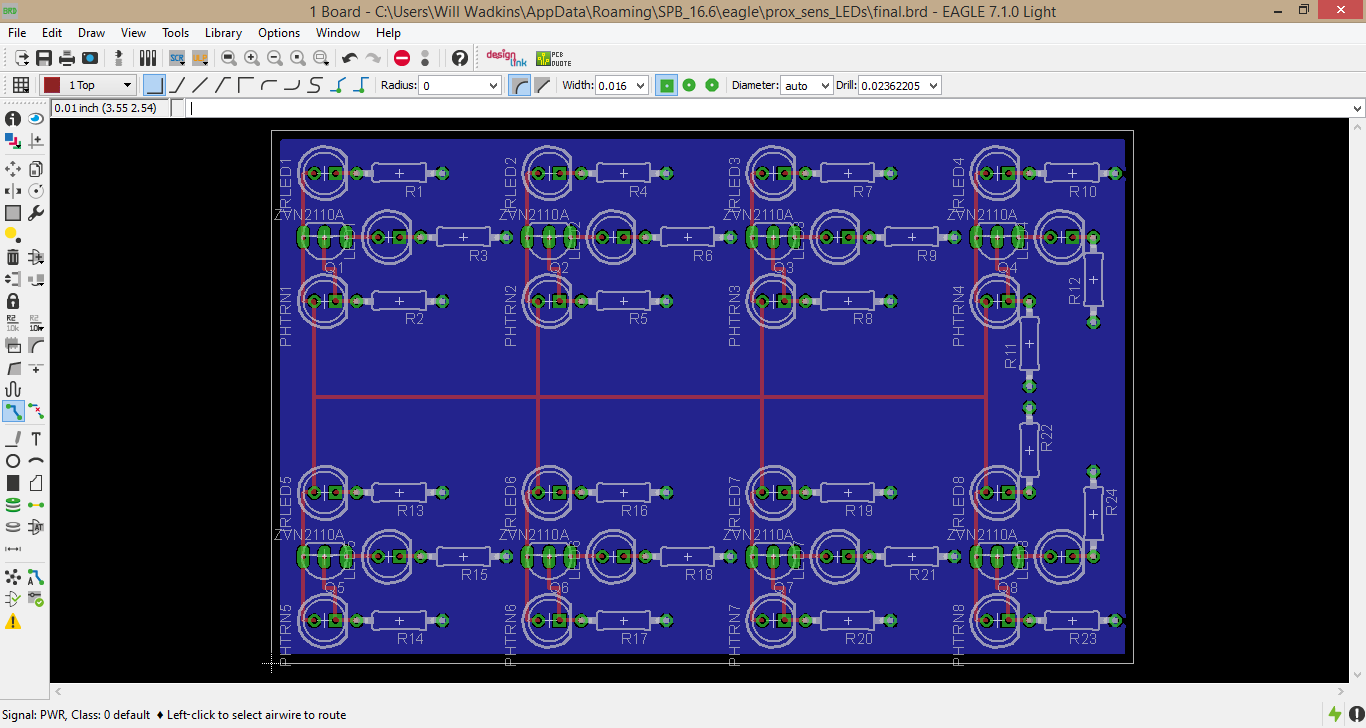
The last step connected everything that will have a connection on the top layer. We're going to work on the bottom layer now. Instead of routing separate traces though, we will draw a grounding plane over the entire bottom of the board. This will connect with all of the grounded sides of the resistors. Note: in some more complicated designs you may have to draw smaller and more specifically shaped planes. Since our board is just a simple design though, we can just draw a rectangular grounding plane over the entire bottom of the board.
To draw this grounding plane, we will use the "Polygon" tool. After selecting the Polygon tool, go to the layer drop-down menu and select "16 Bottom" since we are working on the bottom of the board now. The associated color of this layer is blue so the polygon that we draw will show up in blue.
For simplicity sake, start by selecting the Name tool and clicking the tail end of any of the resistors that will be connected to ground. It will bring up a small window to rename this "net". It's probably something like "N$6". I renamed mine to be "GND". This will make it easier to make sure everything gets connected to the grounding plane properly.
Now, with the Polygon tool selected, click in one corner of the board. Move your mouse to another corner of the board and click again. Do this all the way around the board until you get back to your starting point. Close the polygon by clicking on the point where you started. This will givce you a dotted blue outline around the edge of the board as you can see in the first picture.
Now re-select the Name tool and click somewhere on the polygon. Rename the polygon to "GND" as well. After doing so, EAGLE will ask if you want to connect the segments. Select "Yes". Now the polygon is connected to the "GND" net.
As a final step, click the Ratsnest tool. This finishes all of the connections. The polygon should now be filled in solid blue and any remaining yellow lines should be gone as in the second picture.
Adding Vias

Almost done! This is the last step. We need to add vias (electrical connections between the layers of the board) so that we can connect a power source (battery) to the board.
Adding vias is quite simple. Just click the "Via" tool and click where you want to place the via. Generally, vias that will have some sort of "positive" voltage will be a circle. Vias for connecting to ground will be square. When the Via tool is selected there will be an option in the top tool bar to select whether you want a square, circle, or octagon via.
I placed one square via and one circular via on each side of the board as you can see in the picture. Note: I did re-route some traces to make room for the vias on the left. To do this, click the "Rip-up" tool. Click the traces you need to move. They will turn back into yellow wires. After you rip-up all the ones you want to move, you can use the Route tool again to re-draw them however you want.
Now we want to connect the vias appropriately. We will do this with the "Name" tool. Select the name tool and then click one of the vias. It will bring up the option to rename it. Rename the via to the same name of the net you want to connect to. For example, the round vias connect to power so I renamed mine to "N$1" which is my "power net". I renamed the square vias to "GND". After you rename them and select that you want EAGLE to make the connections, the vias will now have yellow lines connecting them to the appropriate net. However, remember we have the entire bottom of the board as a grounding plane. That being said, the square vias that we set as "GND" will automatically be connected to the grounding plane so you shouldn't see any additional yellow lines coming from the square vias. Only the circular ones.
We now want to route the circular vias to the power net. This is done with the route tool the same way as all our other traces. (Make sure you are working on the top layer. The traces you draw should be red.) Note: I drew one of these traces under a resistor. That's totally acceptable as long as it does not cross any other traces. Compare your board to the one in the picture and make sure you have everything correct. If something looks incorrect, try clicking the Ratsnest tool. This should make all of the changes you made look nicer.
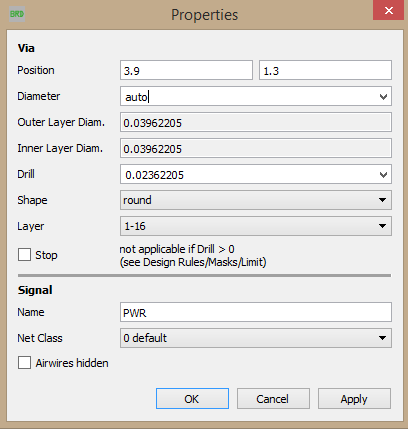
Lastly, you may want to resize your vias a little bit. I made mine a little bit bigger. This makes it so various sizes of wires and connectors can fit and it's also easier to solder. To resize your vias, right click on the one you want and click "Properties". This will bring up a properties window like the one pictured above. I set my diameter to 0.066 and my drill to 0.03543307. (These look like crazy numbers, but it's just in inches.) I used this size for all of my vias, but you can use whatever size that will work best for you.
And that's it! Congratulations! You designed your very own PCB! I added one more step after this one that discusses some finishing touches you can make. I also talk about where you can get a copy of your PCB made.
Finishing Touches and Ordering Your Board
It's not necessary, but if you would like you can add text or images to your board. Rather than overflowing this Instrucatble with too much information though, I found a link to an Instructable from another user that describes this process. You can see it here. I usually like to label my resistor values, but this circuit is simple enough that it can easily be determined where each resistor goes from the schematic (included in step 4).
Now how do you actually get the board? I have always used OSH Park. They have reasonable prices and I have always received quality boards from them. Another thing I like about OSH Park is that you can simply just send them you're ".brd" file. This is the EAGLE file we were just working on. Other fab houses usually require you to submit a collection of what's called Gerber files. This can be a bit confusing for a first-timer.
Before finishing up I would like to say that EAGLE can be very quirky. Using this program effectively takes some practice. That being said, if you are having a weird error or one of the steps is unclear please don't hesitate to message me or leave a comment. I also appreciate any other feedback!
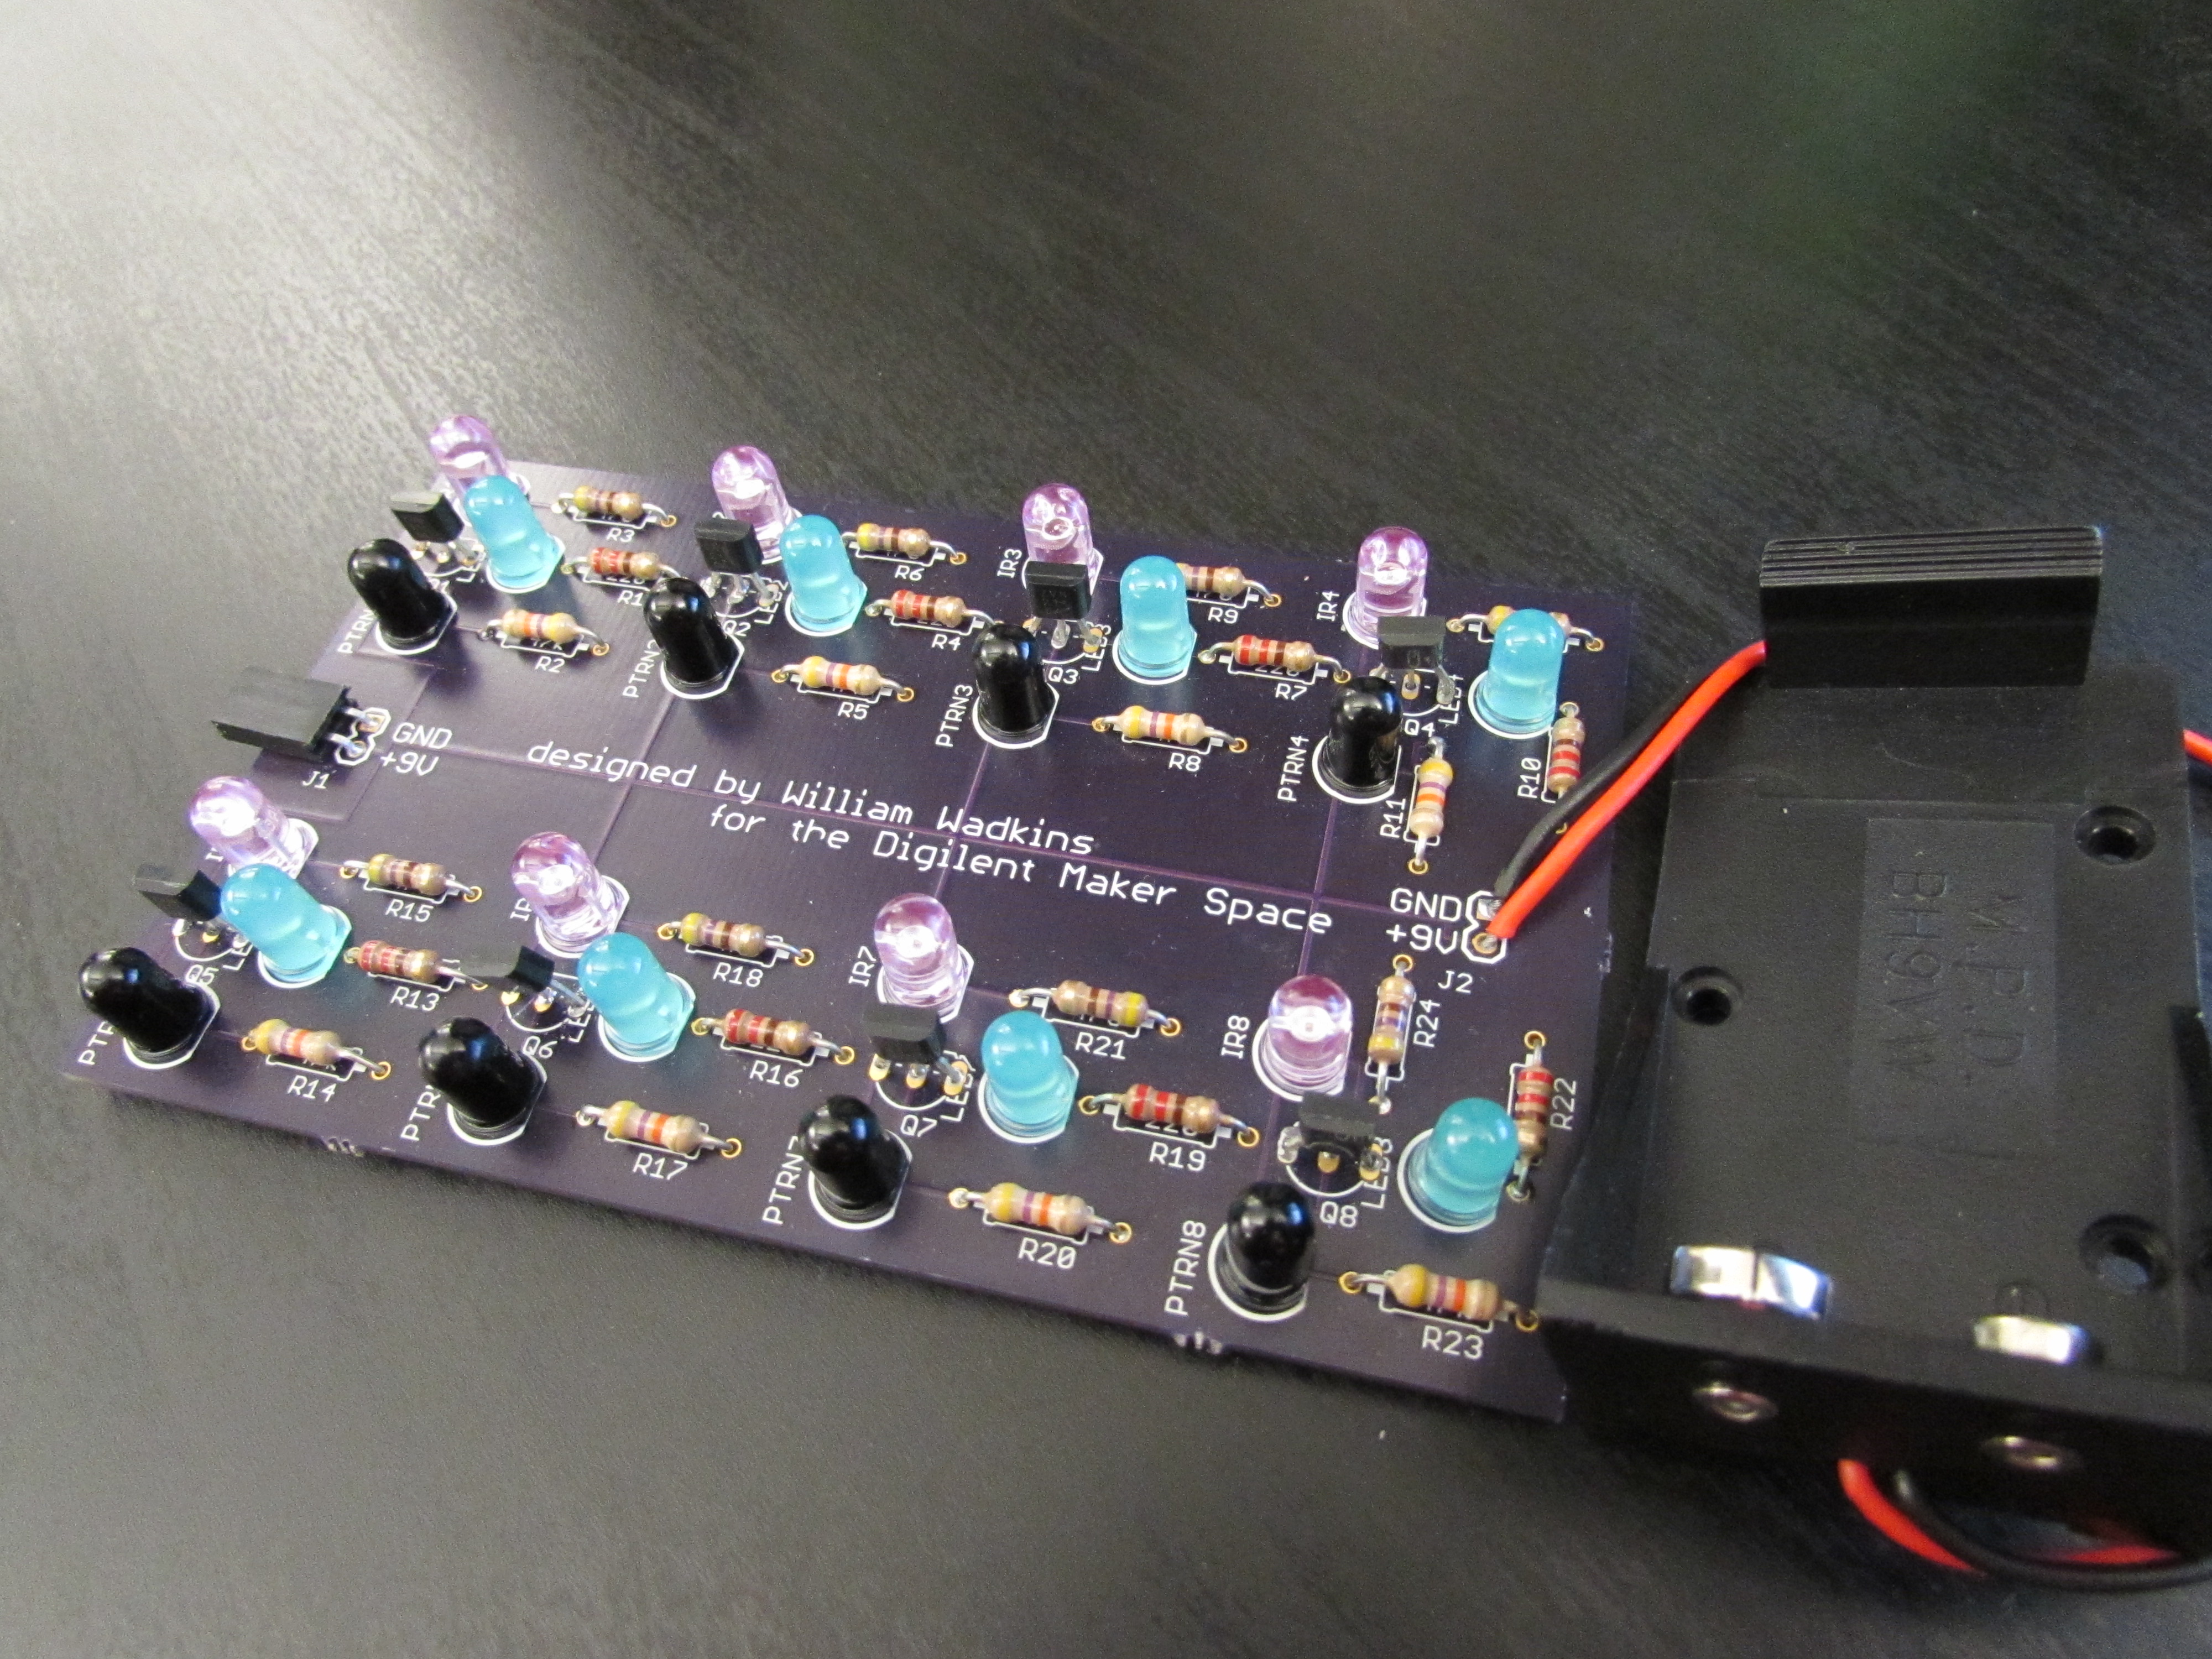
I had OSH park make this board that I designed and you can see it in the picture above! Good luck and thanks for reading my Instructable!