Barbichette Simulator Feat. MakeyMakey
by RomainG1 in Circuits > Microcontrollers
988 Views, 2 Favorites, 0 Comments
Barbichette Simulator Feat. MakeyMakey
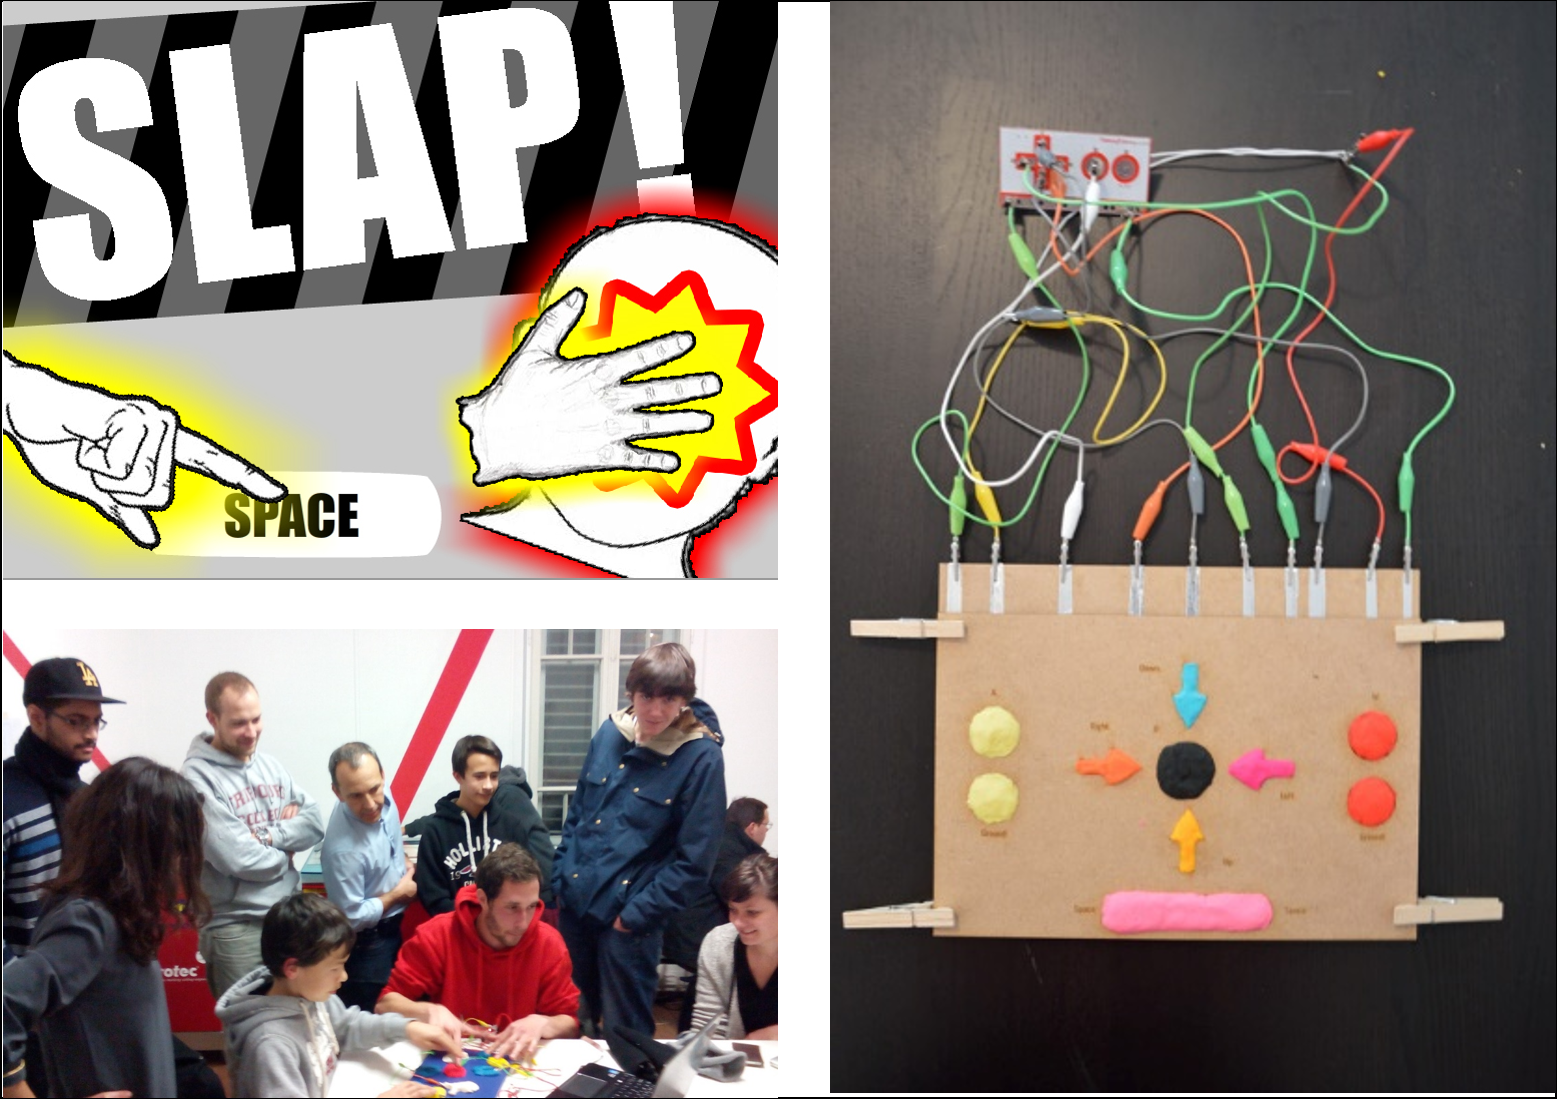
You will find here some instructions to use a MakeyMakey kit and to make your own controller board to play to an original game, designed by Wuthrer and I.
It’s a two player game, named Barbichette Simulator as a tribute to “La Barbichette”, a childish game during the one you should keep calm or accept to be gently slap.
Making the board is not mandatory to play the game. Indeed the MakeyMakey allow you to replace buttons from your keyboard by whatever you want. So you can play with your actual keyboard or bananas, if you prefer!
We spent a significant amount of time on the design of the controller board to achieve a certain game play, actually a “messy finger war” game play. If you want to play directly anyway, please go directly to the section “How to play” at step 5.
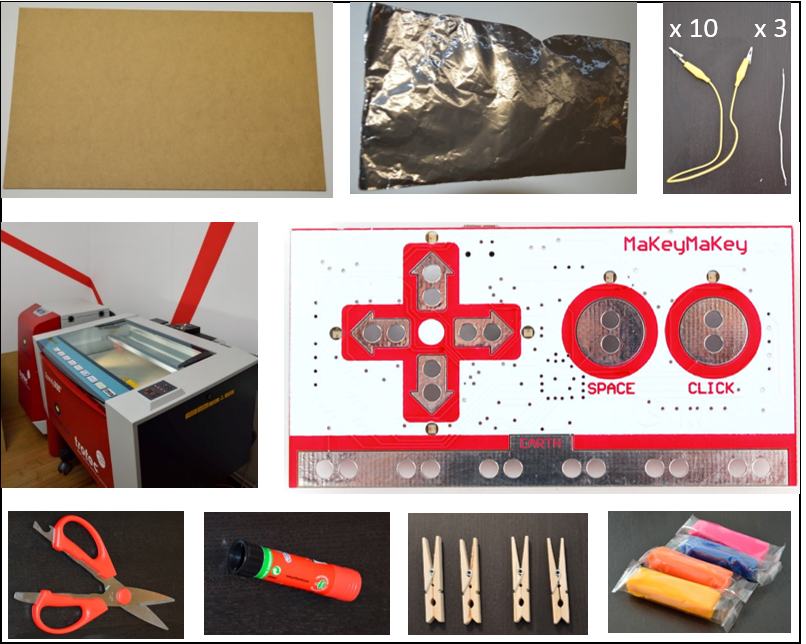
To create the controller Board you need:
- One Wood board (here MDF 3mm was used) dimension 43x30cm (or two boards of 20x30cm and 23x30cm). As an alternative you can also use cardboard
- some aluminum foil
- some glue (classical paper glue stick works well)
- colored plasticine
- 4 clips
And some tools :
- a lasercutter , if you do not have one (most likely) you could contact your closest FabLab (https://www.fablabs.io/) or you can use a cutter if you use a cardboard instead of the wood board.
- a scissors to cut the aluminium foils.
Once your homemade controller board is ready you will need a MakeyMakey kit and some wires to connect your controller board to the MakeyMakey board. Our montage uses 10 alligator clips and 3 connectors wires while the MakeyMakey kit contains 7 alligator clips and 6 connector wires, but we’re convinced you will be able to overcome this issue.
Finally, you need a friend to play with ;) because it's a 2 players game!
You can play freely and directly in your web browser at :
http://wuthrer.net/BarbichetteSimulator/
or you can download and install it at :
http://wuthrer.net/BarbichetteSimulator/Barbichett... (contains source files, flash CSS6 et AS3).
Make the Controller Board ( 1 / 3 ): Cut the Controller Board
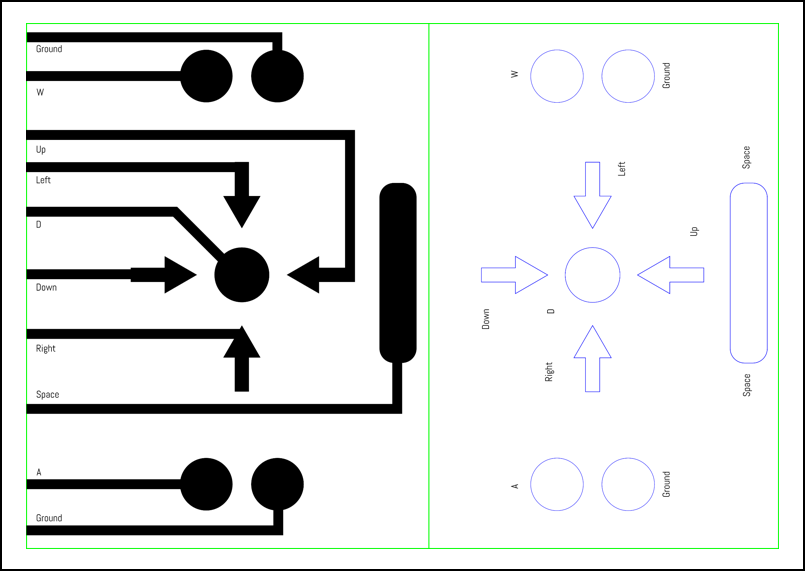
To create the controller board, we used a 3mm MDF and the laser cutter from the FabLab Fribourg (http://fablab-fribourg.ch/). The laser cutter is a speedy300 from Trotec, with 60W laser.
We just had to design the cutting plan (.svg file) with inkscape (inkscape.org) and use the already settled parameters for this material.
Color code : Black is for engraving. Blue for the first, and Green for the second, cutting lines.
If you do not have acces to a FabLab and that you do not have any tool to cut wood you can use some cardboard instead. The largest board (23x30cm) will be at the bottom, you will have to glue aluminium foil on it in the next step. The smallest board (20x30cm) will be at the top, you thus have to cut holes in hit.
Downloads
Make the Controller Board ( 2 / 3 ): Cut Aluminum Foil and Glue Them to the Board
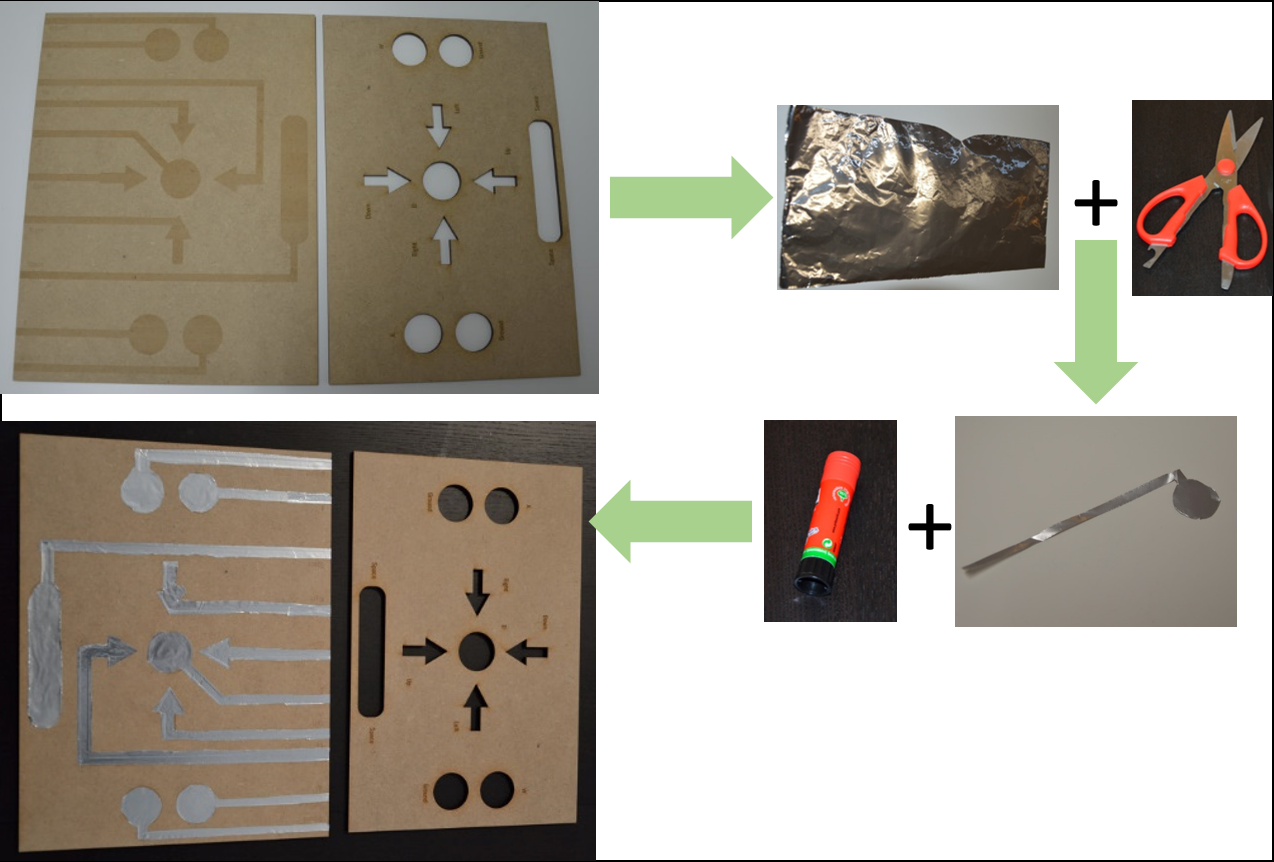
On the lower board of the controller we draw an “electronic circuit”. Since wood is not conductive, we need to set some roads for all the electrons, and for this purpose we used some aluminium foil.
It’s rather simple, you just have to cut the aluminium foil so it follows the path drawn on the board and then you glue it to the board.
Tips : apply the aluminium foil on the engraved board and rub it with your finger. The “drawing” of the path will appear on the foil and you just have to follow it with your scissors. Thank you uncle Tom!
Make the Controller Board ( 3 / 3) : Add Some Colored Plasticine.

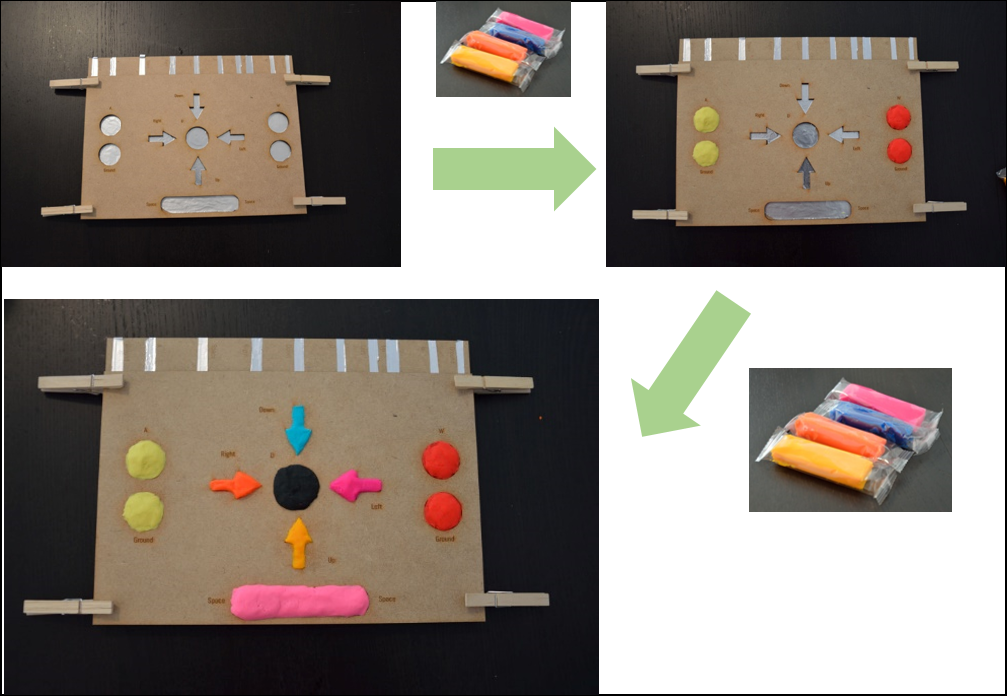
You can now put the board with holes on top of the board where you have glued the aluminium foil. To fix it you can either glue it, or just use some clips placed at each corner.
Then you fill each holes with some colored plasticine. Take a great care to not add too much plasticine, otherwise you will have undesired contact between buttons.
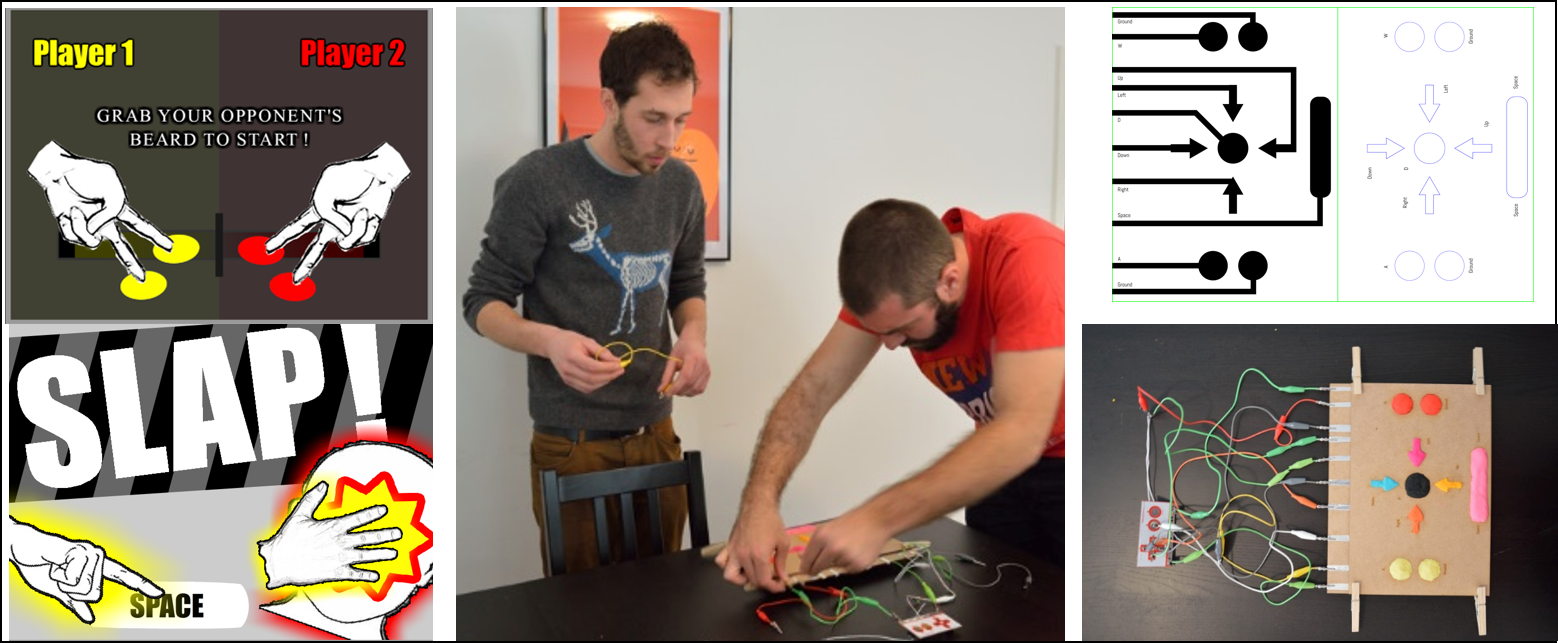
We recommend to use Yellow plasticine for button “A” and its nearby “Ground” and to use a Red one for “W” and its nearby “Ground”. These are the colors used for the buttons at the intro screen. Pressing them will allow you to start the game and to stay in game.
For the others buttons feel free to improvise!
Step 4 : Connect the Controller Board to a MakeyMakey Board
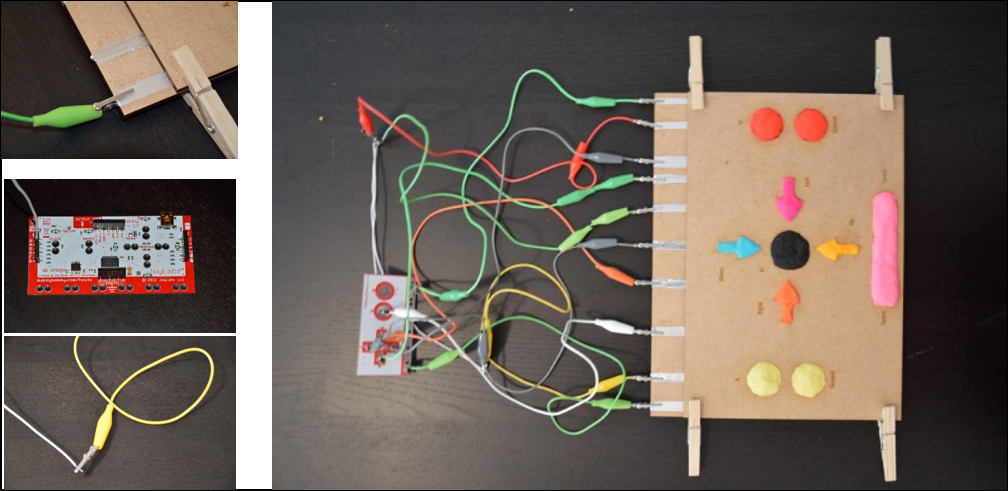
This step is fairly easy, you just need to connect the boards together using the wires.
For each input, fixe a wire with an alligator clip on the controller board and the other extremity to the MakeyMakey board. For imput A, W and D you need a connector wire that you pin at the back of the MakeyMakey board.
Step 5 : How to Play (1 / 2 ) : Get the Game
Using your web browser, go to http://wuthrer.net/BarbichetteSimulator/
you can also download it and play locally , no more need of internet connection ! (http://wuthrer.net/BarbichetteSimulator/Barbichette_Simulator_Prototype.zip , contains source files, flash CSS6 et AS3).
Step 6 : How to Play (2/2)
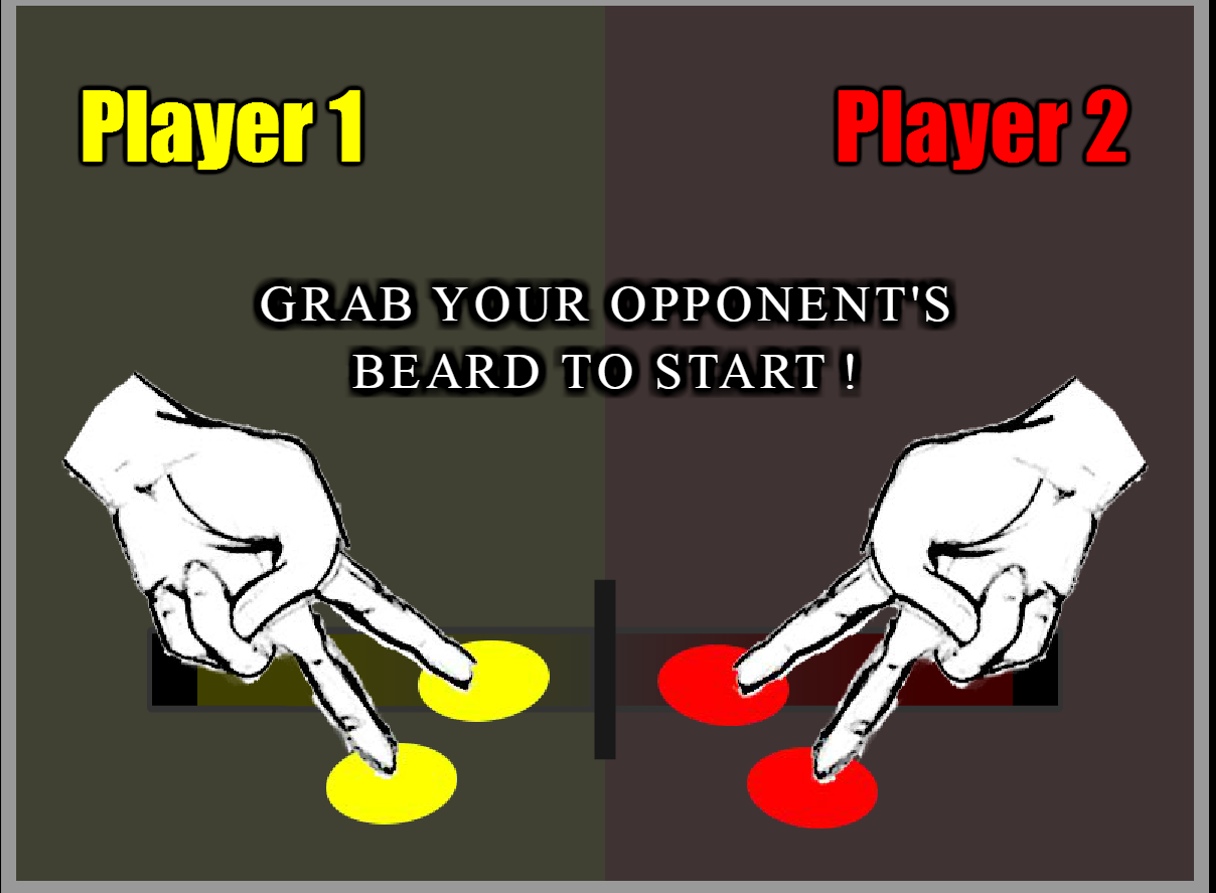
At the intro screen, each player is asked to press corresponding colored buttons.
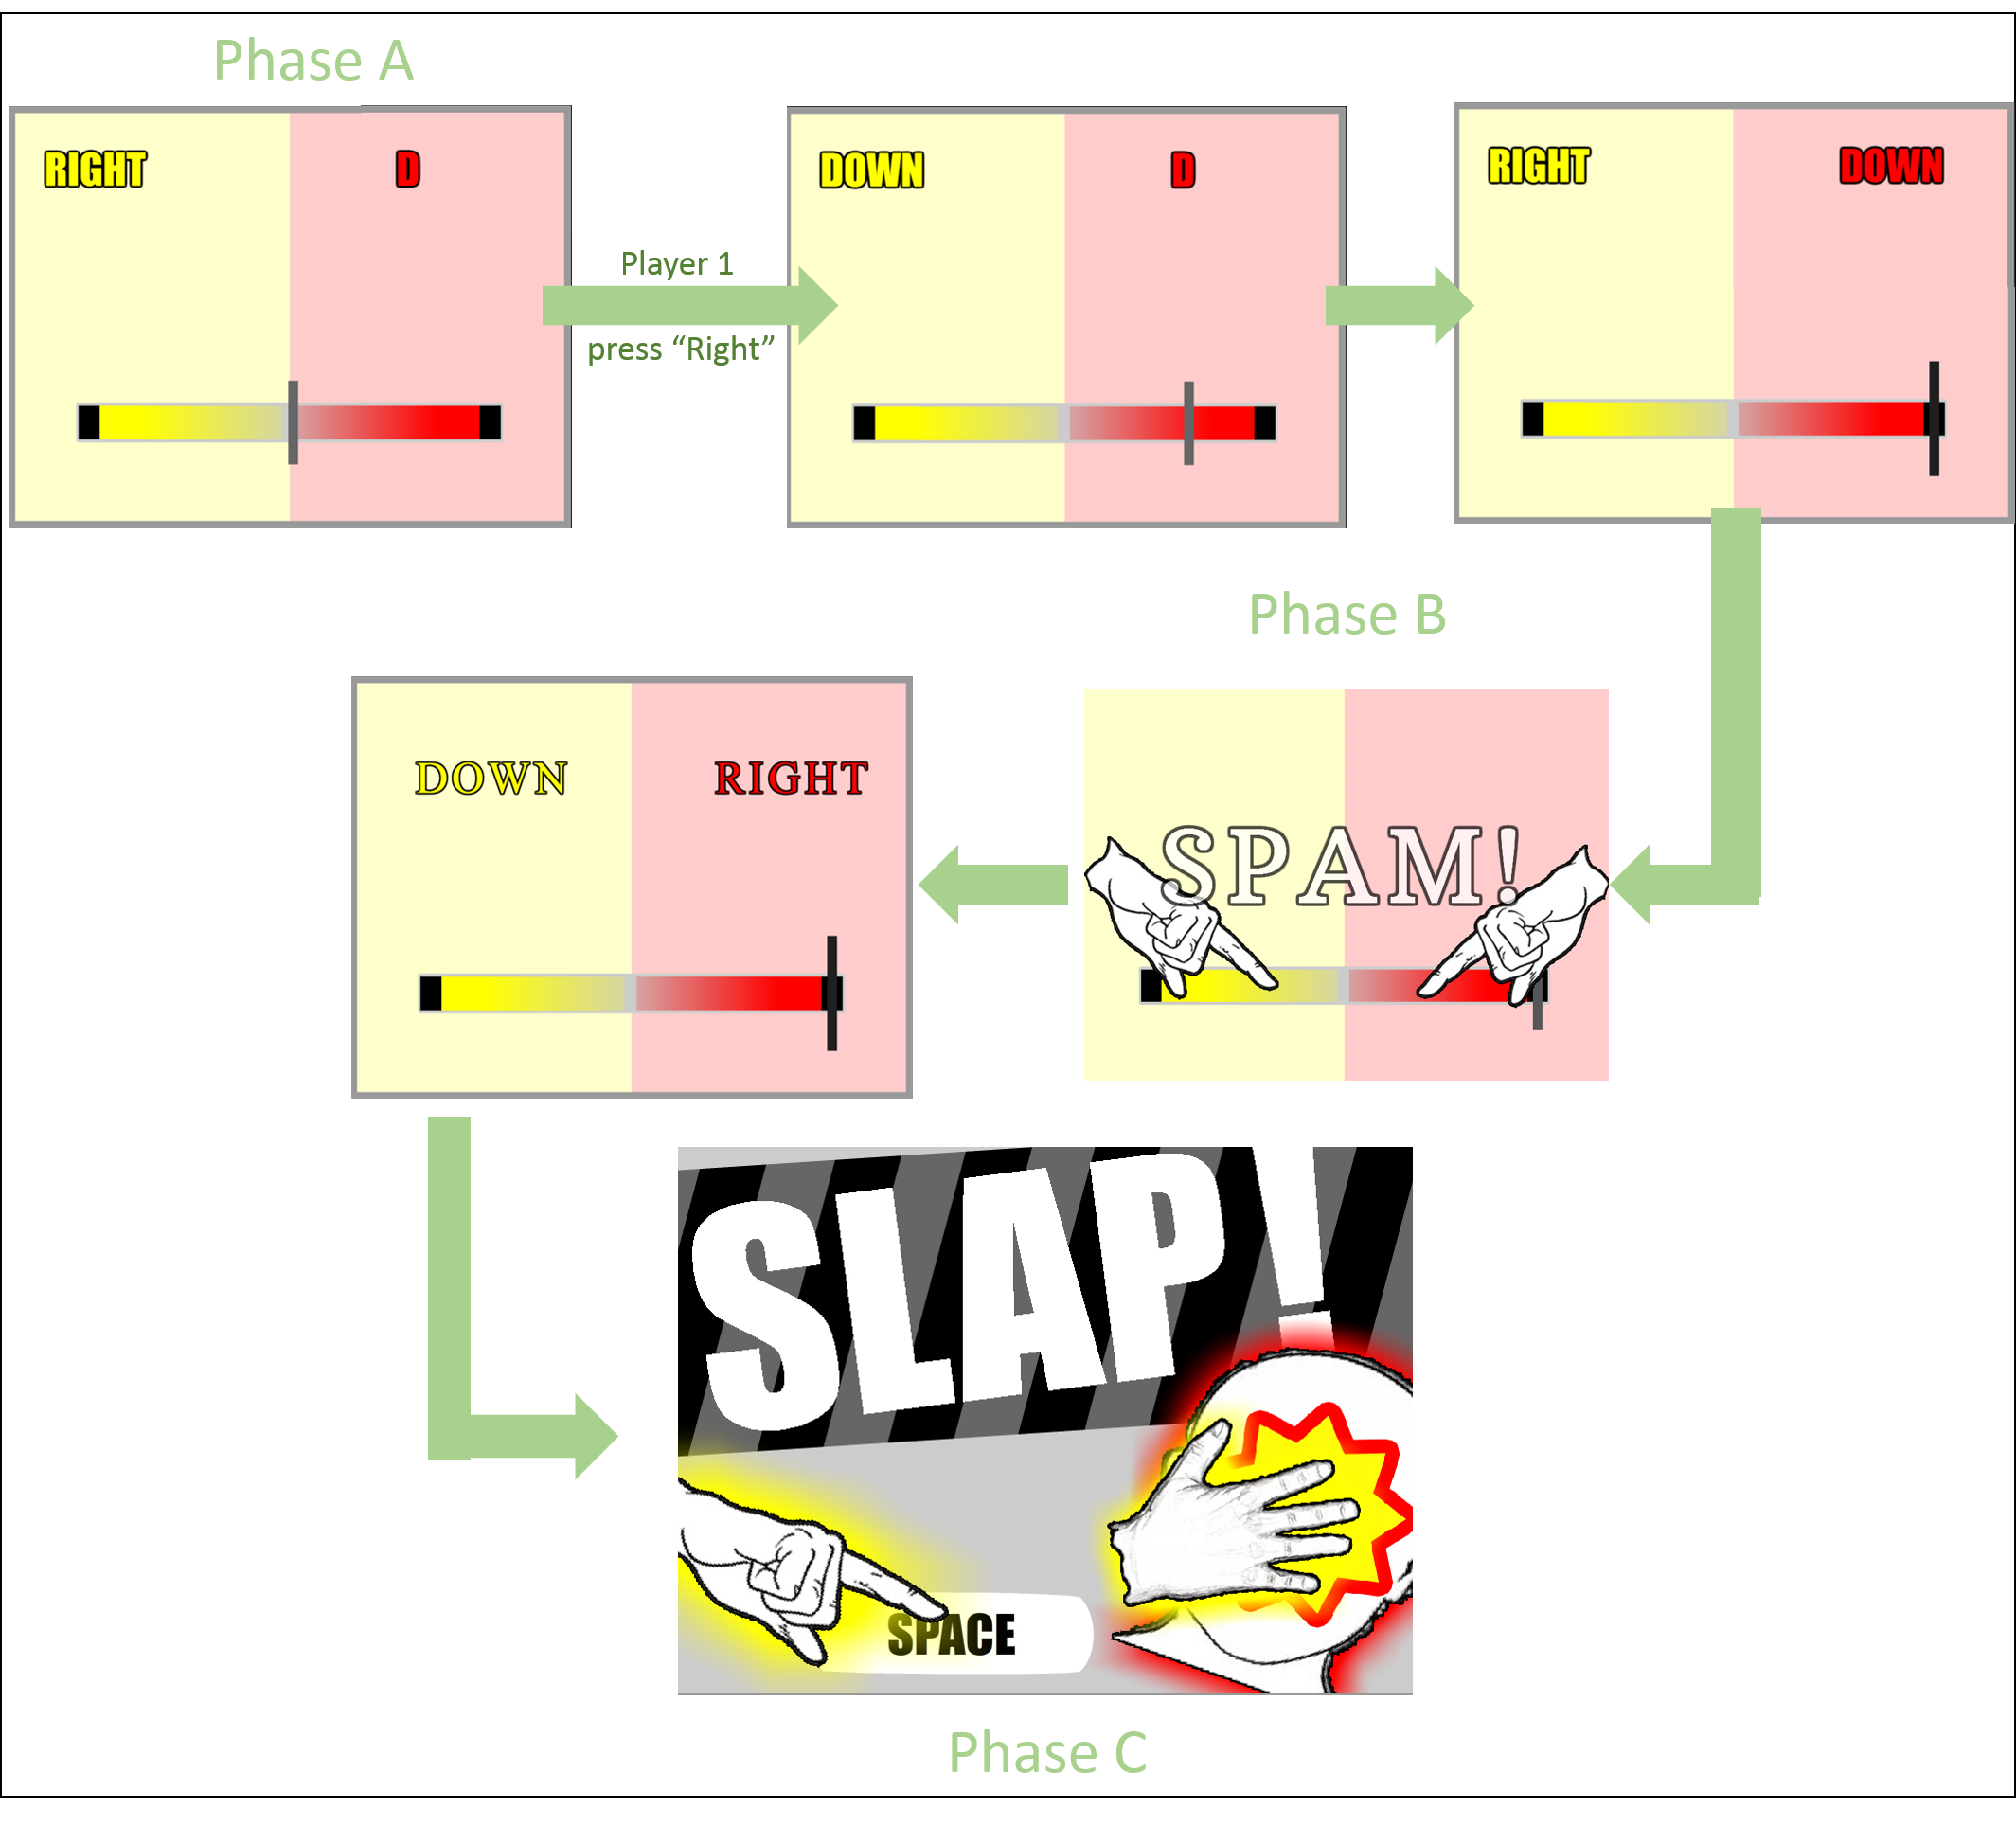
Once in the game, players will face 3 phases and they will have to:
Phase A- Press the “correct” buttons they are asked to
Phase B- Press as fast as possible , one button they are asked to
Phase C- touch their opponent and the space bar to WIN
Details explanations :
During Phase A, you have to press the button you are asked to (each opponent as a different button to press).
Each time you do it correctly, the button you have to press changes. The central cursor will move accordingly to the rate of correct action of each player, until it reached the side of one of the opponent.
Example: Player 1 press the button is asked to (here, the “Right” button). The cursor moves to the opponent zone, and the button that Player 1 has to press is “Down”. Player 1 did more “correct” action than Player 2, the cursor reaches the Player 2 Area, players get in the Phase B.
During Phase B, you have to press multiple time and as fast as possible, one and only one button (each opponent as a different button to press). The player with the larger number of hit, win the Phase B. Let’s continue the explanation with some examples
Example: In the Phase A, the Player 1 brings the cursor to his opponent zone. If player 2 win the phase B, they will restart Phase A. On the contrary if player 1 win this phase B, players get in phase C.
Once in Phase C, the game is nearly ended. The player who won consecutive Phase A and Phase B should release the “start” buttons, press the SPACE button and touch the opponent, by a gentle slap or a kiss , it’s up to you to choose :).
NB: The other player should not remove his fingers from his “start” buttons or will automatically loose, as you noticed if you loose Phase A and B, their nearly no exit to defeat and Phase C is just one more humiliating moment to deals with!
As you already noticed, the controller is too small for two players, you will have to “fight” with your opponent so your fingers get the access to the appropriate buttons you need to press. Meanwhile do not forget that you need to maintains two fingers on your “start” buttons to stay in game.
That's All Folks !
Here is the end of the tuto !
A new display for the game is in preparation, and will be released soon...
Feel free to contact us for remarks and suggestions.
We hope you’ll have fun!
Wuthrer and Romain