BabySEATer – the Device That Will Keep Your Baby Safe While Driving
by netag1102 in Circuits > Arduino
278 Views, 0 Favorites, 0 Comments
BabySEATer – the Device That Will Keep Your Baby Safe While Driving


Introduction
The most important thing for a parent is his children, and he will do anything to keep him safe.
This task becomes a complex task when the children are still infants and they cannot express in words their feelings.
A parent's ability to know what his baby is feeling is limited and when it has to be done while driving, when the parent has to be focused on the road and reach the right destination, it feels almost impossible!
How many times have you driven a car and worried about the condition of your baby in the back seat? Is he cold? Or maybe hot? Did the sun's rays penetrate through the windshield and dazzle him?
Or suddenly the baby is crying, and you have no way to calm him down?
And most importantly, the constant fear that something will distract you and as a result you will forget your baby in the car?
All of these questions and concerns led us to write this instructable that will help parents to produce a device that knows how to monitor and maintain the baby's environment in the car, and in case of distress the device will know to alert the parent immediately!
Our instructable is detailed and user-friendly! And his implementation doesn't take much time or money!
Who are we?
Our names are Tal Efrat and Neta Greenwald. we are two Computer Science students from IDC Herzliya, Israel.
Following the many cases of forgetting children in the car, and the general problem of driving with a baby in the car, we decided to face the challenge and find a solution to this important problem using all the tools and knowledge we learned in “The Internet of Things (IoT)” course.
We hope this will help as many parents as possible, and most importantly, that this will keep safe as many babies as possible!
So if you are a parent of a baby, you have come to the right place!
We will guide you step by step, from beginning to end!
Until you have your own babySEATer!
So... Let's get started!!
Supplies
1X Adafruit Circuit Playground Express, purchase
1X ESP8266 Board, purchase
1X Micro-USB Cable, purchase
1X Battery holder with On/Off Switch, purchase
3X Batteries (size AA), purchase
5X Alligator cable clips, purchase
1X Window shade, purchase
1X Isolierband, purchase
Optional:
1X Disk, purchase
1X Lid disposable cup, purchase
1X Scissors, purchase
Setting the Environment

Arduino IDE
Installation of the development environment
Install Arduino IDE
Install adafruit driver (adafruit_drivers_2.5.0.0.exe)
Install Board Manager
Download Blynk and BlynkESP8266_Lib libraries
- Download the ZIP folder
- Enter to "libraries" folder
- Copy Blynk and BlynkESP8266_Lib folders
- Paste the two folders in your "libraries" folder which placed in the arduino folder in your computer
Defining the development environment
1. Define in the Arduino software to which serial port the Playground board is connected:
Tools --> Port --> COMXXX (Circuit Playground Express)
2. Define in the Arduino software what type of board you are working with:
Tools --> Board --> Circuit Playground Express
Integromat
Sign up to Integromat
Download the Integromat App for Google Play
Download the Integromat App for App Store
Blynk
Download the Blynk App from Google Play
Download the Blynk App for App Store
Sign up to Blynk via the App
Understanding the Big Picture


Preliminary Settings
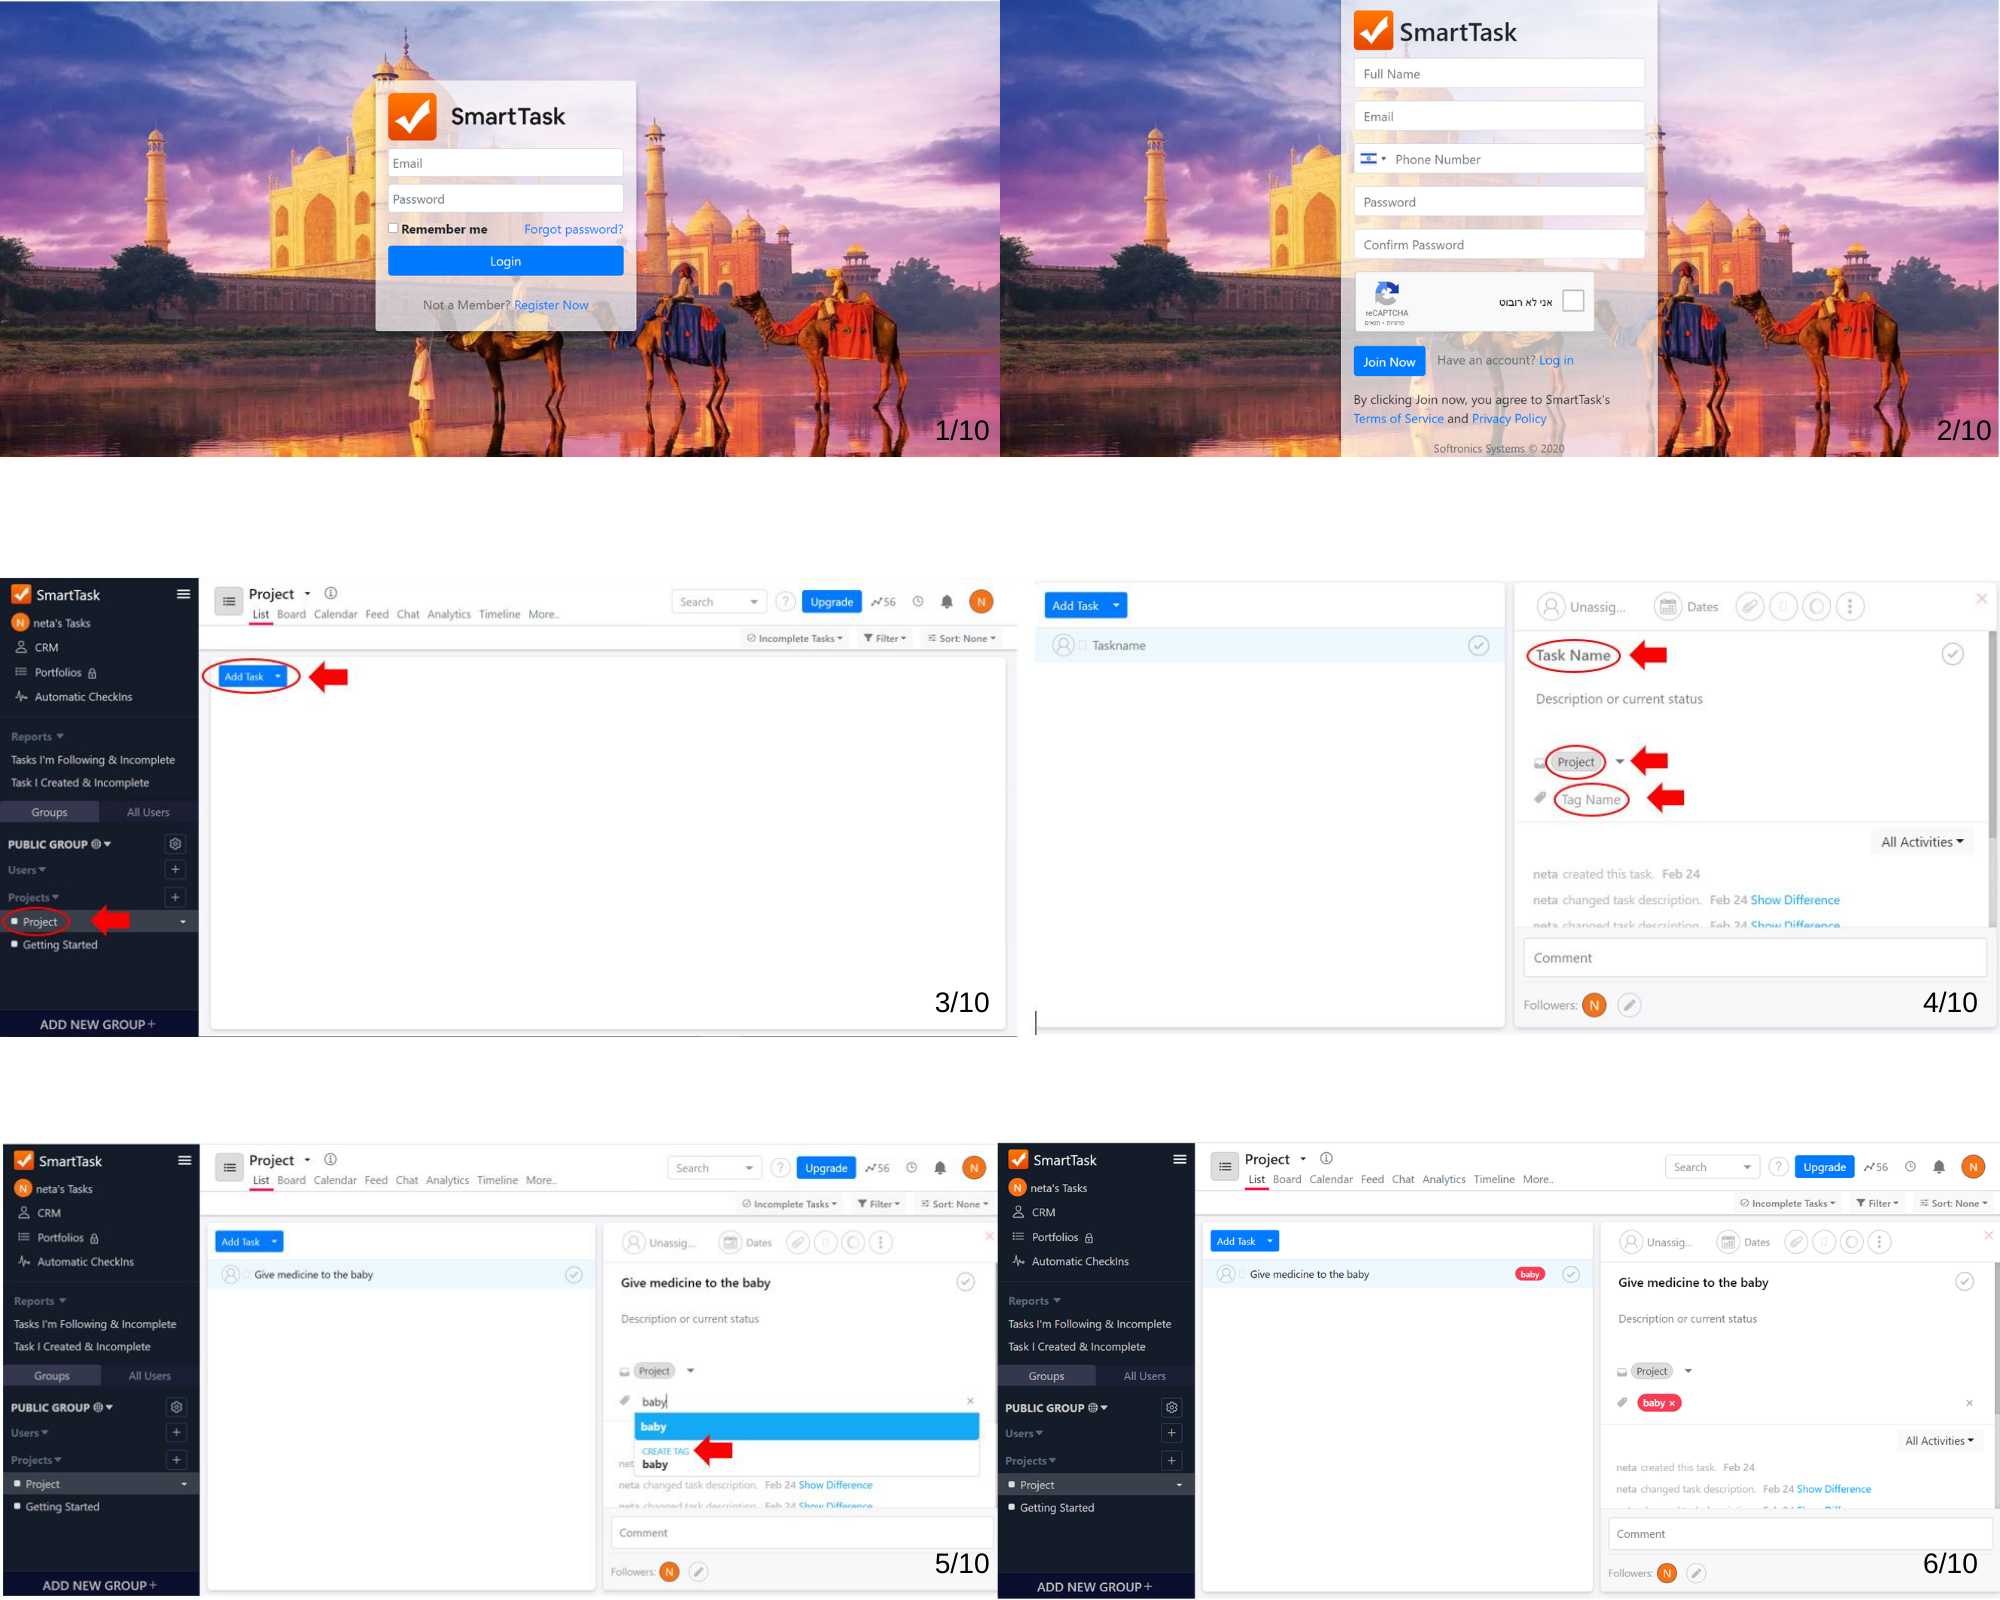
In order to make things much easier in the next steps, it’s important that you will follow the settings below:
Define tasks in SmartTask App
1. Click the link below for registering the App "SmartTask":
Login to SmartTask app | SmartTask
2. Adding new task:
- Write the name of your task in the field "Task Name"
- Pay attention that your task place under "Project"
- Write a new "Tag Name" – write baby and then press "CREATE TAG"
- You can add a description to your task
3. Adding new reminder:
Press "More" --> Press "Add Reminder" --> Fill in the date and hour of the task --> In the field: "Remind if" change to "Any" --> Press save
Notes:
- Pay attention that you must tag your task with the tag "baby" in order that the babySEATer will alert on the reminder in real time.
- If you have completed a task, you can press on the V button and the task will be deleted
- You can add as many tasks as you want
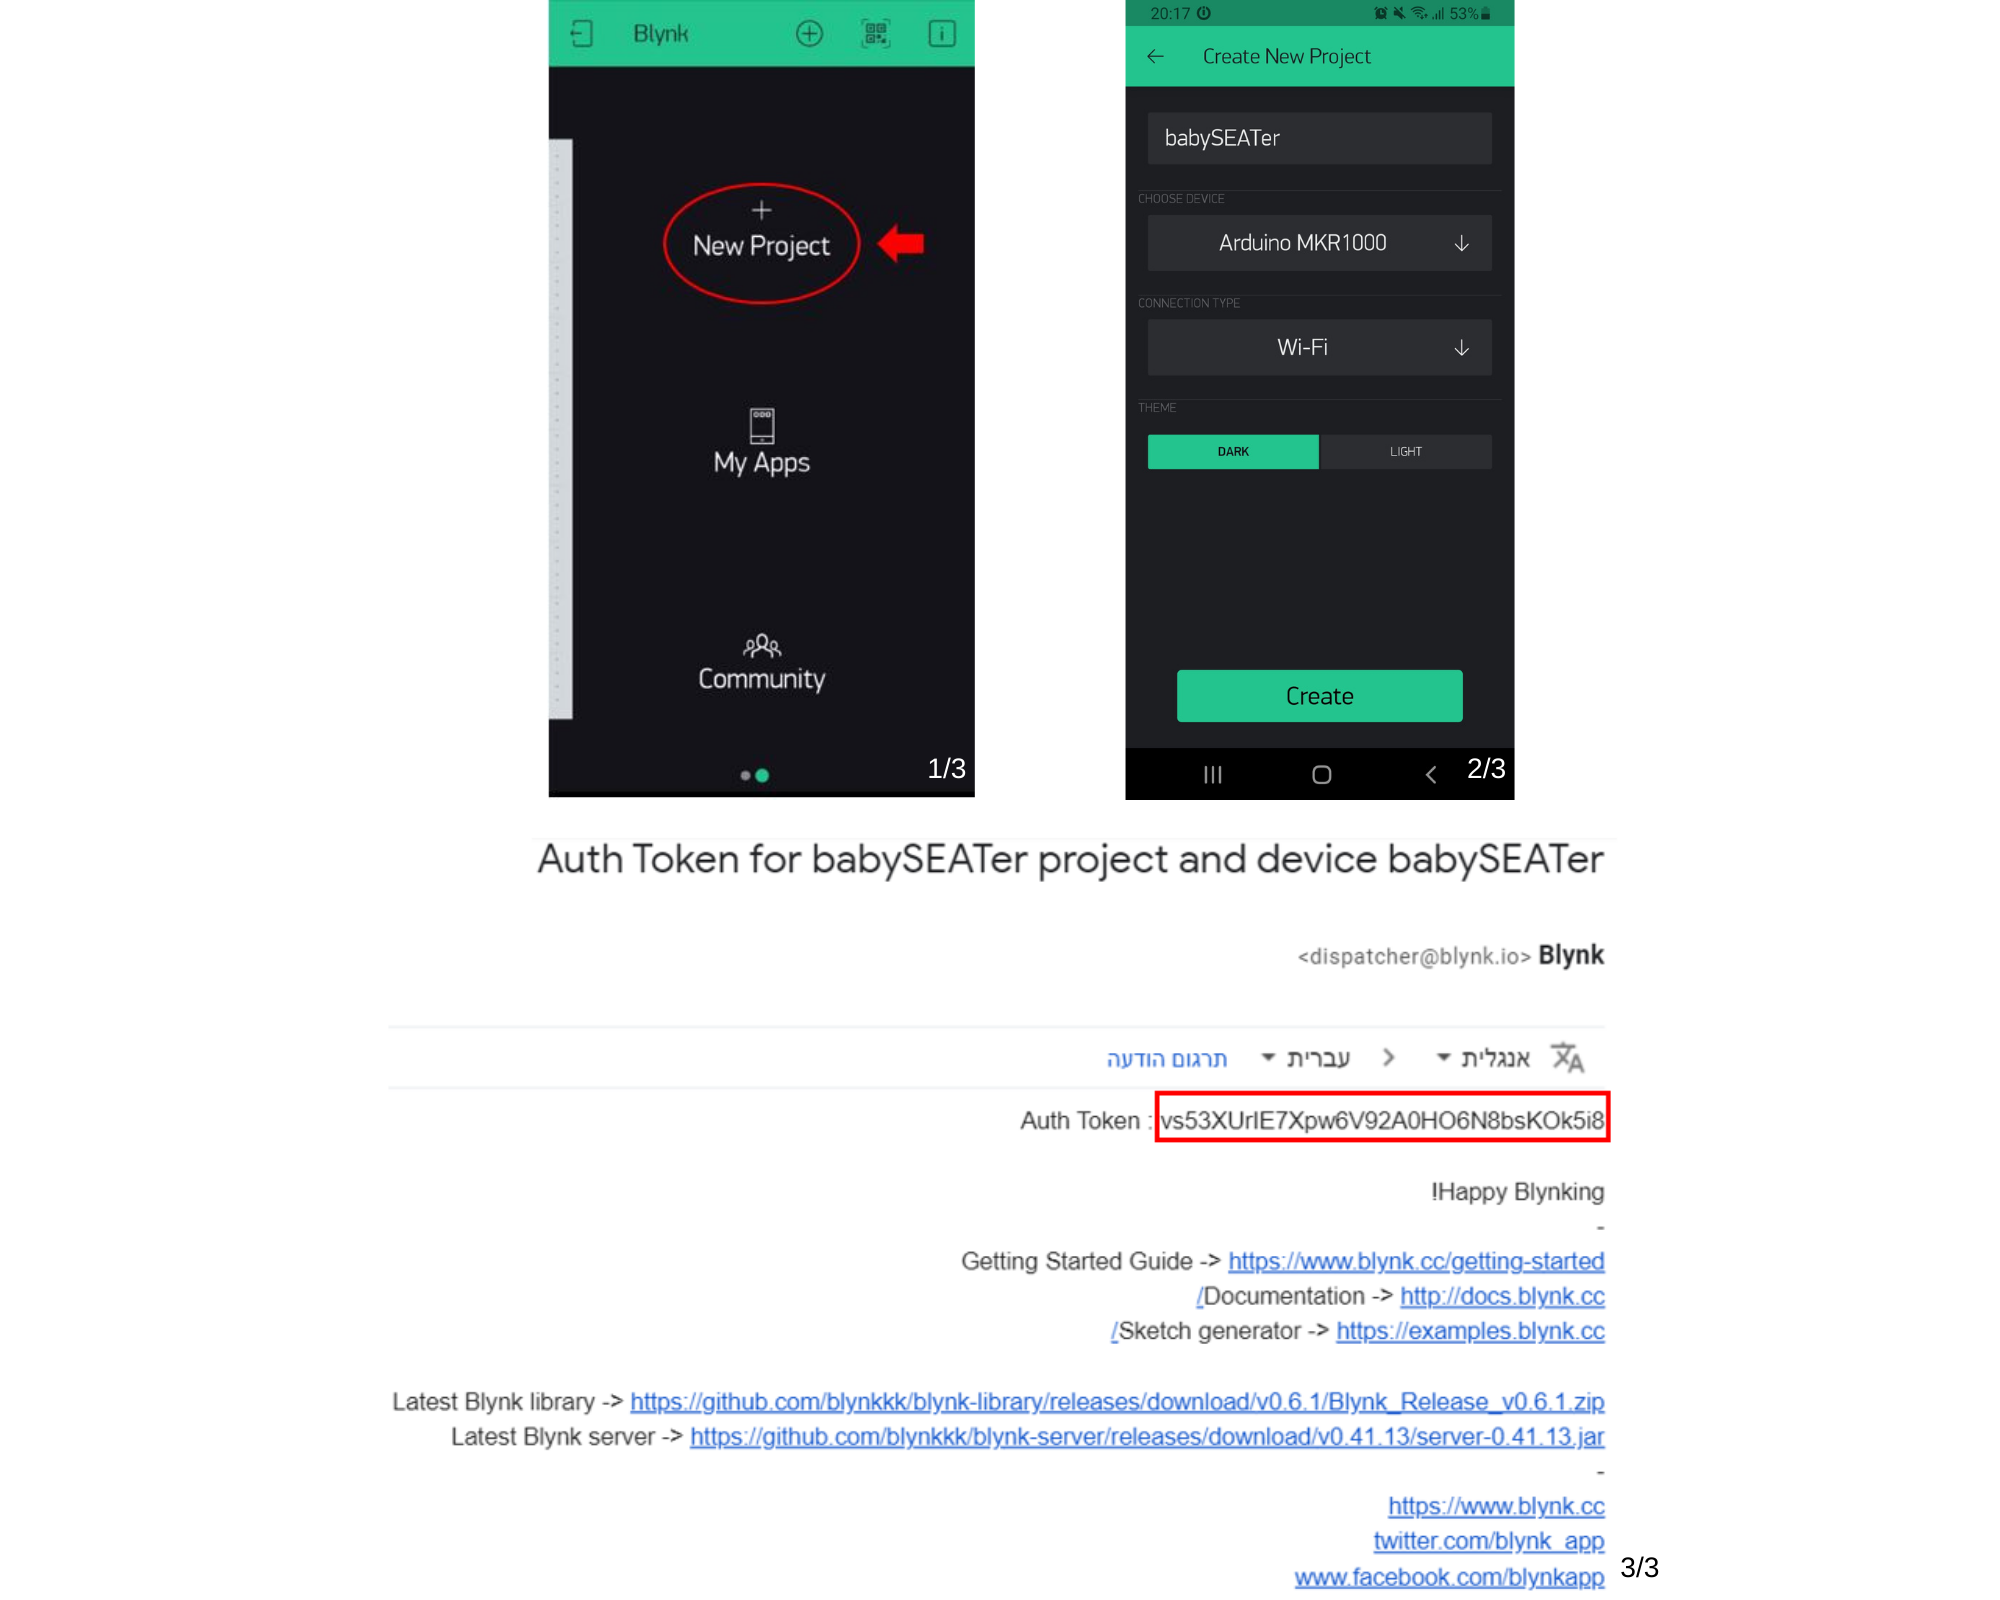
New project on Blynk
1. Press on the “+” Button to start a new project.
2. In the opened form:
- Write the name of the project
- Choose “Arduino MKR1000” as a device
- Choose “Wi-Fi” as a connection type
- Press “Create”
3. You will get two confirmation emails:
- Open the one related to the project (“Auth Token for babySEATer project and device babySEATer”)
- The first line will be : “Auth Token: “ followed by a string of letters and digits
- Save the string – we will need it later (in the next step (Integromat) and in step 5 (code))
Settings in Integromat app
Enter to the Integromat app --> Press "Settings" --> Press "Photos" --> Turn On "Send new photos to Integromat"
Setting the Integromat Scenarios
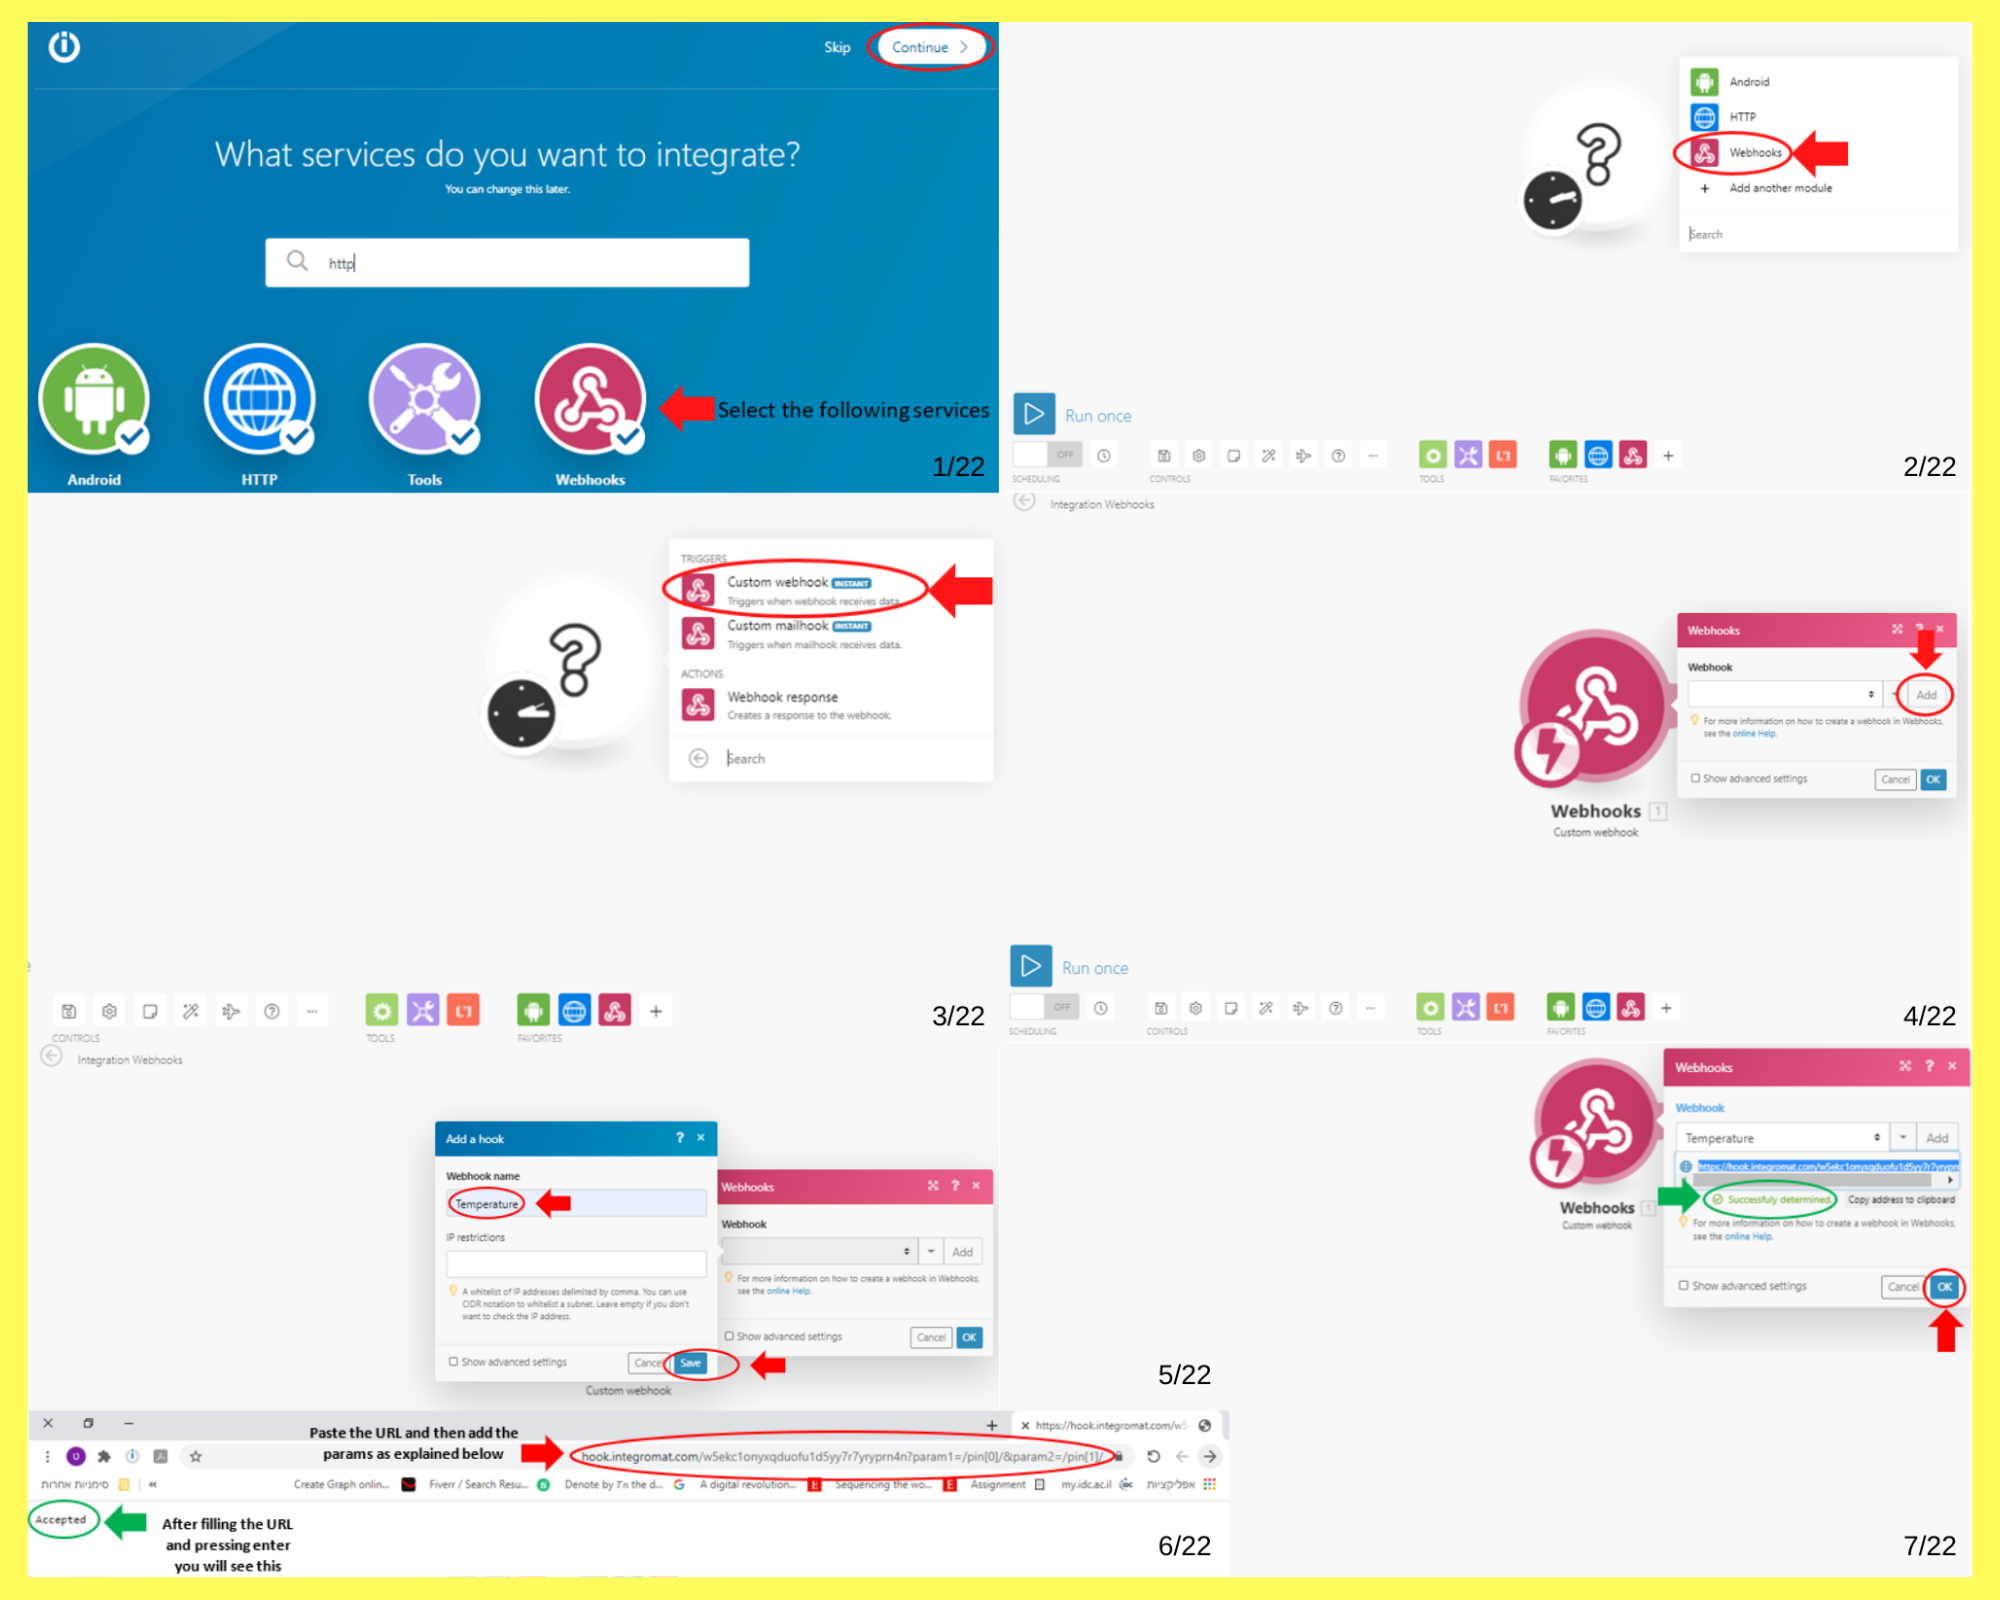
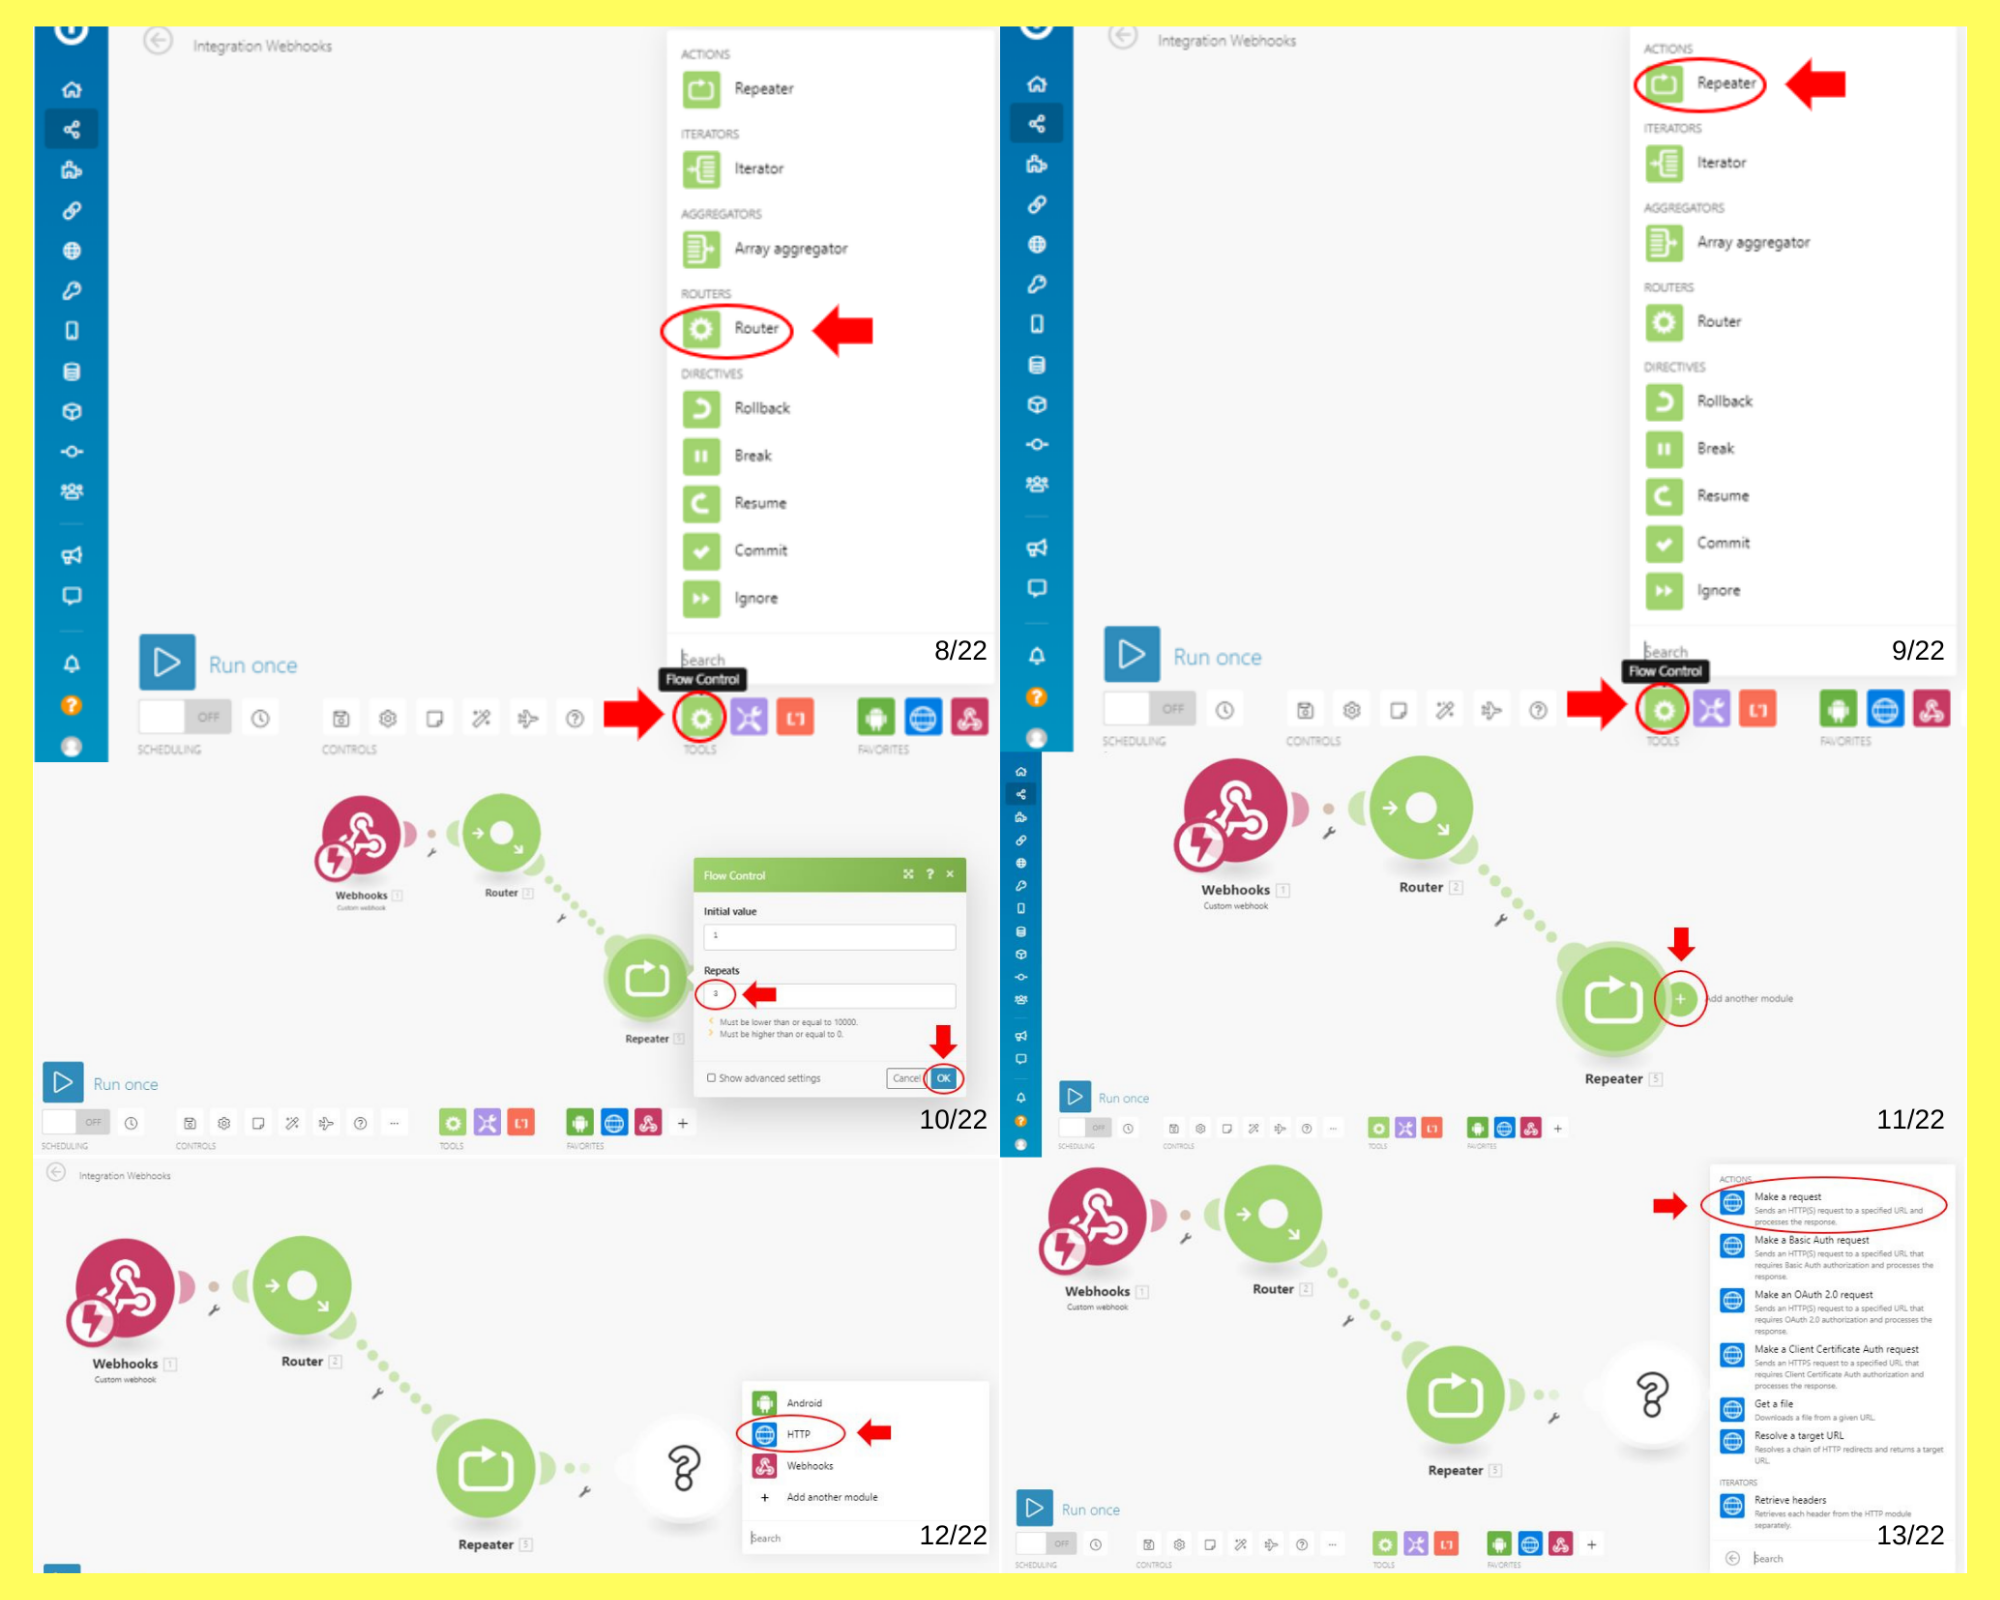
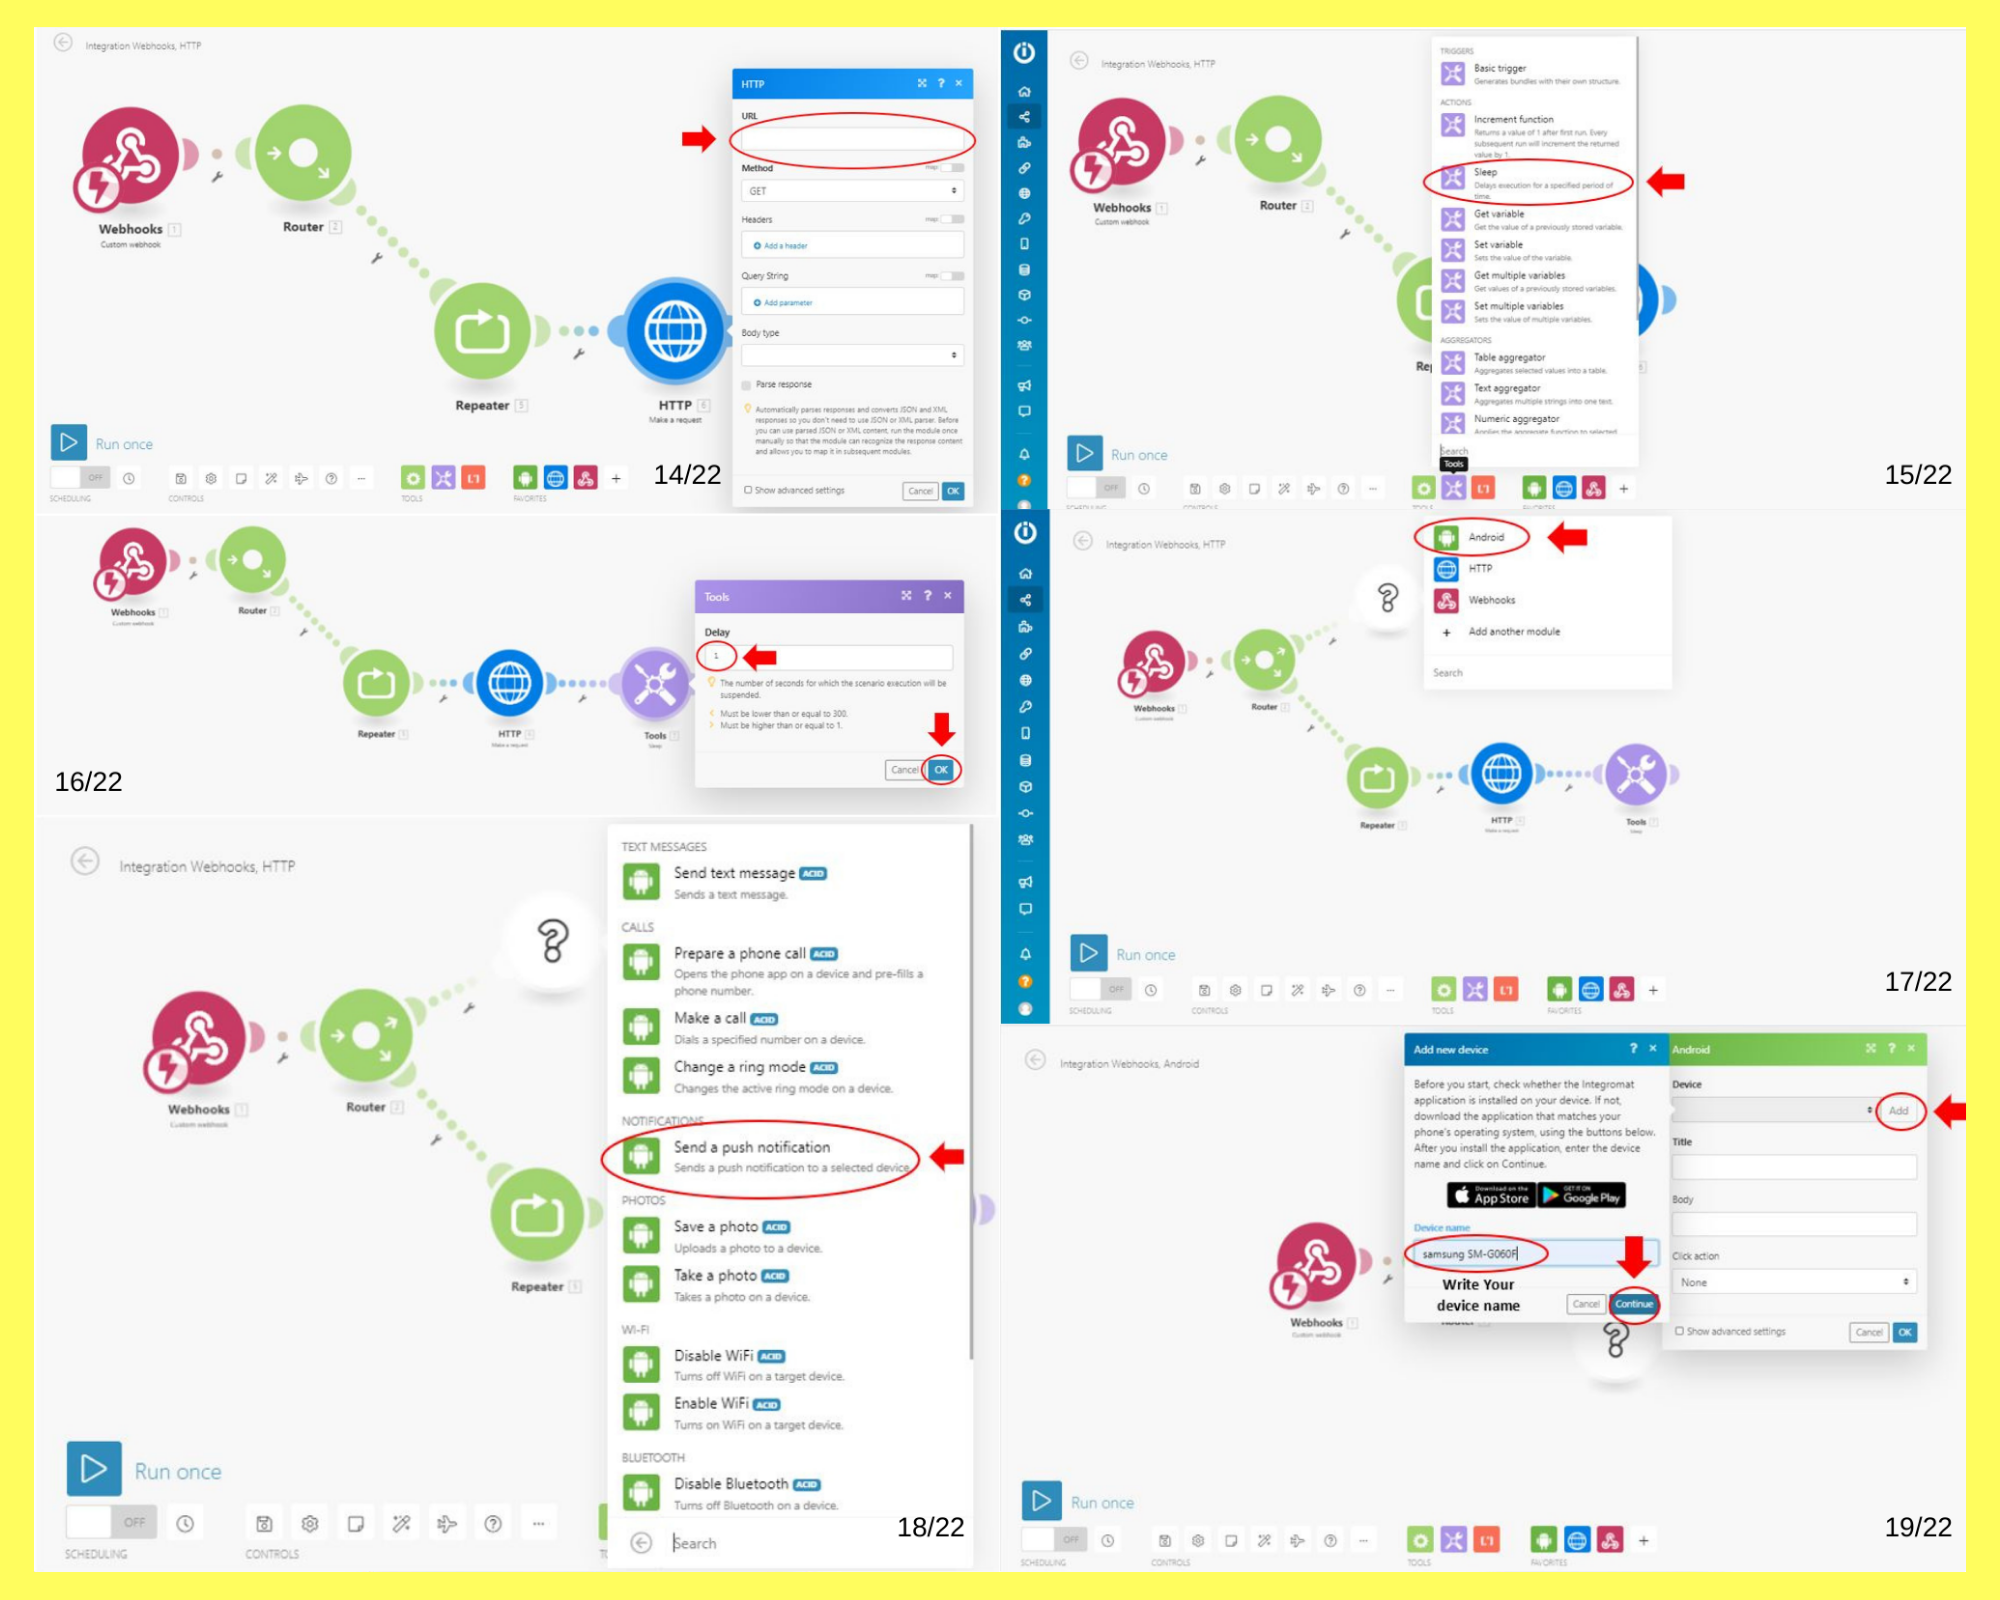
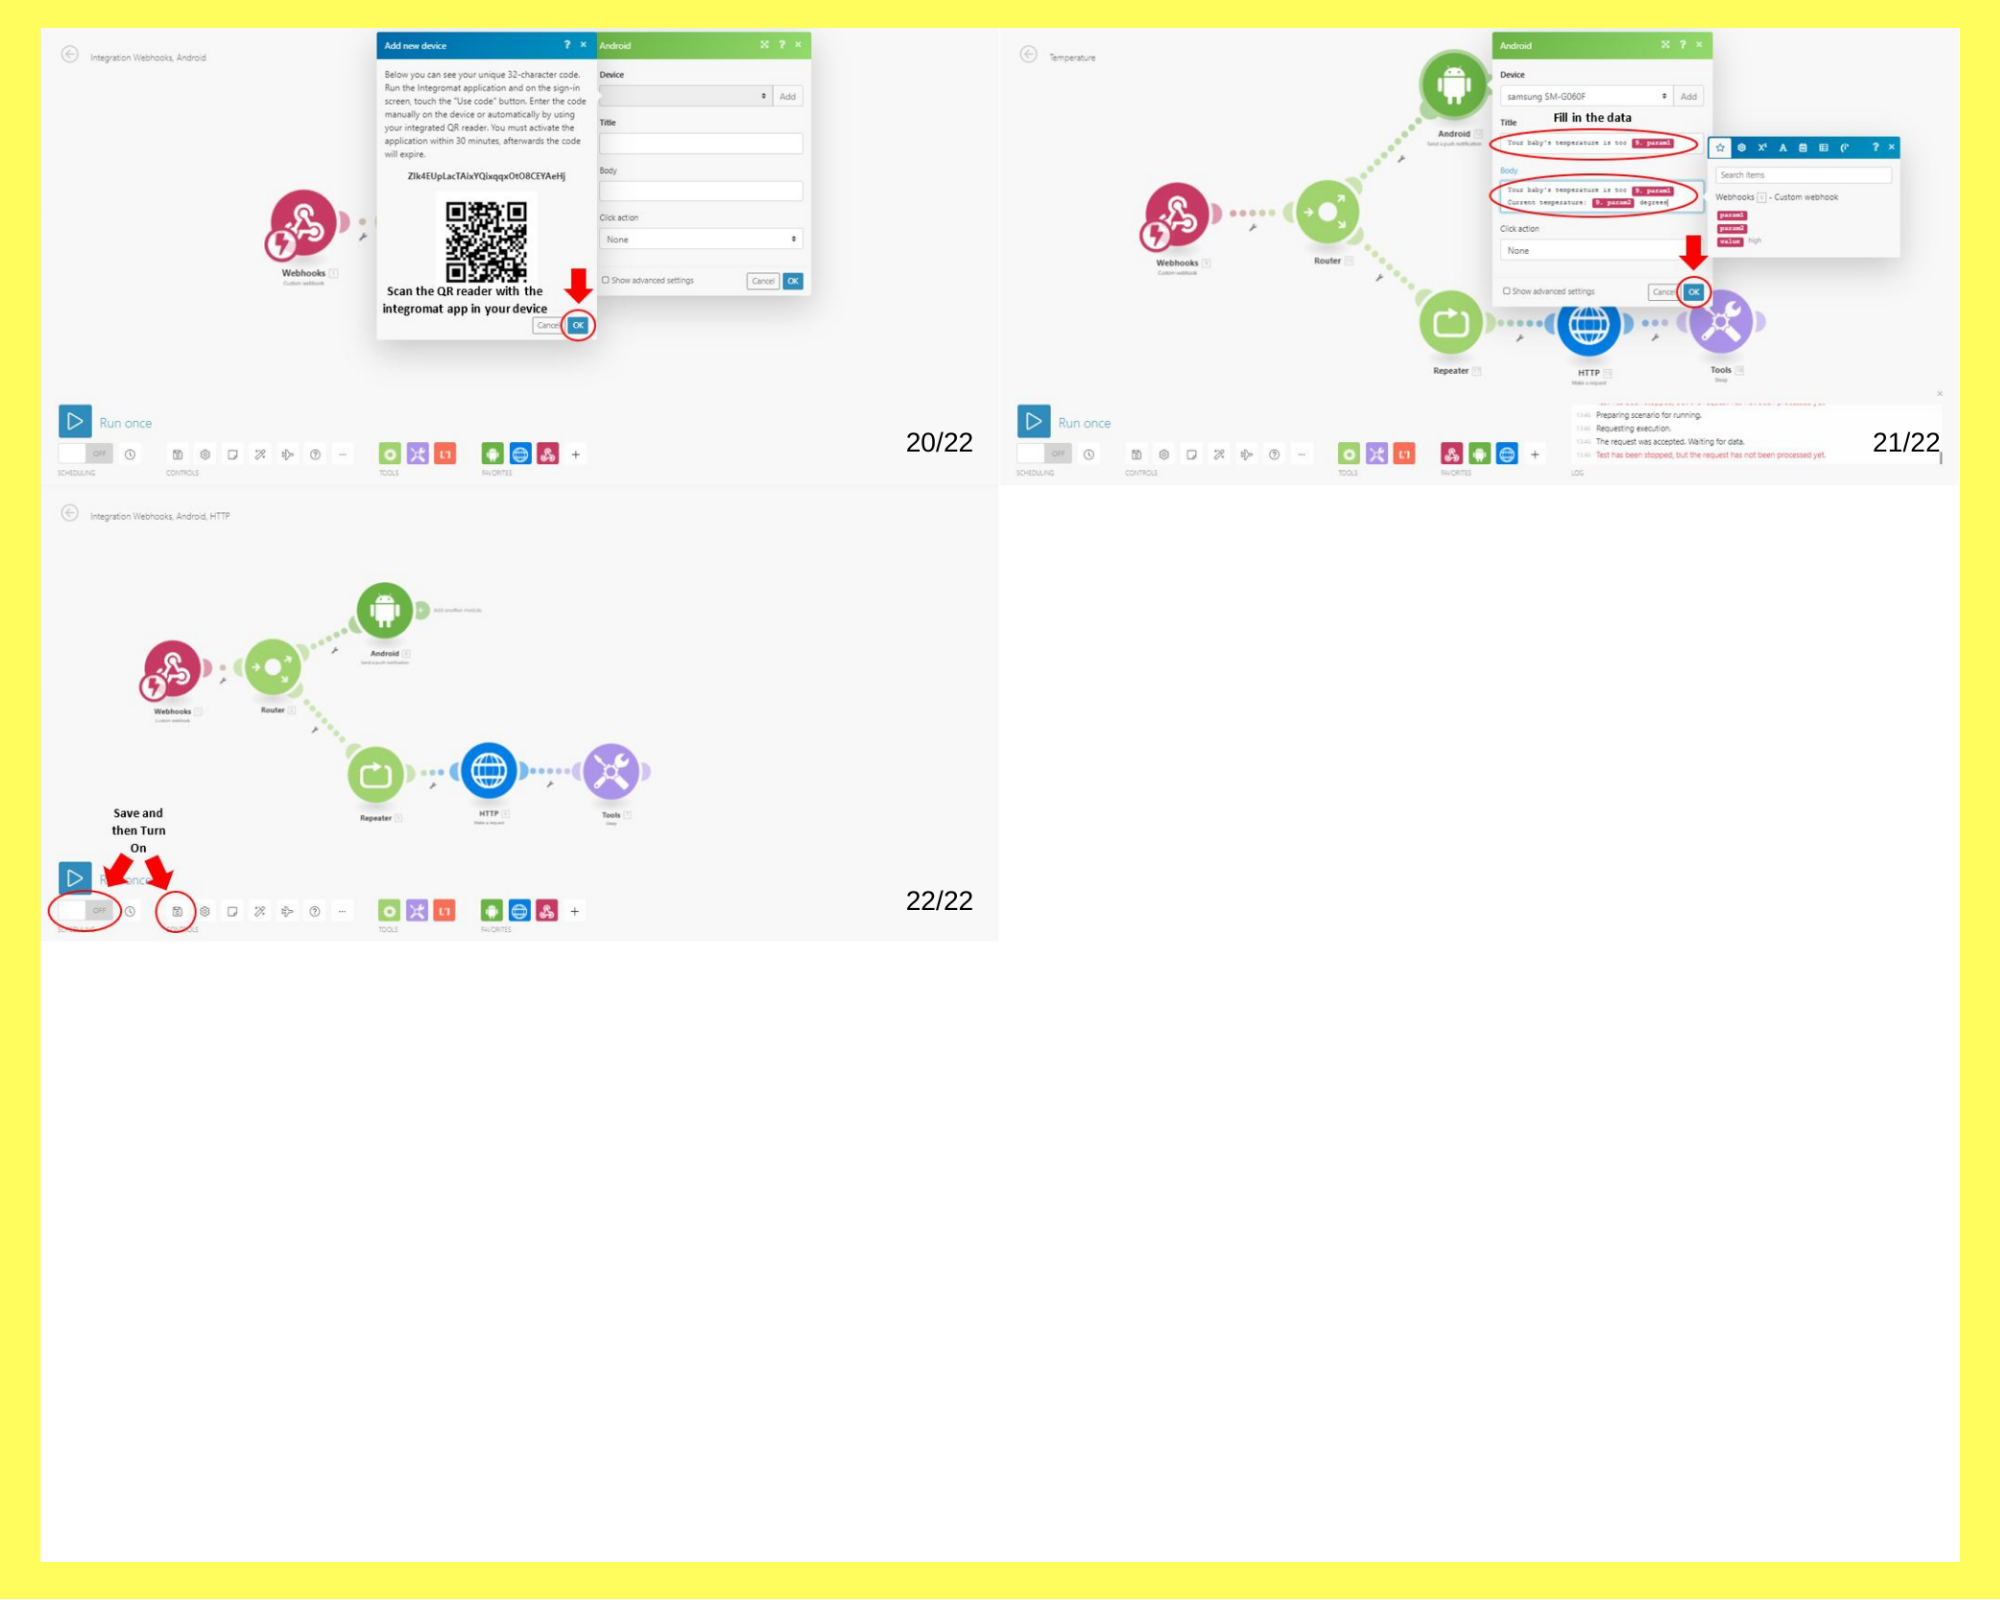
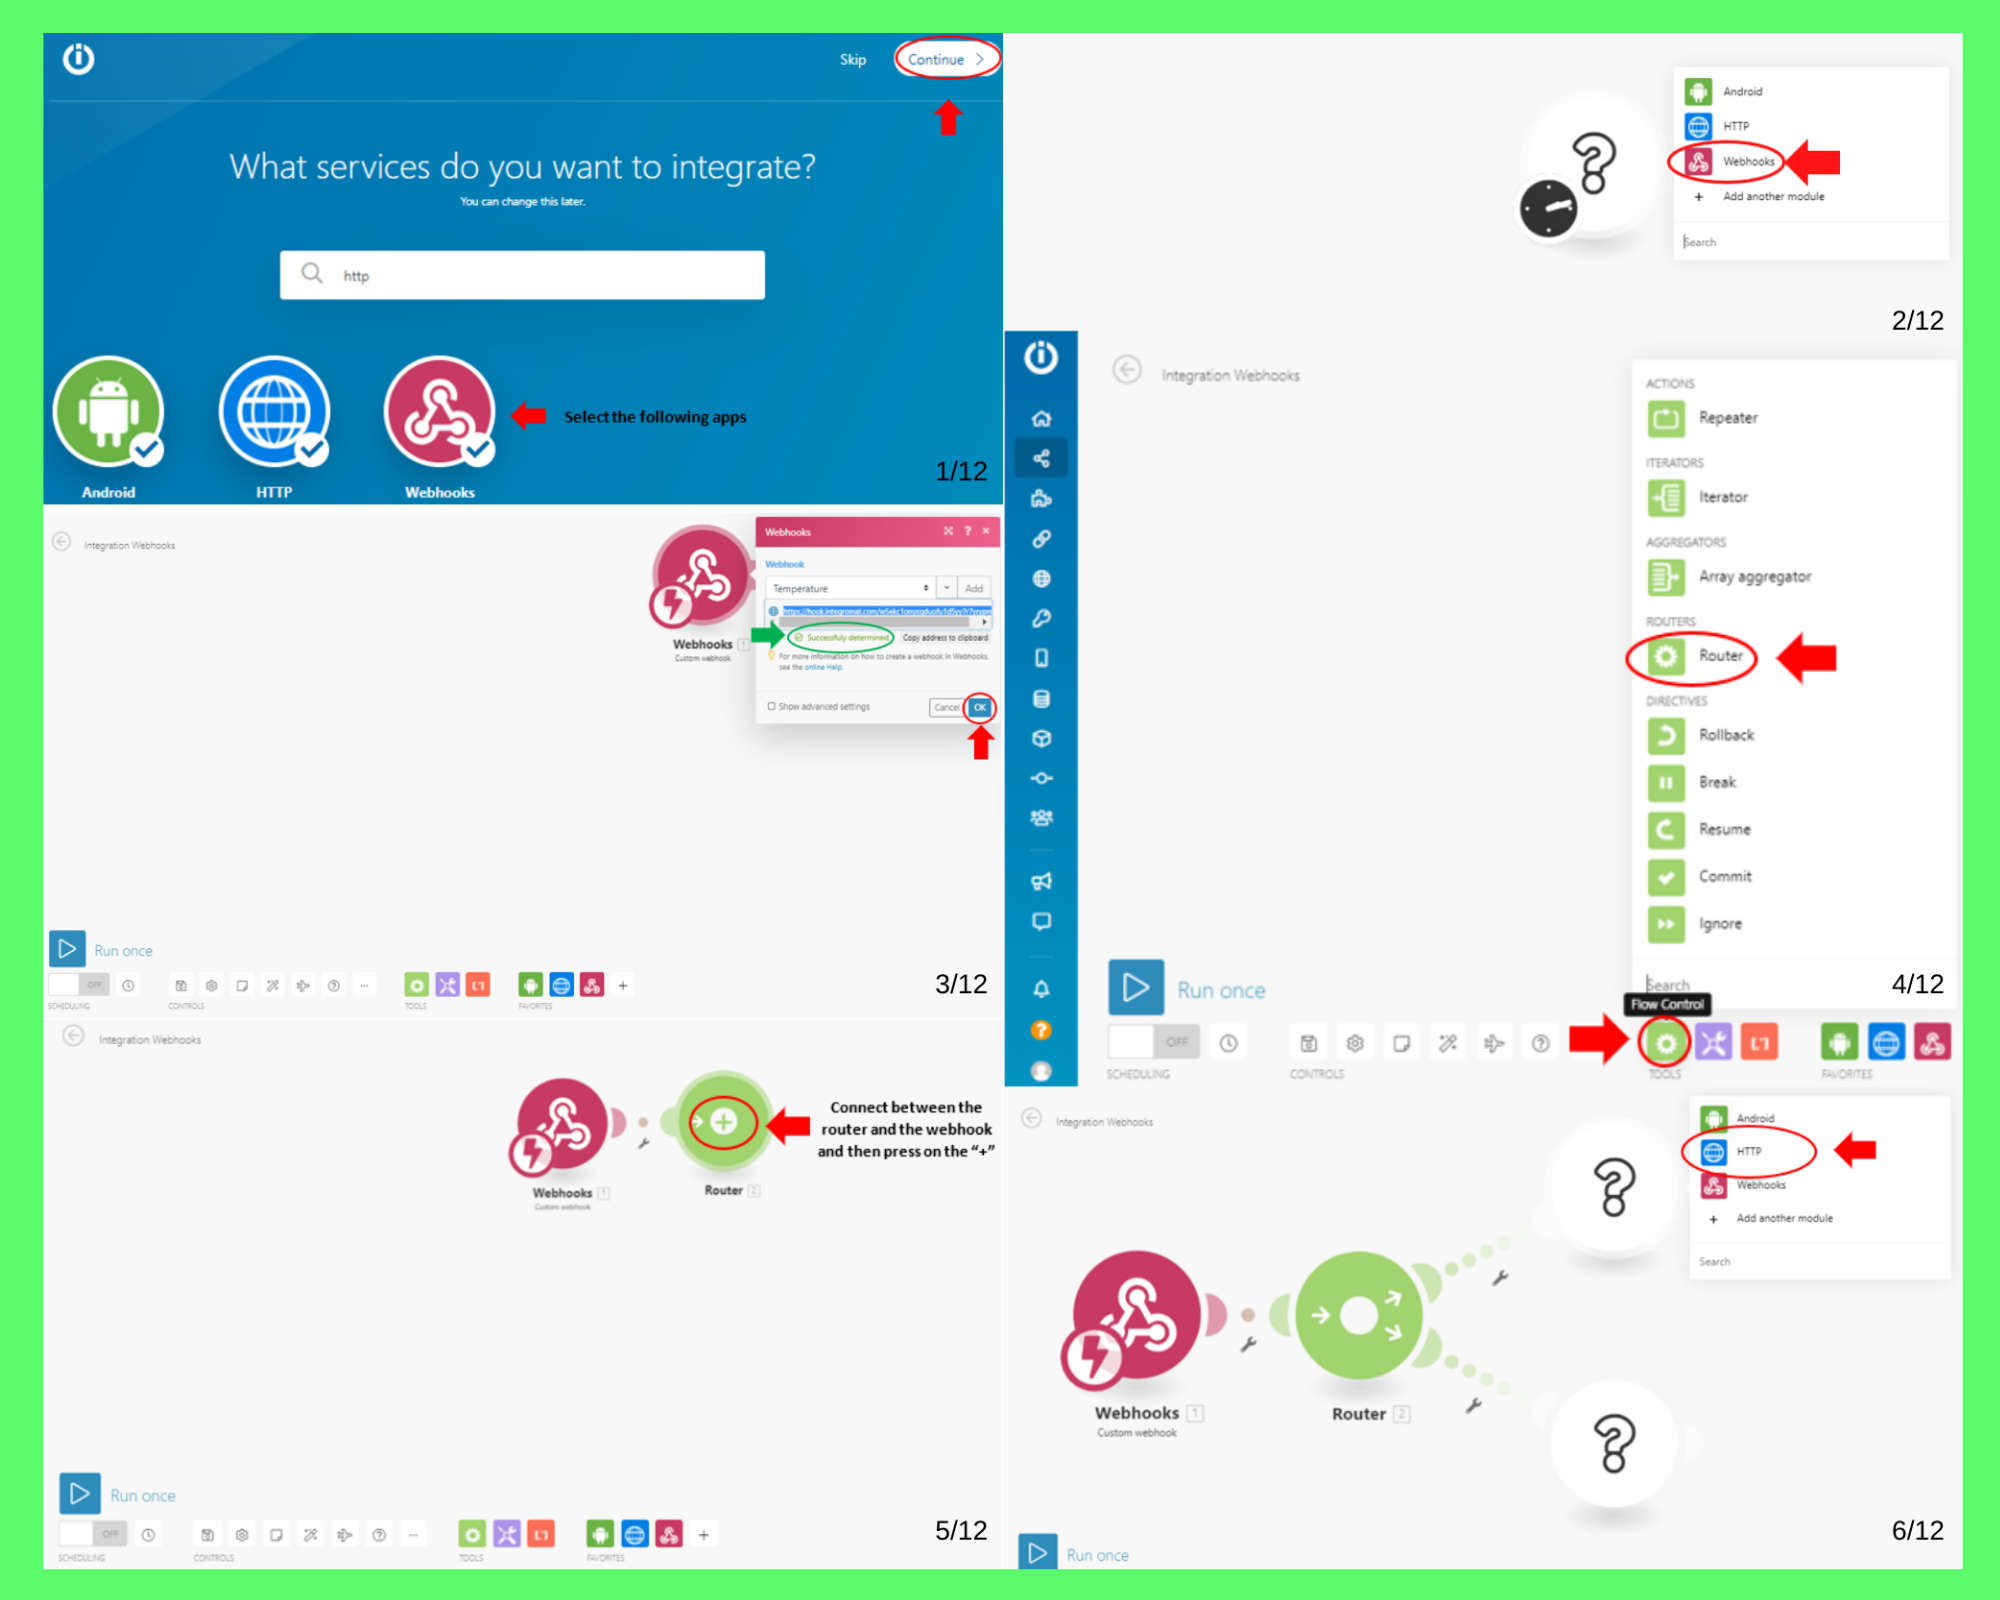
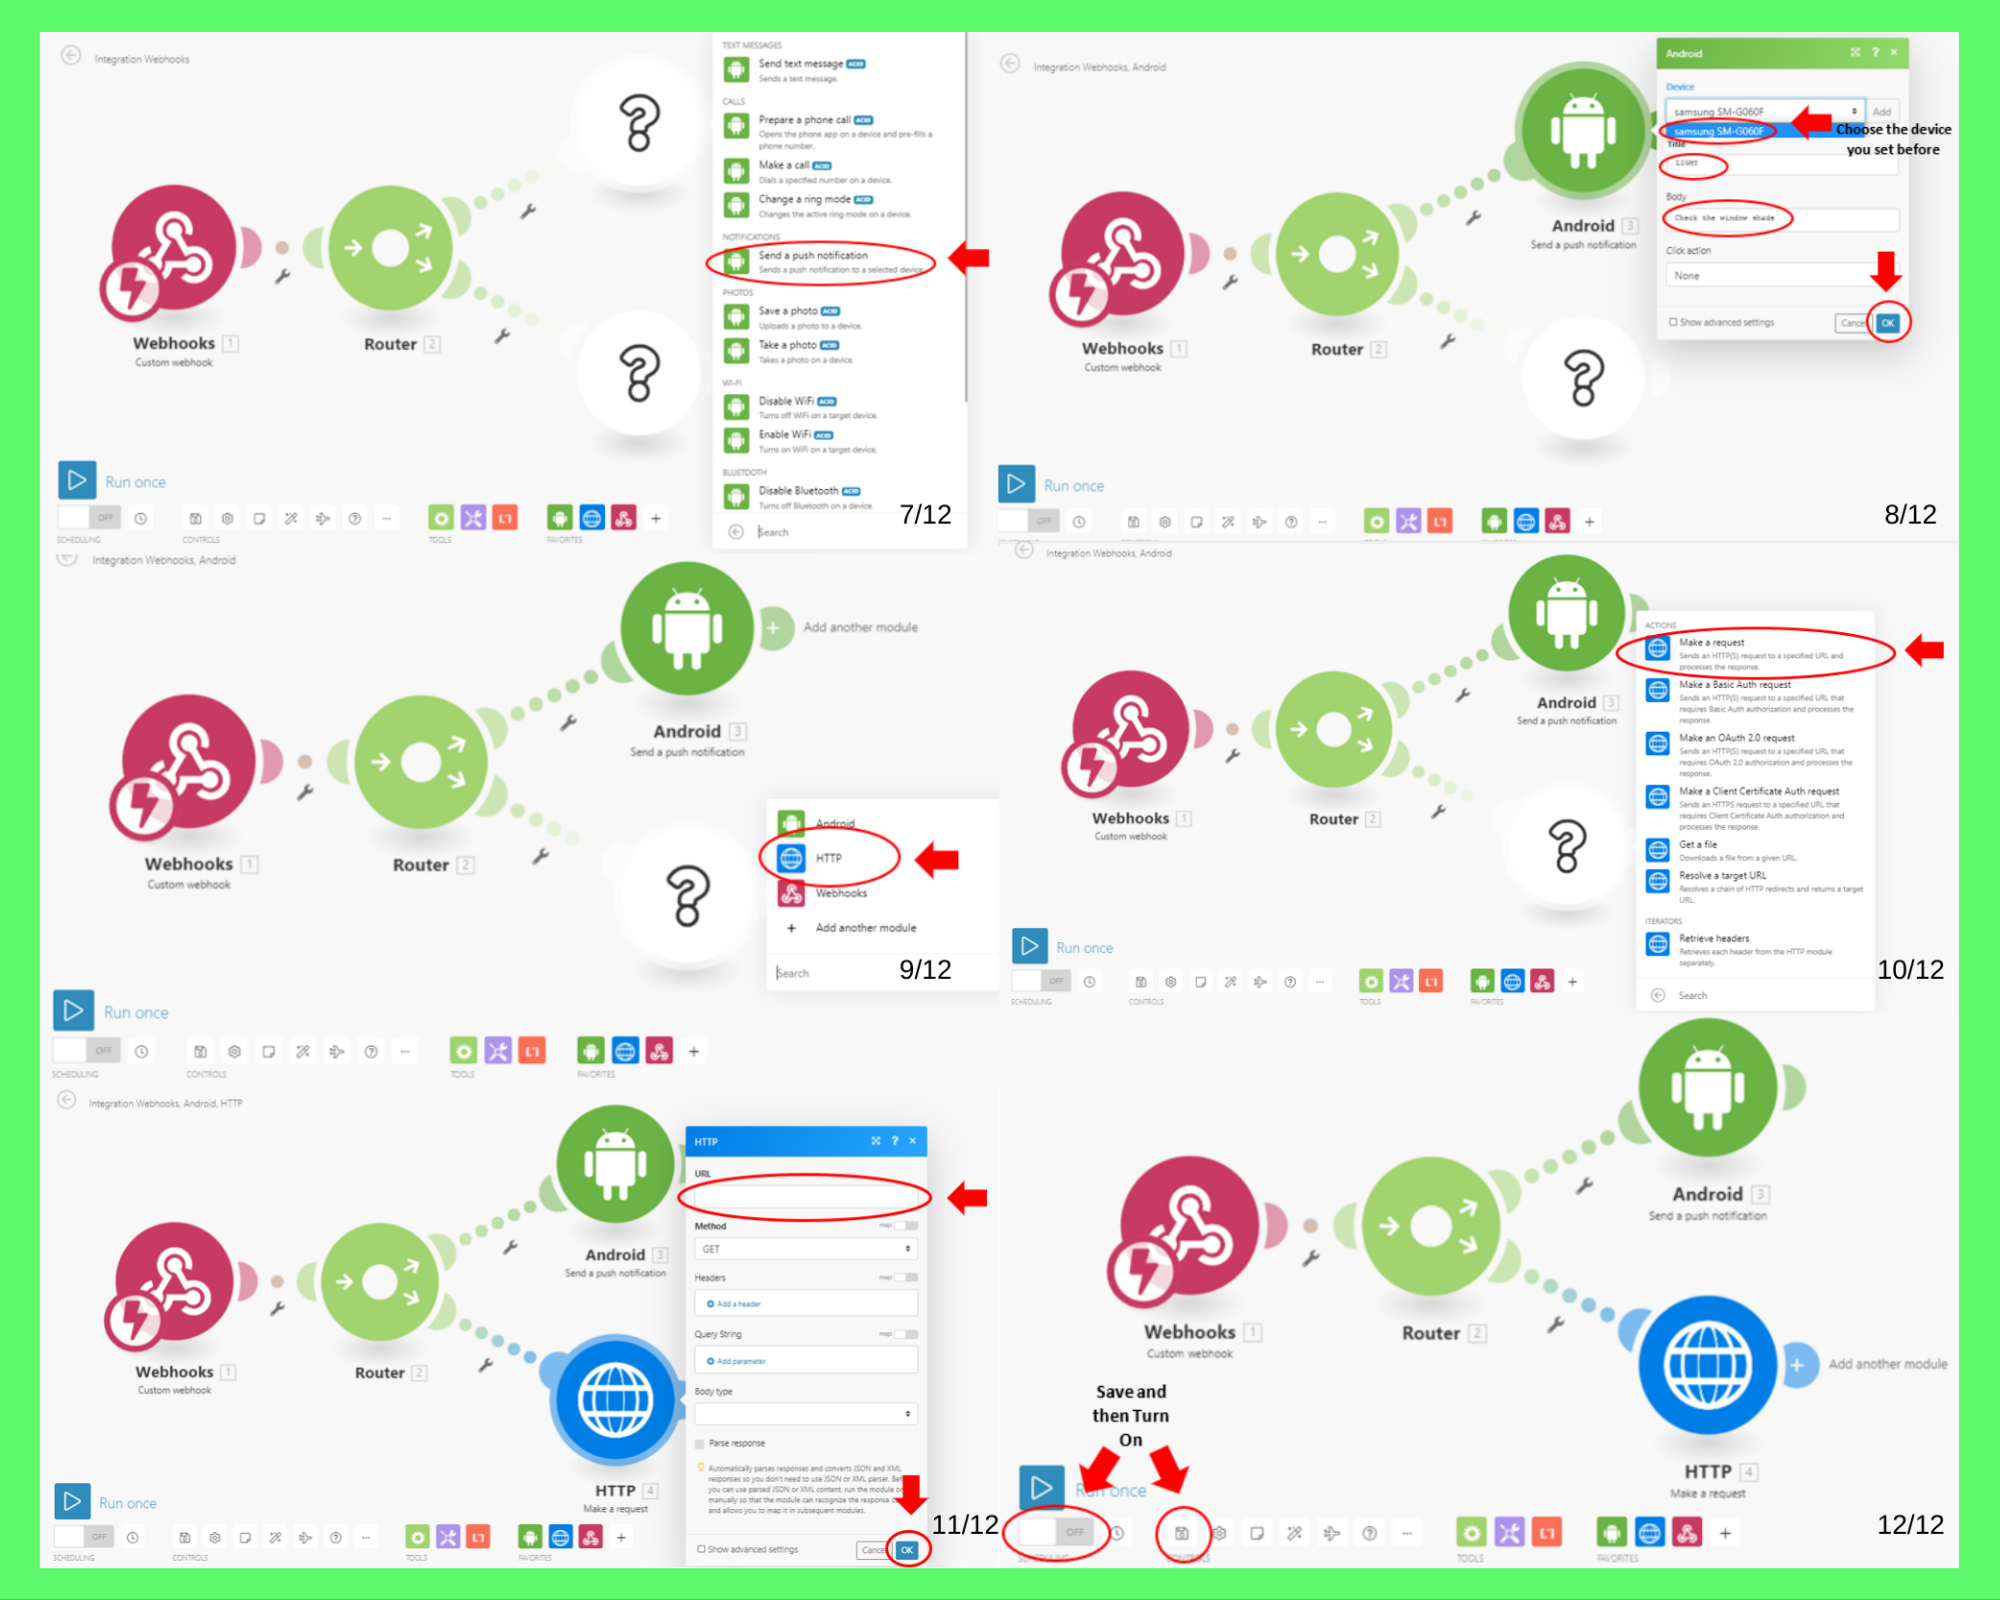
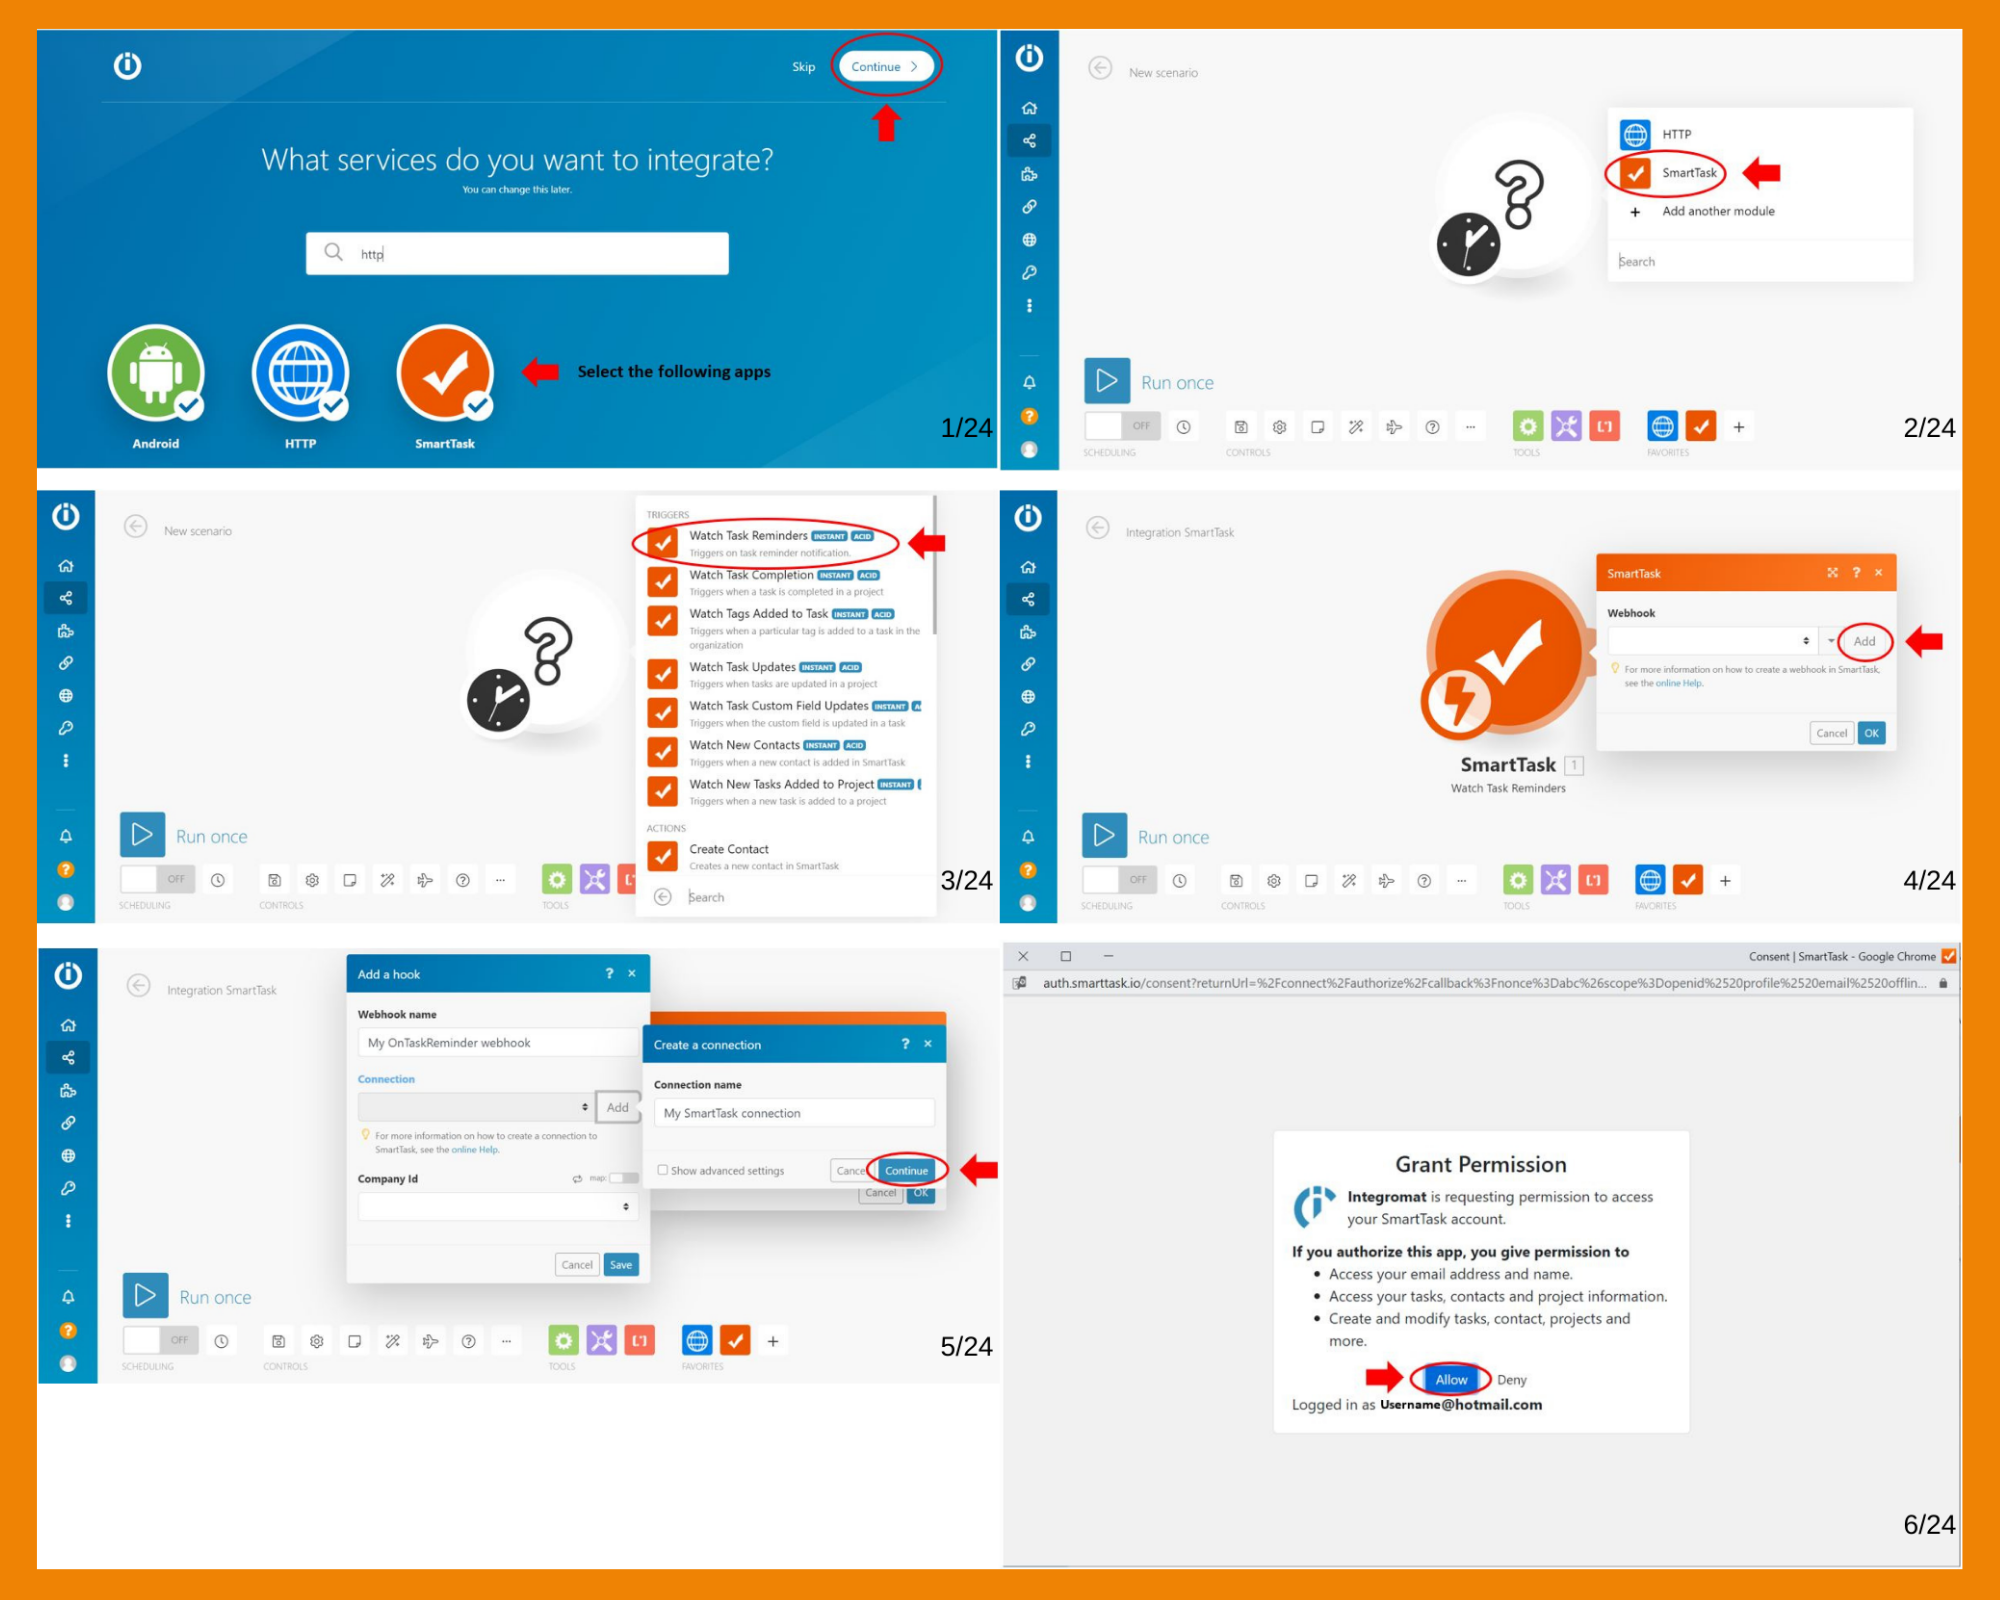
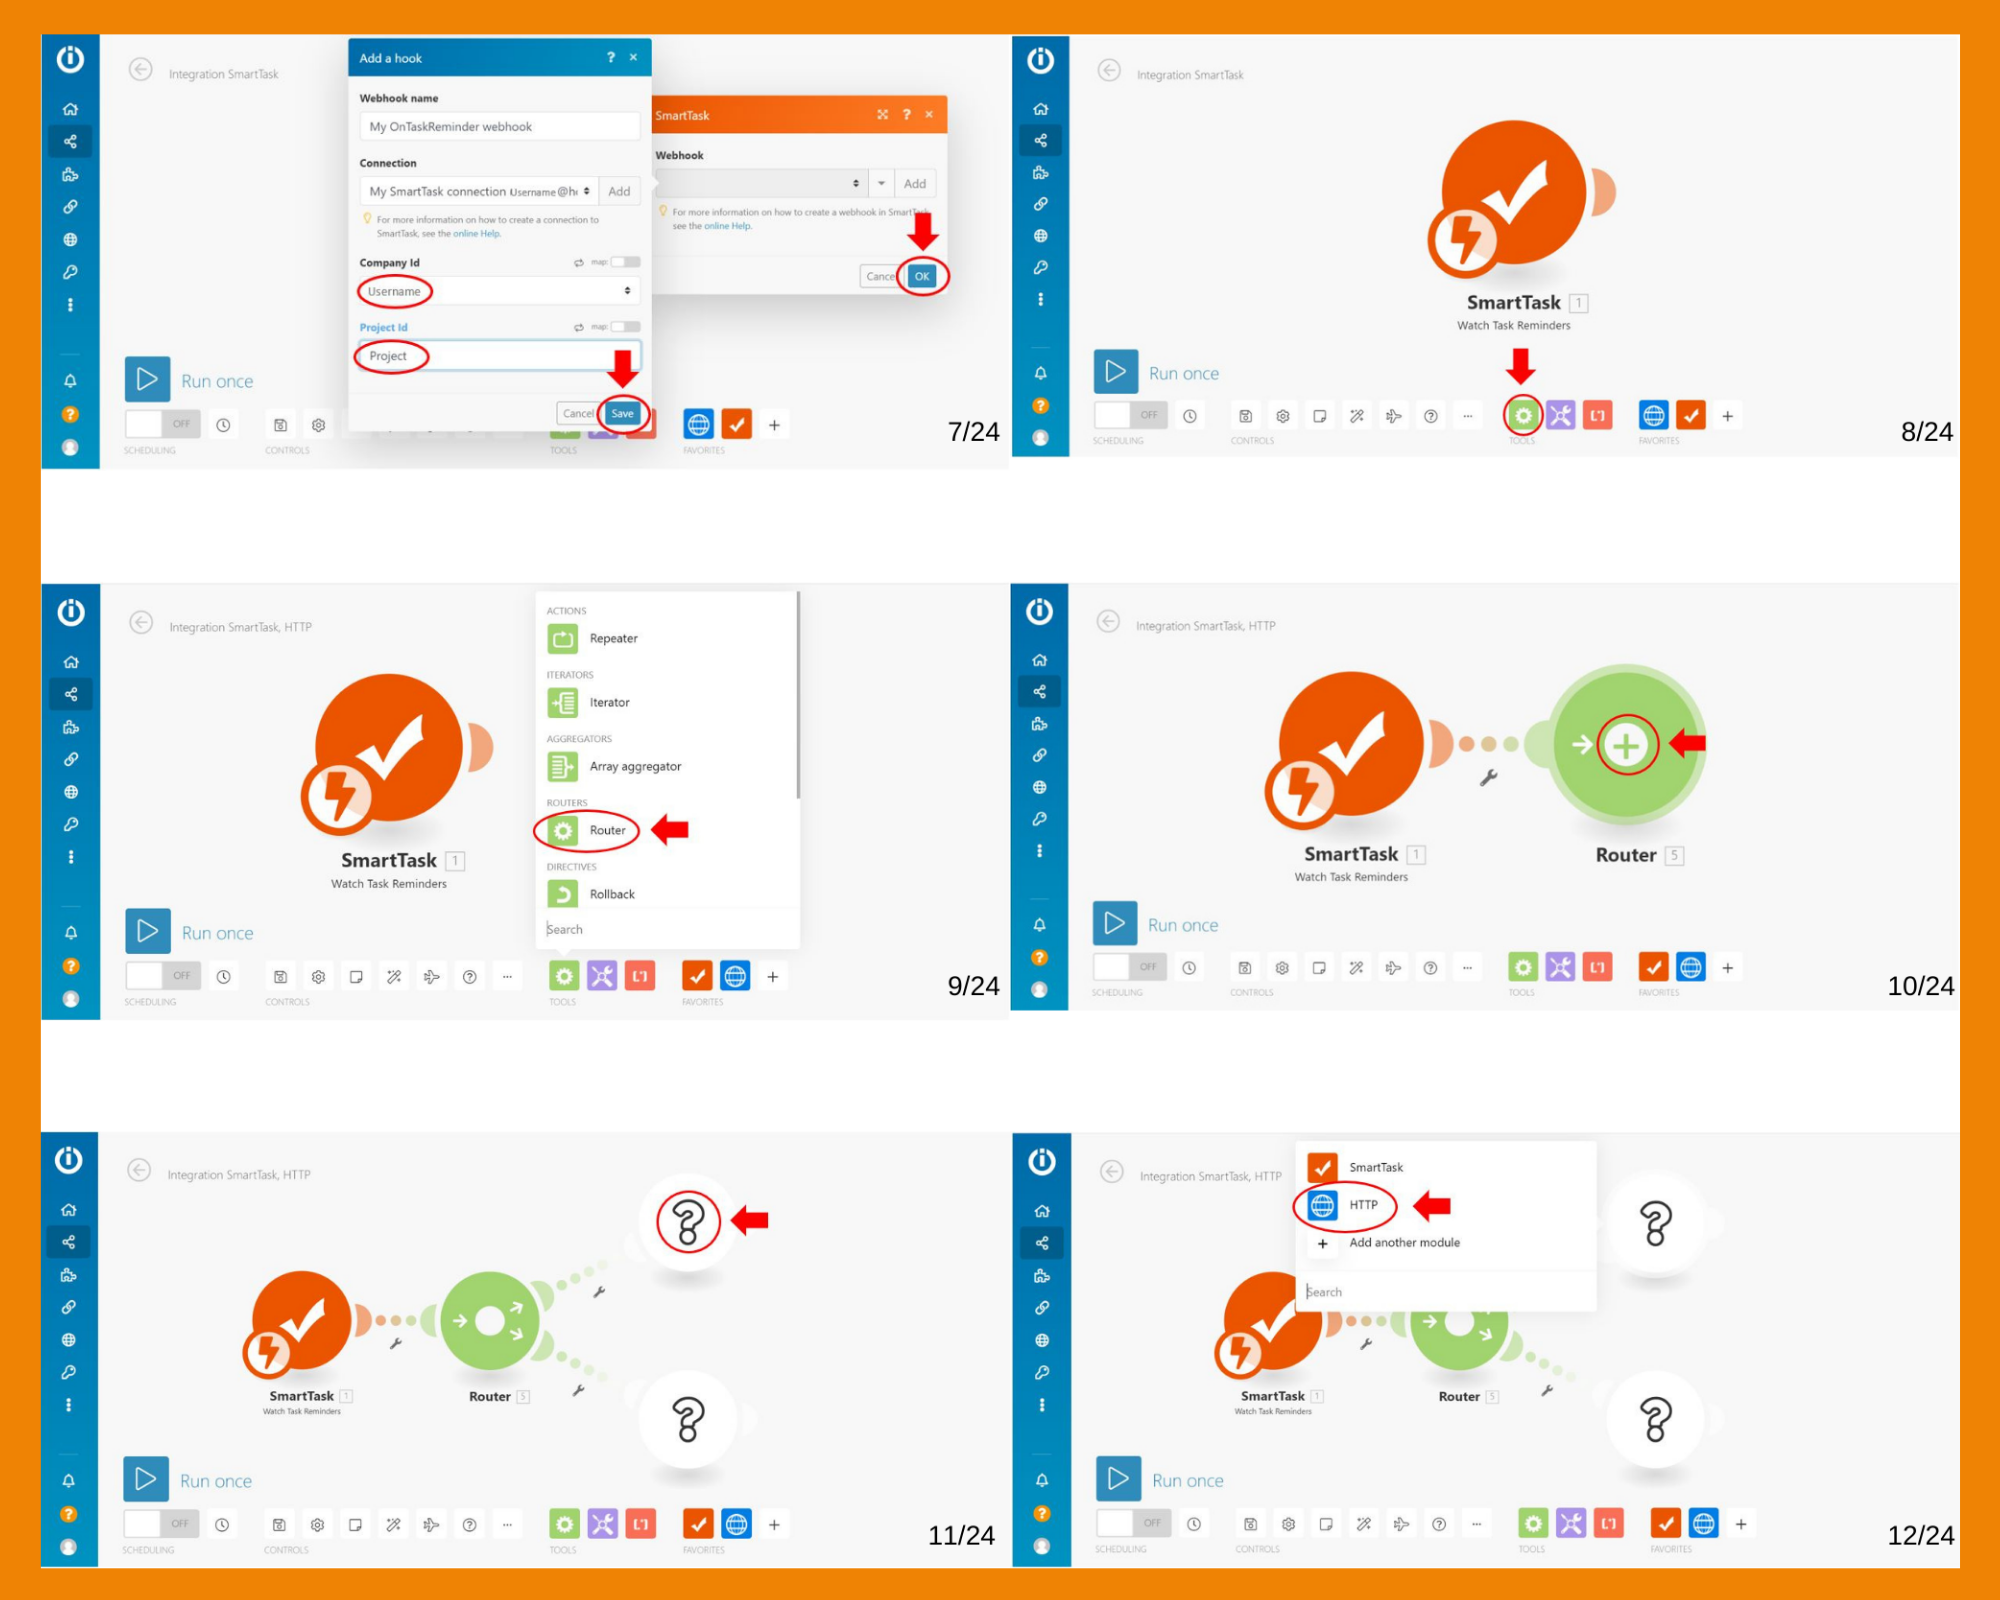
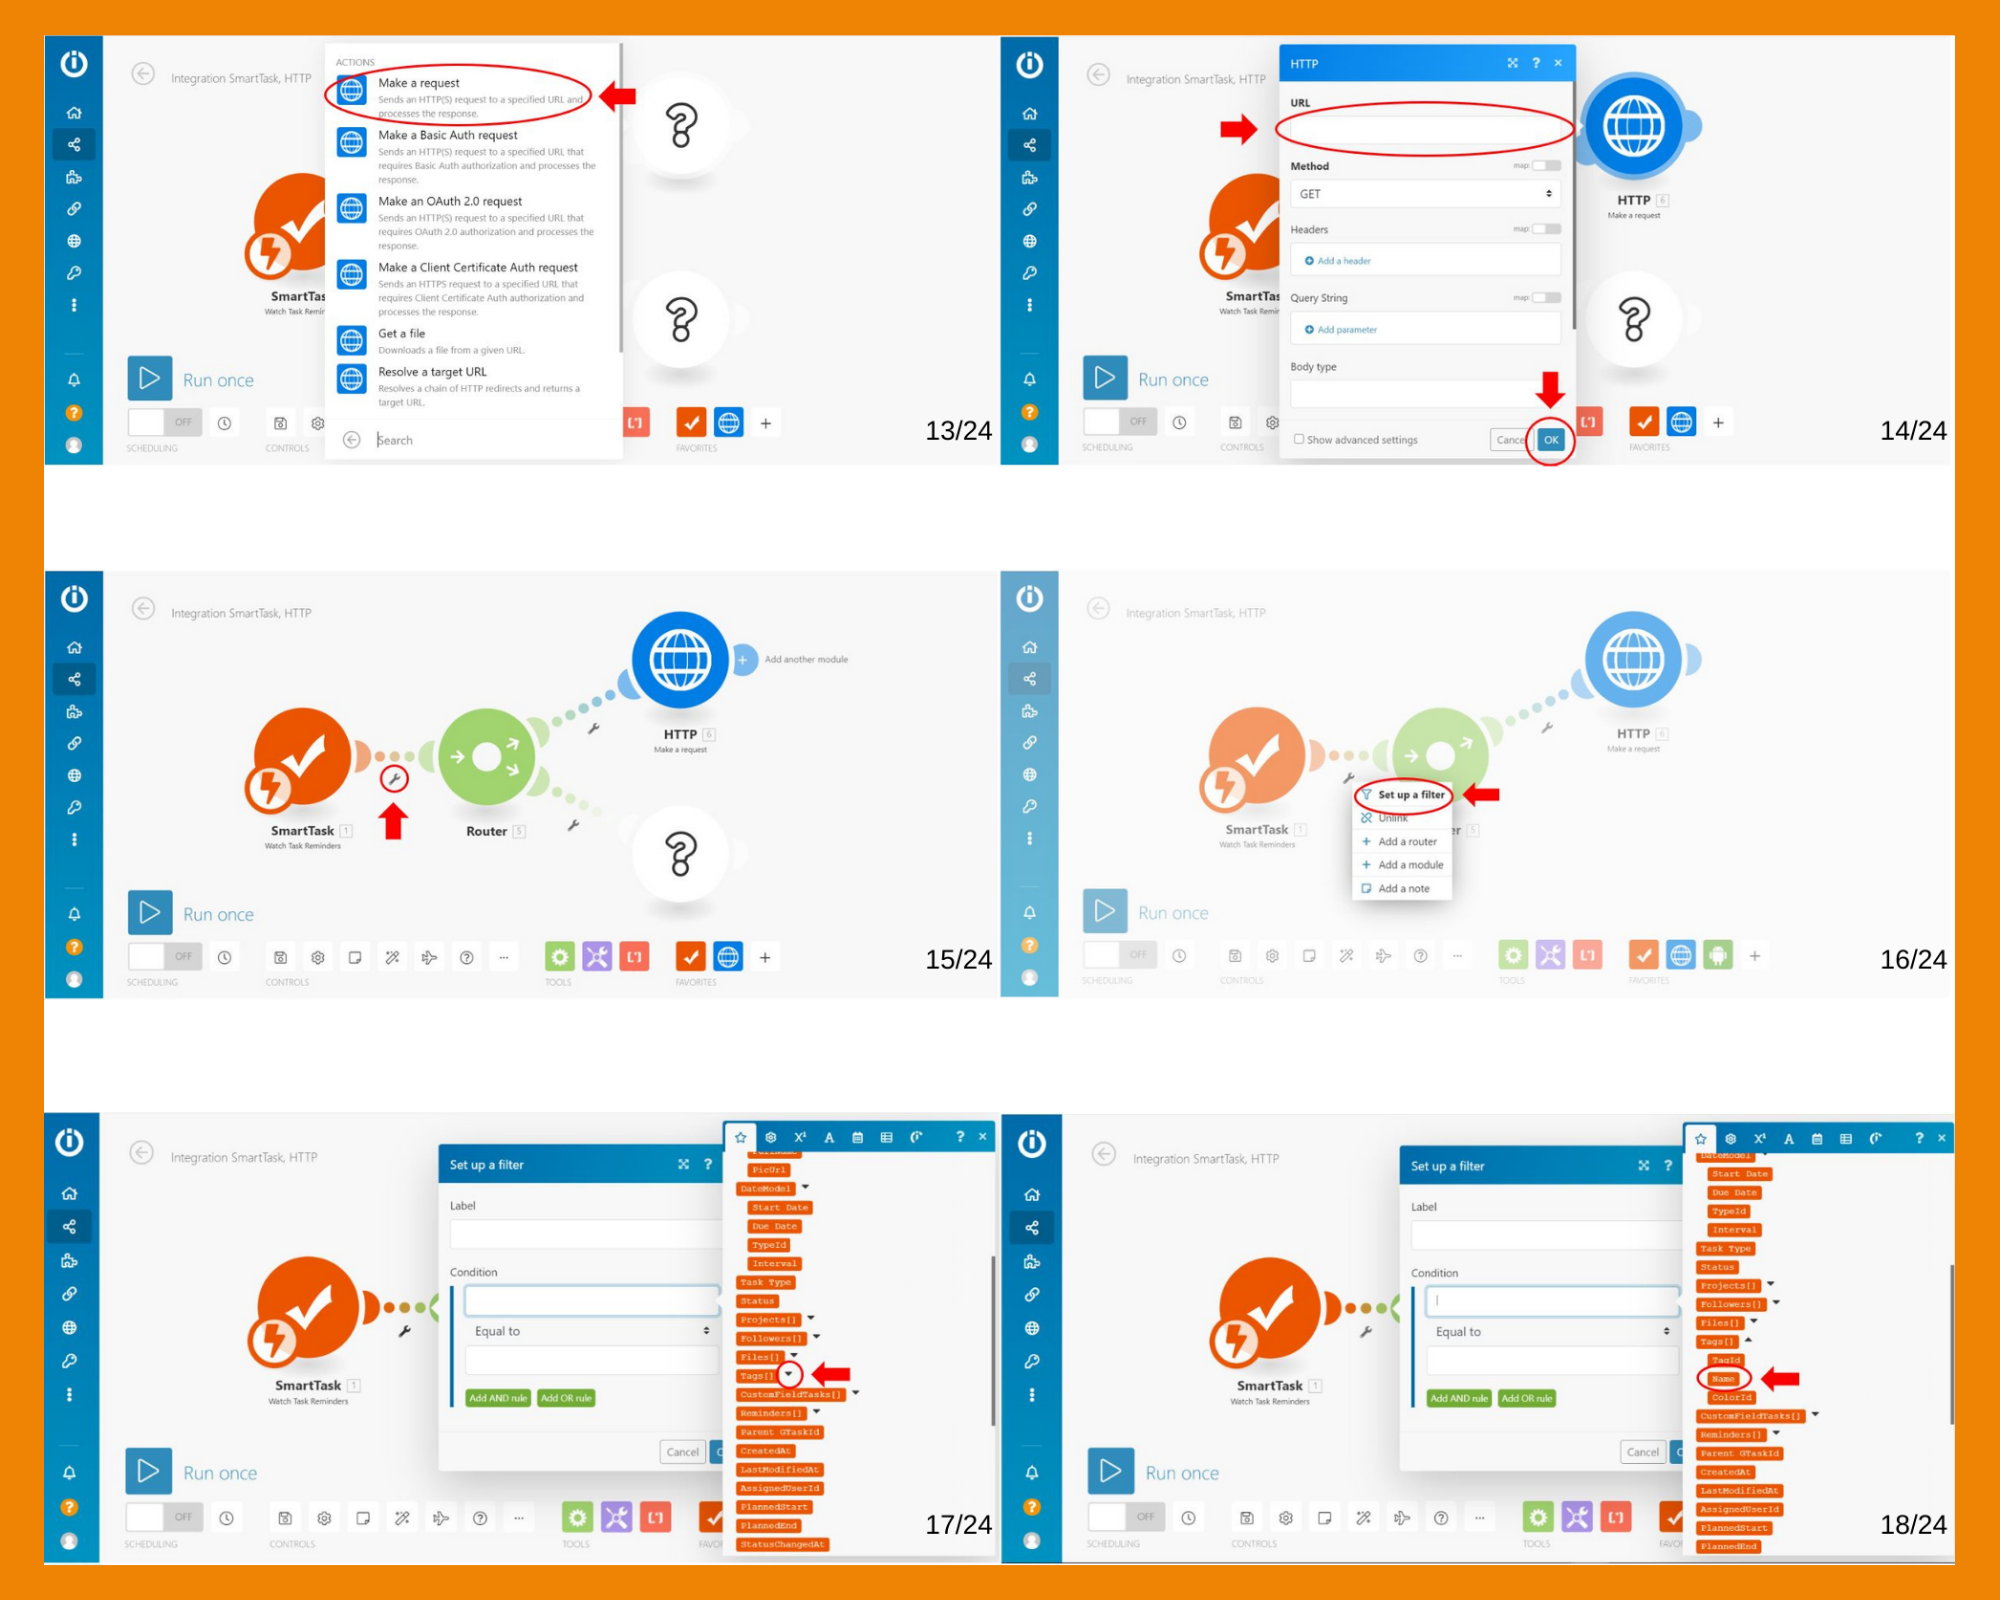
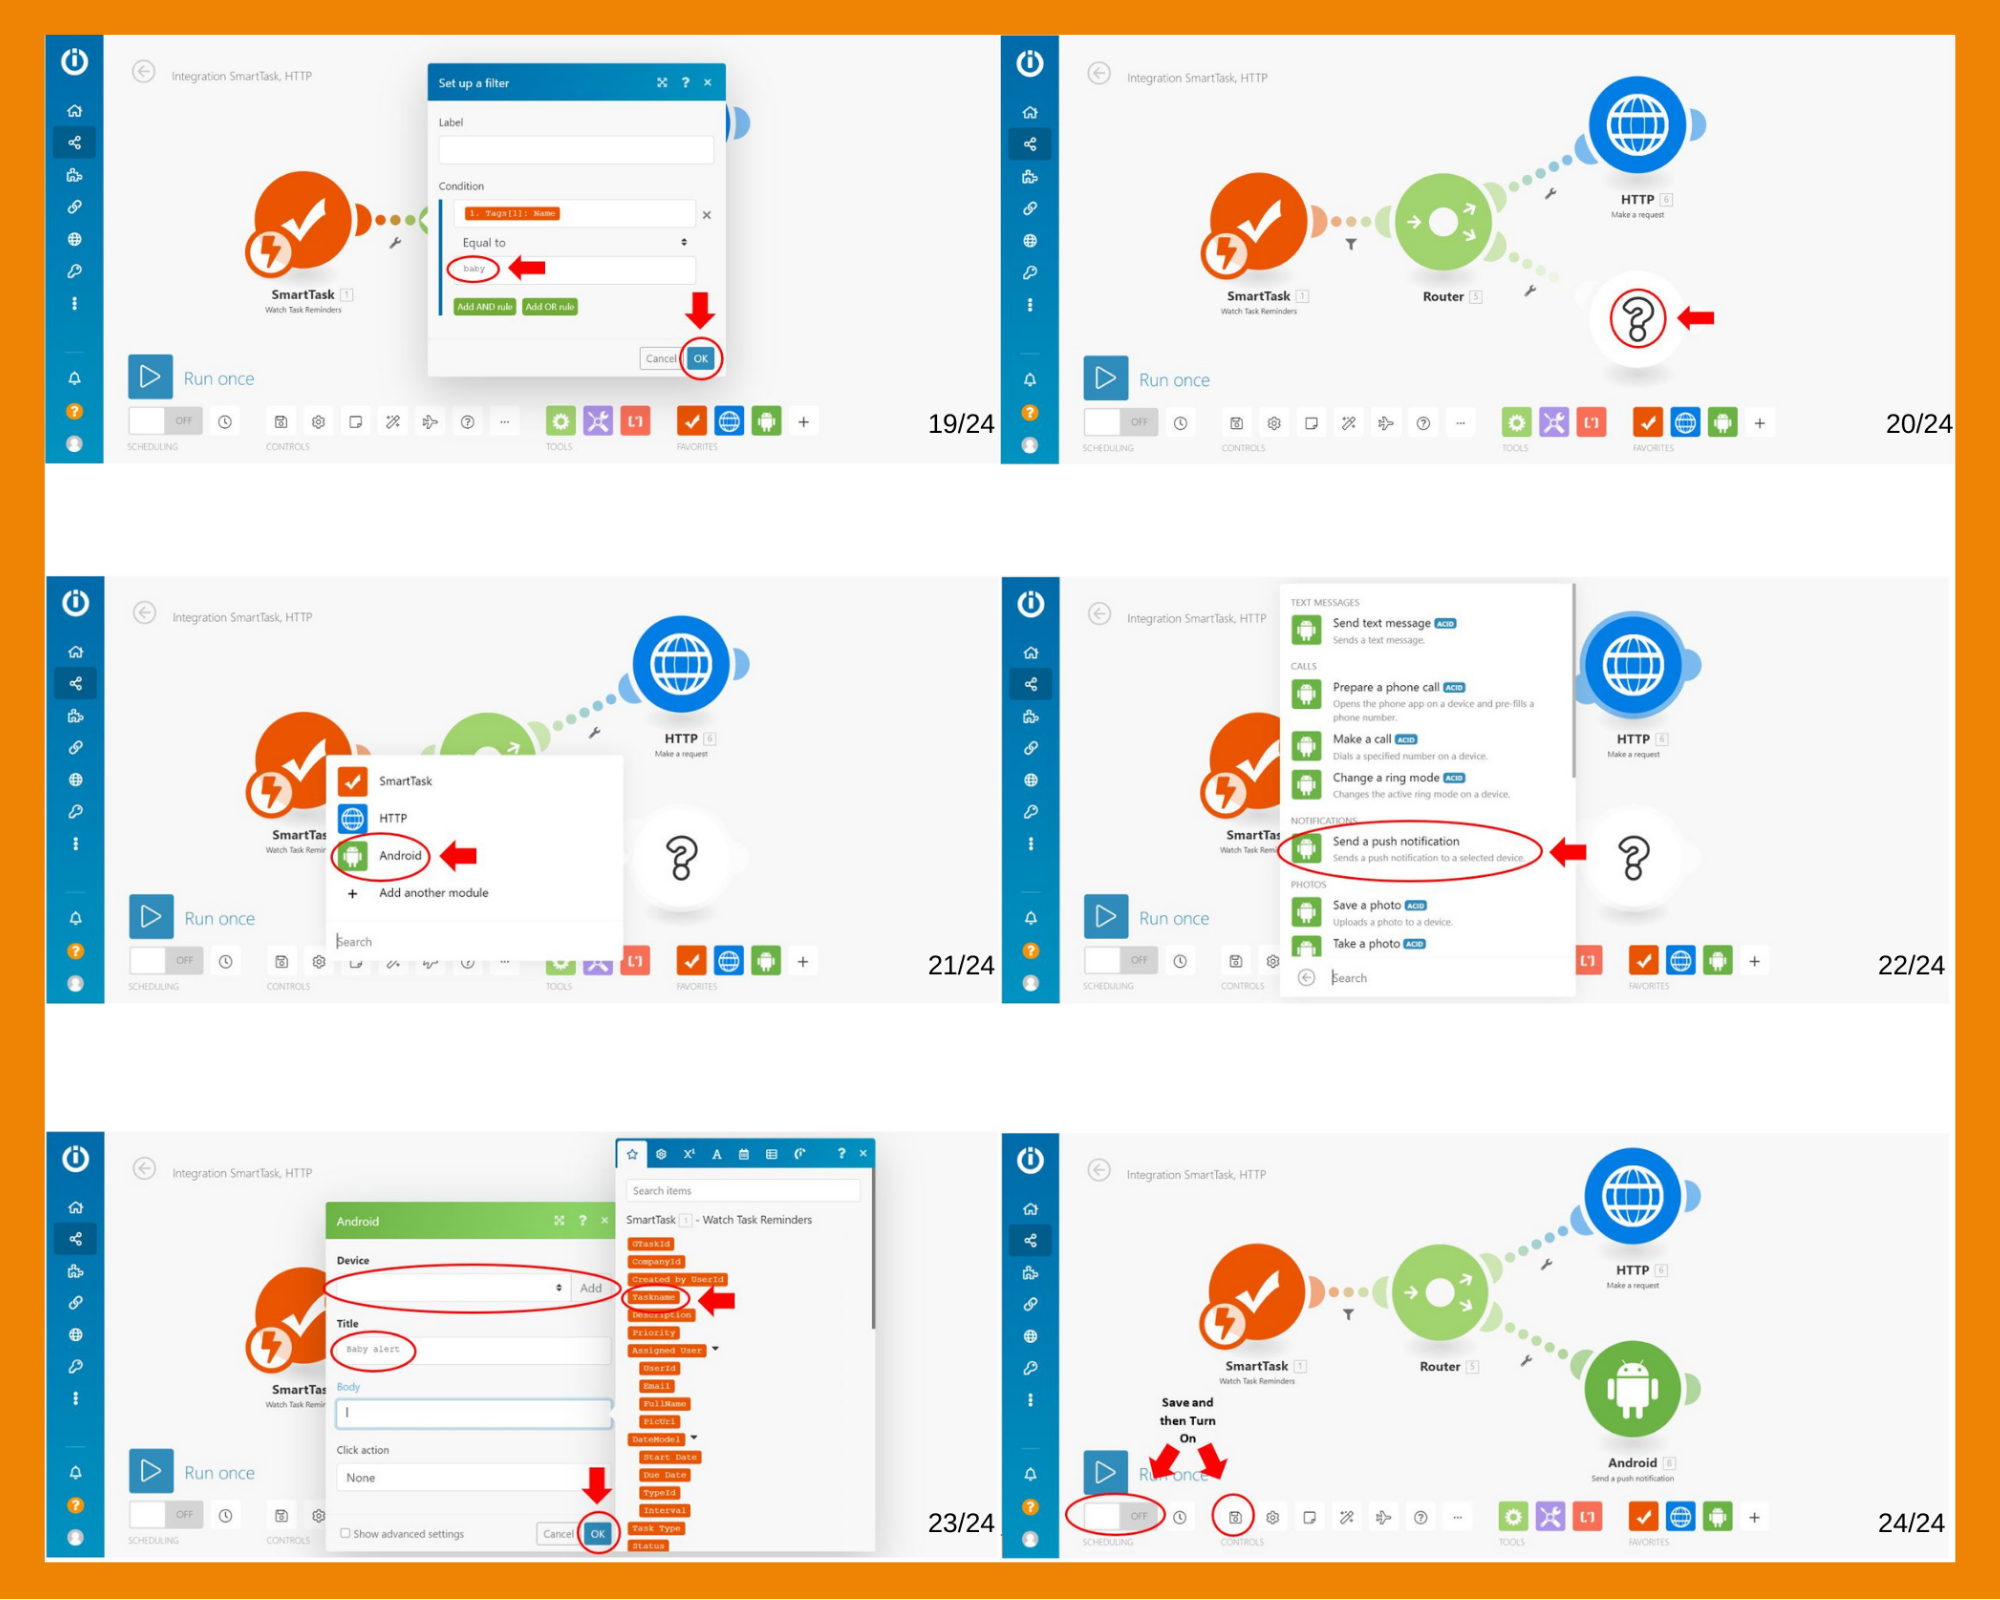
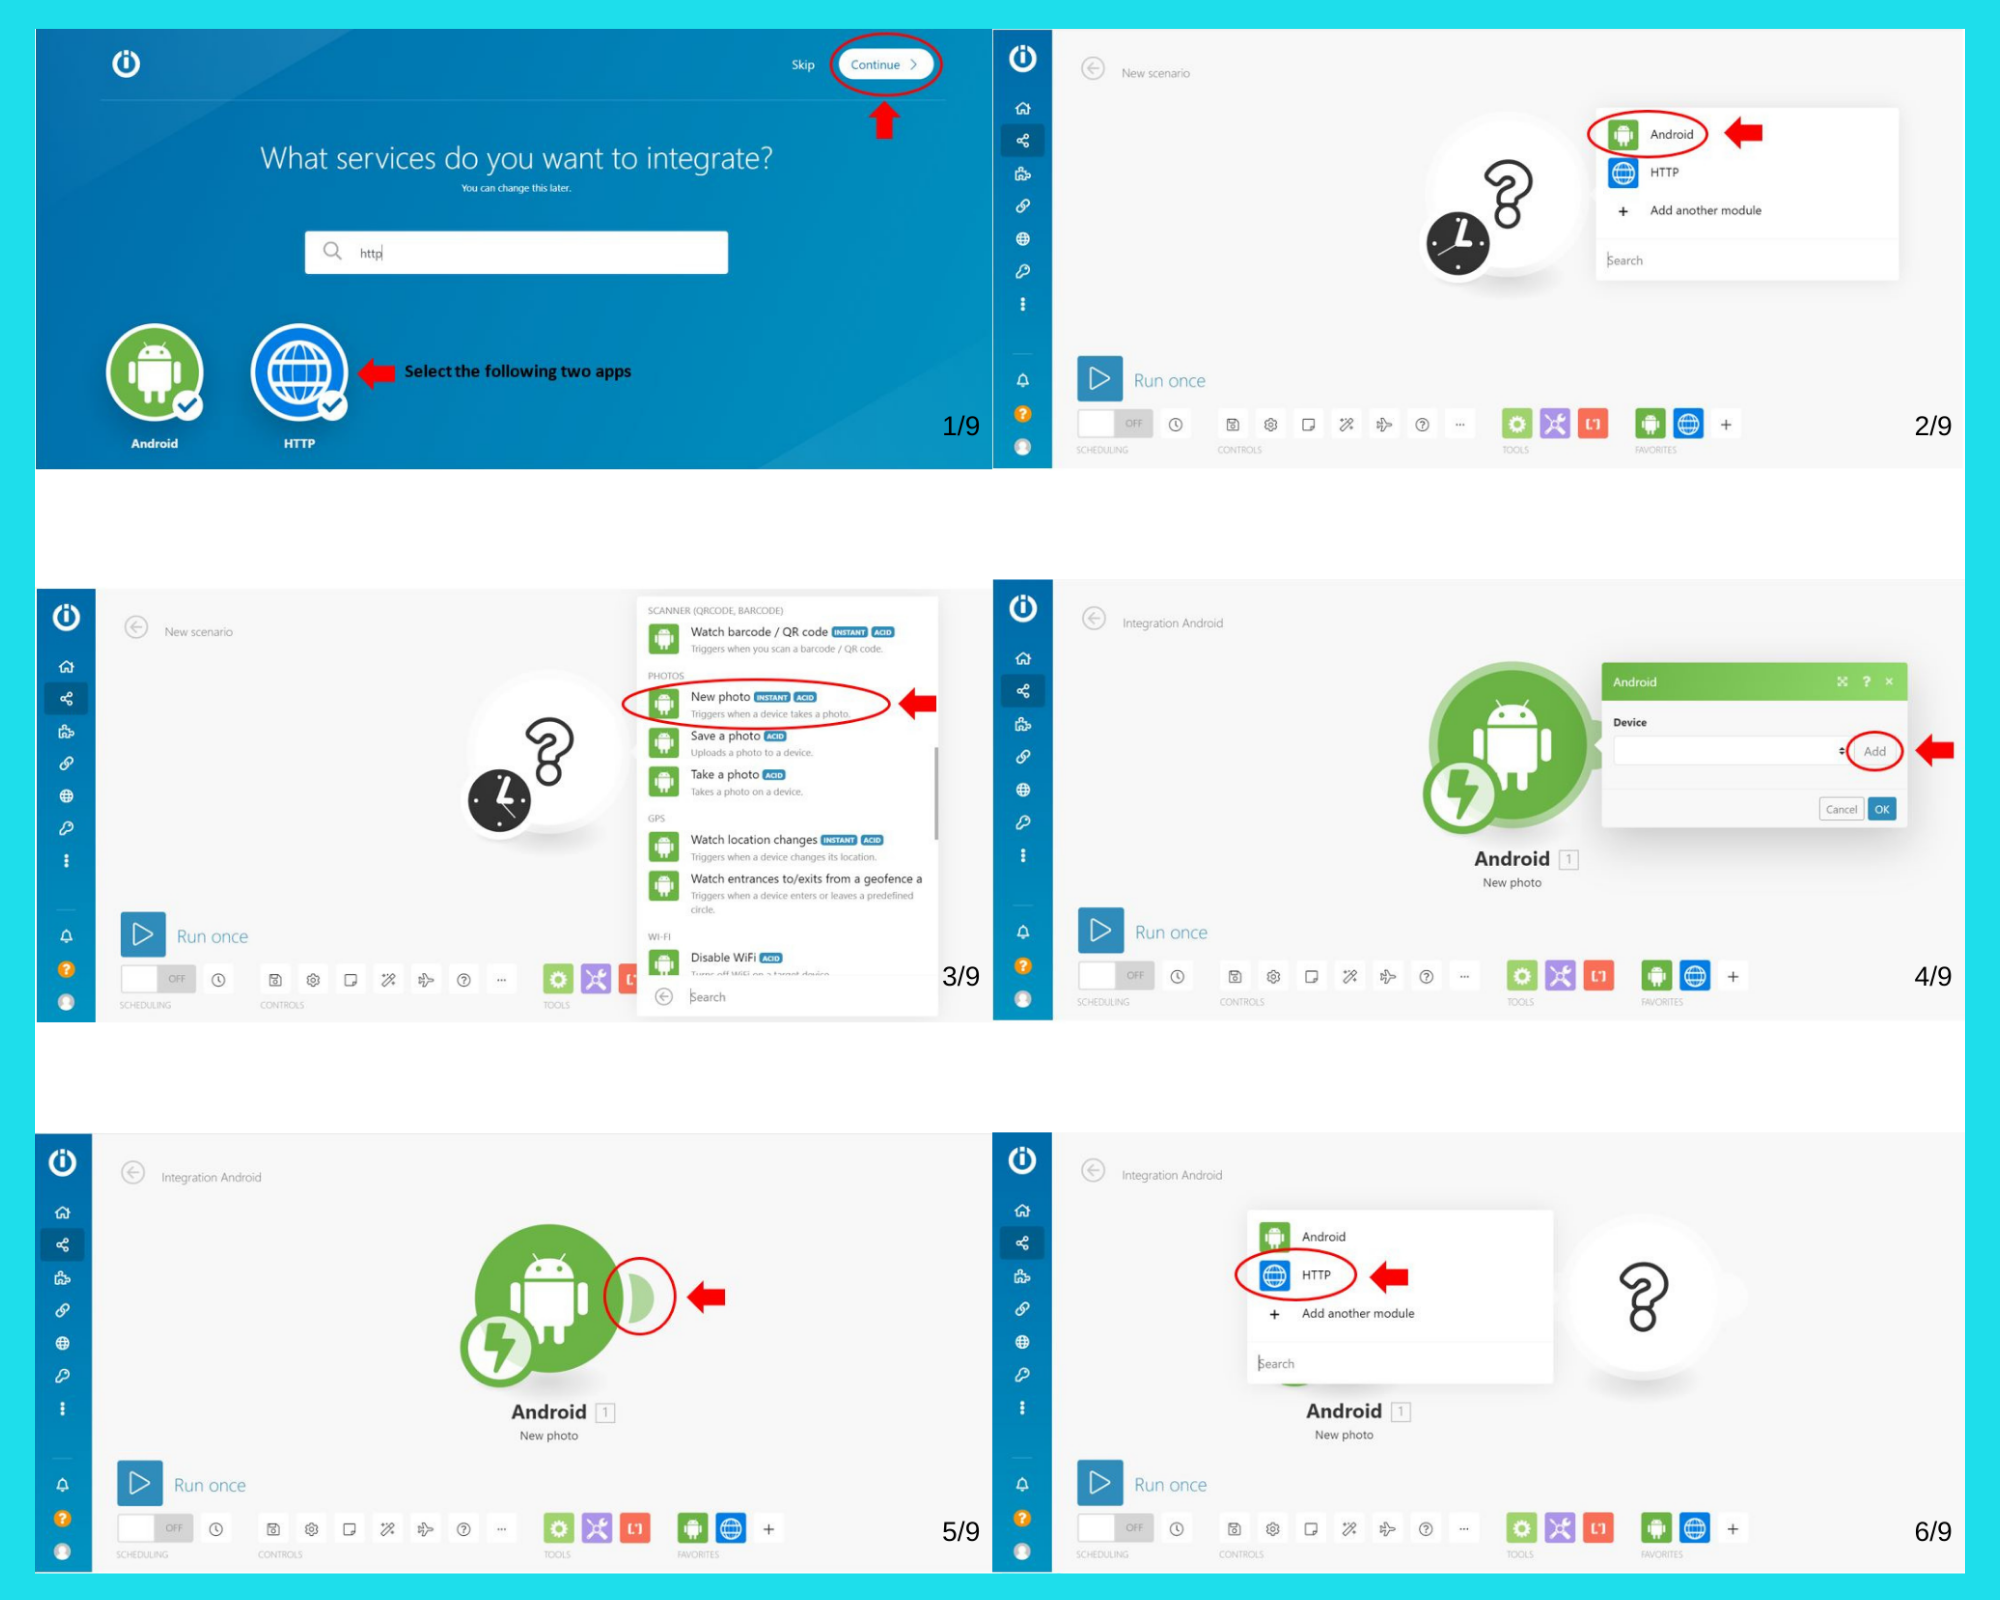
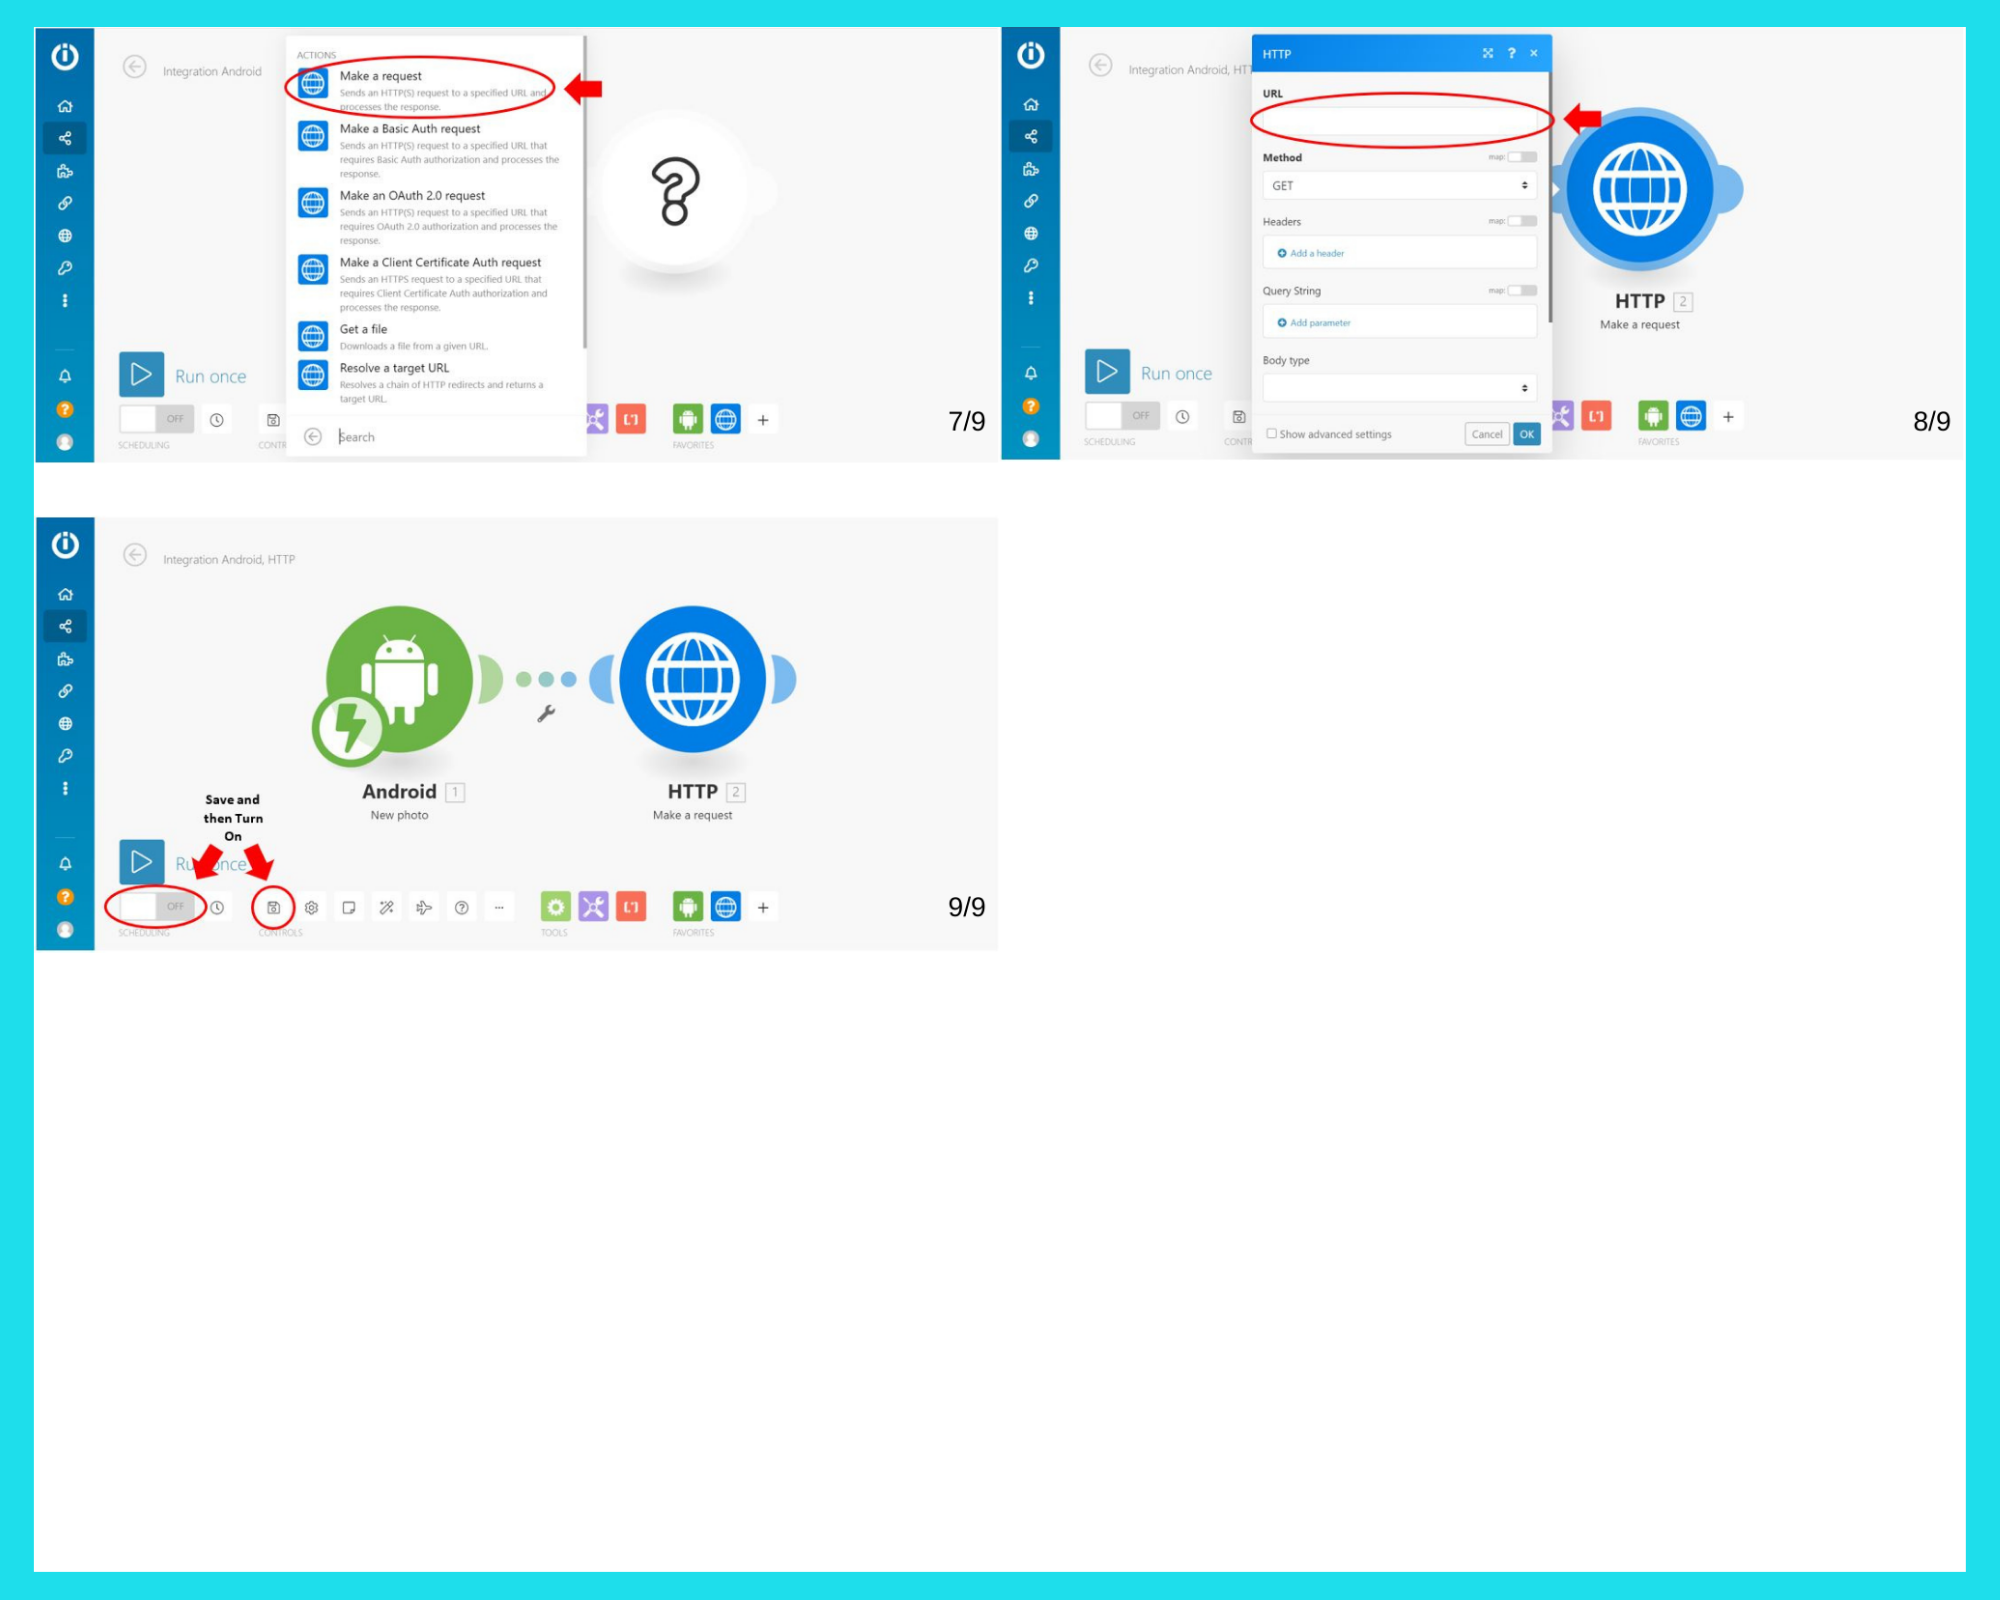
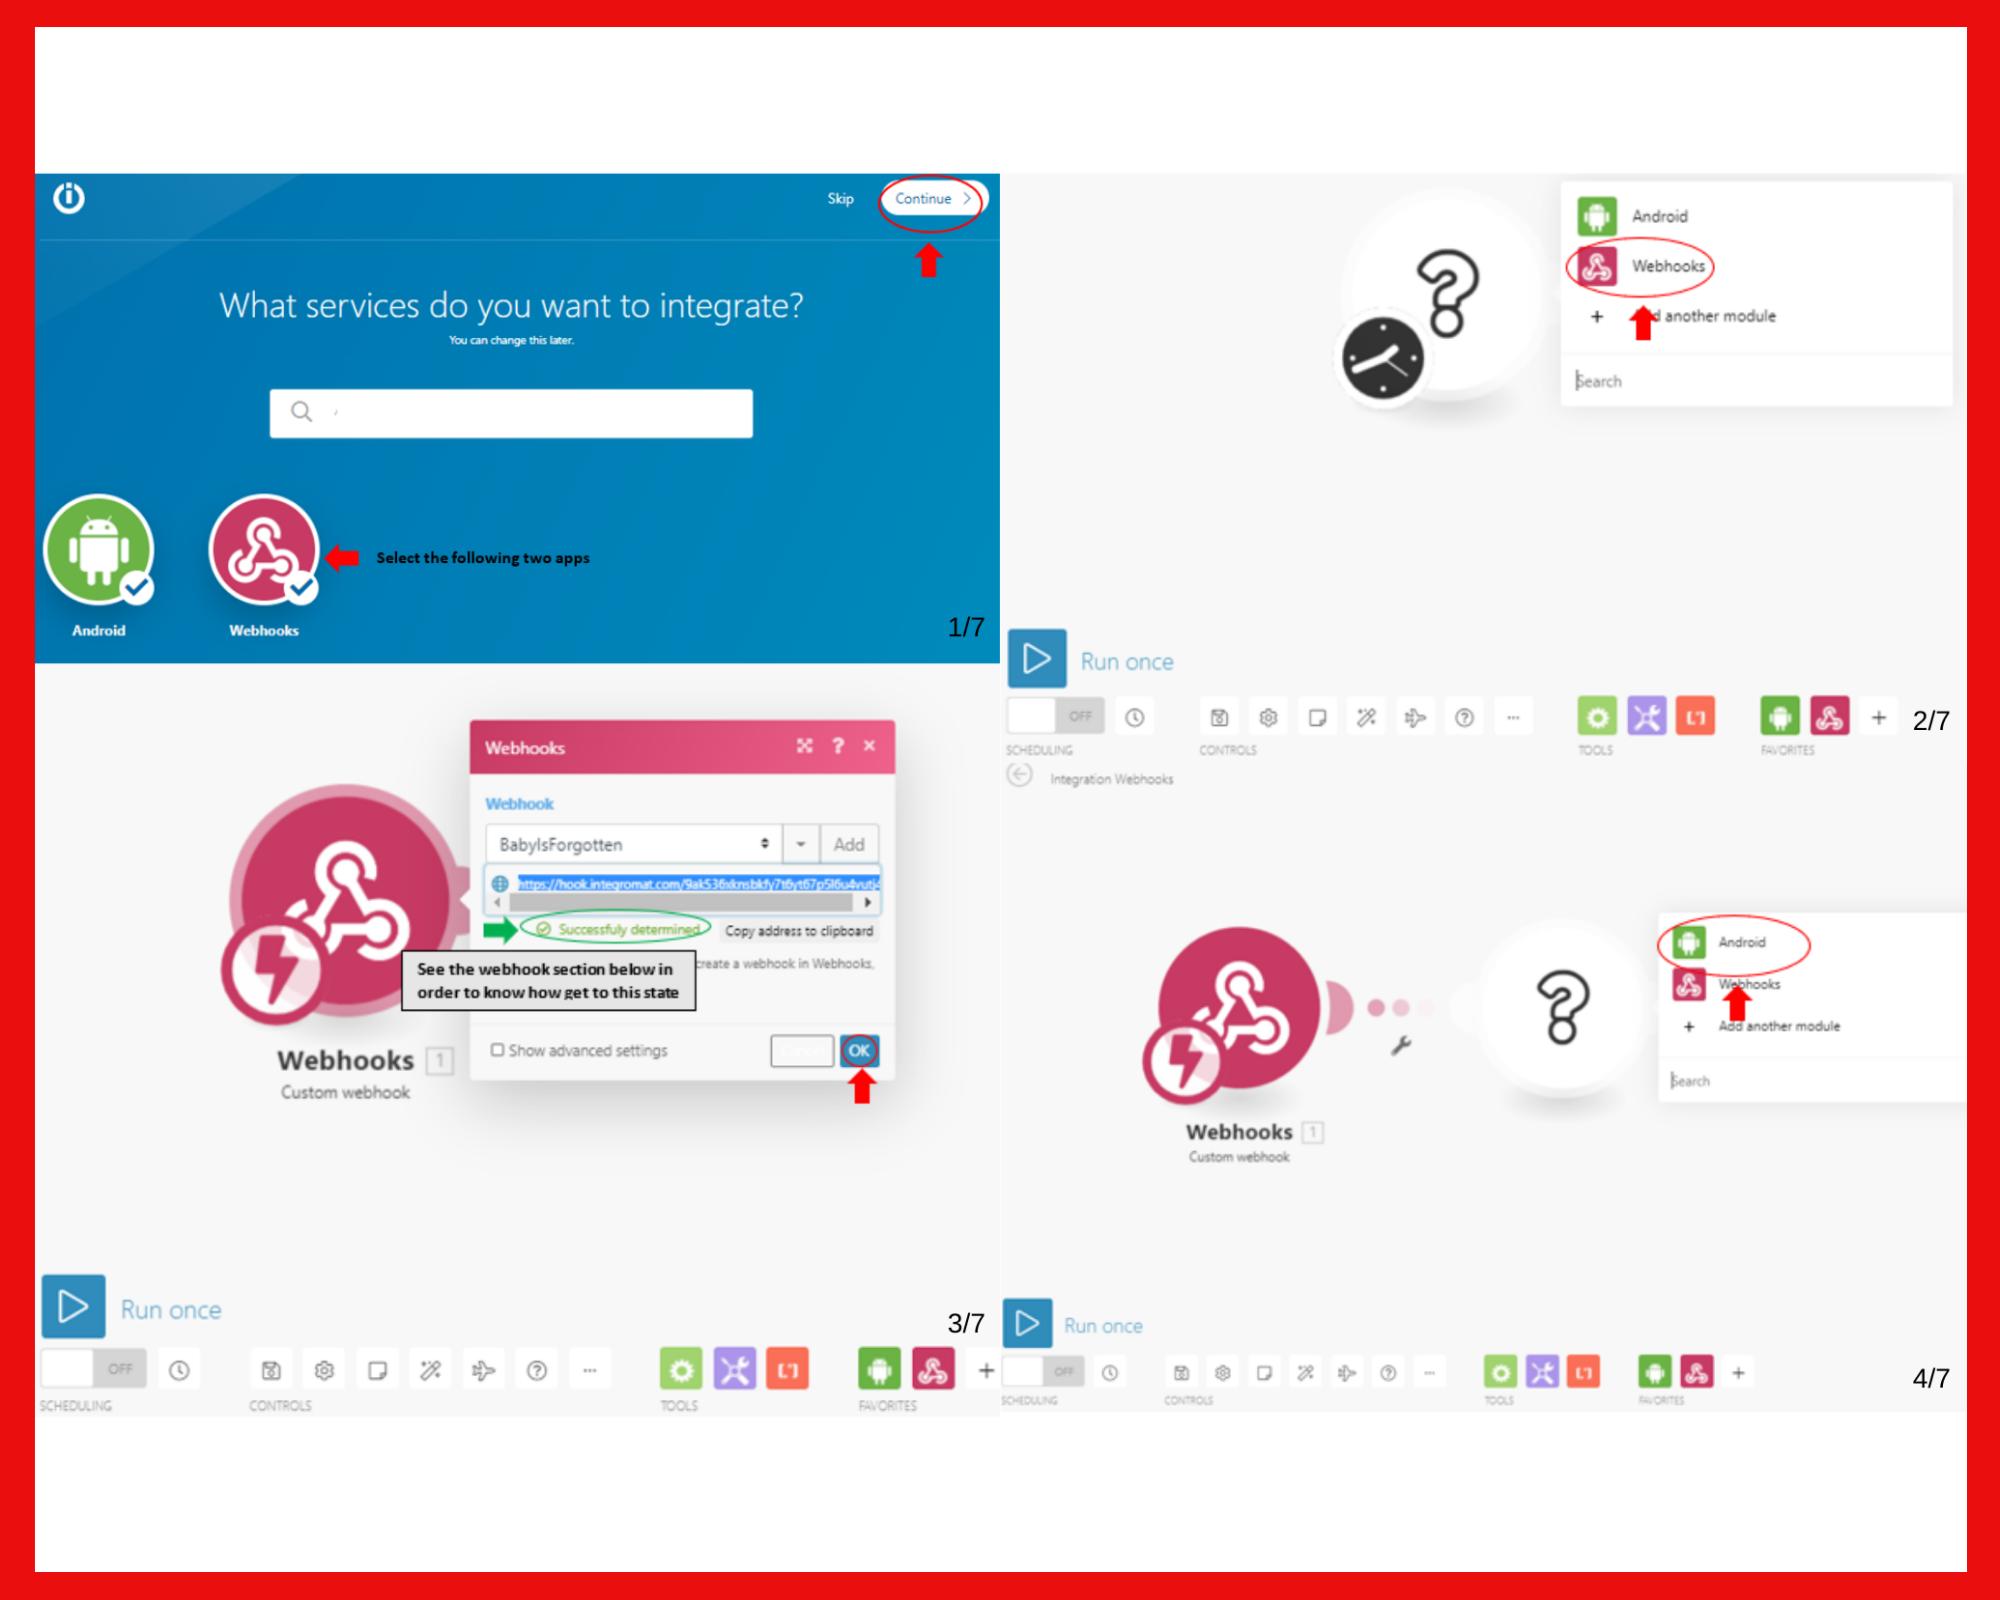
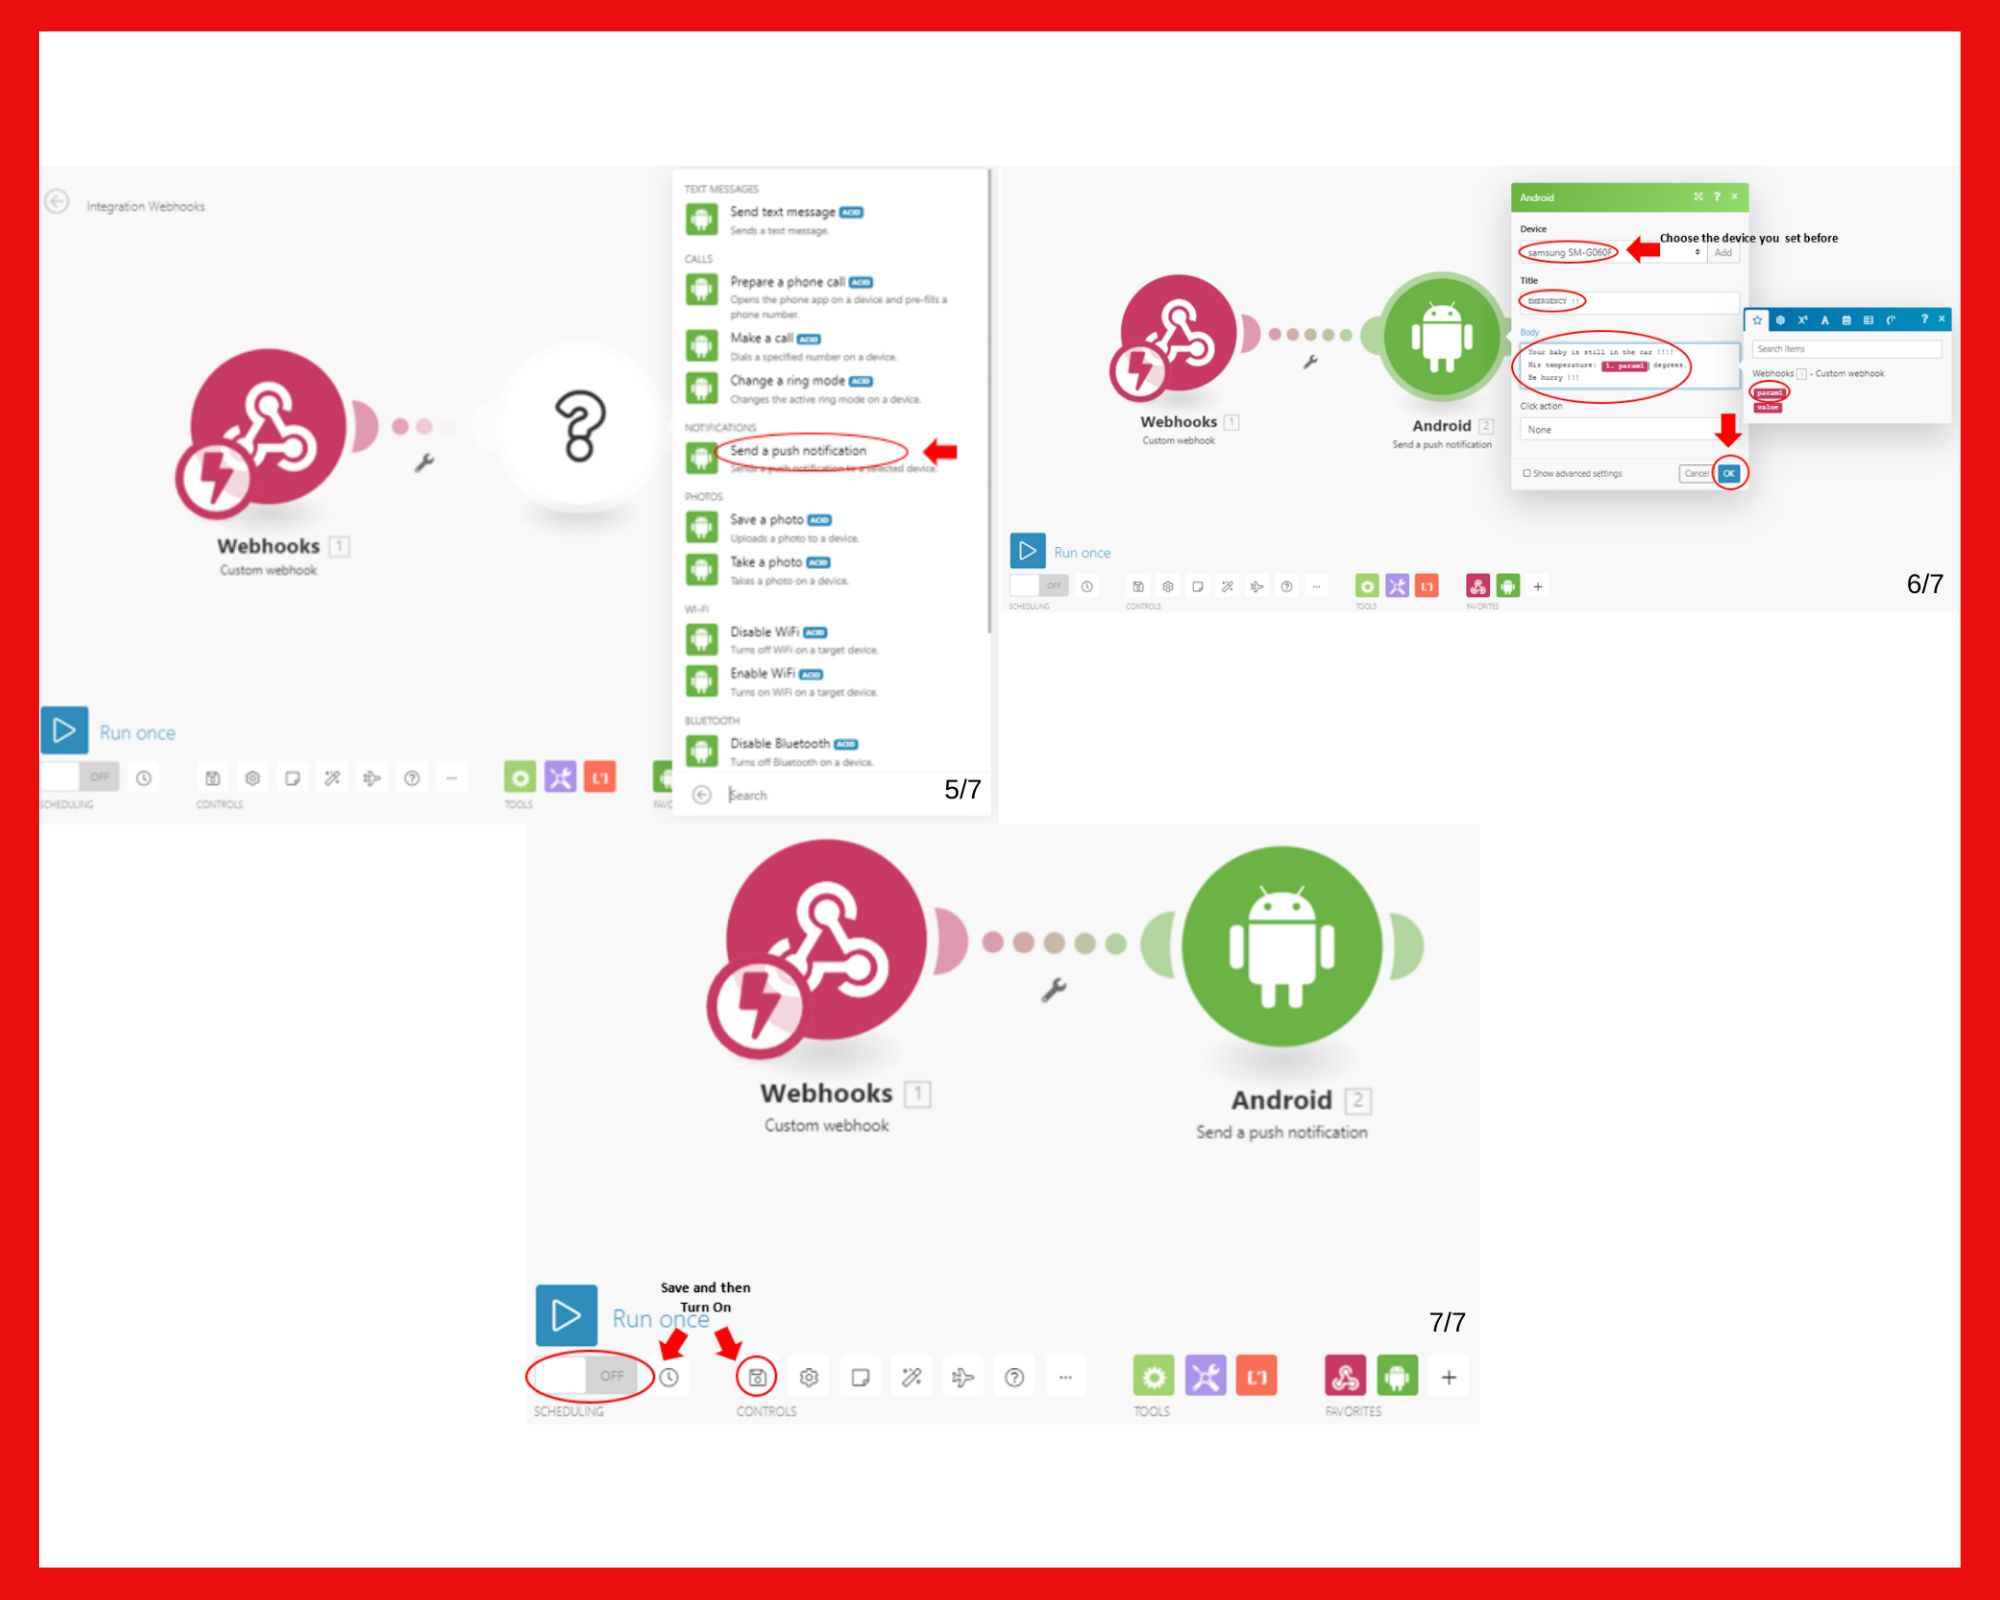
For every service that the babySEATer provides, we need to build a different scenario in Integromat.
In the photos above you can see exactly how to build each of the 5 scenarios, step by step.
In the photos each scenario has different color:
- Yellow - Temperature scenario
- Green - Light scenario
- Orange - Task scenario
- Blue - Play Music scenario
- Red- Forgotten Baby scenario
Most of the scenarios have some systems in common so we found it useful to explain about them here in details:
Android:
- Choose the android service that is relevant to the current scenario you build
- In the "Device" field, press on “Add”
- A new window will be opened, and you will be required to enter the device name:
Go to the Integromat app in your phone --> Settings -> Click on your name --> Check your
device name --> Go to the web Integromat and Fill in the device name in the requested textbox and press “Continue” - A new window will be opened, and you will be required to scan a QR:
Go to the integromat app in your phone --> On the “Sign-in” screen, press the “Use code” button --> Scan the QR shown in the web integromat - Now the device is set and will appear in the drop-down menu of the "Device" field
- If needed, you are free to fill the rest of the fields in the current android service
Notes:
- The same explanation works also for IOS, just remember to add an IOS service instead of the Android service in the first step of the scenario building
- From the moment the QR is shown, You have 30 minutes to activate the application, afterwards the code will expire
- Notice that you need to do the whole process just one time and then, in each time you will use an Android service, your device will appear in the drop-down menu of the "Device" field
- If you can’t scan the QR for some reason – you can enter manually the code above the QR
HTTP request:
1. Choose the “HTTP request” service
2. A new window will be opened and ask for a URL. The URL format will be:
"http://IP/TOKEN/update/PIN?param1=VAL1"
where:
- IP- Is the IP of “blynk-cloud.com” according to you location (*). For example: we used the IP: 188.166.203.43.
- TOKEN- Is the Auth Token that was sent to your mail when you created the Blynk project.
- PIN- Is the number of pin you would like to change (For example: V0).
- After the question-mark you will write the parameters and their values, separated by “&” (if there is more than one parameter)
(*) instruction:
- Go to the CMD in your computer
- Write : ping blynk-cloud.com
- Copy the shown IP to the URL address.
3. Set the “Method” field to “GET”
4. Press OK
Webhook:
- Choose the “Custom Webhook” service
- Click “Add”
- A new window will be open: Write the webhook name and press “Save”
- Click on “Copy address to clipboard”
- Open a new tab on your browser --> Paste the URL and before pressing “Enter” add the relevant parameters by adding a question mark followed by the parameters and their values, separated by “&” (if there is more than one parameter). For example:
"https://hook.integromat.com/bhrho8690q3sc6q9iobcy37jkespmq6x?param1=/pin[0]/param2=/pin[1]/" when before the param2 should be "&" - Press “Enter” and you will see “Accepted”
- Go back to Integromat, you should see under the URL “Successfully determined”. If you can not see it, go back to step 4 and try again. Otherwise, press “OK”
Notes
- If the URL need to include just one parameter, it will look like this:
"https://hook.integromat.com/bhrho8690q3sc6q9iobcy37jkespmq6x?param1=/pin/"
- Tip: save the URL including the parameters, we will use it later
Setting the Blynk Widgets
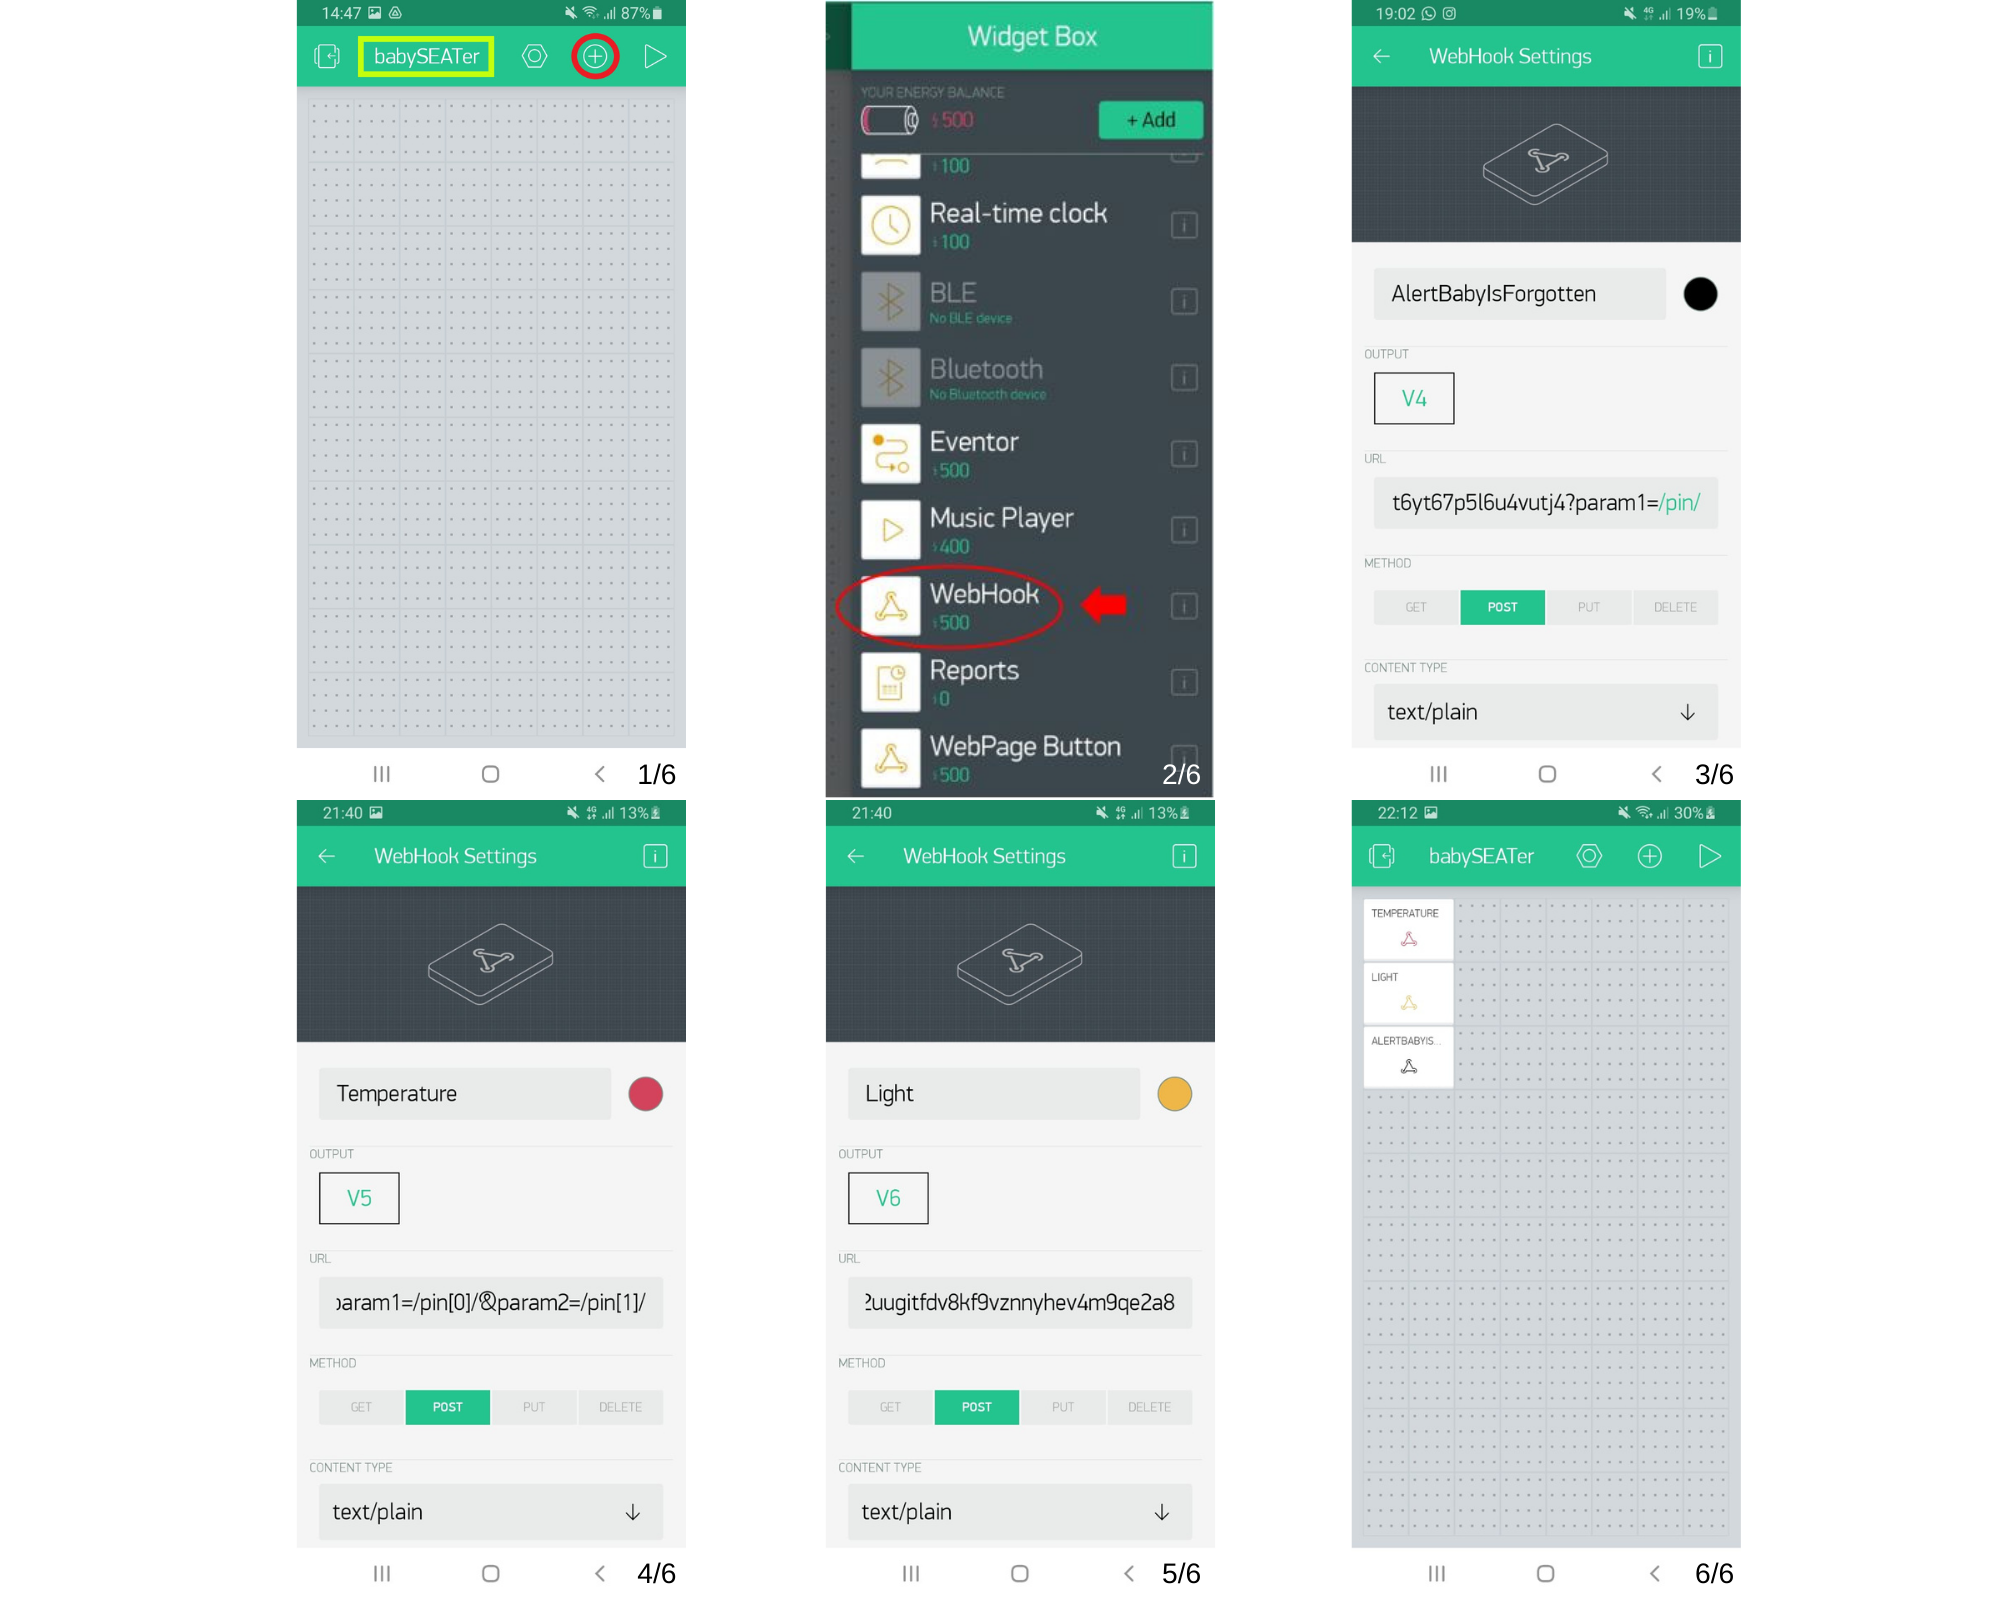
- Enter to the project you created in step 3.
- Press on the “+” Button in order to open the widget box.
- Add three “WebHook” widgets.
- Press on one of them and define it as follow:
- Set the output pin to V4.
- Paste the URL from the webhook in the Forgotten baby scenario in Integromat.
- Set the “METHOD” field to “POST”.
- Determine the content type to be text/plain.
- Press on the arrow stated in the up-left corner. - Press on another webhook and define it as follow:
- Set the output pin to V5.
- Paste the URL from the webhook in the Temperature scenario in Integromat.
- Set the “METHOD” field to “POST”.
- Determine the content type to be text/plain.
- Press on the arrow stated in the up-left corner. - Press on last webhook you didn’t define yet and define it as follow:
- Set the output pin to V6.
- Paste the URL from the webhook in the Light scenario in Integromat.
- Set the “METHOD” field to “POST”.
- Determine the content type to be text/plain.
- Press on the arrow stated in the up-left corner. - Press on the “Play” button (on the up-right corner) and keep it running the whole time.
Notes:
- Remember we recommended to save the URL of the webhooks in the second note in the webhook section above. If you didn’t do it:
- Open the relevant scenario in Integromat and copy the URL.
- Add a question mark followed by the parameters and their values, separated by “&” (if there is more than one parameter).
- Notice that the parameters names must be correlated with the names you wrote while determining the webhook. The values must be in the format of: /pin[0]/ or /pin/ in case of one parameter. - It is very important that the number of pins and the URLs will be exactly as written above. If not, the notifications you will get will not be correlated with the real-time scenarios.
- Notice that you have 2,000 energy units in your Blynk account and each “WebHook” widget costs 500 energy. If needed, removing a widget gives you back the energy it worth.
The Code

- First, Open the "Arduino" folder in your computer
- Create a new folder named "babySEATer"
- Download the code below and place it in the "babySEATer" folder you have just created
- Open the file in Arduino
- Look for “auth[]” in the code (You may use control+F).
- You will see the following line:
char auth[] = "vs53XUrIE7Xpw6V92A0HO6N8bsKOk5i8";
Replace the string between the quotation marks by the Blynk auth token from step 3 - The line below this line will be: char ssid[] = "";
Write the network name of your phone’s mobile hotspot between the quotation marks - The line below this line will be: char pass[] = "";
Write the password of your phone’s mobile hotspot between the quotation marks - Connect the CPX to the computer by the USB cable
- Put the three batteries in the battery holder
- Press the right arrow below the toolbar in order to upload the code
- Check that you see “Done uploading” at the bottom
- Disconnect the USB cable from the CPX
- Connect the battery holder to the CPX
Downloads
Assembling the System in the Car

Hardware
- Connect the 5 Alligator cable clips to each other
- Take one end of the cable chain you created, place it next to the car switch and fix it with isolierband (NOTE: place the clips such that the clips touch the key and not the switch!)
- Using the isolierband, secure the cable chain all the way to the baby seat
- Connect the second end of the cable chain to PIN A1 in the cpx board
- Connect the ESP8266 Board to the cpx Board (with PINs- GND, A6, A7, 3.3V)
System Position
- Place the cpx board in the baby seat while the board facing the window next to the baby
- Attach the window shade to the window next to the baby seat
Optional - Make the cpx board baby friendly
- Using the isolierband, attach the cpx board to the disk