BLE Controlled Servo With NRF
by TechMartian in Circuits > Wireless
3093 Views, 6 Favorites, 0 Comments
BLE Controlled Servo With NRF

Hello everyone!
In this Instructables, you will learn how to setup and interface a servo motor to your Arduino 101 over Bluetooth Low Energy or BLE4.1 using the modular tool, nRF Master Control. The servo motor will be controlled remotely, which makes it perfect application for things like Remote Controlled Airplanes or Boats!
You will also learn how to send information through bluetooth to communicate with ANY microcontroller with bluetooth capabilities.
BoM

- Arduino 101
- 9g RC Servo Motor
- Phone with BLE4.1 Capabilities
- Jumper Wires
Connecting the Servo Motor


- Connect the orange or white pin from the Servo motor to pin 9 on the Arduino 101 board.
- Connect the brown or black pin from the Servo motor to the GND pin on the Arduino 101 board.
- Connect the red pin from the servo motor to the 5V pin on the Arduino 101 board.
Note thatt manufacturers tend to make the servo motor's cable different. As a heuristic, the middle pin is always the VCC pin of the servo motor which can be connected upwards to 7.2V directly. The darker coloured outer pins is always ground, this is usually coloured brown or black. The remaining pin is the signal pin of the servo motor, where it will receive a PWM input signal from a source, in this case is an Arduino board (over BLE).

Coding

#include <CurieBLE.h>
#include <Servo.h>
BLEPeripheral blePeripheral;  // BLE Peripheral Device (the board you're programming)
BLEService ledService("19B10000-E8F2-537E-4F6C-D104768A1214"); // BLE LED Service
//set BLE characteristic
BLEUnsignedCharCharacteristic switchCharacteristic("19B10001-E8F2-537E-4F6C-D104768A1214", BLERead | BLEWrite); const int servoPin = 9; // pin to use for the LED
Servo servo1;
 void setup()
{
 // set servo pin to output mode
  servo1.attach(servoPin);
// set advertised local name and service UUID:
blePeripheral.setLocalName("Tech Martian");
blePeripheral.setAdvertisedServiceUuid(ledService.uuid()); // add service and characteristic: blePeripheral.addAttribute(ledService); blePeripheral.addAttribute(switchCharacteristic);
   // set the initial value for the characeristic:
    switchCharacteristic.setValue(0);
// begin advertising BLE service: blePeripheral.begin(); }
void loop()
{
  // listen for BLE peripherals to connect:
 BLECentral central = blePeripheral.central();
// if a central is connected to peripheral:
if (central)
{
// while the central is still connected to peripheral:
while (central.connected())
{
// if the remote device wrote to the characteristic,
// use the value to control the LED:
if (switchCharacteristic.written())
{
servo1.write(switchCharacteristic.value());
}
}
}
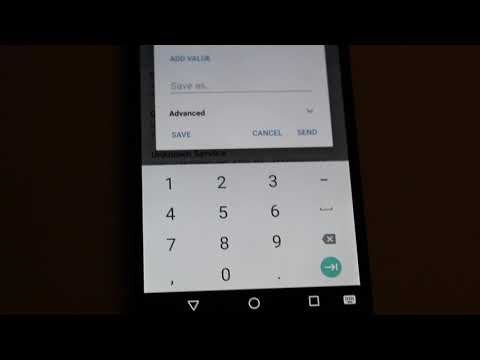
}Using NRF Master Control

- Under the list of Unknown Services, select the option to upload to Arduino 101 board (via BLE).
- Select UiNT8 on the drop down box
- Enter a value from 0 to 180. This corresponds to the angle value (in degrees) you want the RC servo to turn.
Done! Until the next time (instructable), have fun! Looking forward to seeing your creations!