Autonomous Miniquad (software)
by squiggy2 in Circuits > Electronics
5244 Views, 80 Favorites, 0 Comments
Autonomous Miniquad (software)
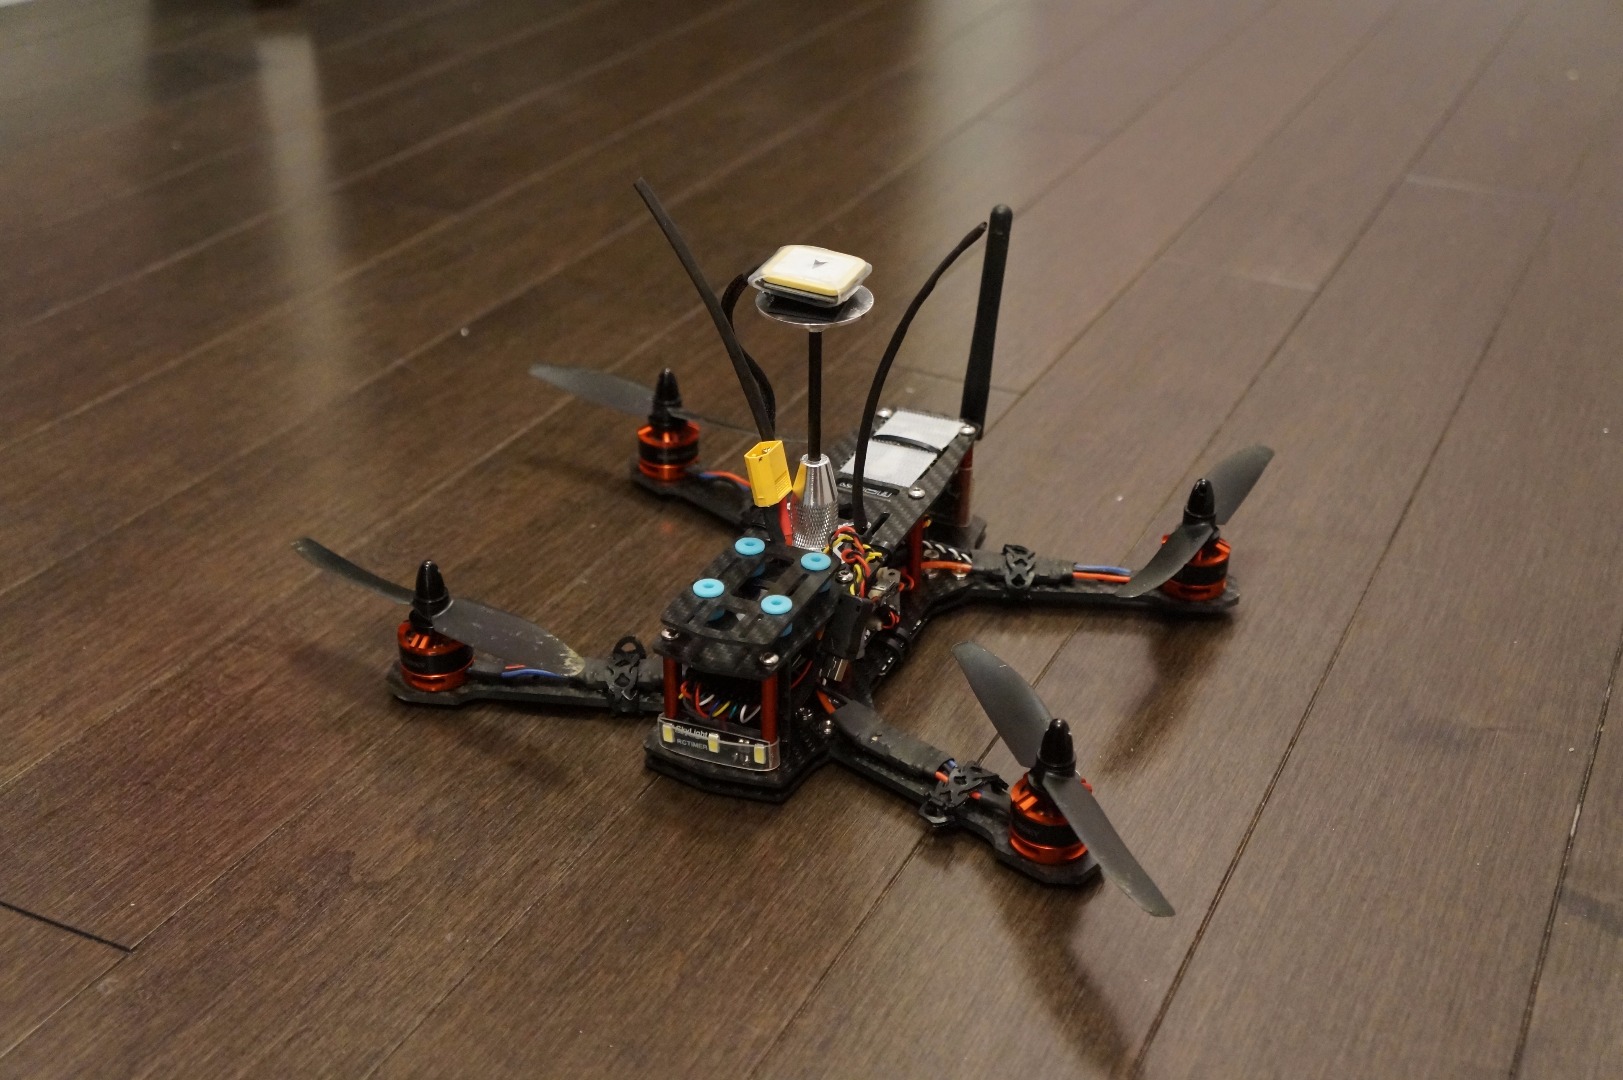
Now that you have converted your miniquad to run the Ardupilot mini by following my previous instructable, it’s time to configure the software. Actually, even if you have built an Ardupilot or Pixhawk based multicopter completely separate from my previous article, this will help you configure it.
Required tools:
- Micro USB cable
- Multimeter
- 2 small jumper wires with alligator clips on the ends.
- Windows computer
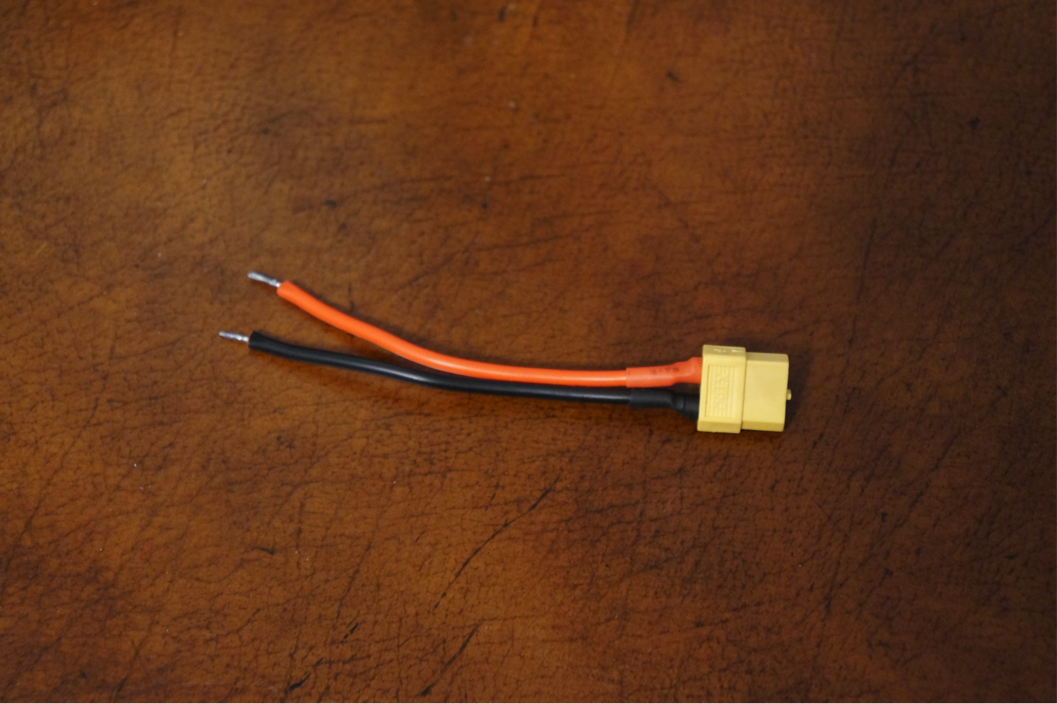
Optional: female (the side that’s on the battery) XT60 connector with bare-ended wires
Download and Install Mission Planner
Missions can be controlled from and Android device, Mac, Linux or Windows computer, but to set up the controller, you’ll need a Windows computer. If you have absolutely no access to Windows, you could use APM Planner 2.0 on Mac or Linux, but I find Mission Planner better. This instructable will describe the process using Mission Planner.
Mission Planner: http://ardupilot.com/downloads/?did=82
APM Planner 2.0: http://ardupilot.com/downloads/?category=35
Download and install Mission Planner. Install the FTDI drivers that it prompts you to install, too. They will allow you to talk to the Arduino and to the telemetry radio.
Once everything is installed, plug the Ardupilot into the computer using the micro USB cable and open Mission Planner.
Installing Firmware
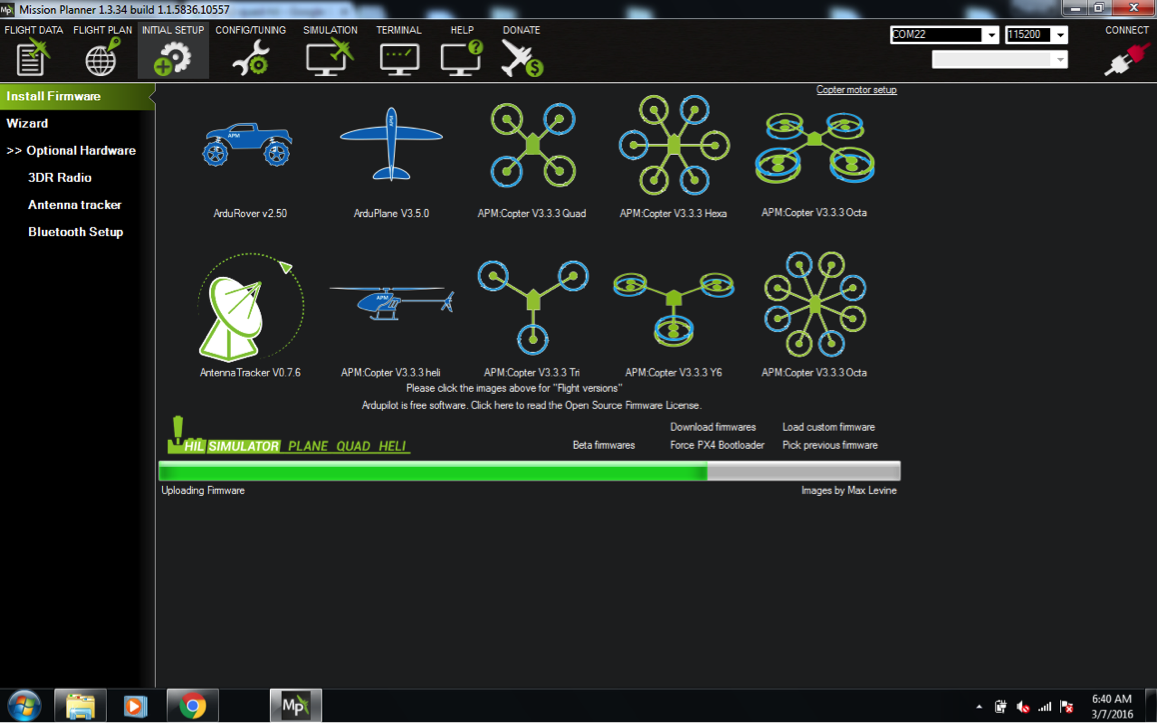
Unfortunately Ardupilot Mega 2.6 is not supported for firmware updates anymore, as it doesn’t have enough memory for the latest versions. Pixhawk is actually Ardupilot Mega’s successor, which has a faster processor and more memory, plus some other bells and whistles. However, the Ardupilot Mega does just fine for our needs, is much cheaper, and has 30mm x 30mm mounting holes – the same size as Naze32 and CC3D.
What this means, though, is that you can’t load the default firmware that Mission Planner offers. You’ll need to download Arducopter 3.2.1 – the last firmware that is supported by Ardupilot Mega. You can get it from here:
http://ardupilot.com/downloads/?did=121.
Plug in the Ardupilot with the micro USB cable. Open up Mission Planner, navigate to the ‘Initial Setup tab’, and click ‘Install Firmware’.
On the right side just above the progress bar, click ‘Load custom firmware’ and select the firmware you just downloaded.
You're a Wizard, Harry!
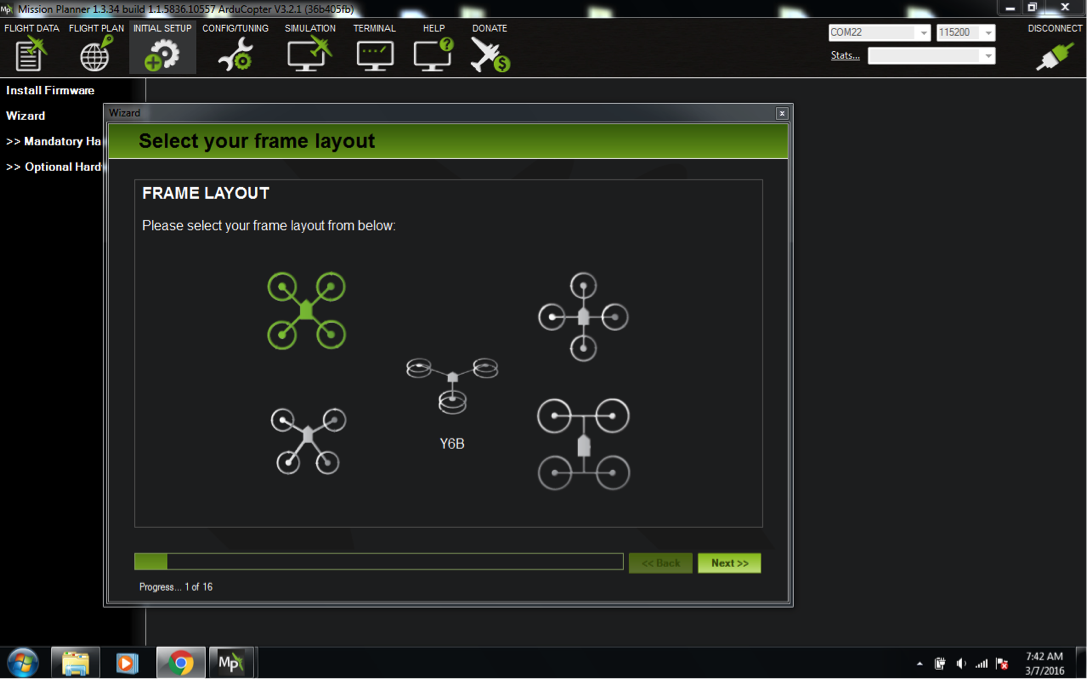
When the firmware installation is complete, click ‘Wizard’.
Input the following options:
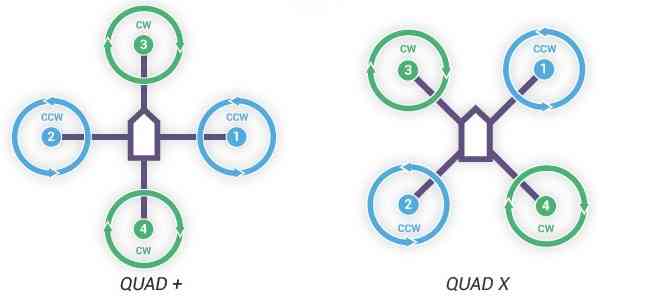
Frame Layout: Choose the top left option, the X quad. See attached picture.
Accelerometer Calibration: Press start and follow instructions
Compass: Follow instructions
Batt monitor: APM2 - 2.5 non 3DR
3DR Power module
Choose battery size
Sonar: none
Radio: Follow instructions
Flight modes: Stabilize
Pos Hold
Auto
Ardupilot reads channel 5 to control its flight modes. Map a three-position switch on your transmitter to channel five. The above options are my suggestions.
Stabilize is the equivalent of Horizon mode on Cleanflight, or Atti on DJI products.
Pos Hold u ses GPS and barometer to hold position and altitude when sticks are centred. Moving sticks controls position in space rather than aircraft attitude.
Auto begins the pre-programmed waypoint mission from its last achieved waypoint.
Verify: Don't worry about this.
Failsafe: Batt - RTL
GCS - Disabled
Throttle - enabled always RTL
Throttle failsafe value – 975
Geofence: Enable
Type - Altitude and Circle
Action - RTL or land
Max Alt - 100
Max Radius - 300
RTL Altitude - 25
Finish
Other Settings
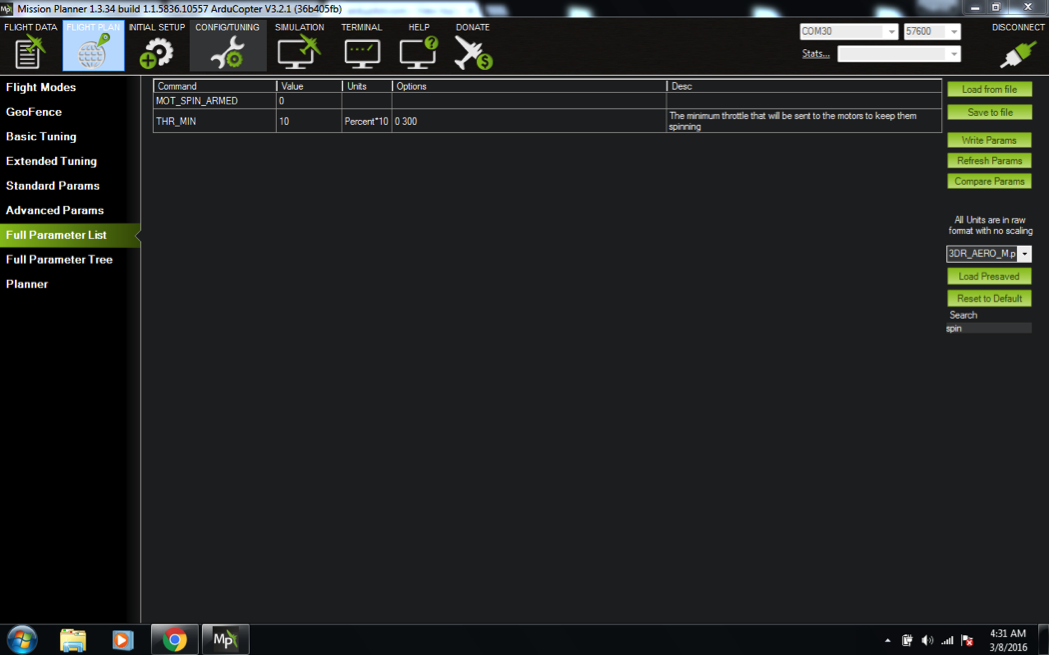
Once the wizards is finished, click on the Config/Tuning tab, and select ‘Full Parameters List’
Type ‘spin’ in the search bar. Change MOT_SPIN_ARMED to 0, and THR_MIN to 10. If MOT_SPIN_ARMED is set to 1, the motors will spin when you arm the aircraft (duh). This is good on larger aircraft to show that it is armed, but because racing quads are so overpowered, it may take off with the little amount of throttle it applies when armed.
Battery Monitor Calibration
You will need a multimeter and 2 alligator-clipped wires for this step.
If you don’t have access to one, you can try using my settings, but beware they may not be accurate for you and your quad might fall out of the sky prematurely.
Remove the propellers if you haven’t already.
What we need to do now is calibrate the voltage and current measured by the battery monitor.
Before we start, use the multimeter to measure the voltage across the battery’s positive and negative terminals. For a 3 cell battery, this should be between 9v and 12.4v, depending on the state of charge. Write down this number.
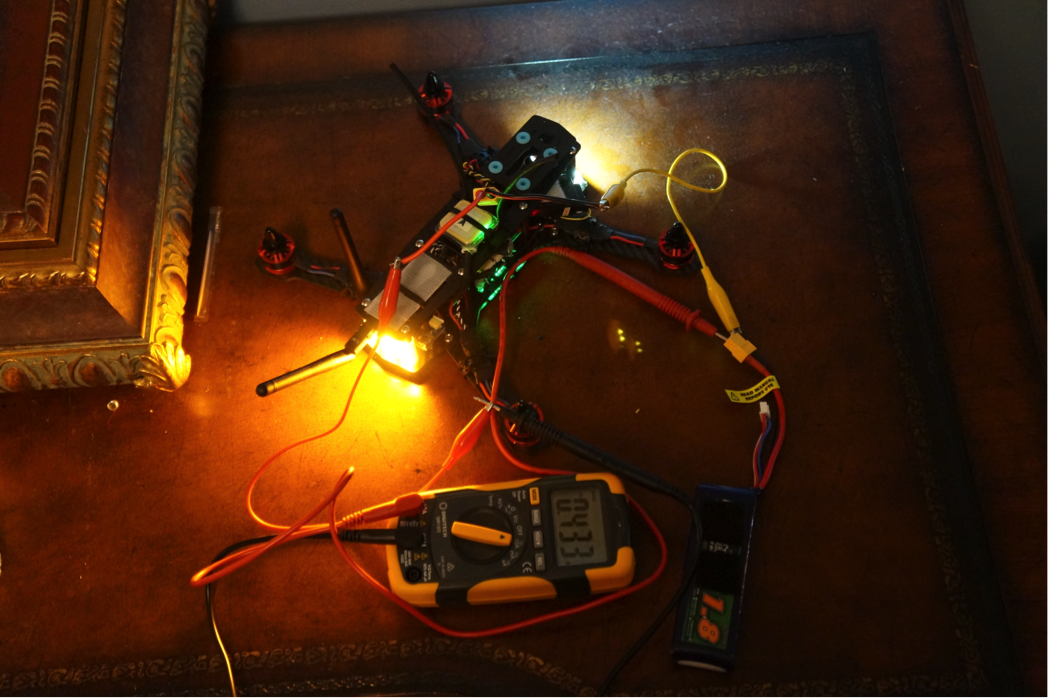
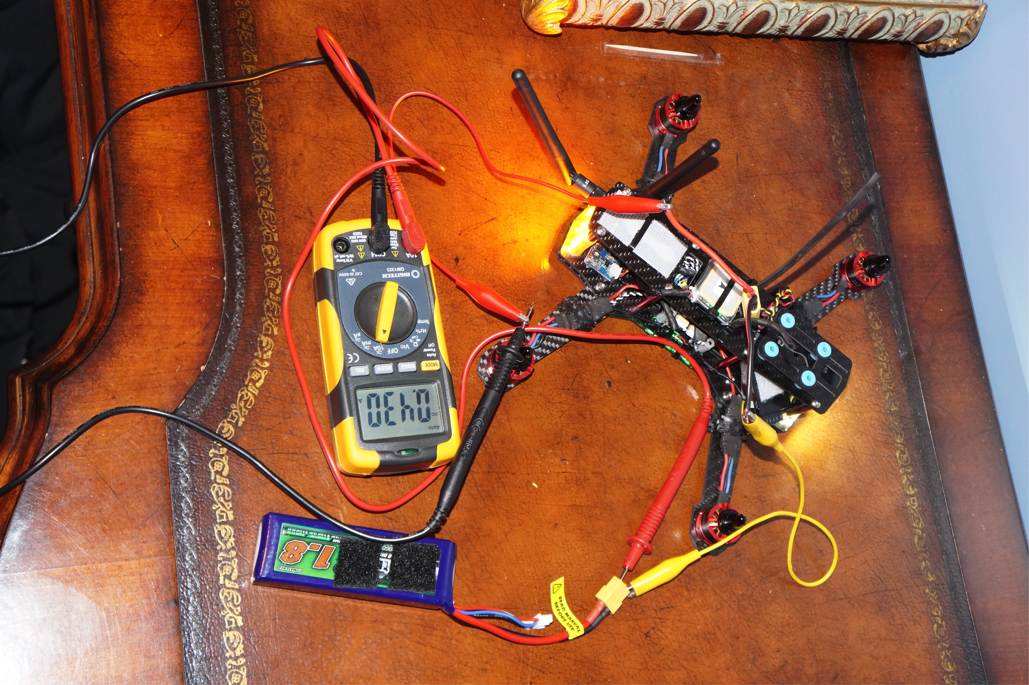
This will be easier if you have a bare-ended female XT60 connector, but not impossible without it. Plug the connector into the miniquad and clamp the alligator clips to it.
Clamp the other end of the negative wire to the negative side of the battery. From this point on, be extremely careful that no wires move and touch each other. Bend the bare-ended wires away from each other and keep those alligator clips separated.
Most multimeters have 3 plugs for 2 probes. One is positive, and the other two are where you put the ground probe depending on what you want to do. One will be for voltage measurement and milliamp current measurement, and the other will be fused for amp-scale current measurement. Plug the black probe into the amp (it might say 10A or something) selector and turn on the multimeter, switching it to current (amps) measuring mode.
Turn on your transmitter and clamp the remaining alligator clip to the black probe of the multimeter.
Ensuring that no bare metal is touching anything that will create a short, stick the red multimeter probe into the positive terminal of the battery.
The miniquad will turn on and the multimeter should register about 0.4A.
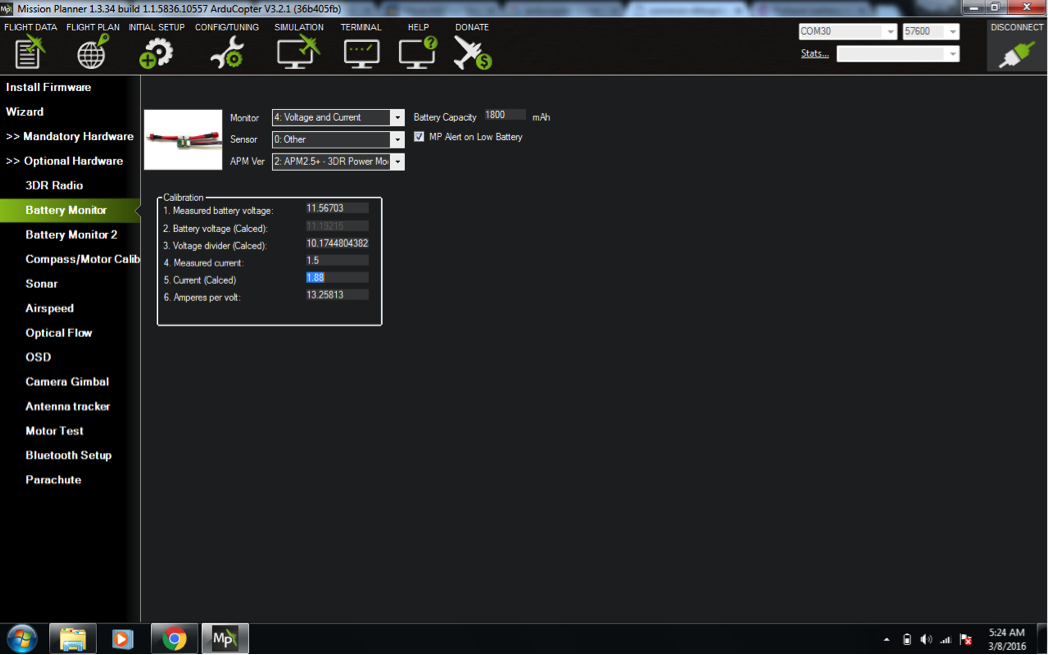
Connect to the aircraft using Mission Planner and navigate to the ‘Initial Setup’ tab, and select ‘Battery Monitor’.
Use the dropdown boxes to set the following settings:
Monitor: Voltage and Current
Sensor: Other
APM Ver: APM2.5+ - 3DR Power Monitor
You now need to enter two numbers.
1. Measured battery voltage: enter the voltage measured before
4. Measured current: enter the current that the multimeter shows. Ensuring the propellers are not on, arm the aircraft by pushing the transmitter’s throttle stick to the bottom left. Raise the throttle 10% or 20% and see if Current (Calced) matches the multimeter. Enter the new current measured by the multimeter and see if Current (Calced) matches it when you move the throttle somewhere else.
You can now disconnect the multimeter and alligator clips.
Compass / Motor Calibration
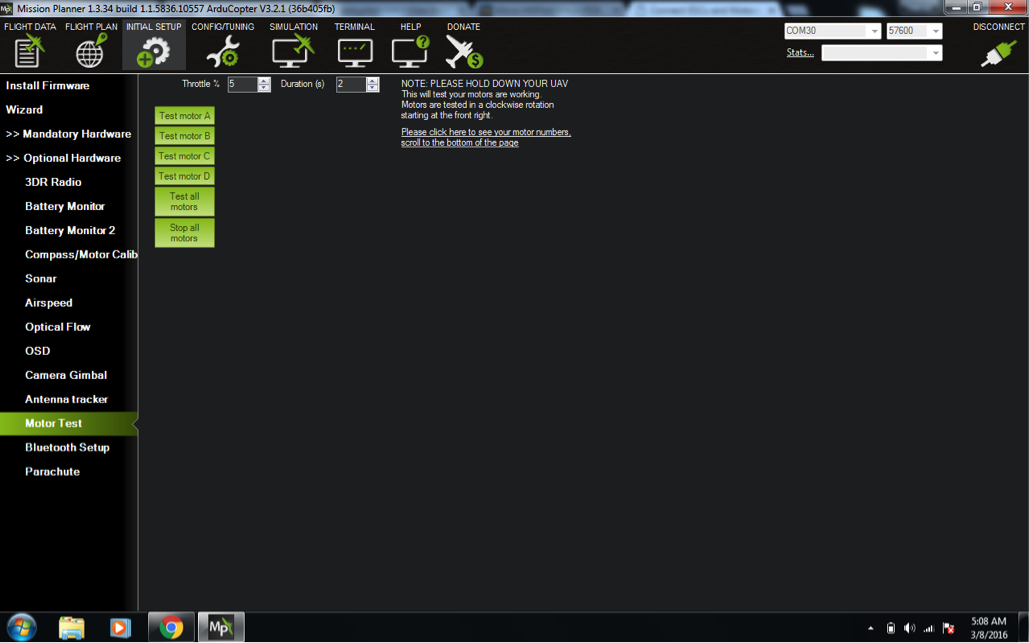
Plug the battery into the mini quad the normal way and connect Mission Planner.
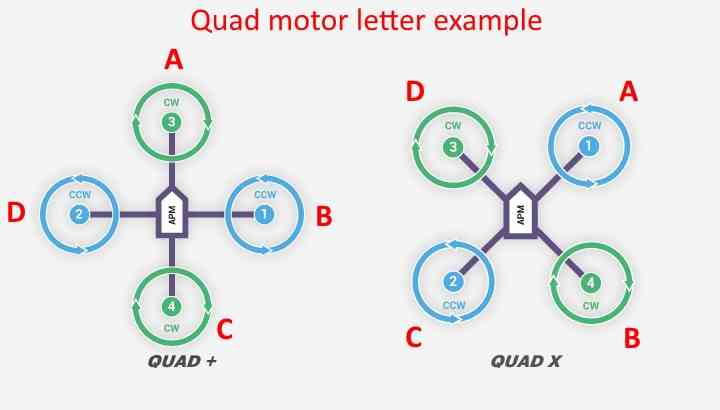
Click ‘Initial Setup’ then ‘Motor Test’. Test that the correct motors are spinning by pressing the buttons. Motor A is the front-right. Motor B is back-right. Motor C is back-left and motor D is front-left. Motors A,B,C and D in the motor test have no relation to motors 1, 2, 3 and 4 that you plug into the motor output pins. Don’t ask why.
For this part you will need to attach the propellers and hold the miniquad down. Be VERY CAREFUL! Ideally, you should wear safety glasses or something. The aircraft isn’t allowed to move, so you’ll need to stand above it and press it down against a table or something. Be sure that nothing is in the way of the propellers e.g. sleeves, fingers, hair.
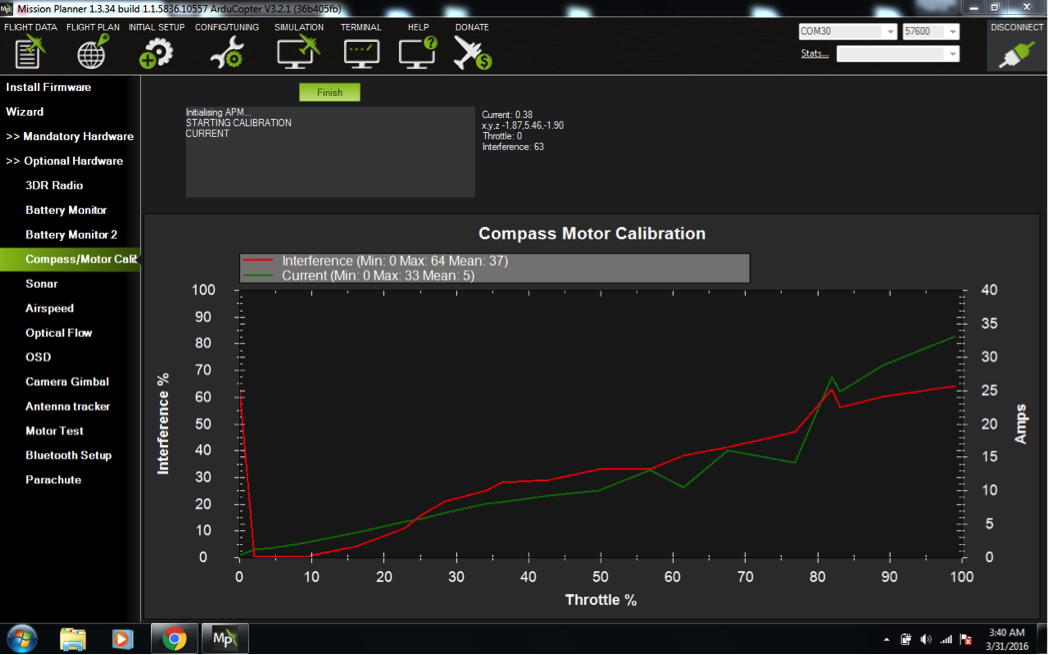
Click on ‘Compass / Motor Calibration’. Press ‘Start’ and slowly raise the throttle to maximum and back down again. Press ‘Finish’.
Choosing Aux Switches
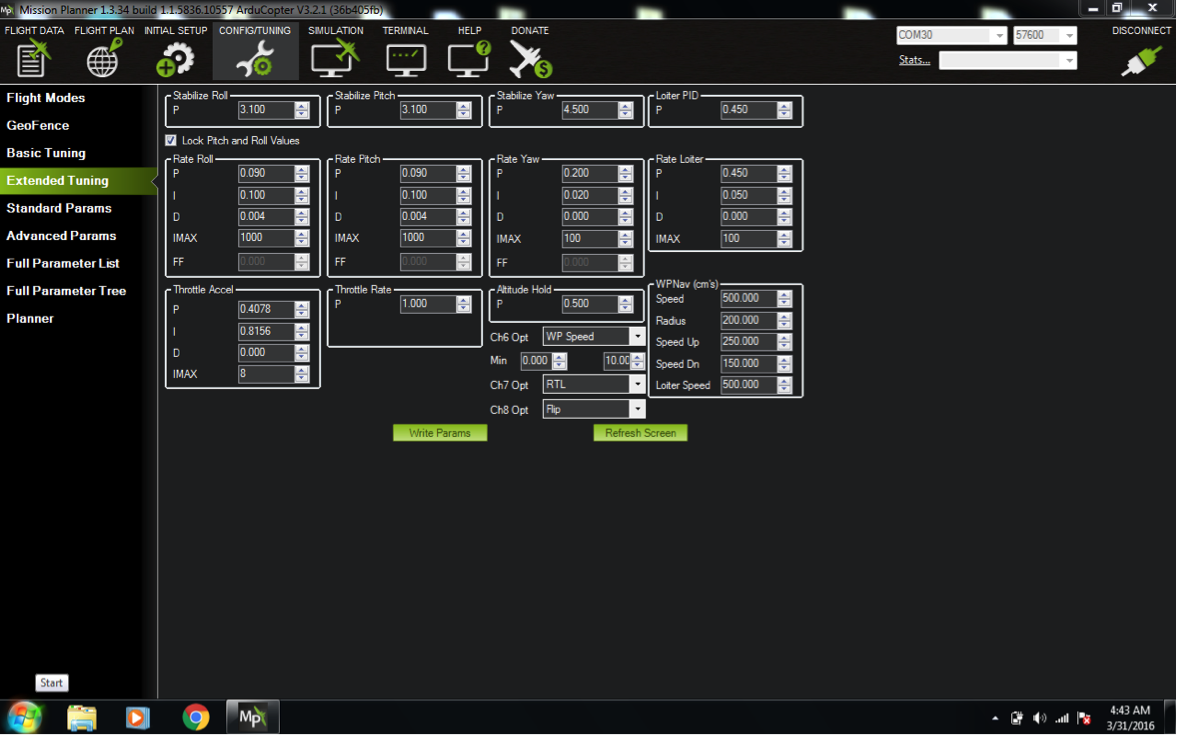
Go to the ‘Config/Tuning’ tab and click ‘Extended Tuning’.
You can choose up to 3 extra functions to enable, in addition to the flight modes you have already set. Ch7 and Ch8 opt dropdowns, RTL and Flip. Channel 6 is set to a potentiometer on my transmitter, so I can twist the knob during tuning to play around with PIDs (this must be set to ‘none’ once you’re happy with your PIDs). Channels 7 and 8 are set to switches. Channel 7 is my failsafe (RTL stands for return to launch). If anything goes wrong, I flick the switch and the miniquad comes home and lands. Flicking the channel 8 switch puts the aircraft into flip mode. The aircraft will do a flip in any direction I push the pitch/roll stick. Flick the switch back to stop doing flips.
Tuning PIDs
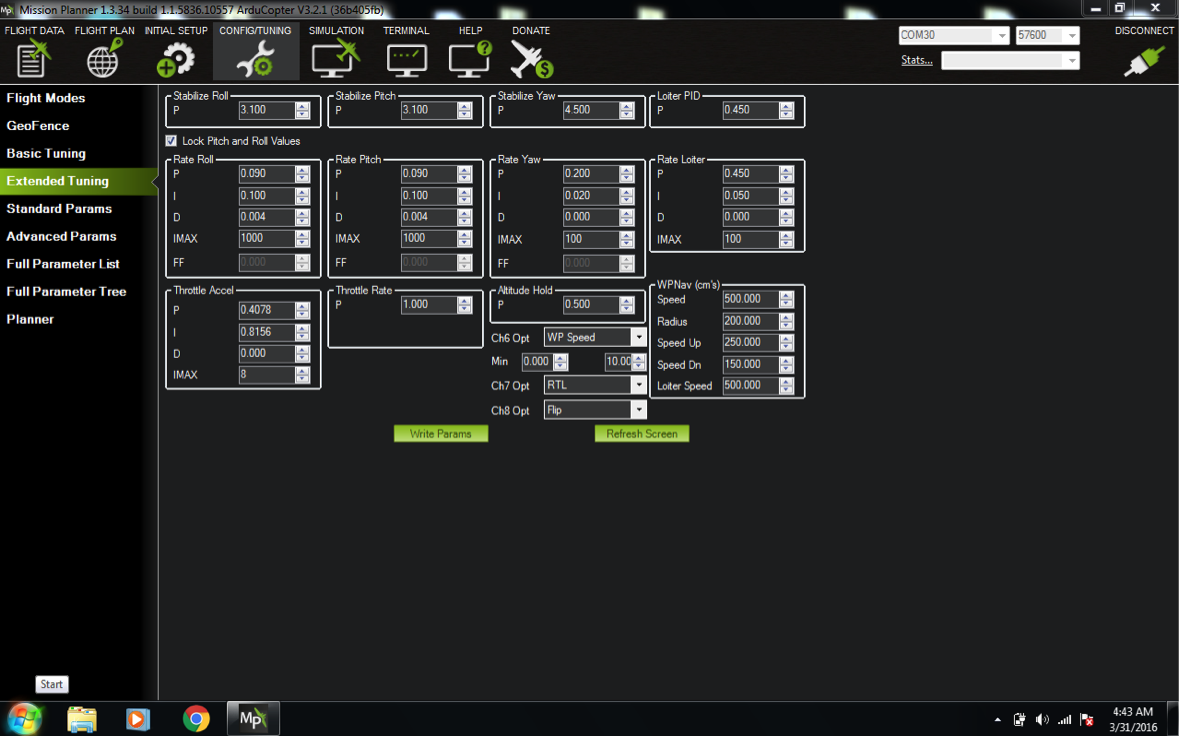
Tuning PIDs is the most annoying bit if you don’t know what you’re doing. There are a lot of good videos and guides around the interned explaining how to tune PIDs, so I won’t go over it here.
The PIDs shown in the image below should give you a good starting point for any 250 size miniquad running 1806 motors and 5x4 propellers.
A simple (SIMPLE!) quick tip is this:
Roll and Pitch
- Take off and hover. If the aircraft is wobbling quickly, lower the associated P value e.g. if it is wobbling left to right, lower ‘Rate Roll’ P. You should be able get away with checking ‘Lock Pitch and Roll Values’ unless you have a really strange setup. If it is not wobbling, raise P until it does, then back off again to where it is stable.
- Once you’ve lowered P enough to stop the aircraft oscillating, raise the D until it wobbles again. Back off on the D again until it’s stable.
- Now with the larger D value, you should be able to raise P further without inducing oscillations. Raise until it oscillates, then back off. Repeat these steps until you have a locked-in quad, and you can’t raise either P or D without inducing oscillations.
- You most likely won’t need to play with I.
Altitude hold
- Make sure you either have the supplied cover for the flight controller, or that you have glued open-cell foam over the barometer. See how well the aircraft holds altitude.
- If it is drifting away from its desired altitude, raise Altitude Hold P.
- If it is overshooting and oscillating around the desired altitude. Lower P.
Rate Loiter
- You will most likely need to have I at an extremely low level, like 0.05, and then keep backing off on P until it stops oscillating back and forth. If the P is too low, it won't be able to hold position against wind, and will slowly drift in one direction. If P is too high, it will be moving back and forth.
WPNav (cm’s)
- You can play around with these numbers – they’re up to you.
Speed is how fast it will move is auto missions, Loiter speed is how fast it will move in Pos Hold mode, and Speed Up and Speed Dn are how fast it climbs and descends.
Using an Android Device
Well done - you’ve now set up your autonomous mini quad!
You can continue using Mission Planner to control your aircraft out in the field. For awesome portability, you can buy a USB OTG cable. This will allow you to plug the telemetry radio into your android device. Download 3DR Tower and now you can control everything from your phone or tablet.
Features that Tower has that Mission Planner doesn’t are:
- Follow me - following around the GPS location of your phone
- Structure scanner - spirals upward around a structure taking photos that can be stitched into a 3D model
- Dronie - A selfie with a drone, where it starts a video at body height, then flies away to zoom out and show an amazing aerial scene