Automatic Waterdispenser to Track Consumption
by MargotDehaene in Circuits > Raspberry Pi
756 Views, 2 Favorites, 0 Comments
Automatic Waterdispenser to Track Consumption

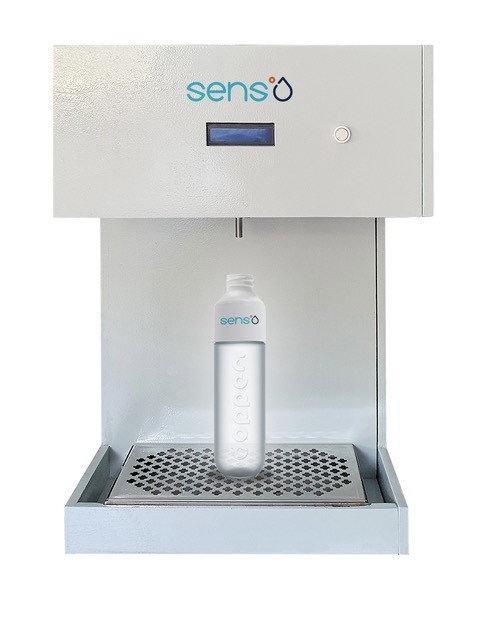
Hi there!
A couple of months ago, I was in my room thinking about what kind of project I wanted to make for a school assignment. I wanted to make something that suited me and that would benefit me in the future. Suddenly, my mom entered the room and started complaining about not drinking enough water. I immediately had an epiphany. The idea came to me to make an automatic waterdispenser (like in the movie theater) that tracks your water consumption on a daily basis.
With a Raspberry Pi, a few sensors, a pump, and little knowledge, I tried to make this as good as possible.
At the end of all the steps, you will have a working waterdispenser that fills your waterbottle and that connects and interacts with your Raspberry Pi. Not only will you be able to track your water consumption on the basis of a percentage, but you'll also have the possibility to view the temperature and water level of your water container. Finally, you'll be able to check your statistics. If this sounds interesting to you, be sure to check it out and try it yourself!
The GitHub repository: https://github.com/DehaeneMargot/SensoWaterDispenser
Downloads
Supplies
Microcontrollers
- Raspberry Pi 4
Sensors and modules
I used 4 sensors:
- 2x HC-SR04 Ultrasonic Sensor
Ultrasonic sensors measure distance by using ultrasonic waves.
The sensor head emits an ultrasonic wave and receives the wave reflected back from the target. Ultrasonic Sensors measure the distance to the target by measuring the time between the emission and reception. I used two of them to check if there's a bottle nearby and to measure the distance to the water in the tank.
- 1x DS18B20 Temperature Sensor
The DS18B20 is a 1-wire programmable Temperature sensorfrom maxim integrated. It is widely used to measure temperature in hard environments like in chemical solutions, mines or soil etc. I used it to measure the watertemperature of the water tank.
- 1x RC522 RFID Module
The RC522 is a 13.56MHz RFID module that is based on the MFRC522 controller from NXP semiconductors.
The module can supports I2C, SPI and UART and normally is shipped with a RFID card and key fob. It is commonly used in attendance systems and other person/object identification applications. In this project, it's used for an identification/login system.
And 2 actuators:
- 1x Peristaltic Pump 12-24V
I used a peristaltic pump to get the water from the tank to a water bottle. Most pumps were too slow, so I went for a 24V version that I power with a 24V power adapter.
- 1x LCD Display
The LCD is used to display the IP address and important messages. A liquid-crystal display (LCD) is a flat-panel display or other electronically modulated optical device that uses the light-modulating properties of liquid crystals combined with polarizers.
Casing
Speaking of the casing, I did a DIY with supplies from a Home depot (in my case the Brico in Belgium). I used plywood that I cut to the right size. I will be talking about how I made my case in a further step, but here are the things you'll need:
- 3x Plywood planks
- 1x Small funnel
- 1x Water tank (you can choose which amount you want, I went for 10L)
- 1x Drip tray
You can find all of the materials and pricing in the attached BOM.
Connecting All the Electronics
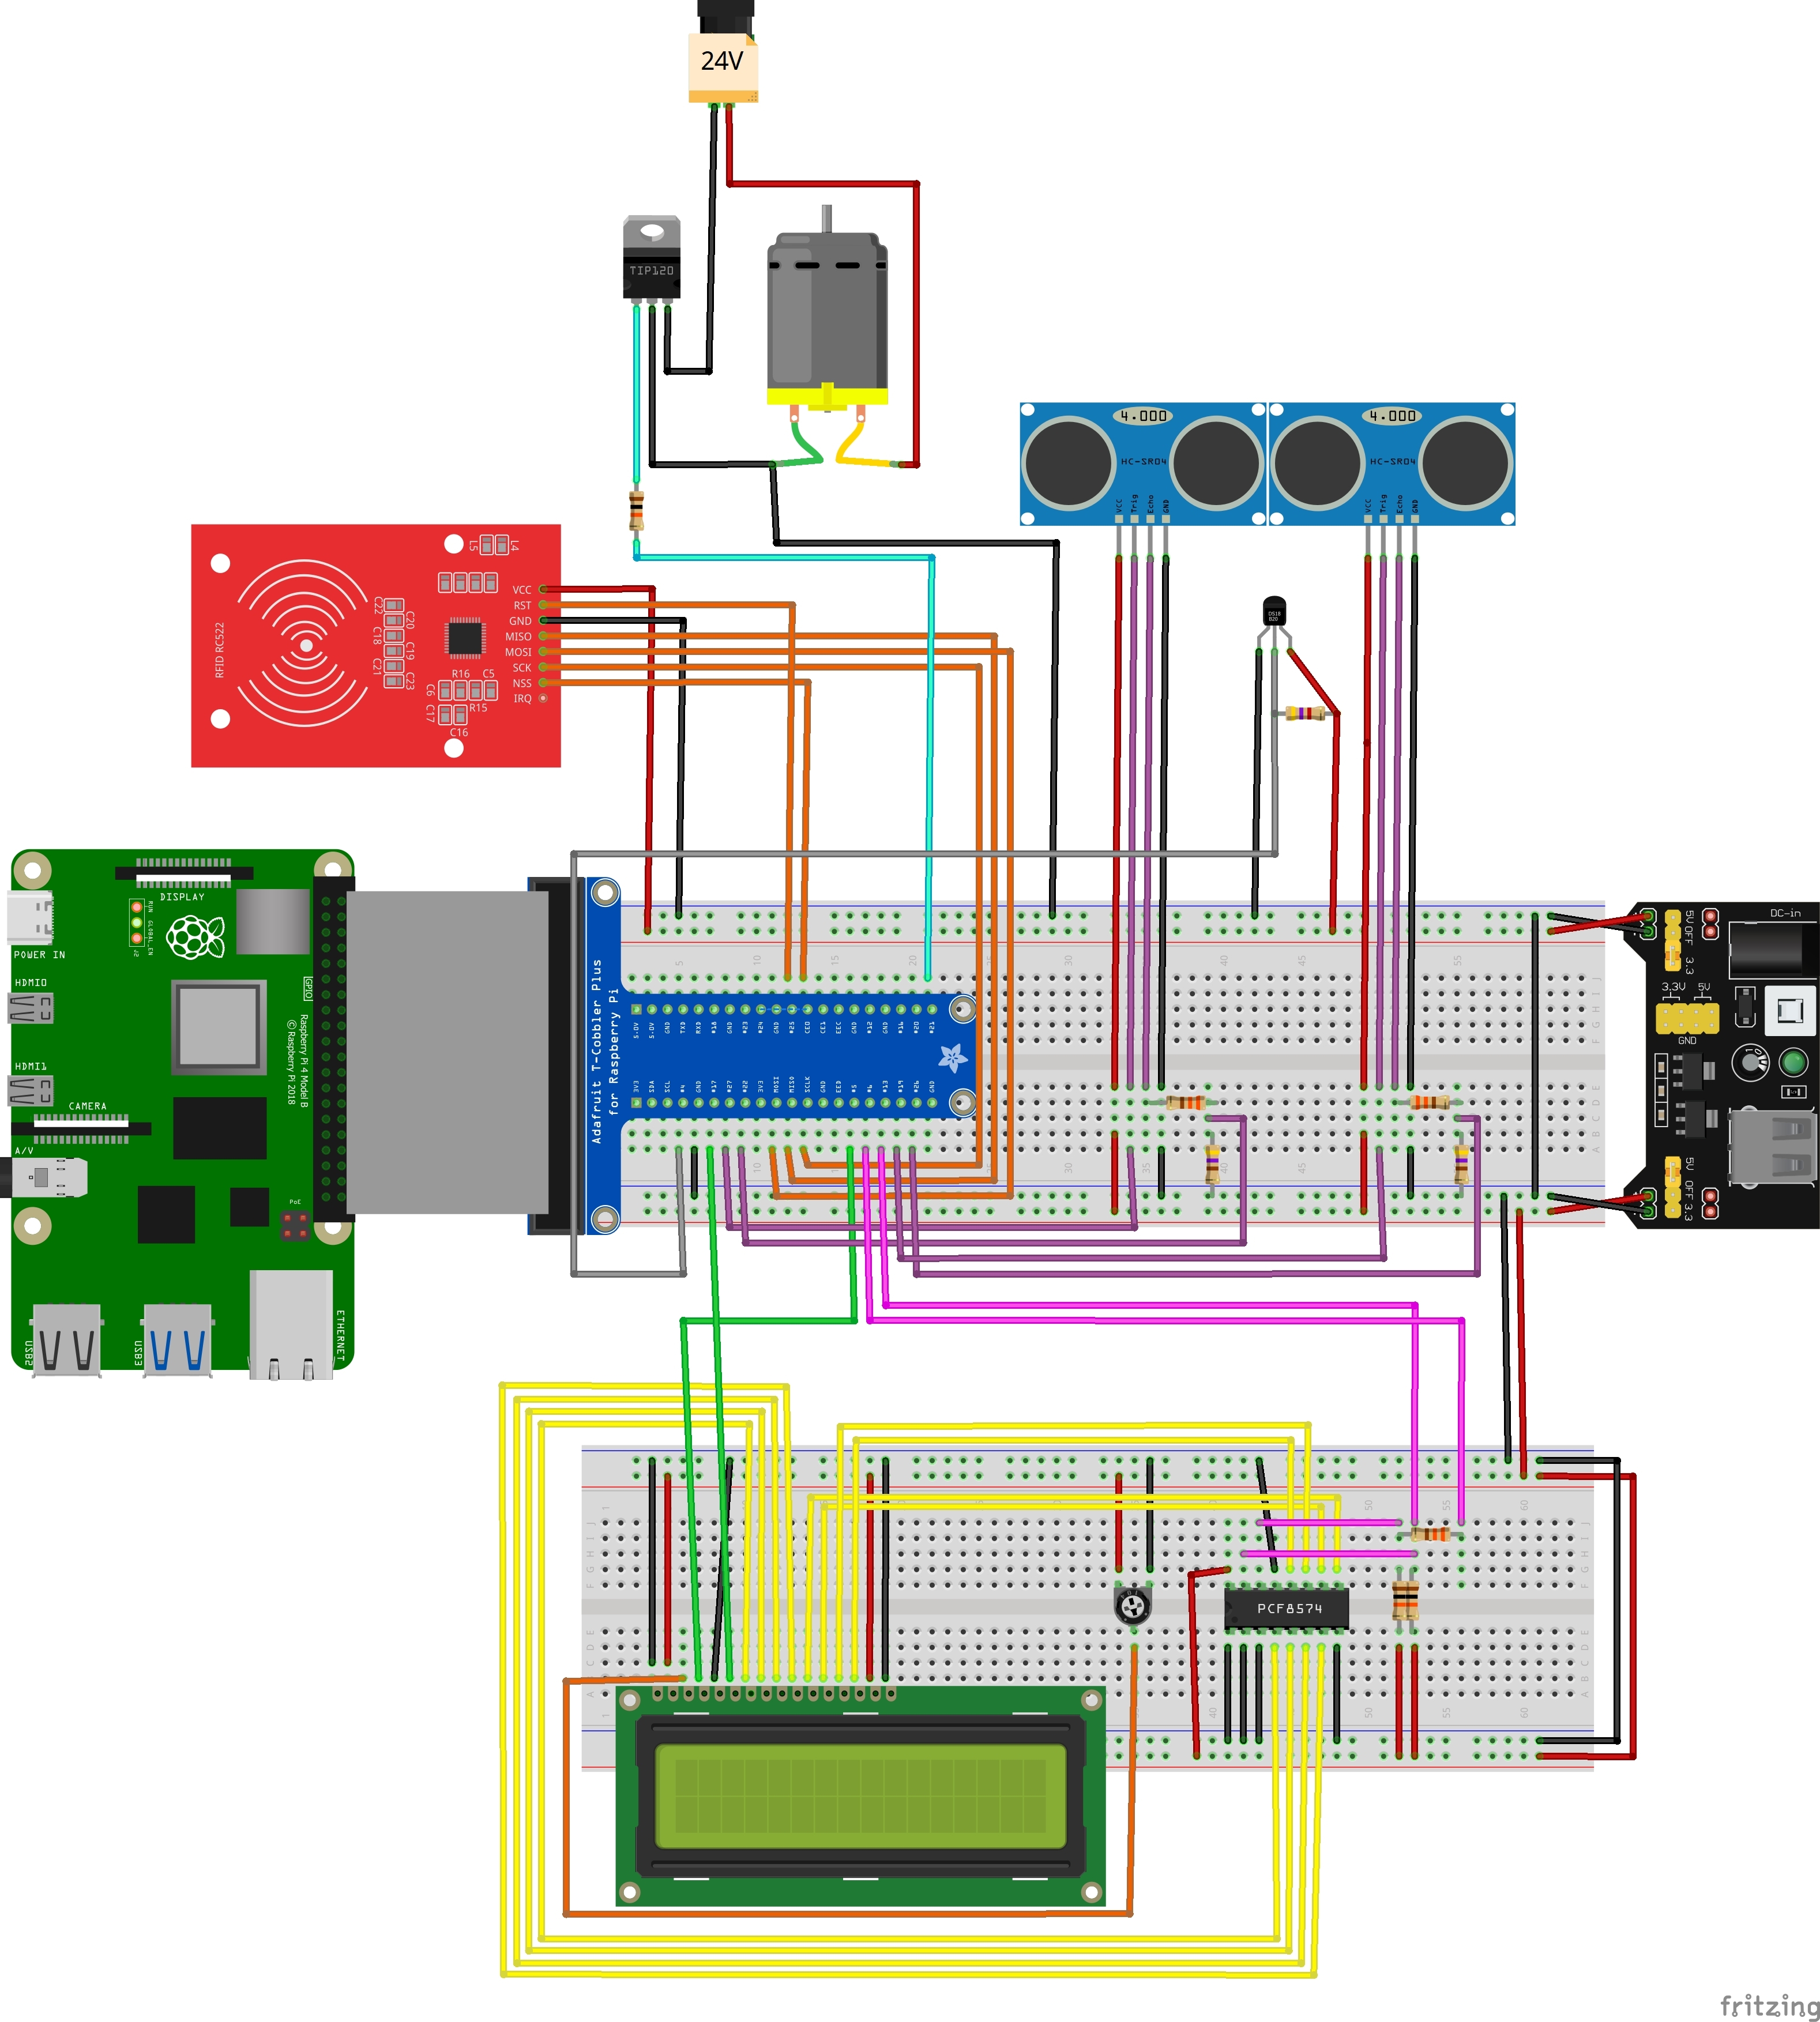
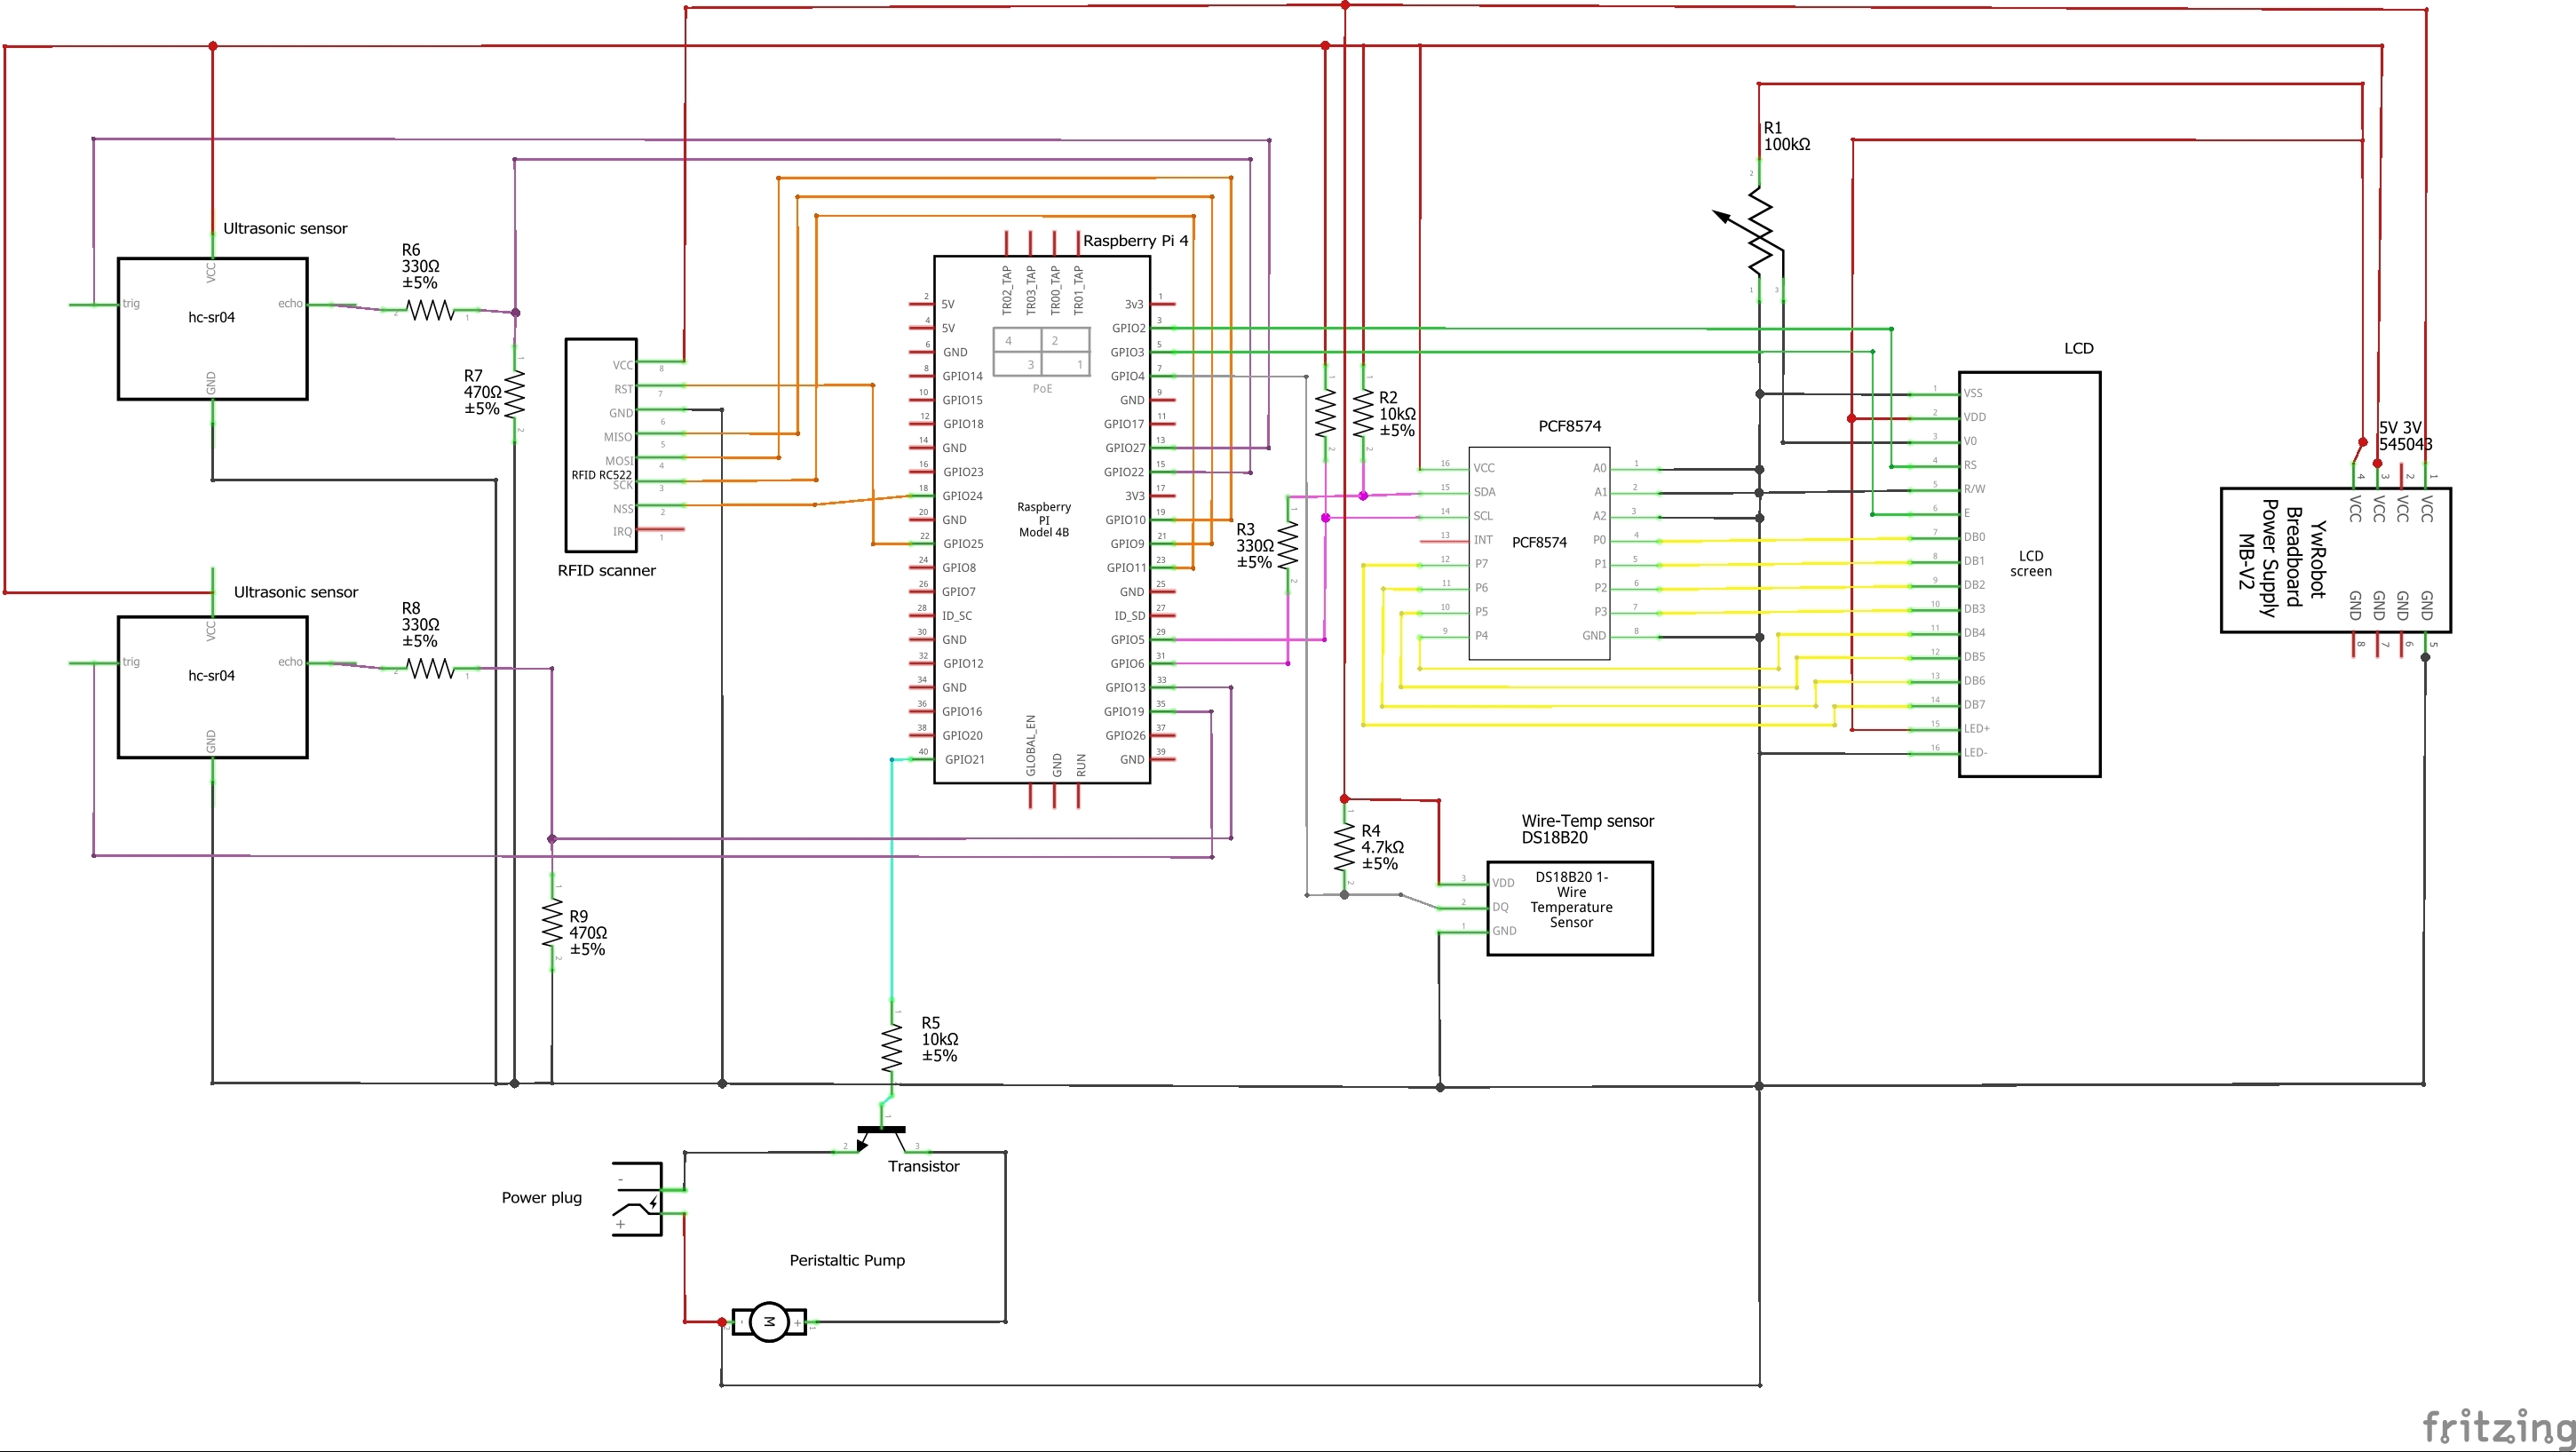
Now that we have summed up all the electronics, it's time to connect them. I made two Fritzing circuits, one breadboard and one schematic, to show you how and where all the electronics should be connected. You can find the download link to Fritzing here: https://fritzing.org/download/. As mentioned before, I used a Raspberry Pi and connected an RFID scanner, two ultrasonic sensors, one temperature sensor, a LCD and a peristaltic pump for the water.
I attached the two circuits in a PDF, if you want to take a closer look at it.
Downloads
Setting Up the Raspberry Pi
We will use our Raspberry Pi to run and control everything: backend, frontend and database.
A Raspberry Pi doesn't run automatically. We will have to go through some steps to start using it.
Step 1: Raspbian
If you're using a brand new Raspberry Pi, you'll need raspbian. The download link and tutorial can be found here.
Step 2: Writing the image to SD
Now that you have your Raspbian image, you'll need an image writing software (I recommend win32diskimager) to write the image file to the SD card. The full tutorial can be found here.
Step 3: Logging into the Raspberry Pi
Open "Powershell" and type "ssh pi@169.254.10.1". If everything goes right, they'll ask you for a password (default password is always raspberry). Normally, this should log you into the Raspberry Pi. Now we'll need to make some changes to our settings. Type sudo raspi-config in the terminal and press enter. Navigate to localisation options > change timezone and set it to your time zone. You should also change your wi-fi country to your own location. Finally, go to interfacing options and enable SPI, I2C and 1-wire. This will be important to use the sensors correctly.
Step 4: Setting Up the Internet Connection
We will be using a WiFi network. You can add your home network through:
wpa_passphrase "YourNetwork" "YourSSID" >> /etc/wpa_supplicant/wpa_supplicant.conf
You'll have to reboot your Pi to make a connection. To check if it worked, you can use ifconfig to check whether there is an IP address.
Step 5: Setting Up the webserver and Database
First, it's best to update and upgrade the system with the following sequence of commands:
- sudo apt dist-upgrade --auto-remove -y
- sudo apt upgrade
- sudo apt update
- sudo apt autoremove
Once this is done, we will need the following packages for our webserver and database:
Apache
sudo apt install apache2 -y
PHP
sudo apt install php
sudo apt install phpMyAdmin -y
Don't forget to set a secure MySQL password, when it asks to set a password.
MariaDB
sudo apt install mariadb-server mariadb-client -y
sudo apt install php-mysql -y
sudo systemctl restart apache2.service
Step 6: Installing Python libraries
For the backend, we will need some libraries for Python. We'll install these using pip3, because we're using python3.
pip3 install mysql-connector-python
pip3 install flask-socketio
pip3 install flask-cors
pip3 install gevent
pip3 install gevent-websocket
sudo apt install python3-mysql.connector -y
pip3 install mfrc522 ! (we'll need this to make use of the RFID scanner)
Step 7: Preparing Visual Studio Code
For running the code, I recommend using Visual Studio Code to connect your Raspberry Pi to. The download link to install VSC can be found here.
If you don't have Remote Development installed using SSH yet, you can find the steps to do this here.
Creating the Database
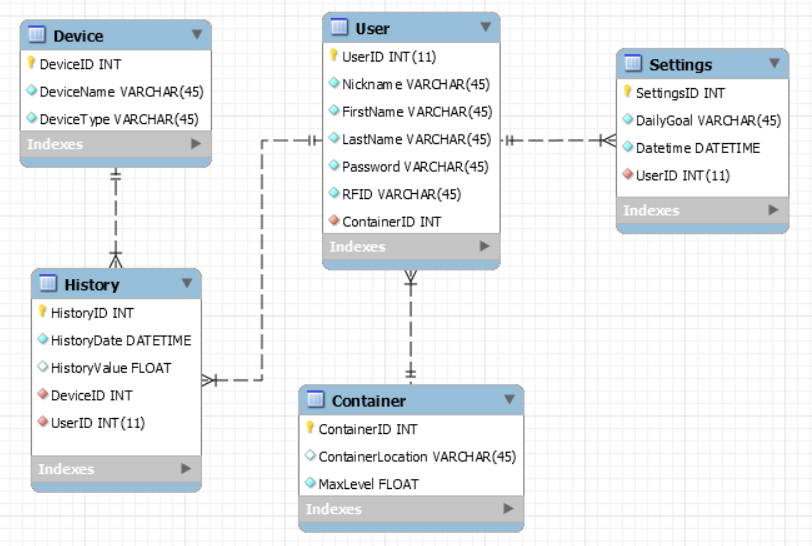
We'll store all of our sensor data and user data in a database.
My database consists of 5 tables:
Device
Table Device has a DeviceID, which references to the device itself. The DeviceName gives the name of the device, in this case ultrasonic sensor, temperature sensor, ... DeviceType gives the type of the device (sensor or actuator).
History
Table History contains all the sensor history, together with de date (HistoryDate) the history was added and the value of the moment in history. It also has two Foreign Keys:
- DeviceID, to link a specific log to a Device
- UserID, to link a specific user to a log (this is because we make use of an RFID, and we want to add the history log to one specific user)
User
Table User is used to create a User Login System with the RFID scanner. It consists of a Nickname, FirstName, LastName, Password and RFID (this is the RFID number of a tag). Every user is linked to a Container (watertank) and also carries the ContainerID as a Foreign Key.
Container
Table Container consists of all the different Containers. It has an ID, a ContainerLocation (this can be an enterprise, home or anything else). Lastly, it has a MaxLevel which stands for the max volume the container has.
Settings
Table Settings has a SettingsID, and tracks the DailyGoal of every user + the date the DailyGoal was added by the user. This explains the Foreign Key UserID.
A dump of the database can be found in my GitHub repository under Database.
Setting Up the Backend
There isn't a project without a working backend.
The backend consists of 4 different things:
helpers
The helpers are all the classes used for the different sensors and actuators. There's a helper for the temperature sensor (DS18B20), for the ultrasonic sensors (HCSR05) to be able to measure the distance and for the LCD to be able to write messages to the screen.
repositories
In the repositories folder, you'll find 2 Python files:
- Database.py which is a helper to get rows out of your database. It makes it easier to execute and read the database.
- DataRepository.py which contains all of the SQL queries, that get used in the main code (app.py). They are used for getting, updating or deleting data from the database.
app.py
This is the main backend code of the project. It does the setup by defining all of the pins and modes and contains the code for making the pump work, getting the temperature, getting the user and so on. It also contains the routes being used to retrieve data from the Database and all the socketio.on's. For every HTML page is a different socketio.on to make sure every function works at the correct time.
config.py
We have one file left: config.py . This is the file with the configuration options to connect with your Database. Don't forget to set your Database credentials.
The backend can be found in my repository under Backend.
Setting Up the Frontend
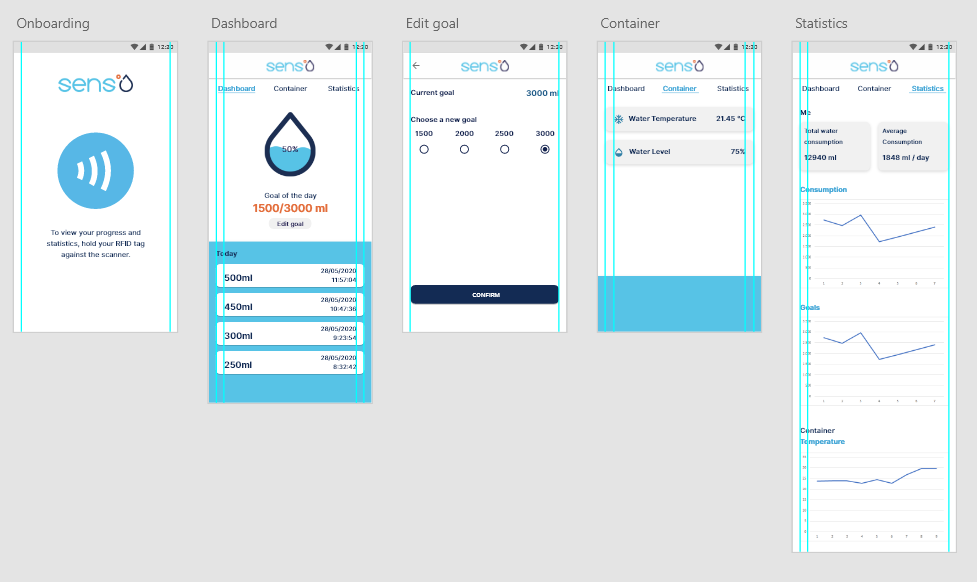
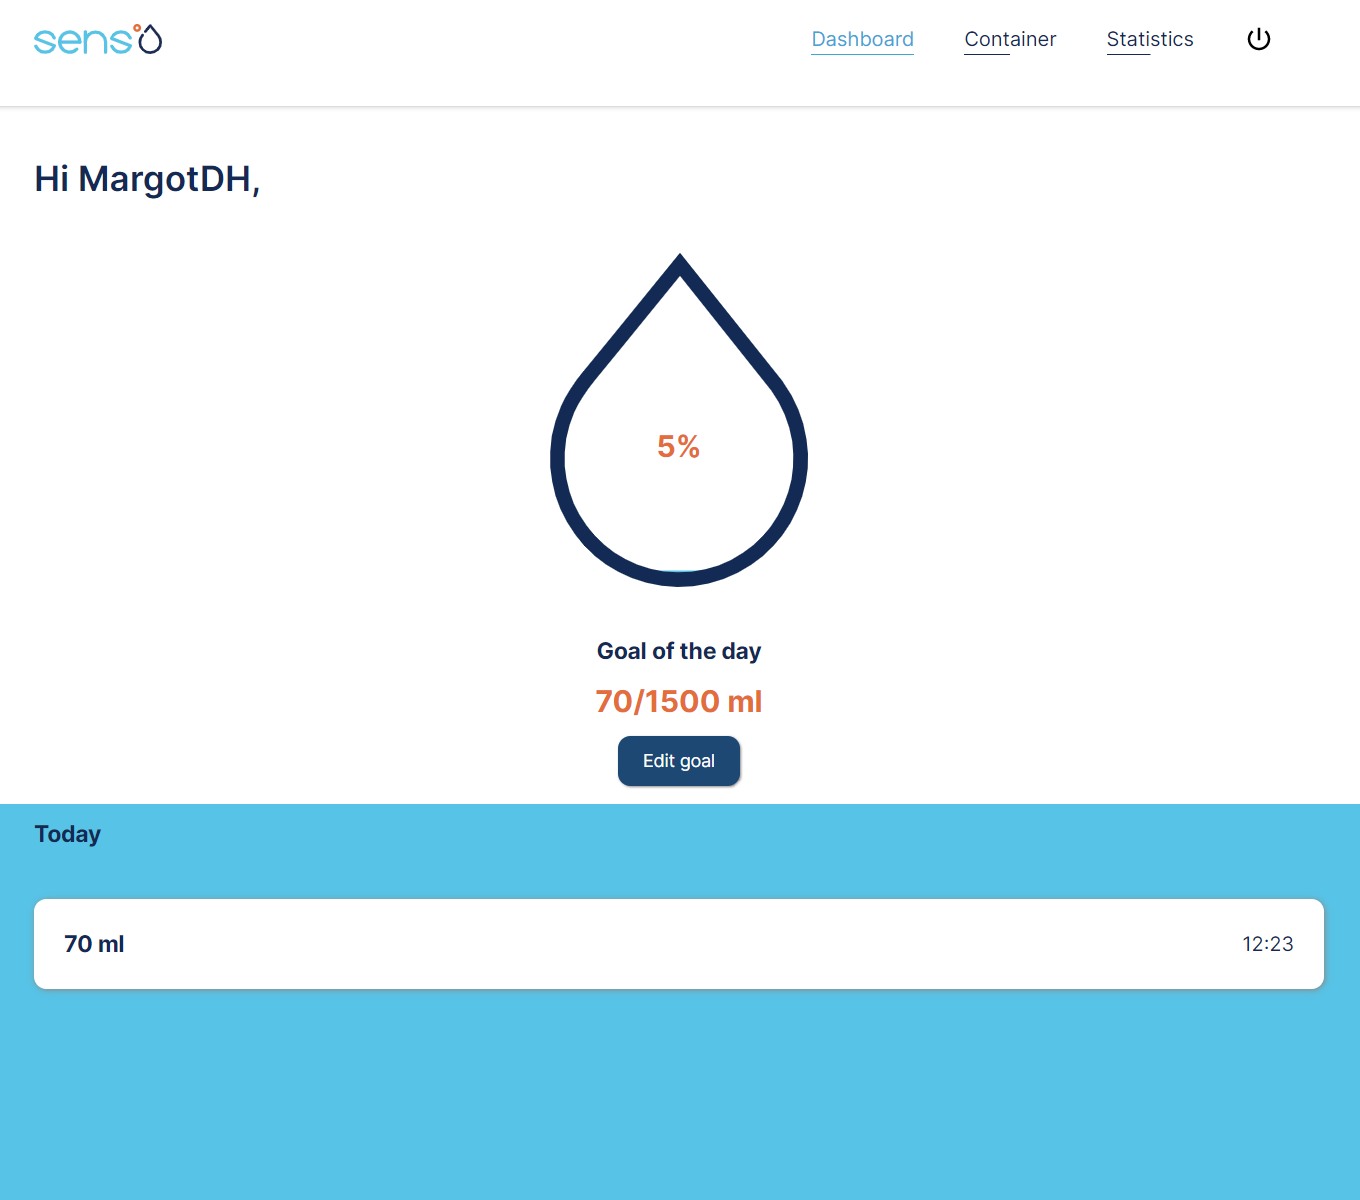
For the Frontend, I started by making a design of what my webserver should look like in AdobeXD. I made use of the colors in my Logo, which are orange and 2 different shades of blue. I tried to keep the design as simple as possible and created a waterdrop that shows the percentage to what extent you have achieved your goal of the day.
In my GitHub repository, you'll find my Frontend under Code > Frontend. It's important that you paste this in your /var/html folder of you Raspberry Pi to make it accesible from the webserver.
It consists of a couple of HTML files, which lead to the different pages. You'll also find my screen.css with all the CSS you'll need to make it look like my project. Lastly, You'll have different JavaScript files under scripts. These scripts communicate with my backend to show data from my Database or backend.
The backend can be found in my repository under Frontend.
Creating the Casing
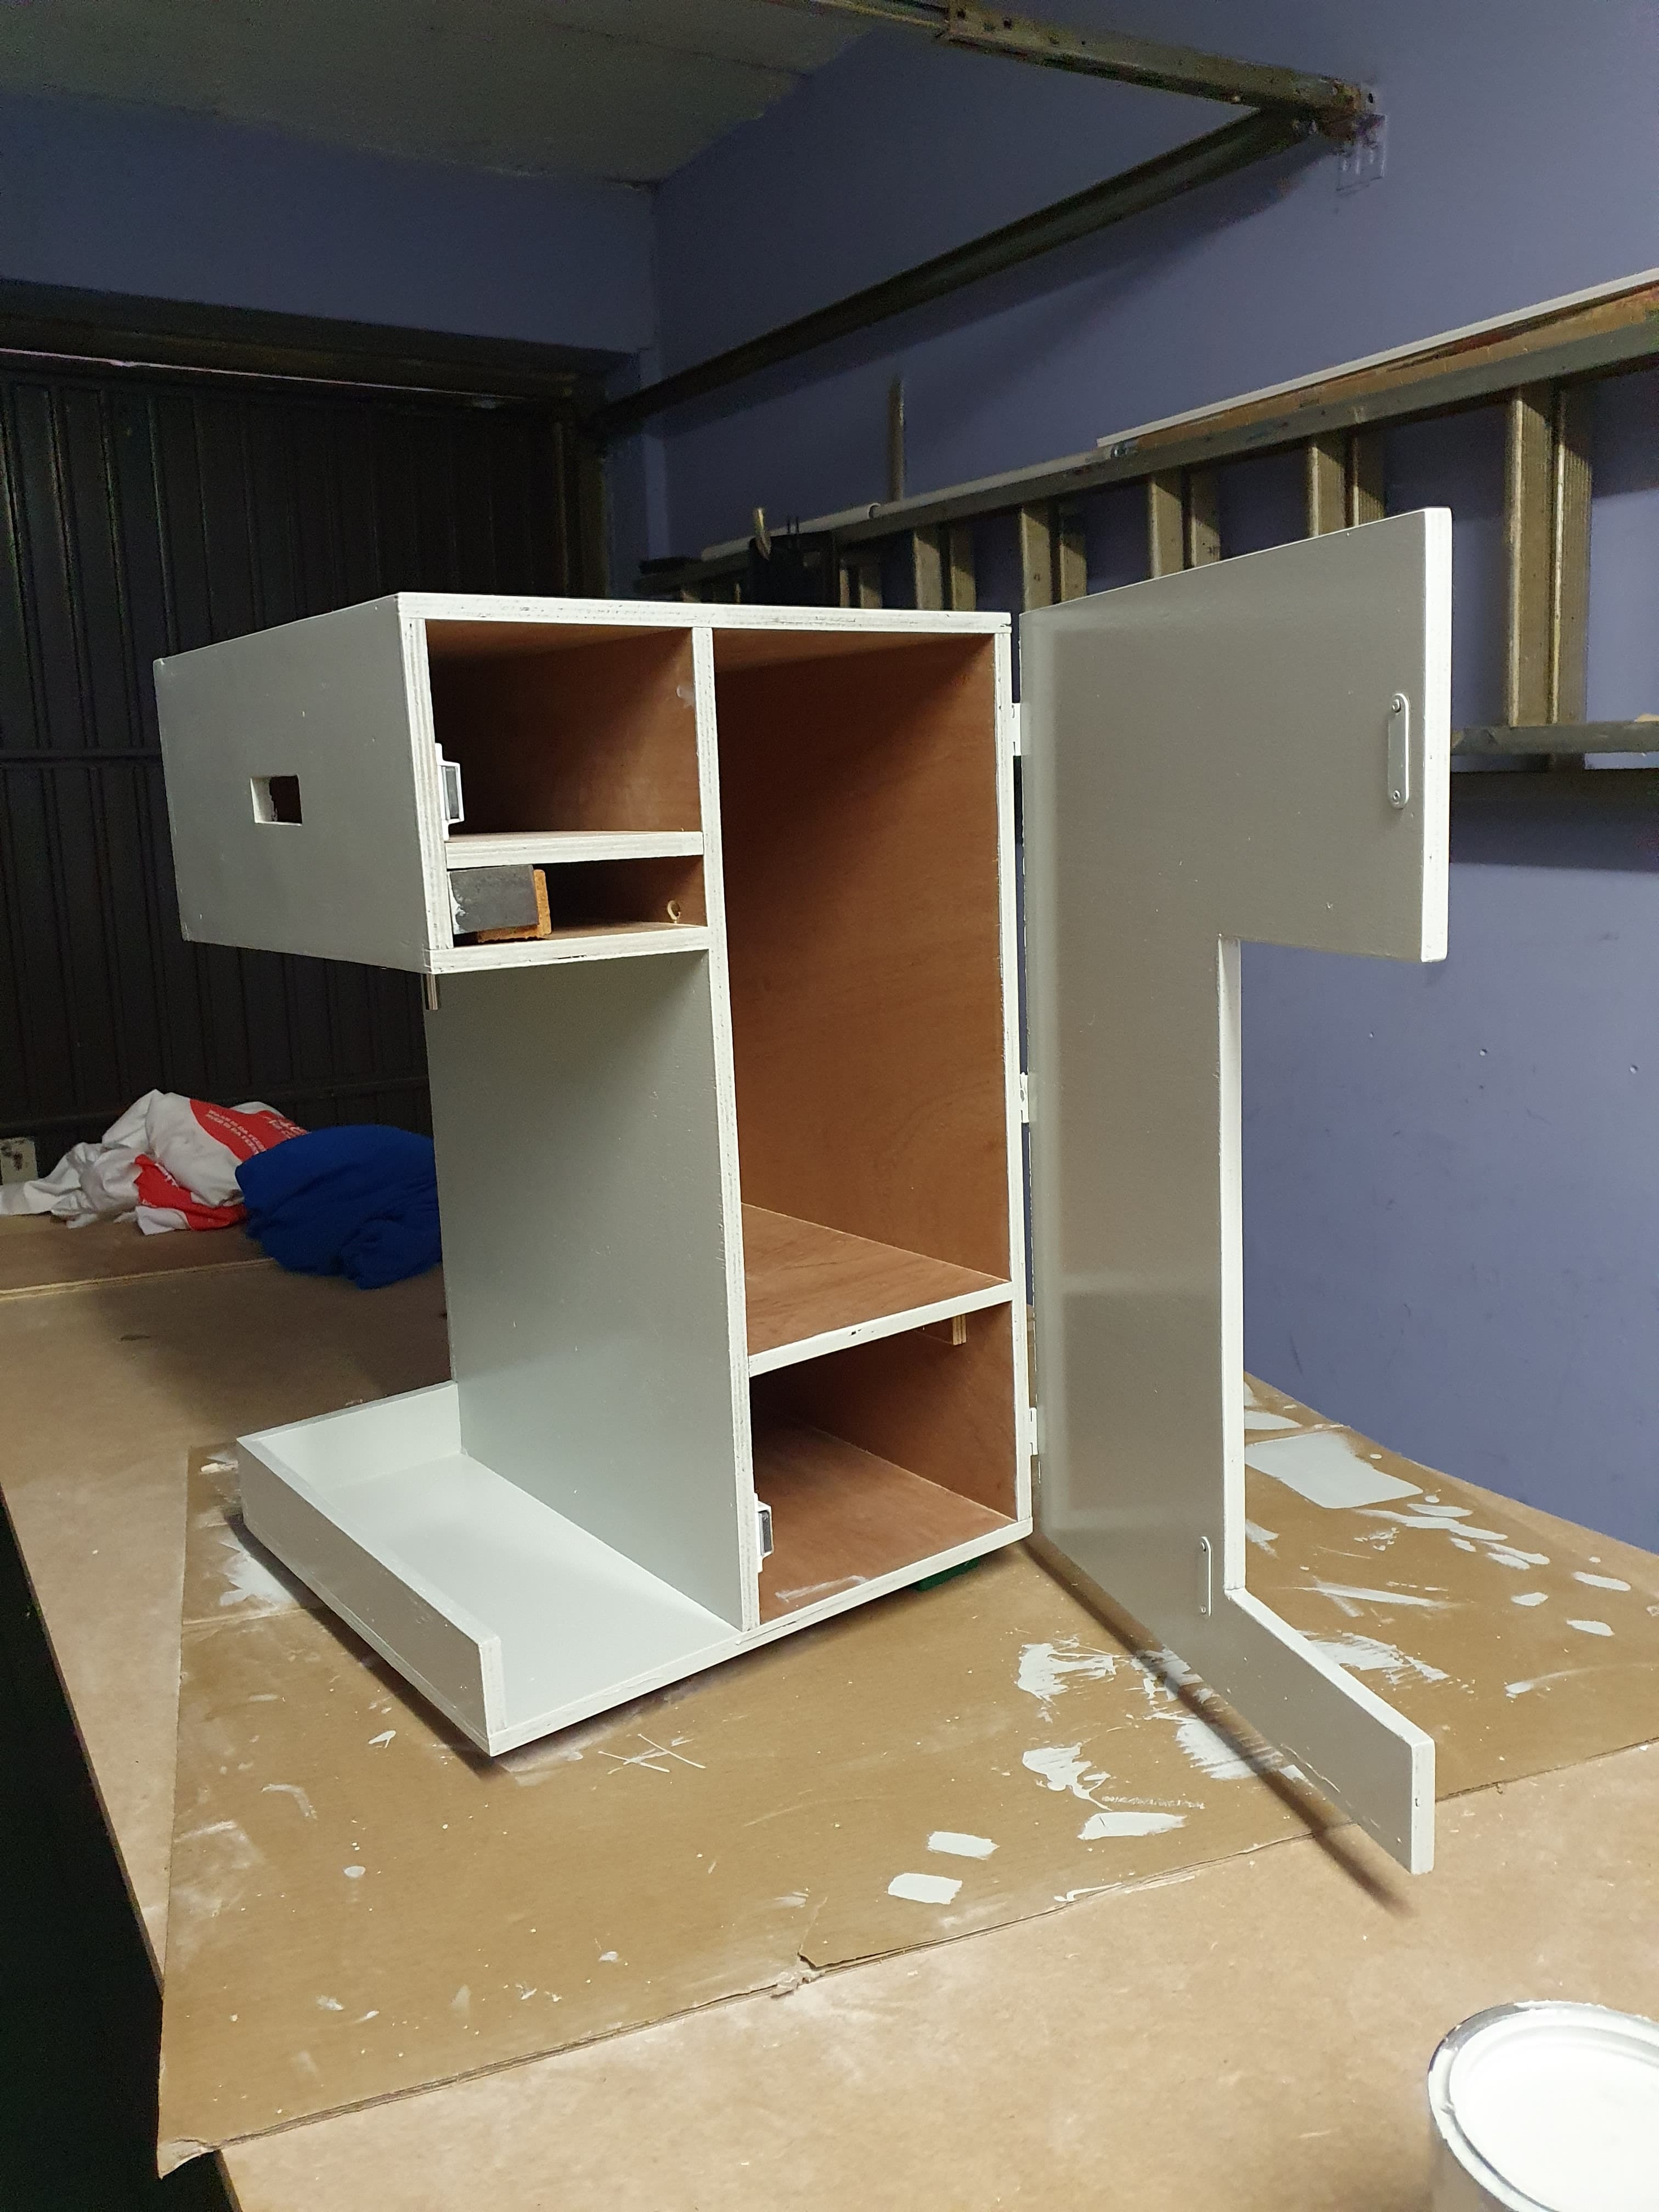
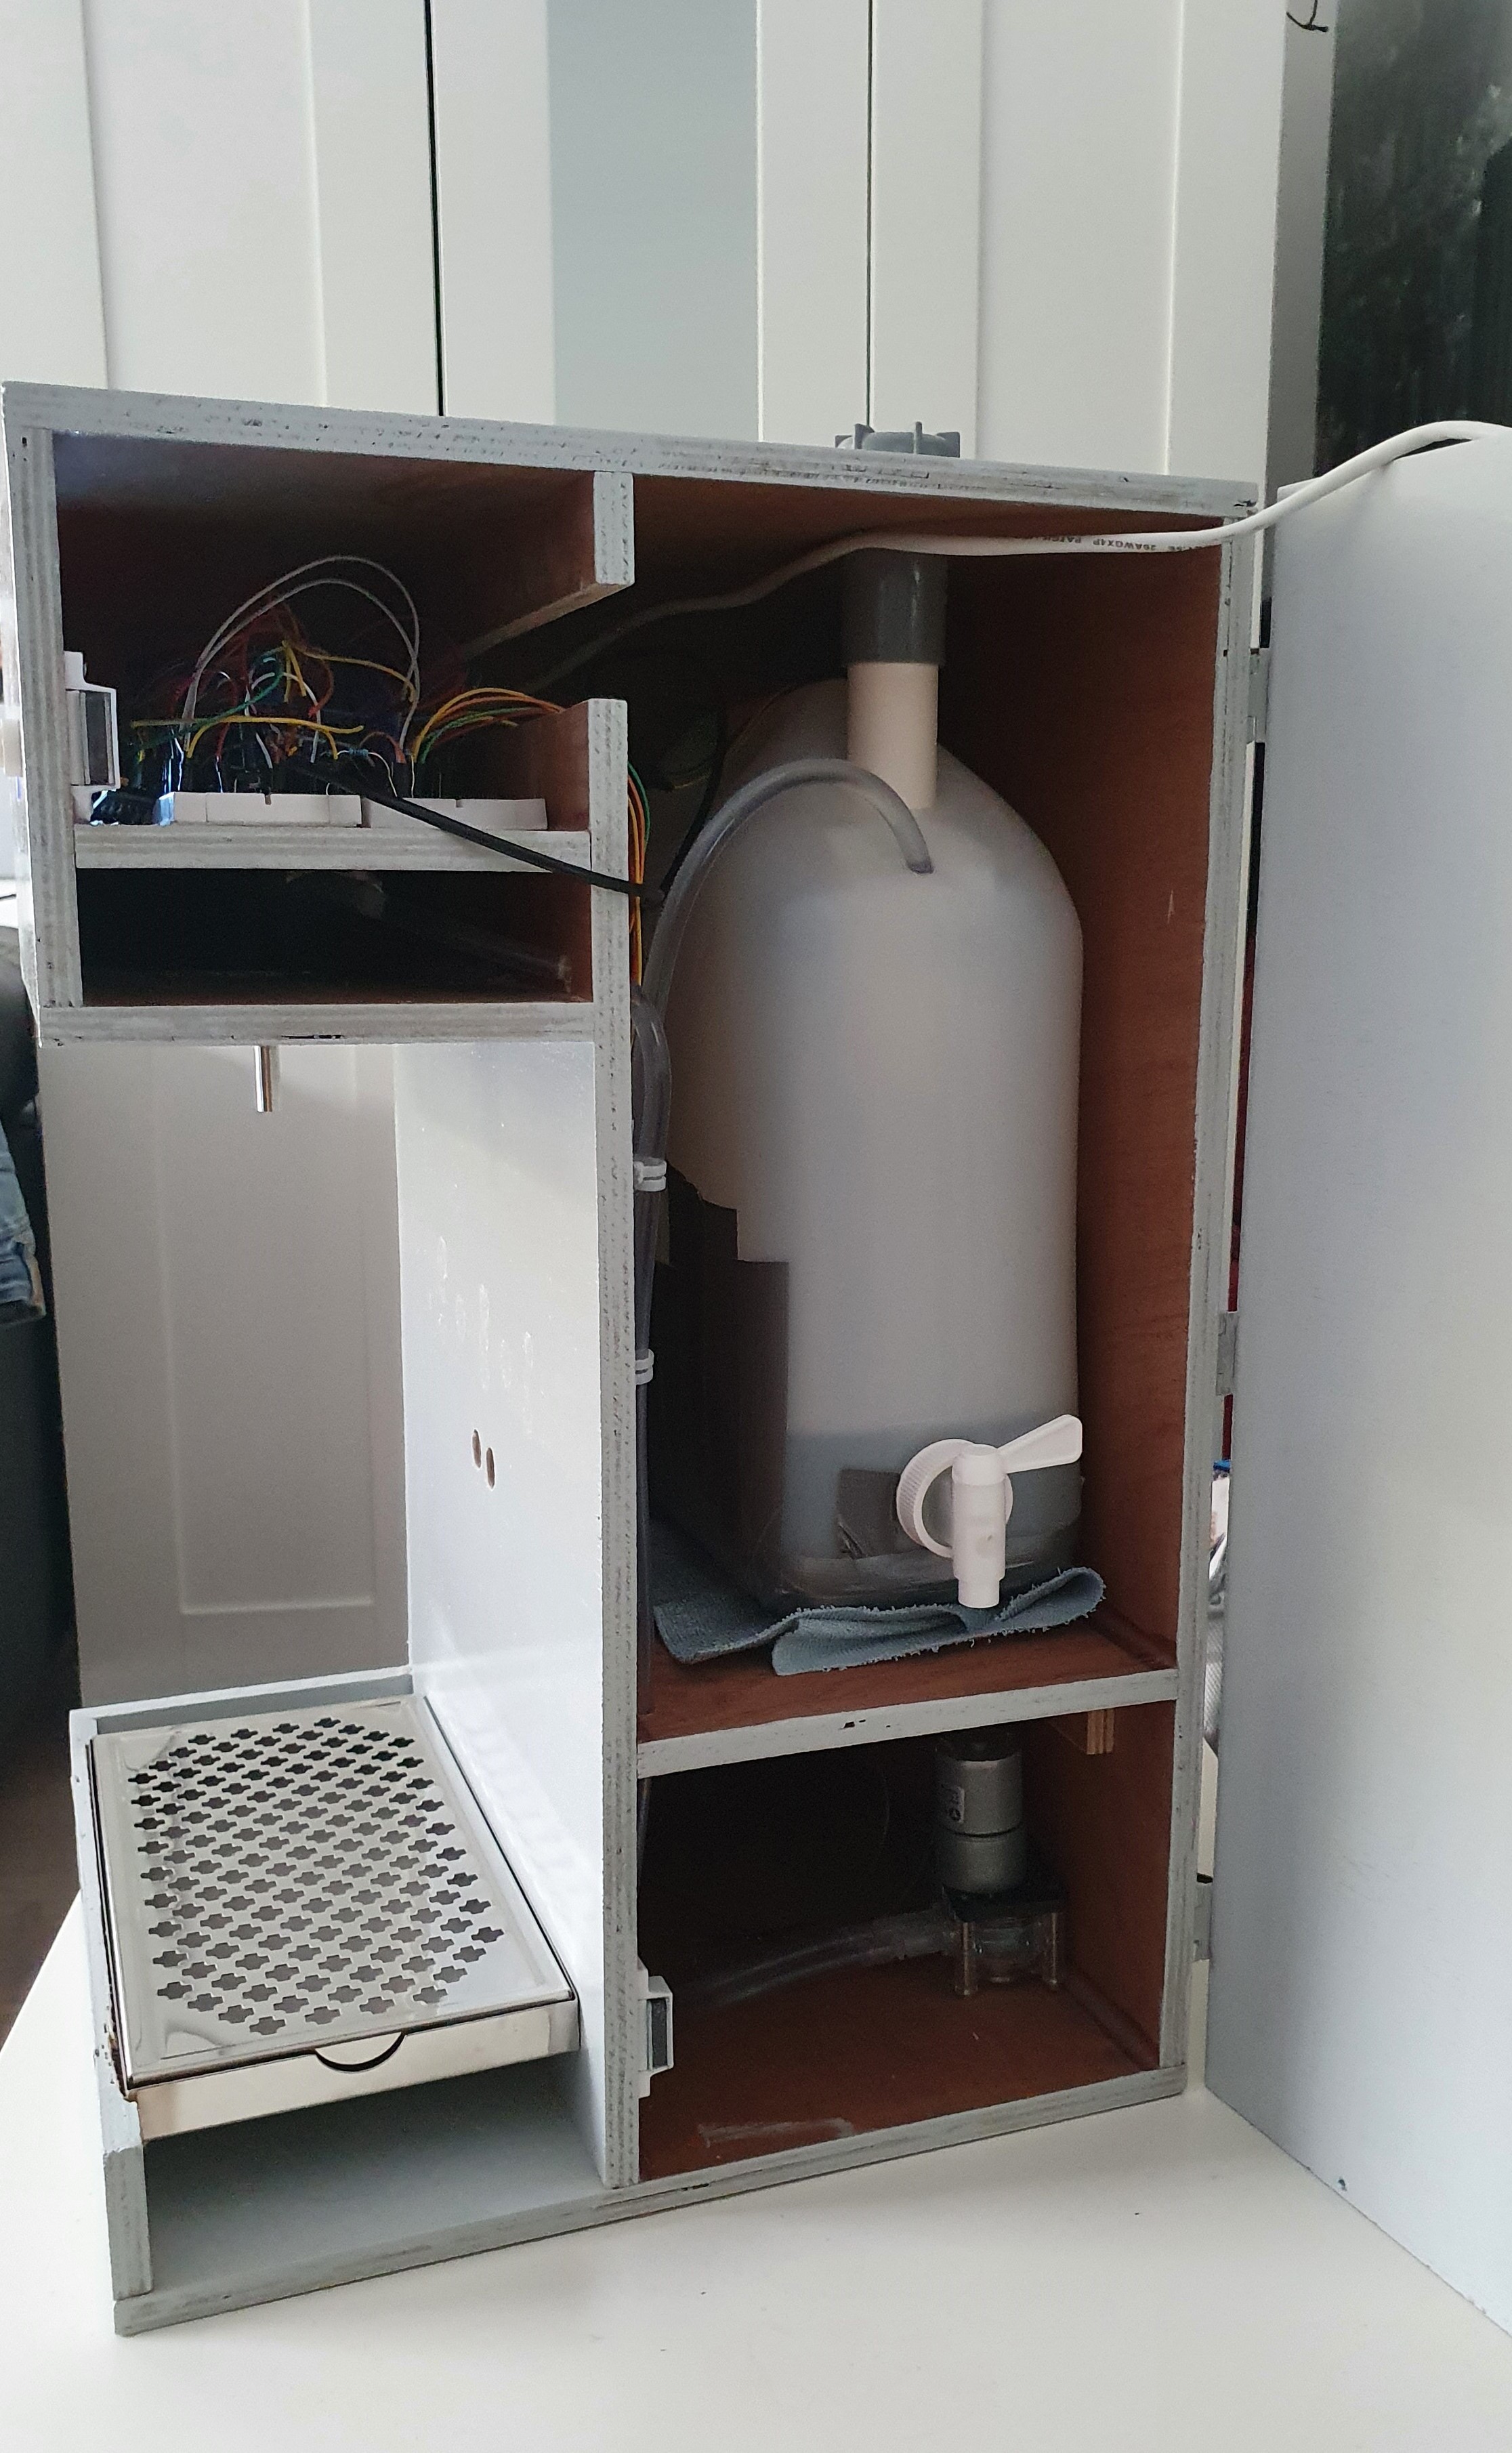
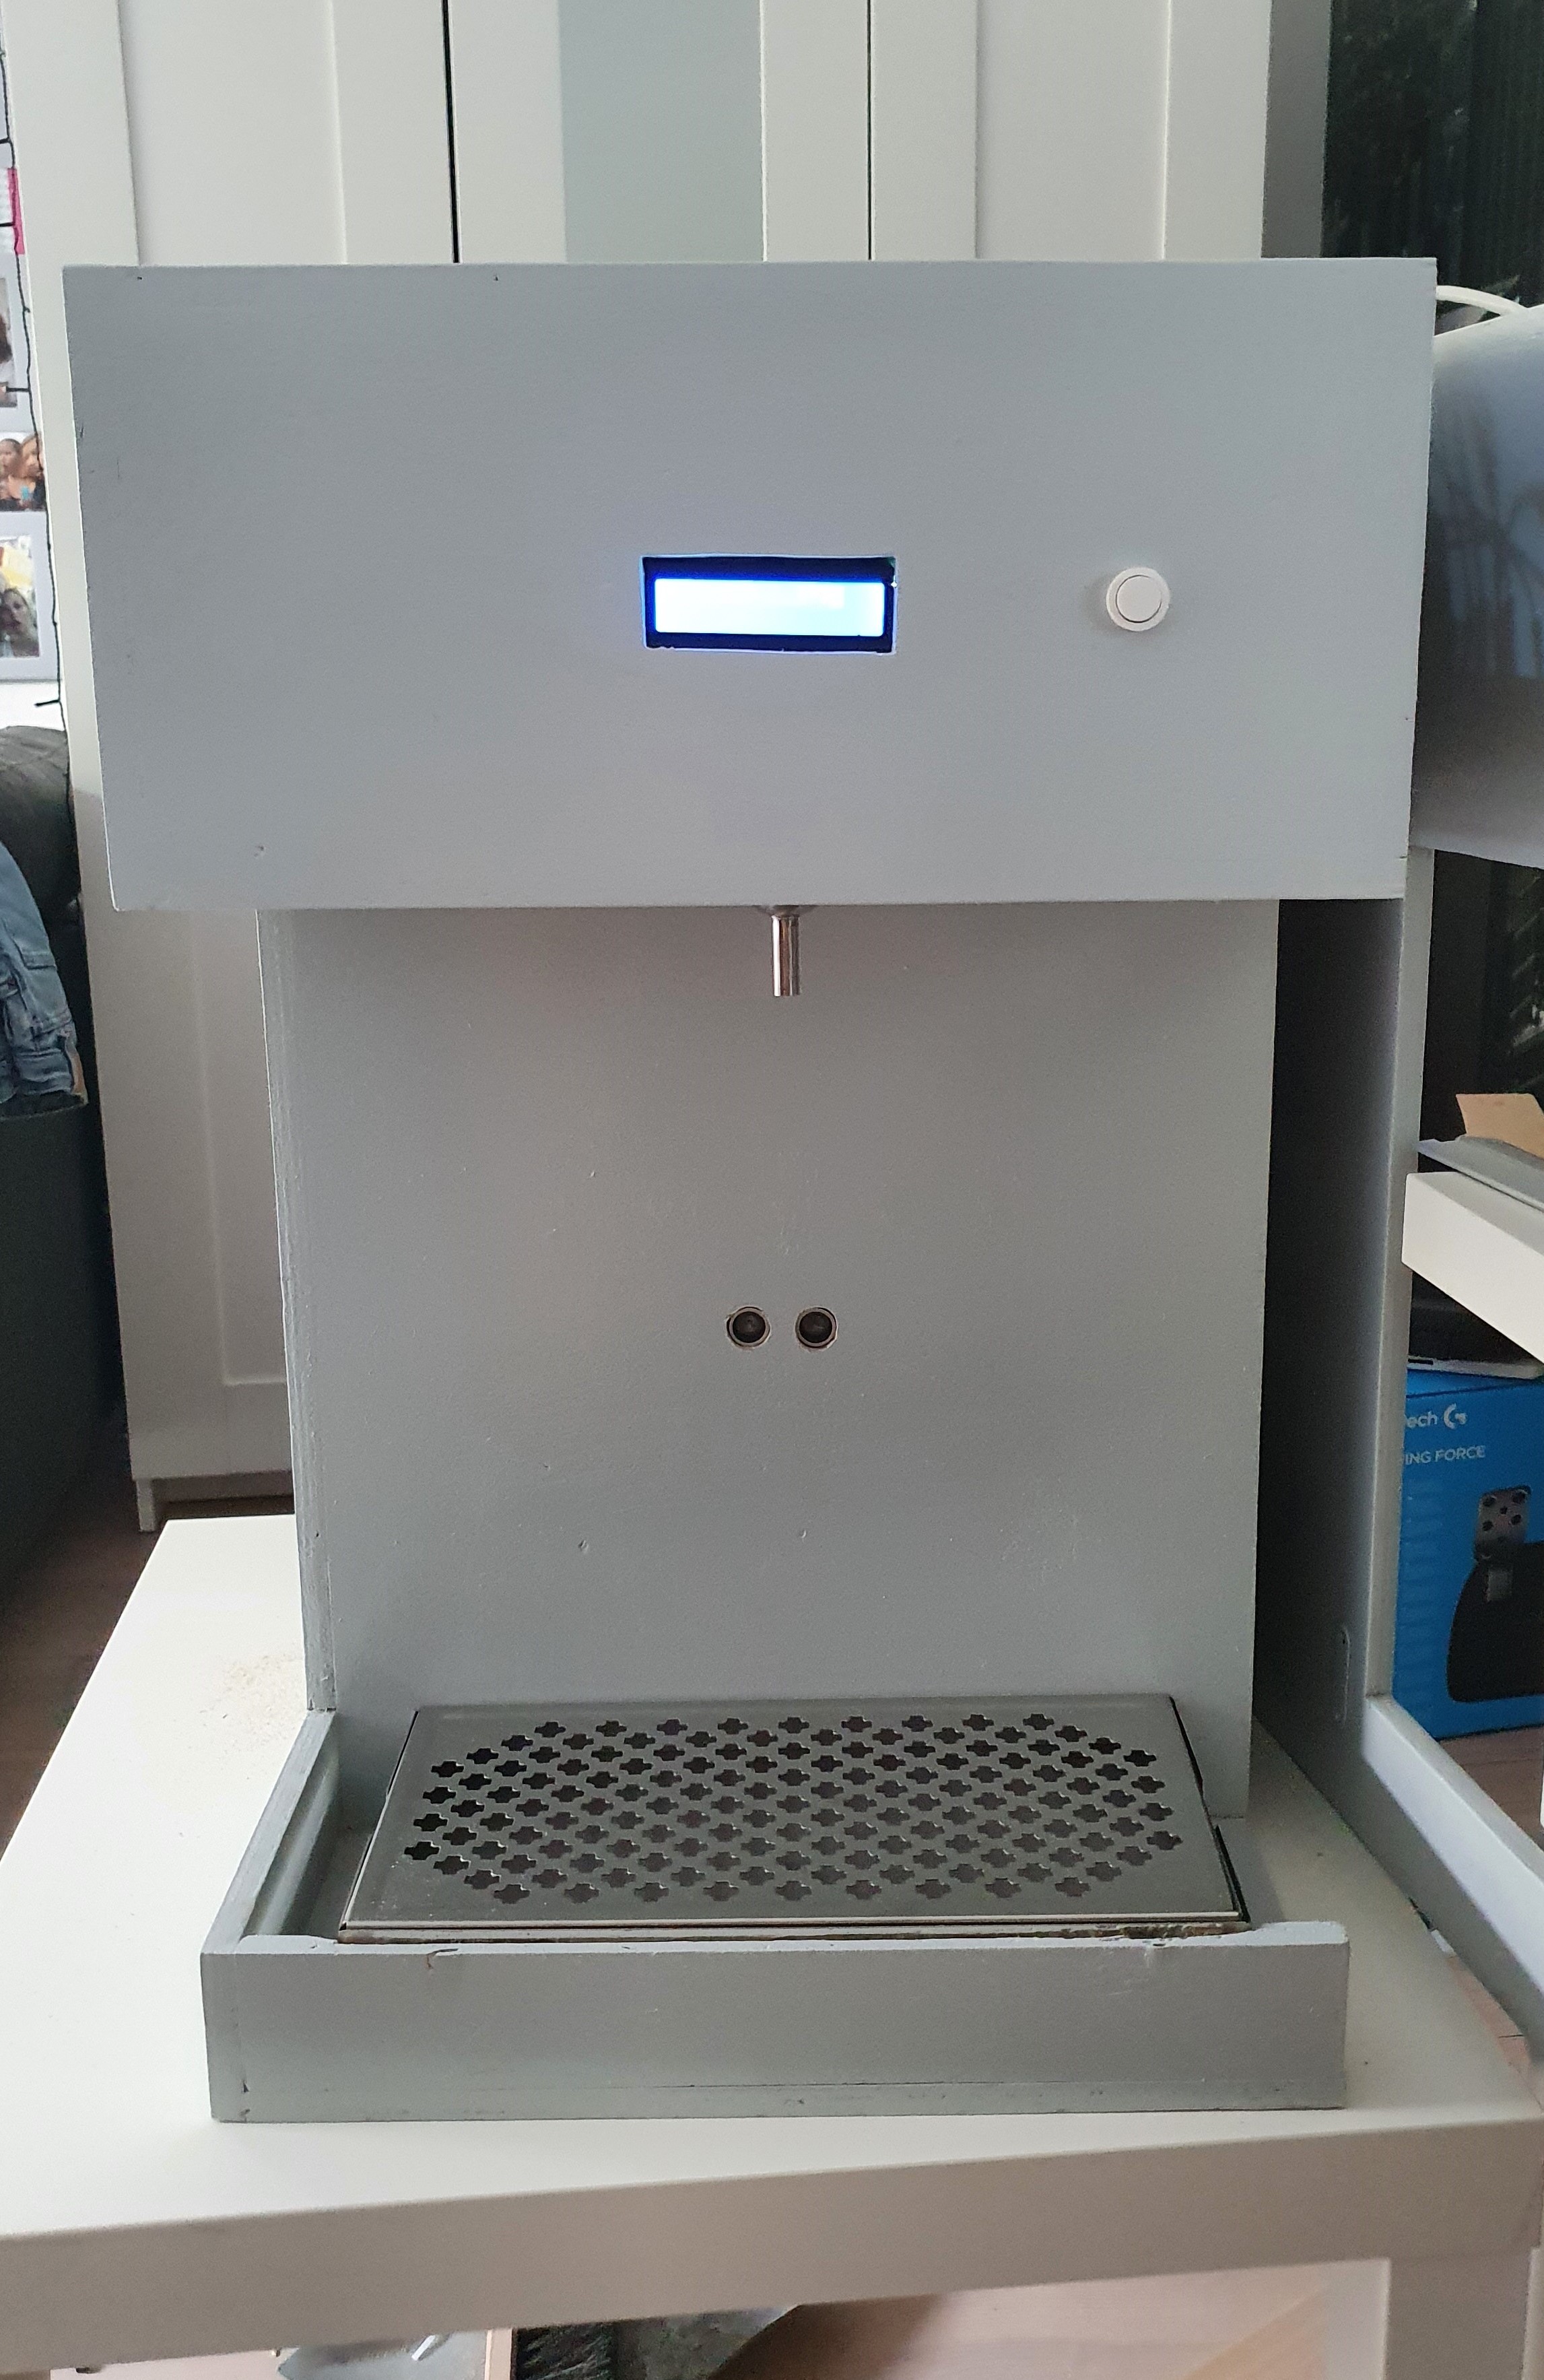
If we're talking about my case, there are two main parts:
Outside casing
I built the case from scratch. I used plywood planks and sawed them in the correct sizes. I screwed all the planks together and drilled holes for the LCD, the button, the ultrasonic sensor to detect whether there's a watter bottle present and the funnel to distribute the water. I devided my case into different sections to keep the water and the electronics seperated and I used a cable tray to protect the cables from water leakage. In the attached video, you can see most aspects of my casing and how I made it. I also 3D printed a button, that is glued to a normal button. Finally, I used a drip tray to catch up all the spilled water. I also used hinges to be able to open and close a side panel to look at my electronics. You can always use a second-hand dispenser or you can also use other materials.
For the exact measurements of my built, I attached a PDF with all the sizes of the plates used in the case.
Water tank
The water tank wasn't an easy job. I got a watertank with a hole on the bottom, so I had to tape it to stop the leakage. You'll need four holes: one for the temperature sensor, one for the tubing of your pump. one for the tubing to refill the tank and one for the ultrasonic sensor. For this last one, I 3D printed a case for it, which can be found here. This gives the sensor more protection against water. I then drilled a rectangle in the top of the tank, to rest the sensor on.