Automatic Nerf Sentry Turret
by EcetTeam19 in Circuits > Microcontrollers
2697 Views, 4 Favorites, 0 Comments
Automatic Nerf Sentry Turret
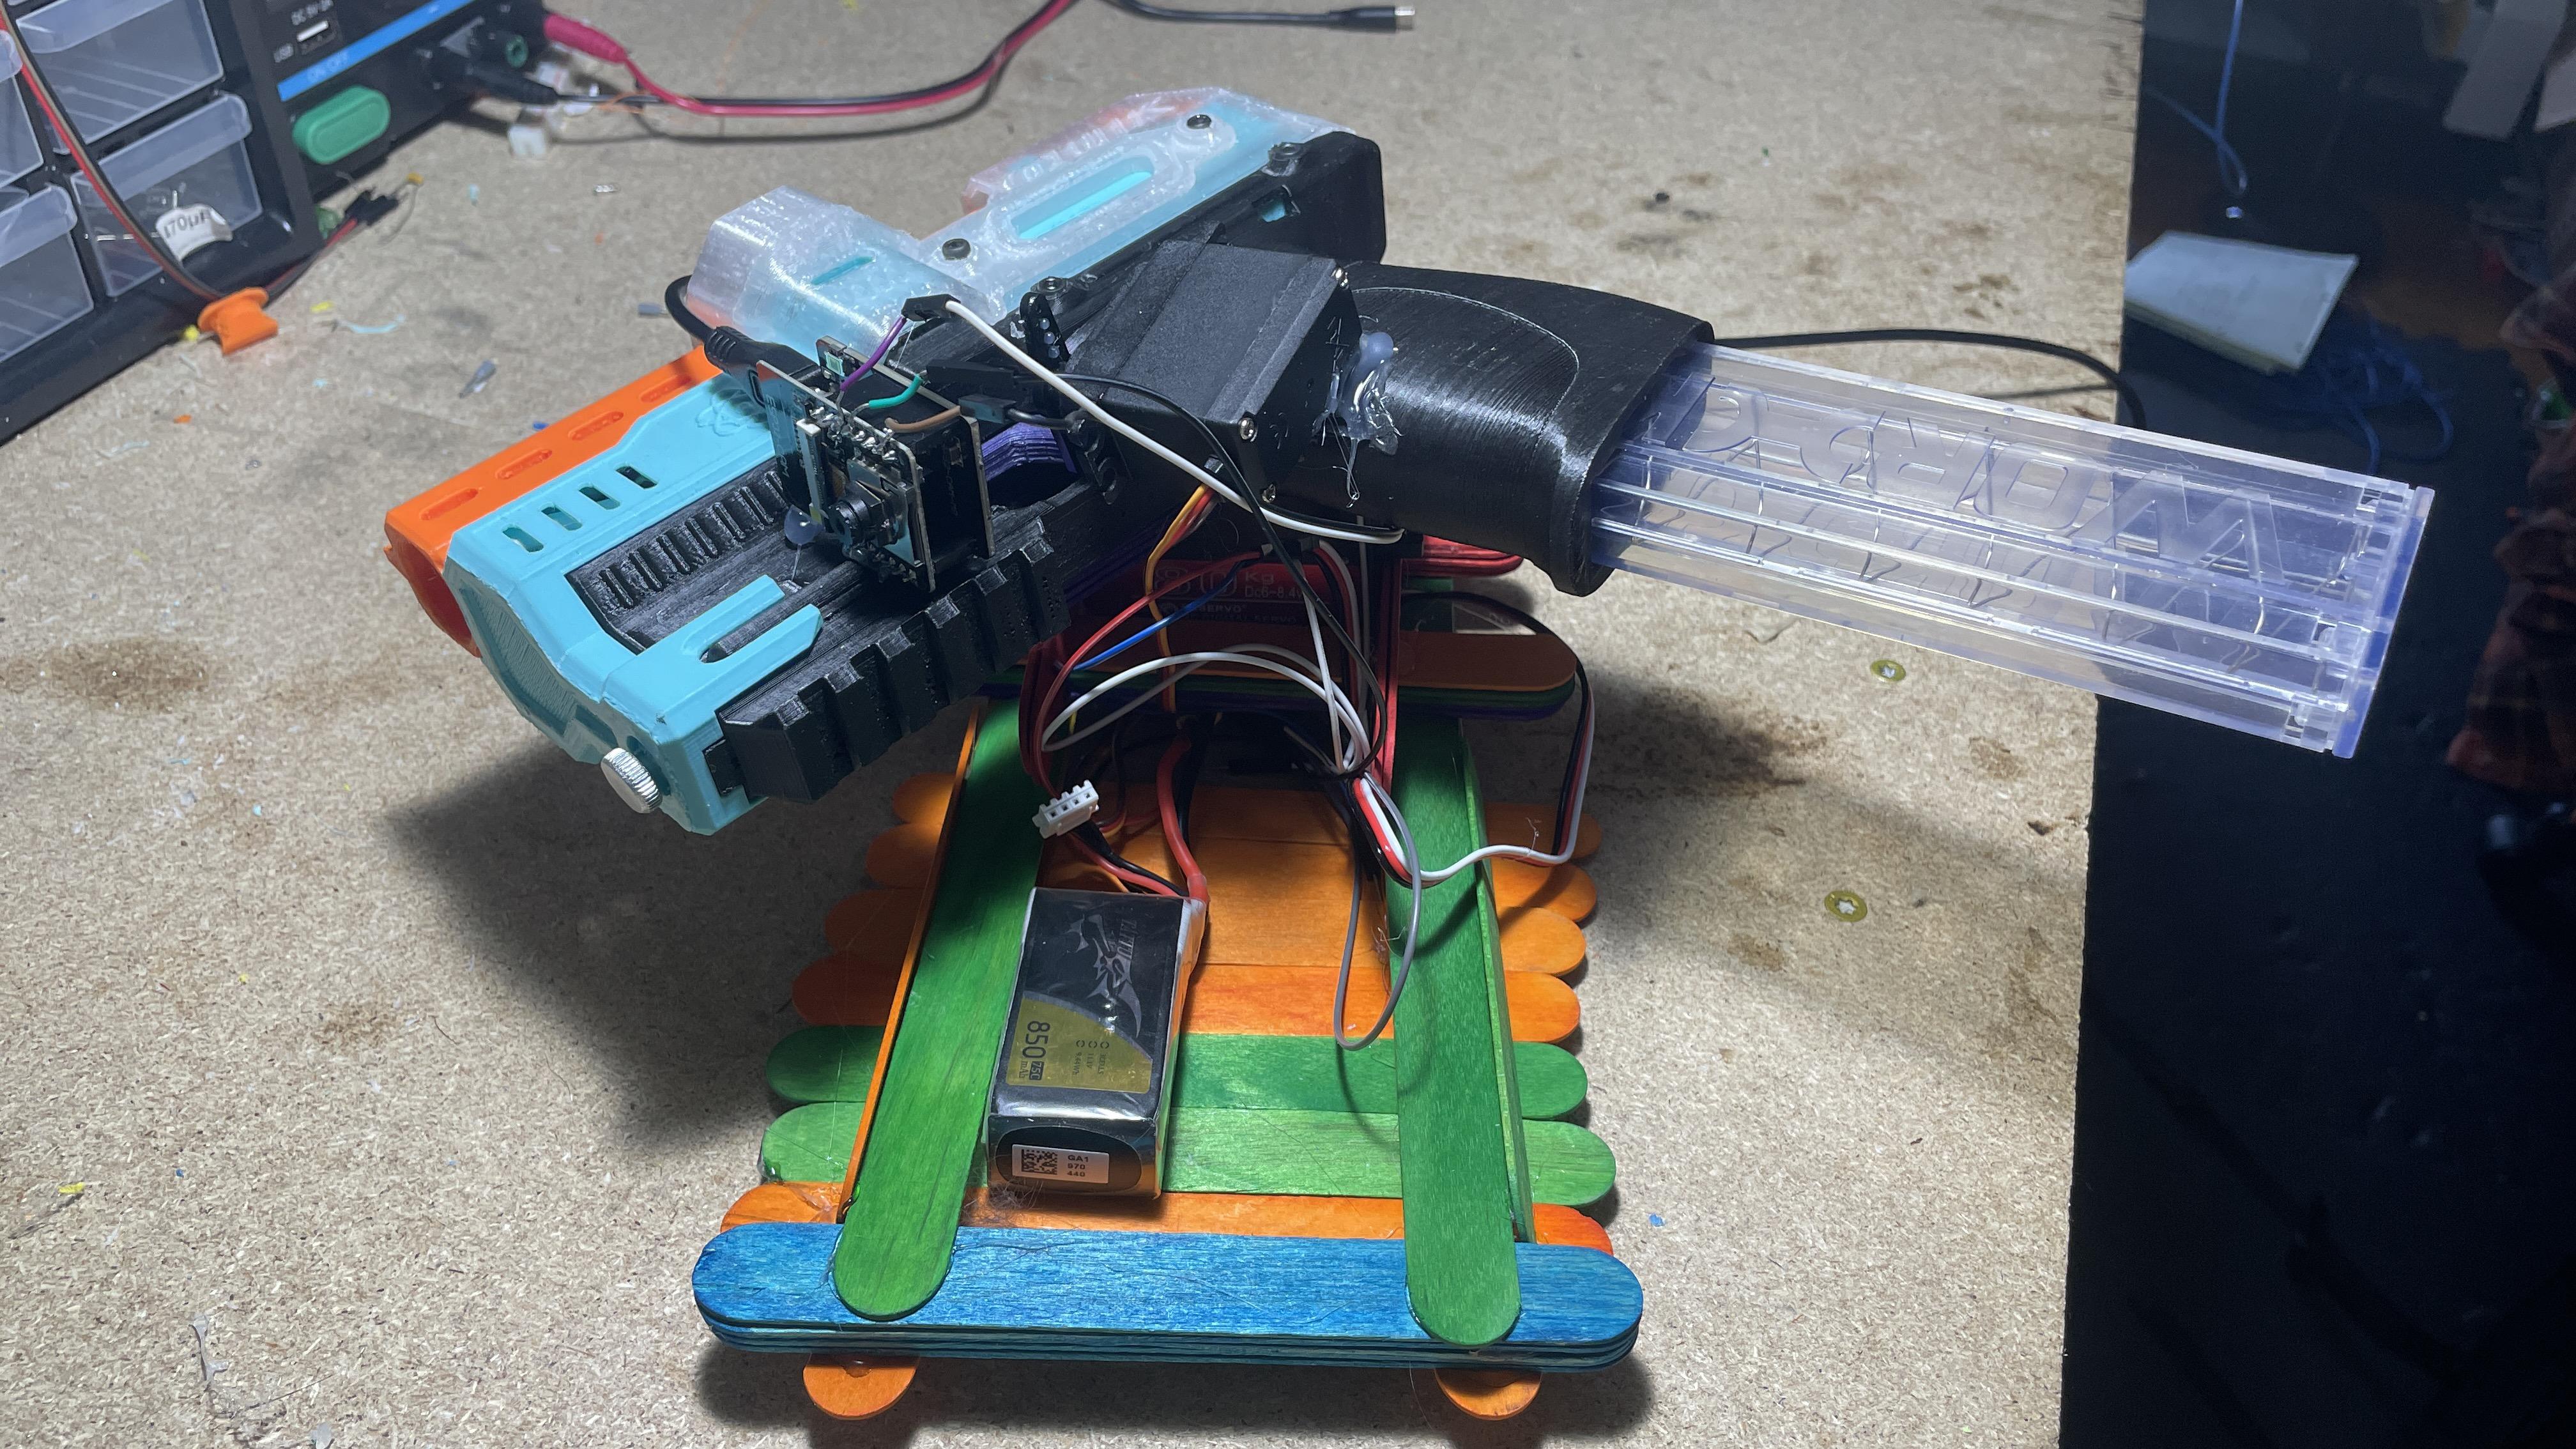
This is a an automatic nerf sentry turret. It will run using an internal power supply and all of the logic will be provided by an ESP-32 microcontroller. There will be an ESP-32 camera that will be used to detect faces so that the nerf blaster knows when there is a target in sight. In order to get the turret to aim, it will be mounted to a servo motor to pivot around. There will also be a second servo motor used to pull the trigger of the nerf blaster. All of this will be supported by a frame built from popsicle sticks and hot glue.
Supplies
- Popsicle Sticks
- Hot Glue
- ESP-32 Microcontroller and Camera
- 1 MG 996R Servo Motor
- 1 DSServo 80Kg servo motor
- Battery Powered Nerf Blaster of User's Choice
- External Battery
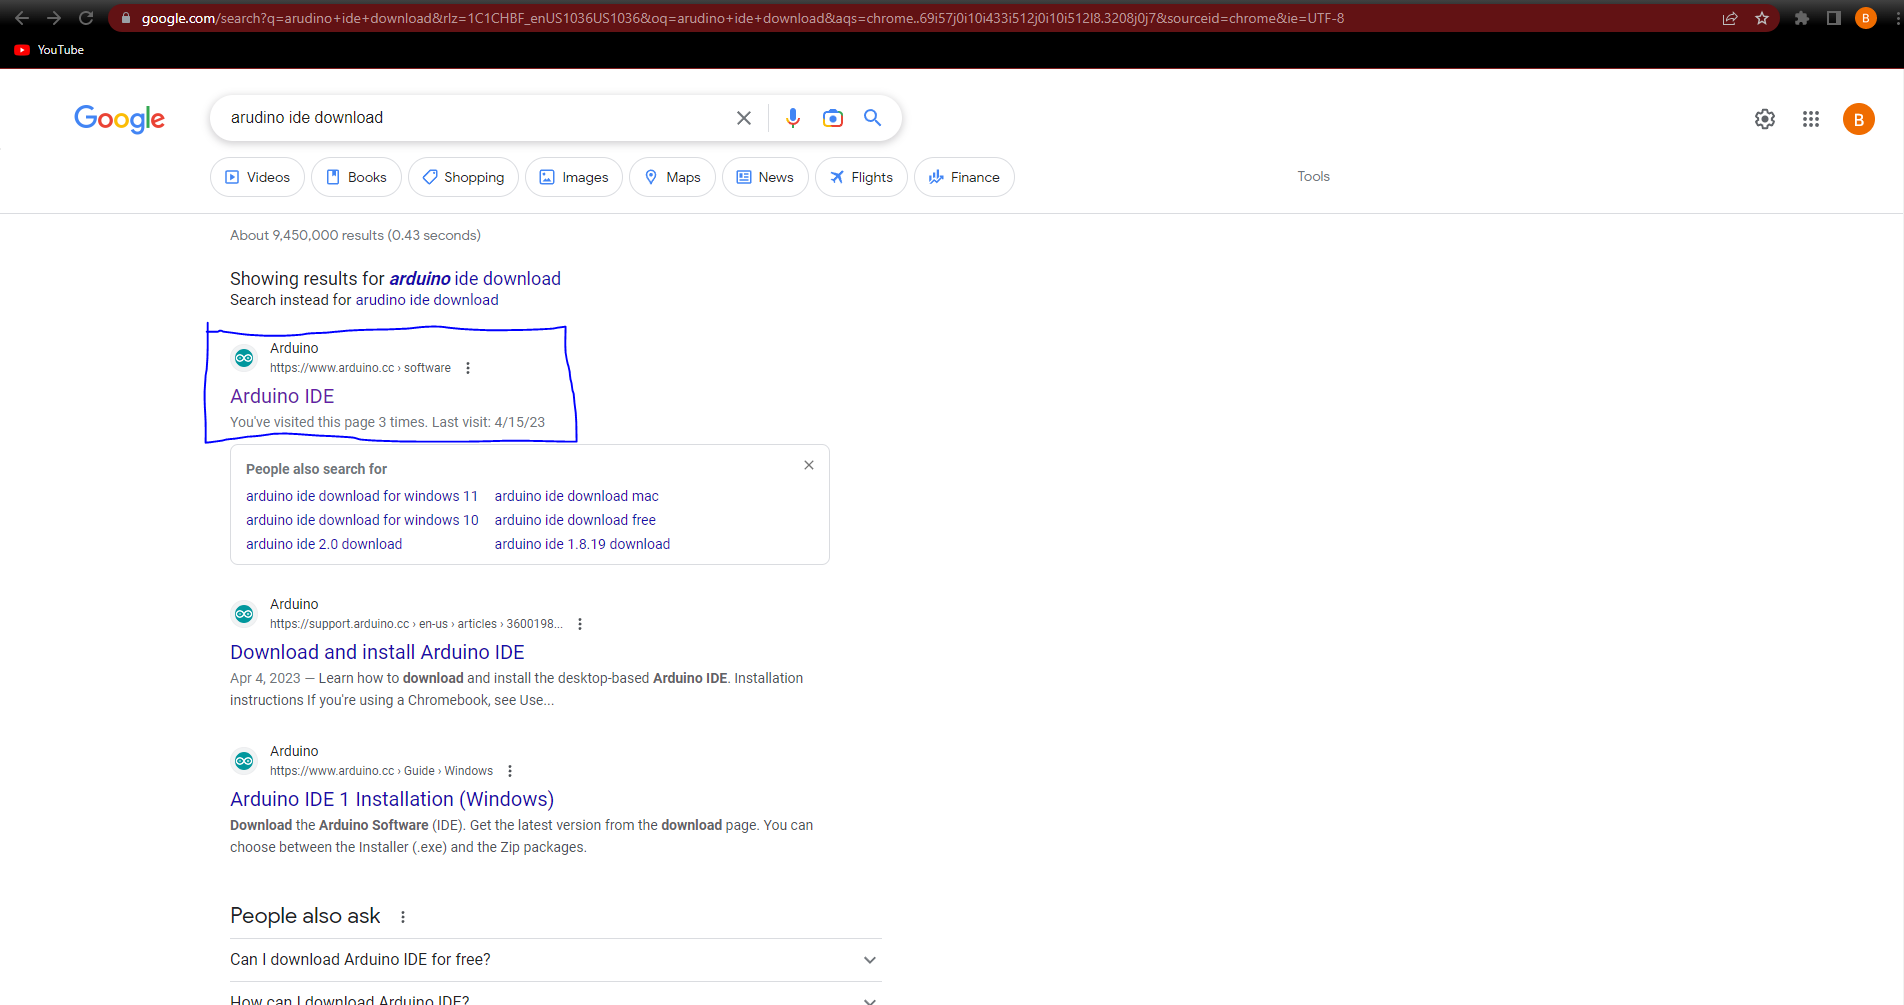
Go to Your Browser and Search Aruduino IDE Download. Click on the First Link
Navigate to the Arduino website.
Select the Proper Software Based Upon the Operating System on Your Computer or Laptop. Then Click Download
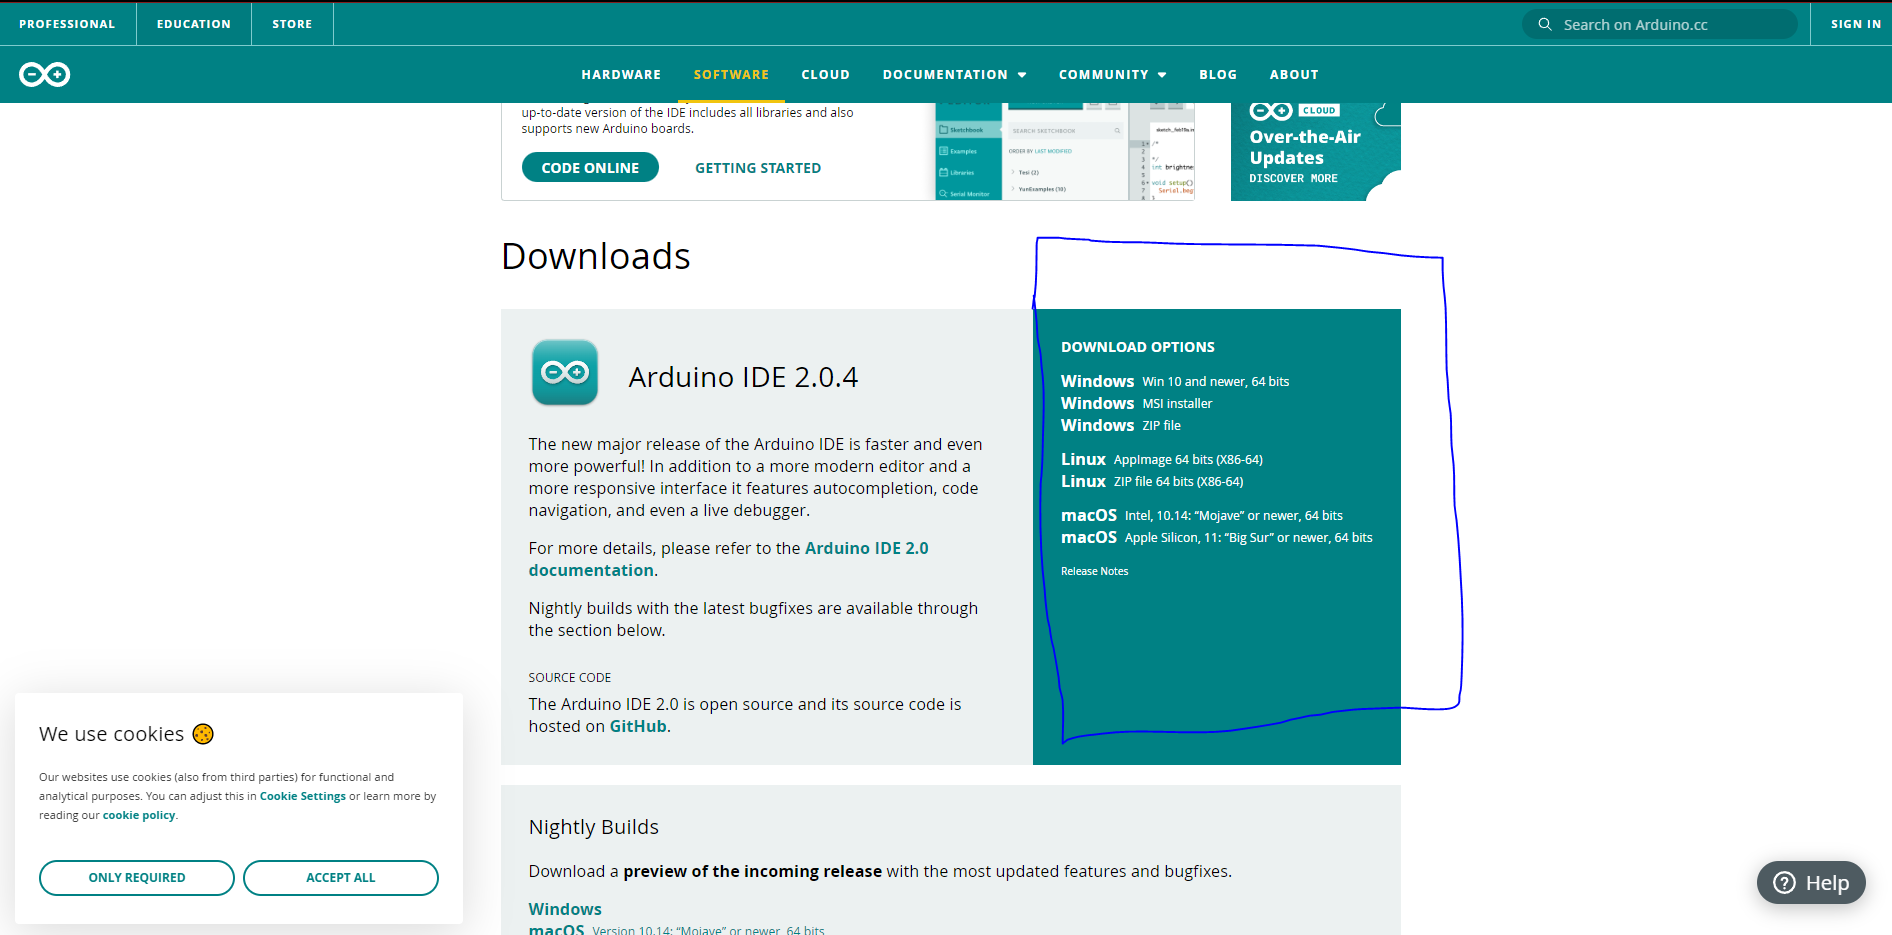
You may download for free or donate to Arduino, that's a personal choice.
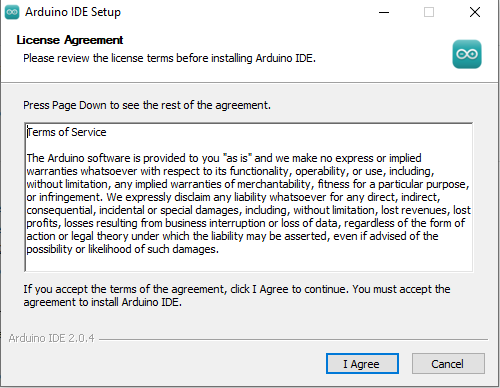
Go to Your Download Folder on Your Computer or Laptop and Click the Arduino IDE File

Select "I Agree" on the Window That Pops Up
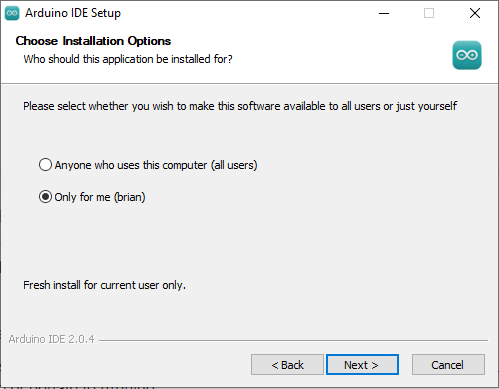
Select the Option for "only Me" and Click Next
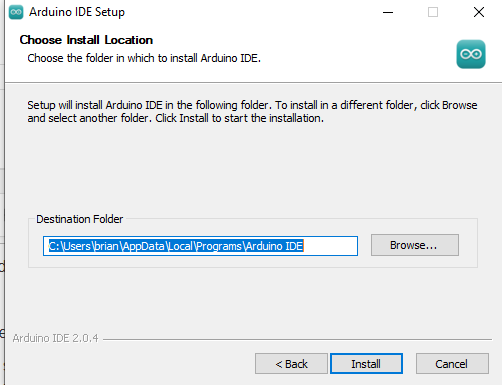
Choose the Destination You Wish to Install the Software and Click "Install"
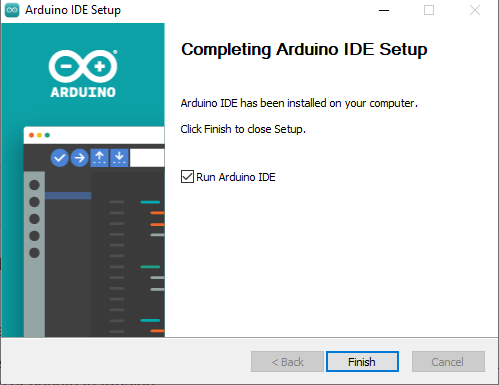
Click "Finish"
Open Up the Arduino IDE Software and Click "File" in the Upper Left Hand Corner of the Screen
Scroll Down to Additional Boards Manager and Paste the Link Below in the Additional Boards URLs Section
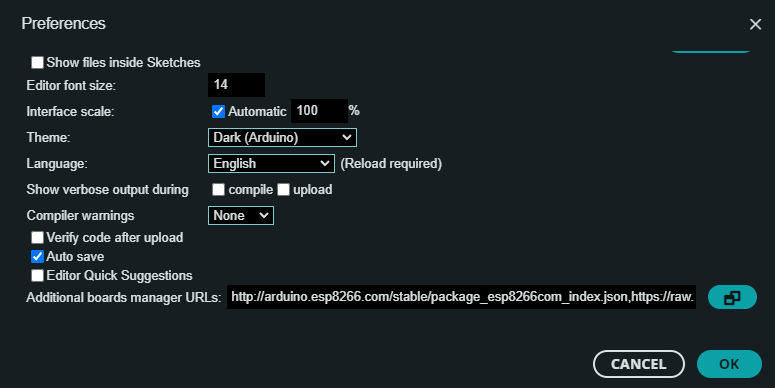
https://raw.githubusercontent.com/espressif/arduino-esp32/gh-pages/package_esp32_index.json
Click on Tools, and Navigate Down the Menu to the Board Section. Click on That and in the New Menu Click on "Boards Manager"
Search ESP32 in the Boards Manager and Click Install on the ESP32 by Espressif Systems Board Set
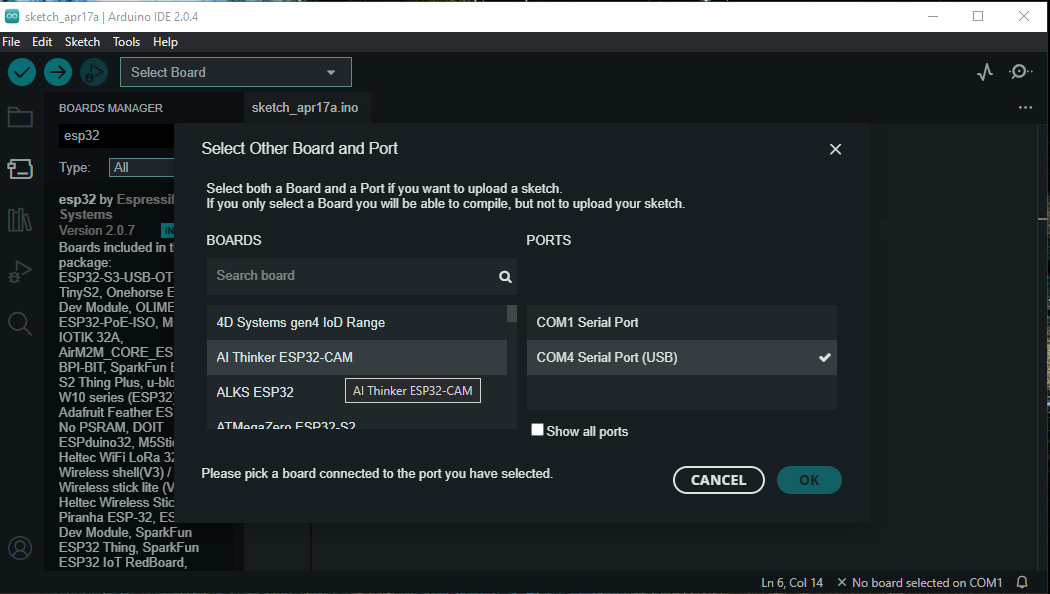
Plug the ESP32 Into Your Computer or Laptop. Click the Arrow in Selecting Your Board and Choose the USB Serial Port. Select the Board Type "AI Thinker ESP32-Cam"
Click on Tools and Navigate to "partition Scheme". Click on That and Select "Huge APP (3MB No OTA/1MB SPIFFS)"
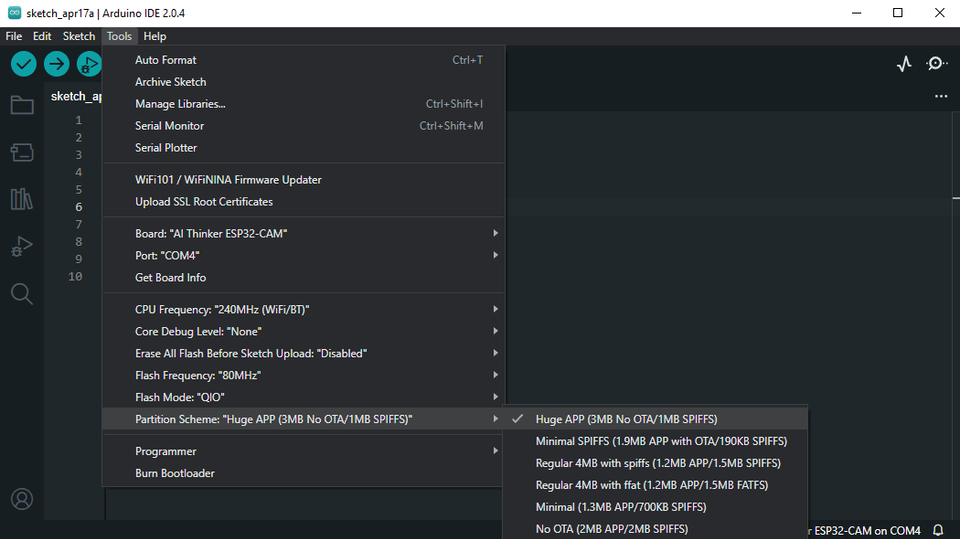
Ensure That the CPU Frequency, Core Debug Level, Erase All Flash Before Sketch Upload, Flash Frequency, and Flash Mode All Match the Settings Within the Pictures Provided

Open Google and Visit: Https://www.python.org/downloads/
Click the Yellow "download Python ..." Button
Once Python Is Downloaded, Run the .exe File That Was Downloaded
Once Python Has Finished Installing, Go to the Search Bar on Your Computer and Type in CMD
Click on the Tile That Says "command Prompt". a Black Window Should Pull Up
Type in "Pip Install Opencv-Python" and Press Enter
Type in "pip Install Numpy" and Press Enter
Type in "pip Install Matplotlib" and Press Enter
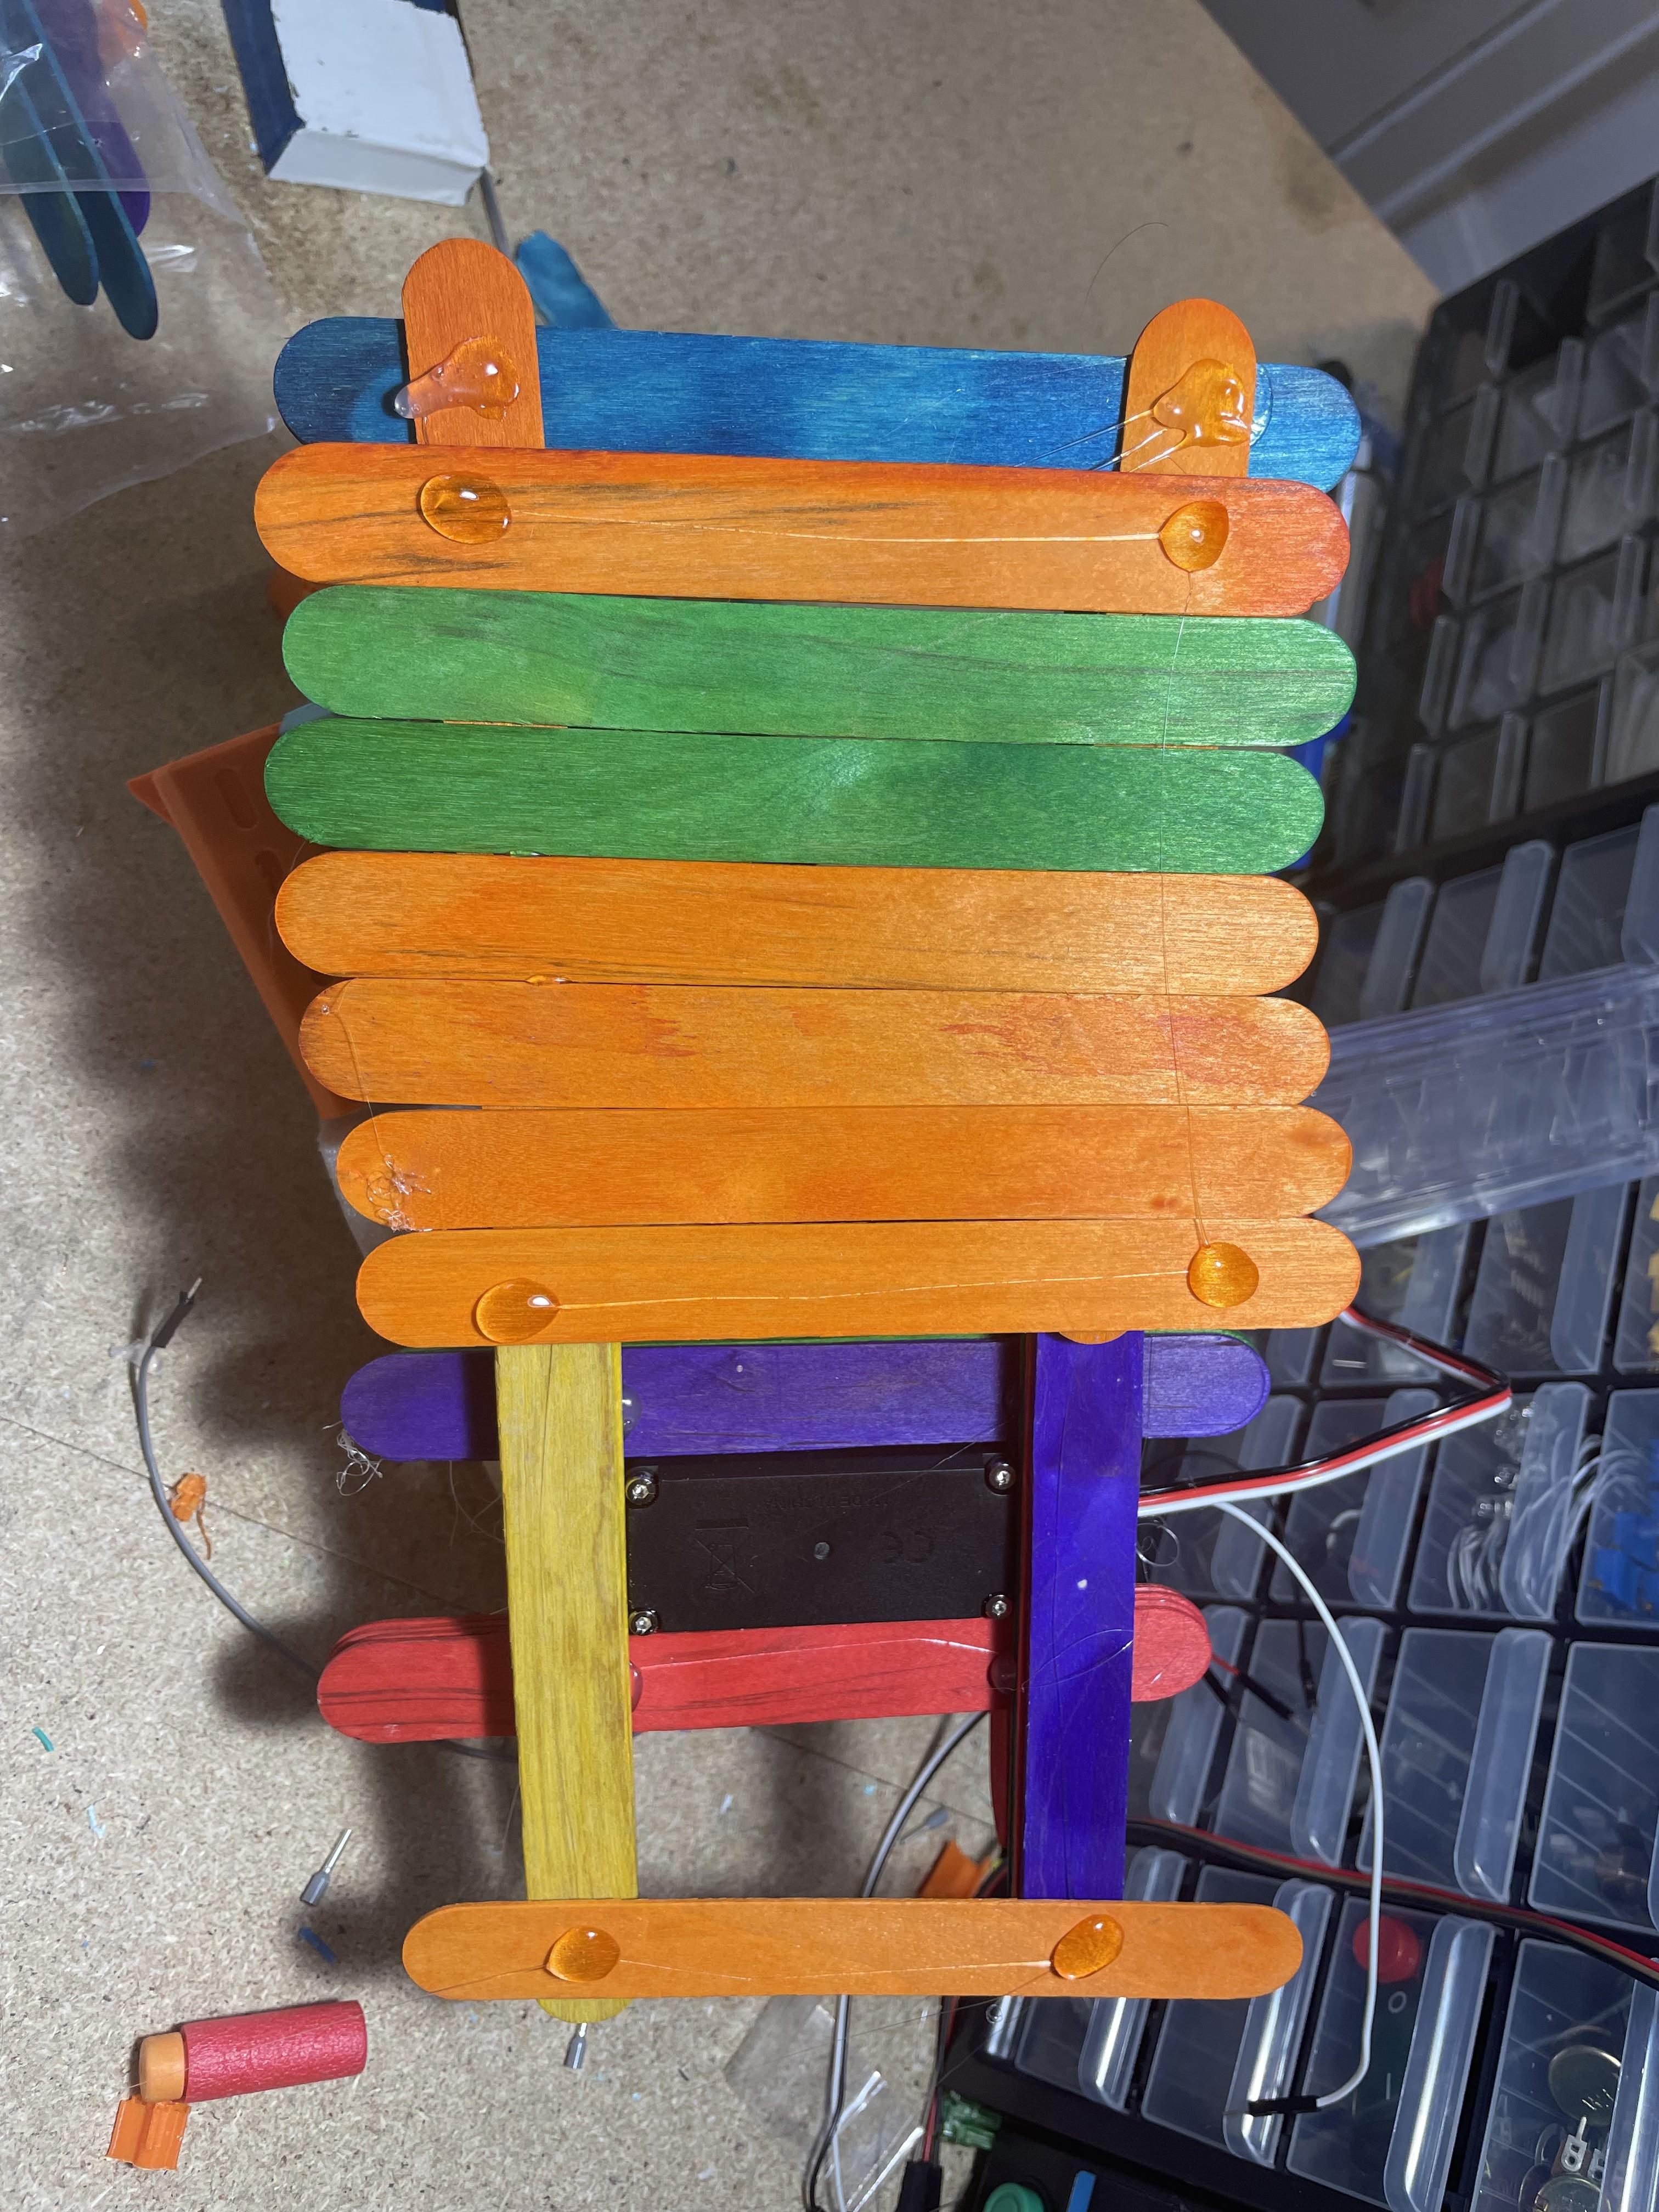
Take 5 Popsicle Sticks and Glue Them All on Top of Each Other, Do This Six Times
Detailed CAD of the turret base can be found in the attached CAD files.
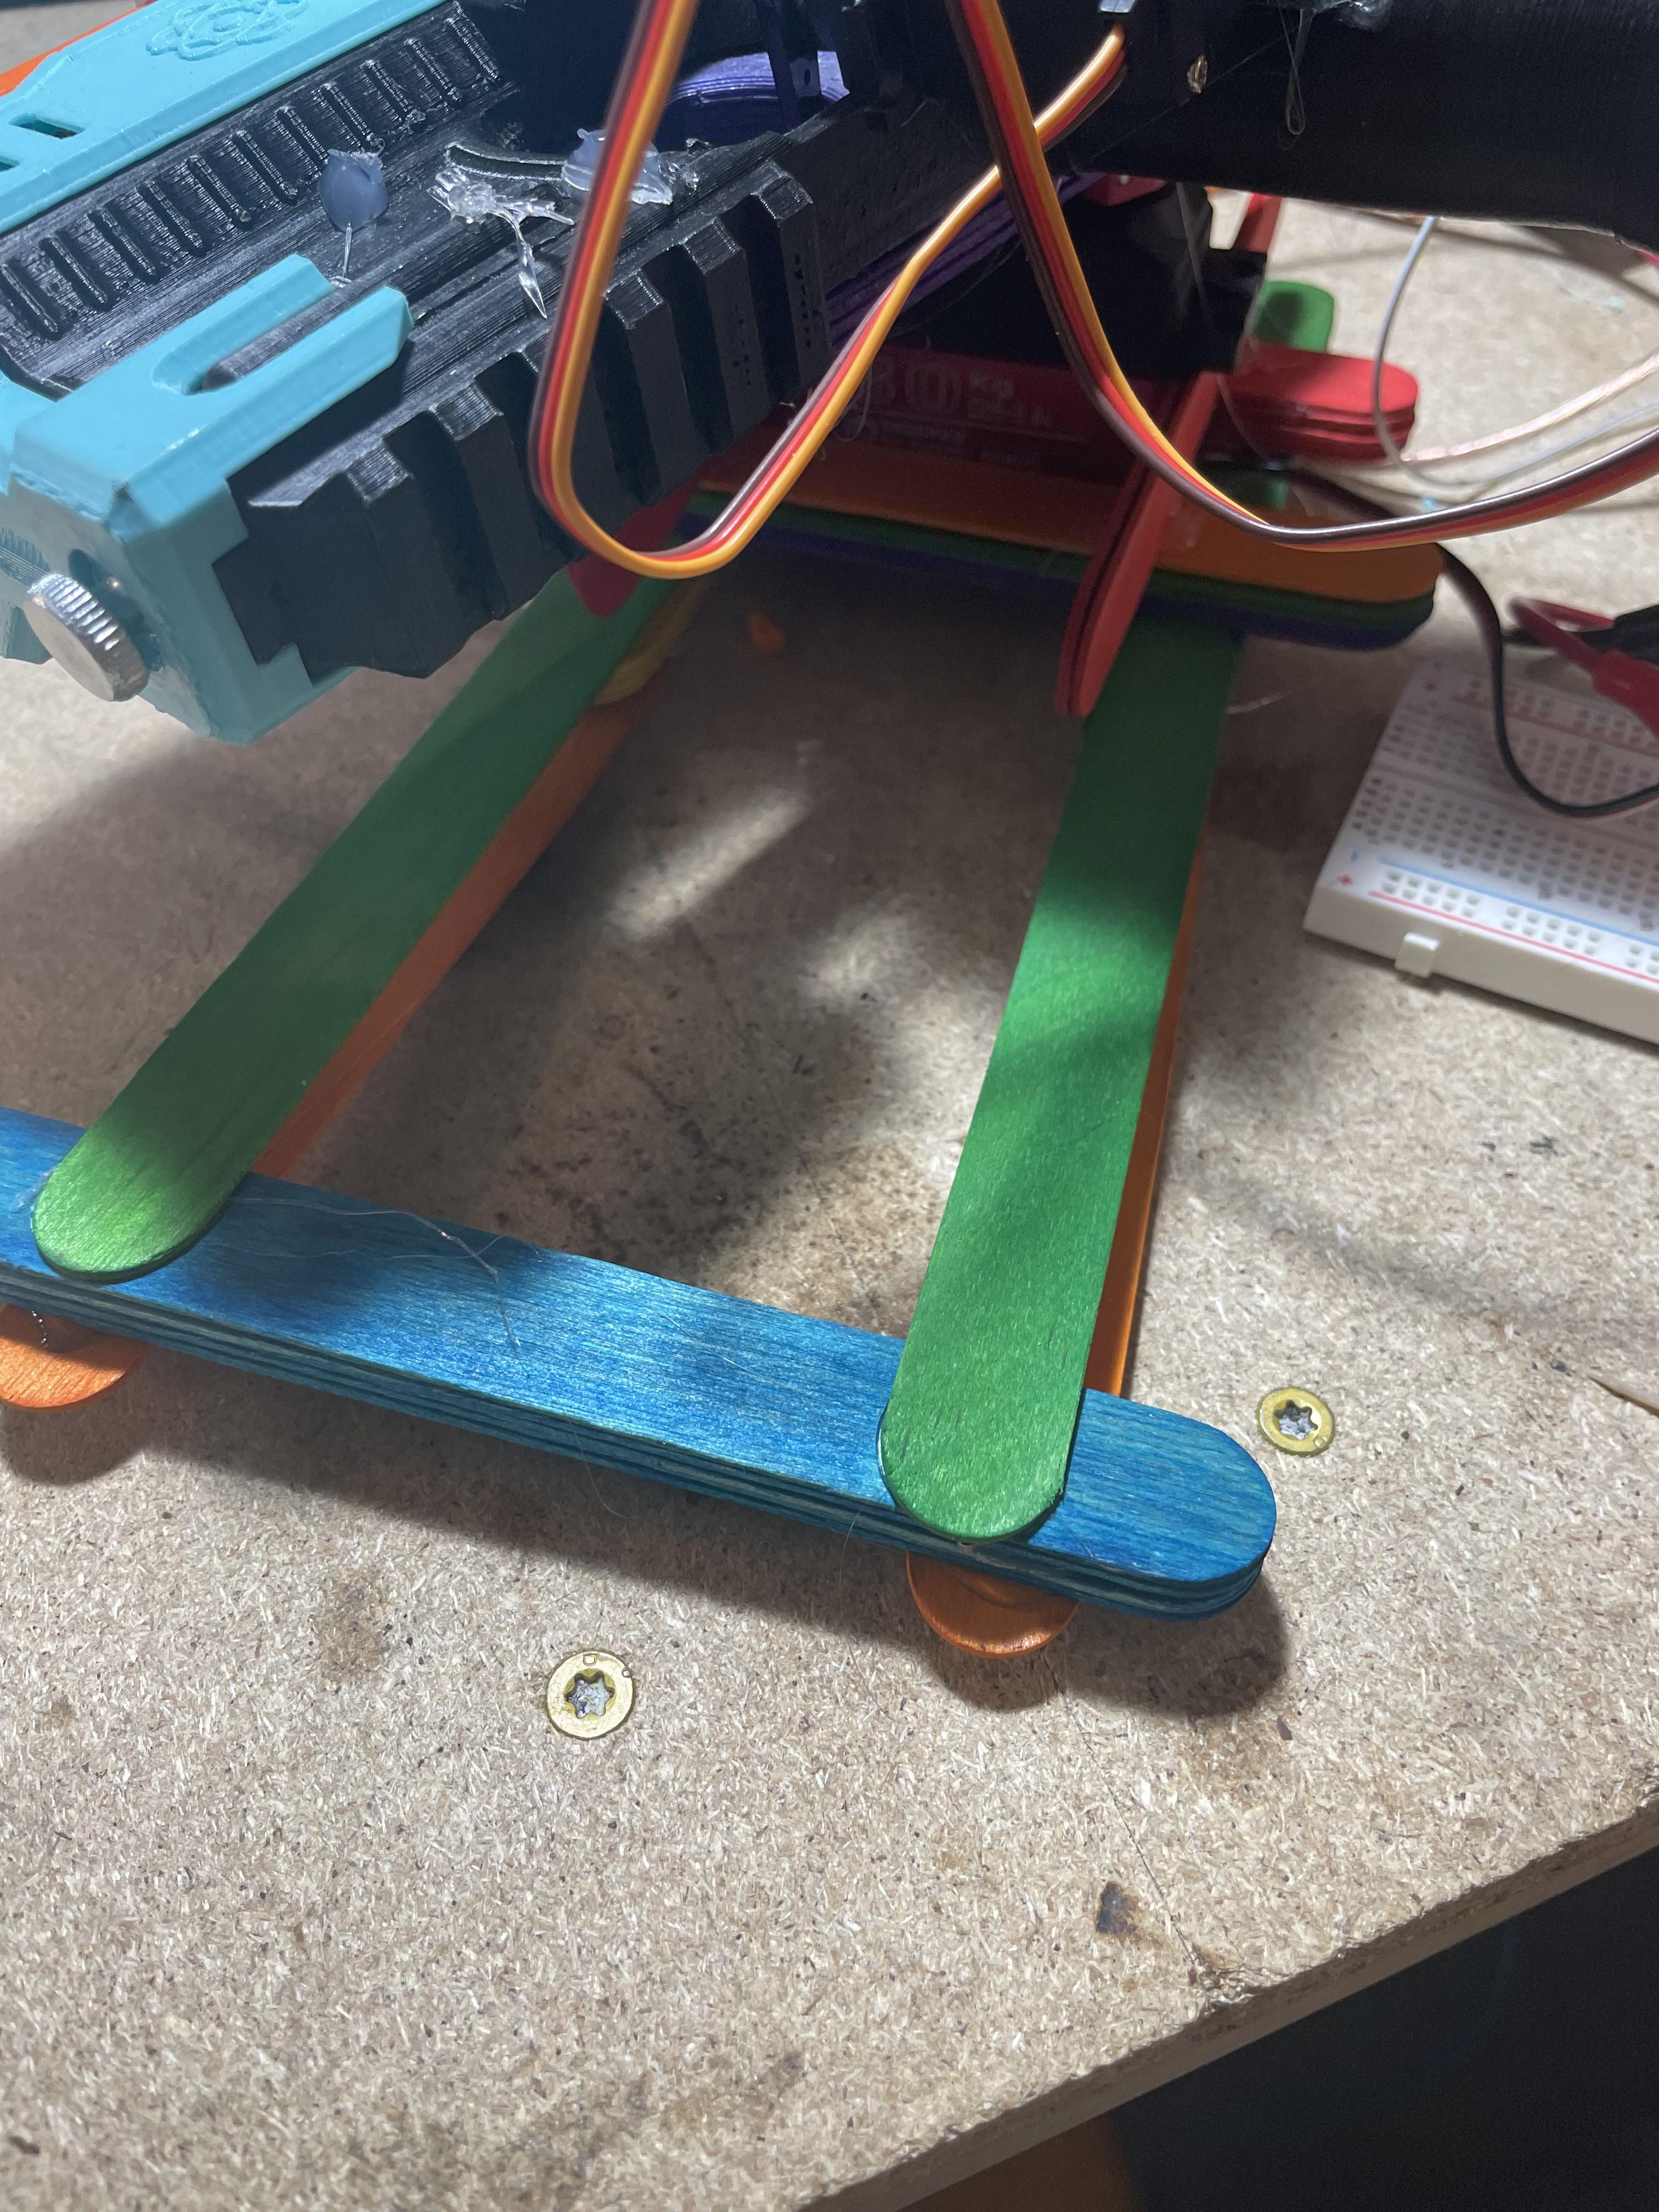
Take Two Popsicle Sticks and Hot Glue Them on Their Side to the Underside of the Servo Mounting Flanges
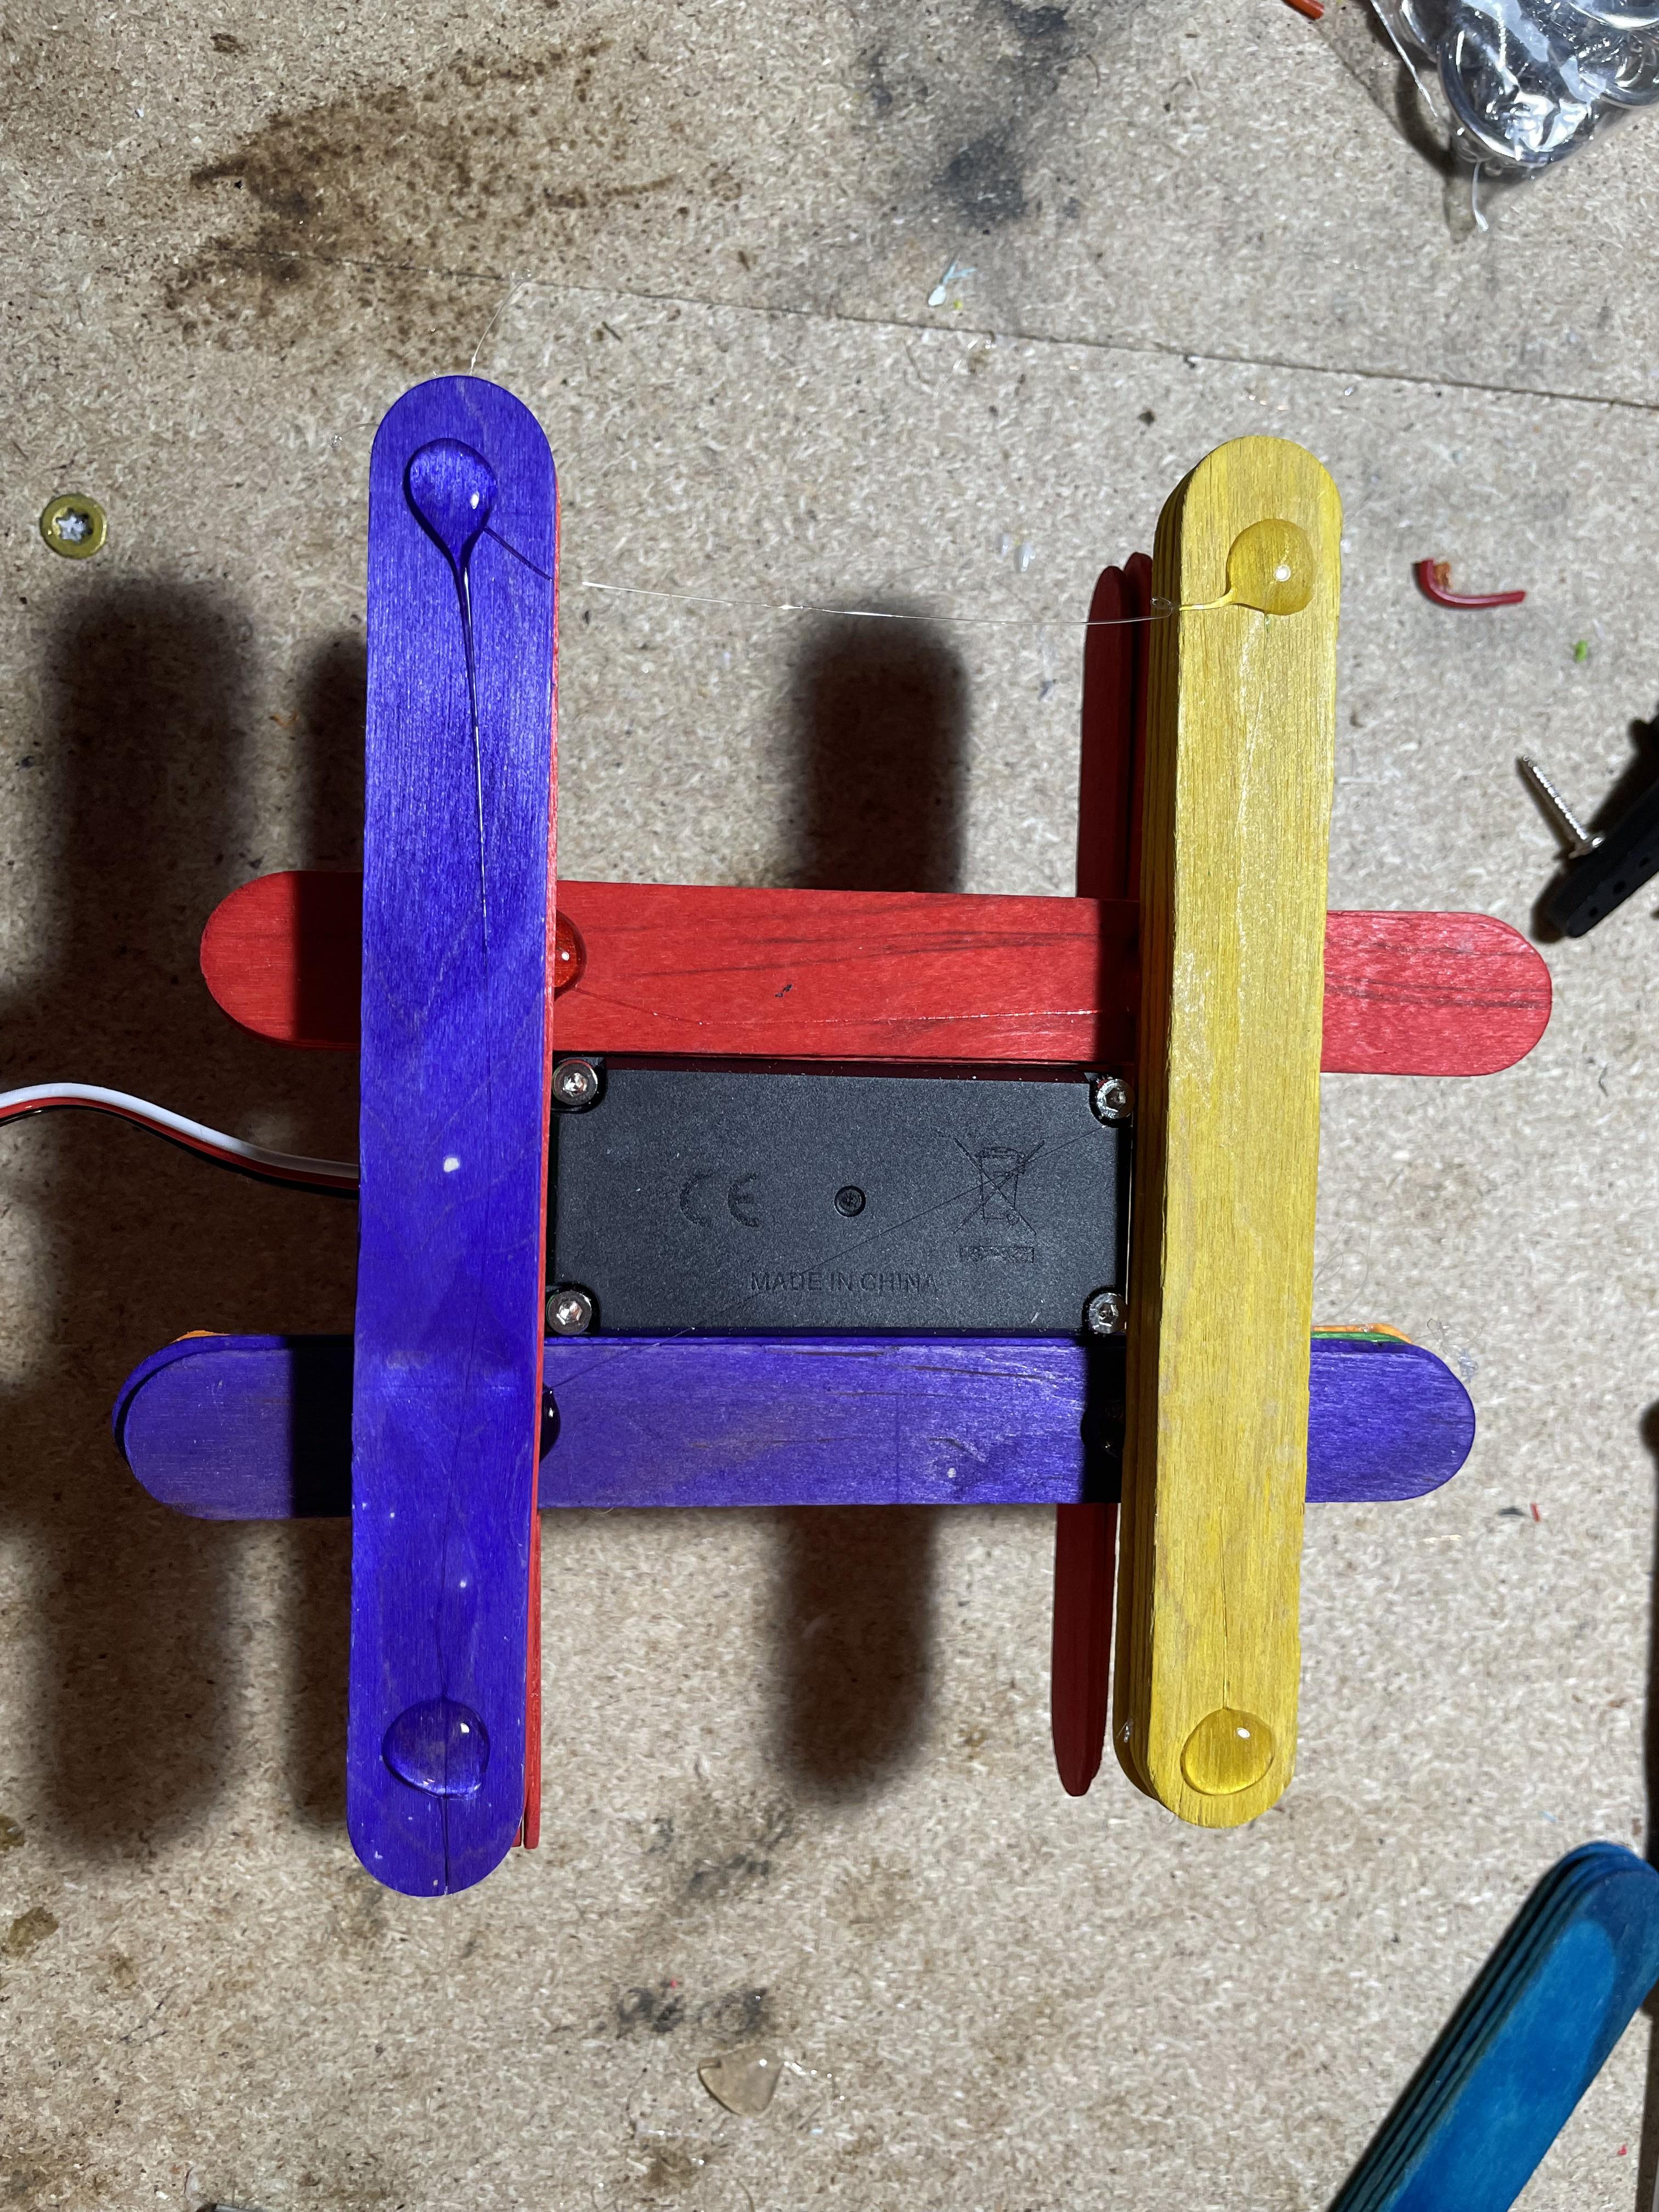
Take Two Stacks of Popsicle Sticks and Place Them Perpendicular Underneath the Popsicle Sticks and Flush to the Servo Body, Then Glue Them in Place
Take Another Two Stacks of Popsicle Sticks and Place Them Underneath and Perpendicular to the Stacks From Step 25, and Flush to the Servo Body, Then Glue Them in Place
Glue a Popsicle Stick to the Top of and in Line With Each of the Bottom Sets of Popsicle Sticks, It Should Be Sticking Off Like a Diving Board
Mirror These Popsicle Sticks to the Underside of the Frame
Take the Fifth Stack of Popsicle Sticks and Place It Underneath the Sticks From Step 27, But Above the Sticks From Step 28, Across Them Located at Their Tip. Glue This in Place There
Glue As Many Popsicle Sticks As Is Necessary Flat and Underneath the Bottom Set of Popsicle Sticks to Fully Bridge the Gap Between the Popsicle Sticks From Step 28
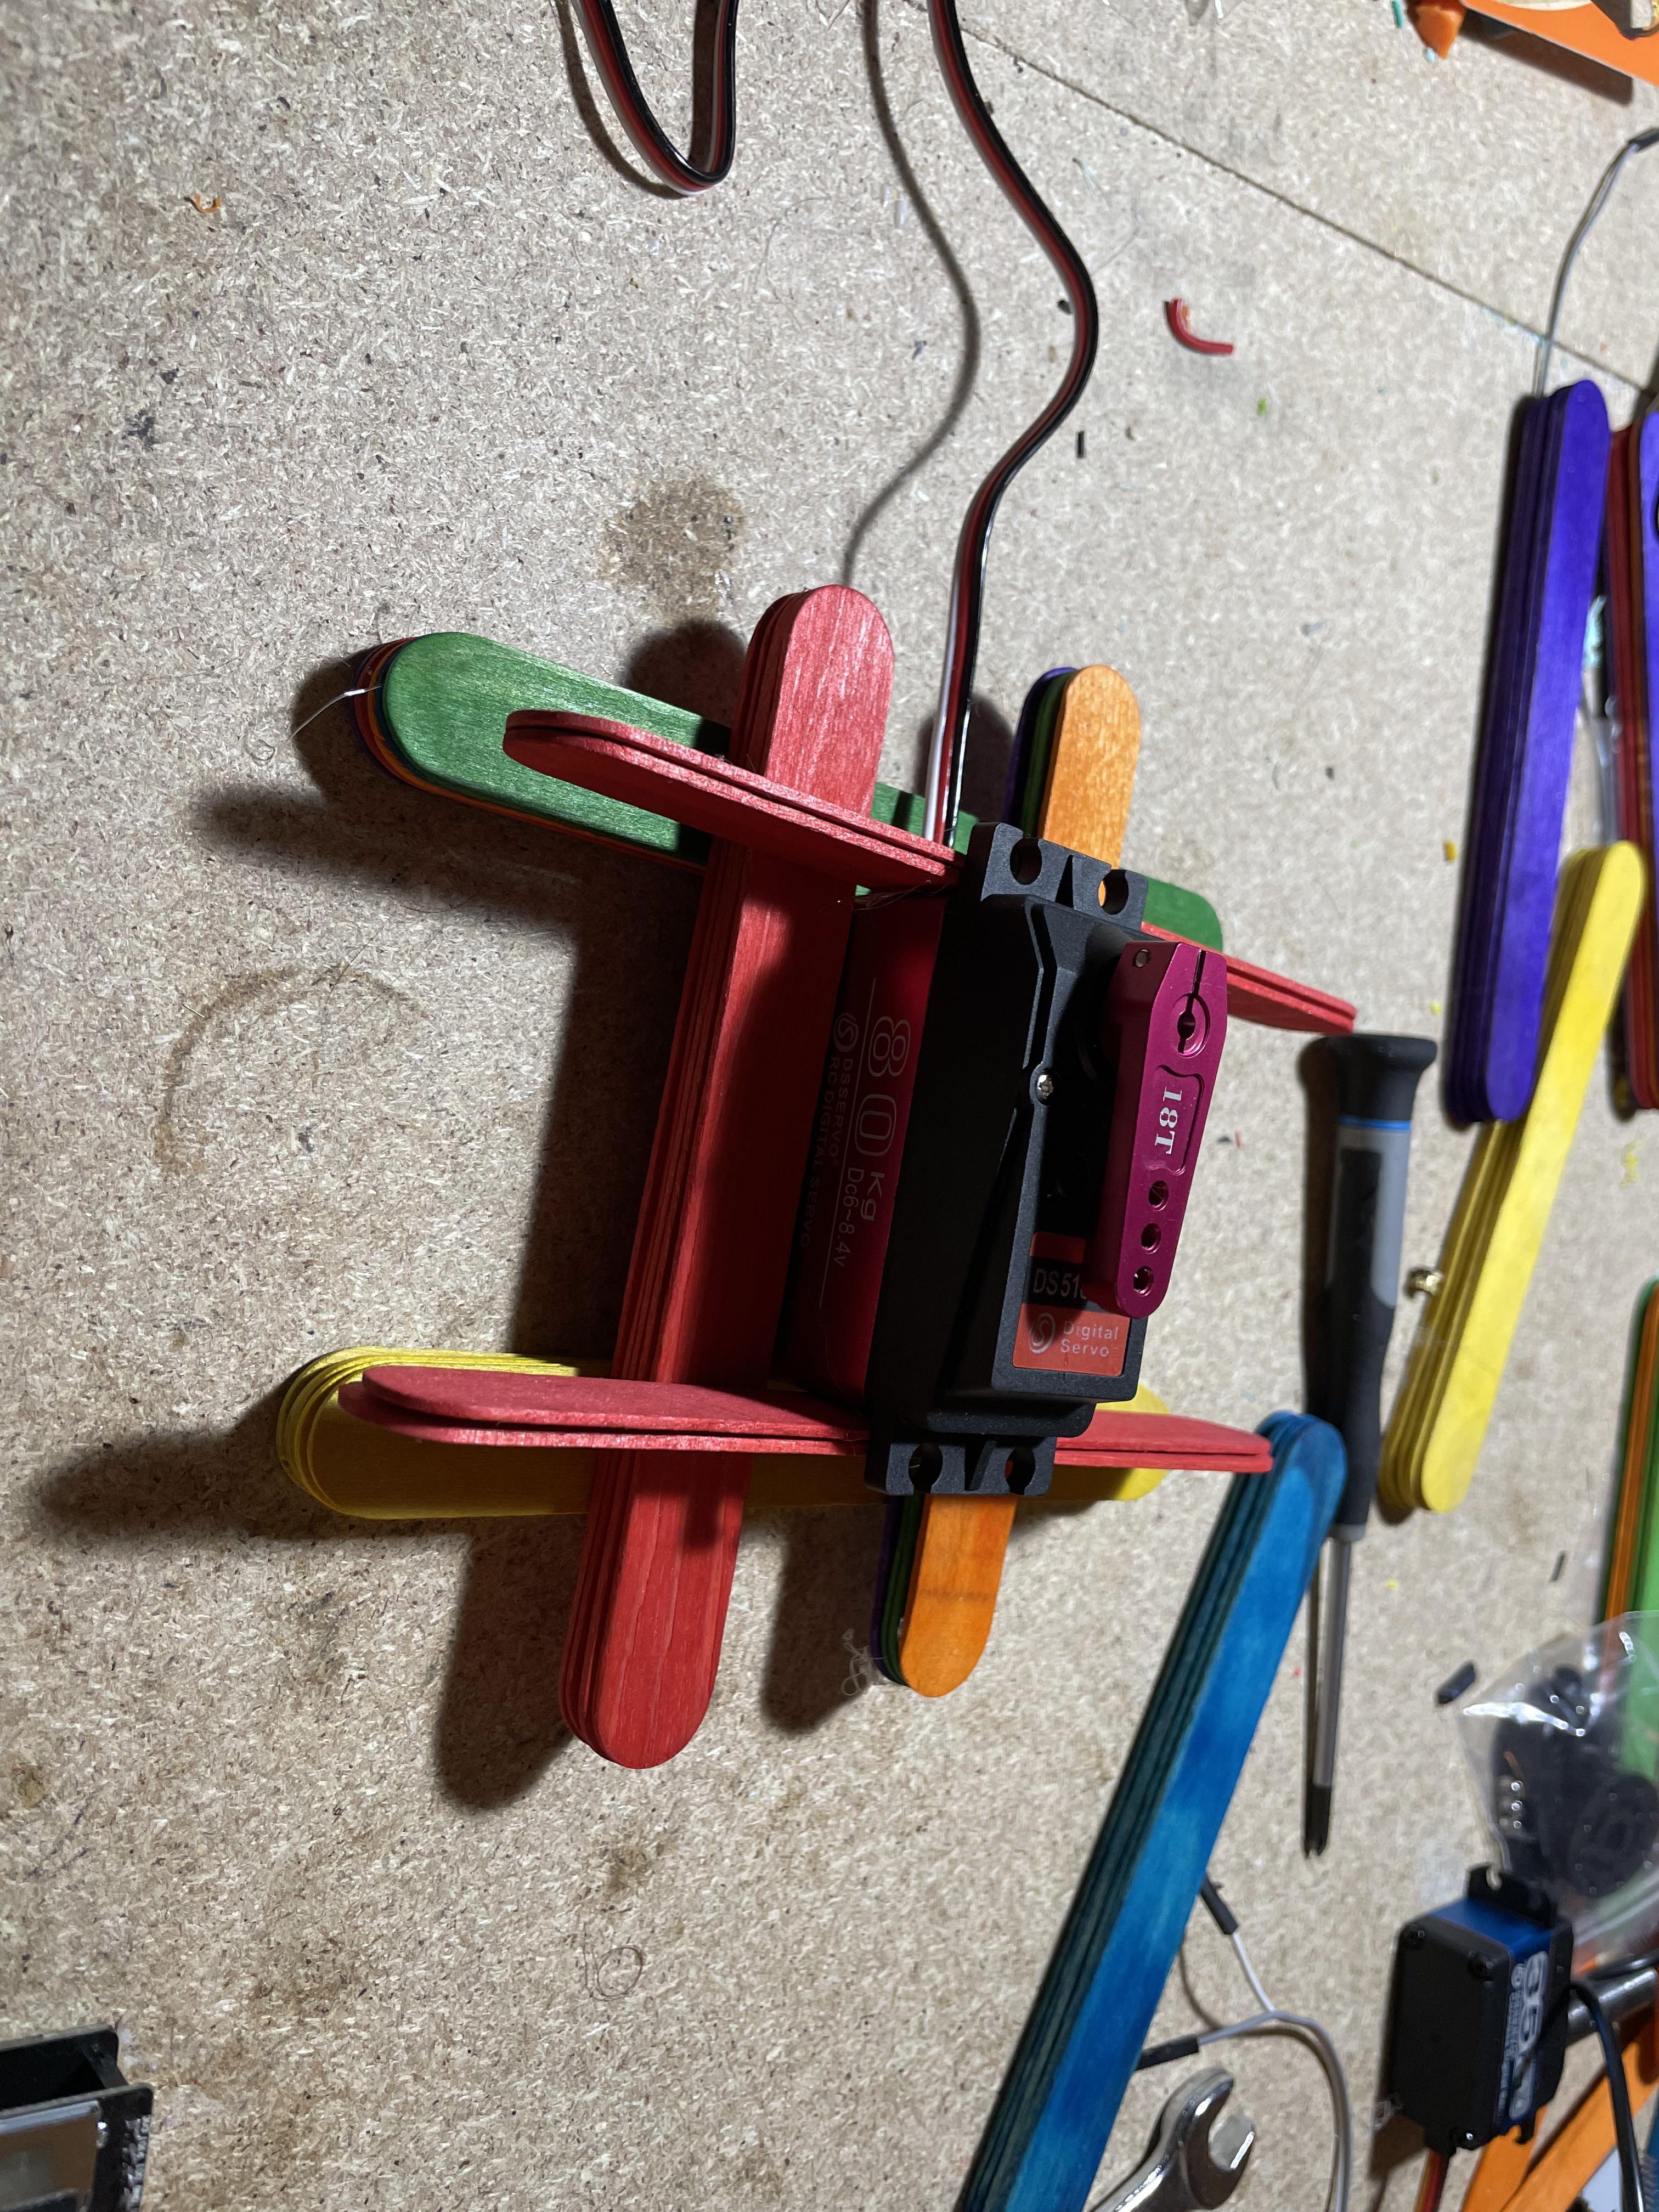
Take the Sixth Stack of Popsicle Sticks and Line It Up With the Metal Servo Horn
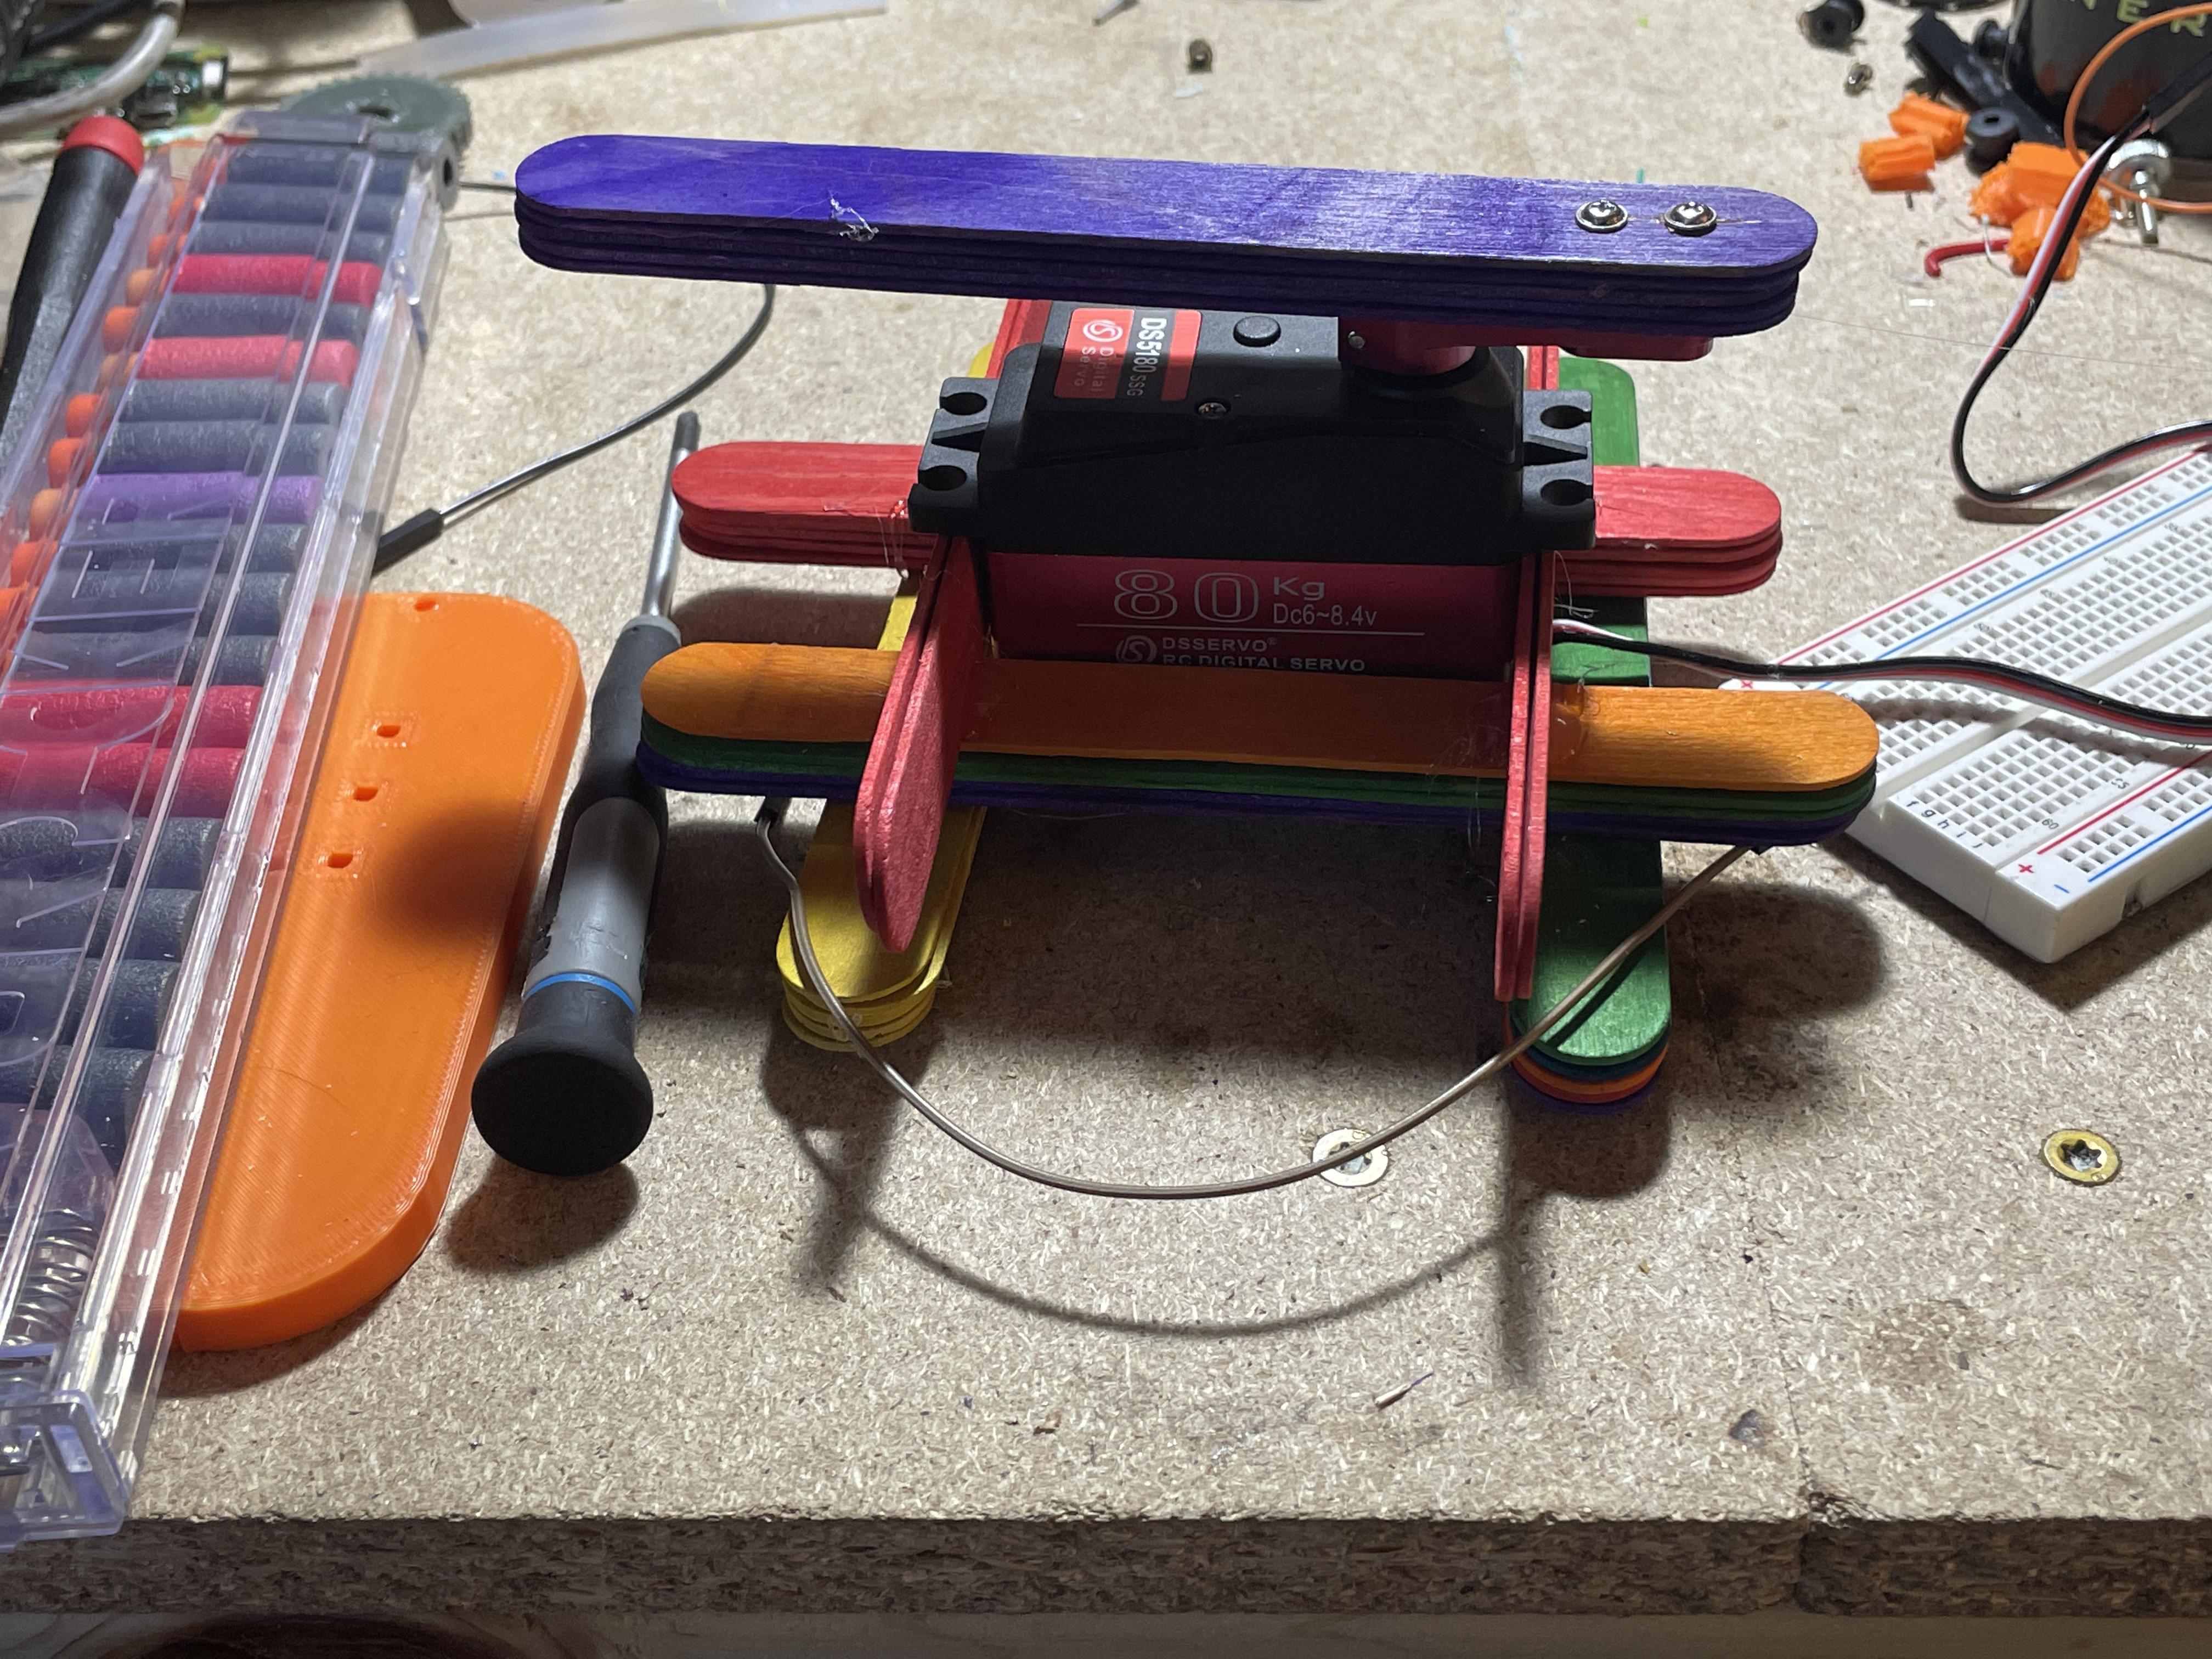
Use a Sharpie to Transfer the Location of the Mounting Holes in the Servo Horn to the Middle of One End of the Stack of Popsicle Sticks
Use a Screwdriver or 1/8th Drill to Drill Those Holes Into the Stack
Glue the Stack Onto the Servo Horn
Put the Mounting Screws for the Servo Horn Through the Stack and Screw Them Down Tightly, But Not Tightly Enough to Break the Wood
Place a 2X3 Array of Hot Glue Blobs on the Bottom of the Frame and Allow Them to Dry
Open Up the Arduino IDE Software
Copy the Code Below and Paste It Into the The New Sketch in the Software
#include <WebServer.h>
#include <WiFi.h>
#include <esp32cam.h>
#include <ESP32_Servo.h>

const char* WIFI_SSID = "Your-Wifi";
const char* WIFI_PASS = "Your-Password";

WebServer server(80);
Servo aimingServ;
Servo firingServ;
int pos;
bool dir;
int firePos = 0;
int openPos = 30;
int servoIncrement = 3;

static auto loRes = esp32cam::Resolution::find(320, 240);
static auto midRes = esp32cam::Resolution::find(350, 530);
static auto hiRes = esp32cam::Resolution::find(800, 600);

void serveJpg()
{
 auto frame = esp32cam::capture();

 if (frame == nullptr) {
  Serial.println("CAPTURE FAIL");
  server.send(503, "", "");
  return;
 }
 server.setContentLength(frame->size());
 server.send(200, "image/jpeg");
 WiFiClient client = server.client();
 frame->writeTo(client);
}

void handleJpgMid()
{
 if (!esp32cam::Camera.changeResolution(midRes)) {
 }
 serveJpg();
}

void scan() {
 server.send(201);
 if(pos >= 179 || pos <= 1) {
  dir = !dir;
 }
 if(dir) {
  pos+=1;
  aimingServ.write(pos);
 } else {
  pos-=1;
  aimingServ.write(pos);
 }
}

void moveLeft() {
 server.send(201);
 dir = false;
 pos-=servoIncrement;
 if(pos < 1) {
  pos = 0;
 }
 aimingServ.write(pos);
}
void moveRight() {
 server.send(201);
 dir = true;
 pos+=servoIncrement;
 if(pos > 179) {
  pos =180;
 }
 aimingServ.write(pos);
}
void fire() {
 server.send(201);
 firingServ.write(firePos);
 delay(500);
 firingServ.write(openPos);
}


void setup(){
 pinMode(4,OUTPUT);
 digitalWrite(4,HIGH);
 delay(100);
 digitalWrite(4,LOW);
 Serial.begin(115200);
 Serial.println();
 aimingServ.attach(14);
 firingServ.attach(15);
 pos = 90;
 dir = false;
 aimingServ.write(pos);
 firingServ.write(openPos);
 {
  using namespace esp32cam;
  Config cfg;
  cfg.setPins(pins::AiThinker);
  cfg.setResolution(hiRes);
  cfg.setBufferCount(2);
  cfg.setJpeg(80);

  bool ok = Camera.begin(cfg);
  Serial.println(ok ? "CAMERA OK" : "CAMERA FAIL");
  if(!ok) {
   for(int i = 0; i < 10; i ++){
    digitalWrite(4,HIGH);
    delay(1000);
    digitalWrite(4,LOW);
    delay(500);
   }
  } else {
    for(int j = 0; j<3; j++){
    for(int i = 0; i < 3; i ++){
     digitalWrite(4,HIGH);
     delay(250);
     digitalWrite(4,LOW);
     delay(250);
    }
    delay(500);
   }
  }
 }
 WiFi.persistent(false);
 WiFi.mode(WIFI_STA);
 WiFi.begin(WIFI_SSID, WIFI_PASS);
 while (WiFi.status() != WL_CONNECTED) {
  delay(250);
 }
 Serial.print("http://");
 Serial.println(WiFi.localIP());
 Serial.println(" /cam-mid.jpg");
 Serial.println(" /left");
 Serial.println(" /right");
 Serial.println(" /fire");
 Serial.println(" /scan");
 server.on("/cam-mid.jpg", handleJpgMid);
 server.on("/left", moveLeft);
 server.on("/right", moveRight);
 server.on("/fire", fire);
 server.on("/scan", scan);

 server.begin();
 for(int i = 0; i < 10; i ++){
    digitalWrite(4,HIGH);
    delay(50);
    digitalWrite(4,LOW);
    delay(50);
   }
}

void loop()
{
 server.handleClient();
}
Replace "Your-Wifi" and "Your-Password" With Your Wifi Address and Password. Leave the Quotation Marks Around the Wifi Name and Password
Plug the ESP 32 Into Your Computer or Laptop Using a USB Cable and Make Sure That the ESP 32 Is Connected to Your Device
Click the Arrow in the Top Left of the Software to Upload the Program to the ESP 32
Watch the Serial Monitor in the Arduino IDE, Ensure the Baud Rate Is Set to 115200
If the Wifi Was Set Up Correctly, the Serial Monitor Will Eventually Show a Number in the Format "xxx.xxx.xxx.xxx." Some of These Sections Can Be Two and One Digit Numbers. Write Down This Number, Do Not Include the Quotations
On Your Computer, Open Notepad
Paste the Following Code Into Your Notepad Window
import cv2
import matplotlib.pyplot as plt
import cvlib as cv
import urllib.request
import numpy as np
from cvlib.object_detection import draw_bbox
from cvlib.face_detection import detect_face

ipURL = 'http://xxx.xxx.xxx.xxx'

url= ipURL + '/cam-mid.jpg'
urlLeft= ipURL + '/left'
urlRight= ipURL + '/right'
urlFire= ipURL + '/fire'
urlScan= ipURL + '/scan'
im=None

if __name__ == '__main__':
  print("started")
  print(url)
  cv2.namedWindow("detection", cv2.WINDOW_AUTOSIZE)
  while True:
    imgnp=None
    img_resp=urllib.request.urlopen(url)
    imgnp=np.array(bytearray(img_resp.read()),dtype=np.uint8)
    img_resp.close()
    im = cv2.imdecode(imgnp,-1)
    bbox, conf = detect_face(im)
    num = -1;
    for i in bbox:
      print("s6")
      num = (i[1] + i[3]) / 2
      break
    width,height,cols = im.shape
    print(num)
    img_resp = None
    if (num < 0):
      while img_resp == None:
        img_resp=urllib.request.urlopen(urlScan)
      imgnp=np.array(bytearray(img_resp.read()),dtype=np.uint8)
      img_resp.close()
    elif (num > (2 * height / 3) ):
      while img_resp == None:
        img_resp=urllib.request.urlopen(urlLeft)
      imgnp=np.array(bytearray(img_resp.read()),dtype=np.uint8)
      img_resp.close()
    elif (num < (1 * height / 3) ):
      while img_resp == None:
        img_resp=urllib.request.urlopen(urlRight)
      imgnp=np.array(bytearray(img_resp.read()),dtype=np.uint8)
      img_resp.close()
    elif ((num >= (1 * height / 3)) & (num <= (2 * width / 3)) ):
      while img_resp == None:
        img_resp=urllib.request.urlopen(urlFire)
      imgnp=np.array(bytearray(img_resp.read()),dtype=np.uint8)
      img_resp.close()
    cv2.imshow('detection',im)
    key=cv2.waitKey(5)
    if key==ord('q'):
      break
  cv2.destroyAllWindows()
In the Section That Has Xxx.xxx.xxx.xxx, Place the Number That You Wrote Down Previously
Save the File to Your Documents Folder
In Your Documents Folder, Right Click on the File and Select Rename
In the Box for the New Name, Type in The-name-you-want-for-your-file.py
Note The .Py Extension Is The Essential Part Of The Name, But It Would Be Wise Not To Use Spaces Or Slashes In Your Name
Connect the Positive Terminal of Each Servo Together.
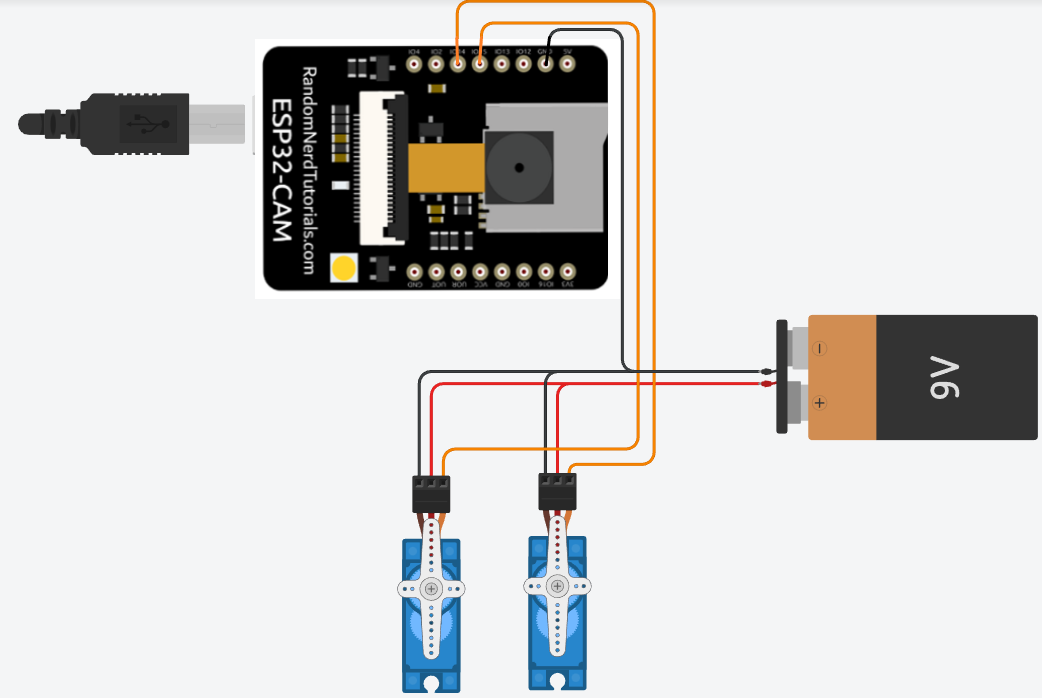
Connect the Negative Terminal of Each Servo and the GND Pin From the ESP32 Together.
Connect Pin 14 on the ESP32 to the Swivel Servo Signal Pin

Connect Pin 15 on the ESP32 to the Trigger Servo Signal Pin
Gluing the Blaster in Place 1
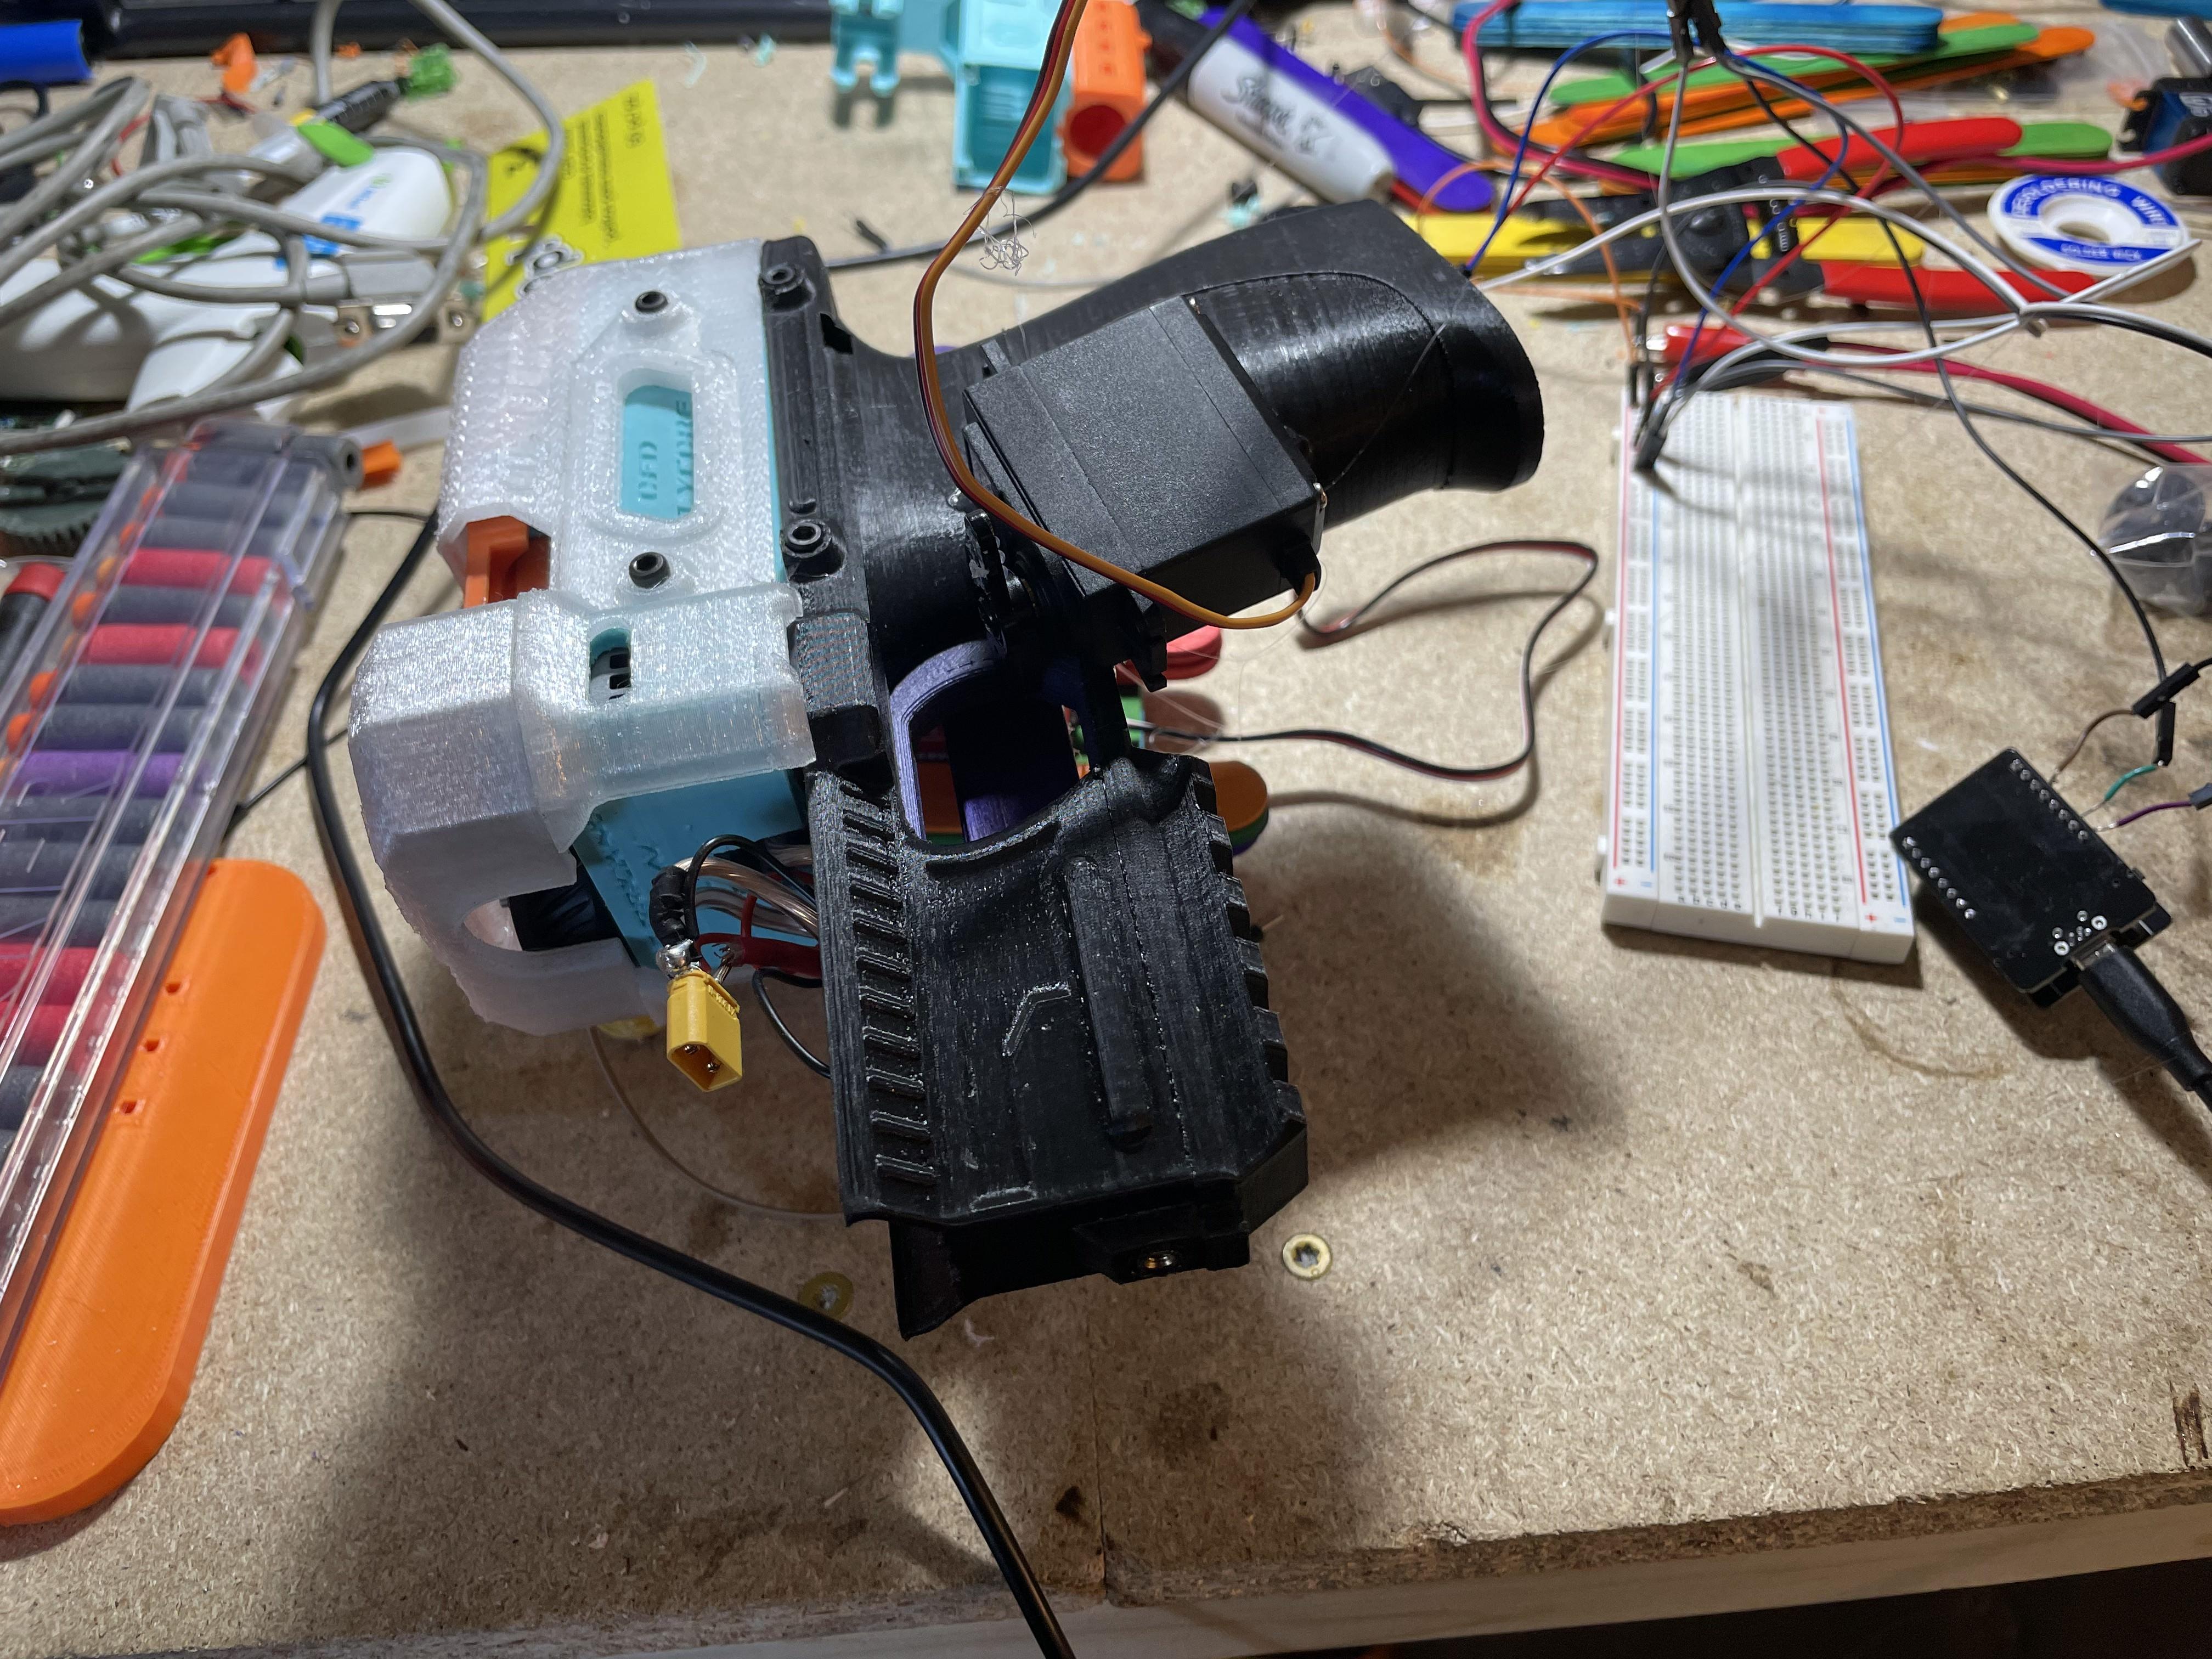
This is where you get to bring in your own nerf toy and mount it to your project. The one used in the pictures is just an example, but many other options exist. Any battery powered Nerf blaster can be made to run on this turret.
Balance your Nerf blaster on the wooden section of the frame sitting atop the servo, in such a way that it can still be loaded and the trigger is accessible, but it does not significantly lean to one side or another. (Ensure that this is done with the battery in the toy so it does not throw balance off later)
Gluing the Blaster in Place 2
Lift the toy up, and apply a significant amount of hot glue to the popsicle stick on the servo then place the toy back onto the position it was in. Hold it there until the hot glue cools.
Take Your MG 996R Servo
Set Your Servo to 30 Degrees and Attach the Cross Pin Horn So That It Is Perpendicular to the Longest Face on the Body, Be Sure to Screw It In
Line Up the Horn So That It Sits Into the Trigger Well and Is Just Resting on the Trigger Pulling Face of the Trigger
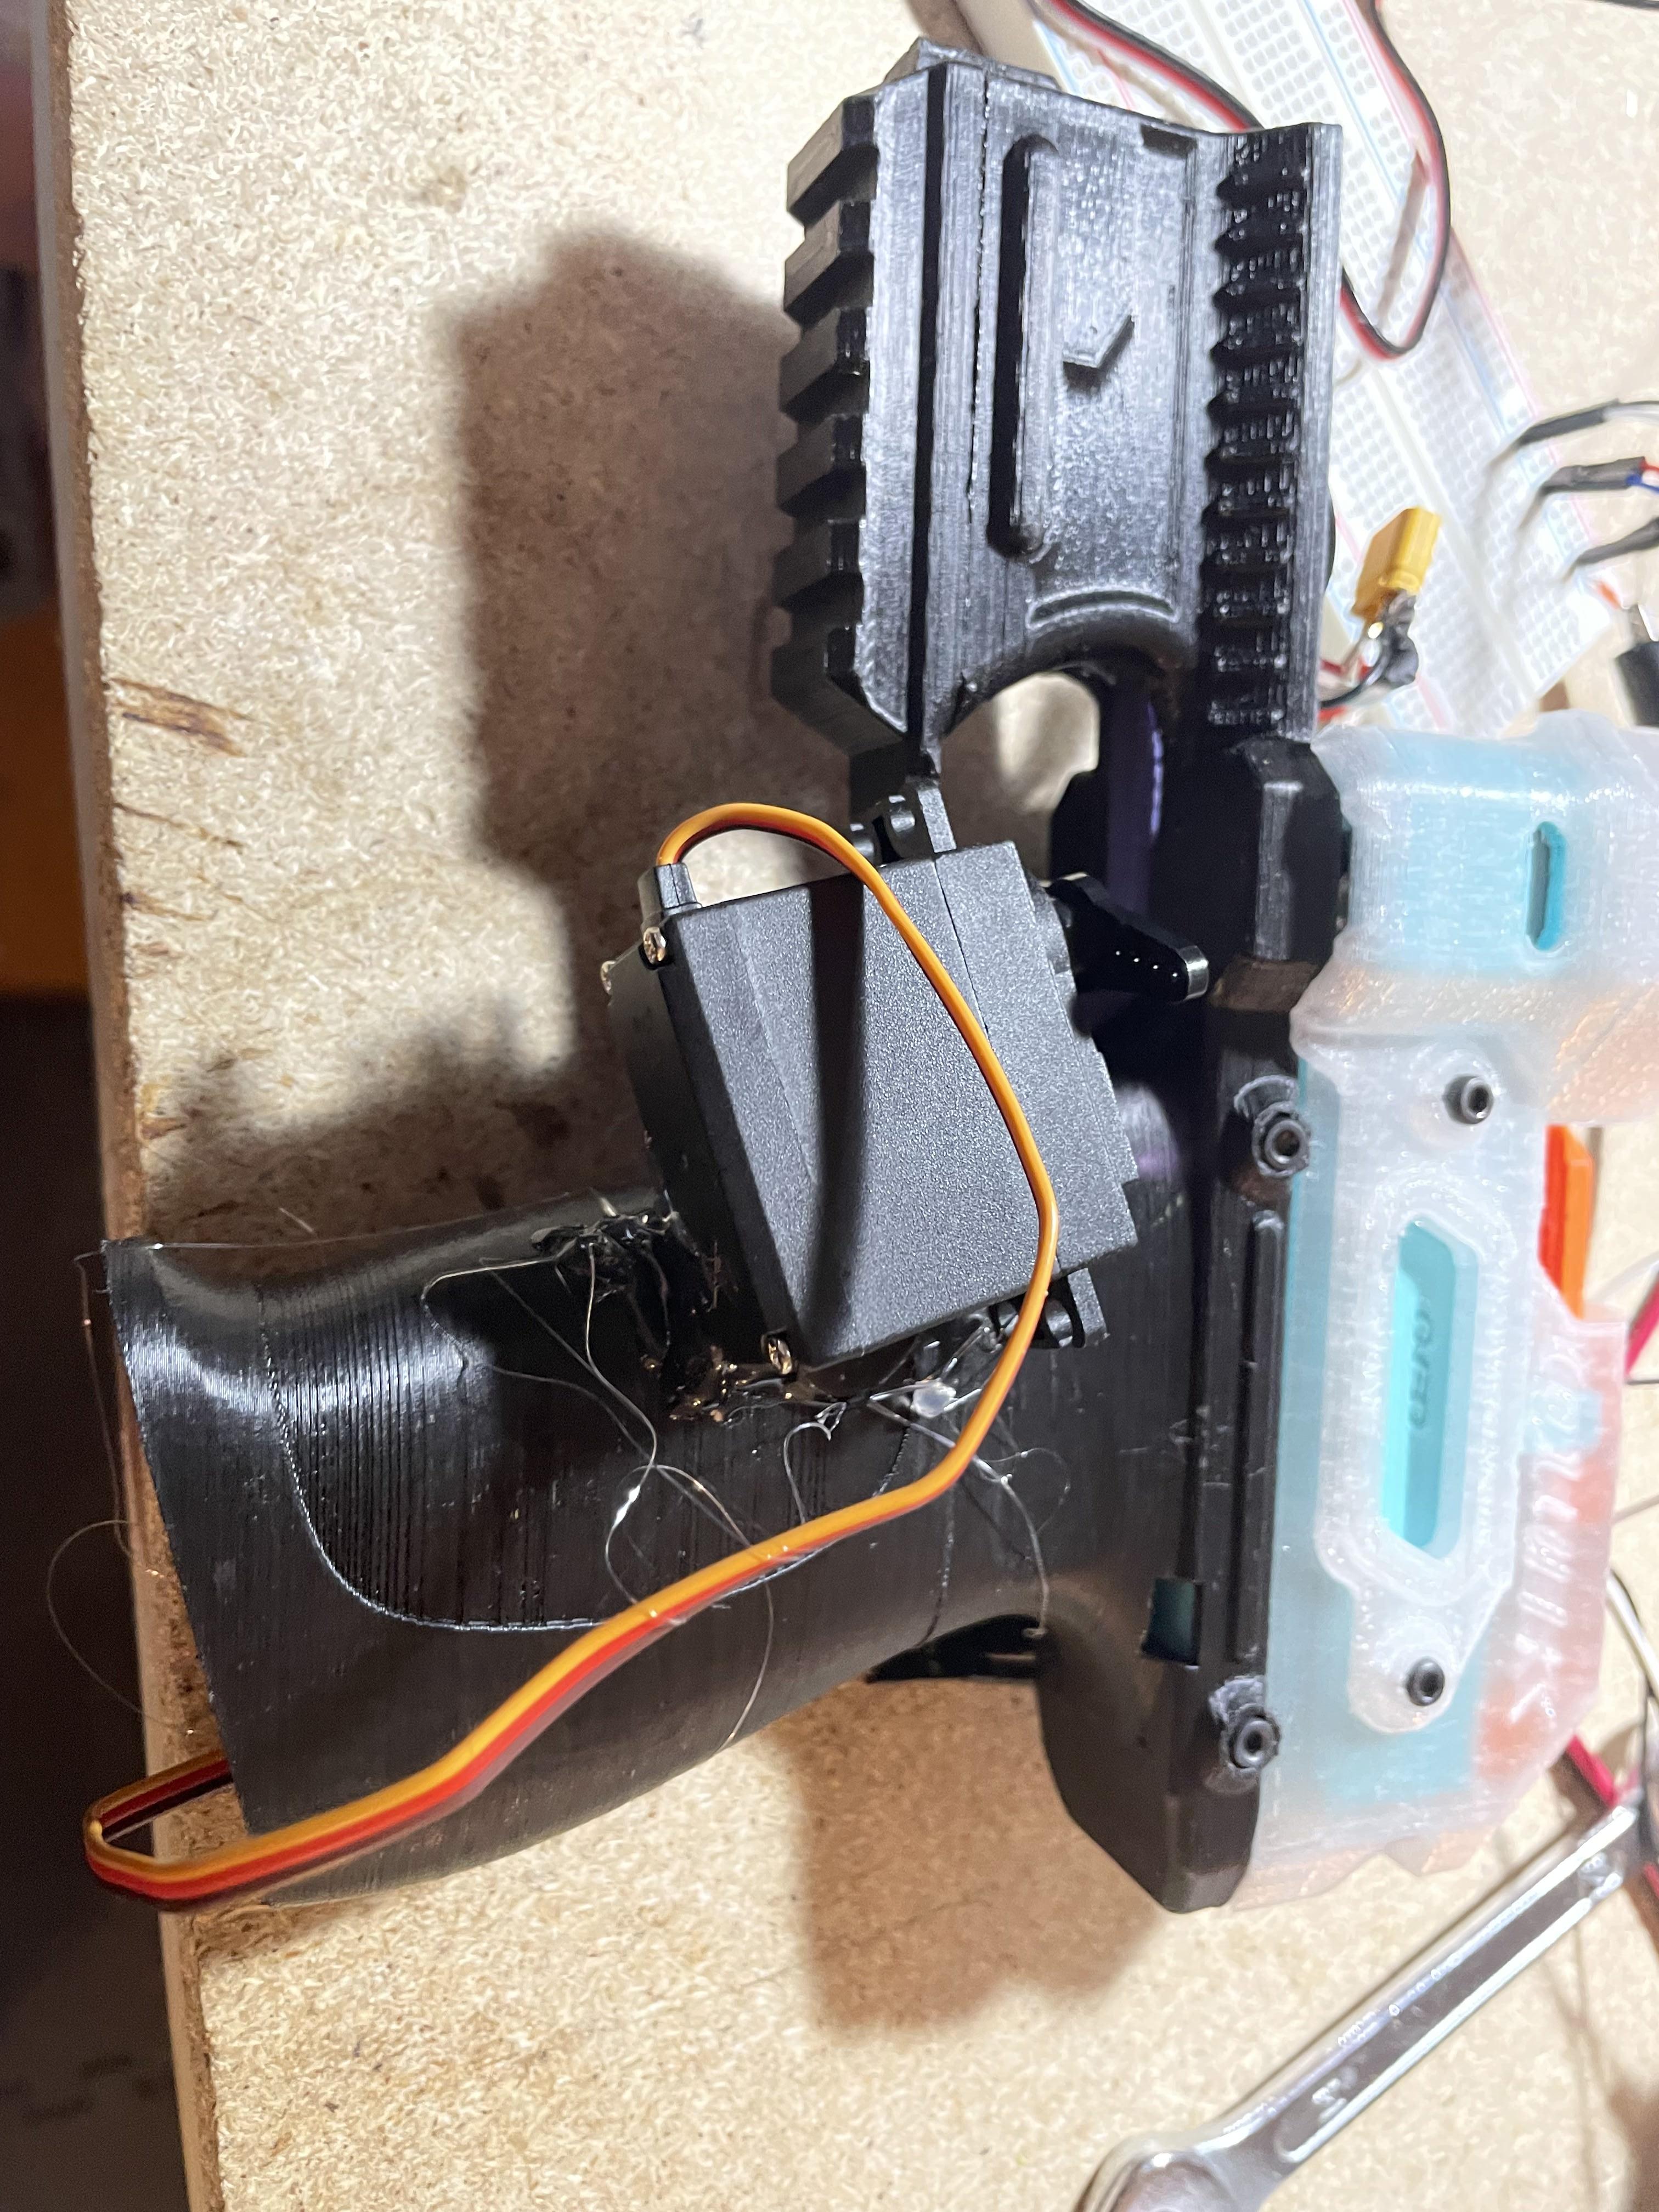
Apply a Significant Amount of Hot Glue to the Body of the Servo That Faces the Toy, Then Push Them Together and Hold Until the Hot Glue Has Cooled
Mount the ESP32 As Pictured, With One Row of Pins Against the Body of the Toy and the Camera Facing Down the Barrel and Slightly Angled Upwards
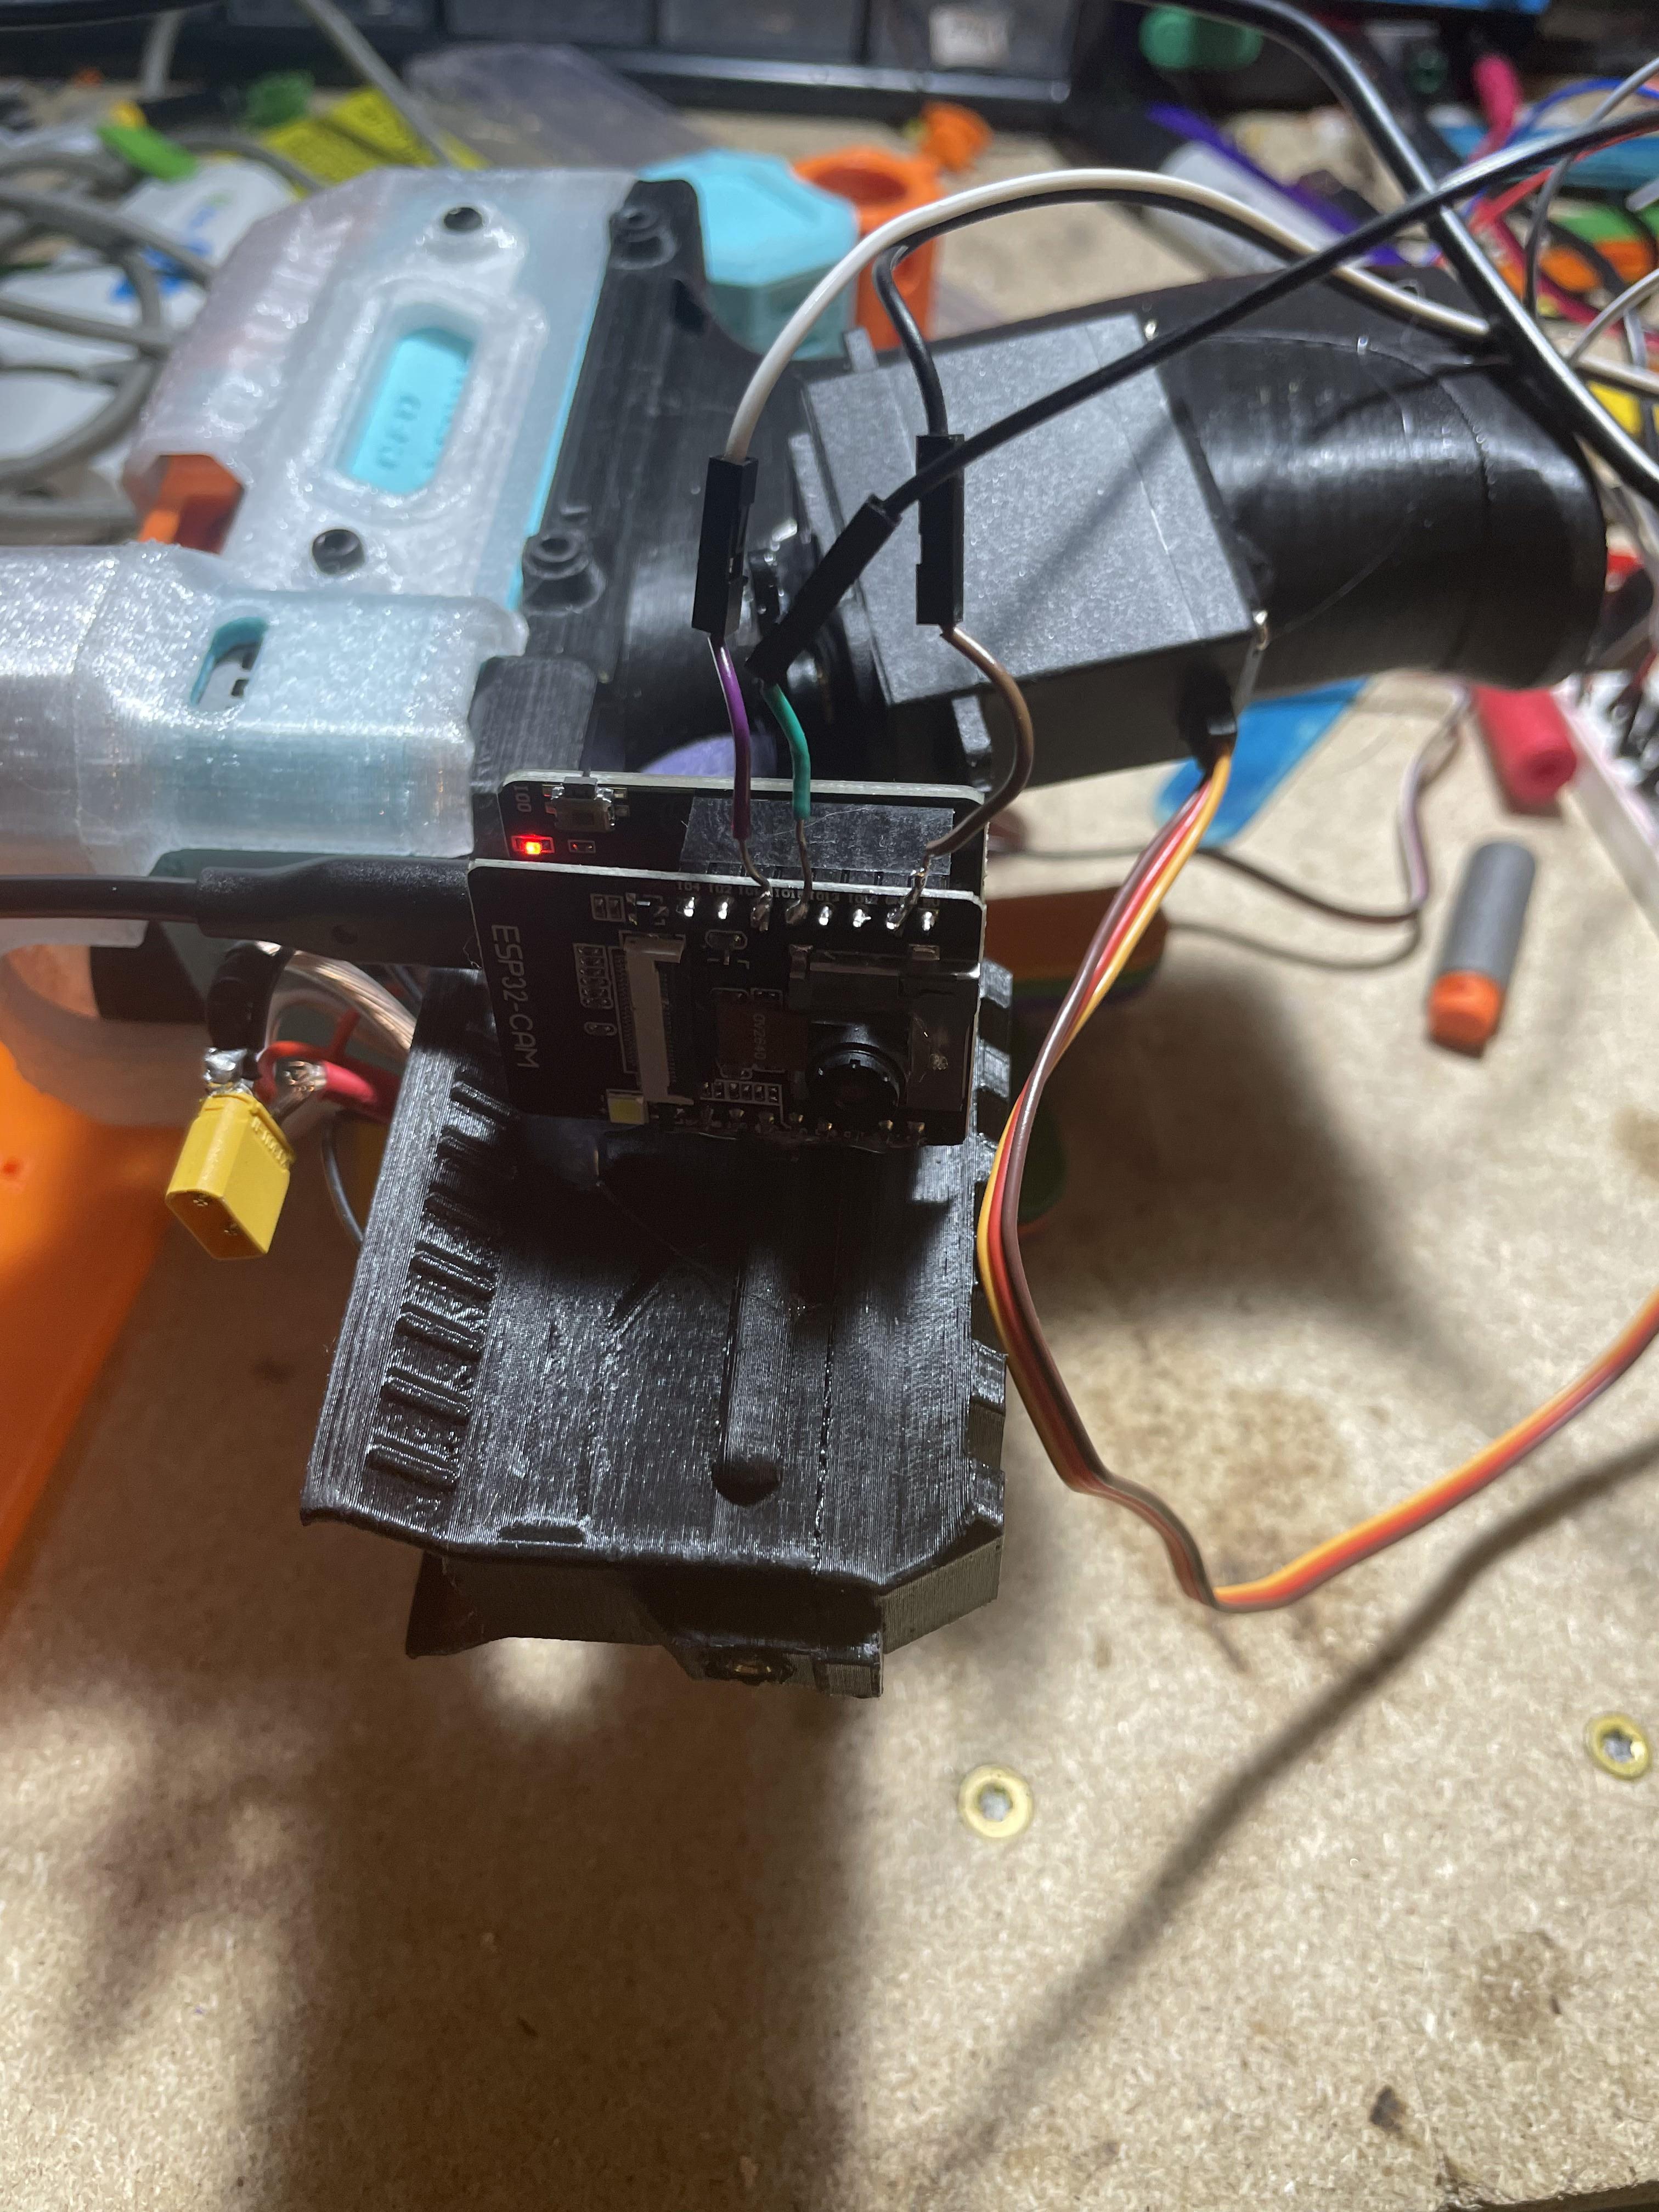
Secure the ESP32 in Place With a Small Amount of Hot Glue, Be Sure Not to Get Any in the Contacts
Plug the ESP32 Into Your Computer and Run Both Programs As Specified in Section 6.
Use This To Verify The Camera Is Aligned How You Would Like. Ensure the toy and servos are unplugged for this step
Unplug Everything and Use More Hot Glue to Affix the ESP32 in Place More Permanently
Place the Battery and Wiring in the Tray Underneath the Turret
Plug the ESP32 Into Your Computer or a USB Power Bank
Plug the Connected Servo Positive Wires to the Battery Positive
Plug the Connected Servo Negatives and the ESP32 GND to the Battery Negative
Ensure the ESP32 Has Gone Through It's Startup Sequence
This will be clear when the ESP32 has posted its IP address in the serial monitor, or it goes through first four flashes, then two sets of 3 flashes, and finally a set of 10 quick flashes. DO NOT PROCEED if it has not produced the quick flashes. If it does not do this shortly, try turning it off and back on again. or check the wifi and SSID section of the ESP-32 Program.
Open CMD
Refer To Steps 18 And 19
Type in "cd Documents"
Type in Python The-name-you-want-for-your-file.py
And now your turret is running!
Sources
Sources
[1] “Project Description - Spring 2023 ECET 38001-001 LEC.” https://purdue.brightspace.com/d2l/le/content/704478/viewContent/11560738/View (accessed Feb. 13, 2023).
[2] A. Kumar, A. Kaur, and M. Kumar, “Face detection techniques: a review,” Artif. Intell. Rev., vol. 52, no. 2, pp. 927–948, Aug. 2019, doi: 10.1007/s10462-018-9650-2.
[3] H. M. Saputra, A. Nurhakim, and M. N. Firdaus, “Servo Motor Controller Device for Stewart Platform Based on Simple Pulse Generator,” in 2019 International Conference on Radar, Antenna, Microwave, Electronics, and Telecommunications (ICRAMET), Oct. 2019, pp. 104–108. doi: 10.1109/ICRAMET47453.2019.8980422.
[4] L. Wulfert, C. Wiede, M. H. Verbunt, P. Gembaczka, and A. Grabmaier, “Human Detection with A Feedforward Neural Network for Small Microcontrollers,” in 2022 7th International Conference on Frontiers of Signal Processing (ICFSP), Sep. 2022, pp. 14–22. doi: 10.1109/ICFSP55781.2022.9924667.
[5] A. Bender, E. Marel, and I. Kristinsson, “Mechatronics I Final Project Report Auto Targeting Nerf Turret”, Dec. 2012, pp. 1-34, doi: 10.1063/1.4999076.
[6] “ESP32 series,” Espressif. [Online]. Available: https://www.espressif.com/sites/default/files/documentation/esp32_datasheet_en.pdf. [Accessed: 03-Mar-2023].
[7] “Metal DC geared motor w/encoder - 12V 83rpm 45kg.Cm Sku: Fit0185 - digi-key,” DigiKey. [Online]. Available: https://media.digikey.com/pdf/Data%20Sheets/DFRobot%20PDFs/FIT0185_Web.pdf. [Accessed: 03-Mar-2023].
[8] “OV7670 CMOS camera module REVB DS - OpenHacks,” OpenHacks. [Online]. Available: https://www.openhacks.com/uploadsproductos/ov7670_cmos_camera_module_revc_ds.pdf. [Accessed: 03-Mar-2023].
[9] “Amazon.com: FLASH HOBBY D3536 1450KV Brushless Outrunner Motor with 2-4s Lipo (1450kv) : Toys & Games.” https://www.amazon.com/FLASH-HOBBY-1450KV-Brushless-Outrunner/dp/B08M96DF1R/ref=asc_df_B08M96DF1R/?tag=hyprod-20&linkCode=df0&hvadid=598295292427&hvpos=&hvnetw=g&hvrand=15809673157108136490&hvpone=&hvptwo=&hvqmt=&hvdev=c&hvdvcmdl=&hvlocint=&hvlocphy=9016722&hvtargid=pla-1727180490677&th=1 (accessed Mar. 03, 2023).
[10] “Amazon.com: Greartisan DC 12V 50RPM Gear Motor High Torque Electric Micro Speed Reduction Geared Motor Eccentric Output Shaft 37mm Diameter Gearbox : Automotive.” https://www.amazon.com/Greartisan-Electric-Reduction-Eccentric-Diameter/dp/B071XCX1LH/ref=asc_df_B071XCX1LH/?tag=hyprod-20&linkCode=df0&hvadid=198064502357&hvpos=&hvnetw=g&hvrand=7258452090221824506&hvpone=&hvptwo=&hvqmt=&hvdev=c&hvdvcmdl=&hvlocint=&hvlocphy=9016722&hvtargid=pla-350566183361&th=1 (accessed Mar. 03, 2023).
[11] “Amazon.com: INJORA 35KG Servo- High Torque Servo Motors- Watreproof Digital Metal Gear for 1/8 1/10 RC Car Models Crawler Truck Boat (Control Angle 270°) : Toys & Games.” https://www.amazon.com/dp/B0922R8KFK/ref=sspa_dk_detail_1?pd_rd_i=B08N525FDV&pd_rd_w=dCATV&content-id=amzn1.sym.dd2c6db7-6626-466d-bf04-9570e69a7df0&pf_rd_p=dd2c6db7-6626-466d-bf04-9570e69a7df0&pf_rd_r=50AJ6N98ZETK0VN68JBE&pd_rd_wg=bWzXE&pd_rd_r=7e378d88-d041-4724-a8b0-b8222d029c46&s=toys-and-games&sp_csd=d2lkZ2V0TmFtZT1zcF9kZXRhaWxfdGhlbWF0aWM&spLa=ZW5jcnlwdGVkUXVhbGlmaWVyPUFFS0pSVUNHWFNQSFMmZW5jcnlwdGVkSWQ9QTA0MzAyMzcyNkg5OE9JT1RDN0pBJmVuY3J5cHRlZEFkSWQ9QTA2MTI0MjUxUjREVFZEQjhNMDNRJndpZGdldE5hbWU9c3BfZGV0YWlsX3RoZW1hdGljJmFjdGlvbj1jbGlja1JlZGlyZWN0JmRvTm90TG9nQ2xpY2s9dHJ1ZQ&th=1 (accessed Mar. 03, 2023).
[12] “Amazon.com: STEPPERONLINE Stepper Motor Nema 17 Bipolar 40mm 64oz.in(45Ncm) 2A 4 Lead 3D Printer Hobby CNC : Industrial & Scientific.” https://www.amazon.com/Stepper-Motor-Bipolar-64oz-Printer/dp/B00PNEQI7W/ref=asc_df_B00PNEQI7W/?tag=hyprod-20&linkCode=df0&hvadid=309777532761&hvpos=&hvnetw=g&hvrand=2239778761973898031&hvpone=&hvptwo=&hvqmt=&hvdev=c&hvdvcmdl=&hvlocint=&hvlocphy=9016722&hvtargid=pla-458488325758&psc=1&tag=&ref=&adgrpid=63226431993&hvpone=&hvptwo=&hvadid=309777532761&hvpos=&hvnetw=g&hvrand=2239778761973898031&hvqmt=&hvdev=c&hvdvcmdl=&hvlocint=&hvlocphy=9016722&hvtargid=pla-458488325758 (accessed Mar. 03, 2023).
[13] “Teyleten Robot ESP32S ESP32 ESP-WROOM-32 Development Board 2.4GHz Dual-Core WiFi +Bluetooth 2 Function Microcontroller for Arduino (ESP32 30P, 3PCS).” https://www.amazon.com/Teyleten-Robot-ESP-WROOM-32-Development-Microcontroller/dp/B08246MCL5/ref=sr_1_3?keywords=ESP32&qid=1677524171&sr=8-3&th=1 (accessed Mar. 03, 2023).
[14] “Arduino UNO REV3 [A000066].” https://www.amazon.com/Arduino-A000066-ARDUINO-UNO-R3/dp/B008GRTSV6/ref=asc_df_B008GRTSV6/?tag=&linkCode=df0&hvadid=309751315916&hvpos=&hvnetw=g&hvrand=12297800837462680057&hvpone=&hvptwo=&hvqmt=&hvdev=c&hvdvcmdl=&hvlocint=&hvlocphy=9016722&hvtargid=pla-457497319401&ref=&adgrpid=67183599252&th=1 (accessed Mar. 03, 2023).
[15] “Amazon.com: Arduino Mega 2560 REV3 [A000067] : Electronics.” https://www.amazon.com/ARDUINO-MEGA-2560-REV3-A000067/dp/B0046AMGW0/ref=asc_df_B0046AMGW0/?tag=hyprod-20&linkCode=df0&hvadid=309743296044&hvpos=&hvnetw=g&hvrand=14550404298577464135&hvpone=&hvptwo=&hvqmt=&hvdev=c&hvdvcmdl=&hvlocint=&hvlocphy=9016722&hvtargid=pla-516265455074&psc=1 (accessed Mar. 03, 2023).
[16] “Raspberry Pi 4 Model B 2019 Quad Core 64 Bit WiFi Bluetooth (1GB).” https://www.amazon.com/Raspberry-Model-2019-Quad-Bluetooth/dp/B07TD43PDZ/ref=asc_df_B07TD43PDZ/?tag=hyprod-20&linkCode=df0&hvadid=380013417597&hvpos=&hvnetw=g&hvrand=16448157784737347834&hvpone=&hvptwo=&hvqmt=&hvdev=c&hvdvcmdl=&hvlocint=&hvlocphy=9016722&hvtargid=pla-781430589105&psc=1&tag=&ref=&adgrpid=77922879259&hvpone=&hvptwo=&hvadid=380013417597&hvpos=&hvnetw=g&hvrand=16448157784737347834&hvqmt=&hvdev=c&hvdvcmdl=&hvlocint=&hvlocphy=9016722&hvtargid=pla-781430589105 (accessed Mar. 03, 2023).
[17] “150 Pieces Balsa Wood Sticks Hardwood Square Wooden Craft Dowel Rods Unfinished Balsa Wood Sheets 12 Inch Thin Wood Strips 1/4 Inch 1/8 Inch for Crafts DIY Projects Models Making Supplies.” https://www.amazon.com/Balsa-Wood-Sticks-Hardwood-Unfinished/dp/B09TK5L4X6/ref=sr_1_5?keywords=balsa+wood&qid=1677524024&sr=8-5 (accessed Mar. 03, 2023).
[18] “Amazon.com: 100Pcs Jumbo Wooden Craft Sticks Wooden Popsicle Craft Sticks Stick 6” Long x 3/4”Wide Treat Sticks Ice Pop Sticks for DIY Crafts,Home Art Projects, Classroom Art Supplies : Arts, Crafts & Sewing.” https://www.amazon.com/Popsicle-Crafts%EF%BC%8CHome-Projects-Classroom-Supplies/dp/B092CMPBPW/ref=pd_lpo_1?pd_rd_w=Wmae4&content-id=amzn1.sym.116f529c-aa4d-4763-b2b6-4d614ec7dc00&pf_rd_p=116f529c-aa4d-4763-b2b6-4d614ec7dc00&pf_rd_r=AE62QHC0CPG1REB4RY5D&pd_rd_wg=6KDQM&pd_rd_r=647da863-05d2-45b5-ac2b-a7b41a83429f&pd_rd_i=B092CMPBPW&psc=1 (accessed Mar. 03, 2023).
[19] “Amazon.com : 36 Corrugated Cardboard Sheets 12 x 12 Inches Brown Kraft Large Craft Paper Squares Thick Flat Card Board Inserts for Packing Shipping Crafts Mailing Dividers Packaging by Gift Boutique : Arts, Crafts & Sewing.” https://www.amazon.com/Corrugated-Cardboard-Packaging-Gift-Boutique/dp/B08JQQ8TRJ/ref=sr_1_2_sspa?keywords=cardboard&qid=1677524095&sr=8-2-spons&psc=1&spLa=ZW5jcnlwdGVkUXVhbGlmaWVyPUEyUzYxRFMxSkNJNVFOJmVuY3J5cHRlZElkPUEwNjU0NDE1MVc3QUI4REtLVlRVRSZlbmNyeXB0ZWRBZElkPUEwODc0OTY5MTFLMzhaWFZDMFA5MCZ3aWRnZXROYW1lPXNwX2F0ZiZhY3Rpb249Y2xpY2tSZWRpcmVjdCZkb05vdExvZ0NsaWNrPXRydWU= (accessed Mar. 03, 2023).
[20] “ESP32-cam ai-thinker Pinout Guide: Gpios usage explained,” Random Nerd Tutorials, 04-Aug-2020. [Online]. Available: https://randomnerdtutorials.com/esp32-cam-ai-thinker-pinout/. [Accessed: 03-May-2023].
[21] “Amazon.com: [2-pack] MG996R 55g metal gear torque digital servo motor ...,” Amazon. [Online]. Available: https://www.amazon.com/2-Pack-MG996R-Torque-Digital-Helicopter/dp/B09JWK494C. [Accessed: 03-May-2023].
[22] “Amazon.com: GOOLRC Digital Servo 80kg metal gear high torque waterproof ...,” Amazon. [Online]. Available: https://www.amazon.com/GoolRC-Digital-Torque-Waterproof-Crawler/dp/B0B58X21XY. [Accessed: 03-May-2023].
[23] “Lumenier 1000mah 3s 35c lipo battery (XT60),” www.getfpv.com. [Online]. Available: https://www.getfpv.com/lumenier-1000mah-3s-35c-lipo-battery-xt60.html?utm_source=google&utm_medium=cpc&utm_campaign=DM%2B-%2BB%2B-%2BPMax%2B-%2BShop%2B-%2BSM%2B-%2BALL&utm_content=pmax_x&utm_keyword=&utm_matchtype=&campaign_id=17881616054&network=x&device=c&gclid=CjwKCAjw_YShBhAiEiwAMomsEHEiqZ3WS4gyx_AaBplpE_1QeV36Rkf7X4YvIm9Wmxb3o6XnQarSeRoC3GwQAvD_BwE. [Accessed: 03-May-2023].