UCL-IIOT - Alarm System With Database and Node-red
by AlexEdel in Circuits > Arduino
1932 Views, 3 Favorites, 0 Comments
UCL-IIOT - Alarm System With Database and Node-red


The purpose of this build is to teach about connecting Arduino with Node-red and a database, so you can log data and also collect it for later use.
For this build I use a simple arduino alarm system that outputs 5 data numbers, each seperated with a comma.
It is not necessary to have that exact amount of data and the program could be anything.
The important part is that the data is seperated with commas as seen on this screenshot.
The output could for example look like this: "324, 0, 0, 1, 1"
(the finished programming and instructions to the creation of the arduino is linked at the bottom of this tutorial)
Getting Started With Node-red
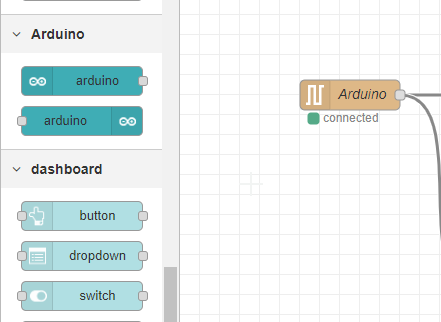
For this tutorial we assume you have already installed Node-red, but there are some extra palettes that are used for this project that we need for it to work
Find the "Manage Palette" button and install the following palettes.
- node-red-dashboard
- node-red-node-mysql
- node-red-node-arduino
- node-red-node-serialport
It should show some new palettes on the side of the Node-red button menu.
Splitting Data in Node-red
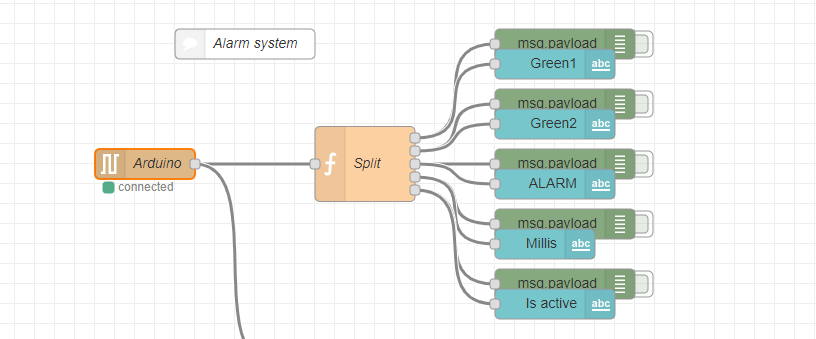
Now that Node-red is ready to go we need to start out by splitting our data into seperate pieces.
This is why we made sure to seperate them with commas inside the Arduino code.
First let's start by putting down the Arduino Input node, found on the left side panel.
You need to make sure it has the correct serial (Mine uses COM4) port and Baud rate (in my program I use 9600 baud rate)
If correctly set up, it should say that it is connected.
Next up we create a Javascript function block and connect it after the Arduino input node.
This block allows us to program in Javascript, and here we write a code that can split our data for every comma.
In this function block I split my 5 data using the following code:
var m1 = {topic: "light1", payload: msg.payload.split(",")[0]};
var m2 = {topic: "light2", payload: msg.payload.split(",")[1]};
var m3 = {topic: "light3", payload: msg.payload.split(",")[2]};
var m4 = {topic: "millis", payload: msg.payload.split(",")[3]};
var m5 = {topic: "onoff", payload: msg.payload.split(",")[4]};
return [m1, m2, m3, m4, m5];
(change the code as necessary)
Make sure the node is set to 5 outputs (or your equivalent)
As seen in the screenshot, we now have 5 outputs that we each link up to a debug node and a text dashboard node. This will be useful for when we need to see it on the UI.
Database With Wampserver
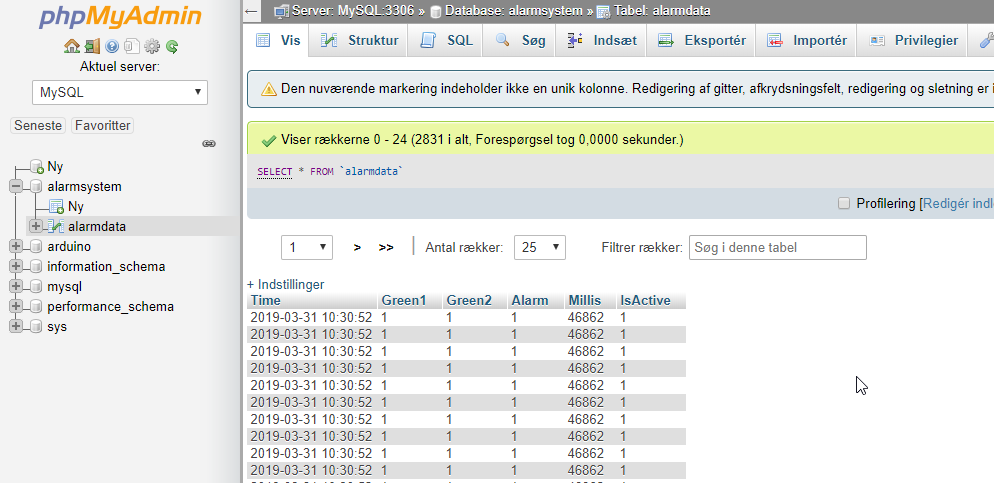
For our database to work you need to have Wampserver installed.
After it is installed and shows as a green icon (after you have started all services), you should open the "phpMyAdmin" which should bring you to a login screen.
Unless you have previously changed it, simply input "root" in the username and login.
Press the phpmyadmin button under tools down in the left bar and it should open the database menu, which looks something like shown in the image above.
Create a new database and name it something related to your project, mine is named "alarmsystem" (these names will be case sensitive)
Under that database, create a new table and name it, mine is named "alarmdata"
it will ask if you want to use "latin1_swedish_ci" and we just keep it as that.
Now you create 6 tables (1 more than the data we have)
The first table needs to use the datatype "longtext"
and the rest of the dataset uses "mediumtext"
Make sure to name them. (the first dataset should be named "time"
Database
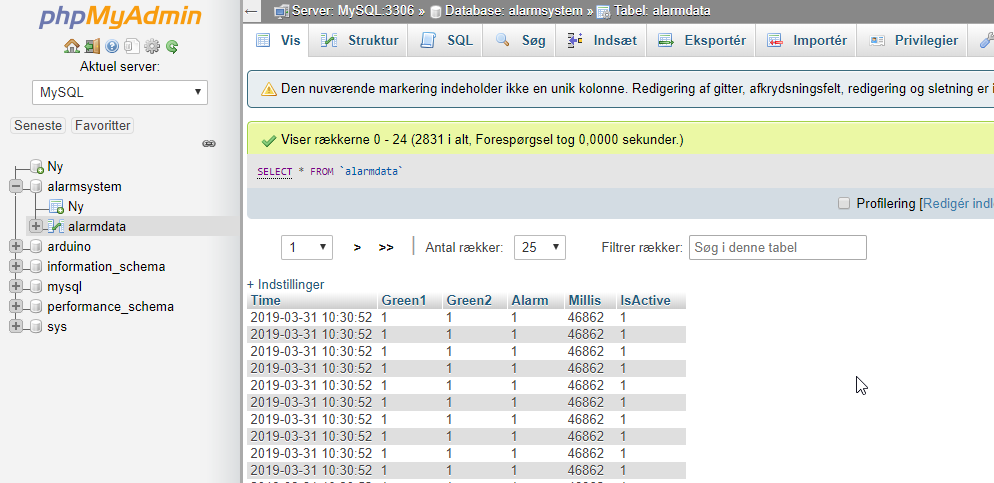
The Wampserver dataset should look something like this.
(but without the actual data, as we haven't gotten to that yet)
Node-red to Wampserver

Now we want the data we are outputting from our arduino to go to our Wampserver.
Start by creating another Javascript function block and connect it to our arduino input node.
In this script block, we once again split our data, but we insert it into our database as well.
var data = msg.payload.split(",");
var Green1 = data[0];
var Green2 = data[1];
var Alarm = data[2];
var Millis = data[3];
var IsActive = data[4];
var out = "INSERT INTO alarmsystem.alarmdata (Time,Green1,Green2,Alarm,Millis,IsActive) VALUES('"+new Date().toISOString().slice(0, 19).replace('T', ' ')+"','"+Green1+"','"+Green2+"','"+Alarm+"','"+Millis+"','"+IsActive+"')";
msg.topic = out;
return msg;
Notice I input "INSERT INTO alarmsystem.alarmdata", this is the name we gave our database and table, make sure you write the exact name you gave your database in that.
Now connect the Javascript block to a debug node and also a "mysql" node found under the storage palette on the left side.
under the mysql block you name it the same as your database "alarmsystem"
change user to "root" (the name we used to log in to our server)
host, port and database should be filled out already with:
Host: 127.0.0.1
Port: 3306
Database: alarmsystem
If all is done correct, it should be connected after you deploy your changes.
You should also be able to see that the database now logs your data from the Arduino directly.
Using Data From Wampserver to Node-red

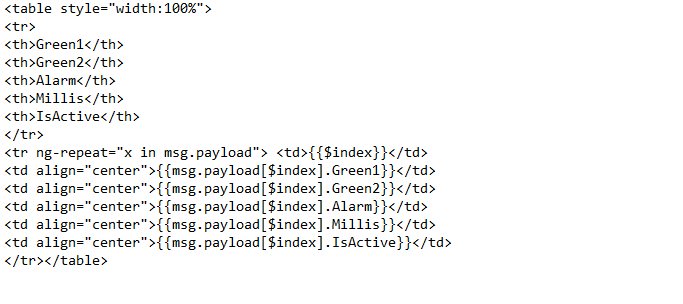
For the final stretch we want to see if we can take the data we have saved and put it back into our Node-red and hopefully display it.
Start out by placing an "inject" node
Under topic in this node we put the code: SELECT*FROM alarmsystem.alarmdata
This will be able to find our database when we press it.
Connect the inject node to a new "mysql" node set up exactly like the one we did in the previous step.
Connect the mysql node to a debug node and a template node found under dashboard.
The template node will be our table that we can update to show data from the database as it is produced.
Input the code shown in the screenshot above (change as needed) and it now should show a data table in our Node-red UI.
We can also add a dashboard button to update the table from the UI itself.
Start by creating a button node.
connect the button node to a Javascript function block.
in the function block we insert the following code.
msg.topic = "SELECT * FROM alarmdata ORDER BY Green1 DESC LIMIT 20";
return msg;
(Green1 being the first data variable in the table)
this function block then needs to be connected to the input of our mysql node we made previously in this step.
Finalizing
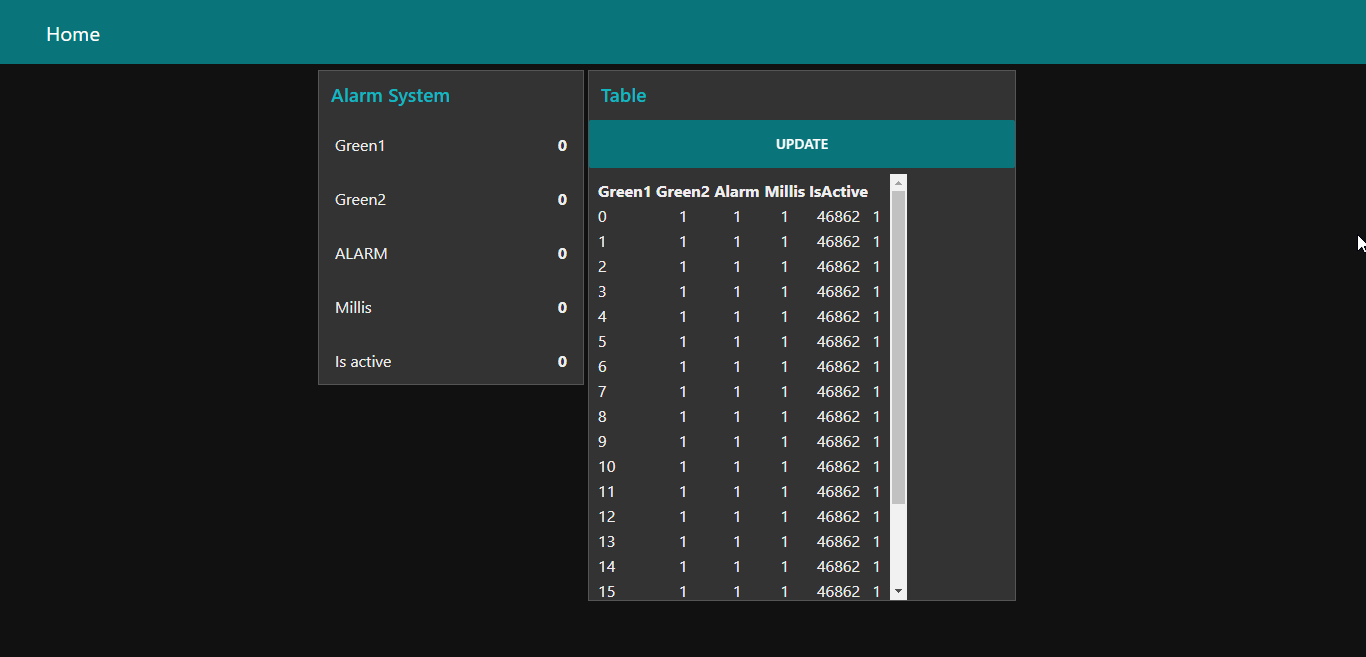
Now our UI should include a live update of our data and a table with data from our server itself.
This means we have created a connection between Arduino, a UI based program and a database.
If you are interested in how my Arduino Alarm System works, I have added a document that explains how that is programmed and set up.
As well as a full export of the node-red programming.