Arduino + Vintage Speech Chip
by Jfieldcap in Circuits > Arduino
18894 Views, 134 Favorites, 0 Comments
Arduino + Vintage Speech Chip
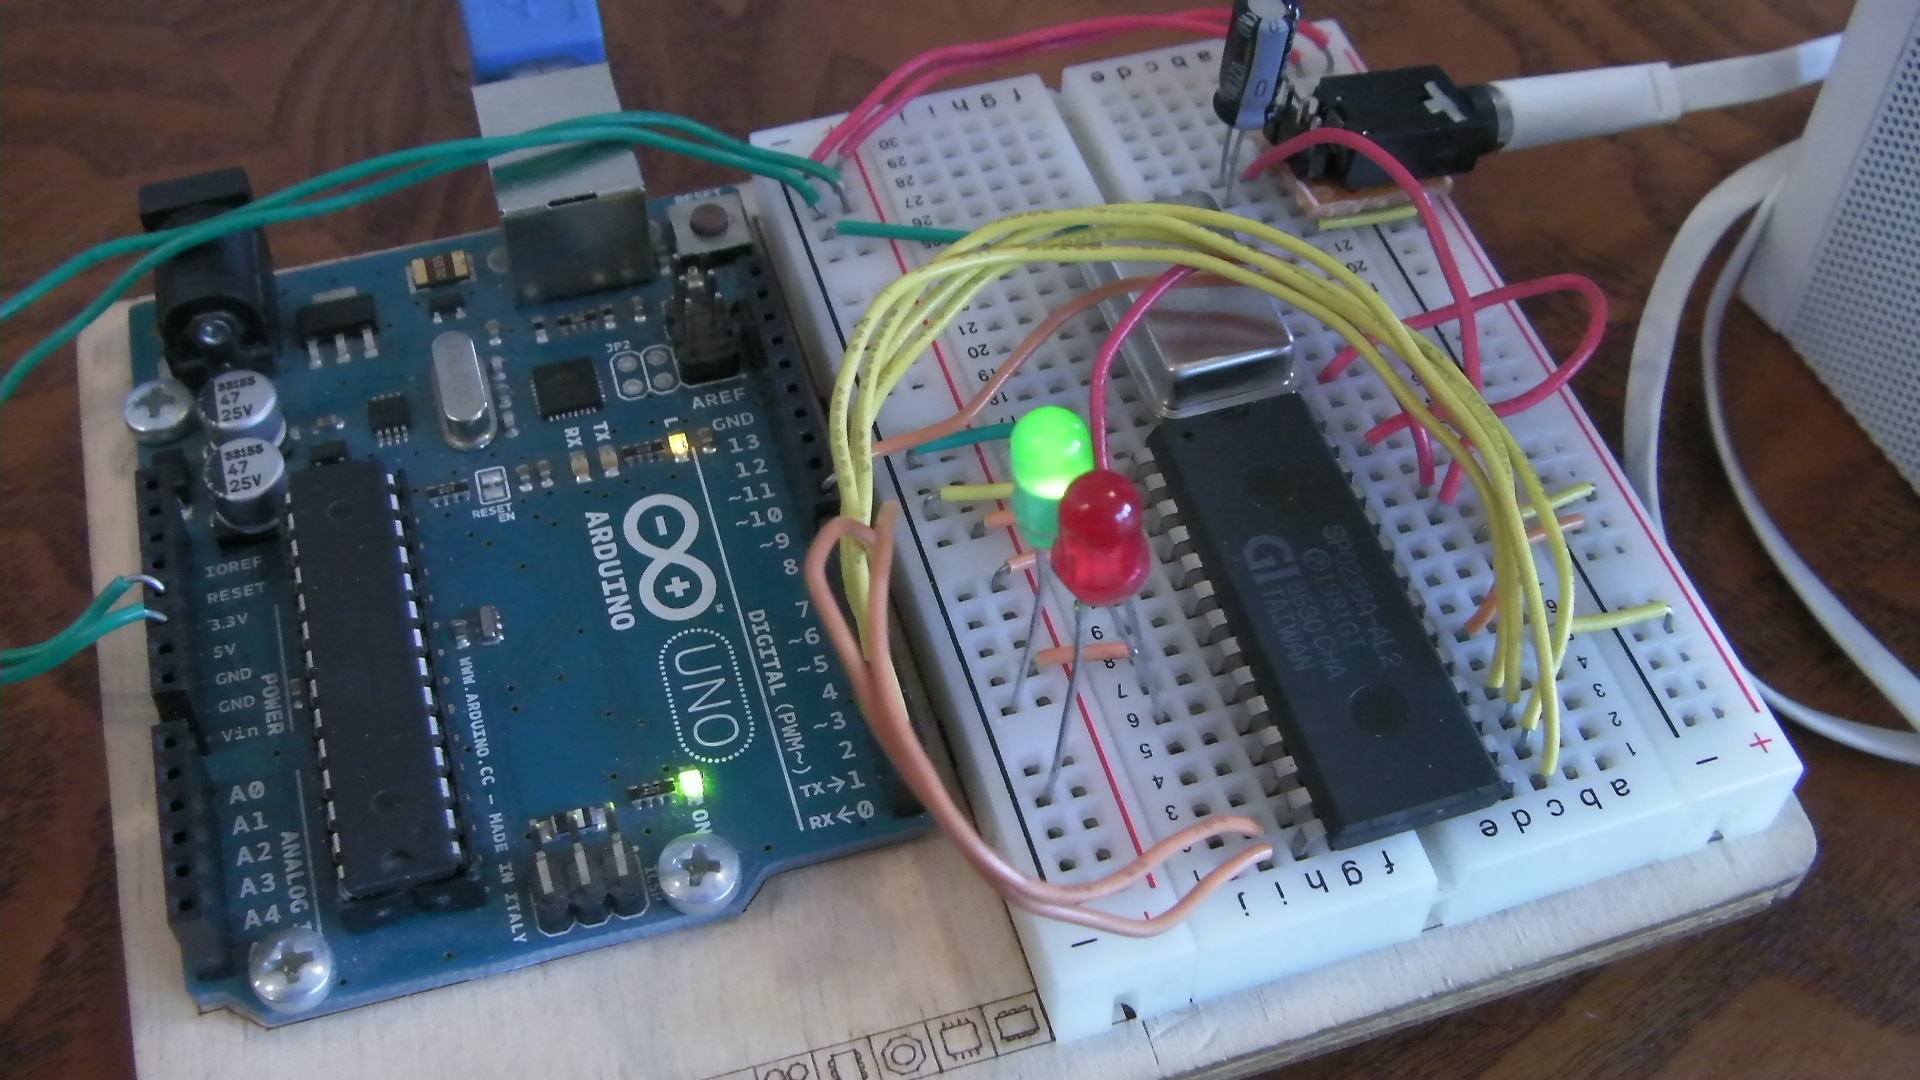
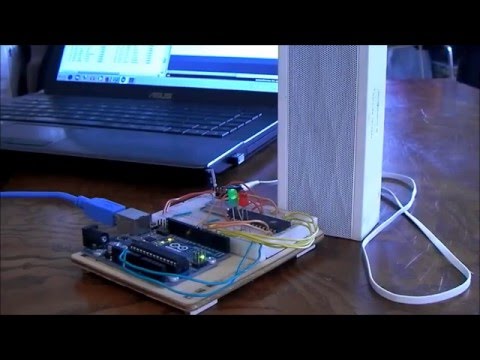
Ever wanted to make your arduino talk to you? Do you want a cool vintage robotic sounding voice for your next robot? Not satisfied with the harsh sounding options you've found so far? Look no more! In this Instructable, I'll show you how to use a vintage speech synthesis chip, the SPO256-AL2 (Also commonly known as the SP0256-AL2), with your arduino!
This particular chip is quite easy to use, sounds good, and can say pretty much anything in the English language.
What You'll Need:
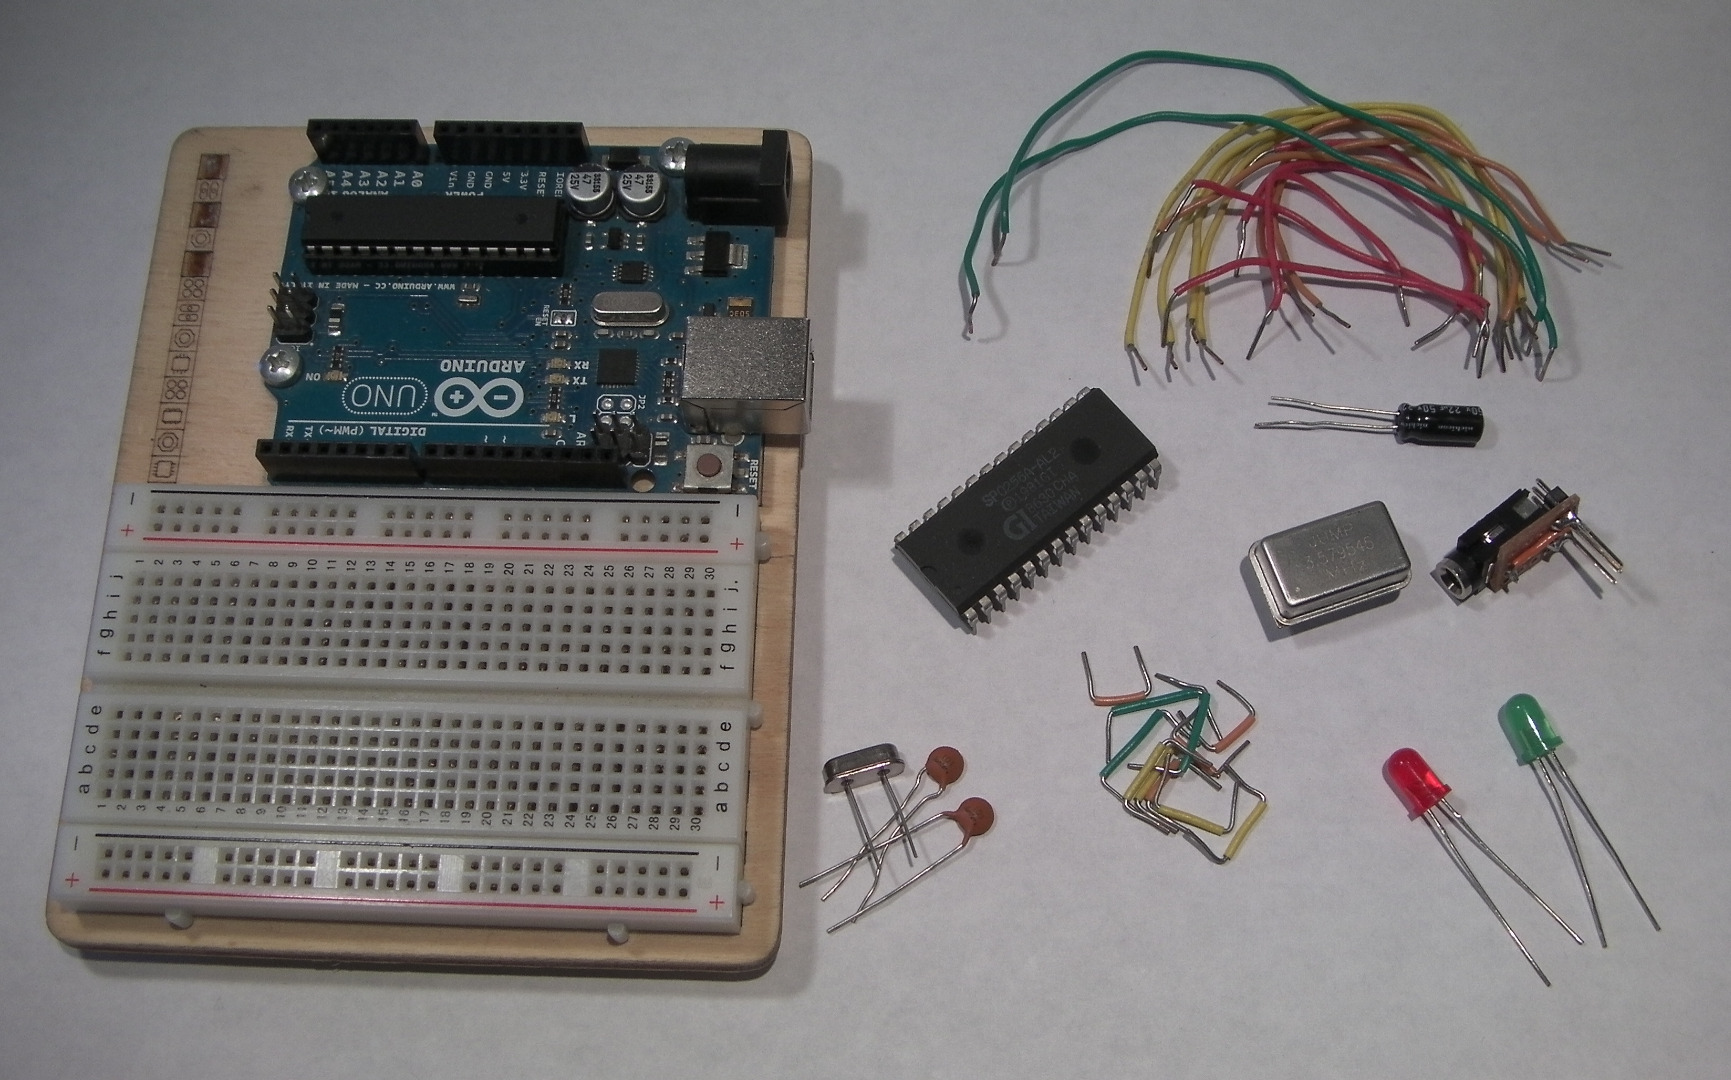
Ready to start? Great! Let's see what we need:
-
An arduino + breadboard + breadboard wires
- The SPO256-AL2 (Info on where and how to get this in the next step)
-
A 3.579545Mhz or 3.120Mhz crystal and 22pf caps, OR a 3.579545Mhz TTL oscillator
-
A speaker or audio jack for your breadboard (Don't use a piezo beeper, it will sound bad)
-
A 22uf capacitor (Or something close to that value). This is optional, but it helps smooth out the sound.
- 2 LEDs. (Green and red) These are also optional, but it's nice to have some indicators.
The overall cost is around 15-20$, depending on where you get the chip, and how much else you already have on hand.
Buying the Chip and Crystal: Where and How
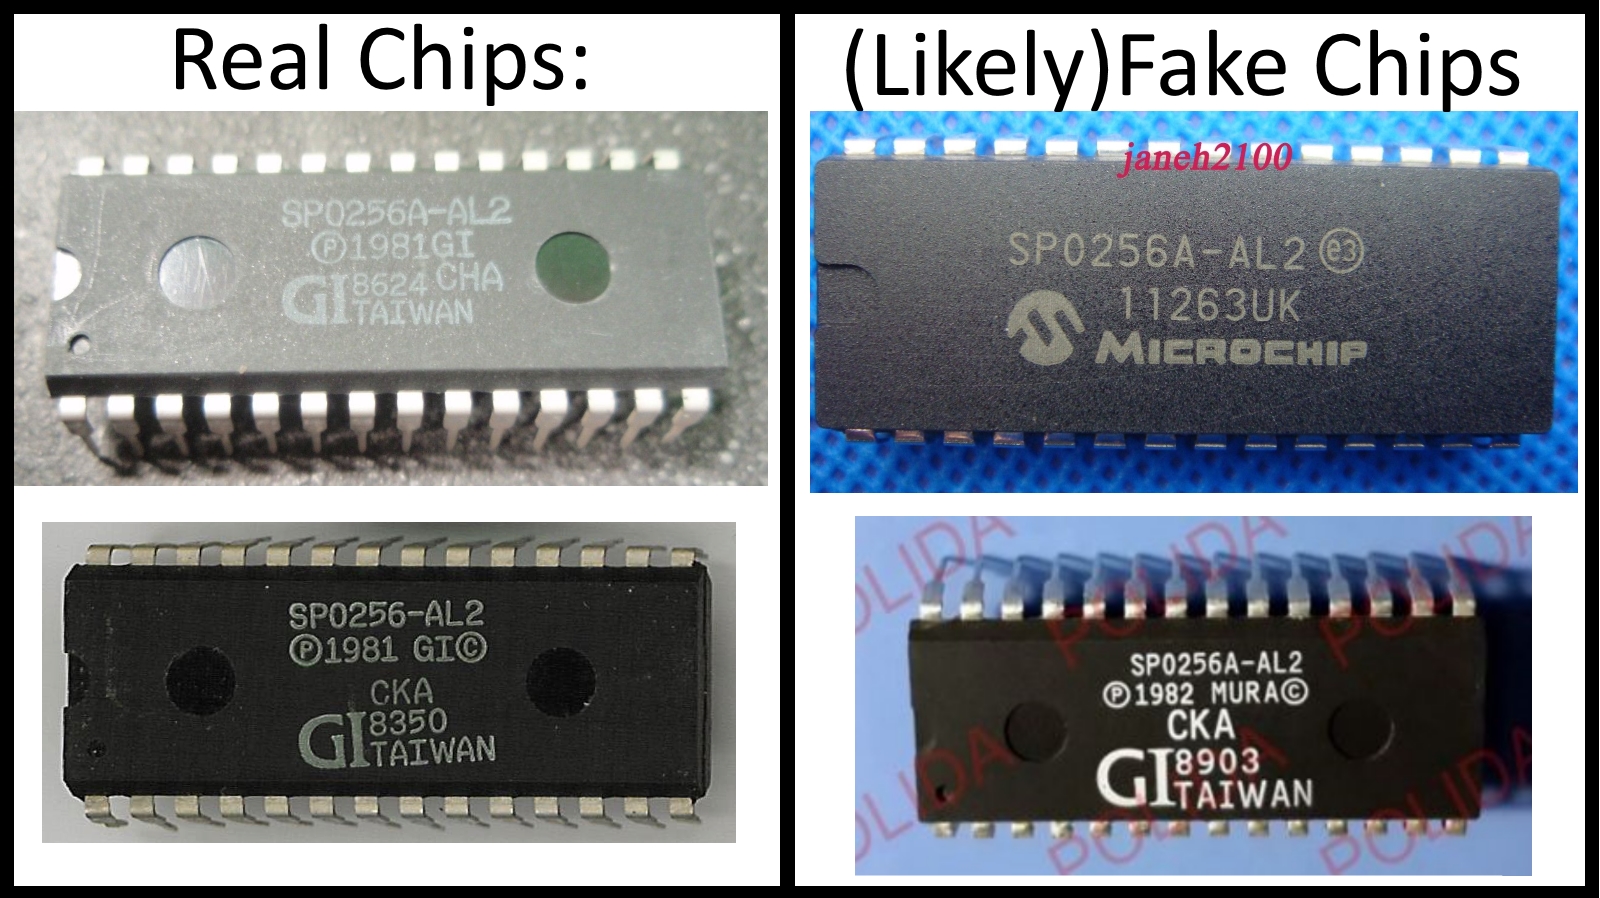
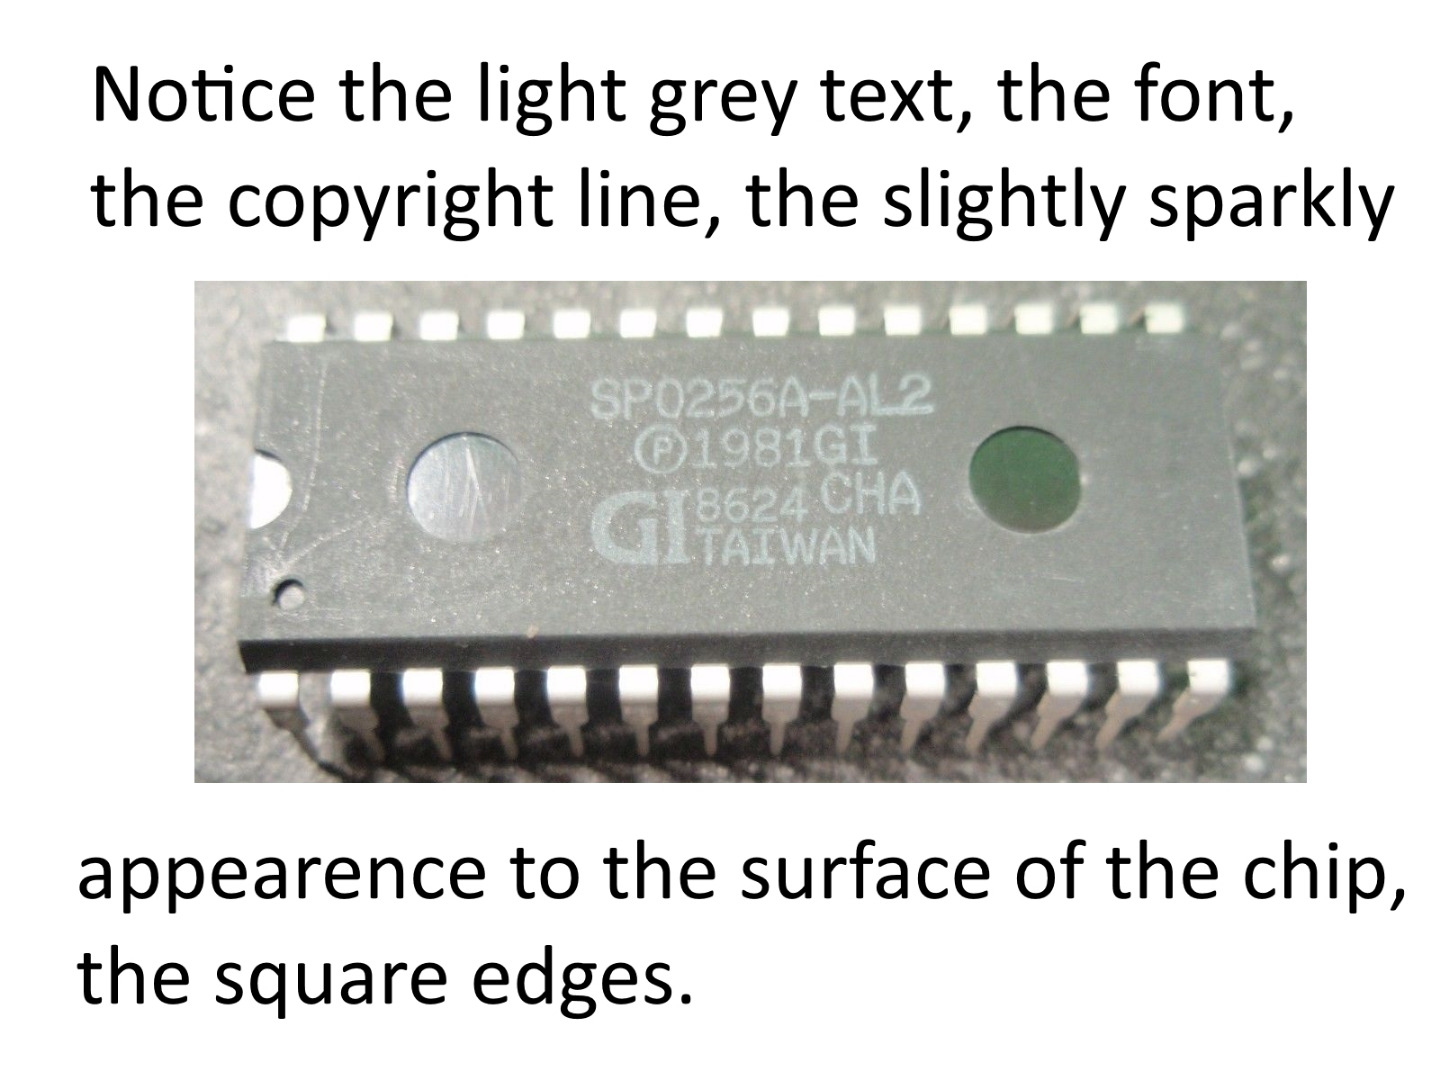
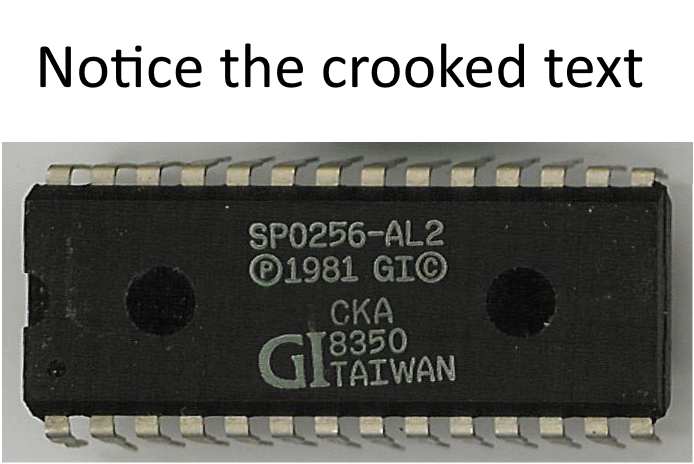
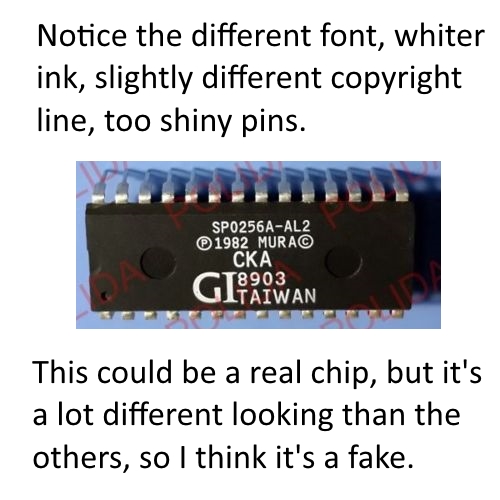
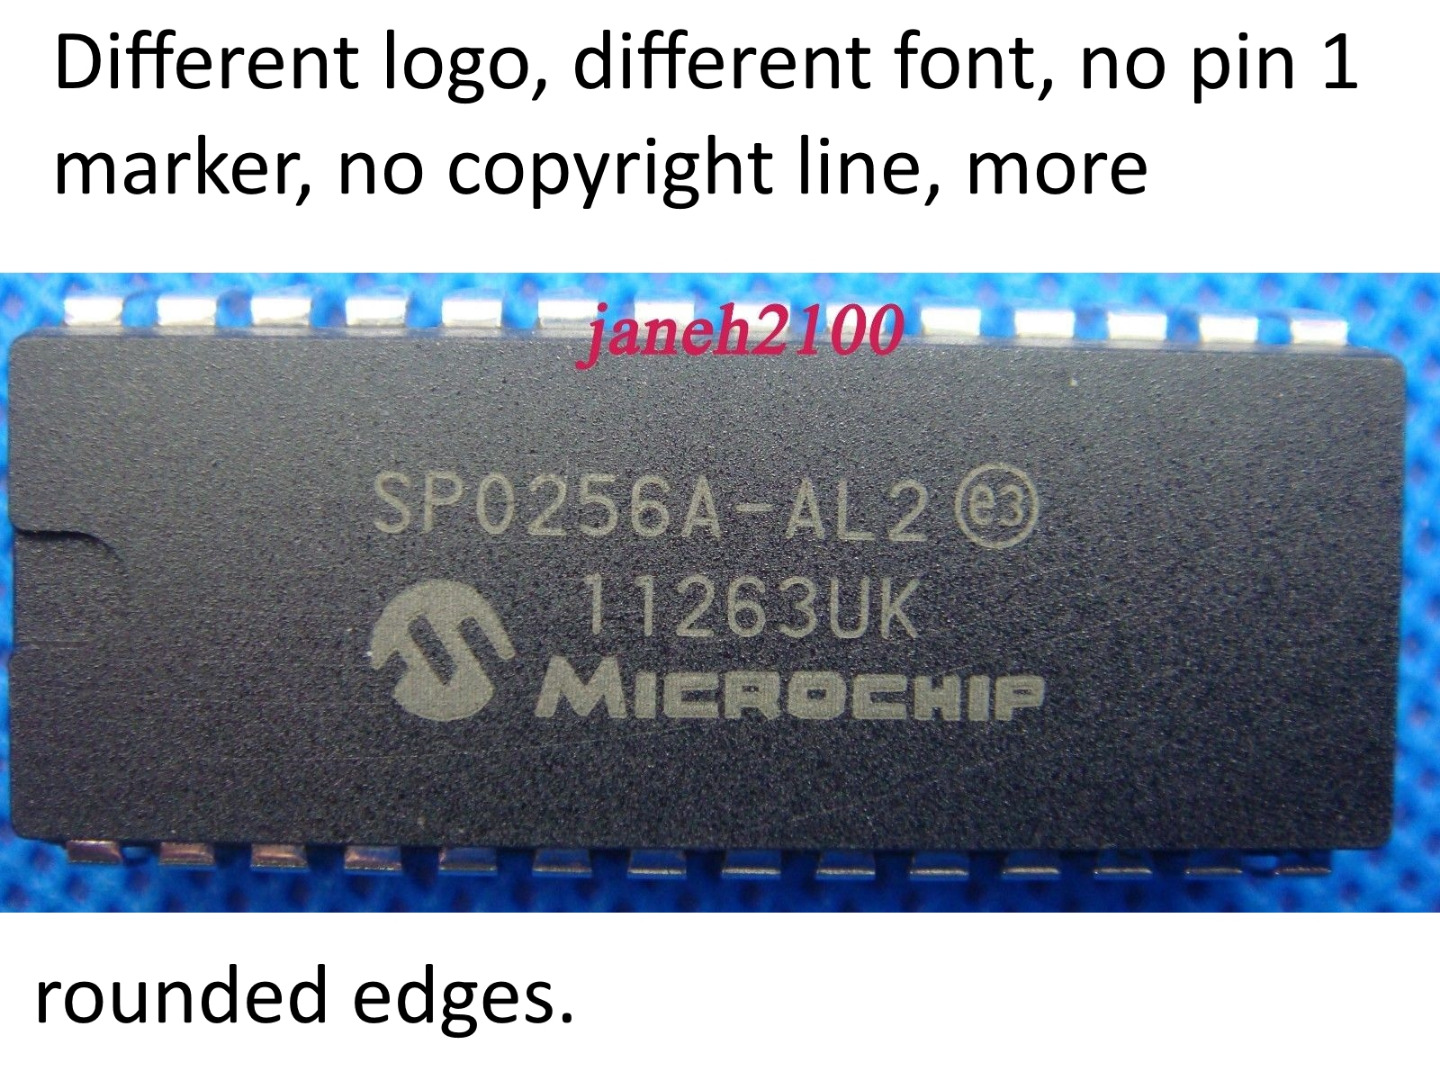
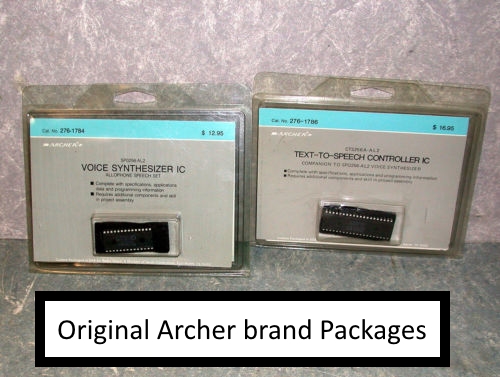
Since the chip is from the 80's, finding one may be a little hard, but they're not too rare yet, so you should be able to get one pretty easily. As for the crystal, there are several options.
When I first started this project, I headed out to eBay and bought a chip from a Chinese seller that was about 1.50$. Long story short, after much frustration (Some of which was my fault), I ended up buying 3, none of which worked, and all of which had a pin break very quickly. They're not original, and they probably don't work. To keep it simple, don't buy cheap new chips from Chinese sellers that don't look original, stick to NOS chips.
When looking for NOS (New Old Stock) chips on eBay, look for a few things. The pictures show some non-genuine chips vs genuine chips, so look for those. The real chips should have the GI logo on them, should have the copyright line, and should look old and like the ones in the pictures.
Make sure the chip you buy has the chip model "SPO256-AL2" or "SP0256-AL2". There are other models with different words and sounds, such as the "SPO256-017", which says numbers from . Apparently, the "SPO256-080" and the "SPO256-019" also have the same allophones as the "SPO256-AL2", so if anyone tries either of them, please let me know how it works. (The SPO256-019 is supposed to have the same allophones, as well as some application-specific phrases, it was used in a game. So, I guess you get some bonus sounds!)
There is one source on eBay right now that I am pretty sure is genuine: eBay Source
Another thing to do is to watch the searches "spo256" and "sp0256" for any auctions for the chips in their original archer brand packaging, as shown in the pictures.
There are a few NOS sources besides eBay, which I have found searching forums and such, which I will list here:
http://www.speechchips.com/shop/item.aspx?itemid=7
Here's a source for the SPO256-080:
http://www.futurebots.com/sensor.htm
Feel free to mention any other sources of NOS chips you've found in the comments.
Wire It Up: Power Connections
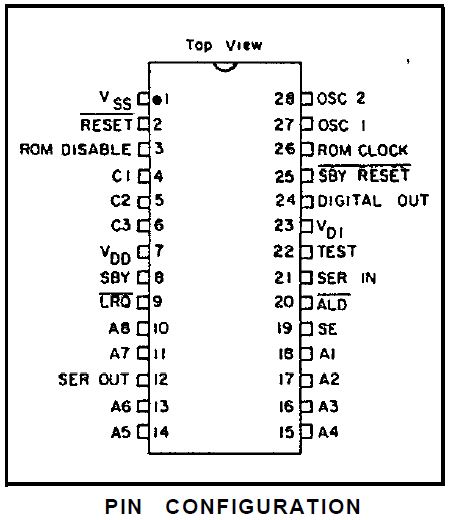
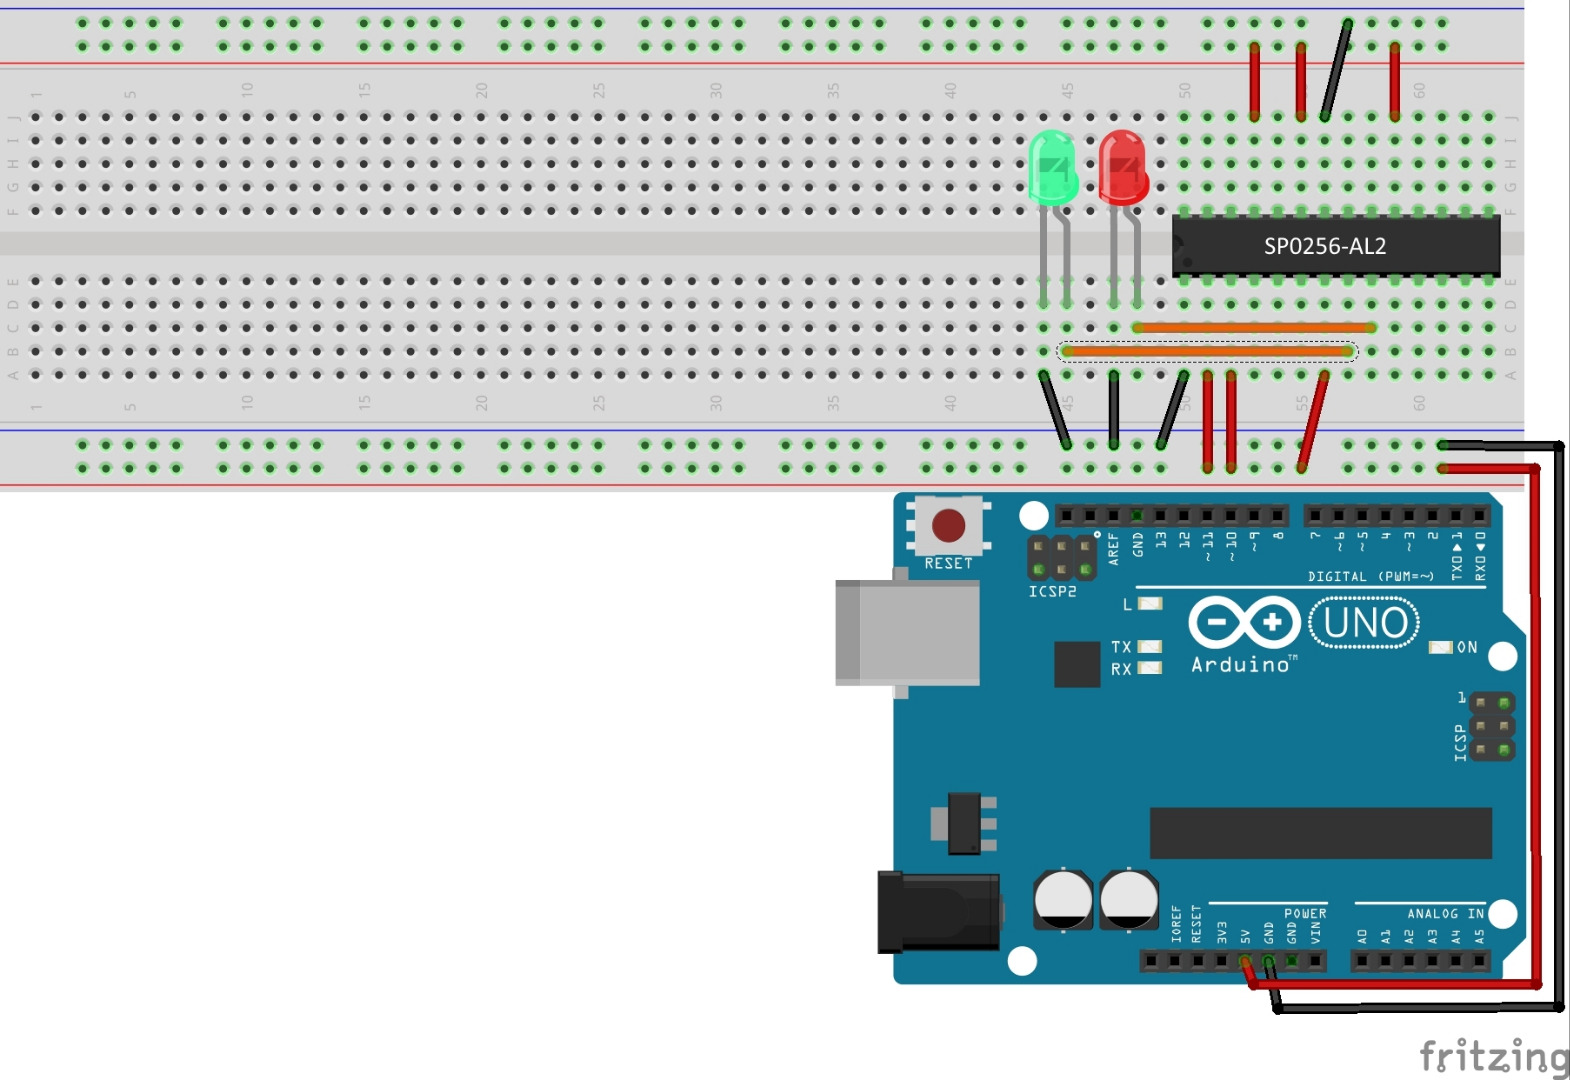
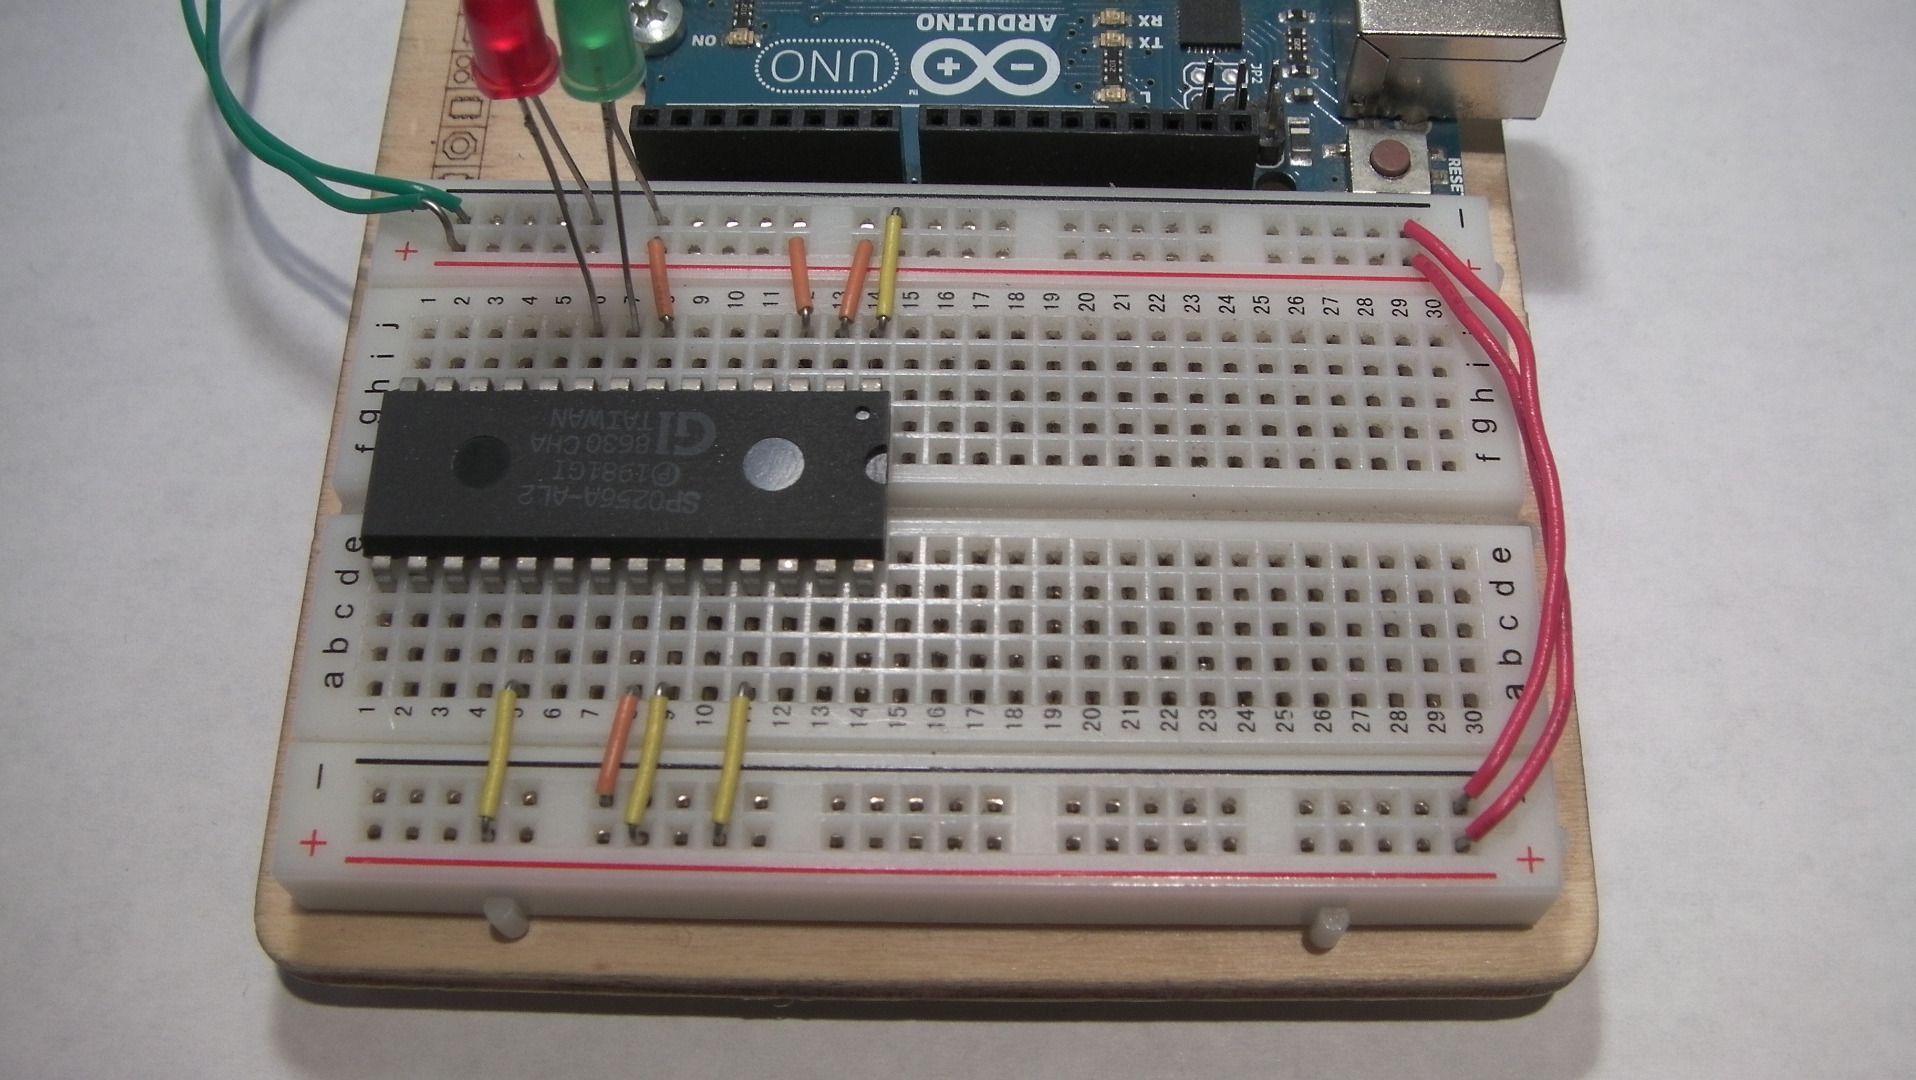
Ok, now you have everything, it's time to wire! Be careful and double check everything, because it's really easy to wire it wrong, and the wrong wires in the wrong places can blow your speech chip, and that would be a shame. (I've wired it wrong a few times, but luckily it's not blown yet.) The PDF datasheet is a lot of help here, so if you're confident enough, you might want to go off of that instead of my version.
- Pin 1 (GND) one the speech chip goes to GND on the breadboard.
- Pin 2 (Reset) goes to +5v.
- Pin 3 (External Rom Disable) goes to +5v
- Pins 4, 5, and 6 don't connect to anything.
- Pin 7 (VDD) goes to +5v.
- Pins 8 (SBY) and 9 (LRQ) can either be left unconnected or connected to LEDs. Pin 8 goes to a green LED, and pin 9 to a red LED.
- Pins 10, 11, and 12 don't connect to anything.
- Pins 13-18 don't go to anything yet.
- Pin 19 (SE) goes to +5v.
- Pin 20 doesn't go to anything right now.
- Pin 21 doesn't go to anything.
- Pin 22 (Test) goes to GND.
- Pin 23 (VD1) goes to +5v.
- Pin 24 (Digital out) goes to the speaker, or the audio jack.
- Pin 25 (SBY Reset) goes to +5v.
- Pin 26 doesn't connect to anything.
- Pins 27-28 don't go to anything right now.
Wire It Up: Everything Else
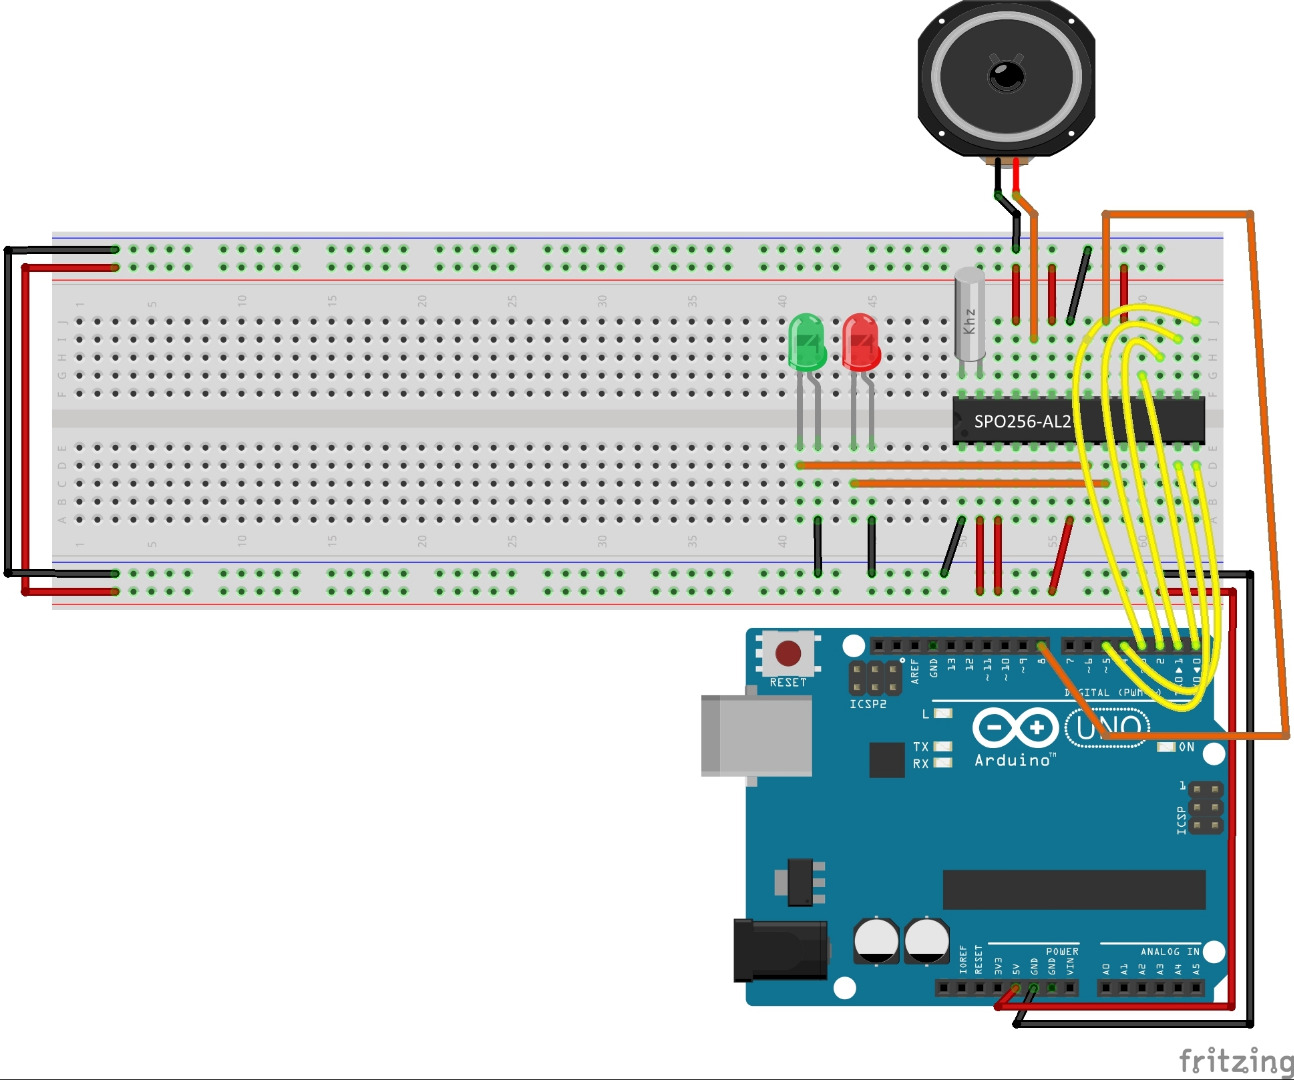
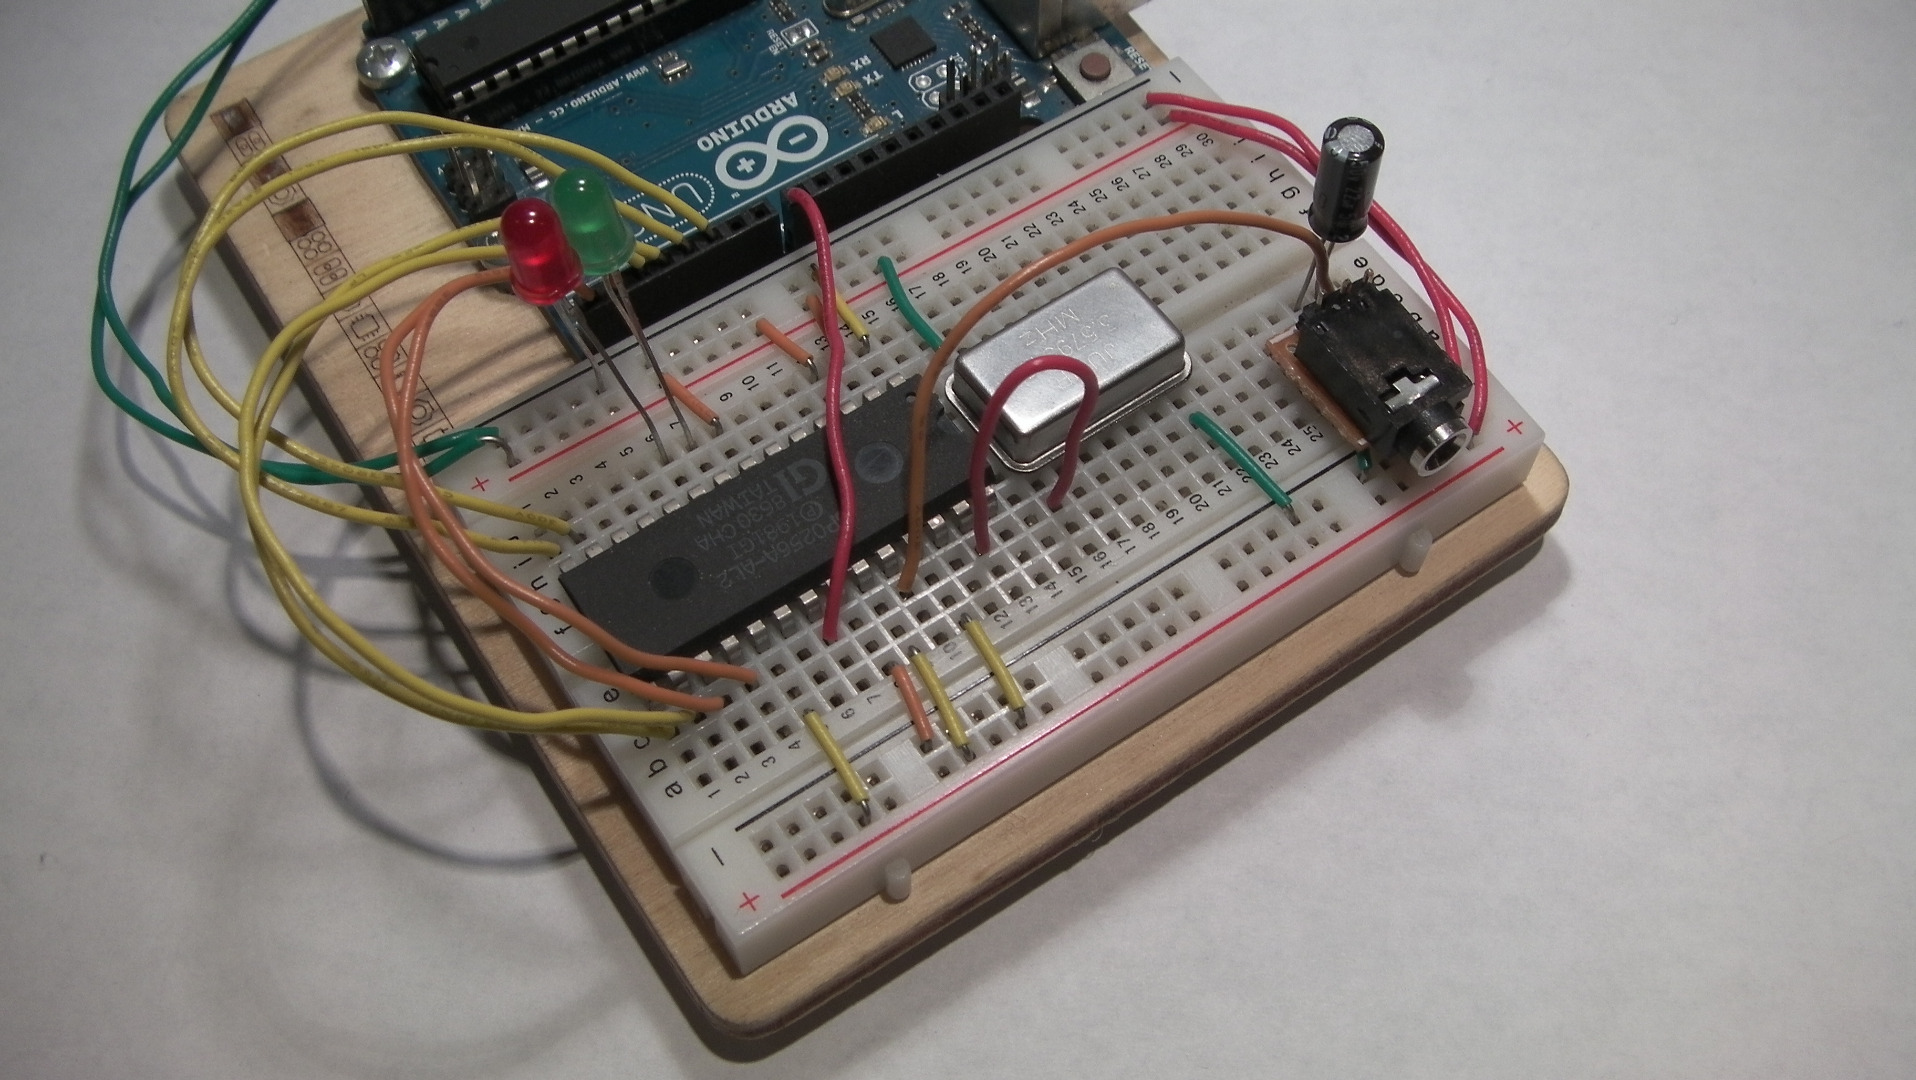
Now that you have all the power and ground wired up, time to add everything else!
- On the Arduino:
- Wire the first 6 pins of port D on the arduino (Digital pins 0-8) to the first 6 address pins on the speech chip (Pins A1-A6) Wire pin D8 on the arduino to pin 20 (ALD) on the speech chip.
- For the crystal:
- If you're using a crystal, connect it between pins 27 and 28 (OSC1 and OSC2) on the speech chip. Connect both pins to ground via a 22pf capacitor. The capacitors aren't needed, but without them, there will be a lot of unwanted background noise, and the chip might behave in unwanted ways.
- For the TTL oscillator:
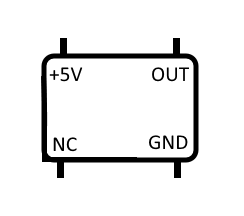
- If you're using a TTL oscillator, stick it into the breadboard. Connect it according to the pinout in the picture, with OUT connected to pin 27 (OSC1) on the speech chip.
- For the speaker/audio jack:
- Connect a wire to pin 24, and connect it to the speaker (Or the audio pin on the jack). Connect the 22uf capacitor between pin 24 and ground. If you use the capacitor, you will need some form of amplification before you'll be able to hear it. As a side note, you'll probably have to listen closely with just a speaker, since it's pretty quiet anyways.
The CODE... (Actually, a Library)
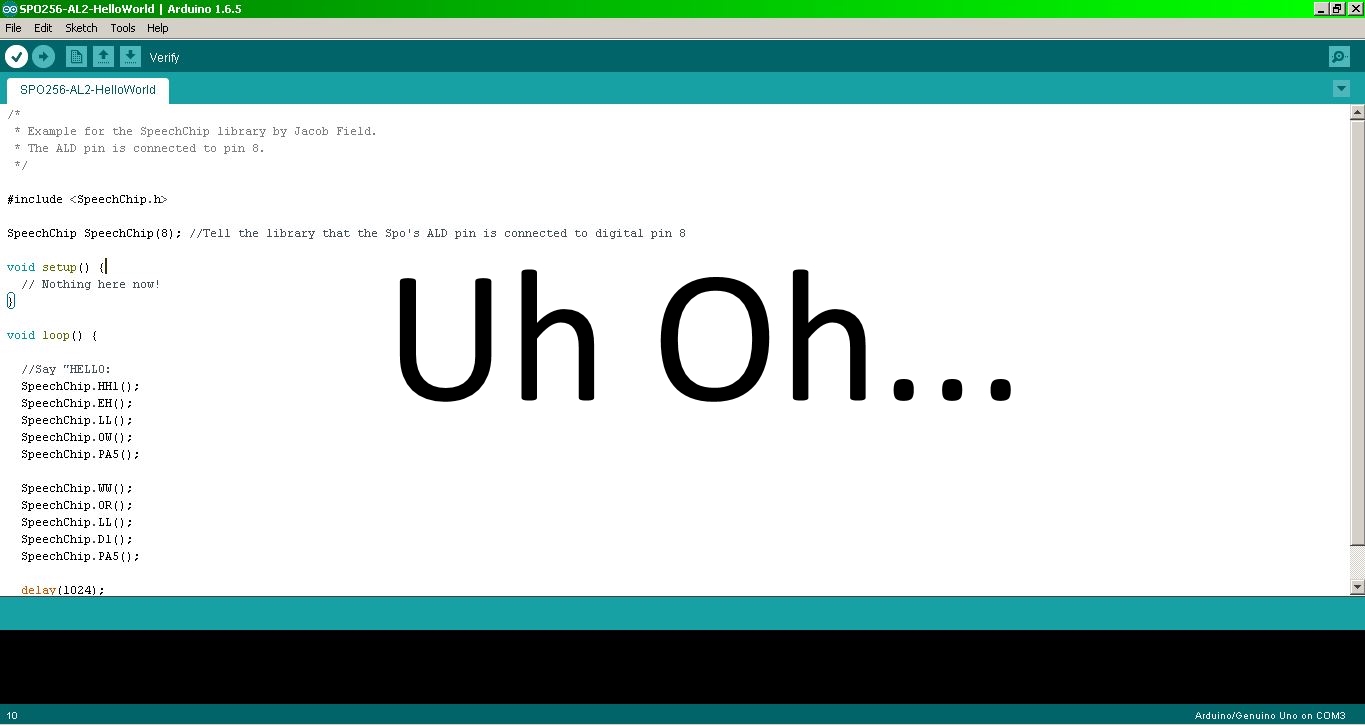
It took me a lot of time to program this. (Well, ok, maybe 48 hours of work) But, don't worry, because I've made a nice library for you to use! The library doesn't have text-to-speech capabilities, instead you decide which allophones to tell the arduino to send.
To add the library, from the Arduino IDE, click "Sketch", then "Include library", then "Add .ZIP library". Browse to wherever you saved the SpeechChip library to, select it, and click "Open". You'll now be able to use the SpeechChip library.
(By special request by a Arduino Mega user, I've included a version of the library which should work on Mega pins 22-29 (Port A), just make sure to change the wiring accordingly.)
Here's the code to the example sketch:
/*
 * Example for the SpeechChip library by Jacob Field.
 * The ALD pin is connected to pin 8. The allophones DD1,
 * DD2, and SS have been renamed to D1, D2, and S for
 * conflict reasons.
 */

#include

SpeechChip SpeechChip(8); //Tell the library that the Spo's ALD pin is connected to digital pin 8

void setup() {
  // Nothing here now!
}

void loop() {

  //Say "HELLO:
  SpeechChip.HH1();
  SpeechChip.EH();
  SpeechChip.LL();
  SpeechChip.OW();
  SpeechChip.PA5();

  SpeechChip.WW();
  SpeechChip.OR();
  SpeechChip.LL();
  SpeechChip.D1();
  SpeechChip.PA5();

  delay(1024);

}Testing and Troubleshooting:

Time to test it out! Every single time I wire this up, without fail, It doesn't work at first. Luckily this chip seems to be pretty fine with us doing horrible things to it, so I haven't blown mine yet. As a general rule, do your wiring carefully, don't rush. Double check the connections, then plug it in. If you hear weird noises, don't be too alarmed. Upload the example program, and see what happens.
- If it works first try, great! Congratulations! Advance to go! I mean, to the next step!
- If nothing happens, don't worry. Check the red LED to see if it's on. If it's consistently on, then you probably need to unplug the Arduino for just a second (Not too long), then plug it back in. My chip does this every time, and I think perhaps it needs a reset before it will operate correctly.
- If nothing at all happens, check all the connections again. Pay especial attention to the power connections.
- If it makes horrible hissing noises, unplug it and plug it back in several times until it stops. My chip seems to do that every now and then, and I have no idea why.
- If it keeps making horrible hissing noises, make sure you wired the data wires correctly (The ones connected to pins 0-5 on the arduino, and pins A1-A6 on the Speech chip). If it seems right, try reversing it anyways. I do that too sometimes. ;P
- If you still haven't got it working, describe your problem (With pics) in the comments, and I'll try my best to help you.
More Vocabulary! More! More!
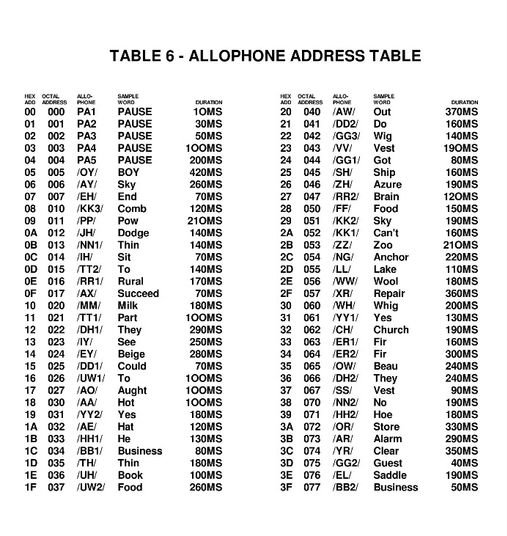
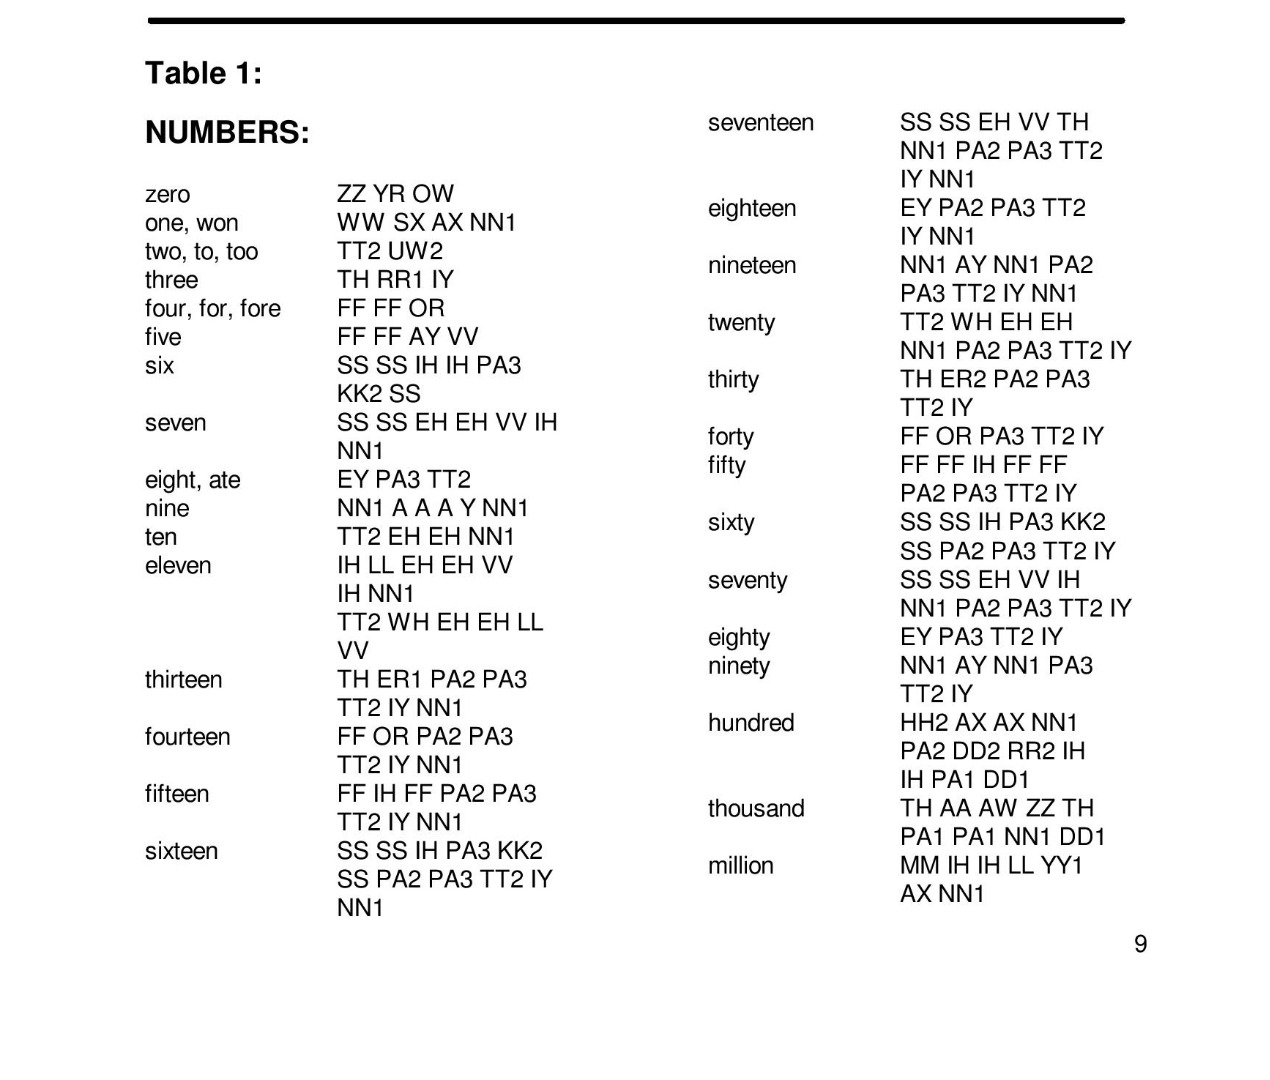
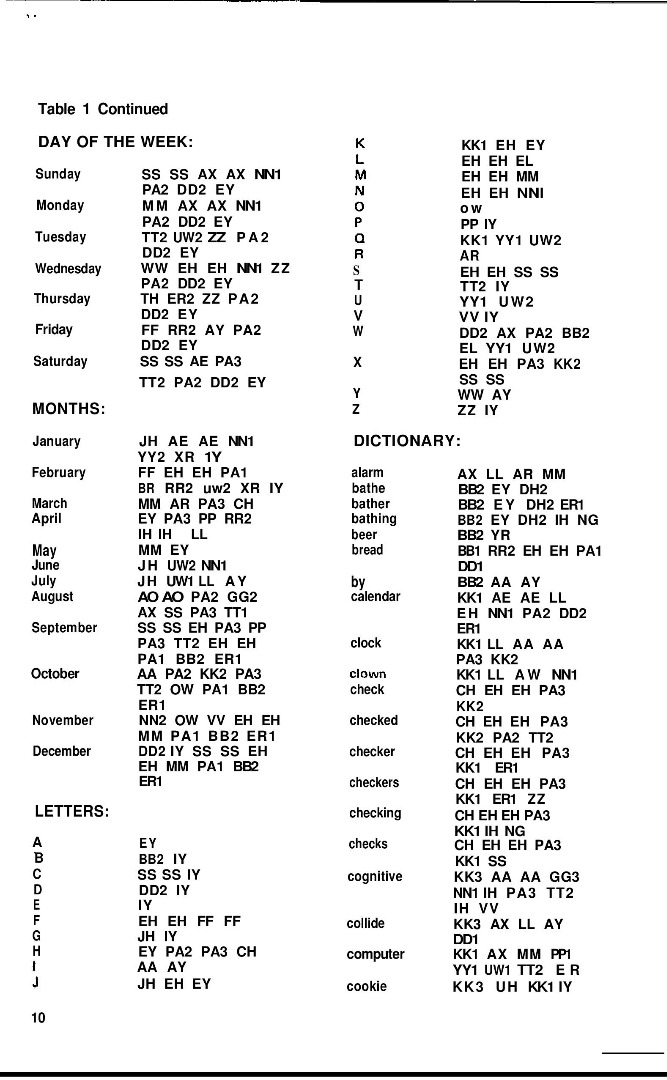
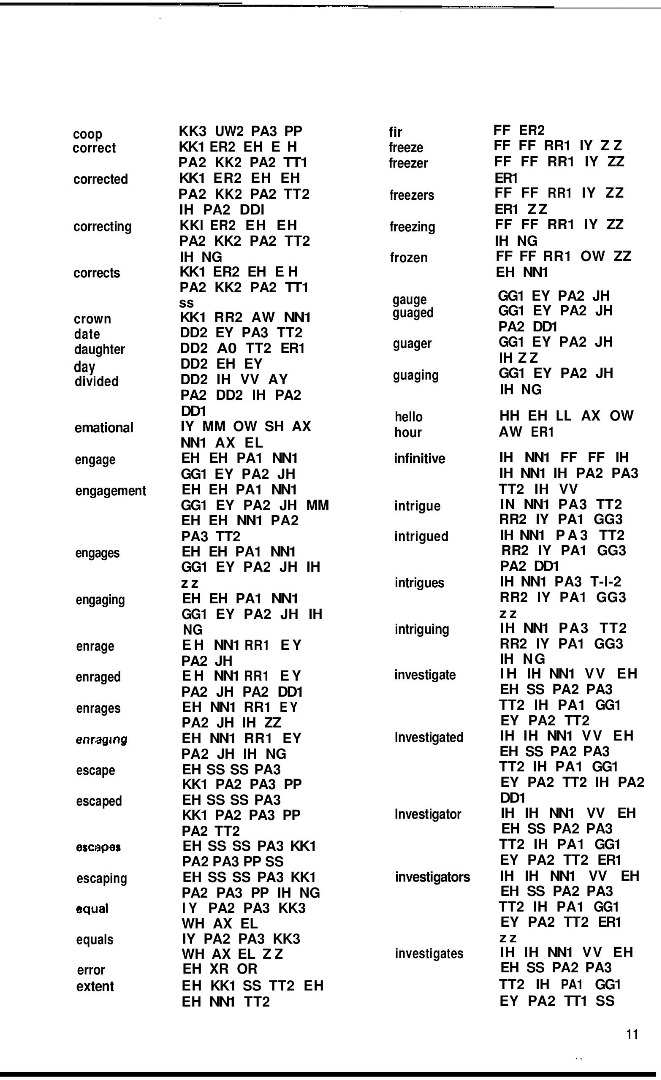
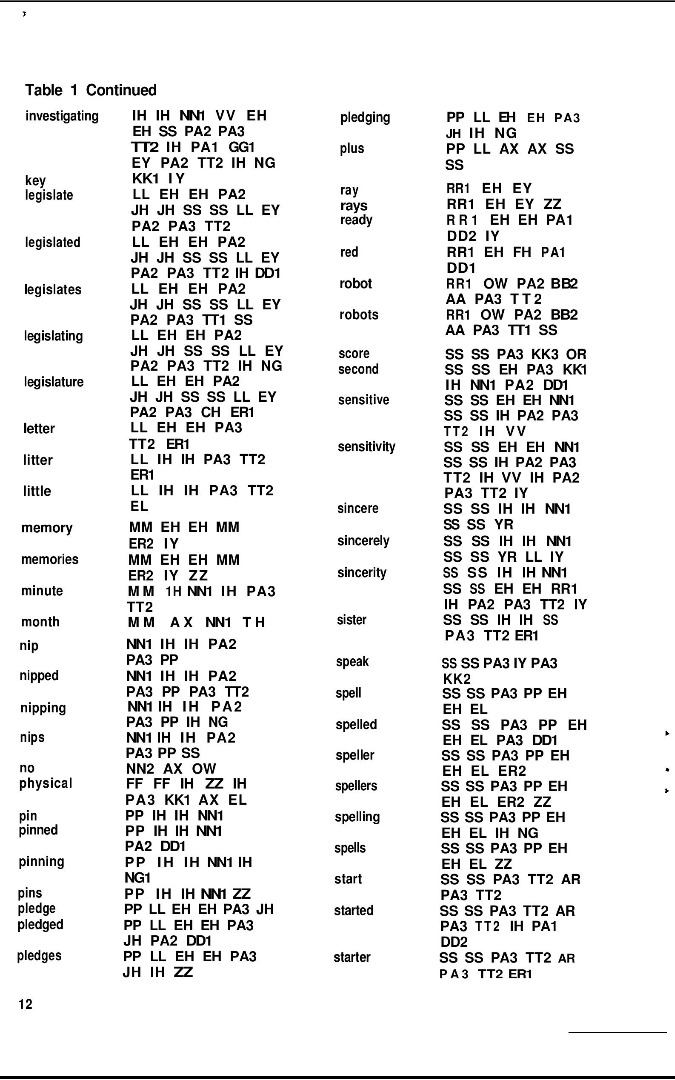
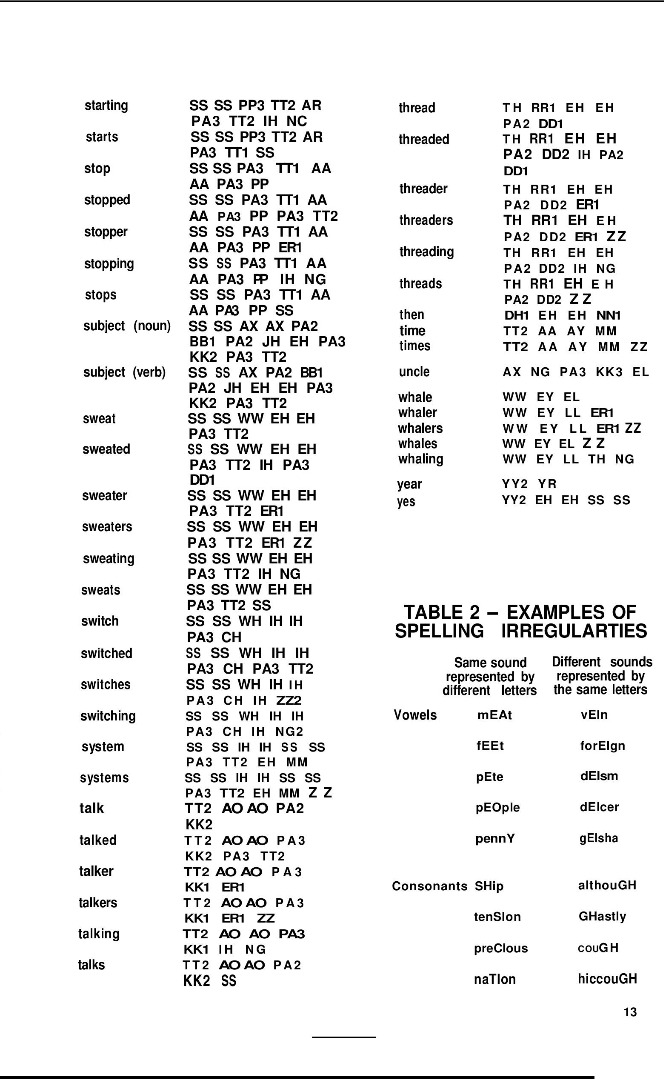
If just simply having an arduino that makes an old chip say "HELLO WORLD" over and over is your thing, then great, but probably most of us want to make it say at least a bit more.
To do this, we need to know a bit about the allophones on the Speech Chip.
The SPO256-AL2 has 59 "Allophones" at different addresses in the chip. Allophones are the sounds that make up words, for instance, "TT UW (Pause) BB EE" in the words "To be". The microprocessor (An arduino, in this case), selects the the correct allophones via a 6 bit address port on the chip to make up a word, and sends them one at a time to the SPO256-AL2, which then speaks the allophone.
I would recommend printing out the manual and reading it that way. I did that back when I first started the project, and it helped a lot. Although, since poring takes a lot of time, the pictures I've included of the manual has the dictionary, and an allophone list with example words. The manual itself has a lot more. In other words, take a look at the manual. It's pretty helpful.
Downloads
Final Notes
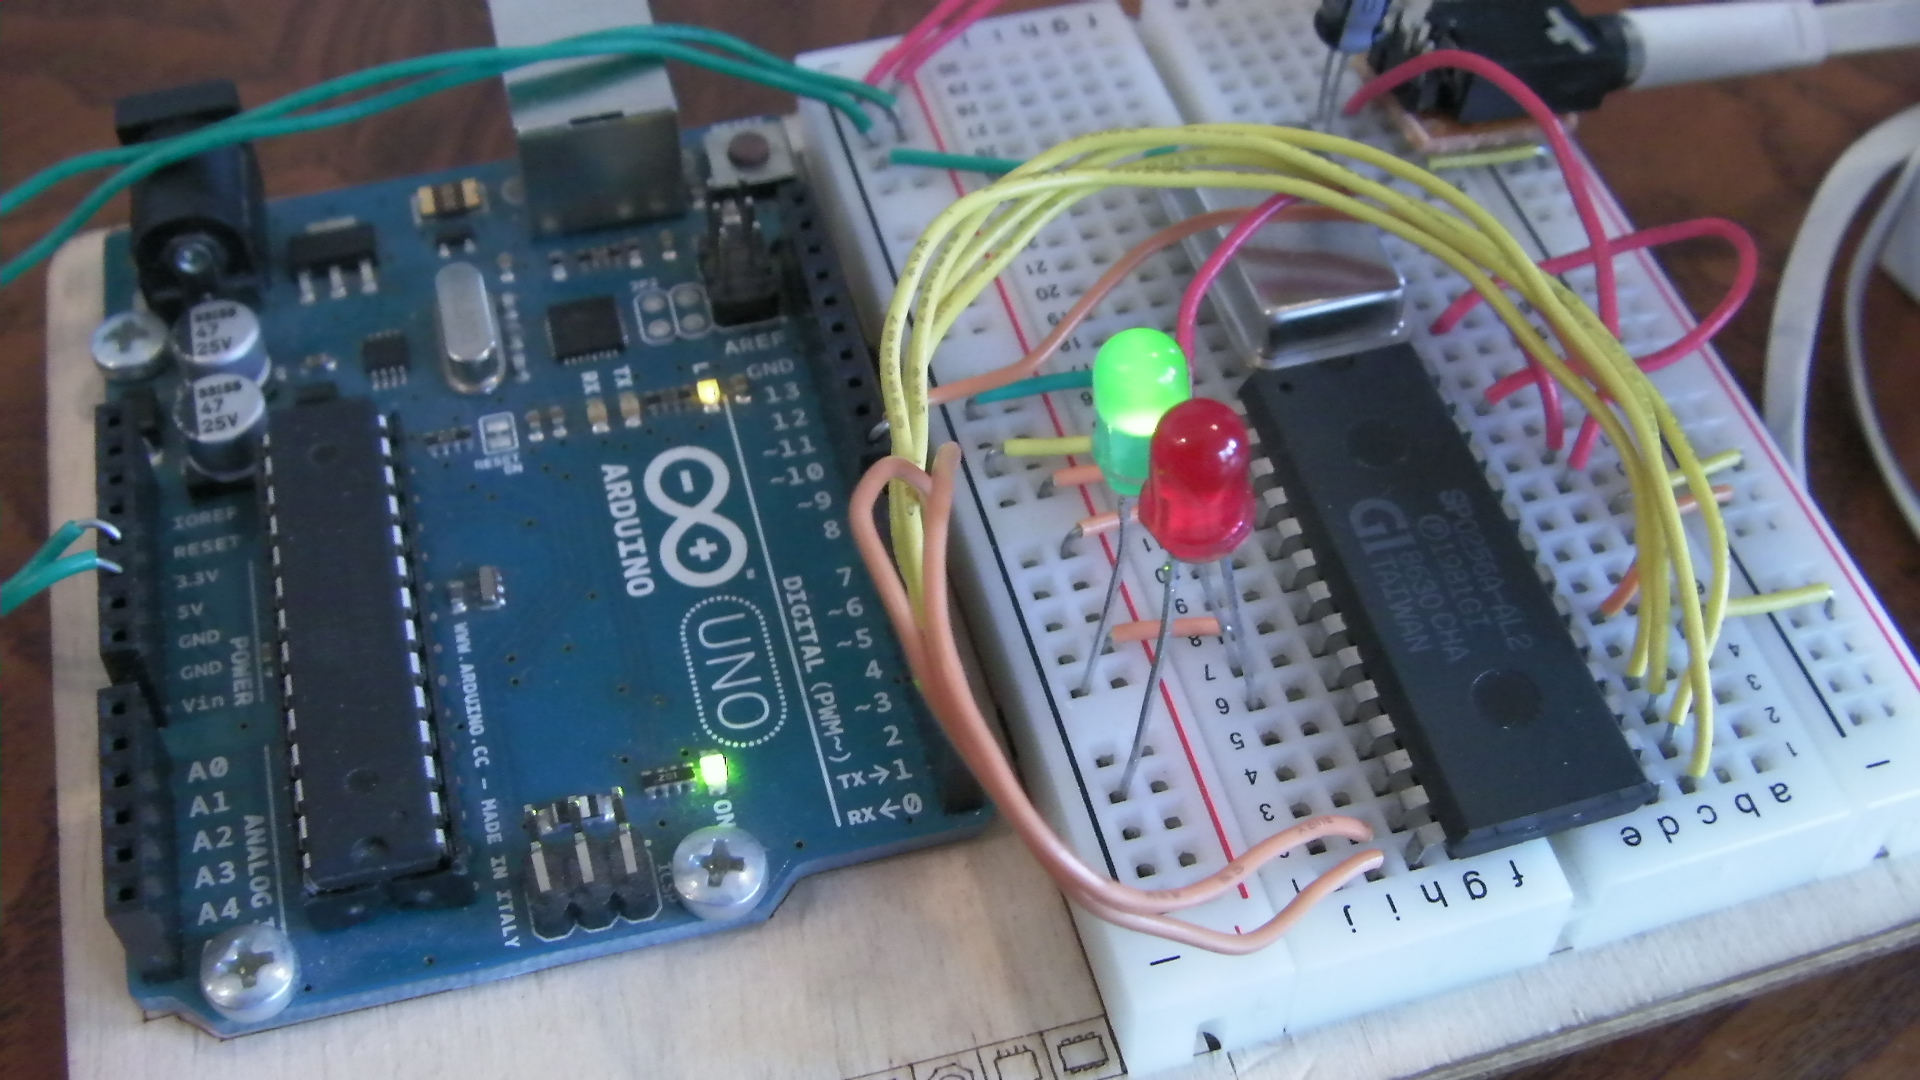
Well, hopefully now you know how to program and use the SPO256-AL2. If I was too over-explanatory, or boring, please let me know! ;P
If anyone downloaded the library before 7:28PM on 12/24/15, please re-download and install the current library. The old one had a couple allophones missing.
Feel free to comment with any thoughts, improvements, suggestions, or corrections.
This is entered in the Arduino all the things! contest, please vote if you think it's a winner!