Any Model Carbon Fiber Cell Phone Case
by ddawson7 in Circuits > Mobile
672 Views, 4 Favorites, 0 Comments
Any Model Carbon Fiber Cell Phone Case

Objective: Use any phone case to mold a brand new carbon fiber composite case for the same model
Hazards: Use proper lab safety techniques to prevent avoidable hazards. Carbon fiber frays easily and can cause skin irritation upon exposure. Uncured epoxy can also cause skin/eye irritation and must be disposed of properly in a separate contaminant bin. Dremmel tool and attachments may not be secured properly or may cause injury due to sharp blades/bits.
Gather Materials
To properly complete this build, you'll need:
Safety/General Components
- Vinyl Gloves
- Nitrile Gloves
- Eye Protection
- Face Mask
- Plastic Wrap
- Paper Towel
- Phone Case
- Wax Paper
- Masking Tape
- Carbon Fiber Sheet
- Fiberglass Scissors / Kevlar Shears
- Disposal Container
- Vacuum Bag
- Vacuum Bag Nozzle
- Dremmel Tool
Plaster Production
- Plaster Powder
- Water
- Craft Stick(s)
- 16 oz. Plastic Cup(s)
- 3 oz. Paper Cup(s)
Epoxy Production
- 3 oz. Paper Cup(s)
- Craft Stick(s)
- Fibreglast 2000 A Epoxy Resin
- Fibreglast 2120 B Hardener (2 Hour Cure)
- Foam Paintbrush(es)
Prepare Work Station
- Put on safety glasses
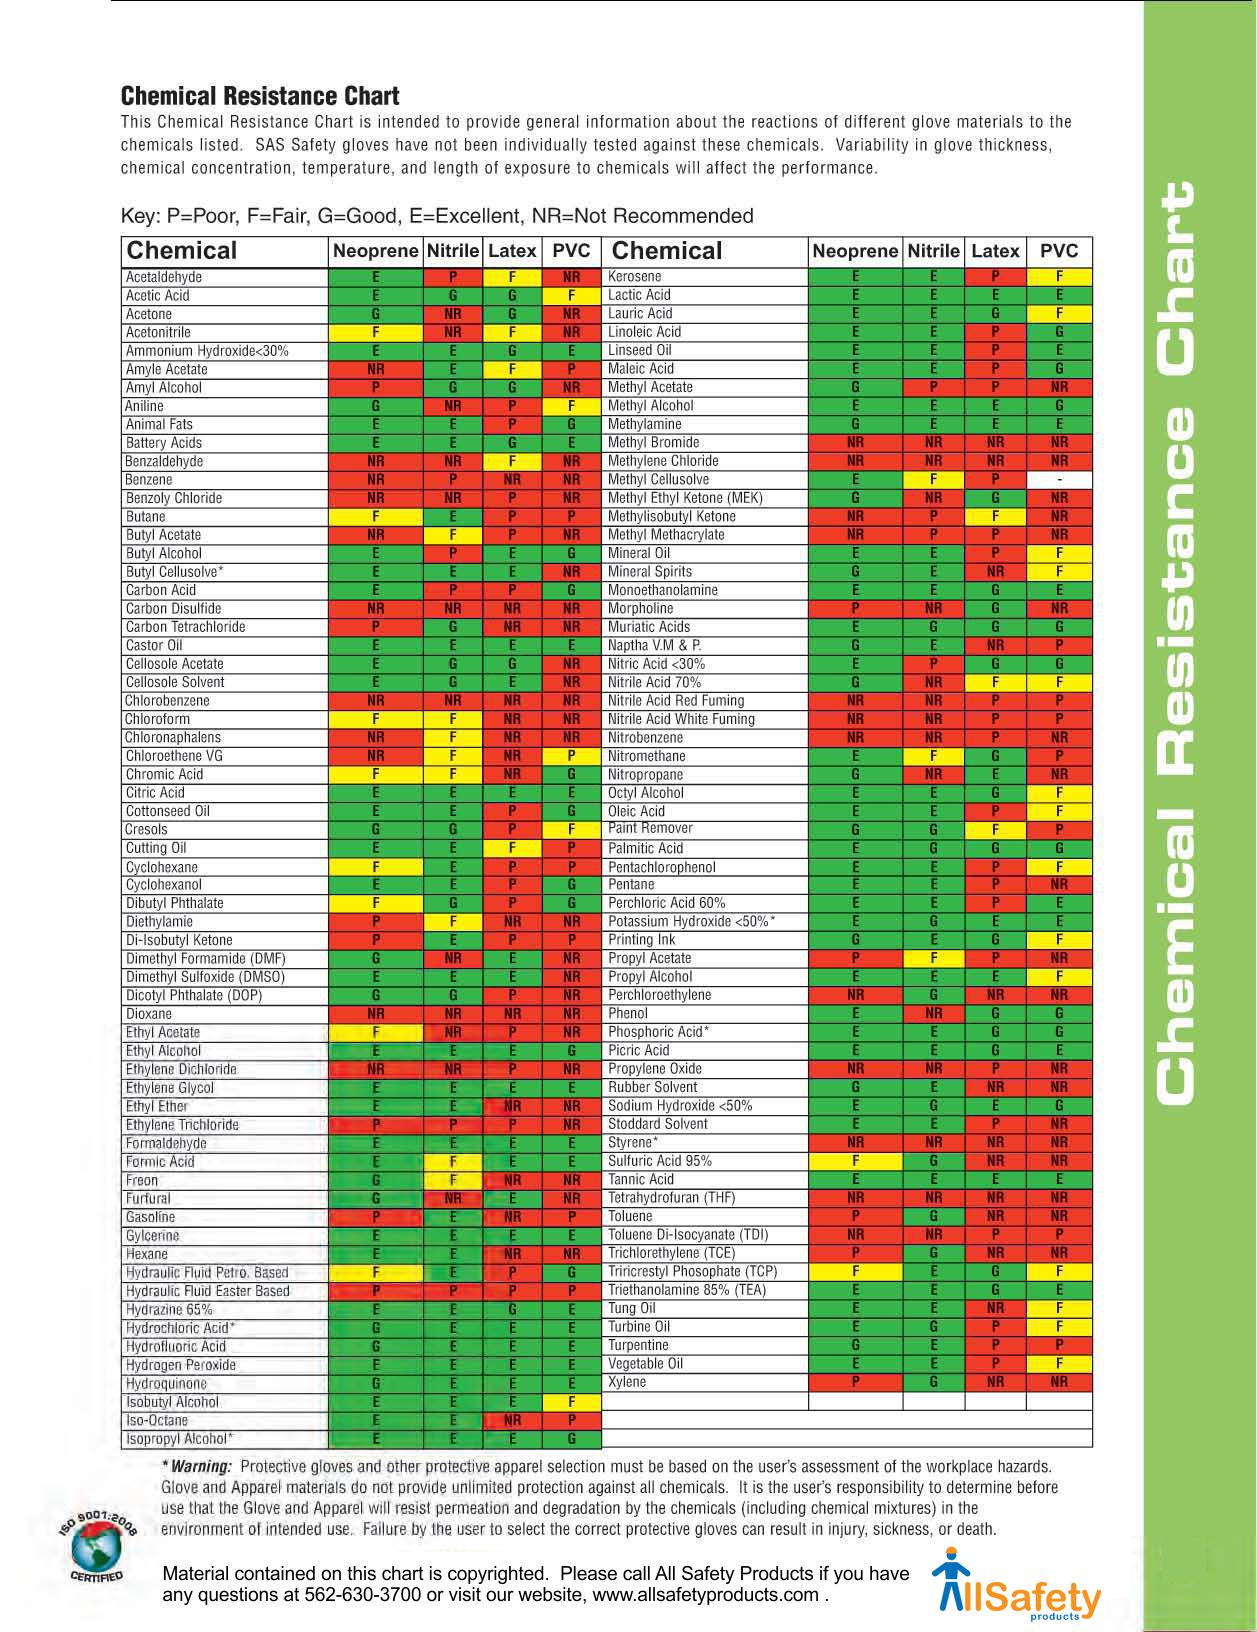
- Put on vinyl gloves
- Other gloves may suffice, but make sure they are appropriate for the chemicals being used. Reference a Chemical Resistance Chart if unsure of compatibility
- Cut out a 3x2' area of plastic wrap and cover workspace
- Apply masking tape to edges to prevent movement during work
- Select desired phone case
- Case must have hard shell on inside of phone and cannot have dimples or "honeycomb" structure as this will affect the molding process and vacuum bagging procedures
- Use soap and water to clean phone case, removing dirt and various particulates
- Dry using paper towel or cloth to remove excess water
Prepare Plaster
.jpg)
- Read proper ratios of plaster mix to water and follow instructions on ingredient containers
- All following measurements were provided by the specific company
- In large plastic solo cup, measure out 1/3-1/2 a cup of plaster mix
- Use separate cup to measure appropriate volume of water in 2:1 plaster to water ratio
- Measuring into the same cup may cause a premature reaction or improper ratios
- Add water to large plastic cup with plaster powder slowly
- Mix with craft stick until homogeneous, being careful to not aerate the plaster with unregulated mixing rates
- Plaster is properly mixed when all "chunks" of plaster mix have been dissolved within the mixture
Create Phone Case Mold
.jpg)


- Line phone case with adhesive side of wax paper
- Use finger or crafting stick to smooth edges and coat inside corners for complete seal
- Any wrinkles or imperfections in this step will continue in your mold/case throughout the process
- It is okay if camera/charging holes are covered in this step, as they will be defined in Step 10.
- Place phone on plastic wrap workspace
- From cup, pour mixed plaster into case slowly, using stick to flow into case in a controlled manner
- Move cup from left to right, across the case, to not have any buildup or "mountainous" regions of plaster buildup.
- Use crafting stick to smooth out regions or remove excess plaster
- Let plaster set for 24 hours in undisturbed location
- When set, pop out of phone case, being careful not to chip edges
- Use a crafting stick or similar blunt object to file down imperfections
Cut Sheet of Carbon Fiber

- Measure dimensions of phone case (as if wrapping a package)
- Leave room to cover to other side of phone case by approximately 2 cm in each direction as seen in the attached image
- Outline desired sheet size with masking tape
- This will prevent the carbon fiber from immediately fraying upon cutting. The tape will eventually be cut off of the case with other excess material
- Use fiberglass scissors / Kevlar shears to cut to proper size.
Wrap Your Plaster Mold


- Place fiber under phone case with the "exterior" of the plaster facing down and the "screen" side face up.
- Fold edges over until corners collide and follow Option 1) OR Option 2)
- 1) Cut the sheet at 45 degree angle to corner, creating two small edges that can be tucked under each other to create a flat, tight corner
- 2) Take short edge corners and fold inward to form trapezoid shape. Then flip over plaster to finish the edge
- Tape folded edges to plaster
- Make sure tape only touches plaster and other tape/removable areas
- After epoxy coating, tape can only be removed by cutting off the entire section
Make Epoxy Coating

- Put on nitrile gloves
- In paper cup, mix 3 parts 2120 B Hardener to 1 part 2000 A Epoxy Resin by volume
- Depending on your hardener (this is for a 2 hour cure), follow the appropriate instructions listed on your hardener label
- Stir using stick until it appears homogeneous and all discolored "striations" dissolve into the epoxy
- Be sure to put proper lids on A and B components, as mixing them will harden them to the container and it will be difficult to reopen/use in the future
- Dispose of all uncured epoxy contaminated materials in disposal container
Apply and Seal Coating


- Using foam paintbrush, apply thick layer of carbon fiber over phone case
- Apply thicker coat to corners and edges of phone case, as a thin layer will peel off over time due to the epoxy settling at the bottom
- Place phone case exposed-plaster side down into vacuum bag
- Keep approximately 5" from vacuum nozzle as the pressure and height of nozzle will cause epoxy pooling if multiple are being done simultaneously
- Each phone case should be approximately 1" apart in each direction
- Seal bag by removing adhesive putty and lining edges between plastic sheets
- Press from center of strip outward to minimize misalignment of the bag edges
- Attach nozzle to vacuum pump and keep active until epoxy cures (~2 hours)
Remove Plaster and Clean Case

- Remove case from vacuum bag
- Crack plaster to remove from case
- Using hammer, crack the face of the plaster and remove large pieces
- Any small pieces can be removed by angling a large-based screwdriver into plaster and tapping end with hammer
- WARNING: Improper chiseling technique can leave holes in case
- Use tap water to remove any particles residing on surface
Create Phone Specific Modifications

- Using Dremmel tool and cutting blade on medium setting, carefully remove excess carbon fiber and cut to proper dimensions
- Change to boring bit to drill holes in the material that matches the camera hole locations on the phone
- Apply in center of region and slowly push down widening the hole and polishing the edges
- Use sanding bit or small boring bit to remove loose/uneven fibers from the case
Apply Final Layer of Epoxy

.jpg)
- Create epoxy using procedure from Step #7
- Using foam paintbrush, coat phone case in epoxy, ensuring to get inside corners
- Small holes may be sealed by the epoxy, but after curing they can be opened/widened by a toothpick, pencil, or Dremmel
- Place on plastic wrap to cure for 2 hours
- When done, wash with soap to remove any excess material or coatings
- Celebrate your new accomplishment