Android Security Camera/Webcam

So, this is my first instructable. I figured I'd start off with an easy one--making a security camera out of your old android cellphone/tablet. This particular project will cover everything from common issues, tweaks and will be fleshed out until I create a small network of IP cameras all tied back to a custom made DVR. However, for now, let's just focus on your first android security camera or even webcam, if you wish!
Update: I've completed the second part of my guide: Android Security Network Setup, if you'd like to give a read after completing this.
So why use these over, say a IP camera?
- Lower cost.
- The android operating system gives you an amazing amount of flexibility.
- Does it still have a battery? Great! You have a security camera with a battery.
What you'll need:
- Wifi router
- Old android phone/tablet with working wifi and camera.
- Charger for that device.
- Computer with web browser capable of running Flash/Javascript or another mobile device that is Javascript enabled. (There are IP cam viewers as well from the app store.)
Don't have an old android device to use?
- Goto Ebay, Goodwill, flea market or even yard sales.
- Search for android phones that are either broken (touchscreen needs to be usable) or with a bad esn. Make sure the camera works and wifi works.
A bad esn merely means that it cannot be activated on a network due to an unpaid bill. At this time(7/26/2015), I am seeing bad esn Motorola Razr M phones go for 25 bucks or less - quite less than an IP webcam.
Still with me? Great! Let's begin.
The Software
We actually have a good deal of flexibility here. Any app that you pull from the Play Store that designates itself as an IP webcam/Security Camera app should work. The only requirement is that the app allows us to access your android device's camera via internet protocol or IP. With all that said, I chose IP Webcam. I have tested others and really it comes down to features and stability. A lot of these apps will make older phones crash and/or release the camera application randomly, which makes it unusable until reboot. We'll get to that a bit later. For now install your choice!
(Alternatives: Camera Stream, DroidCam - I tested Alfred, if you notice it among the highly ranked. I remember not being able to access the IP stream easily or at all.)
Okay so we're done with the software, right?
Nope.
Let's go through setup.
IP webcam in particular works right off of the bat. You will not need to do too much tinkering with the settings unless you want to activate say Motion Detection (will be covered in another instructable). Two main features that IP webcam offer though is streaming from boot (great for a dedicated IP cam device) and password protection. The app also offers the ability to record directly to the device. You will need to install an SD card for this in some devices or point it to the Downloads (/storage/sdcard0/Downloads/) folder due to Android file permission issues. In the Video preferences you may also adjust your video/photo resolutions. More importantly, when you get into a little real world testing, you may turn down quality and fps (for stability/overheating issues), to cut down on saved video file sizes in the future or free up some wifi bandwidth.
If you need to use the front camera: There is an option in video preferences to turn it on. Despite the warning, I have found it to be quite stable on a 4.4 version android tablet with a low resolution set to around 360. You will also need to turn the quality down to around 50-60 percent.
If we scroll all the way down in the main menu you will see an option that should read: Start server. Let's select Disable notification and Stream on device boot while we are here as well.
After clicking it your video should pop up! Continue to the next step, viewing the video feed...If not read below for some troubleshooting.
Bummer
First off, does the camera work with the stock android app? If not, we may have a bad camera module or some corrupted firmware.
Before replacing the firmware:
- Power cycle/battery pull! Try again!
- Clear your camera cache. Settings >> Applications >> Application Manager (Scroll to All) >> Select Camera >> Tap Clear Data and Clear Cache. Reboot your device. Try the stock camera app again. If it works, try IP webcam again. If IP webcam does not work, try a different app. If the stock camera does not work--keep reading.
Replacing the firmware:
- Start by just giving the camera a good ol' power cycle. Try IP webcam again.
- Didn't work? Try to invoke android into a soft/hard reset. Settings Menu >> Backup and Reset >> Clear settings/Factory Data Reset, respectively. Perform a settings(soft) clear first before factory reset. Try again!
- If you don't see the above option we can do it with the built-in recovery console. Turn off your device. Typically most devices require the Home button(if your device has one) + Volume down buttom + Power button to be pressed for about 3-5 seconds to access the menu. You will want to select Clear cache. Reboot/Power on. Try again.
- No go, huh? Go back into the same menu again. Let's try a factory data reset this time.
- Use your Googlefu and track down your camera firmware. Or goto straight the manufacturer website and track it down. Samsung in particular offers directions and download packages for such situations. Good luck!
- Still no? Well, you have either a bad camera module or logic board.
- Try finding a teardown guide for your phone on IFixIt. Search Ebay/Google for your camera module and replace it.
- Go through everything up there again.^
Bonus: Some random troubleshooters have found that downloading a launcher application from the play store then creating a shortcut via the app, to a direct call upon the camera firmware will cause it to work if it is not a bad module and simply the phone refuses to replace the camera firmware itself. I leave you to Googlefu for such endeavors as this method varies from device to device.
Viewing the Feed...

.png)
There are a few ways to view IP camera feeds. I'll break down a few different paths for us.
Simple and quick...
For another android device
If you need to watch something from outside, record the feed and even fiddle with some motion detection on the viewer side. You may simply goto the Play Store and find your own app or may I suggest IP Cam Viewer Lite. I have not tested this one for very long but the ads are quite annoying. So you may wish to search for another, but thus far it is the only app that simply lets you do a quick and dirty DVR with another android device. Or you may open up Chrome/Firefox and follow the Personal Computer instructions below...
For a personal computer (Windows/Mac/Linux)
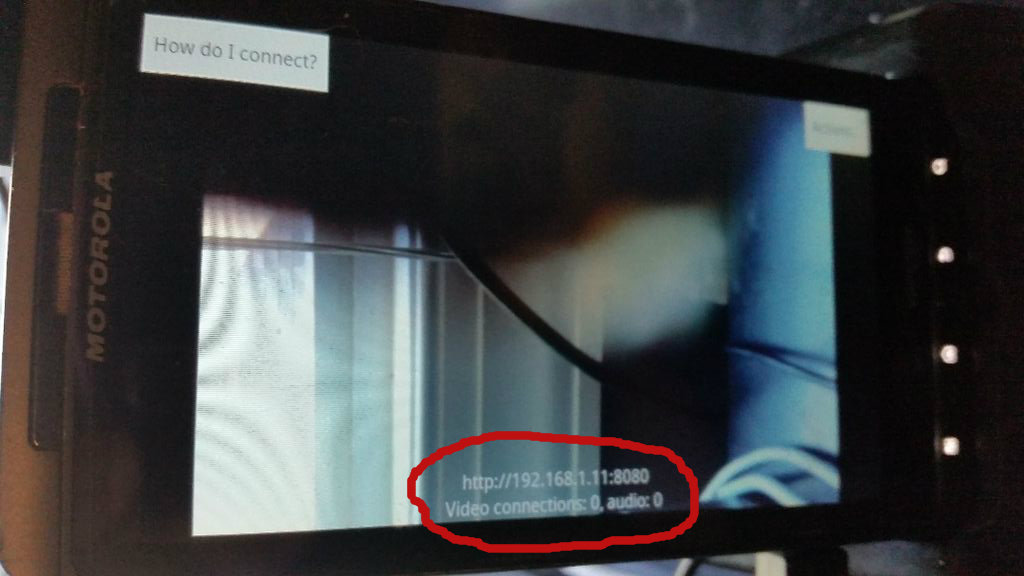
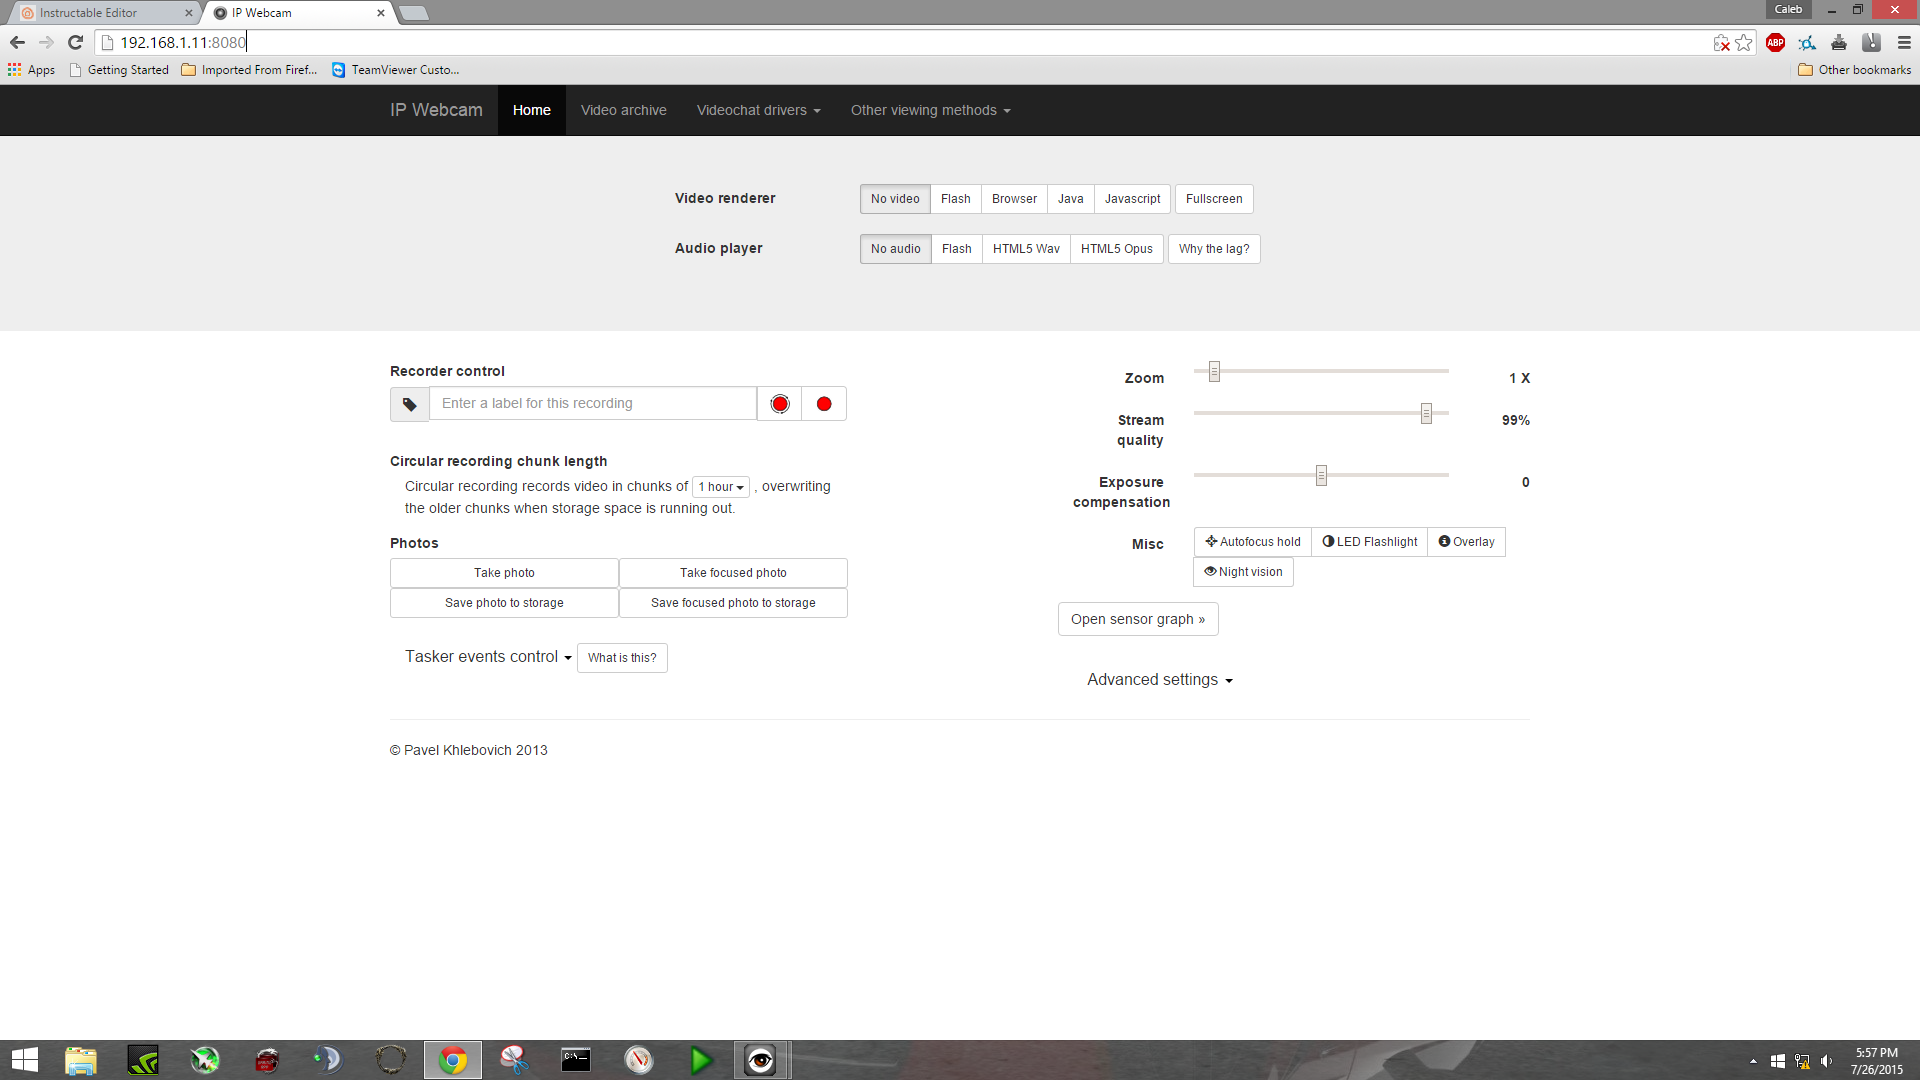
We can pull the feed in a web browser that has Flash or Javascript enabled. Look at the video feed on your IP webcam. Near the middle, on the bottom there will be a IP address. It should read as something similar to: 192.168.1.x or another IP address. After the IP address there will be a colon followed, by default 8080, unless you changed it the IP webcam settings earlier. So, for example one of my cameras has an IP address of 192.168.1.11. The port at which the video feed is being hosted on is 8080. Thus, 192.168.1.11:8080. We can type this into the browser. See the second picture above if you're confused. Please note that we do not need to append http or www to the beginning of an IP address.
Now as you can see we may choose a video renderer and audio player. I would suggest either Flash or Javascript for the video and as audio flash will give you the best without a delay. The others will have a 3-5 second delay on the audio.
This screen actually gives us a ton of options. And in honesty, if you wished to simply stop here and use the built-in DVR functionality with IP webcam--be my guest. Personally, I find android too restrictive when dealing with files, and I choose to have a more robust motion detection software - but that is for another instructable.
Keep in mind there are a few Windows options for further DVR functionality. I've tested a few, either freeware or through trials. It is quite easy to view your feeds in VLC. Just merely Open a Network stream and enter the same information as before and add /video to the end. For example: 192.168.1.11:8080/video
Windows-only
There was only one Windows-specific DVR program that I could find: iSpy and what do you know? The bugger is open source. Adding a video source to it is actually very simple. So go download it and give it a try.
And then...
Click the top-left button that reads Add. Select IP camera. In the video source window make sure you are on the MJPEG URL tab. Enter your IP address and port followed by our /video. So, 192.168.1.11:8080/video for example. If you've added a username and password, you may enter it here as well. After that you'll get a whole lot of options. Everything from motion detection, uploading photos to an ftp server, alerts (which are rather cool), cloud storage, local storage and scheduling. You may mess with these now or later - it's up to you.
A little troubleshooting never hurts
For those among us that liked the capability to add a username and password. You may have to add http://username:password@192.168.1.11:8080/video (give or take the /video depending on your viewing client) to access your IP webcam if you chose to secure it.
As for VLC. The current build(7/26/2015) of VLC seems to be having issues recording the stream and just crashes immediately. So, I did not include how to record the stream in my tutorial. However, it works wonderful for just a basic viewer if that is all that you want. Also a darn fine movie player.
If your fps (frames per second) seems unusually low it is more than likely because of the android IP camera. If you would like higher fps, go into the video preferences and decrease the quality and video resolution a tad. Some viewers/dvr programs will require you to specifically state the video resolution when setting the IP camera up in their software--so keep that in mind.
So your fps is great but your recorded video is choppy/lags. iSpy in particular seems to be a bit heavy on resources. On my eight-core desktop the cpu usage gets quite high when I have 3 to 4 feeds rolling in. I've built a linux-based DVR that is dual-core that seems to run 50 percent more efficient as well. You may want to keep tuned for my linux build later on.
In ending...
So, we've learned how to recycle an unloved device into a potentially useful one. You could go on from here to mess with the Motion detection settings, a little dab of scheduling here and there to record a bear attempting to eat your trash every night at 1am--maybe even setup some nifty alerts that email you when something is detected. Or maybe you want make a separate PC into a DVR now that we have achieved a simple and cost effective solution to video surveillance. With that said, my next instructable will cover Motion Detection and alerts using the iSpy software or I may go ahead and jump to my own Linux DVR build - let me know what you would like to see first!
Now make sure you visit my next instructable that covers setting up multiple devices for access outside of your home network: Link here