Amateur Voice-overs With Audacity
by alexdwilliams in Circuits > Audio
12727 Views, 10 Favorites, 0 Comments
Amateur Voice-overs With Audacity
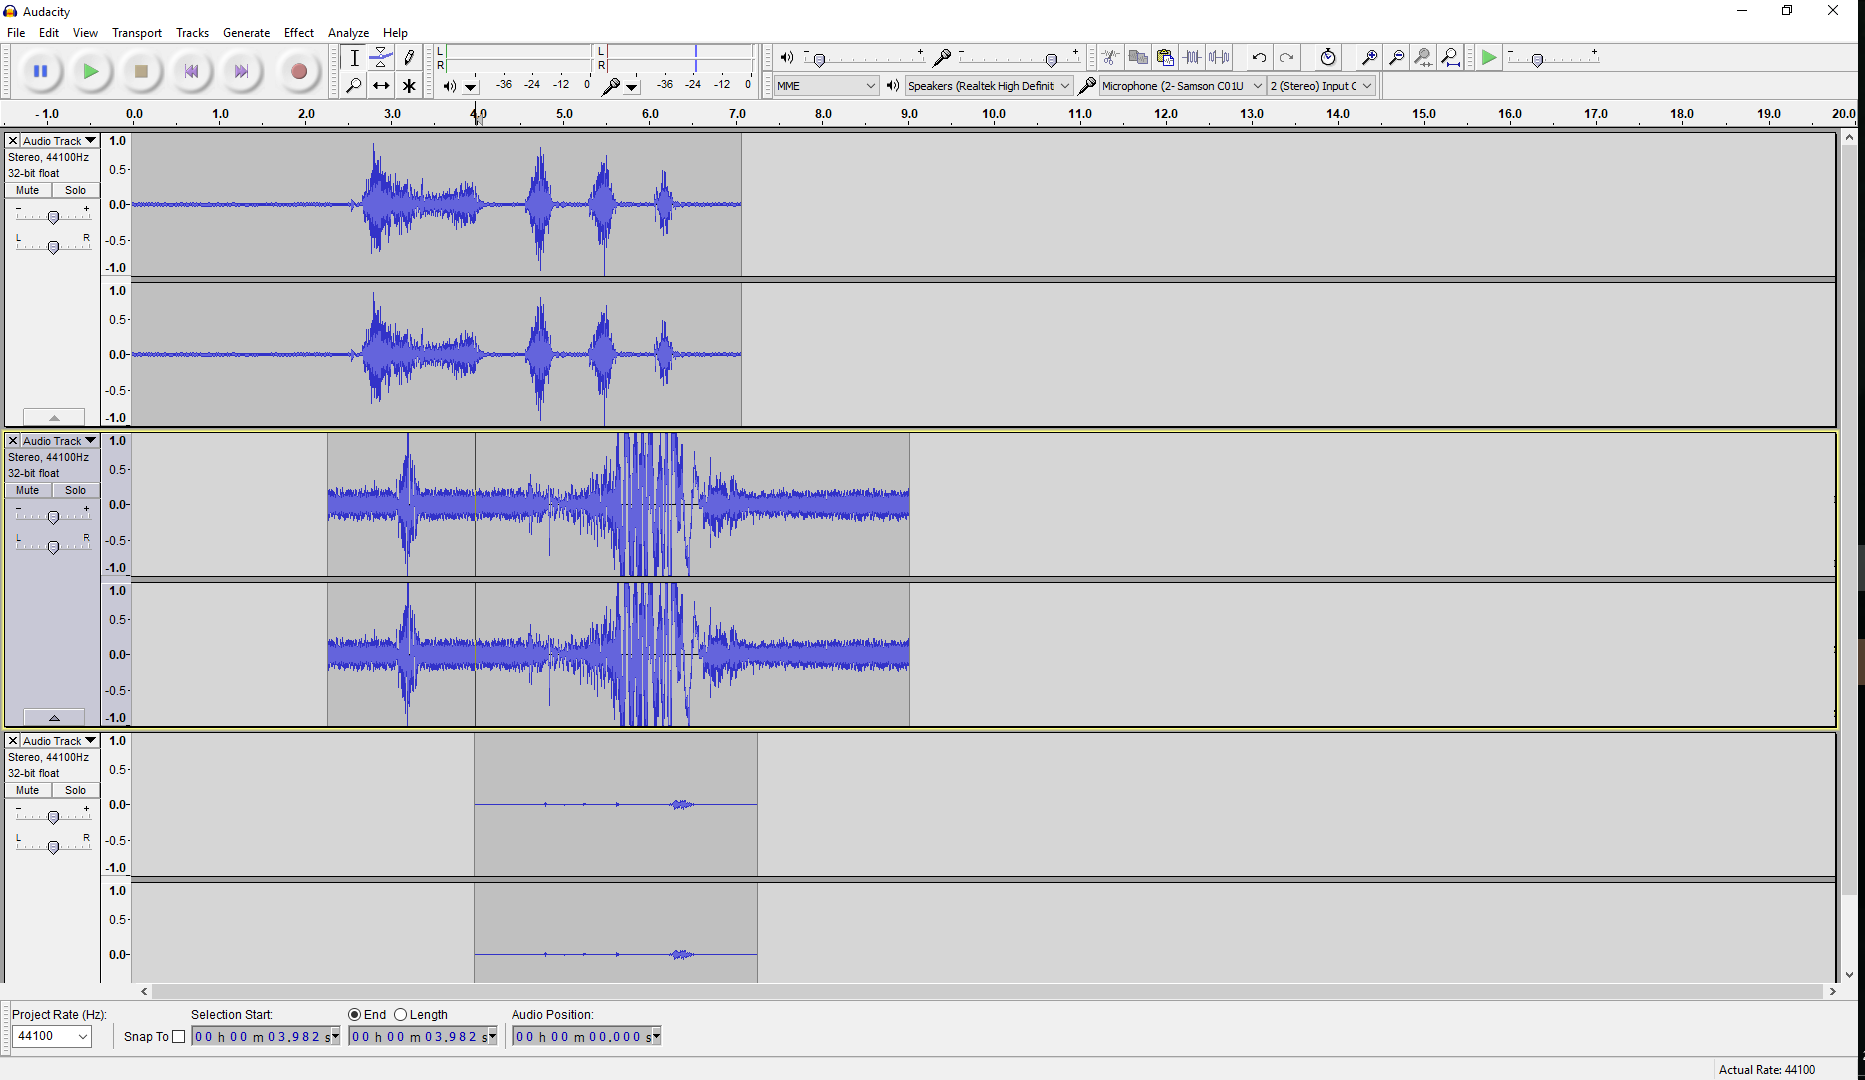
In this guide, I will show you how to get started with using Audacity for voice-over like work.
Audacity is an intuitive, feature-filled audio editing program that can edit recorded audio for many purposes. Some applications for voice-overs would include dubbing a video demonstration, narration audio, podcasts, and similar things.
In the following steps, I will show you how to set up your microphone, use audacity to record it, edit it in a variety of ways, and export your audio.
Setting Up Audacity
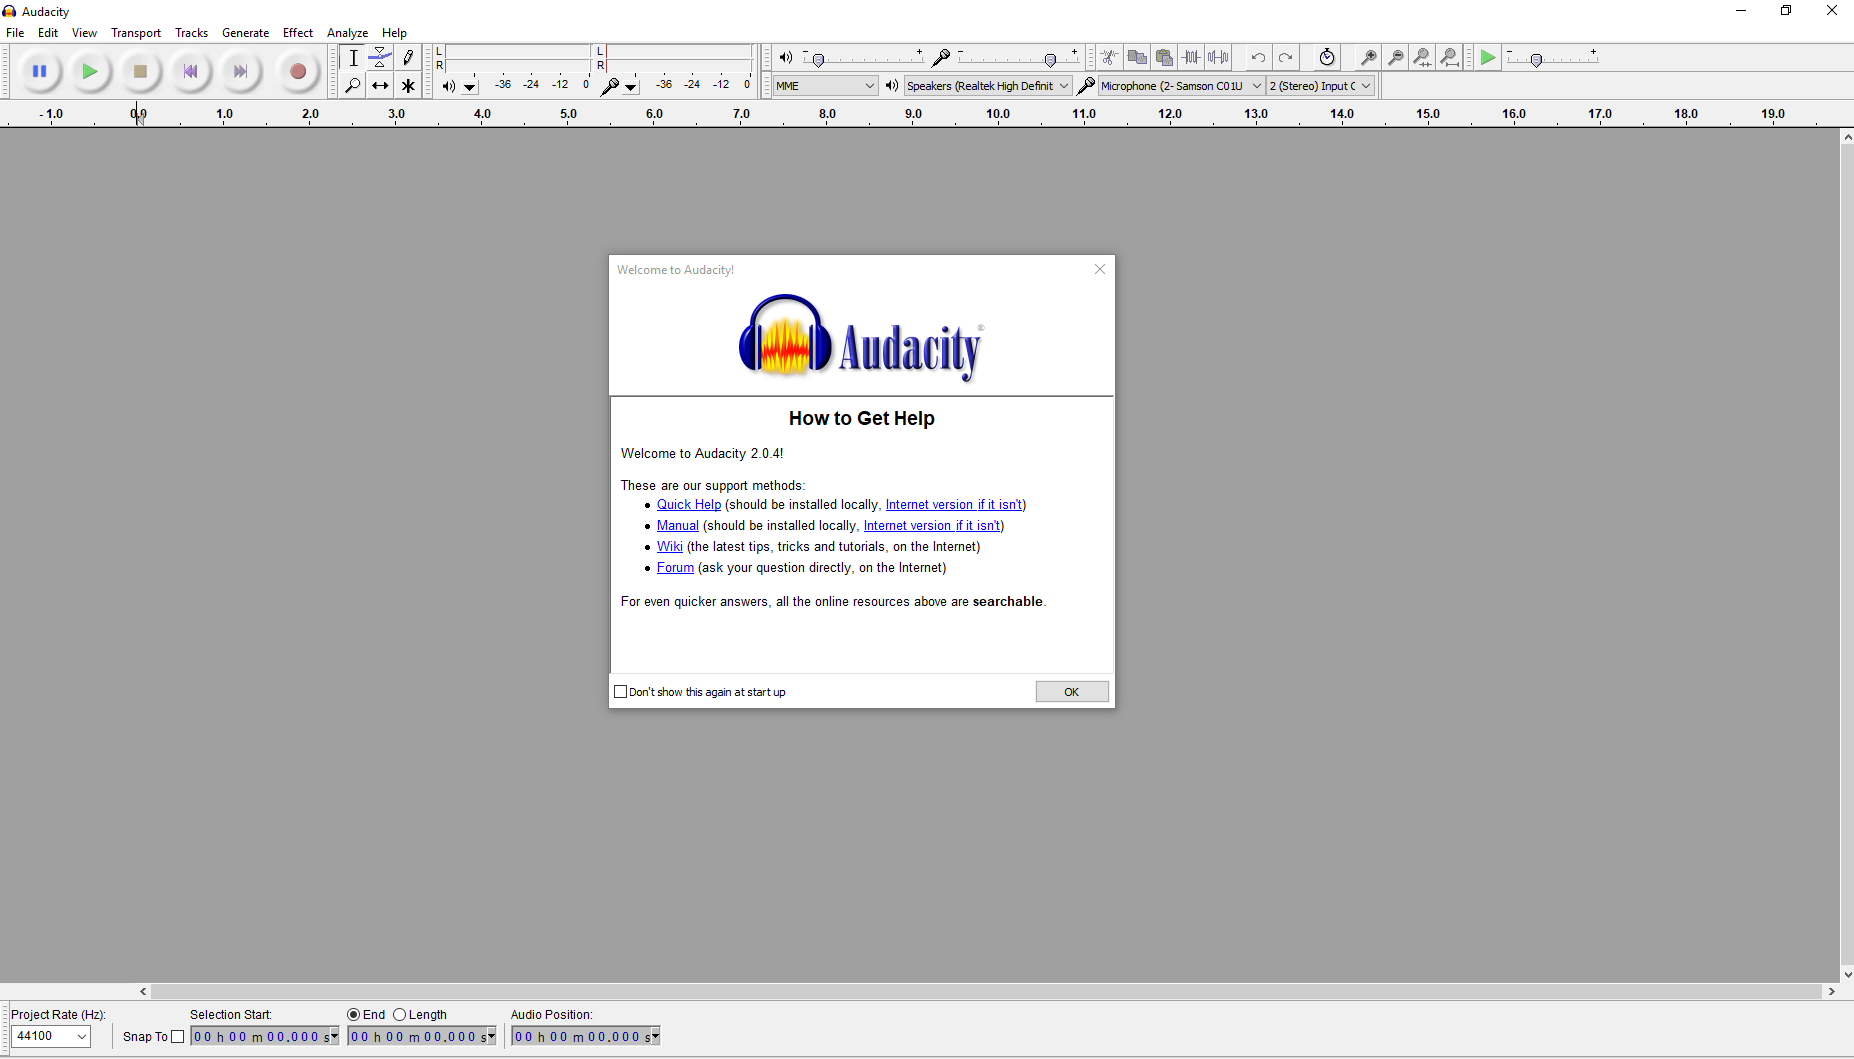
- Download Audacity for your OS. Windows users can download it here , and Mac users can download it here. Be sure your computer meets the listed system requirements near the bottom of the page. Follow the installer's steps.
- Open up Audacity. You should see a screen similar to the above picture. Hit "OK" to close out the welcome popup.
- If you would like to export MP3 files at the end of the project, be sure to get the LAME extension for Audacity that is available for Windows or Mac . Follow the given installation instructions.
CAUTION: The LAME download page does give some warnings about false flags with Antiviruses and possibly needing to allow an exception for its installation.
You should be left with a grey background in the open Audacity window. Move onto the next step for configuring your microphone.
Setting Up Your Microphone
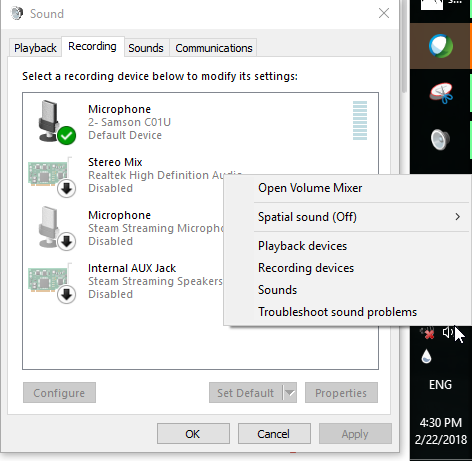
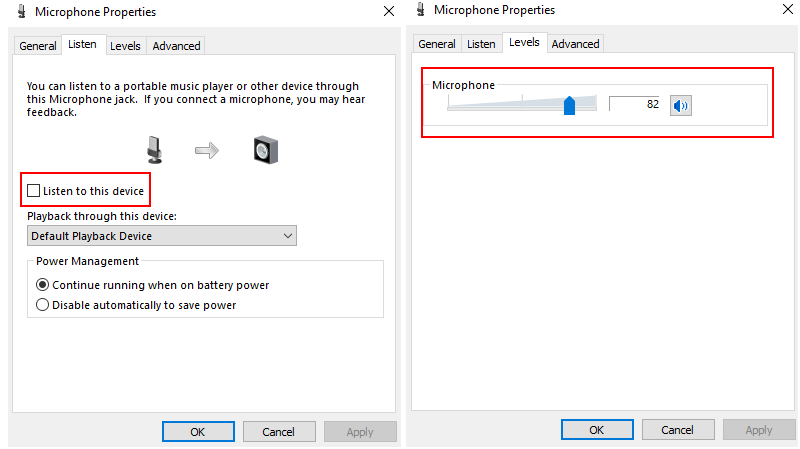
This step will get your recording audio sounding better before using Audacity.
For Windows Users, follow the proceeding steps:
- Position your microphone in an effective way and away from any excessive noise. A distance of 2-3 inches for headset microphones and 6-7 inches for a standalone microphone is a good start.
- For Windows users, right-click the audio icon in the system tray, and click on recording devices. Right-click your microphone and select properties, and click on the "listen" tab. Check the "Listen to this Device" box and hit apply.
Note: You should hear feedback from your microphone to your speakers or headphones. If you don't hear anything, try changing the playback device, or following item #3 below. - Try adjusting the slider in the "levels" tab to various positions, and listen to how you sound. Experiment with different microphone positions. Find the settings and adjustments that make you sound the clearest.
- Uncheck "Listen to this Device" and hit apply to stop feedback
For Mac users:
- Adjust microphone levels under sound in system preferences
Note: I do not have a computer with Macintosh OS, so I cannot provide any pictures.
- Go to the next step for testing in Audacity
Since recording setups vary, you will have to tinker with this step. If the audio feedback in item #2 bothers you, skip to the next step and adjust your microphone level while test recording in Audacity.
Audacity Test Record

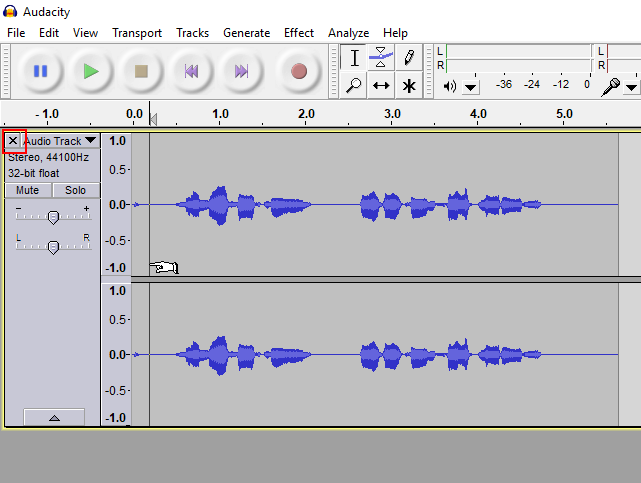
In this step, we will test our microphone in Audacity by recording short samples, and then listen to the playback:
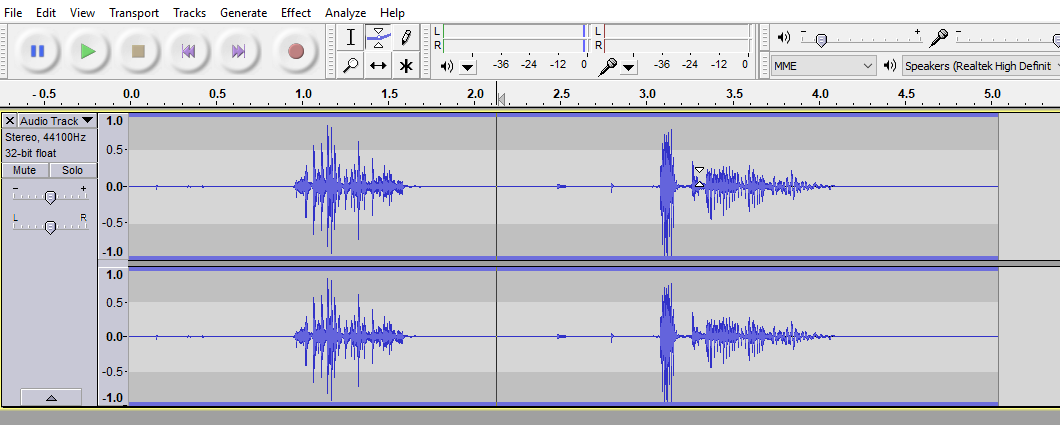
- Become familiar with the round control buttons on the top left of Audacity (see the first image). From left to right, they are Pause, Play, Stop, Start Skip, End Skip, and Record. To the right of those, there are also cursor options. Make sure the Selection tool is selected as shown in the first picture.
Note: Hover over an option for a bit to get a popup with its name. - Hit Record, speak a phrase into your microphone, then hit Stop. You should see a sound waveform created.
- Click near the beginning (second picture) of the waveform (or alternatively, click Skip to Start), and then hit Play. You should hear your voice playback through your speakers.
- Click the X in the top left of the Waveform box to delete the recording.
- Perform any needed microphone adjustments, repeating steps 2-4.
If any problems occur in step 3 where the waveform is strangely affected, you may not have the Selection tool selected. You can undo any steps by clicking "Edit" in the top left and hitting the undo option near the top of the drop-down (Ctrl-Z also works).
Learning Selection and Timeshift
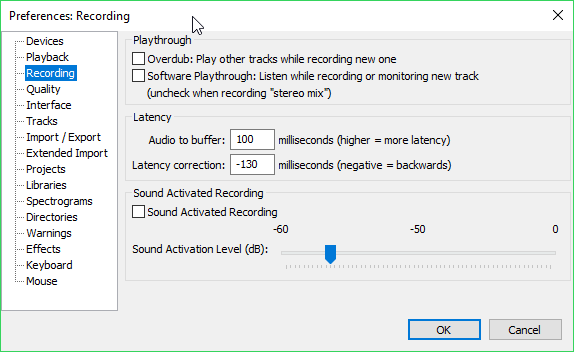
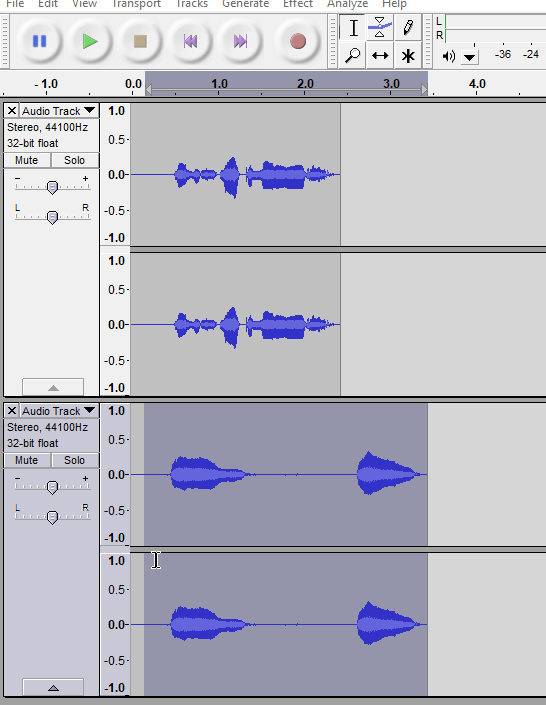
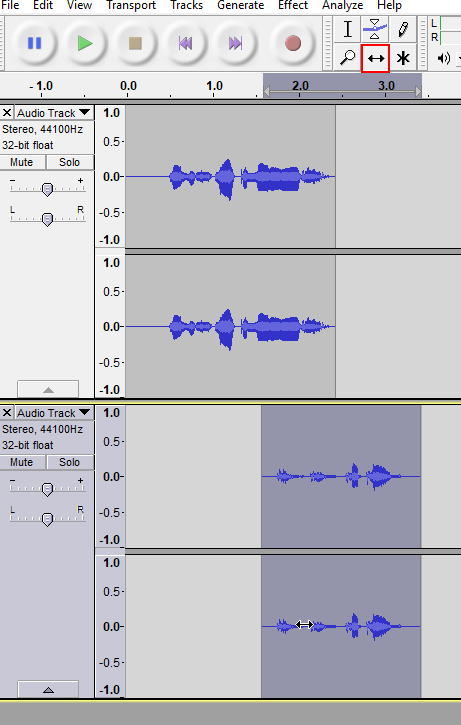
For this section, we will learn how to use the selection tool along with the timeshift. In addition, we will also see how Audacity handles overdubbed recordings with multiple tracks.
- Go to "Edit -> Preferences" and uncheck Overdubbing under the recording section. This to prevent other audio tracks from playing while recording a track. Hit okay to apply the changes.
- Make an audio track using the procedure from the last step.
- Make another track after stopping the previous recording.
- Click and drag a selection with the Selection tool on one of the tracks.Make sure your selection is highlighted
- Change to the Time Shift tool from the Selection tool. Click and drag the selection around to move the track along the timeline.
- Click play and listen to how the tracks start at different times.
- Delete your tracks after you are done experimenting with the time shift tool.
The application of the Timeshift tool will come in later, but the Selection tool is very key to doing a lot of things in Audacity. At this point, every step will assume you will start with a sample audio track that you can edit with and dispose of.
Deleting Silence/Unwanted Audio, Splitting Tracks
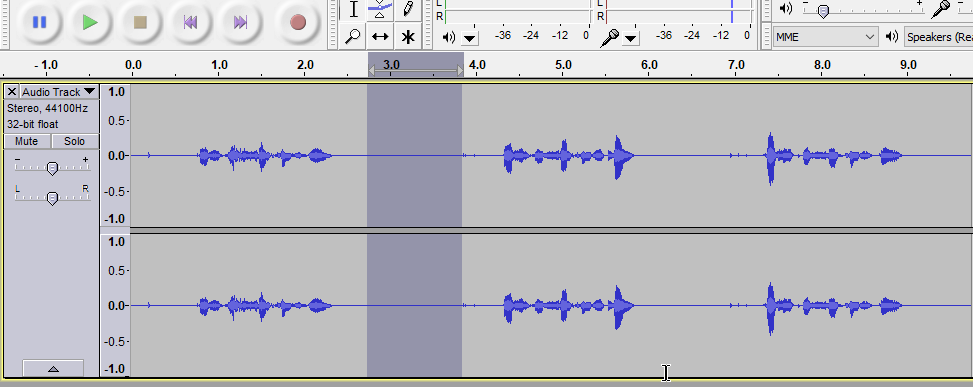
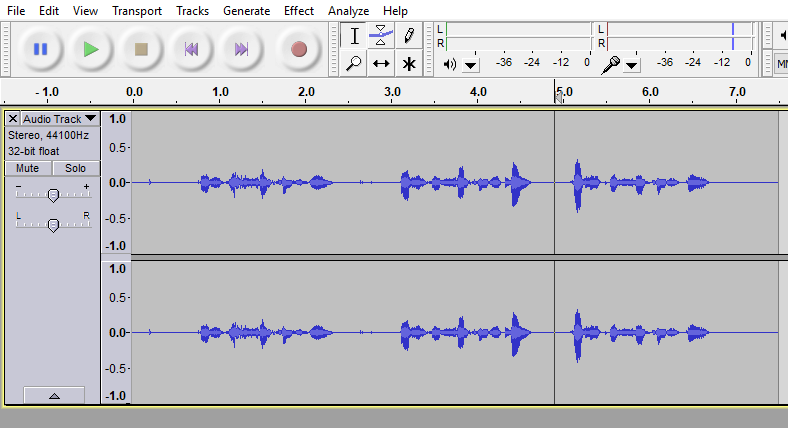
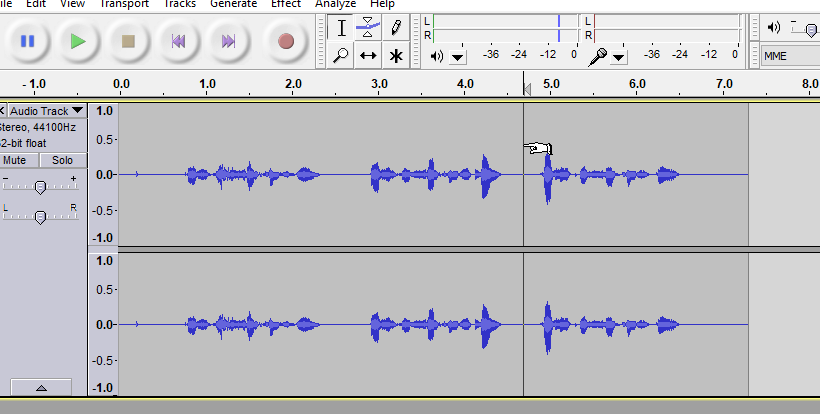
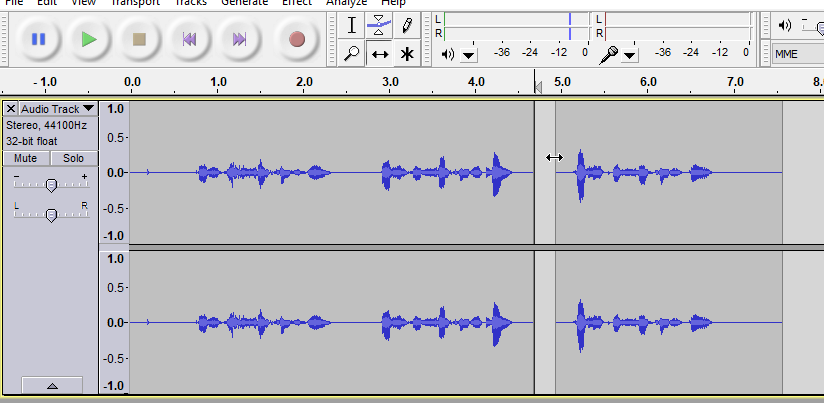
From this step on, we will start getting more into editing longer script audio. Controlling silence and noise in a script reading is very important. Silence and unwanted noises like "um" and breathing between lines can be edited out easily. To delete part of the recording while joining the remaining segments, do the following items:
- Create a new audio track that includes multiple sentences. Be sure to allow a break between each line.
- Create a selection of the silence, and hit the DEL key on the Keyboard to cut out the silence and simultaneously join the ends
To split a track, and thus allow more silence between parts, do the following steps:
- Place your cursor where you want to split the track (with the Selection tool)
- Press CTRL+I, or go to "Edit -> Clip Boundaries" and click "Split"
- Switch to the Time Shift Tool
- Drag one of the segments and have a blank gap equating to the amount of silence desired
Note: Dragging the split track piece onto another piece and clicking the divider line will rejoin the track back together
At this point, if you just read your script in one decent take, you have enough knowledge to edit it to your needs. The next steps will simply go into more detail about other helpful editing tools.
Combining Multiple Tracks
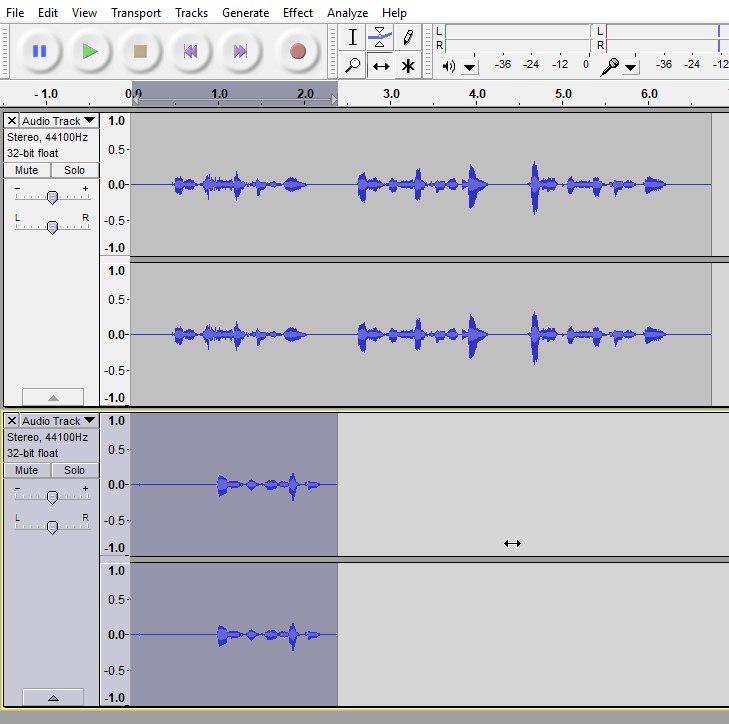
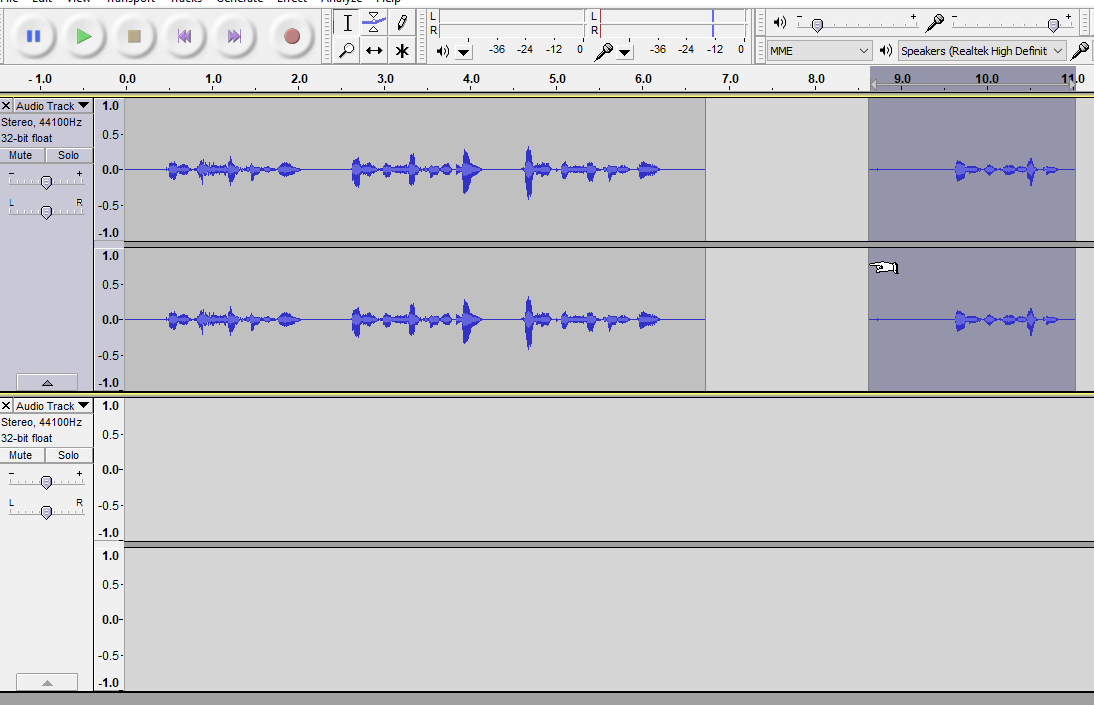
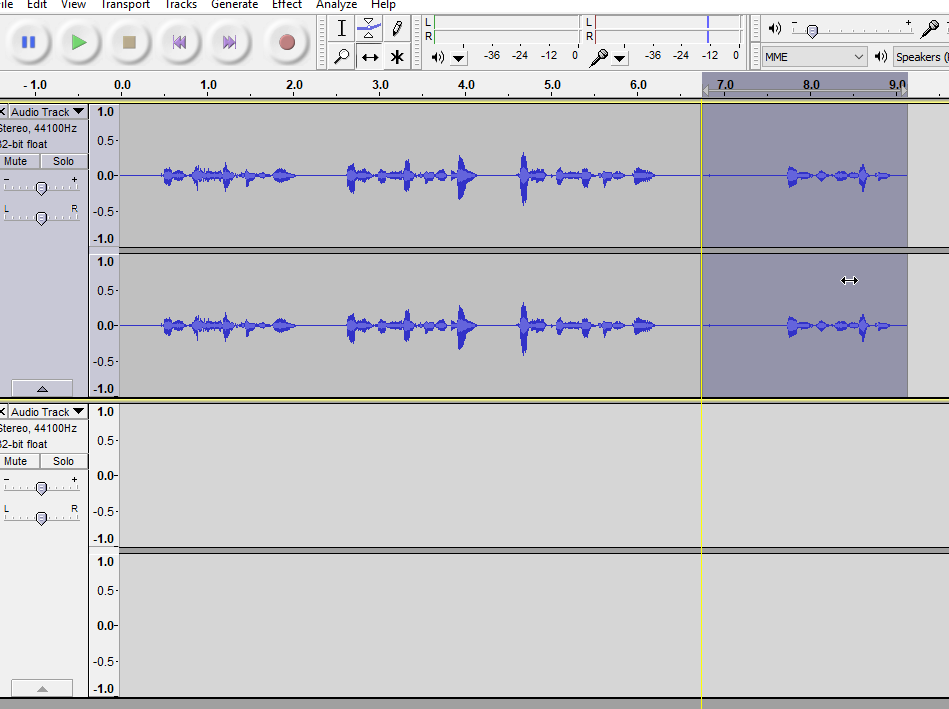
Sometimes, a recording has to be stopped, despite some good content being present in the first take. As we saw in the introduction to Selection and Timeshift, Audacity will make a new track everytime you start recording with default settings. These tracks may not be aligned to play at the right time, and it may be best to combine them into a single track unless you want to overdub.
- Select the second audio track made, ie the audio that should be appended to the end of another track
Note: The position of this track may not be at the beginning, depending on where the selection cursor was before recording was started - Use "CUT" under the edit menu, or press CTRL-X to cut the audio track
- Click into a blank part of the main track with the selection tool, and "PASTE" the track using CTRL-V or the option under the Edit drop-down menu
- Use the Time Shift tool to join the tracks together
- Delete the empty track by clicking the X on it (optional)
The two tracks should be joined into a single track now. This is not necessary if you time shift each track to the right spot, but it would be easier to work on a single track.
Removing Noise: Amplification
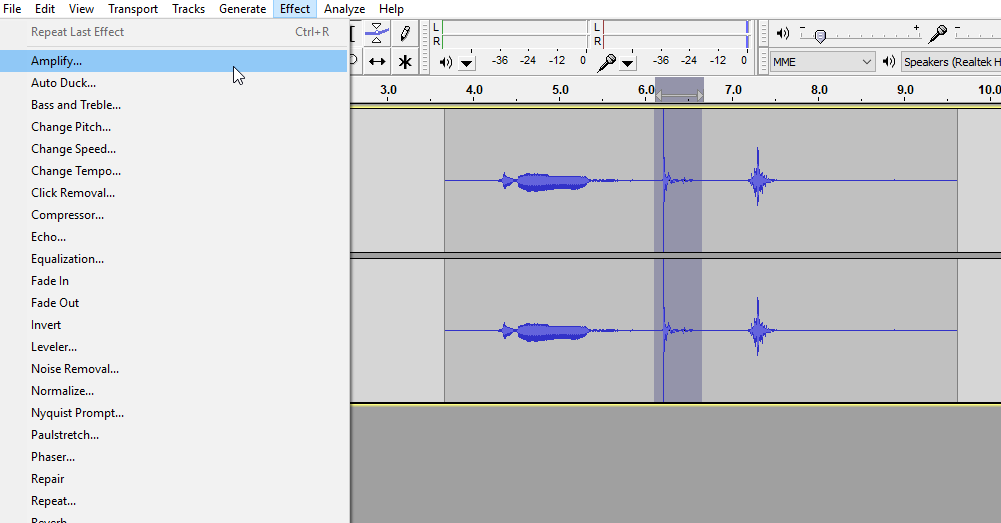
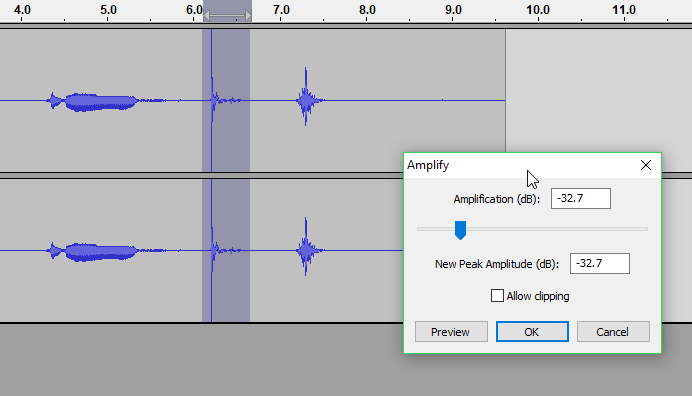
Sometimes, there is some noise where it may be more convenient to turn it into silence rather than snip out the entire segment. To do this, follow these items:
- Select the part of the audio you want to silence/make quieter
- Go to "Effects -> Amplify"
- Select a negative value with the slider. If you want complete silence, pick a high value. If you want to lower a loud piece of audio but not silence it, pick a lower value
- Hit preview, and readjust the value until the desired volume is reached
- Hit okay
The selected audio only should be affected. If no audio was selected, the effect would apply to the whole track. This is another reason why the selection tool is very important in Audacity. Many effects work in this way, affecting a selected portion of the audio if a selection is present, or the whole track without a selection.
For amplification, making something louder is possible. If a segment of audio is too quiet, a positive value could be selected in item #3.
Removing Noise: Noise Removal Effect
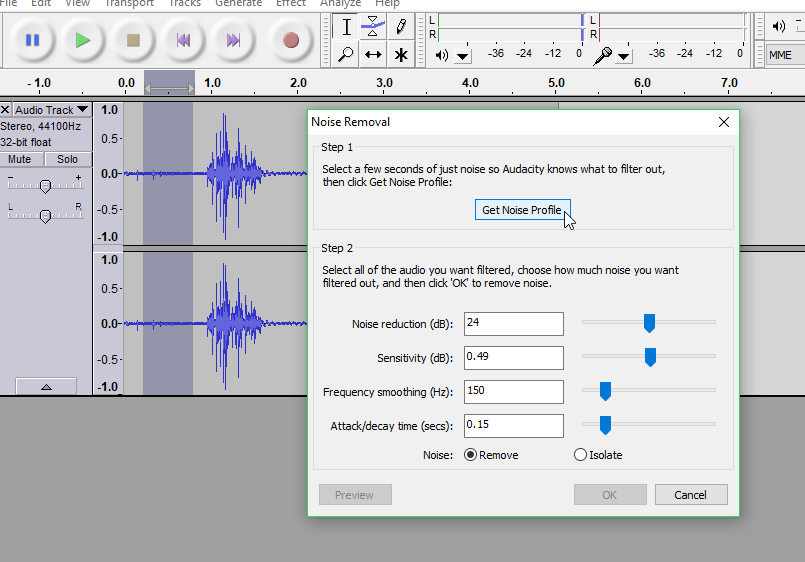
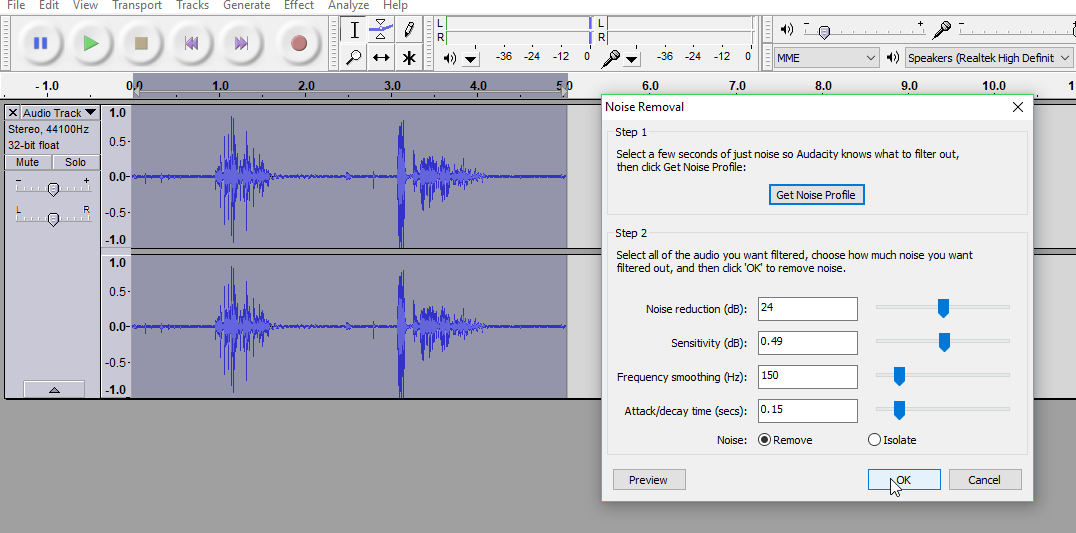
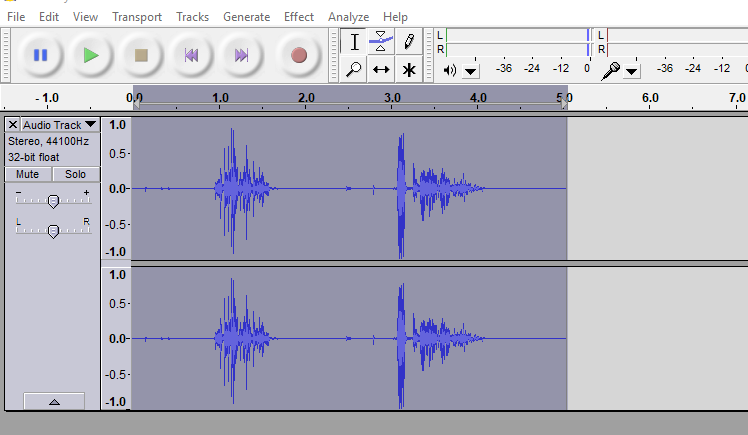
Audacity's Noise Removal effect is effective at removing persistent background noise. For example, uncontrollable environmental noise such as an AC can be almost entirely removed with a few clicks. Here is how to use the noise removal effect in Audacity:
- Select a small snippet of audio of just background noise
- Click on "Effects -> Noise Removal", and click "Get Noise Profile"
- Select the entire track, then Click on "Effects -> Noise Removal" again
- Make sure "Remove" is checked for noise, then click okay
The noise should be mostly silenced while speaking parts are left intact. Touchups with amplification and repeated noise removals will further remove unwanted noise if done correctly. There are more options which I haven't gone over in the second part of the noise removal, but leaving it with settings similar to the picture should yield a good result. Step 2 of this page goes into more detail with the settings and what they do.
One Last Tool: the Envelope Tool
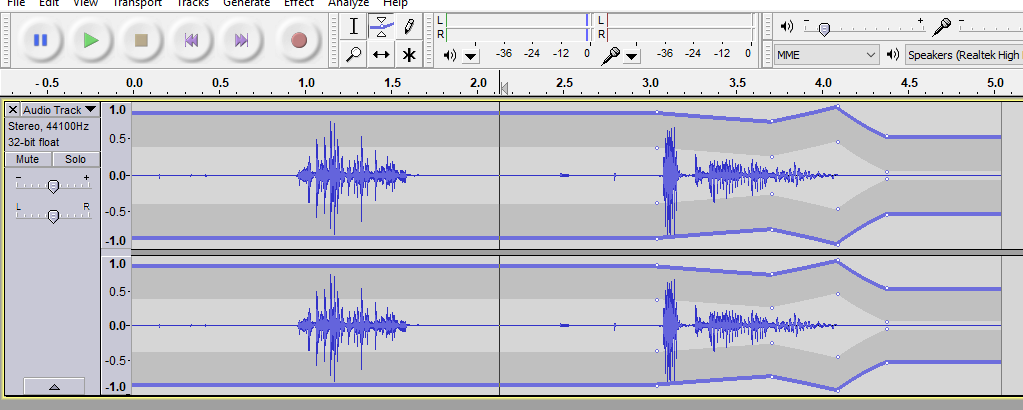
One last tool that helps with audio leveling is the Envelope Tool. This tool allows you to make any number of reference points, where you can manipulate audio levels by folding and stretching sections between these points. It's a bit weird to use, but with a bit of practice, it becomes a very useful tool. This is how you can get started with learning and using the envelope tool:
- Select the Envelope tool
- Click a few times in different places within the track. It should distort the shape (and thus the volume levels) of the audio waveform, and pairs of dots should appear where you clicked
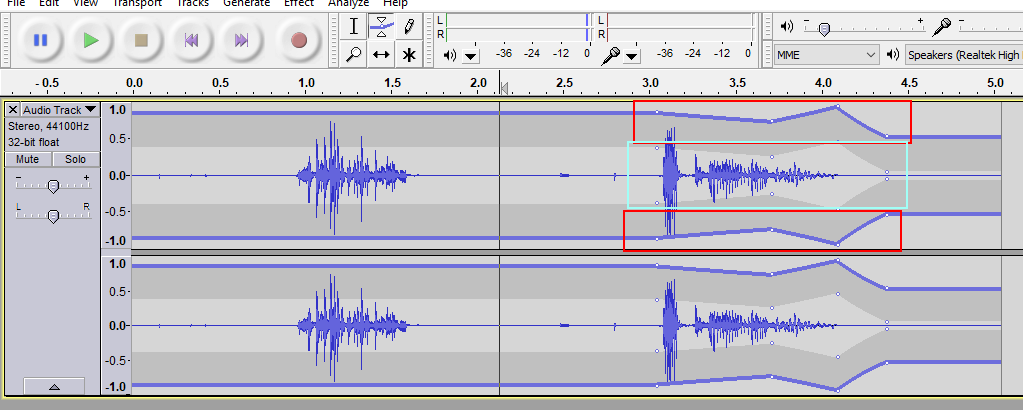
- Manipulate the dots to change audio levels, by moving them left, right, up and down. The pairs of dots near the outside (red box) act as points that can be affected without positively amplifying the audio while manipulating the inside dots (aqua box) will allow you to positively amplify audio too.
- Click around and make more points of reference for the envelope tool. You can also get rid of points by dragging the outer dots to the outer edge (which is in effect resizing it back to normal).
The envelope tool is very potent in that it allows the user to control audio levels at any point in their track, and change levels dynamically in a single track to an extent without needing other effects.
Exporting Audio and Conclusion
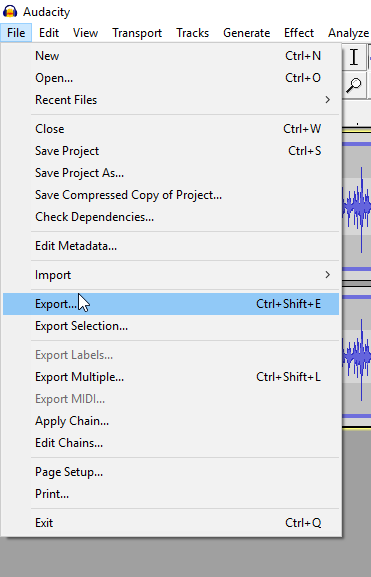
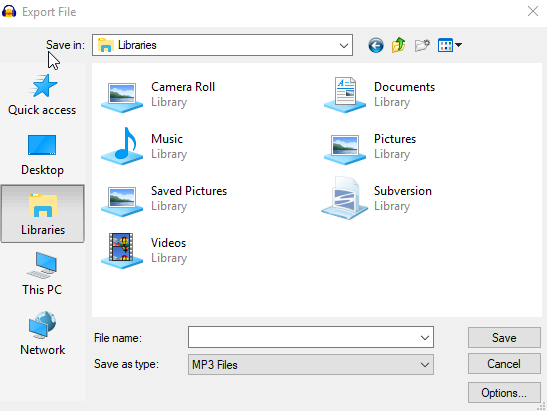
In this last step, we will export our final edited audio. This step assumes you finished editing the audio with techniques from the previous steps.
- Click on "File -> Export"
- Navigate the file browser to where you want to save the file
- Name your file and choose the file type (MP3 is likely what you want)
- Click Save
At this point, you should have the final edited audio, which can be used in any other program. If you want to edit the file later, you can simply open the file in Audacity by clicking "File -> Open" and open the file. You can then pick up where you left off and edit it further.
If you have any suggestions or questions concerning this guide, feel free to message me and I'll respond when I can. Critical feedback is very appreciated.