Alien Facehugger Plush With Bendable Limbs
by CrafTea Cosplays in Craft > Sewing
3734 Views, 59 Favorites, 0 Comments
Alien Facehugger Plush With Bendable Limbs

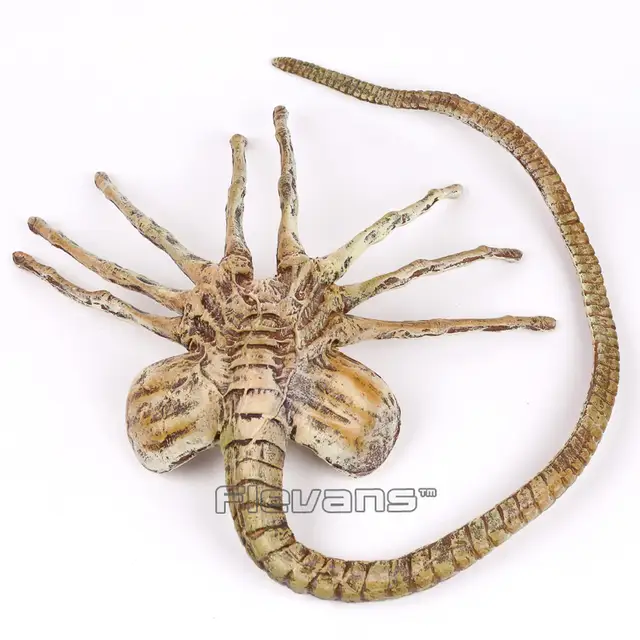
After looking everywhere on the internet trying to find a plush facehugger template, I decided that I was going to make my own, based off of an image of a prop facehugger that I had found.
NOTE ON THE TEMPLATES:
As I couldn’t find any templates online I had to try and work out my own. I used the image from: HERE
I had to alter them a bit as the first image wasn’t symmetrical and most of the limbs had bends in them.
and used BlockPosters to create the template I needed on a larger scale.
I then used bits and pieces from this image to make sure everything was symmetrical, as the original image wasn’t. I also tried to straighten out the tail so that you could pose it in other positions.
You can find my templates HERE on my google drive.
YOU MAY *NOT* USE THESE TEMPLATES FOR PROFIT
Supplies
• Fabric of your choice (I used crushed velvet)
• Wire (I used 3m of 4mm gauge electrical wire)
• Stuffing or an old pillow
• Sewing Machine
• Sewing Needle
• Thread (close to the colour of your material)
• Fabric Marker
• Fabric Scissors
• Scissors
• Wire Cutters / Cutting Pliers
• My Template HERE on my google drive
YOU MAY *NOT* USE THESE TEMPLATES FOR PROFIT
• Sewing Pins
• Chopstick (something to turn legs inside out)
• Sticky Tape
Printing and Making the Template


Print out the template and cut out using regular scissors.
Attach the pattern together with tape into two sections, the main body and the tail.
Tracing Pattern Onto Fabric


Using a fabric pen, trace the pattern onto the wrong side of your fabric, keeping the body and the tail in two separate pieces
Because mine was fuzzy I made sure that the direction that the fur went started from the head and travelled down to the tail - you don’t want the fuzz gong sideways, or not matching the body and the tail.
Sewing


- Place the two sides of your fabric right sides together. (The fuzzy side facing inwards, and making sure that the direction of the fabric is facing the same way)
- I wanted to get my lines as close as possible, so I didn’t cut out around the pattern first. Instead, I roughly cut a rectangle around the general shape.
- Roughly pin the two pieces of your fabric together around the general shape.
- Sew over the lines of the pattern, leaving a gap at the bottom of the body and at the top of the tail to attach the body and tail and stuff them.
Cutting Around the Pattern


Cut around the outline. The closer you cut to the edge, the better the curves will turn out, but don’t cut too close to the stitches.
Turning Inside-Out


Turn your facehugger inside out. You may need to use a chopstick or other tool to help turn out the legs and the tail.
Making Wire Legs


Add in your wire legs, roughly eyeballing it first.
I tended to cut mine a little too long, Place them inside my plush to see how they fit, and then cut them down accordingly. You can always make your wire shorter, but you can’t add to it. I made mine so that they ended up following the curve between each leg.
I forgot to take a photo of how the last wire was positioned, but I cut it like the third image.
Once all your wire legs are cut to size, place them inside the body.
Stuffing the Body

Stuff the body of the facehugger. Don’t stuff the legs as they don’t need it with the wire.
Making Wire Tail

Thread the rest of the wire into the tail. Leave the access for now.
Stuffing the Tail


Start stuffing the tail, making sure to keep the wire centred.
Hooking the Tail Wire Into the Body


- Place the tail against the base of the body and make a bend in the wire near the top where the wire goes straight across the plush. (Outlined in the second and third image).
- Hook the loop of the wire in the tail over the wire that goes straight across the plush. you may need to push the stuffing in the body out of the way. (I had to remove some for this step and then place it back in).
- Cut the wire about an inch longer than the opening of the tail and thread it back into the tail.
Sewing on the Tail


Hand sew the tail onto the body. When you get halfway around you may want to add more stuffing to fill out this area before you finish stitching around the tail.