Air Hockey Game

.png)
.png)

For an assignment, our teacher had us design a game of any type in Onshape and then construct it in real life. We decided on air hockey but without the actual air. We 3D printed the pieces and the scoreboard, but other than that it was made with wood.
Supplies
.png)
.png)
For this project, you will need to have access to a 3D printer, various color filaments (we used grey, purple, and yellow), varying sizes of wood, a way to cut that wood (we used an X-Carve machine), and various paint colors (we used white, purple, yellow, clear, and a sharpie for black). For the exact dimensions of the wood, you can access our Onshape document.
Cut (and Paint) the Floor


Using the dimensions found on this Onshape document you can cut the floor to the proper size. If you want to tweak the sizes, you can! Just cut it whichever way would be best for you. Keep in mind that doing so would affect the dimensions of the other pieces. Once it has been cut to the proper size, you can paint it whichever color you want. I would recommend white, as the floor design will easily be seen on top of it.
Paint the Floor Pattern

.png)
Once you've painted the floor, you can add the pattern on top. This pattern is displayed above and can also be found in this Onshape document. We used a Sharpie to make this pattern, but you can use whichever tools you want. Keep in mind that the scoring areas will block some of the floor! You can change the floor pattern to whatever you want, it does not have to follow what is shown. Good luck! Once you've completed this, you can cover it in a coat of clear paint to make sure it does not smudge.
Cut (and Paint) the Scoring Areas


After the floor is complete, you can start working on the scoring areas. These will be more complex as there are two of them and they have intricate cuts. In order to get the base dimensions, access this Onshape document. After you cut those out to the proper size (take into account your custom dimensions if you are using them), you can start the complex part. You will need a cutting tool of some sort to get the proper shape, such as an X-Carve, or tools to do it yourself. Follow the pattern in the Onshape document and you should end up with the right result. After that, you can start painting them in different colors; whichever you'd like. Once that is complete, these will need to be glued to the floor on either side with wood glue. Make sure to line it up properly!
Cut (and Paint) the Sides

.png)
After the floor and scoring areas are all set up, you can start working on the sides. Make sure to use the dimensions from this Onshape document, or the dimensions based on how you changed the size if you did. You will need two of these! After you cut them out, you can paint them white, or whichever color you choose. Cover this in a clear coat of paint too if you want! In order to attach these, you can use wood glue and apply it to the necessary areas. This should align with the floor at the bottom as well as the scoring areas.
Print the Scoreboard
.png)
.png)
This process includes two pieces; the scoreboard and the scoreboard slider. These can both be found in the "Table" tab of the Onshape document. To start, find the pieces on the table that look like the two in the image. Right-click on either of the scoreboards and click export and set it up how you'd like. You will need two of these, so make sure to take that into account. Print with whatever color you'd like! After that, you can print the scoreboard slider. Right-click on either of the pieces (the only difference is the color which does not have an impact on the way it prints), click export, and you're all set! Once these have been printed, you can glue them to whichever side of the base that you want.
Print the Hand-holders
.png)
.png)

.png)
Once you have the base all setup, you can get to work on the game pieces! In order to do this, open this document if you haven't already. Make sure to open the "Hand-Holders" tab at the bottom. Right-click on either of the pieces (the only difference is the color which does not have an impact on the way it prints), click export and set it up how you'd like. I'm sure you already know the rest, just get the print ready!
Print the Puck
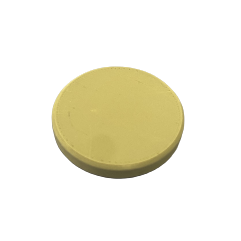.png)
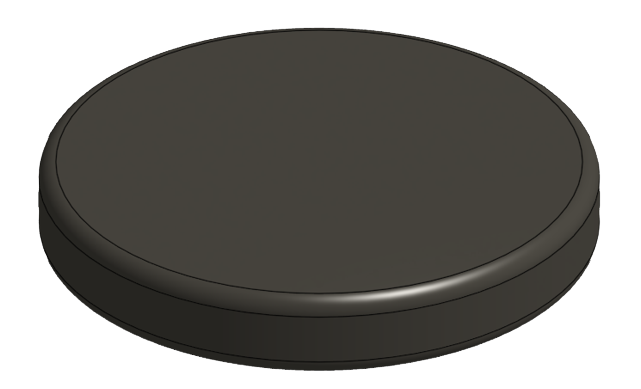.png)
After the Hand-Holders are printed, you can set up the puck! This can be found in the "Puck" tab of the Onshape document. Set up the print with whichever color you want, and you're all set! Print a few if you want extras.
Enjoy Playing Air Hockey!

Once you have everything set up, you can actually start playing! Have fun!