Adafruit Feather 32u4 and HC74xx Logic Chips
by chillininvt in Circuits > Arduino
930 Views, 3 Favorites, 0 Comments
Adafruit Feather 32u4 and HC74xx Logic Chips
![IMG_20170521_064636[1].jpg](/proxy/?url=https://content.instructables.com/F9B/71BC/J2UPIPO2/F9B71BCJ2UPIPO2.jpg&filename=IMG_20170521_064636[1].jpg)
Today we are going to look at how to use the Adafruit feather and the HC74xx Chipset and set up different types of logic gates so that you can start connecting hardware based logic operations. We will extend on this module step after step so don't throw away your breadboard because each section builds on the next. We are going to learn how to hook up a logic DIP packages.
1) Adafruit Bluefruit 32u4 which can be found on the adafruit store. Which is an arduino compatible device so this should work with most Arduinos you may have to change the Pin numbers specific to your configuration.
2) You're going to need a few breadboards and lots wires. (I'm using what I have here for wiring)
3) You will need the HC74xx chipset you can find these on Amazon or you can get the more specific chips we are going to review in this documentation. Which are going to be
4) You will need 10 LEds
5) You will need 10 Resistors between 220 Ohms and 370 OHMs Or whatever works good with your LED's I am using 3.3v logic in this instructable.
SN74HC21 - 4 Input AND
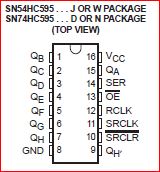
SN74HC595 - Serial In / Parallel Out Shift Register
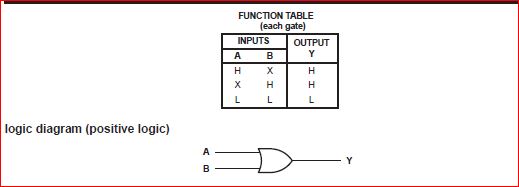
SN74HC32 - 2 Input OR
Here are the datasheets for the given chips that we will be using.
The Hooking Up the SNHC7421N
![IMG_20170521_014340[1].jpg](/proxy/?url=https://content.instructables.com/F1W/GXT1/J2UPHT2G/F1WGXT1J2UPHT2G.jpg&filename=IMG_20170521_014340[1].jpg)
![IMG_20170521_023337[1].jpg](/proxy/?url=https://content.instructables.com/FIZ/8LHH/J2UPHT2H/FIZ8LHHJ2UPHT2H.jpg&filename=IMG_20170521_023337[1].jpg)
![IMG_20170521_023409[1].jpg](/proxy/?url=https://content.instructables.com/FRP/2YT8/J2UPHT2I/FRP2YT8J2UPHT2I.jpg&filename=IMG_20170521_023409[1].jpg)
![IMG_20170521_023435[1].jpg](/proxy/?url=https://content.instructables.com/FE4/1JQF/J2UPHT2J/FE41JQFJ2UPHT2J.jpg&filename=IMG_20170521_023435[1].jpg)
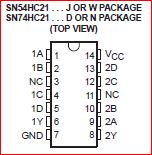
We can start buy connecting the the HC7421N to the Feather. You can see the Eagle schematic diagram for a pin out the connections that I have are labeled in the pinOut that I attached to this step.
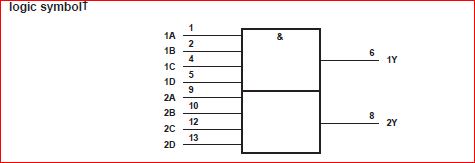
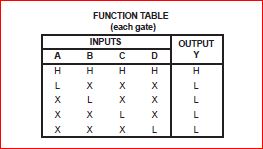
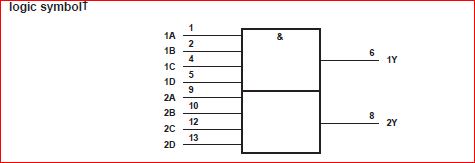
The SNHC7421N is a DIP package that contain 2, 4 input and gates. So all 4 input A,B,C,D have to be set to HIGH to get a HIGH output on Y. There are 2 of these 4 input gates on the SNHC7421N 1 and 2.
The first thing you want to do is to look at the pins 1A, 1B, 1C, 1D, and 1Y
The pins 1A-1D are input pins and pin 1Y is the output pin. Like wise on the other side of the chip you will see Pins 2A-2D on the pin out of the DIP package. The exact connections from the feather to the DIP package are as follows.
13->1A
12->1B
11->1C
10->1D
9->2A
6->2B
5->2C
3->2D
Than made Next connections
Hook the GND on the feather to the pin 7 or GND on the DIP
Hook the power 3V to pin 14 or Vcc on the DIP package.
Now lets set up 2 LED's and connect them to 1Y and 2Y so that we can see our output.
So connect the positive lead of the LED to the output of 1Y than put that in series with a 330 Ohm resistor and connect it to ground.
Next open your Arduino IDE and insert the following code.
The variables in the pinVals[] array can be set to either a 1 or a 0 which represent a HIGH or a LOW value on the corresponding pin.
<p>int myInts[8];<br>int myPins[] = {13, 12, 11, 10, 9, 6, 5, 3 };</p><p>/*
  you may set the values of the pins in the myPins[] array above with
  the pinVals[] array. this sould either be a 1 for HIGH or if not a one 0
  For LOW;
*/
int pinVals[] = {1,1,1,1,1,1,1,1};
void setup() {
  // put your setup code here, to run once:
   Serial.begin(9600);
   for(int x=0;x<6;x++){
      pinMode(myPins[x], OUTPUT);
   }
}void loop() {
  // put your main code here, to run repeatedly:
  for(int x=0;x<8;x++){
    if(pinVals[x] == 1){
       digitalWrite(myPins[x],HIGH );
    }else{
      digitalWrite(myPins[x], LOW );
    }

   }
}</p>
Downloads
Using Less Output Pins With the HC74595
![IMG_20170521_032541[1].jpg](/proxy/?url=https://content.instructables.com/FZK/29W1/J2UPHXW7/FZK29W1J2UPHXW7.jpg&filename=IMG_20170521_032541[1].jpg)
![IMG_20170521_053716[1].jpg](/proxy/?url=https://content.instructables.com/FK7/FN67/J2UPIEF9/FK7FN67J2UPIEF9.jpg&filename=IMG_20170521_053716[1].jpg)
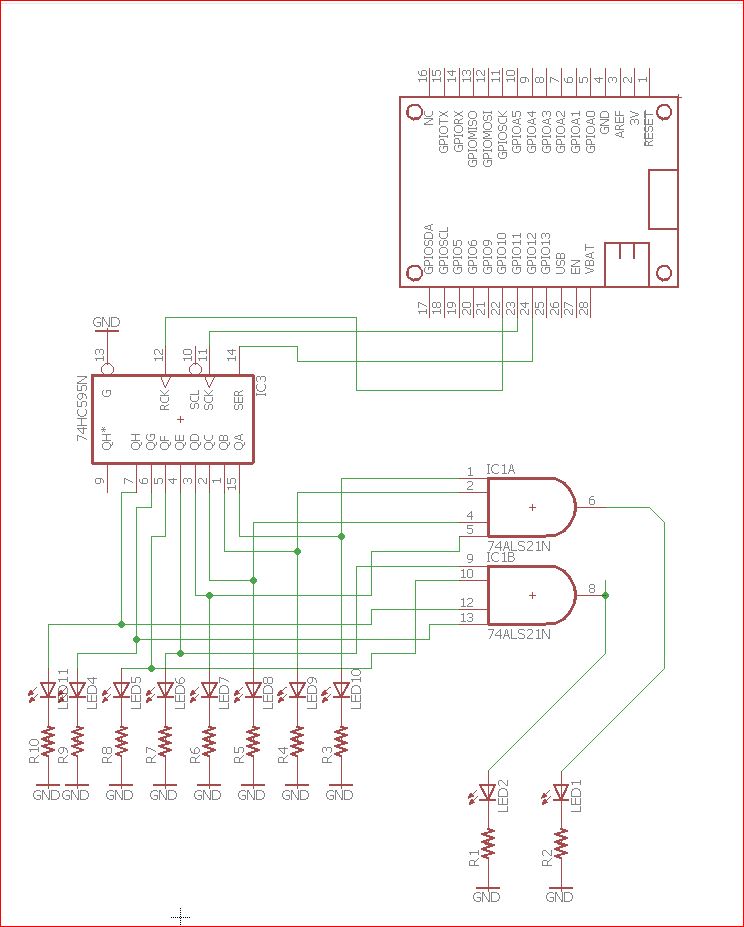
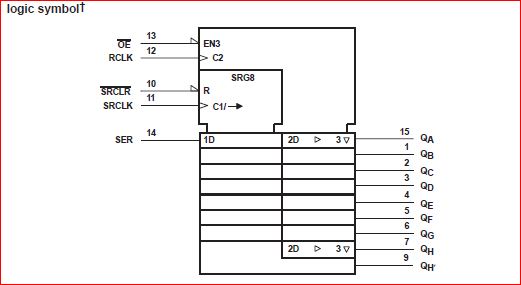
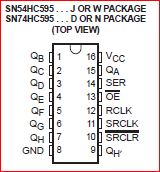
Now we might have noticed that in order to operate this DIP package that it took up 8 of the GPIO pins on our device. We probably will want to figure out a way to free up some of our output pins so that we can use them for more important input collection devices and circuits than using 8 pins on the device as an output. So in order to do this we are going to use and HC74595 Serial in Parallel Out shift register. Which will allow us to use only 1 GPIO pin on our feather device. The HC74595 is an 8 Bit Shift register, which means that it can store 8 bits of data at a time.
So building upon what we built in the previous step lets see if we can get the Shift Register controlling the and Gate. Now lets disconnect the 8 input pins from our feather and connect them into out shift register.
So the pins should now be disconnected from the feather and the pins on the DIP packages should be connected together as follows.
The Shift register has Output pins labeled QA - QH Lets make the following connections
Connect QA on the shift Register to 1A on the SN54HC21
Now connect QB on the Shift Register to 1B on the SN54HC21
Now connect QC on the Shift Register to 1C on the SN54HC21
Now connect QD on the Shift Register to 1D on the SN54HC21
Make sure to leave 1Y on the SN54HC21 connected to the resistor and LED
Now we want to hook up the other 4 input and gate on the SN54HC21
Connect QE on the shift Register to 2A on the SN54HC21
Now connect QF on the Shift Register to 2B on the SN54HC21
Now connect QG on the Shift Register to 2C on the SN54HC21
Now connect QH on the Shift Register to 2D on the SN54HC21
Make sure to leave 2Y on the SN54HC21 connected to the resistor and LED
Leave the Vcc on the SN54HC21 connected to 3V feather and GND connected to GND on the feather
We also want to finish hooking up the shift register so we need to make a few more connections in order to compete the breadboard set up.
Hook up pin 12 on your feather to the SER pin on the shift register. (Serial Data)
Hook up pin 10 on your feather to the RCLK pin on the shift register. (Clock Pin)
Hook up pin 11 on your feather to the SRCLK pin on the shift register. (Latch Pin)
Now I also want you to put in 8 Leds that are connected from Pins QA - QH into a 330 Ohm Resistor into Ground.
Once you have done that you can load the following sketch onto your board. When you run this board if you have it hooked up correctly you should see it cycle through the lights and light up one at a time. Each time 4 bits are completely lighted up you will see one light light up from the SN54HC21. Than when the next 4 bits from the shift register light up you can see the next board.
Please see schematic for hook up configuration.
//by John Anderson
//chillininvt
//www.vermontinternetdesign.com //2017.05.21int latchPin = 11; int clockPin = 10; int dataPin = 12; int rotation = 1;
byte leds = 0;
void setup() { Serial.begin(9600); pinMode(latchPin, OUTPUT); pinMode(dataPin, OUTPUT); pinMode(clockPin, OUTPUT); }
void loop() { leds = 0; updateShiftRegister(); delay(50); int i = 0; for (int i = 0; i < 8; i++){ bitSet(leds, i); updateShiftRegister(); delay(500); } rotation++; }
void updateShiftRegister() { Serial.print(leds); Serial.println(); digitalWrite(latchPin, LOW); shiftOut(dataPin, clockPin, LSBFIRST, leds); rotation=1; digitalWrite(latchPin, HIGH); }
Chaining on the SN74HC32
![IMG_20170521_064625[1].jpg](/proxy/?url=https://content.instructables.com/FUG/QS2F/J2UPIL5V/FUGQS2FJ2UPIL5V.jpg&filename=IMG_20170521_064625[1].jpg)
![IMG_20170521_064636[1].jpg](/proxy/?url=https://content.instructables.com/FSK/WJ33/J2UPIL5W/FSKWJ33J2UPIL5W.jpg&filename=IMG_20170521_064636[1].jpg)
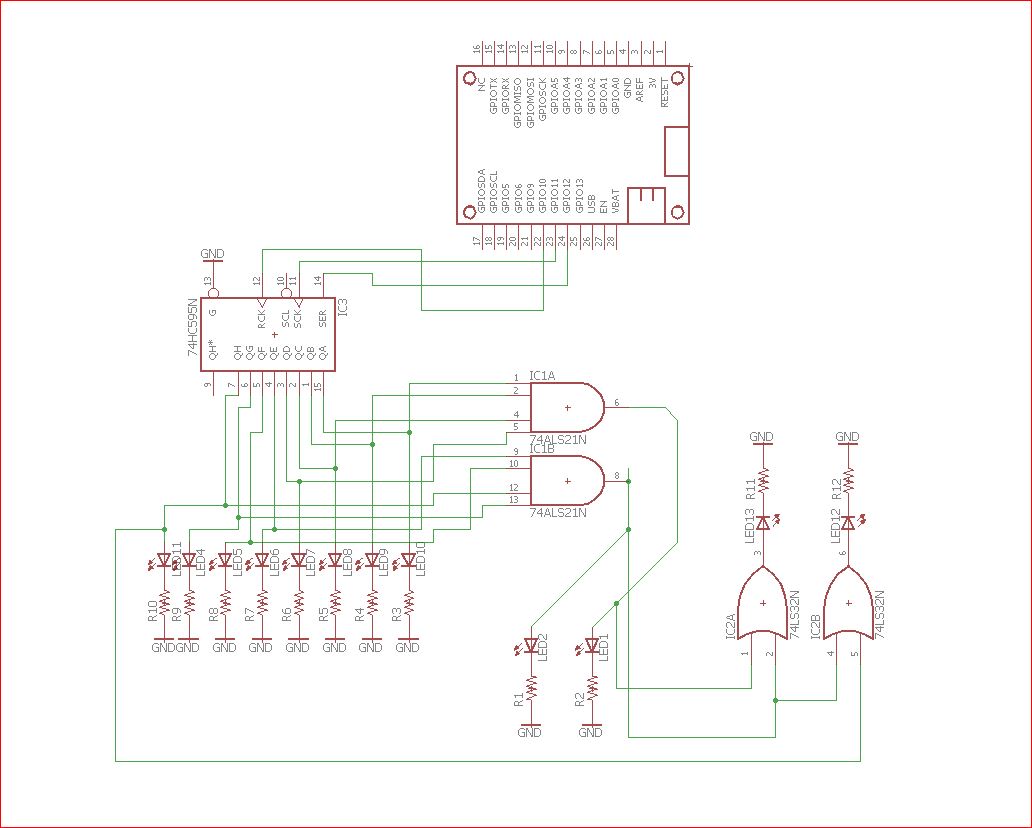
So now what we are going to do is to tap into the output of the of the SN54HC21 Set your new chip onto a new breadboard like I have in the picture.
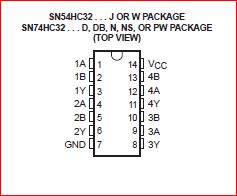
Hook up the Vcc Pin and the GND pins on the SN74HC32 which are pins 14 and 4.
Now you will run a wire from the somewhere between the resistor and the output of the HC21 you should already have 2 leds hooked up at this location. Now take each of these new wires that you connected and connect the other end of them into inputs 1A and 1B on the SN54HC32 these are pins 1 and 2.
Than take another wire and connect it from pin 3 into a resistor and Led to Ground.
Now you should see that this Led will only light up, if both of the Leds, coming from the HC7421 are lit up as true. You can also use the other OR gates on the chip and set up additional LED's to Turn on and off.
Let's Add Send Some Data Back to the Feather
![IMG_20170521_075934[1].jpg](/proxy/?url=https://content.instructables.com/F0Y/D40M/J2UPIRXH/F0YD40MJ2UPIRXH.jpg&filename=IMG_20170521_075934[1].jpg)
Now lets use the same schematic that we used in the previous step but this time we are going to send some data back to the feather to process it. Now leave everything connected from the previous step and hook up one wire from PIN 3 of the SN74HC32 and hook it back to GPIO pin 5 on the feather. Than have the feather turn on the onboard LEd on pin 13 when it receives a high input on GPIO 5
So what we are going to do is to modify the sketch that we used in step 3
Now you should be able to collect data from a logic chip that is three gates away from the Arduino
<p>//by John Anderson<br>//www.vermontinternetdesign.com
//2017.05.21</p><p>int latchPin = 11;
int clockPin = 10;
int dataPin = 12;
int rotation = 1;
int returnpin = 5;
int ledPin =  13;
int val = 0;</p><p>byte leds = 0;</p><p>void setup()
{
  Serial.begin(9600);
  pinMode(latchPin, OUTPUT);
  pinMode(dataPin, OUTPUT);
  pinMode(clockPin, OUTPUT);
  pinMode(ledPin, OUTPUT);      // sets the digital pin 13 as output
  pinMode(returnpin, INPUT);      // sets the digital pin 7 as input

}</p><p>void loop()
{
  leds = 0;
  updateShiftRegister();

  val = digitalRead(returnpin);   // read the input pin
  digitalWrite(ledPin, val);
 for (int i = 0; i < 8; i++){

     bitSet(leds, i);
     updateShiftRegister();
     delay(500);


  }
  rotation++;
}</p><p>void updateShiftRegister()
{
   Serial.print(leds);
   Serial.println();
   digitalWrite(latchPin, LOW);

      shiftOut(dataPin, clockPin, LSBFIRST, leds);
      rotation=1;


   digitalWrite(latchPin, HIGH);
}</p>
Add in More Gates and Switches
The fun doesn't stop there. Now that you know how to do all of that try to chain together other logic chips from the HC74xx this is a great family of chips that allow you to chain the out put of one chip to the input of another chip. Try it out there are several different types of logic gates that you can use.
There are OR gates, there are AND gates, XOR, NOT, NAND and many more different types of logic gates. Remember that you can use more than one shift register if you would like so you can build off of this in several different directions.
My hope was to get you go hook up a logic chip directly to the Adafruit feather. Than add another logic chip between the Logic chip and the feather, to have another logic chip control the logic chip that was previously controlled by the feather. Than to extend the output of that logic chip into yet another logic chip. Than logic chip and then wrapped back around as input to a switch that is controlled back at the feather.
You can also use hardware based switches as inputs to your logic gates and helps you to integrate more hardware based logic into and out of your Arduino Compatible.
Now that you know house to use logic chips go find an app like Circuit Scramble and learn some gates and start integrating them into your projects.
If you have any questions please comment below I will do my best to answer them. Please visit my website for more about me and what I do.
http://www.vermontinternetdesign.com
Like on facebook.
https://www.facebook.com/vermontinternetdesign