AVR/Arduino Flashing With Raspberry Pi
by albedozero in Circuits > Electronics
9053 Views, 34 Favorites, 0 Comments
AVR/Arduino Flashing With Raspberry Pi
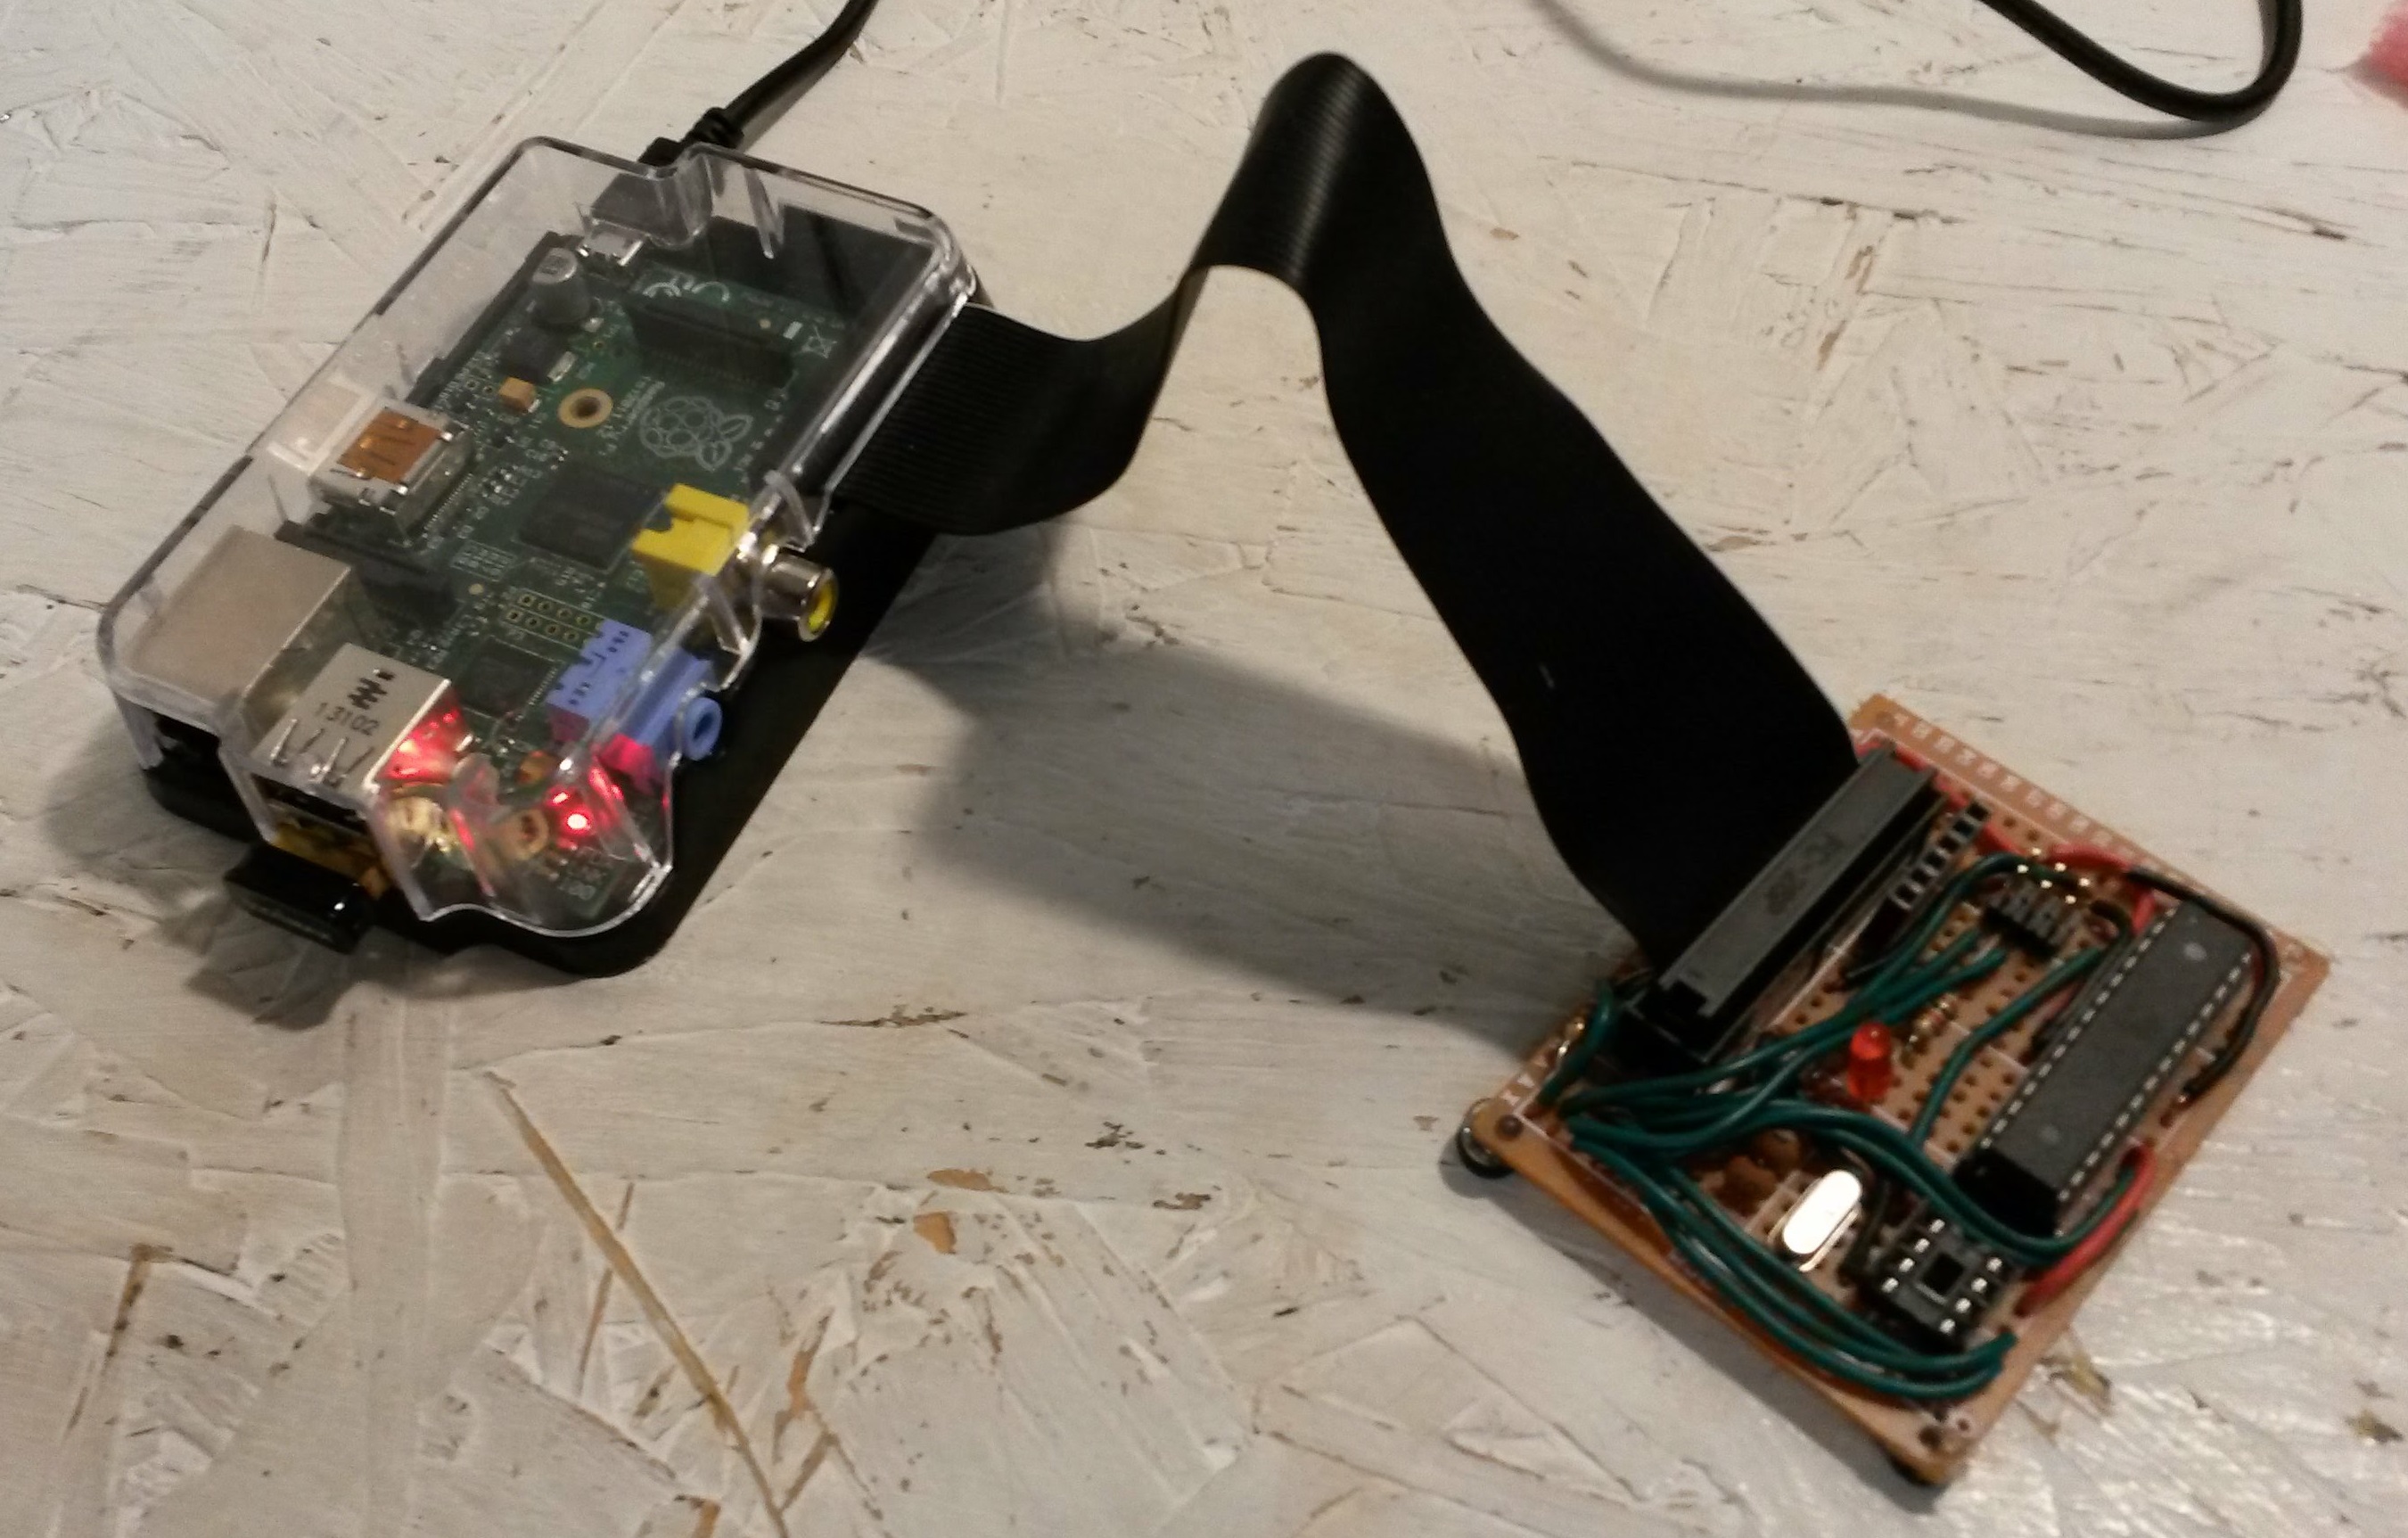
An in-system programmer (ISP) is a device you can use to program many microcontrollers, for example the ATMega328p that is the brains of an Arduino Uno. You can buy something like a USBtinyISP, or you can even use an Arduino. This instructable will show you how to use a Raspberry Pi as an ISP.
The avrdude program, which is what the Arduino IDE uses under the hood to flash chips, can be used with many programmers. One of its options is to use the SPI pins on the Pi's expansion port. I'll explain how to make the appropriate connections, put together a simple circuit on perfboard so you don't have to redo the wiring every time you want to flash a chip, and how to install and use avrdude. I'll also show you how to get programs compiled using the Arduino IDE onto an AVR chip such as an ATmega or ATtiny using this method.
Things Needed:
- Raspberry Pi with latest Raspbian installed
- 40-pin male header socket (or 26-pin if you have an older Pi)
- IDE cable to connect to your Pi
- 16 MHz crystal resonator
- 22 pF capacitors (2)
- LED (1) to indicate programmer status
- 8, 14, and/or 28 pin IC sockets, depending on what shape of chips you want to flash
- Some perfboard, wires, solder
Building Cobbler Attachment
.png)
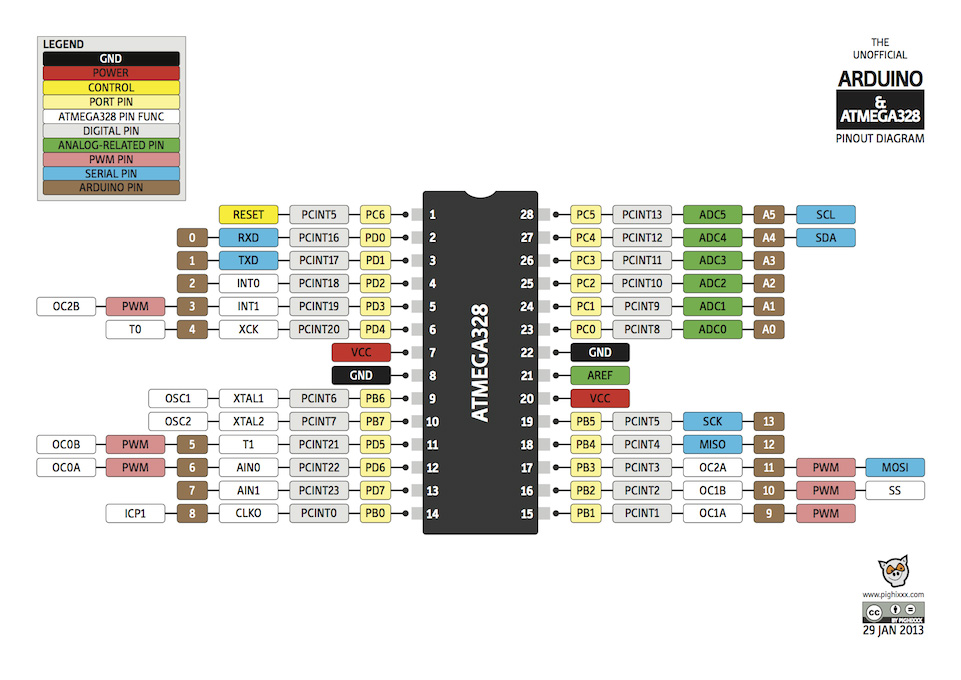
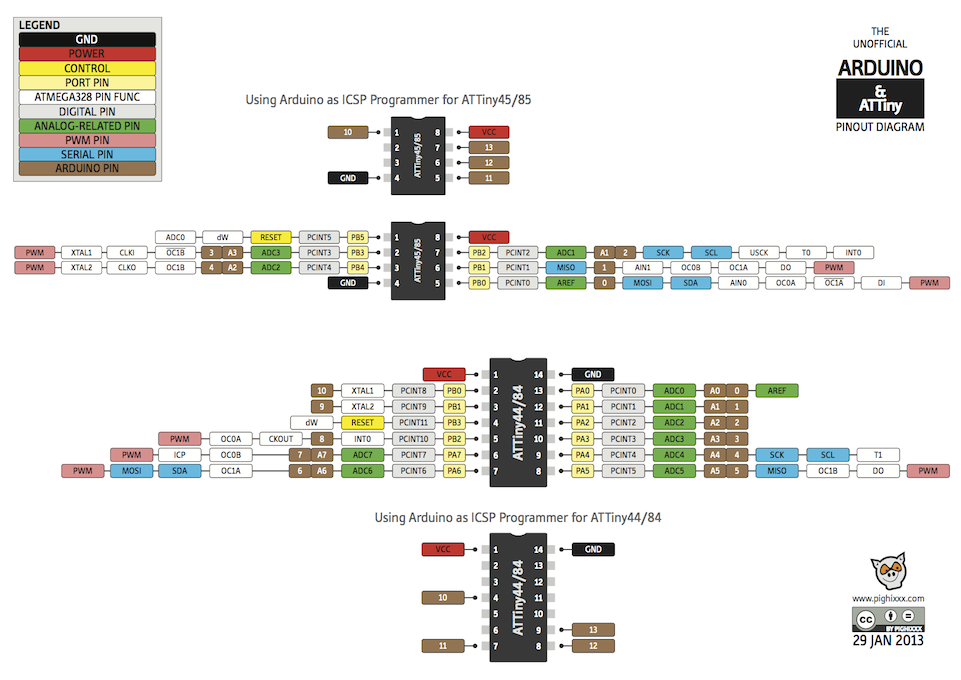
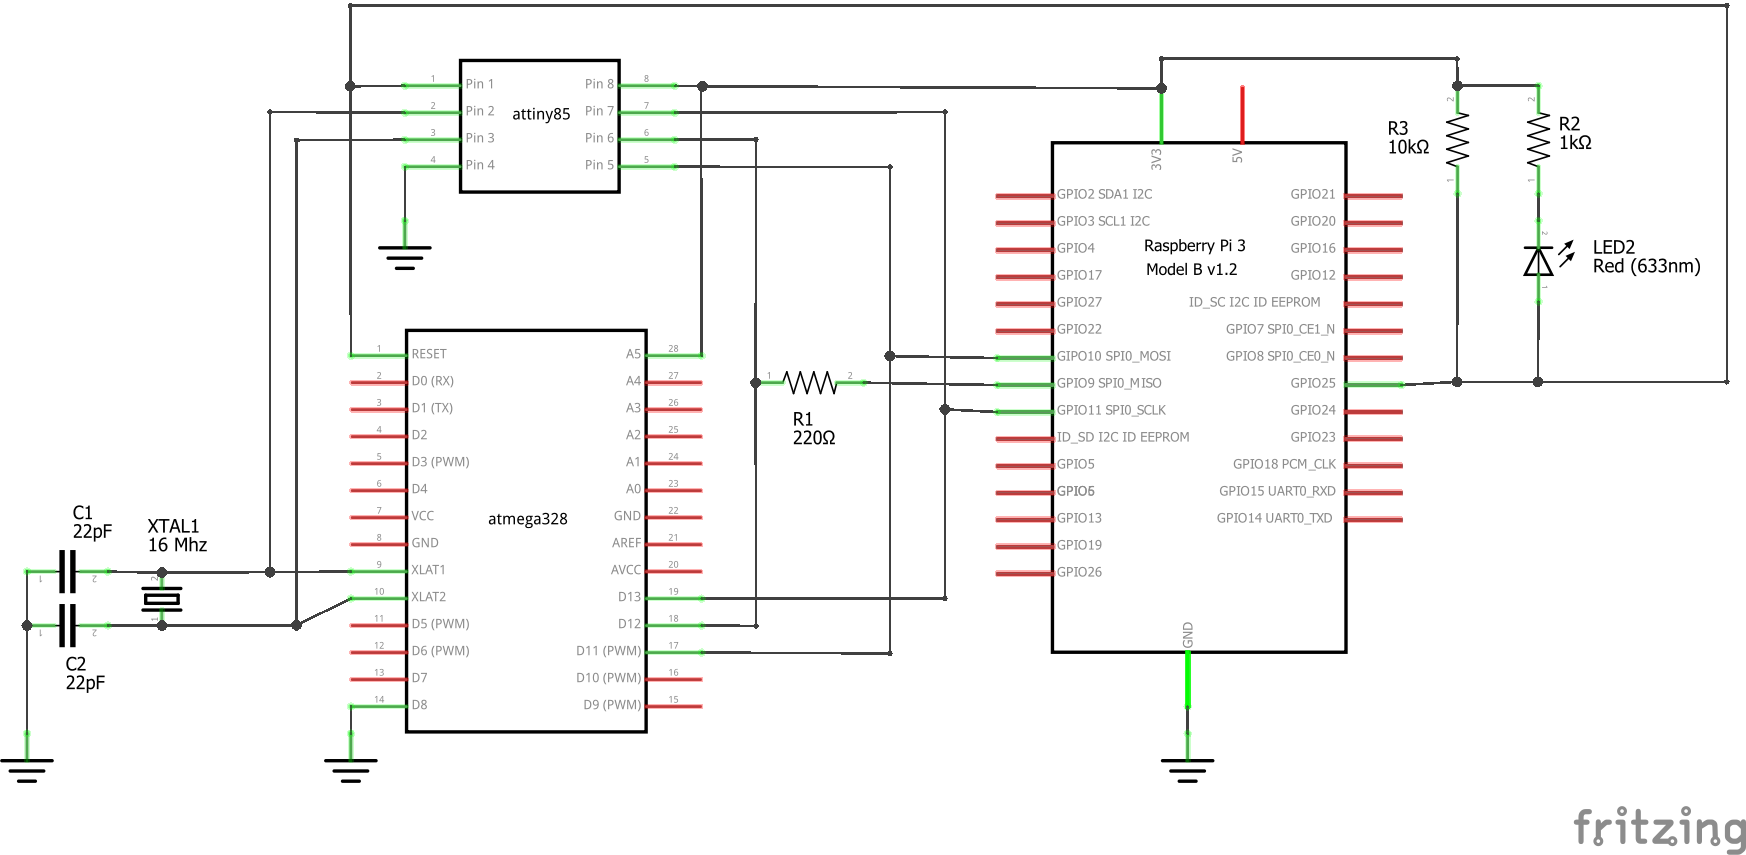
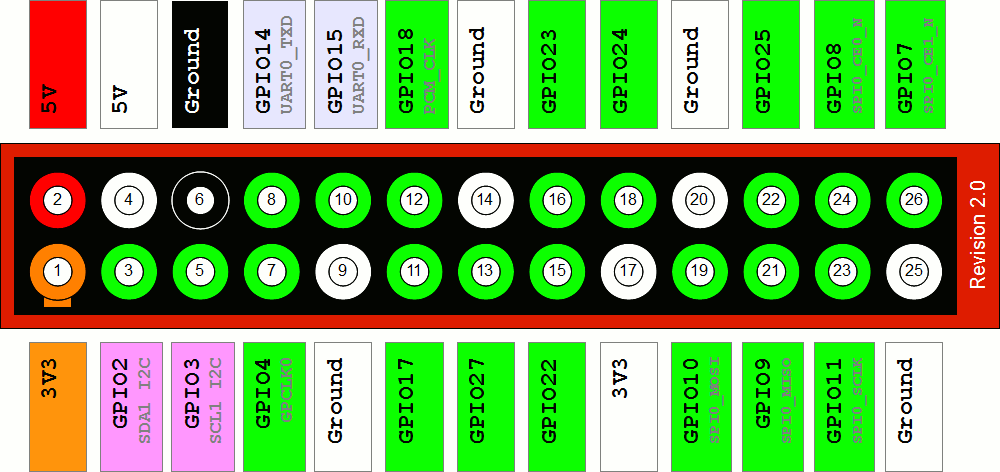
Serial Peripheral Interface (SPI), also called four-wire serial, is a way of communicating between a single master device and one or more slave devices. We will use this to flash chips, with the Pi as the master and the chip as the slave. You will make the following connections between the Pi and your chip (see the pinouts above for various AVRs and Pi expansion ports to know which pins are which):
- Connect the MOSI (master-out-slave-in) pins together
- Connect the SCLK (shared clock) pins together
- Connect the MISO (master-in-slave-out) pins together with a 220 Ohm resistor, to protect the Pi from any unexpectedly high voltages from the chip
- Connect GPIO 25 on the Pi directly to the RESET pin on the chip. The Pi pulls this pin low when programming, so we use a 10K resistor to keep it high when not programming, and an LED with a 1K protection resistor running to positive voltage to give us some nice visual feedback when it is programming.
We connect ground and power (3.3V) pins between the Pi and the chips we want to program. In case you don't already know, the Raspberry Pi's pins are not 5V tolerant - they will be damaged if more than 3.3V appears on them. If the chips being programmed need 5V power for some reason, we could use a level shifter chip to protect the Pi's pins, but I haven't run into any problems using 3.3V - so I recommend playing it safe and saving on components.
Lastly, we connect a 16MHz crystal oscillator across the XTAL pins on the chip, which we also connect to ground via a couple of 22pF capacitors. AVR chips can be set to run at different frequencies, and can also be set to use an internal or external source to determine that frequency. If your chip is set to use an external crystal as its frequency source, you won't be able to reprogram without it. Otherwise it doesn't matter if it's there.
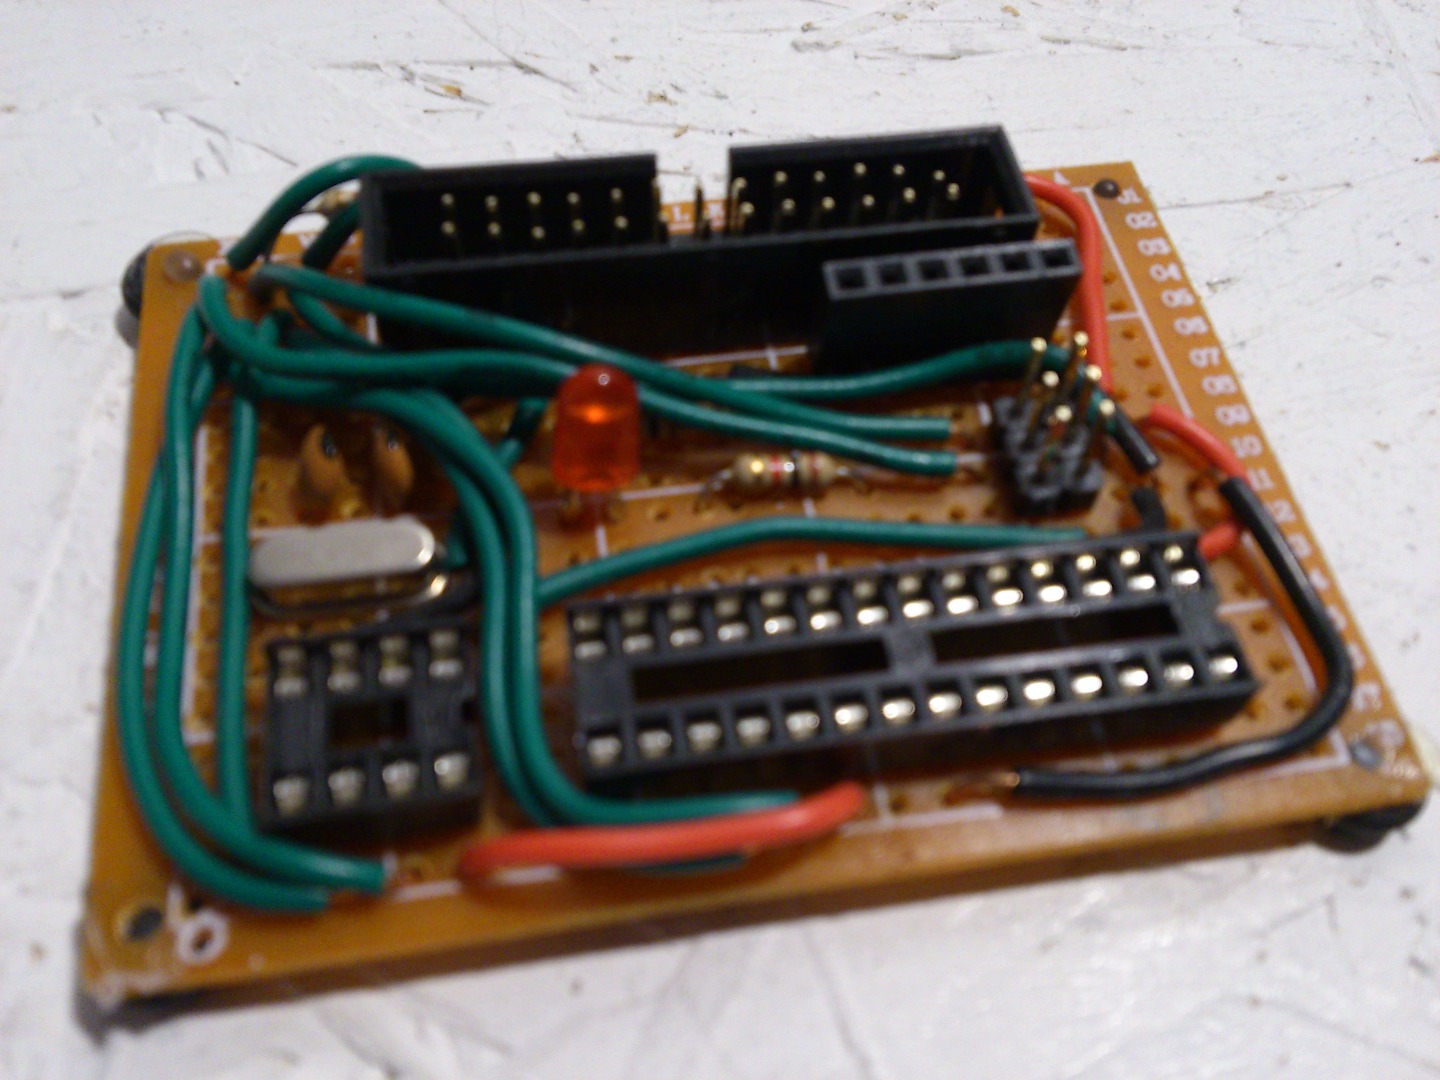
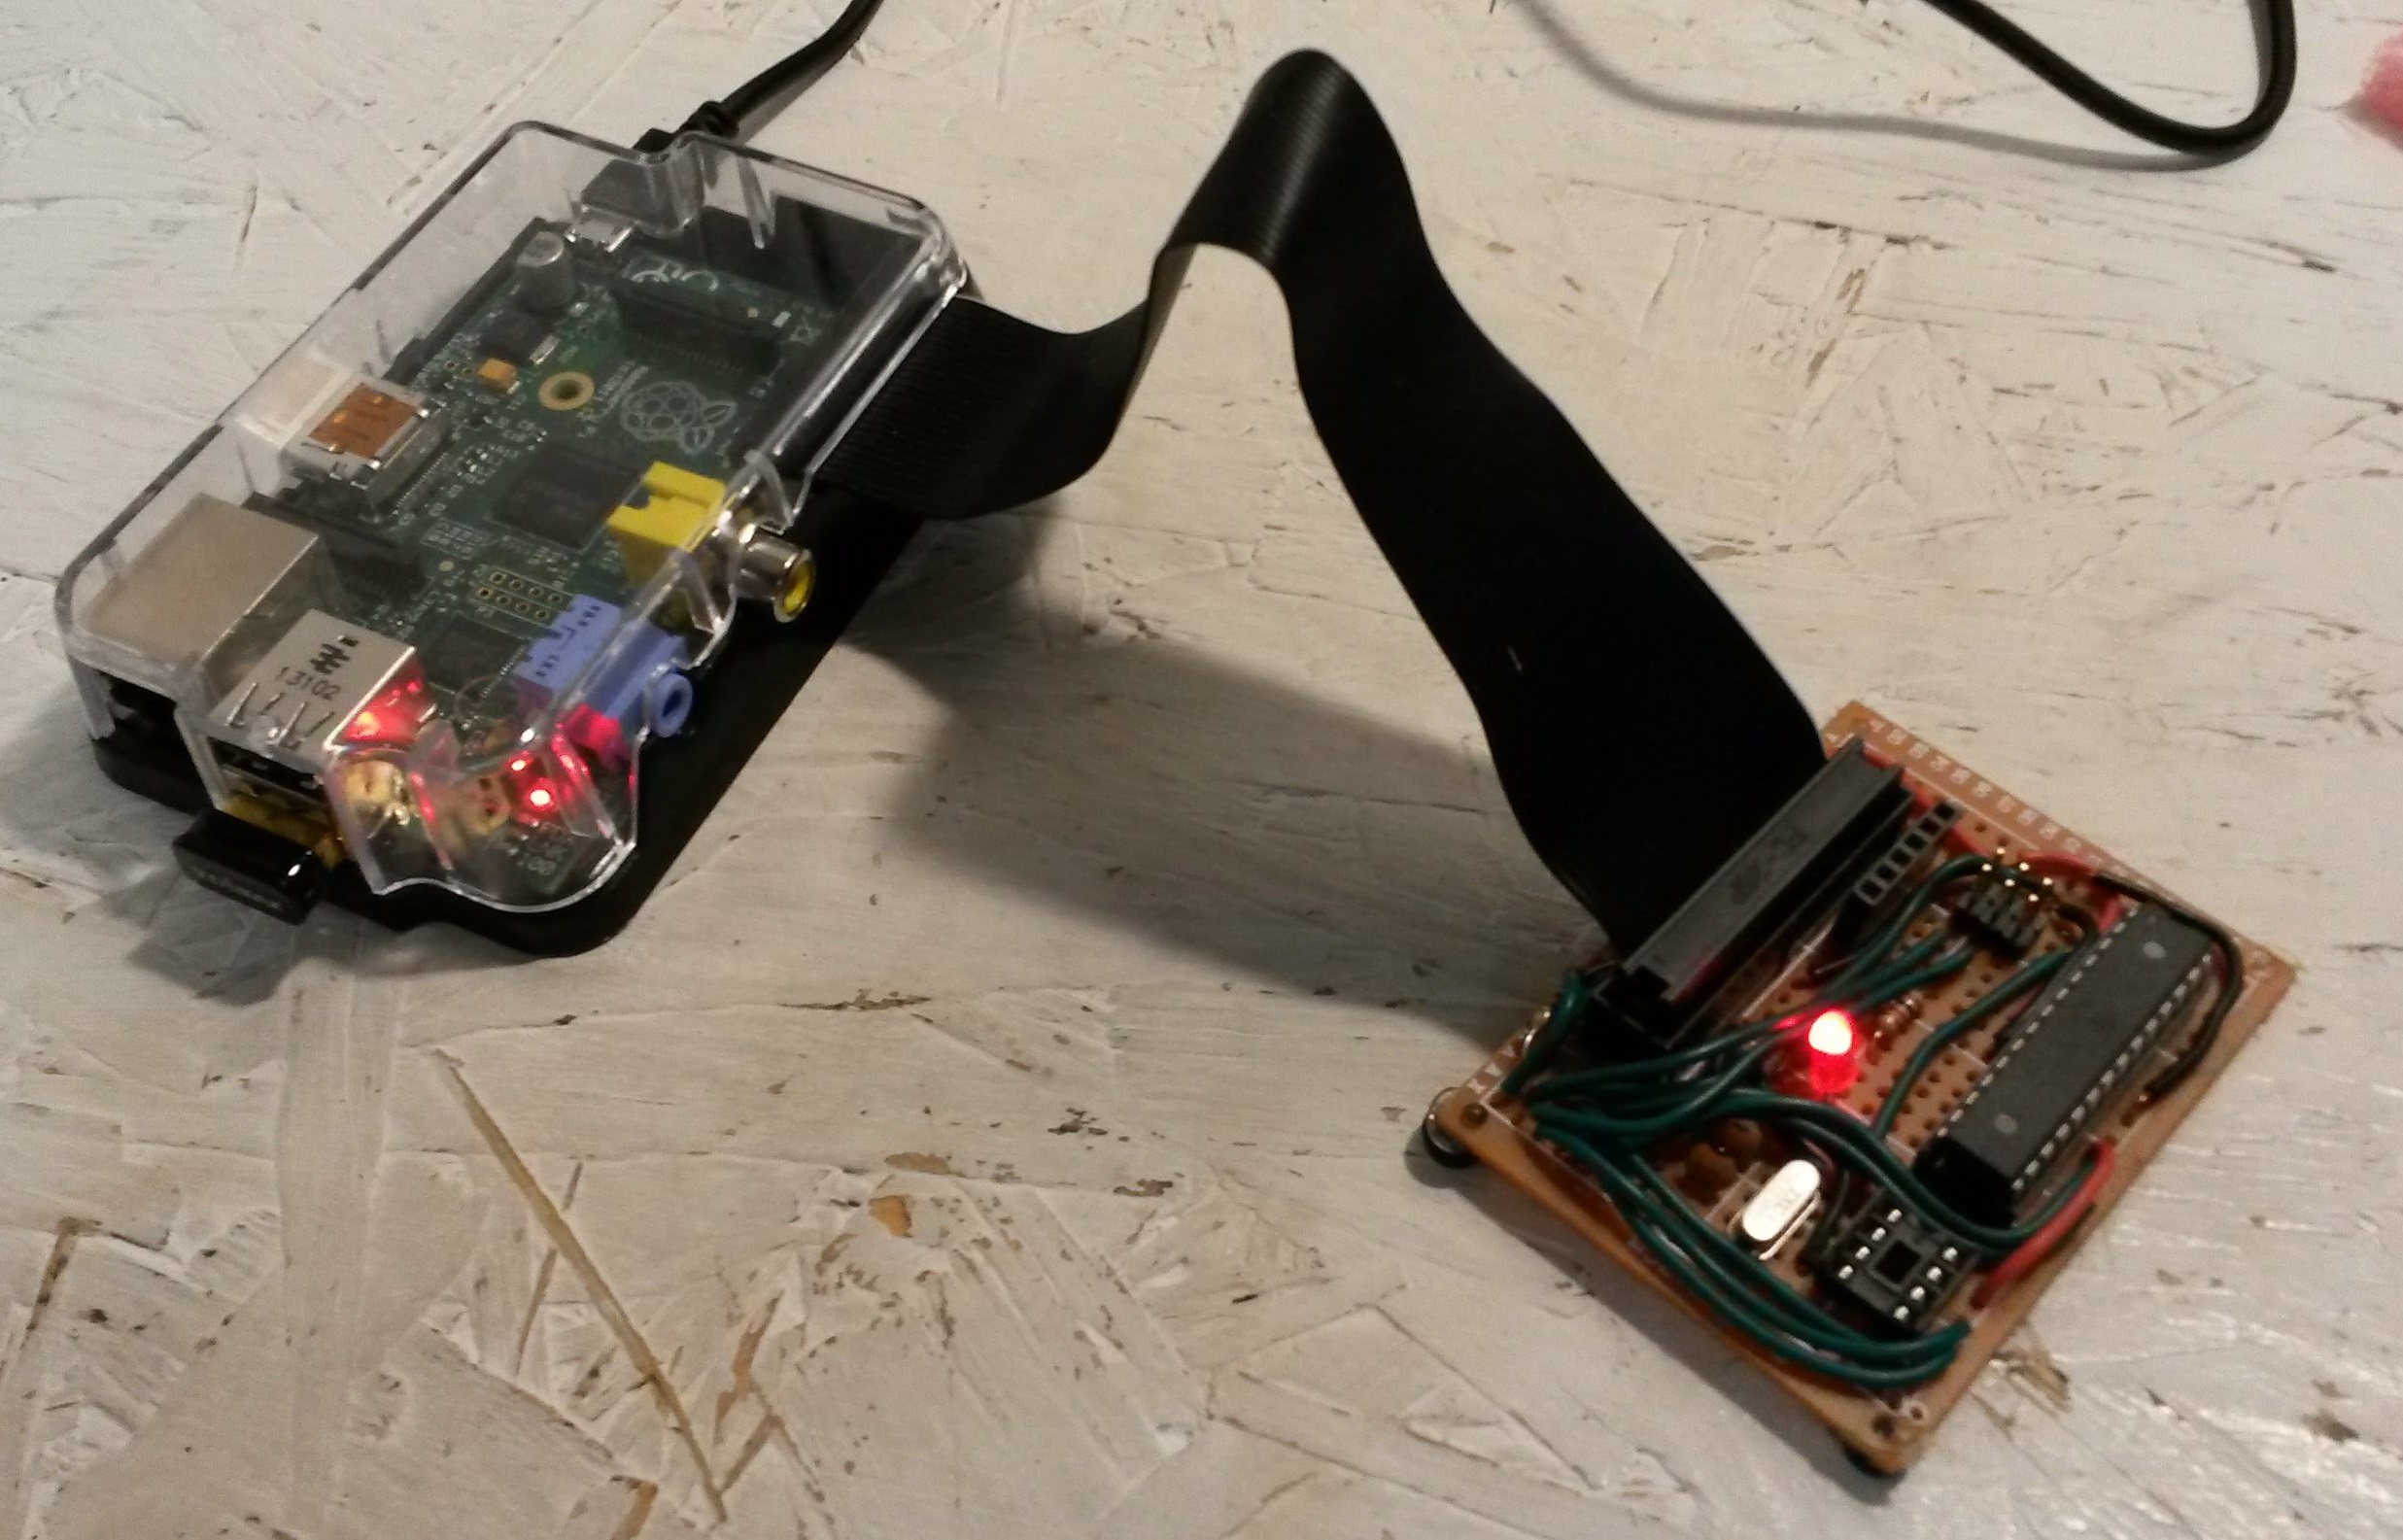
You can use the circuit schematic in the last image as a guide to assembling your cobbler attachment on perfboard. You can have as many or as few different shapes of IC sockets as you want, just connect the appropriate pins in parallel with the Pi and the crystal. N.B. if you use the image of my prototype as a guide, note that I added some extra header pins and sockets so I could access pins on the Pi for unrelated reasons.
Installing and Using Avrdude

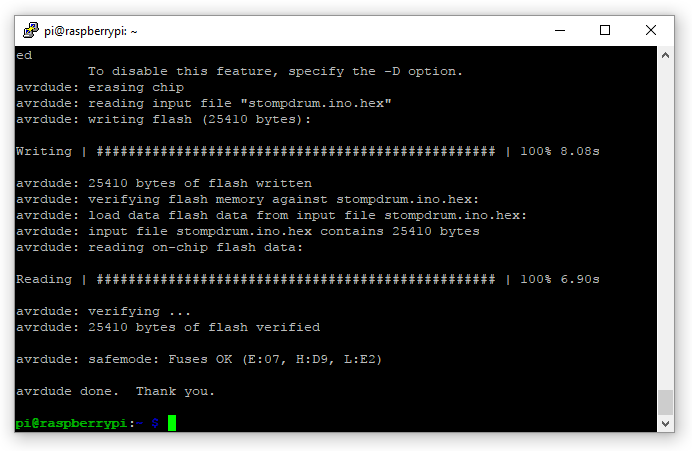
To install avrdude on your Pi, just type
sudo apt-get install avrdude
You will then need to enable the SPI interface, if it hasn't already been turned on. There is a command-line way to do this, but it's much easier to use the Raspberry Pi configuration tool. Type
sudo raspi-config
and go to Interface Options to turn on SPI.
In order to flash your chip, plug the ribbon cable from your Pi into the connector on the perfboard circuit and insert the chip into the appropriate IC socket (make sure it's facing the right way).
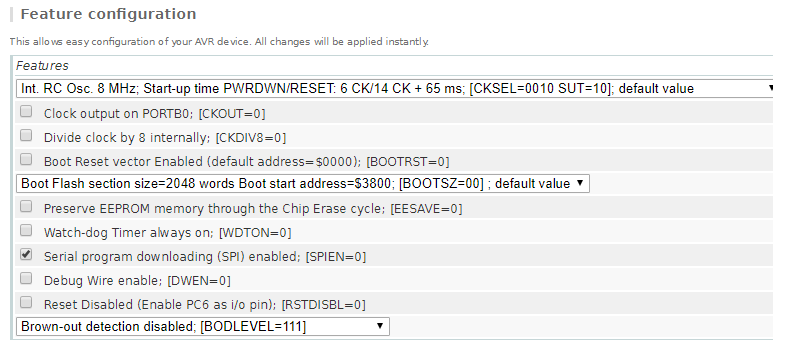
When flashing a program, you must also make sure to set the fuses in the chip correctly. These are really just bits in the chip that you set to tell it what clock speed to run at, whether to erase the EEPROM when writing the chip, etc. You could read the full AVR spec to figure out how to set each bit, but it's much easier to use the fuse calculator provided at engbedded.com/fusecalc. Select the AVR part name you are using and choose options you want in the "Feature Selection" area. I usually just make sure the clock settings are right and leave the other things at default. You will almost always want to leave "Serial programming enabled" CHECKED and "Reset Disabled" UNCHECKED - otherwise you won't be able to reprogram the chip. When you have the right settings, you can scroll down the the "Current Settings" area and copy the AVRDUDE arguments as shown in the image.
To set the fuses, enter the command
sudo avrdude -c linuxspi -P /dev/spidev0.0 -p <partname> <<pasted fuse arguments from engbedded.com>>
where partname corresponds to the chip you are using. You can find the list of part names by entering sudo ardude -c linuxspi -p ?type. To flash your program, make sure it is in your current directory and enter
sudo avrdude -c linuxspi -P /dev/spidev0.0 -p <partname> -U flash:w:<your program.hex>:i
After both commands, the LED will light while the chip is being modified.
Getting Arduino Programs Onto AVRs
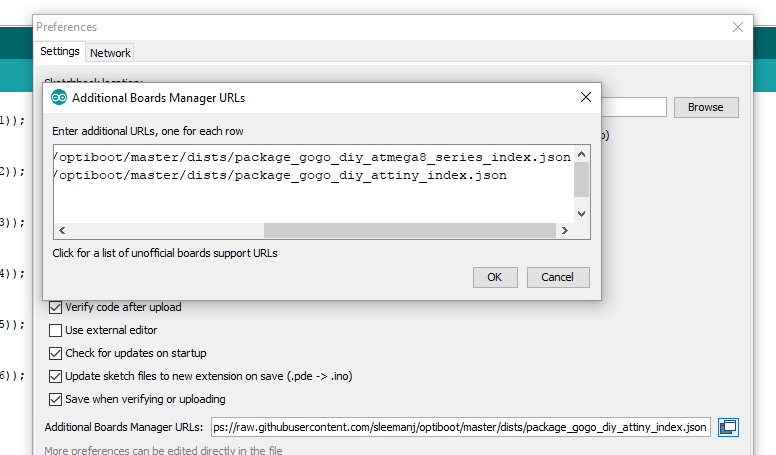
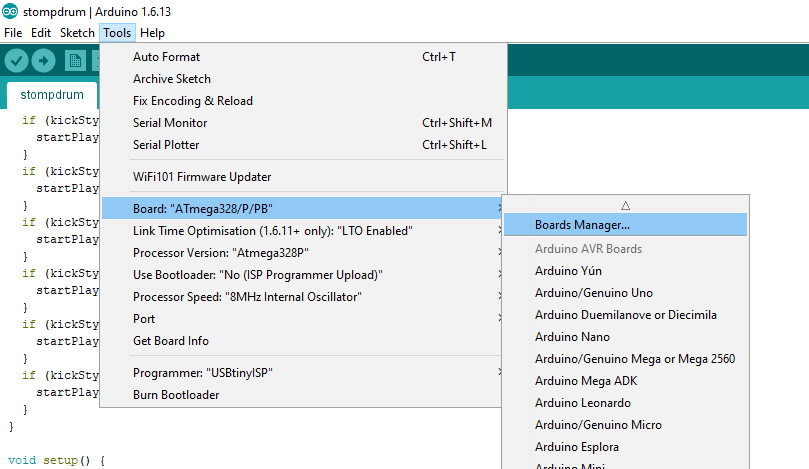
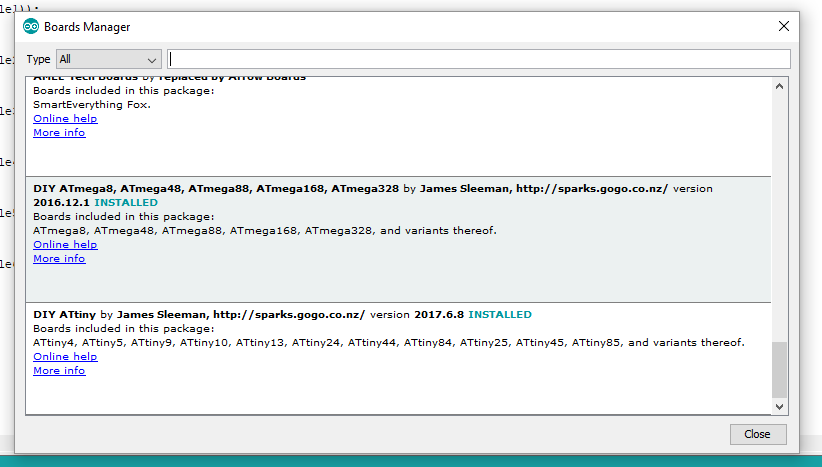
The main focus of this instructable is flashing already-compiled programs onto chips, not how to write or compile them. However, I wanted to explain how you can compile binaries using the Arduino IDE and get them onto bare AVR chips using this method, since Arduino is relatively easy to learn and there are so many tutorials and examples.
First, you will need to add information about the AVR chips you will be flashing so that the IDE knows how to compile for them. James Sleeman has very helpfully put together some setup files, which are available on github. To use them, open the "Preferences" menu in the Arduino IDE and click the box next to the "Additional Boards Manager URLs" field. Copy and paste the following URLs in the dialog box that appears:
Then, go to the "Tools" menu and find the "Boards Manager..." option in the "Board" submenu. Scroll down to the bottom of the list in the Boards Manager dialog box and install the DIY ATmega and DIY ATtiny boards.
To compile your programs, first make sure you have selected the correct chip in the "Processor" menu, as well as the correct Processor Speed. Select the "Use Bootloader: No" option, since we will upload directly with the Pi and thus can use the extra space that would normally be taken up by the Arduino bootloader. Now, click the "Verify" button (the check mark). This will compile your program without trying to upload it (since you are doing that step yourself).
Assuming everything goes fine, you now need to get the compiled program to your Pi. The IDE hides them in a temporary location, since it is designed to upload programs itself. On Windows, it is in AppData/Local/Temp in your user directory, in a folder that begins with 'arduino_build'. Look for the .hex file - that's your program! Send it over to your Pi via FTP or with a USB stick, and you're in business.
Doing this requires that you have a Windows PC or Mac to compile your programs, which you then send to the Pi. It would be really slick to be able to do this on the Pi itself, but unfortunately the official version of the Arduino IDE available in the Raspbian repository is rather old and doesn't have the Board Manager. Without this, adding the appropriate settings to compile for bare AVRs is a bit trickier. There are tutorials out there for compiling a more recent version of Arduino on your Pi - if that's what you want to do, go find them! I also feel like it should be possible to get the IDE to use the linuxspi programmer to flash a chip from within the IDE itself (i.e. using the "download" button), but this is beyond my patience and skill level - if you know of a way, post it in the comments! Lastly, you could just write programs directly in AVR-C and compile them on the Pi with avr-gcc, giving you a complete AVR development platform in the Raspberry Pi. I've done a tiny bit of that, and if you want to go that route, I salute you. Get flashing!