ARDUINO NANO BLE SENSE - TinyML FITNESS BAND USING EDGE IMPULSE
by Sanyam_Arora in Circuits > Arduino
2230 Views, 14 Favorites, 0 Comments
ARDUINO NANO BLE SENSE - TinyML FITNESS BAND USING EDGE IMPULSE

Recently I learned to build a disruptive fitness solution where I classified different physical motions and body positions using SparkFun MicroMod ML and Nordic nRF52840 MicroMod processor in a workshop organized by Edge Impulse and Sparkfun. It was an amazing experience, thanks to Louis Moreau and Jenny Plunkett who made the workshop fun and easy to learn.
With the support of Edge Impulse, I collected data and trained ML models. In order to have accuracy and to perform different physical movements which might not be possible with wired. So, I wrote a small python script to collect data from BLE and send it to Edge Impulse Studio for data collection, which turned out successful! Check the video for the test of data collection example. ( I am wearing the device on my left arm).
Find the detailed information below :
HARDWARE REQUIRED:

.jpeg)

.jpeg)
.jpeg)
- Arduino Nano Ble Sense or any TinyML compatible controller
- USB boost convertor or Power Bank
- Battery
- Arm Band
Just Simply power your Arduino nano from your powerbank/ USB boost converter and you are ready to go.
NOTE- As Arduino BLE Sense operates at very low power, so some power banks do not work properly with the device. They would get automatic shut down after a while which would interrupt the process of collecting the data or testing the device. In that case, it is better suggested to use a boost converter and a 3.7v battery.
.jpeg)
The device can be easily worn at your wrist or at your arm as I have done in the video demonstration.
INSTALLING THE REQUIREMENTS :

Arduino IDE is a fantastic minimalistic solution to microcontrollers with the potential of a computer environment for most Arduino-based projects.
We shall begin with the installation of IDE! you have to be sure in downloading the correct version of IDE for your operating systems, however, it is available for the most common OS including Windows, Linux, Mac OS X.
There you go with the link! - [ https://www.arduino.cc/en/software ]
As the installer is downloaded, you may install the IDE, enabling options such as libraries!
It is essential to install the required core for your specified microcontroller. For that, we move to board manager which is a great tool for its installation [FIG -2]. Here we’ll go with the quick steps:
On the left column do click on the “board manager”. Among the list of available options, search for Mbed OS core for Arduino nano 33 BLE sense. This may take a while. It will show “installed” at the board manager column when done as shown below.
After installing the boards, upload the code to get Accelerometer data over BLE.
Downloads
GETTING STARTED WITH EDGE IMPULSE STUDIO:


"Edge Impulse enables developers to create the next generation of intelligent device solutions with embedded Machine Learning."
Edge Impulse Studio is a great platform to get started with Tiny Machine Learning.
If you have an existing Edge Impulse studio account, log into that. If you are new, create a new account by using this link [ https://studio.edgeimpulse.com/login ] then create your project by clicking "Create New Project".
From the above menu, go to the project key section and copy the "API key" and "HMAC key" of your project.
COLLECTING THE DATA (USING BLE):

On the Edge Impulse Studio documentation, [ https://docs.edgeimpulse.com/docs/arduino-nano-33-ble-sense] we can see that Arduino nano BLE sense is completely compatible with the Edge Impulse Studio and data can be collected using EDGE IMPULSE CLI or WEB USB interface. But for collecting data of "HUMAN MOTION", it becomes a little harder to collect data via USB cable.
So for collecting data over BLE we have a custom python script, which depends on the "bluepy python library" for getting data over BLE and then forwards it directly to EDGE IMPULSE STUDIO.
To collect data via BLE we have two files, one for collecting test data and other for collecting training data, just open the code and add your "API KEY" and "HMAC KEY". And you are ready to collect the data.
To run the python file simply use a terminal and use command
python3 train_collect.py [MAC Address of device] " Data name" [time period of recording]
For reference check the image.
NOTE Bluepy python library works only for LINUX so this code cannot be used on windows, I have received suggestions to use BLEAK python library which is much faster and supports Windows. So I will soon test it using BLEAK and change the code which would run on both LINUX and WINDOWS.
DATA VERIFICATION:
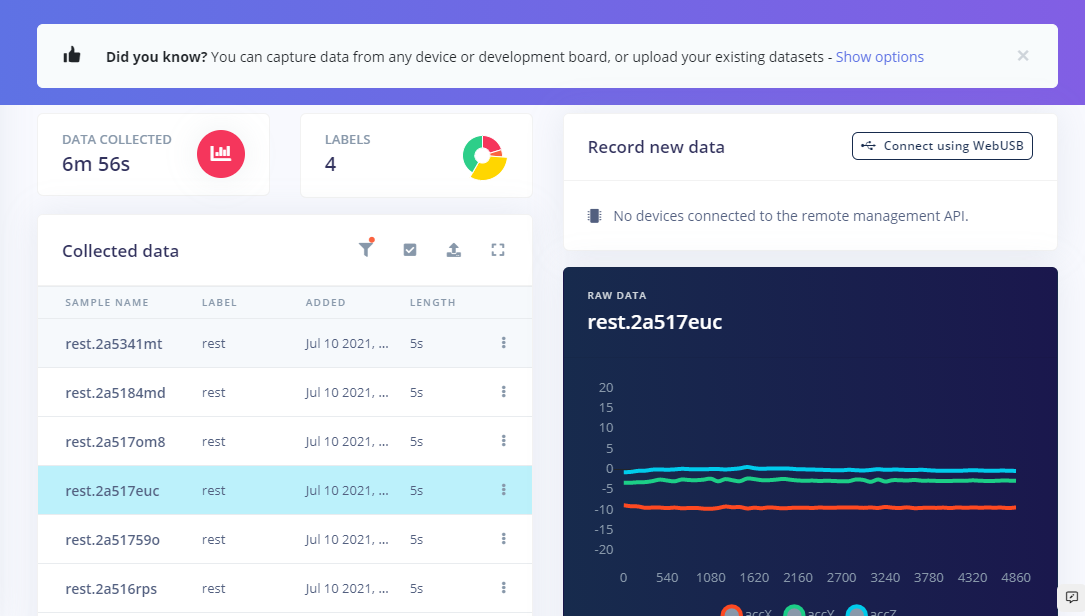


Initially, I collected data for Squats, Jumping Jacks, and Rest positions, for testing my model, Which is pretty accurate.
Now I will be adding a few more exercises in the model which are Pushups, Skipping, pullups and more to check how much accuracy I could get deploying this on a tiny device.
Here the data in the images refer to the Rest, Squat, and Jumping Jack position.
TRAINING THE MODEL:


For training the model, Edge Impulse provides easy to use UI. Just follow some steps and you are ready to go.
for visual instructions, refers to the images.
Step 1 - Go to Impulse Design and create impulse, you could choose from many options, but Edge Impulse provides you the best choices according to your data.
Step 2 - Choose Spectral Features(here you can change the training parameters if you do not get good results on default) and generate features for the model.
Step 3 - Go to Neural Network classifier (change the training parameters if needed) and Train your model.
Step4- Go to model testing and test your training data with respect to test data and check the accuracy of your model.
Step5 - Deploy the model. (Edge impulse supports many platforms, so you could directly download the code, compatible with your platform. In our case we would choose Arduino).
TESTING ON THE DEVICE:

Simply Import the library, downloaded from Edge Impulse Studio, and in the Arduino examples, you would get some test examples to deploy on your device and test your model.
These examples can only be tested via USB serial. If you want to test your examples then modify the code attached. Or just download the attached library and upload the given code to your Arduino.
Library Download Link - https://drive.google.com/file/d/1mOxGAAqvDcCXva60EFks_9bs4sK0h5a0/view?usp=sharing
Downloads
TESTING WITH BLE:
.jpeg)


To test your device with BLE, download the code attached in the above section. And download nRF Connect App for your device. In the nRF connect app connect to your device
In the client section just press on the UUID of your service (128-bit id, refer to the images, and press the download button). Then your phone will start displaying the exercise that you are currently doing.
I have attached images of REST, SQUATS, and JUMPING JACK.
There are wide applications of tinyML that can be implemented and edge impulse makes it easier to get started with it. So try your own application.
Feel free to give your suggestions for improvements, it would be very helpful.
Thankyou.