ALLoween Bucket


The iconic Halloween bucket is typically only brought out one night a year. The rest of the time, its use is relegated to collecting "anik-anik" or small household items. To solve this, I introduce the ALLoween Bucket: a bucket with added flexibility for your most important occasions! You use the bucket as you would any other, but you can add certain attachments to make them fit a few more yearly occasions.
These occasions are:
- Halloween (Image 1),
- Birthday (Img. 2),
- Easter (Img. 3),
- Christmas (Img. 4), and
- Valentines' Day (Img. 5)!
All it takes is either slotting the attachment into the hat slot above the face or sticking a face attachment onto the velcro patch (found right below the nose).
Another key feature of the bucket is the comfortable handle, as strain on the hand is commonly encountered by Halloween Go-ers with their plastic buckets once the buckets start to become heavy and full.
By following these steps, you too can create an ALLoween Bucket that is durable, user-friendly, and flexible to the occasion!
Supplies

You will need access to the following machines when working on your bucket:
- Laser Cutting Machine
- 3D-Printer
You will also need the following materials:
- 3mm Acrylic cast acrylic sheets. The main material for creating the ALLoween Bucket. About 1810 cm^2 in orange for your base bucket, equivalent to about 1 large sheet. About 52 cm^2 in blue for the birthday 'set', 25 cm^2 in red and 63 cm^2 in brown for the Christmas set, 110 cm^2 in clear for the Easter set, and 135 cm^2 in pink for the Valentines' set. Any additional attachments would require more acrylic.
- 3D Print Filament. About 54 grams. The filament type will depend on the printer available to you.
- Soft Towel or Cloth. About 15cm by 15cm. It should be enough to adequately wrap around the handle as seen in the cover photo.
- Mallet.
- Mighty Bond. One 3g tube.
- Needle and Thread. Color doesn't matter and any small spool would do for quantity.
- Wood. The desired piece is 8cm by 1.5cm and at least 1cm thick.
- Woodworking Clamps and Hand Saw.
- P60 Grit Sandpaper. One A4-sized sheet would be more than enough.
Design Your Base Bucket


We will be designing the bucket in Inkscape, a free vector graphics editor. The bucket's structure relies on friction-fitting to connect the panels we will be creating later on with the laser cutter. This requires a precise system of tabs and slots in the design of our bucket.
I approached the design of the bucket in two main areas: face and non-face sides.
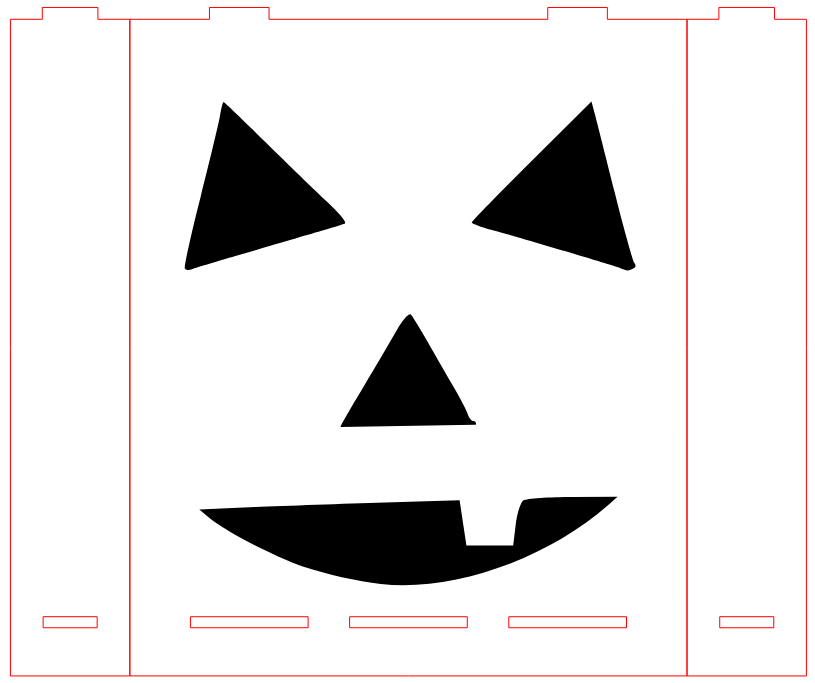
Bucket Base (Img. 1)
The base of the bucket is a simple 200mm by 200mm square, with tabs along the sides to fit into the slots of the panels later on. For non-face sides (Left, Up, and Right; Img. 1), the tab length configuration is 15-30-30-20-10-20-30-30-15. The numbers in bold indicate the lengths of the tab in mm, while the numbers not in bold represent the lengths of the gap in between the tabs. For the face side, the tab length configuration is 8-14-23-30-10-30-10-30-23-14-8. The thickness of the tabs is 3mm, the same thickness as the acrylic sheets we are using.
Non-Face Panels (Img. 2 & 3)
Friction-fitting can be a delicate matter because trying to force the fit can lead to breaking some pieces. I decided to section the sides into panels so the number of tabs you fit into a slot at each time is reduced, making it easier to friction-fit. It also adds a bucket vibe to the design. The panels serve both a stylish and functional purpose! The panel length configuration is 60-80-60. When you put the panels together side-by-side, you should notice that the lengths and distances between the slots are identical in configuration to the respective tab length configuration of the non-face sides of the base (tdlr: the tabs and slots should are mathematically fit and aligned). The slots are placed 15mm above the bottom of the panel. Additionally, the 80-mm center panels on the left and right sides of the buckets should have a centered 12-mm circular hole. The handles will go into these holes.
Inkscape Tip: Familiarity with the alignment, coordinate, and path combination tools will make constructing these figures a lot easier. Make sure to enable Snapping (magnet icon in top-right)!
Face Panels (Img. 4)
Meanwhile, the panel configuration of the face side is 30-140-30, with the slots again aligned with the respective tab length configuration. The face's design was taken from the Internet, and Inkscape was used to turn the image into a format recognizable to the laser cutter.
Braces (Img. 5 & 6)
Since the panels would only be attached to the base by the slots and tabs, they can be flimsy at the top. Braces were designed (fitting the tabs above the panels, using the same configuration as the base slots and tabs of non-face sides) to connect the panels along each side together. Some of the slots in the braces do not fully surround a tab to allow the handle to move, but the friction fit still occurs just fine.
Using Inkscape to create acrylic cut-outs
There are a few important things to note when designing in Inkscape to properly instruct the laser-cutting machine.
- Ensuring a Friction Fit. To ensure a tight friction fit, the slots must be slightly smaller than the tabs. I've found that a kerf of -0.4mm for the length and -0.2mm for the thickness works best. Use the scaling tool of Inkscape for best results, as it adjusts a vector's dimensions with respect to the center of the vector, so there's no more need to adjust the coordinates.
- Cutting Through. The laser will cut through the acrylic if a vector (e.g. line) is red. You want the laser to trace out your shapes, so set the trace (see: trace tool in Inkscape) of your vectors and shapes to red (hex code: #ff0000) with a thickness of 0.001 inches.
- Details. As seen in the face of the bucket, the laser cutter can also imprint details onto acrylic sheets. This is done if a vector (e.g. rectangle/circle) is filled in black (hex code: #000000). Turning your desired images into black-filled vectors will require familiarity with tracing bitmaps and node editing (see: Step 3).
I'm attaching the Inkscape files for everything required in this step for your reference.
Assemble Your Base Bucket


Once you've designed your base bucket components, export these as PDFs (set rasterization DPI to 1000, see Export Format Options). These should look like the images from Step 1. Select the corresponding software for your laser cutter as your printer and press Print. The software will load, then set the laser's start position after placing your acrylic sheet onto the printer (Relevant info starts at about 3:30 in this video). Once done, start the print!
Note: Look into the relevant power settings (mine were already set to cut through 3mm acrylic) for the laser, and make sure to calibrate your cutter for your material (place the calibration tool on your sheet, and adjust the cutting surface up or down such that the laser fits snuggly into the notch of the tool more or less).
Once you've printed your pieces, friction-fit them together onto the base by lightly hammering the tabs into the slots with a mallet. Make sure not to break your pieces!
Design and Assemble Your Attachments


Once you've taken your desired images, import them into Inkscape and manipulate them using the trace bitmap tool, manipulating the nodes until you get your desired results. They should look like the PDF images above.
Note: Make sure to include a tab for the attachments that slot above the face as a 'hat'. Since the slot is 29.6mm by 2.8mm, set the length of the tab to 29.9mm so the kerf isn't as tight (the panel would otherwise be 30.0mm), allowing you to slip the attachment on and off with relative ease.
The same steps apply as in Step 2 when assembling the attachments. If you find that your acrylic is too thick for the slot, use your sandpaper to sand against the back of the attachment on the tab to reduce the thickness (I experienced this with the heart attachment).
The Inkscape files for the attachments are uploaded here as a guide.
Use Mighty Bond to attach Velcro strips (around 15mm squares) to the bucket face and the back of the face attachments (Image 4).
Design and 3D-Print Your Handle and Handle Stops


Handle
Use Tinkercad to create the model for both your handle and handlestops. The handle was split into two equal pieces (with the exception of the joining component) because the 3D printer could not accommodate its size, with one piece fitting into another. The handle can be broken down into
- A rod of 206mm by 15mm by 15mm.
- Two downward beams 95mm by 15mm by 10mm. Attached at the ends of the rod.
- Cylindrical 'tab' with a radius of 12mm (same as the hole described in Step 1) and a height of 11mm attached to the end of the downward beams.
The joining component was a 25mm by 8mm by 8mm beam attached to the end of one half of the rod. A hole of the same size was created on the other half of the rod so they would fit together in place. Exporting these parts into a STL file, opened in the UltiMaker Cura software will show the image (Image 1, left) above. To create the print, click on 'Slice' on the lower-right of the Cura UI, which will give you the approximate printing time given the settings in the bar above (including 3D printer, material, and print settings). Then, export this into a Gcode file. Transfer this file onto a memory card your printer can read. Once the printer recognizes the card, direct it to the file to begin the print. Combine the two pieces (sanding may be required) and join with Mighty Bond once done. The finished handle is shown (Image 1, right).
Handle Stops
The handle stops were cylinders with a radius of 15mm and a height of 13mm. A hole was then added to each stop with a radius of 12.4mm (slightly bigger than the 12mm cylindrical tab radius for fit) and a depth/height of 8mm. Follow the same 3D printing steps to produce your handle stops (STL image seen in Image 2).
The STL files for the handles and the stops are uploaded as a guide.
Reinforce Your Handle

To further strengthen the handle, cut out an 80mm by 15mm piece of wood with a saw. Sand the piece accordingly to avoid pointy and rough edges. Finally, place this on top of the handle in the middle with Mighty Bond to solidify the joint. The tough wood piece helps resist the upward force of a hand when the bucket is being used.
Sew on the Handle Cover

To increase the user's comfort, the next step is to create a handle cover. First, fold your square towel in half and sew it together with a back stitch. Now that we've doubled the layers of the cover by folding the cloth in half, wrap it around the middle of the handle. I personally did not use a pin to hold the cloth in place, but it would help. With the cloth wrapped, use a hem stitch to neatly close the cover around the handle, with the resulting stitch seen in the image above.
Secure the Handle
.jpg)

With the handle completed, the final thing left to do is to secure it to the bucket. Apply Mighty Bond to the inner surface of the stop, and press it together with the cylindrical tabs of the handle. With the help of clamps, wait until the Mighty Bond dries up (Image 1).The final result should look like Image 2.
More Attachments???
We've completed the bucket! I encourage you, however, to further expand the ALLoween Bucket's uses by designing more attachments! As a challenge, what would a different attachment for each month look like? I hope you enjoyed making the bucket, but I hope even more that you enjoy using it. Thank you!